1
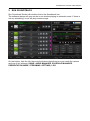
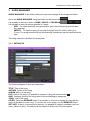
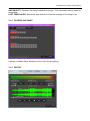
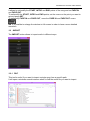
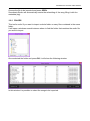
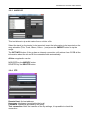
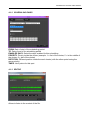
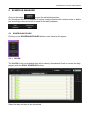
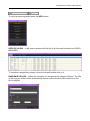
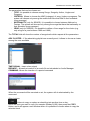
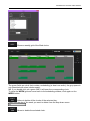
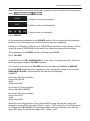
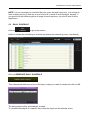
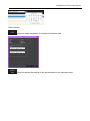
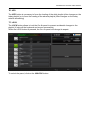
SOUNDTRACK STUDIO USER MANUAL
SOUNDTRACK
STUDIO
USER GUIDE
(Rev. 1.1 ENG)
SOUNDTRACK STUDIO USER MANUAL
TABLE OF CONTENTS
SOUNDTRACK.................................................................................................................................................................... 1
STUDIO ............................................................................................................................................................................... 1
USER GUIDE ...................................................................................................................................................................... 1
1
INSTALLATION .......................................................................................................................................................... 3
2
RUN SOUNDTRACK .................................................................................................................................................. 5
3
AUDIO MANAGER ..................................................................................................................................................... 6
3.1.1
METADATA ....................................................................................................................................................................6
3.1.2
SCHEDULING RULES ...................................................................................................................................................7
3.1.3
EDITOR...........................................................................................................................................................................7
3.2
IMPORT ............................................................................................................................................................. 8
3.2.1
FILE ................................................................................................................................................................................8
3.2.2
FOLDER .........................................................................................................................................................................9
3.2.3
AUDIO CD ....................................................................................................................................................................10
3.2.4
FTP................................................................................................................................................................................10
3.3
SEARCH .......................................................................................................................................................... 11
4
ADVERTISING .......................................................................................................................................................... 12
4.1.1
METADATA ..................................................................................................................................................................12
4.1.2
SCHEDULING RULES .................................................................................................................................................13
4.1.3
EDITOR.........................................................................................................................................................................13
4.2
SEND DATA ...................................................................................................................................................... 14
5
SCHEDULE MANAGER ........................................................................................................................................... 15
5.1
SCHEDULING RULES .................................................................................................................................... 15
5.1.1
CLOCK..........................................................................................................................................................................15
5.1.2
EVENTS.........................................................................................................................................................................19
5.1.3
FILLERS ........................................................................................................................................................................19
5.2
DAILY SCHEDULE .......................................................................................................................................... 20
6
ON-AIR ..................................................................................................................................................................... 22
7
PRESENTATION MODE .......................................................................................................................................... 27
8
STREAMING ............................................................................................................................................................. 28
9
SETTINGS ................................................................................................................................................................ 29
9.1
ON-AIR .............................................................................................................................................................. 29
9.1.1
General ..........................................................................................................................................................................29
9.1.2
Audio Hardware ............................................................................................................................................................29
9.1.3
Advertising ....................................................................................................................................................................29
9.1.4
Extern ............................................................................................................................................................................30
9.1.5
Scheduling .....................................................................................................................................................................31
9.1.6
Mix ................................................................................................................................................................................31
9.2
ADVERTISING MANAGER ...................................................................................................................................... 31
9.2.1
General ..........................................................................................................................................................................31
9.3
COMMON SETTINGS ............................................................................................................................................ 32
9.3.1
General ..........................................................................................................................................................................32
9.3.2
Language .......................................................................................................................................................................32
9.3.3
Font Type ......................................................................................................................................................................32
9.3.4
Audio HW for Editing ....................................................................................................................................................32
9.4
PRESENTATION MODE ......................................................................................................................................... 32
10
UPD ..................................................................................................................................................................... 33
11
LOCK ................................................................................................................................................................... 33
12
LOG ..................................................................................................................................................................... 34
13
EXIT ..................................................................................................................................................................... 34
SOUNDTRACK STUDIO USER MANUAL
1 INSTALLATION
Run setup and choose the language for the installation
Click Next
Insert the User Name (name of the Radio Station) and Company Name, then press Next
SOUNDTRACK STUDIO USER MANUAL
Choose the folder where the Soundtrack Studio will be installed, then press Next and then
Install. The installation will start automatically.
At the end of the installation press Finish.
Soundtrack Studio will automatically set up the sound card and start.
SOUNDTRACK STUDIO USER MANUAL
2 RUN SOUNDTRACK
Run Soundtrack Studio with double click on the Soundtrack icon.
The software always will open on the on-air window playing in automatic mode. If there is
not any scheduling, on-air will play random songs.
On the bottom, from the left, there are the buttons that allows to move inside the various
sections of the software: ONAIR, AUDIO MANAGER, SCHEDULE MANAGER,
PRESENTATION MODE, STREAMING, SETTINGS, LOG.
SOUNDTRACK STUDIO USER MANUAL
3 AUDIO MANAGER
AUDIO MANAGER is the section where to insert and manage all the songs and audio.
Open the AUDIO MANAGER using the button on the bottom left
It is possible to choose if insert a SONG, JINGLE or PROGRAM
It is possible to insert a new song/audio in 2 ways:
- ADD – To create manually a song schedule, give rules to the song and edit start,
intro and stop
- IMPORT – To import a song (or a group of songs) from file, folder, audio cd or
iTunes. The song schedule will be automatically created and can be modified by the
user.
The song schedule is divided into three parts.
3.1.1 METADATA
The fields highlighted in blue are compulsory.
TITLE: Title of the song
AUTHOR: Author of the song
ALBUM: Album of the song
FILE: Path of the song. It is possible to choose it using the search button
KIND: Category (kind) of the song used for the scheduling by categories
YEAR: Year of the song
COVER: Using the BROWSE button it is possible to connect an image (for example the
cover of the album) to the song. To remove the cover image, use the REMOVE button.
GET INFO: If the pc is connected to internet, it is possible to retrieve metadata (such as
cover, album or year). The search will be based on Author and Title information.
SOUNDTRACK STUDIO USER MANUAL
NATIONALITY: Choose if the song is national or foreign. This information can be used for
scheduling.
LAST TIME PLAYED: Shows the date and time of the last passage of the song on air
3.1.2 SCHEDULING RULES
It allows to disable Days, Months or Hours from the scheduling
3.1.3 EDITOR
SOUNDTRACK STUDIO USER MANUAL
It allows to set/modify the START, INTRO and END points of the song and set FADE IN
and FADE OUT.
To set/modify the START, INTRO and END points, set the cursor on the point you want to
set and press SET.
To set/modify FADE IN and FADE OUT, move the FADE IN and FADE OUT cursor
NB: It is possible to enlarge the window to full screen in order to have a more detailed
waveform.
3.2
IMPORT
The IMPORT button allows to import audio in different ways
3.2.1 FILE
This tool is useful if you want to import a single song from a specific path.
It will open a windows search instance where to find the audio file you want to import.
SOUNDTRACK STUDIO USER MANUAL
Choose the file to be imported and press OPEN.
Soundtrack Studio will automatically create the scheduling of the song filling it with the
metadata (tag).
3.2.2 FOLDER
This tool is useful if you want to import a whole folder or many files contained in the same
folder.
It will open a windows search instance where to find the folder that contains the audio file
you want to import
Once selected the folder and press OK, it will show the following window:
In this window it is possible to select the songs to be imported.
SOUNDTRACK STUDIO USER MANUAL
3.2.3 AUDIO CD
This tool allows to rip audio tracks from a cd into a file.
Select the track (or the tracks) to be imported, insert the information to be imported on the
song schedule (Title, Track, Album, Genre…) and press the IMPORT button to rip the
songs.
The GET INFO button, if the pc has an internet connection, will retrieve from CCDB all the
information about the cd and fill the metadata fields automatically.
All the songs/audio can be:
MODIFIED by the MODIFY button
DELETED by the DELETE button
3.2.4 FTP
Remote Host: ftp host address
Username: Username (provided by the host)
Password: Password (provided by the host)
Test connection: After the insertion of the ftp settings, it is possible to check the
connection
SOUNDTRACK STUDIO USER MANUAL
Remote default directory: Folder or directory where to find the files to be downloaded
Delete source if imported is Ok: If enabled, the system will delete the source file from
the ftp folder when the download is completed
Start: starts the download
3.3
SEARCH
A search tool is available to make searches inside the songs or audio database using
filters.
To add more filters press the + button.
SOUNDTRACK STUDIO USER MANUAL
4 ADVERTISING
Use the ADD button to schedule a new advertising.
4.1.1 METADATA
The fields highlighted in blue are compulsory.
TITLE: Name of the customer
FILE: Path of the spot file. It is possible to choose it using the search button
KIND: Product category of the spot
SOUNDTRACK STUDIO USER MANUAL
4.1.2 SCHEDULING RULES
FROM: Date of start of the scheduling period
TO: Date of end of the scheduling period
ENABLED DAYS: Select the days enabled for this scheduling
PRIORITY: Priority inside the cluster (example: 1 = first of the cluster; 5 = in the middle of
the cluster; 9 = last of the cluster)
ROTATION: Different position inside the each cluster (with the other spots having the
same priority).
TIMES: Hour points for this spot
4.1.3 EDITOR
Allows to listen to the content of the file.
SOUNDTRACK STUDIO USER MANUAL
4.2
SEND DATA
Once the advertising schedule is complete, it is possible to MODIFY or DELETE it.
The advertising list will be available for scheduling or broadcasting only after the data are
sent.
To do this, use the SEND button.
It is possible to send more than one day, choosing the start and end date.
SOUNDTRACK STUDIO USER MANUAL
5 SCHEDULE MANAGER
Click on the button
to open the scheduling section.
On Soundtrack Studio it is possible to create a daily schedule with random music or define
pre-scheduling rules which will be used for the daily schedule.
5.1
SCHEDULING RULES
Clicking on the SCHEDULING RULES button a new window will appear:
5.1.1 CLOCK
The CLOCK is the pre-schedule that will be used by Soundtrack Studio to create the daily
playlist (with the DAILY SCHEDULE button).
Select the day and hour to be scheduled.
SOUNDTRACK STUDIO USER MANUAL
To insert a new song/audio press the ADD button.
SPECIFIC AUDIO – It will open a window with the list of all the audio insertend on AUDIO
MANAGER
To insertion a song/audio choose it from the list and double click on it.
RANDOM BY RULES – Allows the insertion of a song/audio by category (Genre). The title
of the song (or audio) will be automatically chosen at the moment of the insertion on the
On-Air playlist.
SOUNDTRACK STUDIO USER MANUAL
The parameters that can be chosen are:
- TYPE: It is possible to choose among Songs, Songs by Author, Jingles and
Programs.
- CRITERIA: Allows to choose the KIND (category) of song, jingles or programs. The
system will choose only among the audios that have that kind on their schedule
(song manager)
- NATIONALITY (only for SONGS): It is possible to choose between National or
Foreign. The system will choose only among the songs that have that nationality on
their schedule (song manager).
- YEAR (only for SONGS): It is possible to define a Year range for the choice (e.g.
only songs of a year between 1990 and 1999).
The TOTAL field will show the number of songs/audio which respect all the parameters.
ADV CLUSTER – If the advertising playlist was correctly sent, it allows to choose a cluster
among the ones available
TIME SIGNAL –Insert a time signal
BROWSE – Allows the insertion of an audio file not scheduled on Audio Manager
COMMAND- Allows the insertion of a special command
When the command will be executed on air, the system will do what asked by the
command.
Other buttons:
Allows to copy or replace a scheduling into another time or day.
Open the clock you want to copy (for example Sunday 00:00), then press the COPY
button, and it will appear a new window where it is possible to choose where to copy the
selected clock.
SOUNDTRACK STUDIO USER MANUAL
Shows a weekly grid of the filled clocks
The green fields are clock that contain a scheduling (at least one audio), the grey space is
not scheduled with rules (clocks empty).
NB. If you double click on a green field, it will open the corresponding clock.
To close the WEEK grid and come back to the scheduling window, click again on the
WEEK button.
Allows to delete all the clocks of the selected day.
Select first the day of the week you want to delete from the drop down menu
Allows to delete the selected clock.
SOUNDTRACK STUDIO USER MANUAL
Select first the day of the week and the time (clock) you want to delete from the drop down
menu.
To change an item on the playlist
To delete an item from the playlist
To listen an item on the playlist
5.1.2 EVENTS
All the audio/songs scheduled in the EVENTS section, will be inserted by the automation
directly on the on-air playlist but not before the time they are scheduled.
Example: If on Monday 09.00 there is a TIME SIGNAL scheduled, every Monday at 09.00
on-air will insert a TIME SIGNAL at the end of the audio/song playing at that moment.
The scheduling of the EVENTS section is the same as CLOCK.
5.1.3 FILLERS
In the absence of a DAY SCHEDULING (or in the event of a playlist too short), the on-air
will fill the playlist using the FILLERS schedule.
The insertion of events on the FILLERS section is the same as CLOCK and EVENTS.
Every FILLERS scheduling will be repeated in loop (changing the songs if you schedule
RANDOM BY RULES) until the system will meet a new scheduling.
EXAMPLE:
On Sunday 00:00 we schedule:
Song of kind ROCK
Jingle
Song of kind POP
On Sunday 07:00 we schedule:
Song of kind RECURRENT
On Sunday 09.00 we schedule:
Song of kind POP
Jingle
Song of kind POP
What the on air will play will be: From midnight ROCK song, followed by a jingle and
followed by a song POP, then again ROCK – Jingle – POP until 07.00. From 07AM the on
air will play only RECURRENT songs without jingles and from 09AM the on air will play
song POP, jingle, Song POP then again POP – jingle – POP.
SOUNDTRACK STUDIO USER MANUAL
NOTE: It is not necessary to schedule fillers for every day and every hour. It is enough to
have at least one line in one day in one hour to fill in event of lack of playlist. Anyway, if
you want to fill with different genre of songs for each day/hour, you can fill one or more
days/hours.
5.2
DAILY SCHEDULE
Click on
to go to the section.
button to create the scheduling of a whole day (based on scheduling rules, if set before).
Click on GENERATE DAILY SCHEDULE
Then choose the date from and to of the day (or days) you want to create and click on OK
The daily playlist will be automatically created.
To visualize the playlist of a specific day, select the day from the calendar menu:
SOUNDTRACK STUDIO USER MANUAL
Other buttons:
Allows to copy the playlist of one day into another date
Allows to delete the playlist of the day selected on the calendar menu
SOUNDTRACK STUDIO USER MANUAL
6 ON-AIR
The On-Air module will open and start automatically when you run Soundtrack Studio
The song playing now is on the top of the screen
Automatic/Manual switch
Pause the song On-Air (to restart playing, click Pause again)
Stop the song On-Air with a fade effect
Stop the song On-Air and switch to Manual mode
Skip to the next item on playlist.
SOUNDTRACK STUDIO USER MANUAL
Put the song in CUE panel to allow the pre-listening
The other songs of the playlist are listed below the one playing:
Start playing this song
Insert another audio on the playlist (it will open the audio manager
Change the song/audio with another audio (it will open the audio manager)
The INSERT and CHANGE buttons will open the INSERT panel down on the right
The buttons SONG, JINGLE, PROGRAM, ADVERTISING, TIME SIGNAL, BROWSE
allow the insertion of the items on the On-Air playlist.
SONG, JINGLE, PROGRAM, ADVERTISING will open the related database.
To insert an item, double click on it or drag and drop it on the playlist
It is possible to sort the list order by any column just clicking on the column title.
TIME SIGNAL will insert a time signal directly in playlist
BROWSE will open a browse window to insert an audio not contained on Soundtrack
databases. To insert an item, drag and drop it on the playlist.
Delete the song/audio
SOUNDTRACK STUDIO USER MANUAL
Move up and down on the playlist
Changes the playlist view. The “grid” view of the playlist is the following:
The advertising command are shown on top right:
Automatic/Manual switch. If set on AUTOMATIC mode, the cluster, as
soon as it reaches the time when it is scheduled, will be played at the end of the audio
playing at that moment.
When it reaches the time of a cluster, the cluster time will turn into yellow.
If the ADVERTISING panel is set on MANUAL mode, when it reaches the scheduled time
of a cluster, it will turn the cluster time into yellow and add a PLAY button
SOUNDTRACK STUDIO USER MANUAL
When enabled, plays immediately the cluster
Insert a cluster. It will open the list of the available clusters for the current day.
Show details about the content of the cluster on the CUE window.
Hide advertising details and restore the CUE window
On the CUE window it is possible to pre-listen the audio and modify START, INTRO,
STOP, FADE IN and FADE OUT only for that instance of the audio (does not change the
values set on the AUDIO MANAGER):
To change START, INTRO and STOP points, position the play cursor on the point and
click SET.
To modify the FADE IN and FADE OUT, just move the corresponding cursor.
SOUNDTRACK STUDIO USER MANUAL
The HOT KEYS module is on the bottom right:
To PLAY an audio from the HOT KEYS, just click on the corresponding button.
To INSERT an audio on the HOT KEYS, drag it from the playlist on the left ad drop it on
the corresponding button.
The HOT KEY configuration can be saved using the SAVE PAGE button and all the saved
configurations can be recalled using the LOAD PAGE button.
Enabling the DELETE KEY button it is possible to delete the content of the buttons by
clicking on every single button you want to delete.
SOUNDTRACK STUDIO USER MANUAL
7 PRESENTATION MODE
It will show a full screen view of the title of the song on-air and the remaining time to the
end
To exit the presentation mode, press the ESC button on the keyboard.
SOUNDTRACK STUDIO USER MANUAL
8 STREAMING
Clicking on the
button it will show the streaming panel on the On-Air
For Streaming settings, read the SETTINGS section of this manual.
SOUNDTRACK STUDIO USER MANUAL
9 SETTINGS
9.1
ON-AIR
9.1.1 General
Deactivate Always-On-Top at every change: If disabled, at every change of item playing
on air, it will bring the On-Air panel over all the other windows
Transmission Log
Type: choose among different levels of transmission logs
Log Path: Path where the transmission logs will be saved
Log Path of Digiware mode: Path where the transmission logs used to create registers
with Digiware will be saved
Operation LOG: choose among different levels of user’s operations log
Log path of operations: Path where the operation log will be saved
Browse path: Default path for the BROWSE button when you insert an audio on the OnAir
9.1.2 Audio Hardware
Out
Device list type: choose the device list type to be used for playouts
OnAir audio output: Choose the sound card output for the main playout (On-Air)
CUE: Choose the sound card output for the CUE
Hot Keys: Choose the sound card output for the Hot Keys
Monitor Out: Choose the sound card output for the Monitor Out
In
Monitor In: Choose the sound card output for the Monitor In
9.1.3 Advertising
SOUNDTRACK STUDIO USER MANUAL
Advertisement Playlist Path: Path where the Advertisement playlist will be saved
For each advertising cluster
Ready nn seconds before scheduled time: The advertising cluster will be ready nn
seconds before the scheduled time.
Color (default Green): Color of the NEXT cluster time on the advertising panel of the OnAir when the cluster is READY
Warning:
At scheduled time. Color (default Yellow): Color of the NEXT cluster time on the
advertising panel of the On-Air when the cluster arrives at the SCHEDULED TIME
Alert nn seconds after scheduled time: The NEXT cluster time will change color after nn
seconds after the scheduled time.
Color (default Red): Color of the NEXT cluster time after nn seconds after scheduled time.
Force nn seconds after Alert time: After nn seconds after ALERT time, the On-Air will
force the cluster (it will cut the audio on air and play the adverts).
Certification
Enable: Enables the certification file that compares scheduled time and date and air time
and date of the adverts.
One file per day: If enabled, Soundtrack will write one file for each day for certification
9.1.4 Extern
9.1.4.1 TCP-IP
Enabled: Enables TCP-IP settings
Server: IP address of the TCP-IP server
Port: Server port used for TCP-IP connection
Client port: Client port used for TCP-IP connection
Timeout: Validity time (in milliseconds) of the TCP-IP command
External Terminal: Enables the communication with an external terminal
Start External Terminal at the program startup: If enabled the communication with
External Terminal will start automatically at every Soundtrack startup
Header: Path of the .XML file with all the data for the External Terminal
9.1.4.2 RDS and XML
XML File: Path of the .XML file that provides information regarding the song on air to RDS
or streaming.
9.1.4.3 Extern
Multi I/O Mode: Command to be executed by the Multi I/O contact
MOXA - address: IP address of the MOXA device
MOXA – port: Port used by the MOXA device
MOXA – Timeout: Validity time (in milliseconds) of the multi I/O command
9.1.4.4 Streaming
Source
Soundtrack studio: Enable if the source of the streaming is Soundtrack output itself
SOUNDTRACK STUDIO USER MANUAL
Input card: Enable if the source of the streaming comes from another input card
SHOUTcast server
Server: IP address of the SHOUTcast server
Port: Port used on the SHOUTcast server
Password: Password of the SHOUTcast server
SHOUTcast info
Name: Name of the radio
Kind:Kind of the radio
Your homepage: website homepage of the radio
Publish: Enable if you want to publish Title and Artist of the song on air on the website
Encoder Settings
Frequency: Frequency of the streaming (Hz)
Bitrate: Bitrate of the streaming (kbps)
Mode: Stereo or mono
9.1.5 Scheduling
9.1.5.1 Events and daily schedule
Daily schedule load mode at startup
It is possible to choose among:
0 – none: At the startup Soundtrack will not load the daily playlist until someone click on
the UPD button
1 – Load from the begin of the last clock until the end of the day
2 – Load from the begin of the last clock until the end of the clock
3 – Load from the current time in the last clock until the end of the clock
9.1.5.2 Automatic song selection
Control time for artists repetition (hours): Hours that must separate two passages of
the same artist
Control time for songs repetition (hours): Hours that must separate two passages of
the same song
9.1.6 Mix
Default fadeout: Default fadeout if not set on the song schedule
AGC (Auto Gain Control): If enabled, an internal processor will automatically keep the
volume at a constant level in order to avoid distortion
9.2
ADVERTISING MANAGER
9.2.1 General
Advertisement Export Path: Pth of the .txt file stat will contain the advertisement daily
playlist
SOUNDTRACK STUDIO USER MANUAL
Starting Jingle: Jingle that will be automatically inserted at the beginning of every cluster
Separator Jingle: Jingle that will be automatically inserted between adverts to separate
them.
Ending Jingle: Jingle that will be automatically inserted at the end of every cluster
9.3
COMMON SETTINGS
9.3.1 General
Reset “Do not show this message again”: this button will restore all the message box
hidden by the “do not show again” selection
Resete columns order/size: this button will restore the original order and size of the
columns
Get Info API
Type: Select where to retrieve the song information when press the GET INFO button on
the song schedule (see AUDIO MANAGER section)
9.3.2 Language
Select the Soundtrack Studio language
9.3.3 Font Type
Activate custom font for ALL the Soundtrack programs and ALL the users: if
selected it will allow the customization of the font
Font Type: Select the font type from the list
Font scale factor: Choose the scale factor to enlarge or reduce the font
9.3.4 Audio HW for Editing
Device list type: Select the device to be used for the audio editor
Output: Select the output to be used for the audio editor
Input: Select the input to be used for the audio editor
9.4
PRESENTATION MODE
Data path: Path of the temporary files with data for the Presentation Mode
Logo image: Image (e.g Radio Logo) that will be shown on the Presentation Mode
Text: Test that will be shown on the Presentation Mode
Data refresh (ms): Milliseconds for refresh of the data
Animation refresh (ms): Duration (milliseconds) of the animation
SOUNDTRACK STUDIO USER MANUAL
10 UPD
The UPD button is necessary to force the loading of the daily playlist (after changes on the
today playlist) or to force the loading of the adverts playlist (after changes on the today
adverts scheduling)
11 LOCK
The LOCK button allows to lock the On-Air panel to prevent accidental changes to the
playlist (it locks all the keyboard and mouse commands).
When the LOCK button is pressed, the On- Air panel will change its aspect:
To unlock the panel, click on the UNLOCK button.
SOUNDTRACK STUDIO USER MANUAL
12 LOG
It will open, in a new window, the list of all the audio/songs broadcasted in the current day.
13 EXIT
The EXIT button will close Soundtrack Studio.