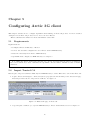
1
Viola M2M Gateway
OpenVPN Application Note
Document version 1.0
Modified September 24, 2008
Firmware version 2.4
Contents
1 OpenVPN overview
1.1 VPN basics . . . . . . . . . . . . . . . . . . . . . . . . . . . . . . . . . . . . . . . . . . . . . . . .
1.2 OpenVPN features . . . . . . . . . . . . . . . . . . . . . . . . . . . . . . . . . . . . . . . . . . . .
1.3 OpenVPN on M2M Gateway . . . . . . . . . . . . . . . . . . . . . . . . . . . . . . . . . . . . . .
4
4
4
4
2 Configuring OpenVPN server on M2M Gateway
2.1 Quick reference . . . . . . . . . . . . . . . . . . . .
2.2 Requirements . . . . . . . . . . . . . . . . . . . . .
2.3 OpenVPN configuration screen on M2M Gateway .
2.4 Create new certificate authority . . . . . . . . . . .
2.5 Create new server key . . . . . . . . . . . . . . . .
2.6 Create new server configuration . . . . . . . . . . .
2.7 Server routing configuration . . . . . . . . . . . . .
2.8 Start server . . . . . . . . . . . . . . . . . . . . . .
.
.
.
.
.
.
.
.
.
.
.
.
.
.
.
.
.
.
.
.
.
.
.
.
.
.
.
.
.
.
.
.
.
.
.
.
.
.
.
.
.
.
.
.
.
.
.
.
.
.
.
.
.
.
.
.
.
.
.
.
.
.
.
.
.
.
.
.
.
.
.
.
.
.
.
.
.
.
.
.
.
.
.
.
.
.
.
.
.
.
.
.
.
.
.
.
.
.
.
.
.
.
.
.
.
.
.
.
.
.
.
.
.
.
.
.
.
.
.
.
.
.
.
.
.
.
.
.
.
.
.
.
.
.
.
.
.
.
.
.
.
.
.
.
.
.
.
.
.
.
.
.
.
.
.
.
.
.
.
.
.
.
.
.
.
.
.
.
.
.
.
.
.
.
.
.
.
.
.
.
.
.
.
.
.
.
.
.
.
.
.
.
.
.
.
.
.
.
.
.
.
.
.
.
.
.
.
.
5
5
5
5
7
7
8
9
9
3 Adding client configuration to server
3.1 Quick reference . . . . . . . . . . . .
3.2 Requirements . . . . . . . . . . . . .
3.3 Create client key . . . . . . . . . . .
3.4 Create new client . . . . . . . . . . .
3.5 Client routing configuration . . . . .
3.6 Export client configuration files . . .
.
.
.
.
.
.
.
.
.
.
.
.
.
.
.
.
.
.
.
.
.
.
.
.
.
.
.
.
.
.
.
.
.
.
.
.
.
.
.
.
.
.
.
.
.
.
.
.
.
.
.
.
.
.
.
.
.
.
.
.
.
.
.
.
.
.
.
.
.
.
.
.
.
.
.
.
.
.
.
.
.
.
.
.
.
.
.
.
.
.
.
.
.
.
.
.
.
.
.
.
.
.
.
.
.
.
.
.
.
.
.
.
.
.
.
.
.
.
.
.
.
.
.
.
.
.
.
.
.
.
.
.
.
.
.
.
.
.
.
.
.
.
.
.
.
.
.
.
.
.
10
. 10
. 10
. 10
. 11
. 12
. 13
.
.
.
.
.
.
.
.
.
.
.
.
.
.
.
.
.
.
.
.
.
.
.
.
.
.
.
.
.
.
.
.
.
.
.
.
.
.
.
.
.
.
.
.
.
.
.
.
4 Configuring Windows client
14
4.1 Requirements . . . . . . . . . . . . . . . . . . . . . . . . . . . . . . . . . . . . . . . . . . . . . . . 14
4.2 Export client configuration . . . . . . . . . . . . . . . . . . . . . . . . . . . . . . . . . . . . . . . 14
4.3 Connect to server using OpenVPN GUI . . . . . . . . . . . . . . . . . . . . . . . . . . . . . . . . 14
5 Configuring Arctic 3G client
5.1 Requirements . . . . . . . .
5.2 Import Trusted CA . . . . .
5.3 Import Local Identity . . .
5.4 Create client settings . . . .
5.5 Test connectivity . . . . . .
.
.
.
.
.
.
.
.
.
.
.
.
.
.
.
.
.
.
.
.
.
.
.
.
.
.
.
.
.
.
.
.
.
.
.
.
.
.
.
.
.
.
.
.
.
.
.
.
.
.
.
.
.
.
.
.
.
.
.
.
.
.
.
.
.
.
.
.
.
.
.
.
.
.
.
.
.
.
.
.
.
.
.
.
.
.
.
.
.
.
.
.
.
.
.
.
.
.
.
.
.
.
.
.
.
.
.
.
.
.
.
.
.
.
.
.
.
.
.
.
.
.
.
.
.
.
.
.
.
.
.
.
.
.
.
.
.
.
.
.
.
.
.
.
.
.
.
.
.
.
.
.
.
.
.
.
.
.
.
.
.
.
.
.
.
.
.
.
.
.
.
.
.
.
.
.
.
.
.
.
.
.
.
.
.
.
.
.
.
.
15
. 15
. 15
. 16
. 17
. 18
6 Troubleshooting
19
6.1 Routing problems . . . . . . . . . . . . . . . . . . . . . . . . . . . . . . . . . . . . . . . . . . . . . 19
6.2 Client connection problems . . . . . . . . . . . . . . . . . . . . . . . . . . . . . . . . . . . . . . . 19
6.3 Certificate handling problems . . . . . . . . . . . . . . . . . . . . . . . . . . . . . . . . . . . . . . 19
7 Technical Support
20
7.1 Contacting Technical Support . . . . . . . . . . . . . . . . . . . . . . . . . . . . . . . . . . . . . . 20
7.2 Recording Product Information . . . . . . . . . . . . . . . . . . . . . . . . . . . . . . . . . . . . . 20
1
Copyright and Trademark
Copyright © 2008, Viola Systems Ltd. All rights to this manual are owned solely by Viola Systems Ltd.
(referred in this manual as Viola Systems). All rights reserved. No part of the contents of this manual may be
transmitted or reproduced in any form or by any means without the written permission of Viola Systems.
Ethernet is a trademark of XEROX Corporation. Windows and Internet Explorer are trademarks of Microsoft Corporation. Netscape is a trademark of Netscape Communications Corporation. Linux is a Registered
Trademark of Linus Torvalds. All other product names used in this manual are the properties of their respective
owners and are acknowledged.
Contact Information
Viola Systems Ltd.
Lemminkäisenkatu 14 - 18 B
FIN-20520
Turku
Finland
Technical Support
Phone: +358 (0)20 1226 226
Fax: +358 (0)20 1226 220
E-mail: [email protected]
On-line: http://www.violasystems.com/
2
Disclaimer and Revisions
Viola Systems reserves the right to change the technical specifications or functions of its products, or to discontinue the manufacture of any of its products or to discontinue the support of any of its products, without any
written announcement and urges its customers to ensure, that the information at their disposal is valid.
Viola software and programs are delivered “as is”. The manufacturer does not grant any kind of warranty
including guarantees on suitability and applicability to a certain application. Under no circumstances is the
manufacturer or the developer of a program responsible for any possible damages caused by the use of a program.
The names of the programs as well as all copyrights relating to the programs are sole property of Viola Systems.
Any transfer, licensing to a third party, leasing, renting, transportation, copying, editing, translating, modifying
into another programming language or reverse engineering for any intent is forbidden without the written consent
of Viola Systems.
Viola Systems has attempted to verify all information in this manual as of the publication date. We assume
no responsibility for any errors that may appear in this guide. Information in this manual may change without
prior notice from Viola Systems.
Revision History
07/2008
Version 0.1
09/2008
Version 0.1.2 - More detailed routing descriptions
09/2008
Version 1.0 - First official release
3
Chapter 1
OpenVPN overview
This chapter describes the basics of OpenVPN.
1.1
VPN basics
VPN tunnels are secure connections between two computers on the Internet. All data in this tunnel are encrypted
and therefore not visible to outsiders. This is important because Internet itself is a hostile environment.
The most typical use for VPN is to connect two separated networks together. These networks usually locate
in different physical locations and are connected to a public Internet. Secure VPN connection is then formed
between two hosts.
VPN setup can also be configured to have one server and multiple remote clients. This way one VPN server
is configured to handle the connections from many clients. The server is located on fixed address (both IP and
physical) and the clients are located on the field on large geographical area.
1.2
OpenVPN features
• Many options for authentication and encryption
• Uses only single UDP port for many remote connections
• Can be configured to use compression and traffic shaping
• Works over NAT and firewalls
• GUIs for easy configuration on different operating systems
• Client to client connectivity possible
1.3
OpenVPN on M2M Gateway
OpenVPN on M2M Gateway is designed for server-client operation. Server running on M2M Gateway is usually
located in central management station and the clients are distributed to remote monitored stations.
4
Chapter 2
Configuring OpenVPN server on M2M
Gateway
This chapter describes how to configure OpenVPN server on Viola M2M Gateway.
2.1
Quick reference
Here are brief instructions how to set up a server. For more detailed instructions, please read the whole chapter.
1. Create a new certificate authority if not exist.
2. Create a new server key.
3. Create a new server configuration. Select server name and tunnel network.
4. If you need to configure routing, define routing parameters. See section 2.7.
5. Save new server configuration and start server.
6. Add clients to server.
2.2
Requirements
OpenVPN server requires
• Configured M2M Gateway on fixed IP address. Refer to Viola M2M Gateway User Manual for more
information about configuring M2M Gateway.
• Web access to M2M Gateway.
• Correct date and time configuration on M2M Gateway.
• Open port in firewall for M2M Gateway (OpenVPN uses UDP 1194 by default).
2.3
OpenVPN configuration screen on M2M Gateway
Login to M2M Gateway and from the main menu go to OpenVPN configuration screen. Select OpenVPN with
certificate-based authorization from two choices (pre-shared keys method is not described in this document).
See figure 2.1 for more detailed explanation.
5
CHAPTER 2. CONFIGURING OPENVPN SERVER ON M2M GATEWAY
Figure 2.1: Finding OpenVPN configuration screen on M2M Gateway
OpenVPN main configuration screen is displayed on figure 2.2.
Figure 2.2: OpenVPN main configuration screen on M2M Gateway
6
CHAPTER 2. CONFIGURING OPENVPN SERVER ON M2M GATEWAY
2.4
7
Create new certificate authority
Each key needs a certificate authority. This certificate authority is used to create the actual keys.
From the OpenVPN configuration screen, click New Certificate Authority button. Configuration screen
appears, see figure 2.3. Change the values to suit your preferences.
Figure 2.3: New certificate authority configuration
Note: Country and Province fields should be only two characters long upper case.
When you are ready, press Save button. The next phase takes a while to complete, so be patient. When the
certificate is created, press back button on the bottom of the screen.
Figure 2.4: New certification authority creation
Note: Internet Explorer does not show any progress on this creation page. The text will appear only at
the end of the certificate creation, which could take a while. If you run to any problems, please use other
browsers, for example Mozilla Firefox.
Usually these problems are caused by invalid characters or too long texts in configuration fields.
Now you should have a certificate authority created. You usually need only one certificate authority per
M2M Gateway.
2.5
Create new server key
To create an OpenVPN server key.
1. Server always needs a key. To create a key, select Server/Client key administration button on the OpenVPN main configuration screen.
2. Key configuration screen appears. This screen lists all the keys for a specific Certificate Authority on the
top and has configuration fields for a new key on the bottom.
CHAPTER 2. CONFIGURING OPENVPN SERVER ON M2M GATEWAY
8
3. To create a new server key, enter your correct values to configuration fields. Do not forget to select server
key from the Key Server list. See figure 2.5.
Figure 2.5: New server key configuration
2.6
Create new server configuration
Now that the keys are configured, new server can be created.
1. Select New VPN Server button on the OpenVPN main configuration screen.
2. Server configuration screen appears. See figure 2.6. Fill in server name and select correct key (the key
you created in previous step).
3. Configuration field server - Net IP assigns determines what IP address to be assigned to OpenVPN tunnel.
This has to be a network which does not overlap with any other network in current setup.
4. If you need to access IP addresses behind OpenVPN client, enter its network information to route configuration. See section 2.7.
5. When you are ready, press Save button.Now this new server should be listed on the main page.
Figure 2.6: Server configuration screen
CHAPTER 2. CONFIGURING OPENVPN SERVER ON M2M GATEWAY
2.7
9
Server routing configuration
Server route parameter describes the network that is being routed to the specific OpenVPN server interface. If
the M2M Gateway has multiple OpenVPN servers, all the servers must have specified server route parameters
in order to have working routing.
Server route parameter is related to client iroute parameter. All the clients configured to specific server
must have their client iroute parameters fit in the server route address space. See figure 2.7 for example.
Figure 2.7: OpenVPN routing example 1
In this exemple, the clients are configured to small 172.16.x.0/255.255.255.0 networks that fit inside the larger
server route address 172.16.0.0/255.255.0.0. The clients tell their addresses to server with iroute parameters.
The clients are also told that the eth1 address on the M2M Gateway is reached via the OpenVPN tunnel by
defining push route parameters. If the clients would use OpenVPN as their default gateway, push route would
not be needed.
See section 3.5 for client route configuration.
2.8
Start server
Server can be started by selecting Start text on its status line from the OpenVPN main configuration screen.
Figure 2.8: Server start button
Chapter 3
Adding client configuration to server
This chapter describes how to add client configurations to OpenVPN server running on Viola M2M Gateway.
For information about configuring clients, refer to following chapters.
3.1
Quick reference
Here are brief instructions how to set up a client. For more detailed instructions, please read the whole chapter.
1. Create a new server if not exist.
2. Create client key.
3. Create a new server configuration. Select client name and tunnel endpoint IP address.
4. If you need to configure routing, define routing parameters. See section 3.5.
5. Save new client configuration and export configuration to client machine.
3.2
Requirements
Requirements are
• Network diagram. Write down a network diagram describing exactly what kind of a network you are
building.
• Configured OpenVPN server running on M2M Gateway with fixed IP address.
• Web access to M2M Gateway.
• Open port in firewall for M2M Gateway (UDP 1194 by default, can be changed).
• Client with network connectivity to M2M Gateway. Can be tested with ping from client to M2M Gateway
IP address.
3.3
Create client key
To create an OpenVPN client key.
1. Client always needs a key. To create a key, select Server/Client key administration button on the OpenVPN
main configuration screen.
2. Key configuration screen appears. This screen lists all the keys for a specific Certificate Authority on the
top and has configuration fields for a new key on the bottom.
3. To create a new client key, enter your correct values to configuration fields. Do not forget to select client
key from the Key Server list. See figure 3.1.
10
CHAPTER 3. ADDING CLIENT CONFIGURATION TO SERVER
11
Figure 3.1: New client key configuration
Note: Do not specify a password unless you are generating PKCS#12 keys as well. Password enabled
PEM keys are not currently supported.
3.4
Create new client
Now that the keys are configured, new client can be created.
1. From the OpenVPN main configuration screen, select add/list clients text on the server status line.
2. Select New VPN Client button on the OpenVPN main configuration screen.
3. Client configuration screen appears. See figure 3.2. Fill in client name and select correct key (the key you
created in previous step).
4. Configuration field ifconfig is the address of OpenVPN tunnel endpoint on client side. This should be
next value from server side IP address.
5. Configuration field remote is the address of OpenVPN server (public IP address of M2M Gateway which
the clients have access to).
6. If you need to access IP addresses behind OpenVPN server, configure push route and iroute parameters.
See section 3.5.
7. When you are ready, press Save button.Now this new client should be listed on the client list under specific
server.
CHAPTER 3. ADDING CLIENT CONFIGURATION TO SERVER
12
Figure 3.2: Client configuration screen
3.5
Client routing configuration
Client route configuration has two parameters: push route and iroute.
Client push route is added to clients routing table after the OpenVPN connection is initialised. It tells the
client that there is a specific network behind the OpenVPN tunnel and that network can be reached via the
tunnel. This parameter can be left unused and configure the client to use OpenVPN tunnel as default gateway.
Client iroute parameter describes the network that is being routed to the specific OpenVPN client. It tells
the OpenVPN server what network belongs to each client.
Client iroute parameter is related to server route parameter. All the clients configured to specific server
must have their client iroute parameters fit in the server route address space. See figure 3.3 for example.
Figure 3.3: OpenVPN routing example 2
In this exemple, the clients are configured to small 192.168.100.x/255.255.255.252 networks that fit inside
the larger server route address 192.168.100.0/255.255.255.0. The clients tell their addresses to server with iroute
parameters. The clients are also told that the eth1 address on the M2M Gateway is reached via the OpenVPN
tunnel by defining push route parameters. If the clients would use OpenVPN as their default gateway, push
route would not be needed.
See section 2.7 for server route configuration.
CHAPTER 3. ADDING CLIENT CONFIGURATION TO SERVER
3.6
13
Export client configuration files
Client configuration has to be exported to actual client machine before the OpenVPN connection could be made.
This can be done by selecting Add/list clients on the server list and then selecting either Export or View text
on the client status line.
• Export creates a compressed package with all client files which can be downloaded to client.
Figure 3.4: Export client configuration
• View allows user to view individual configuration files for copy-pasting them to client. Select file from
dropdown list and press Show button to view file.
Figure 3.5: View client configuration files
The actual client configuration is described in the following chapters.
Chapter 4
Configuring Windows client
This chapter describes how to configure OpenVPN client running on Windows.
4.1
Requirements
Requirements are
• OpenVPN software installed from download page http://openvpn.net/index.php/downloads.html. It
is recommended to use 2.1 version or later because it has better Windows Vista support and it has
OpenVPN GUI in the same installation package.
• Network connectivity from client to M2M Gateway.
• OpenVPN client configured to M2M Gateway. See chapter 3.
4.2
Export client configuration
Connect to M2M Gateway user interface from the client. Export client configuration like described in section
3.6. Extract the package to OpenVPN config folder.
With default OpenVPN installation the config folder is C:\Program Files\OpenVPN\Config\
4.3
Connect to server using OpenVPN GUI
Start OpenVPN GUI and select the application icon from the Windows status bar with right-click of the mouse.
Select the configuration you want to use and press Connect. If you have only one connection on your client, the
screen shows like in figure 4.1.
The log screen appears for a while and displays the connection creation status. The screen closes when the
connection is made and the application gives a notification message.
The tunnel should now be up and running.
Figure 4.1: Connecting Windows client
14
Chapter 5
Configuring Arctic 3G client
This chapter describes how to configure OpenVPN client running on Arctic 3G product. For more detailed
description about Arctic 3G product, refer to Arctic 3G User Manual.
This documentation is written for Arctic 3G firmware version X.Y.
5.1
Requirements
Requirements are
• Configured Arctic 3G Gateway or Router.
• Correct date and time configuration both on Arctic 3G and M2M Gateway.
• Network connectivity from client to M2M Gateway.
• OpenVPN client configured to M2M Gateway. See chapter 3.
Note: Make sure Arctic 3G has date and time set correctly and check that the imported certificates
have correct valid from/to dates. Otherwise the OpenVPN connection fails to initialise because of invalid
certificates.
5.2
Import Trusted CA
First step is to import a Certificate Authority from M2M Gateway to client. This can be done in the Arctic 3G:
1. Login to Arctic 3G. Navigate to VPN->Certificates page (select from left menu). Select Trusted CA page.
Press Import New button to import new certificate. See figure 5.1.
Figure 5.1: Trusted CA page on Arctic 3G
2. Copy and paste certificate (ca.crt) from M2M Gateway to Arctic 3G Certificate screen. See figure 5.2.
15
CHAPTER 5. CONFIGURING ARCTIC 3G CLIENT
16
Figure 5.2: Import Trusted CA on Arctic 3G
3. Press Submit button to save copied Certificate Authority.
5.3
Import Local Identity
Second step is to import a client certificate from M2M Gateway to client. This can be done in the Arctic 3G:
1. Navigate to VPN->Certificates page on Arctic 3G. Select Local Identity page. Press Import New button
to import new certificate. See figure 5.3.
Figure 5.3: Local Identity page on Arctic 3G
2. Select Identity type as Complete certificate (PEM).
3. Copy and paste certificate (client.crt) and key file (client.key) from M2M Gateway to Arctic 3G Certificate
screen. See figure 5.4.
CHAPTER 5. CONFIGURING ARCTIC 3G CLIENT
17
Figure 5.4: Import Local Identity on Arctic 3G
4. Press Submit button to save copied certificate.
Note: If you have troubles importing local identity files, check if they have been created with password
enabled. Currently only PKCS#12 certificates have password support.
5.4
Create client settings
Third step is to create client configuration on Arctic 3G:
1. Navigate to VPN->OpenVPN page on Arctic 3G. Press Create New button to create new configuration.
See figure 5.5.
2. Give name to client (can be any name), set M2M Gateway IP address, select certificate files. If you want
to route all traffic thorough the OpenVPN tunnel, set Routing to Default route. See section 3.5 on client
routing configuration.
3. Press Submit button to save configuration.
Note: If you receive error messages about LZO compression during OpenVPN connection start up, set
Limit MSS to no.
CHAPTER 5. CONFIGURING ARCTIC 3G CLIENT
18
Figure 5.5: OpenVPN client configuration page on Arctic 3G
5.5
Test connectivity
Enable client from the M2M Gateway and restart Arctic 3G. Wait for the connection to come up. Figure 5.6
shows syslog messages from Arctic 3G when the OpenVPN connection is properly configured.
Figure 5.6: OpenVPN client syslog messages on Arctic 3G
OpenVPN connection status can be checked from the front panel LED. See Arctic 3G user manual for more
information.
• If the VPN LED blinks, the connection is being initialised
• If the VPN LED is lit, the connection is up and running
When the OpenVPN connection is up, the network status screen on the Arctic 3G shows tun interface. See
figure 5.7.
Figure 5.7: Arctic 3G network status screen with OpenVPN connection up
Chapter 6
Troubleshooting
6.1
Routing problems
If you want to access the Ethernet address of Arctic 3G, you have to set up routing on the M2M Gateway. See
sections 2.7 and 3.5 for more information about routing.
6.2
Client connection problems
If the OpenVPN client fails to connect the server the problem usually pins down to certificate vadility. Check
that both the server and the client have correct date and time set up. Also check the certificate for correct
validity dates. If the certificate has incorrect dates, it has to be recreated.
If Arctic 3G clients connection fails with LZO compression errors, set Limit MSS to no.
6.3
Certificate handling problems
If you have problems importing local identity files to client, check if you have passwords enabled on certificates.
See section 5.3 for more details.
If you have troubles creating new certificate authority on M2M Gateway, see notes on section 2.4.
19
Chapter 7
Technical Support
7.1
Contacting Technical Support
• Phone: +358 20 1226 226
• Fax: +358 20 1226 220
• E-mail: [email protected]
• On-line http://www.violasystems.com
7.2
Recording Product Information
Before contacting our Technical Support staff, record the following information about your product:
• Product name.:
• Serial no.:
Note the status of your product in the space below before contacting technical support. Include information
about error messages, diagnostic test results, and problems with specific applications.
20