1
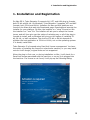
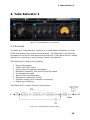
Wave Arts Tube Saturator 2 User Manual Copyright © 2015, Wave Arts, Inc. All Rights Reserved 1 Table of Contents Table of Contents 1. Installation and Registration.............................................................. 5 2. Plug-in Control Operation ................................................................. 8 2.1 Knobs........................................................................................ 8 3. Menu Bar and Preset Manager ........................................................... 9 3.1 Bypass ...................................................................................... 9 3.2 Undo ......................................................................................... 9 3.3 Copy ......................................................................................... 9 3.4 A/B buffers ................................................................................ 9 3.5 Preset name and arrow controls .................................................... 9 3.6 Preset menu .............................................................................. 10 3.7 Factory Presets .......................................................................... 10 3.8 User Presets .............................................................................. 10 3.9 Save… ...................................................................................... 11 3.10 Import….................................................................................. 11 3.11 Export… .................................................................................. 11 3.12 Reset… ................................................................................... 11 3.13 Tools menu ............................................................................. 12 3.14 About… ................................................................................... 12 3.15 Open User Manual… .................................................................. 12 3.16 Check for Updates… .................................................................. 12 3.17 Visit Website… ......................................................................... 13 4. Tube Saturator 2 ............................................................................ 15 4.1 Overview .................................................................................. 15 4.2 About Tube Saturation ................................................................ 16 4.3 About the Technology ................................................................. 20 4.4 Tube Saturator 2 Schematics ....................................................... 20 4.5 Using Tube Saturator 2 ............................................................... 22 4.6 Parameters ............................................................................... 23 4.7 Presets ..................................................................................... 25 Support ............................................................................................ 27 Index ............................................................................................... 29 3 1. Installation and Registration 1. Installation and Registration On Mac OS-X, Tube Saturator 2 supports AU, VST, and AAX plug-in formats, both 32-bit and 64-bit. On Windows, Tube Saturator 2 supports VST and AAX formats, both 32-bit and 64-bit. Installers for Mac and Win platforms are found on the Wave Arts web site Downloads page. Download and execute the installer for your platform. On Mac, the installer is a “.dmg” file and on Win the installer is a “.exe” file. The installer will ask you to accept the license terms, and will then give you the option of selecting any or all of the plug-in formats to install, and on Windows will give you the option of installing 32bit, 64-bit, or both variations. The choice of 32-bit or 64-bit depends on whether the host application is 32-bit or 64-bit, not on the operating system. If in doubt, install both. Tube Saturator 2 is licensed using Pace/iLok license management. You have the option of installing the license on a particular machine, or you may install onto an iLok2 dongle, original iLoks are not supported. When the plug-in first runs, or during installation on Mac, it will check for a Pace/iLok license associated with the machine, or on any iLok plugged into the machine. If a license is not found, it will pop up the following dialog: 5 Wave Arts Tube Saturator 2 Clicking the activate button will bring up a dialog asking for your Pace redeem code. You can copy/paste it into the field and click Next. Then you will need to login to your iLok account or create a new account. This is because the redeem code license needs to be associated with an iLok account. Then you have the option of moving the license to your machine or to an iLok. To run as a demo, select “Try”. This will ask to login to an iLok account, or to create a new account. Once the account is identified, a 14-day trial license is deposited. Then you have the option of moving the license to your machine or to an iLok. When you purchase Tube Saturator 2, you will receive an email containing the product serial number, of the form WA-TS2-XXXXX-XXXXX. Go to our website registration page, enter your name, the serial number, your email address, and select Pace/iLok licensing. This will generate a Pace redeem code and send it to your email address. There are two ways to redeem the code and generate a license. When opening the plug-in the dialog window shown above will appear giving you the option to Activate the plug-in. You can paste the PACE redeem code there, and proceed to create or login to an iLok account and then transfer the license to an iLok or your machine. Otherwise, go to http://www.ilok.com, create an iLok account, and download and install the iLok License Manager. Within the manager, under the Licenses menu, select “Redeem Activation Code” and paste your redeem code. Then transfer the license to either an iLok dongle or your machine. The plug-in will run only if it can find a license on an iLok or the machine. 6 Wave Arts Tube Saturator 2 2. Plug-in Control Operation 2.1 Knobs Please refer to the following guide for information about the various ways you can use knobs: Function Increase/Decrease a parameter value (rotate clockwise/counterclockwise) Mac Windows Click on the knob + drag up/down Click on the knob + drag up/down Shift + click + drag up/down Right click + drag up/down -orShift + click + drag up/down Fine adjustment — increase/decrease Reset knob to default value 8 AAX: Command + click AAX: Ctrl + click Command + click -orDouble-click Control + click -orDouble-click AAX: Option + click AAX: Alt + click 3. Menu Bar and Preset Manager 3. Menu Bar and Preset Manager Tube Saturator 2 has the following menu bar displayed at the top of the plug-in: This section describes the operation of the menu bar, preset manager, and the other functions available in the menus. 3.1 Bypass Clicking on the bypass button bypasses the effect, that is, audio will pass through the effect without alteration. The button is lit when the effect is bypassed. 3.2 Undo Clicking the Undo button causes the parameters to revert to their settings prior to the last edit. Only one level of undo is available, so clicking the undo button again will restore the parameters after the edit. Both A and B buffers (described below) have their own undo buffers. 3.3 Copy Clicking the Copy button copies the current set of effect parameters to the unused A/B buffer. Hence, if the A buffer is currently selected, the parameters are copied to B, and if the B buffer is selected, the parameters are copied to A. After clicking Copy, you can continue to make changes, and then revert to the original copied settings by clicking either the A or B buttons to switch buffers. 3.4 A/B buffers The A/B edit buffers allow you to compare two different sets of parameters or presets. One of the A or B buttons is always lit; the button that is lit shows the current buffer. Clicking either the A or B button will switch to using the other buffer, thus changing the effect settings (assuming different settings are stored in A and B). Here’s how to use the A/B buffers to compare two different presets. Select a preset from the Preset menu, then switch to the other buffer and select a different preset. Now switch between the two buffers to alternate between the two different presets. 3.5 Preset name and arrow controls 9 Wave Arts Tube Saturator 2 The currently selected preset name is displayed in the text field in the menu bar. Changing any parameters causes an asterisk (*) to be displayed at the end of the name. This indicates that changes have been made to the preset. In order to save the changes to a user preset you must select the “Save…” item in the Preset menu, described below. The arrow controls to the left and right of the preset name cycle through the set of factory and user presets. Clicking the right arrow goes to the next preset, clicking the left arrow goes to the previous preset. 3.6 Preset menu The Preset menu contains lists of factory and user presets for easy selection, and options for managing presets. The functions are described in the following sections. 3.7 Factory Presets Factory presets are selected from a rolloff menu at the top of the Preset menu. Factory presets cannot be modified or deleted. The Default preset is always first in the list; it defines all default parameter settings. 3.8 User Presets User presets are selected from a rolloff menu just below the Factory presets in the Preset menu. When you first run a Wave Arts plug-in, there will not be any user presets and the menu will be empty. When you save a preset using the “Save” option the preset is added to the User menu. All instances of a plug-in share the same set of user presets. So, after you save a preset with one instance of a plug-in, you can go to another instance and find that the preset can be found in its User preset menu too. 10 3. Menu Bar and Preset Manager You can delete an individual user preset by holding down the SHIFT key while selecting the preset. The entire set of user presets can be deleted using the Reset option, described below. User presets are stored in a text file called “TubeSaturator 2 Presets.txt”. On Macintosh, the presets are stored in the folder “/Library/Application Support/Wave Arts/TubeSaturator2”. On Windows the presets are stored in the folder “C:\Users\<user>\AppData\Local\Wave Arts”. If the preset file is deleted it will be created automatically by the plug-in. 3.9 Save… When you have created an effect you want to save as a preset, select the “Save…” option. You will be asked to name the preset and the preset will be saved in the set of User presets. If you supply the same name as an existing user preset, the preset will be overwritten with the new preset without any warning notice. 3.10 Import… User presets can be written to files using the “Export” function, and read from files using the “Import” function. Selecting the “Import…” option will first ask if you want to replace or merge the imported presets. Replacing causes your current set of user presets to be deleted and replaced with the presets read from the file, merging will add the presets read from the file to your set of User presets. Then you will be asked to choose a preset file for importing and the presets are read from the file. Import can also be used to convert presets from an older version of the plug-in to the current version. If the plug-in detects presets from an older version and it knows how to convert them to the current version it will ask you if you want to convert the older presets to the current format. 3.11 Export… Selecting the “Export…” option will first ask if you want to replace or merge the exported presets. Replacing causes the presets in the file to be deleted and replaced with the exported user presets, merging will add the user presets to the presets in the file. Then you will be asked to choose a preset file for exporting and the presets are written to the file. Preset Export is also useful for making backup copies of your user presets. If you have a large set of user presets, be sure to export them to a backup file. 3.12 Reset… Reset is used to delete all of your user presets. Selecting “Reset…” will first ask you if you really want to do this, and if you confirm, all the user presets are deleted. 11 Wave Arts Tube Saturator 2 3.13 Tools menu The Tools menu contains various important options, described below. 3.14 About… The About option displays important information about your plug-in. An example is shown below: On the top line, the plug-in name and version are displayed, along with the current plug-in format (VST, AU, or AAX). This is useful if you aren’t sure which format of the plug you are running. The build date of the plug-in is displayed on the next line. The registration status is always displayed as “PACE License”. A button is provided for opening the User Manual. 3.15 Open User Manual… Select this option to open the user manual in a browser. If the manual isn’t found, you will be asked to navigate to it. Once the manual is opened successfully the plug-in remembers the location. 3.16 Check for Updates… 12 3. Menu Bar and Preset Manager If you are connected to the internet, selecting this option will launch a browser and will navigate to the Wave Arts Downloads page. 3.17 Visit Website… If you are connected to the internet, selecting this option will launch a browser and will navigate to the Wave Arts home page. 13 4. Tube Saturator 2 4. Tube Saturator 2 Figure 4-1. Tube Saturator 2 user interface. 4.1 Overview The Wave Arts Tube Saturator 2 plug-in is an exact digital simulation of a dual triode tube preamp with a three-band equalizer. Tube Saturator 2 authentically recreates the sound of a tube amp being overdriven. It can add a touch of analog warmth to a recording, or can be driven heavily into distortion. Tube Saturator 2 features the following: Dual triode preamp 12AX7 and 12AU7 tubes Drive control for distortion adjustment Baxandall 3-band EQ, with pre and post EQ modes 2x oversampling mode Wet/dry mix and output gain Bypasses for saturation and EQ Accurate analog circuit simulation technology Analog style metering Tube Saturator 2's audio routing is shown below: Figure 4-2. Tube Saturator 2 audio routing. 15 Wave Arts Tube Saturator 2 The signal is first upsampled to twice the sampling rate if the 2x oversampling option is enabled. It is then processed by the saturation and EQ modules. The EQ processing happens first if the EQ is in “PRE” mode, if in “POST” mode the EQ is applied after saturation. Saturation is achieved by overdriving the tube preamp. The Drive control adjusts the amount of tube amp saturation by increasing the gain at the input of the circuit; higher levels of input gain increase the amount of saturation. In order to keep the overall gain roughly constant, the Drive control also adjusts the output gain to counteract the input gain, this happens automatically. The saturated and equalized signal is then mixed with the dry signal, optionally downsampled, and then the output gain and metering are processed. 4.2 About Tube Saturation Tube amps have long been revered by guitarists and other musicians as having a fat warm sound that solid state (transistor) amps lack. This section will describe the basics of tube amplifiers, their distortion characteristics, and why they sound better than solid state amplifiers. We will start with the basic building block of tube amplifiers, the triode, whose circuit schematic element is shown below: Figure 4-3. Basic triode circuit element. The triode consists of a plate (also called anode), a cathode, and a control grid. These are metal components sealed in a vacuum, usually a glass tube, and hence the term "vacuum tube". The cathode is heated with an electric heating element not shown in the above schematic. In operation, a high positive voltage is applied to the plate. Negatively charged electrons escaping the heated cathode are attracted to the positive plate, and hence electrons flow from the cathode to the plate. In electronics the convention is to discuss the flow of positive charge, hence we say there is a current from the plate to the cathode. The control grid is a metal screen between the plate and cathode. Applying a negative voltage to the grid impedes the current flow because the electrons leaving the cathode are repelled by the negatively charged grid. By adjusting the voltage on the grid, the current flow from plate to cathode is controlled. The triode functions much like a water valve with the signal on the grid controlling the current flowing from the plate to the cathode (in fact tubes are commonly called "valves"). 16 4. Tube Saturator 2 Figure 4-4. Simple triode amplifier. Input voltage on grid controls the current flow and hence the output voltage. The circuit in figure 4-4 above shows how the properties of the triode can be used to construct a voltage amplifier. In the circuit a 300 volt power supply is connected to the plate through a 100 kilohm resistor. Current flowing from the power supply to the plate to the cathode causes a voltage drop across the resistor. With a 100 kilohm resistor, a 1 milliamp current causes a 100 volt drop. The graph in figure 45 shows the relationship between the voltage applied to the grid and the voltage at the output. With no voltage applied to the grid, i.e. grid at 0 volts, there is approximately 2 milliamps of current flowing, the voltage drop across the plate resistor is about 200 volts, and hence the output voltage is 100 volts. With the grid at -1 volts, there is less current flowing and the output voltage rises to about 170 volts. Hence a 1 volt change in the input has resulted in a 70 volt change in the output, so this simple circuit can amplify the input voltage by a factor of 70. Figure 4-5. Relationship between grid voltage and output voltage in triode amp from figure 4-4. For small swings in grid voltage around -1 volt we see that the graph is reasonably straight, that is, the amplification is fairly linear and distortion-free, though a small 17 Wave Arts Tube Saturator 2 amount of distortion is created due to the curvature of the graph. We also note that this amplifier is "inverting", that is the output voltage rises when the input voltage drops and vice-versa. For large negative or positive grid voltages, the graph flattens out because the amplifier can only produce a limited range of voltages. This means that large input signals will result in clipped, or distorted, output signals. Clipping is also called "saturation", which explains the name "Tube Saturator". The nature of the clipping in a triode differs for negative and positive inputs. For large negative grid voltages, the current flow nears "cutoff" where there is no current flow from the plate, and the output voltage approaches the power supply voltage, in this case 300V. This type of clipping is called "plate cutoff". For large positive grid voltages the output voltage reaches a minimum which is determined by the maximum current the plate can pass. However, this type of clipping does not occur in practice because another phenomenon usually dominates the behavior. When the grid voltage is positive with respect to the cathode, electrons leaving the cathode are attracted to the positively charged grid rather than repelled by it. The onset of grid current for positive grid voltages is rapid, and the effect is to immediately decrease the input signal voltage due to current flowing through the internal resistance of the circuit driving the grid. Hence, grid current causes the input signal to be clipped. The mechanism of grid current clipping the input signal determines how the amplifier will clip positive input signals. Figure 4-6. Complete triode amplifier including cathode bias circuit and DC removal circuit. A complete triode amplifier schematic is shown in figure 4-6. It has a few additional details missing from the previous example. First there is a "cathode bias circuit" whose purpose is to apply a small positive voltage to the cathode, in this case +1.5V. This allows the grid voltage to assume positive values up to +1.5V without causing a positive grid to cathode voltage which would cause grid current and input clipping. Hence for small input signals oscillating say between -1 and +1 volts the 18 4. Tube Saturator 2 cathode bias ensures linear distortion-free amplification. The second addition is a "DC removal circuit" on the output which removes the large constant power supply voltage. So, instead of the output ranging from say 0 volts to 300 volts, the output will range from say -150 volts to +150 volts. Figure 4-7. Left: 100 Hz input sinusoid. Right: resulting response of the complete triode amplifier for 1 volt input (blue dotted), 2 volt input (green dashed) and 4 volt input (red solid). The response of the complete triode amplifier is shown in figure 4-7. On the left is a single period of a 100 Hz input sinusoid with amplitude of 1 volt. On the right are the outputs of the amplifier for different input amplitudes: 1 volt (blue dotted plot), 2 volts (green dashed plot), and 4 volts (red solid plot). One can clearly see that the 4V input has caused an output that is clipped. However, the clipping is smooth with rounded edges on both positive and negative waveforms. The other important factor is that the output waveform is asymmetrical: the negative amplitudes are greater than the positive amplitudes and the shape of the positive and negative clipping is slightly different. The positive input causes a negative output which is clipped due to grid current, while the negative input causes a positive output which is clipped due to plate cutoff. Transistor amplifiers have very different characteristics. They are very linear until they hard clip, and the hard clipping characteristic is the same for positive and negative inputs. Hence, transistor amplifiers will clip by producing square waves whose positive and negative shapes are symmetrical. The symmetry is important because it determines the harmonic content of the distortion. Symmetrical waveforms as produced by transistor amplifiers produce odd harmonic distortion, for example a 100 Hz tone would produce distortion harmonics at 300 Hz, 500 Hz, 700 Hz, etc. Asymmetrical waveforms as produces by tube amplifiers also produce even harmonic distortion, for example a 100 Hz tone would produce 200 Hz, 400 Hz, 600 Hz, etc. in addition to the odd harmonic products. The even harmonics, being octaves of the original tone, have a different (and many would say more pleasing) timbre than the odd harmonics. 19 Wave Arts Tube Saturator 2 In summary, the basic triode amplifier can produce linear distortion free amplification for small input signals. Larger input signals cause clipping, but the saturation characteristics are very smooth. Hence the onset of distortion is very gradual rather than abrupt and the distortion is less harsh. There are different mechanisms responsible for positive and negative clipping, this results in asymmetrical distortion and the production of even harmonic distortion products which gives a more musical tone. 4.3 About the Technology What makes Tube Saturator 2 special is the technology used to simulate the tube sound. On the surface, it appears similar to a myriad of other plug-ins that purport to reproduce the sound of some analog circuit. However, under the surface, Tube Saturator 2 uses technology that really does accurately reproduce analog circuits. The technology, aptly called “circuit simulation,” is not new. The best known circuit simulation program, called “SPICE,” was developed at UC Berkeley in the 1970s. Using SPICE, an engineer can enter the schematic of a circuit and then simulate its operation with a very high degree of accuracy. SPICE was not intended to simulate circuits in realtime; typically SPICE users simulate circuits for brief periods of time to verify proper operation with particular input signals. Wave Arts has developed circuit simulation software similar to SPICE which has been optimized to run in realtime, hence it can be used as the basis for digital audio effects. This technology was used to implement the original Tube Saturator plug-in. However, it was still very CPU intensive, and there was demand for the same authentic sound quality with significantly less CPU consumption. For Tube Saturator 2, we’ve taken another step forward. In order to greatly speed up processing, Tube Saturator 2 uses large tables of pre-calculated data output by our circuit simulator. Using the pre-calculated data speeds up the processing with negligible decrease in accuracy. To ensure accuracy, we carefully compare the output of the data-driven model with the original circuit simulation and adjust the data sampling until the two models match with a high degree of precision. 4.4 Tube Saturator 2 Schematics Tube Saturator 2 combines a Baxandall 3-band equalizer and a two stage triode preamp. The circuit schematic for the equalizer is given in Figure 4-8. 20 4. Tube Saturator 2 Figure 4-8. Baxandall style equalizer used in Tube Saturator 2, derived from version by Chu Moy, http://www.headwize.com/projects/equal_prj.htm. The bass control implements a low shelving filter with a transition frequency of approximately 100 Hz, that is the frequency at which the shelf is at half-height. For example, when the height is set at +12 dB, the response will be +6 dB at 100 Hz. The midrange control implements a parametric boost/cut with a center frequency of 800 Hz and a very low Q of about 0.2, hence the boost/cut lobe is very wide. The treble control implements a high shelf filter with a transition frequency of approximately 1 kHz, that is the frequency at which the shelf is at half-height. For example, when the height is set at +12 dB, the response will be +6 dB at 1 kHz. The circuit schematic for the preamp is shown in figure 4-9. 21 Wave Arts Tube Saturator 2 Figure 4-9. Preamp consisting of two triode amplifier stages. Both triodes are either the 12AX7 or 12AU7 type. The preamp in Tube Saturator 2 is responsible for generating the saturation effect. The preamp consists of two common cathode triode amplifiers based on the 12AX7 or 12AU7 tube. This configuration is quite typical to find in tube guitar amps or tube hi-fi amps. Multiple stages of amplification are usually needed to bring a signal from the millivolt range up to the volt range in order to drive the input of a power amplifier. Here we are using the amplifier sections to simply model the sound of tube amplification and overdrive. A single 12AX7 or 12AU7 tube contains two triodes so this circuit would be implemented with a single physical tube. When the Drive control is at minimum, the amplifiers are running in a very clean mode with no appreciable saturation effect. However, there is still a small amount of harmonic distortion created by the tube amplification which is not perfectly linear. As the Drive is increased, the input gain is increased and the second amplifier stage will be overdriven and will begin to saturate. Further increases in Drive will cause the first stage to saturate too. 4.5 Using Tube Saturator 2 Tube Saturator 2 can be used to add the subtle harmonic distortion caused by tube amplification. Unlike solid state amplifiers which generate odd harmonic distortion, tube amps also create even harmonic distortion which sounds decidedly different. At low Drive settings the harmonic distortion simulates clean tube amplification. At higher Drive settings you will start to hear tube saturation effects, increasing to a 22 4. Tube Saturator 2 fairly distorted sound at maximum Drive. The character of the distortion is greatly affected by the selection of 12AX7 versus 12AU7 tubes. The 12AX7 tube distortion features prominent even harmonics, whereas the 12AU7 distortion has both odd and even harmonics. Because a tube amp naturally implements a soft peak limiter, it is possible to send transient signals through Tube Saturator 2 with enough gain to bring up the low level signals cleanly while the high level signals cause soft clipping. Essentially this is soft peak limiting, and it will sound like compression with the transient peaks getting fattened by the soft clipping. Try it with drums and percussive sounds. The EQ has bass, mid, and treble frequency bands, each with a +/- 12 dB level control. The bass is a low frequency shelf with 100 Hz transition frequency, the mid is a wide parametric filter with 800 Hz center frequency, and the treble is a high frequency shelf with a 1 kHz transition frequency. When running in PRE mode the EQ alters the frequency content before saturation, so for example you could boost the bass to get a fatter sounding distortion. When running in POST mode the EQ alters the tonal balance of the harmonic distortion. In combination with the wet/dry mix control this provides a lot of flexibility for tailoring the effect. Distortion effects create harmonic overtones. When these overtones exceed half the sampling rate (the Nyquist frequency), they wrap around, becoming inharmonic – this is called aliasing. To reduce the amount of aliasing, you can simply turn on the 2X oversampling option. This doubles the sampling rate of the saturation and EQ modules using a high quality sample rate conversion algorithm. Of course it takes roughly twice the CPU power to run in 2X mode. When running in stereo, the left and right channels get independent effects sharing the same parameters. It's just like running two mono Tube Saturator 2 effects, one on each channel. The output meter shows the peak across the stereo channels. Internally, Tube Saturator 2 runs at only the following sampling rates: 44.1, 48, 88.2, 96, 176.4, and 192 kHz. When processing sound sampled at a different rate, the sound will be automatically resampled to the closest higher supported rate. Also, the 2X oversampling mode is not available at rates higher than 96 kHz, enabling it has no effect. 4.6 Parameters The table below lists all the internal parameters of Tube Saturator 2 and shows the range of values as would be displayed by a generic parameter-value plug-in interface. All of these parameters have a one to one correspondence with controls on the user interface. Parameter name Enable Sat Enable Values 0 = Off, 1 = On 0 = Off, 1 = On 23 Wave Arts Tube Saturator 2 Tube Drive EQ Enable EQ Pre/Post Bass Mid Treble 2x Rate Mix Out Gain 0 = 12AX7, 1 = 12AU7 0 to 10 0 = Off, 1 = On 0 = POST, 1 = PRE -12 to +12 dB -12 to +12 dB -12 to +12 dB 0 = Off, 1 = On 0% (dry) to 100% (wet) -12 to +12 dB The parameters are described in more detail below. Enable — This parameter enables/bypasses Tube Saturator 2. It is controlled by the Bypass button on the menu bar; enabling the Bypass disables Tube Saturator 2 and vice versa. Sat Enable — This parameter enables/bypasses the saturation circuit consisting of the tube preamp with drive circuitry. Drive — The Drive parameter simultaneously controls the input and output gains around the tube preamp circuit, as shown in Figure 4-2. At low drive levels, increasing the drive increases the input gain and also decreases the output gain. At higher drive levels where the tube preamp is already saturating and hence limiting the output, increasing the drive simply increases the input gain. The idea is that the drive control sets the amount of distortion while keeping the level roughly constant. However you may still need to adjust the output gain. At maximum setting, the Drive control increases the input signal level by a factor of 100, or 40 dB, relative to the minimum setting. The actual range of the Drive control depends on the tube type in use. For the 12AX7 tube, the Drive control changes the preamp input signal level from a minimum of 10 millivolts to a maximum of 1 volt. For the 12AU7 tube, the range is 100 millivolts to 10 volts, i.e., +20 dB relative to the 12AX7 range. The 12AU7 triode has much lower amplification gain than the 12AX7, hence to achieve the same saturation effect, Tube Saturator 2 drives the 12AU7 triodes harder. EQ Enable — Enables/bypasses the equalizer. Because the EQ is a genuine circuit simulation of an analog EQ circuit, it consumes more CPU power than a standard digital EQ, so you may want to bypass the EQ when not in use. EQ Pre/Post — In PRE mode the equalizer processes the input to the tube preamp saturator. In POST mode the equalizer processes the output of the saturator. Bass — Sets the EQ bass level. The bass is a low shelf filter with a transition frequency of 100 Hz. 24 4. Tube Saturator 2 Mid — Sets the EQ midrange level. The midrange is a parametric filter with a center frequency of 800 Hz and a Q of 0.2. Treble — Sets the EQ treble level. The treble is a high shelf filter with a transition frequency of 1 kHz. 2X Rate — Enables/disables the 2X oversampling mode. When enabled both the EQ and saturation effect run at twice the sampling rate of your audio in order to reduce aliasing distortion and to more accurately simulate true analog circuitry. Mix — Mixes the unprocessed (dry) signal with saturated and/or equalized (wet) signal. Output gain — Sets the output gain. 4.7 Presets Tube Saturator 2 factory presets are listed in the table below. Name Default Subtle Warm Warm-a-mix Tube X Crunch Tube U Crunch Tube X Shred Tube U Shred Bass boom Bass enhance Harm mix-in Clean loud EQ Description Default settings Very mild saturation Fatting loudness control for mixes Light distortion with X tube for even harms Light distortion with U tube for all harms Heavy X tube distortion Heavy U tube distortion Pre distortion bass boost Bass distortion harmonics mixed in Mix in some harmonic distortion Clean EQ with bass and treble boost 25 Support Support For assistance, please send email to: [email protected] If you are having problems with a plug-in, please include the following information: plug-in name, operating system, and host software you are using. The version numbers are also helpful. For software updates, revision history, frequently asked questions (FAQ), and more, please visit our website at: www.wavearts.com Contact information: Wave Arts, Inc. 99 Massachusetts Ave. Arlington, MA 02474 support: tel: fax: 866-925-5070 +1 781-646-3794 +1 781-646-7190 27 Index Index A K A/B buffers ................................... 9 Audio routing ...............................15 Knobs........................................... 8 B Bass............................................24 Bypass ......................................... 9 C M Menu bar ...................................... 9 Mid .............................................25 P Circuit simulation ..........................20 Copy ............................................ 9 Preamp........................................22 Preset name .................................10 Presets .................................. 10, 25 D S Drive ..................................... 22, 24 Saturation .............................. 18, 19 Save preset ..................................11 E EQ ..............................................20 Export preset ...............................11 F Factory presets .............................10 FAT .............................................22 H Harmonics ............................. 19, 23 T Tools menu ..................................12 Treble .........................................25 Triode .........................................16 U Undo ............................................ 9 User manual .................................12 User presets .................................10 I Import preset ...............................11 29