1
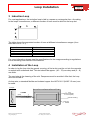
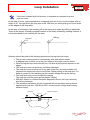
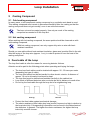
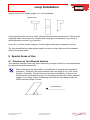
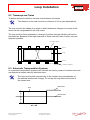
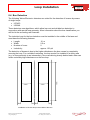
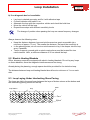
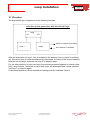
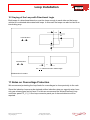
Loop Installation
Manual
Loop Installation
Weiss-Electronic GmbH
Niederkircher Straße 16
54294 Trier
Germany
http://www.weiss-electronic.de
© 2006 All rights reserved
Subject to technical modifications
Loop_install_BE_22
© Weiss-Electronic GmbH
Tel.: +49 (0) 6 51 / 8 10 02 – 0
2/20
Loop Installation
Contents
1
GENERAL DESCRIPTION ....................................................................................................... 4
2
MODE OF OPERATION ........................................................................................................... 5
3
INDUCTION LOOP ................................................................................................................... 7
4
INSTALLATION OF THE LOOP............................................................................................... 7
5
CASTING COMPOUND............................................................................................................ 9
COLD CASTING COMPOUND ................................................................................................. 9
HOT CASTING COMPOUND ................................................................................................... 9
5.1
5.2
6
FEED CABLE OF THE LOOP .................................................................................................. 9
7
GEOMETRY OF THE LOOP .................................................................................................. 10
8
SPECIAL AREAS OF USE..................................................................................................... 11
DETECTION OF TWO-WHEELED VEHICLES .......................................................................... 11
TRAMWAYS AND TRAINS .................................................................................................... 12
AUTOMATIC TRANSPORTATION SYSTEMS ........................................................................... 12
BUS DETECTION ............................................................................................................... 13
8.1
8.2
8.3
8.4
9
SPECIAL CASES ................................................................................................................... 14
9.1
9.2
9.3
10
HEAVY IRON REINFORCEMENT........................................................................................... 14
ELECTRIC HEATING BLANKETS .......................................................................................... 15
LOOP LAYING UNDER INTERLOCKING STONE PAVING ......................................................... 15
DIRECTIONAL LOGIC ....................................................................................................... 16
10.1
10.2
FUNCTION ......................................................................................................................... 17
LAYING OF THE LOOP WITH DIRECTIONAL LOGIC ................................................................ 18
11
NOTES ON OVERVOLTAGE PROTECTION .................................................................... 18
12
NOTES ON THE LOOP WIRE............................................................................................ 19
Symbols
In several places throughout this manual you will find the following symbols stating
important safety instructions:
ATTENTION!
This symbol indicates dangers which might cause damage to people
or property
#
NOTE
This symbol indicates information for installation and function
of the device
Subject to technical modifications
Loop_install_BE_22
© Weiss-Electronic GmbH
Tel.: +49 (0) 6 51 / 8 10 02 – 0
3/20
Loop Installation
1 General Description
Inductive impulse transmitters are the most frequently used devices for the detection of
vehicles of all sorts. The induction loop as sensor of these inexpensive devices is
characterized by its robust and weather-independent structure.
These advices for the laying of loops relate to the following areas of use:
Gates:
Automatic opening and closing of gates, shutters, barriers, etc.
Parking lots:
Monitoring of single parking spaces
Control of barriers
Counting in parking garages
Rail-bound vehicles:
Opening and closing of hall gates
General detection for other control purposes
The following features apply for the Weiss-Electronic induction impulse transmitters:
•
•
•
•
•
•
•
Microprocessor controlled
Static hold time
High sensitivity of max. 0.02% Δf/fo
Multi-channel version, max. 4 channels
Wide operation range 10 µH - 2000 µH
Temperature compensation
Automatic alignment
These characteristics are typical values, the characteristics indicated in the data sheet of
each device must be observed.
Subject to technical modifications
Loop_install_BE_22
© Weiss-Electronic GmbH
Tel.: +49 (0) 6 51 / 8 10 02 – 0
4/20
Loop Installation
2 Mode of Operation
The induction loop is the inductive part of an L-C oscillator. The loop inductivity and the
capacity of the internal capacitor determine the resonance frequency fo of this resonating
circuit. With some devices, the capacity of the capacitor and so the resonance frequency
can be modified by switches resp. jumpers.
Other detectors can be set via software to different measuring frequencies.
supply voltage
power unit
relay
oscillator
loop
microprocessor
loop feed cable
For the induction loop applies the following rule:
The lower the inductivity the higher the frequency fo.
f in KHz
o
125
100
75
50
25
0
0
200
400
600
800
1000
L in µH
Example of the dependence of fo on L
Subject to technical modifications
Loop_install_BE_22
© Weiss-Electronic GmbH
Tel.: +49 (0) 6 51 / 8 10 02 – 0
5/20
Loop Installation
In order to explain the function we first look at the un-attenuated loop. A magnetic
alternating field is formed around the loop flown through by the electric current.
At the same time the magnetic field lines close on the shortest way.
Now a vehicle drives onto the induction loop.
In the vehicle's chassis, currents are induced by the alternating field of the loop. These
currents form a magnetic field themselves and have a counter-effect on the original field.
The field lines of the induction loops are diverted by this magnetic field and do not close on
the shortest way any more.
As the inductivity gets smaller with a growing field line length, the inductivity of the loop
decreases. The frequency increases. The microprocessor detects this frequency change.
With a frequency change higher than the switching threshold, the microprocessor switches
on the relay contact of the detector. The switching threshold is set via the sensitivity. If a
high sensitivity is set there will be a low switching threshold. If a low sensitivity is set there
will be a high switching threshold. The sensitivity should not be set higher than necessary
for the individual application.
Very slow changes of the loop frequency (e.g. caused by temperature changes) do not
lead to a switching.
Subject to technical modifications
Loop_install_BE_22
© Weiss-Electronic GmbH
Tel.: +49 (0) 6 51 / 8 10 02 – 0
6/20
Loop Installation
3 Induction Loop
For most applications, the induction loop is laid in a square or rectangular form. According
to the loop’s circumference, a different number of turns must be laid into the loop slot.
b
a
The table shows the requested number of turns at different circumference ranges (for a
side ratio of b:a = 3:1).
Circumference
4-5m
5-6m
6 - 15 m
15 - 25 m
Number of turns
5
4
3
2
For more information please read the specifications for the usage according to regulations
in the according user manual of the detector.
4 Installation of the Loop
In order to lay the loop into the ground covering, at first a slot must be cut into the concrete
or asphalt with a diamond disk. This slot should be approx. (40 – 70) mm deep and (5 – 8)
mm wide.
The next step is the cleaning of the slot. Dampness must be avoided. After that, the loop
wire can be laid in.
As loop wire, a standard flexible and isolated copper line HO7V-K1.5 (NYAF1.5 mm2) can
be used.
example
IG
CH 1
CH 2
CH 3
CH 4
ERROR
loop
(3 turns together
in one loop slot)
feedfeeder
cable
(twisted loop cable)
TRANS.
FUNC.
RESET
LAMPS
ground covering
loop slot
5-8mm
RS232
Subject to technical modifications
Loop_install_BE_22
© Weiss-Electronic GmbH
Tel.: +49 (0) 6 51 / 8 10 02 – 0
7/20
Loop Installation
#
If the loop is casted with hot bitumen, a temperature-resistant loop wire
must be used.
In the area of doors, gates and barriers, a diagonal joint are to be cut at the edges with an
angle of 45°, through which the loop wire is led. With this you avoid putting too much strain
on the edges of the loop cable.
In the area of motorways, the rounding off of the sharp joint edges by drilling is advisable.
There is the danger of breaking edges because of the strain caused by passing vehicles. It
is therefore better to do a drilling for this area.
drilling
diagonal
cut
45°
Attention should be paid to the following points when laying induction loops:
• The ground covering must be continuously solid and without cracks.
• A diagonal joint must be cut at the joint edges or the edge must be drilled.
• When laying the loop wires into the slot, one should pay special attention to the
edges.
• The loop wire must not show any insulation damages.
• The loop wire may not stick out of any part of the slot, since the isolation will
otherwise be destroyed or the wire will tear. When putting in the loop wire, it is
better to protect it from washing up with wooden wedge during the casting.
• The loop wires may not move after the casting.
The loop slot must be clean and dry before casting.
• With an L-Meter or a Weiss Electronic diagnostic device, the loop inductivity
should be measured.
• The insulation resistance is to be measured with an insulation testing device
against earth (values > 500 MΩ at 500 V measurement voltage and recently
installed loops)
loop wire
casting compound
5-8 mm
40-70 mm
loop slot
Subject to technical modifications
Loop_install_BE_22
© Weiss-Electronic GmbH
Tel.: +49 (0) 6 51 / 8 10 02 – 0
8/20
Loop Installation
5
Casting Compound
5.1 Cold casting compound
In many cases, a two-component casting compound on a synthetic resin basis is used.
This casting compound must remain in permanent flexibility after the casting so that the
casting compound does not get crumbly, even in an cold environment.
#
The loop cut must be casted properly. Use only as much of the casting
compound as needed to fill the loop slot.
5.2 Hot casting compound
When working with hot casting compound, the same points should be observed as with
cold casting compound.
#
With hot casting compound, use only copper alloy wire or wire with heatresistant insulation!
Should you use cable without heat-resistant insulation, glass sand must be filled in the slot
after the laying of the loop wire (approx. 1 cm), in order to protect it from the heat of the
casting compound.
6 Feed cable of the Loop
The loop feed cable is often the reason for occurring detector failures.
Attention must be paid to the following points when operating and laying the loops:
•
•
•
•
•
The two loop feed cables must be twisted with approx. 20 - 50 turns per meter
(depending on type of cable).
The loop feed should not be laid parallel to other electric circuits. A distance of
approx. 10 cm to all nearby lines must be kept.
The loop feed must be twisted and installed carefully in the cabinet too.
Loop feeds of different detectors also must also be laid in distance to each other.
Do not lay the feed cable through the loop slot of a neighbouring loop.
correct
wrong
•
•
Protect the feed cable against mechanical damage.
The ohmic resistance (feed cable plus loop) mustn’t become too high in relation to
the loop inductivity. Corresponding information can be found in the data sheets of
the detectors. In general: The higher the ohmic resistance, the higher the loop
inductivity must be chosen.
Subject to technical modifications
Loop_install_BE_22
© Weiss-Electronic GmbH
Tel.: +49 (0) 6 51 / 8 10 02 – 0
9/20
Loop Installation
7 Geometry of the Loop
With certain applications, the inductivity also depends on the geometry of the loop.
The loop geometry must be adjusted according to its application. Therefore, a loop with a
length of 5 m and a width of 0.2 m is very unfavourable. The width of the loop must be
adjusted to the vehicle width. The highest sensitivity will be achieved if the vehicle is a little
bit wider than the loop.
favourable
unfavourable unfavourable
Nearby loops of different detectors must be laid with a space of 1 m to 1.5 m (depending
on the loop size). Interfering frequencies from loop to loop will be diminished.
detector 1
loop 1
minimum (1.0
– 1.5) mm
minimum
of 1.0-1.50
detector 2
loop 2
If multichannel detectors are used, the loops of one device can be laid with very little
distance or even in an interlocking way.
0.5 m
0.5 m
0.5 m
favourable
Subject to technical modifications
Loop_install_BE_22
favourable
© Weiss-Electronic GmbH
Tel.: +49 (0) 6 51 / 8 10 02 – 0
unfavourable
10/20
Loop Installation
Special forms like T-double-angles, etc. can be realized.
Special forms
A loop should not be narrow or small, otherwise the detection will decrease. This must be
especially taken into account for vehicles with a high ground clearance (e.g. lorries) or
small attenuation surface (e.g. bicycles).
As a rule: A vehicle causes a approx. 3-times higher attenuation compared to a lorry.
The loop should have an appropriate length in order to avoid a fade-out of the drawbararea of lorries with trailer.
8 Special Areas of Use
8.1 Detection of Two-Wheeled Vehicles
Two-wheeled vehicles cause only minor frequency changes, which is in most applications
just above the switching threshold.
#
Most of the times, the attenuation is not sufficient to signal a sure permanent
occupancy. Therefore, the loop should be laid in an angle of 45° to the travel
direction, if possible. This will cause an increase of sensitivity. If there is iron
reinforcement underneath the loop, in most cases the detection of two-wheeled
vehicles is no longer certain. Preliminary tests with the loop diagnosis device
(SDG) must be carried out here.
travel direction
45°
Subject to technical modifications
Loop_install_BE_22
© Weiss-Electronic GmbH
Tel.: +49 (0) 6 51 / 8 10 02 – 0
11/20
Loop Installation
8.2 Tramways and Trains
To detect rail-bound vehicles, the loop is laid between the tracks.
#
The distance to the track must be a minimum of 20 cm (pre-attenuation!).
The loop is laid in the shape of an eight so that interference voltages of currents in the
tracks can be compensated in the loop circuit.
The loop must be firmly embedded, a change of position through vibration will lead to
interferences. Because of the high clearance of these vehicles, there is often only axle
detection possible.
c o n c r e te s la b
tra c k
lo o p
tr a c k
ra ilw a y s le e p e r
8.3 Automatic Transportation Systems
In conducted transportation systems, the vehicles are lead by means of contact wires and
are detected at certain sites by induction loops.
#
The loop must be laid symmetrically to the contact wire (neutralization of
the induced interference voltage). Do not lay the loop feed into the slot of
the contact wire.
feed cable
loop
XXXXXXXXXXXXXX
a1
contact wire
a2
a1 = a2
Subject to technical modifications
Loop_install_BE_22
© Weiss-Electronic GmbH
Tel.: +49 (0) 6 51 / 8 10 02 – 0
12/20
Loop Installation
8.4 Bus Detection
The following Weiss-Electronic detectors are suited for the detection of busses by means
of single loops:
•
•
IG745/3
IG224/4
These detectors use algorithms, which allow low-cost and reliable bus detection in
connection with special loop geometry. More information about the bus classification you
will find in the according user manuals.
The induction loop for the bus detection must be installed in the middle of the lane and
must have the following features:
•
•
•
•
Length:
Width:
Number of turns:
Inductivity:
10 m
2.5 m
2
approx. 150 µH
2.5 m
a
10 m
The detection of busses is due to the higher disturbance the bus causes by completely
covering the loop. For a reliable functioning, the loop mustn’t be installed in a dusty area
(e.g. in close proximity to an intersection), since cars driving closely behind each other can
cause a similarly high disturbance on the bus loop.
2.5 m
a
a
a
Installation of the bus loop in the middle of the lane
Subject to technical modifications
Loop_install_BE_22
© Weiss-Electronic GmbH
Tel.: +49 (0) 6 51 / 8 10 02 – 0
13/20
Loop Installation
9 Special Cases
9.1 Heavy Iron Reinforcement
Iron reinforcement in the ground lowers the sensitivity of the induction loop. The smaller
the distance of the loop to the iron reinforcement, the lower the sensitivity becomes.
sensitivity %
100
75
50
25
0
0
200
400
600
800
1000
pre-attenuation Hz
The exemplary curve shows how the switching level decreases with increasing
attenuation.
A 100 % switching level corresponds to the un-attenuated loop without iron reinforcement.
Especially with lorries, the pre-attenuation must be taken into account because of their
high ground clearance.
Here should be proceeded as follows before the final laying of the loops:
a) If a loop diagnosis device (SDG2) for the measurement of the pre-attenuation is
available:
•
•
•
•
•
•
•
•
Measure the level of pre-attenuation with the measuring device and the reference
loop
Measure an area for the loop installation in which the pre-attenuation is relatively
small
After that, lay a provisional loop of the desired size on the ground and fix it with
adhesive tape
Connect the diagnostic device to the loop. The detector must not be connected
Measure the alignment frequency of the loop with the loop diagnosis device
Drive onto the loop with the according vehicle.
Measure the frequency change level with the diagnosis device. It is a gauge for
sensitivity. The Weiss-Electronic detectors switch in the highest level of sensitivity at
Δf/fo = 0.02% - 0.01%
To detect a vehicle reliably, frequency changes in the order of Δf/fo ≈ 0.2 - 0.5% are
desired. This must be observed especially for induction loops with a safety function
Subject to technical modifications
Loop_install_BE_22
© Weiss-Electronic GmbH
Tel.: +49 (0) 6 51 / 8 10 02 – 0
14/20
Loop Installation
b) If no diagnosis device is available:
•
•
•
•
•
Lay loop in desired geometry and fix it with adhesive tape
Connect detector and switch it on
Attenuate the loop with the respective vehicle and check the hold time
Move the vehicle off the loop.
Repeat these steps with different sensitivity levels
#
The change of position when passing the loop can cause frequency changes
Always observe the following notes:
•
•
•
Keep the distance between loop and reinforcement as great as possible (at a
minimum of approx. 70 cm). The smaller the distance, the lower the sensitivity is
In the planning state, do not use iron reinforcement or lay it the deeper into the loop
area, if possible.
Tracks, supports, ground grids or steel constructions must be treated like iron
reinforcement. Here, a minimum distance of 20 cm should be kept.
9.2 Electric Heating Blankets
Often, driveway ramps are equipped with electric heating blankets. Do not lay any loops
on these blankets, since the magnetic interferences are too strong.
Already during the planning, enough space should be provided for the induction loop.
The distance between loop and heating blanket should be at a minimum of 1 m on each
side.
9.3 Loop Laying Under Interlocking Stone Paving
The loops are laid in the sand layer between the layer of broken stones at the bottom and
the interlocking paving stones on the top.
Schleifenfixierung
loop fixation
paver
Verbundstein
loop
Schleife
sand
Sand
gravel
Schotter
Subject to technical modifications
Loop_install_BE_22
© Weiss-Electronic GmbH
Tel.: +49 (0) 6 51 / 8 10 02 – 0
15/20
Loop Installation
Most advantageous is the use of prefabricated cable loops of Weiss-Electronic.
KAS I
KAS II
KAS III
•
•
•
6 m circumference, 15 m feed cable
12 m circumference, 15 m feed cable
21 m circumference, 15 m feed cable
Lay the cable duct (e.g. 1.5 cm x 1.5 cm, like the ones used for electrical
installation) halfway into the sand layer.
Put in loop and fix.
Fill with permanently elastic sealant (e.g. loop sealant).
These frame loops are also offered completely by Weiss-Electronic
RS
RS-S
1.80 m * 0.80 m, 10 m feed cable
customized type
Afterwards:
•
•
•
•
•
Fill in sand layer and compress it
Put in stones and vibrate
Measure insulation resistance
Measure inductivity
Check function
10 Directional Logic
The microprocessor-controlled induction pulse generator in 2- and 4-channel version can
be delivered with directional logic.
Hereby, 2 channels (channels 1 and 2, as well as channels 3 and 4) each form a
directional logic.
Application for Directional Logic
•
•
•
direction-dependent control of barriers, garage driveways and gate systems
entry and exit countings in parking garages
detection of wrong-way drivers
Subject to technical modifications
Loop_install_BE_22
© Weiss-Electronic GmbH
Tel.: +49 (0) 6 51 / 8 10 02 – 0
16/20
Loop Installation
10.1 Function
The directional logic is explained on the following example:
induction pulse generator with directional logic
relay
K1
K2
entrace: channel 2 switches
loop 1
loop 2
exit: channel 1 switches
After the attenuation of loop 1, this is recorded in the detector, but no output is switched
yet. Only when loop 2 is also simultaneously attenuated, the relay of the second channel
switches on and stays switched until loop 2 is released again.
For the other direction (in this case exit), the switching process happens in reverse order.
Here, relay channel 1 switches on when both loops are attenuated and it stays switched
until loop 1 is released again.
A directional detection can be realized accordingly with the channels 3 and 4.
Subject to technical modifications
Loop_install_BE_22
© Weiss-Electronic GmbH
Tel.: +49 (0) 6 51 / 8 10 02 – 0
17/20
Loop Installation
10.2 Laying of the Loop with Directional Logic
Both loops of a directional detection must be close enough to each other so that every
vehicle to be detected attenuates both loops. In this case the loops can also be laid in an
interlocking way.
0.5
0.5
travel direction
0.5
travel direction
a
0.5 < a < half the minimum vehicle length
All dimensions in meters
11 Notes on Overvoltage Protection
We recommend protecting the loop feeds for overvoltages in close proximity to the rack.
Since the induction loops may be strained neither induction-wise nor capacity-wise, here
only gas release lines can be used. For this we recommend the Weiss-Electronic loop
connector panel FP_V1_2. One loop connector panel per 4-channel detector will be
required.
Subject to technical modifications
Loop_install_BE_22
© Weiss-Electronic GmbH
Tel.: +49 (0) 6 51 / 8 10 02 – 0
18/20
Loop Installation
12 Notes on the Loop Wire
The requirements for the loop wire are primarily determined by mechanical and thermal
exposures which especially have influence on the insulation. Furthermore, influences
caused by weather (humidity) and resistance against chemicals and solvents (oil, fuel,
road salt etc.) must be observed.
The mechanical exposure results from the bends caused by the loop corners. Therefore
the minimum bending radius of the loop wire used must be observed. Also deformations of
the loop cuts, especially in the traffic light area (hard breaking and acceleration of the
vehicles), must be considered. Because of this there are high requirements for the
mechanic stability of the loop wire insulation (abrasion and tensile strength). Choosing an
insulation material as thick as possible is advantageous.
The thermal requirements are especially high when hot casting compounds are being used
(Tmax approx. 250°C). When using cold casting compounds, the thermal requirement for
the loop wire is predetermined by the temperature range of the loops (e.g.: -25°C to +75°C
according to TLS1 BASt2).
The insulation of the loop wire must be resistant against water absorption (deterioration of
the loop’s insulation resistance with wetness) and change of characteristics caused by
chemical reactions (e.g. with the casting compound or the road paving).
The electric characteristic (ohmic resistance) is predetermined by the wire’s material and
cross-section. A flexible tinned Cu stranded wire with a cross-section of at least 1.5 mm2
must be used.
Stranded wires with an insulation based on PTFE-basis (brand names: Teflon, Polyflon,
Dyneon, DIN-VDE label “5Y”) have proved themselves as loop wire. This kind of insulation
material fulfils the thermal requirements for hot casting (up to 260°C), is solvent resistant,
weatherproof, has a low water absorption (long-time stable insulation resistance) as well
as a high abrasion and tension strength. The thickness of the insulation material should
also not be lower than 1 mm. For further improvement of the mechanical characteristics,
the stranded wires can be obtained with glass-fibre (no metal!) sheathing.
Insulations made of PVC, PE (< 120°C) and generally of silicon (Si, high water absorption
and low abrasion strength) are not suited, especially for hot casting.
The TLS, BAST recommends the following cable type: TE-CU VS AWG 14EE
Weiss-Electronic offers a Teflon-insulated loop wire with glass-fibre sheathing labeled
“SK”.
1
2
TLS: Technical terms of delivery of road stations
(German) federal office for road constitution
Subject to technical modifications
Loop_install_BE_22
© Weiss-Electronic GmbH
Tel.: +49 (0) 6 51 / 8 10 02 – 0
19/20
Loop Installation
Thank you for choosing a Weiss-Electronic GmbH quality product.
We are glad to provide you with a product which combines a safe operating performance
with the best possible usability.
Subject to technical modifications
Loop_install_BE_22
© Weiss-Electronic GmbH
Tel.: +49 (0) 6 51 / 8 10 02 – 0
20/20