1
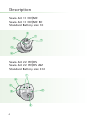
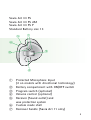
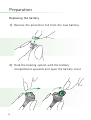
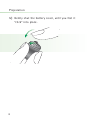
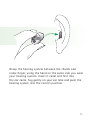
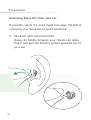
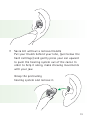
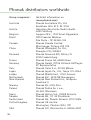
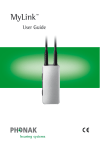
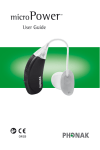
Savia
Art
™
User Guide
0459
Contents
Welcome
3
Description
4
Preparation
Replacing the battery
Inserting Savia Art in your ear
Removing Savia Art from your ear
Fine tuning your Savia Art hearing system
6
6
10
12
14
Operation
Switching ON/OFF
Controlling the volume (optional)
Selecting a hearing program
Telecoil (optional)
EasyPhoneplus (optional)
Remote controls (optional)
Wireless Systems – MyLink (optional)
15
15
17
19
20
21
24
28
Maintenance
Important points
32
32
Warning
34
Service and Warranty
35
Phonak distributors worldwide
36
Welcome
Your new Savia Art hearing system uses the very latest
advances in digital hearing technology. Savia Art
offers you – fully automatic – the highest sound quality,
speech understanding and listening comfort in all
your hearing situations. High-tech has turned highly
sophisticated hearing systems into convenient devices
that are easy to use.
Please read this manual carefully to benefit from all
the features of your new Savia Art hearing system. Ask
your hearing care professional if you have any questions.
Savia Art is a quality product developed by the Swiss
company Phonak, a world leader in hearing technology,
innovation and reliability. With proper care and usage,
your Savia Art hearing system will support your hearing
and understanding for many years.
If you want additional information about Savia Art,
please visit the Phonak website www.phonak.com.
Phonak – Your partner for good hearing!
3
Description
Savia Art 11 CIC/MC
Savia Art 11 CIC/MC RC
Standard Battery size 10
햴
햲
햳
햸
햶
햷
Savia Art 22 ITC/HS
Savia Art 22 ITC/HS dSZ
Standard Battery size 312
햲
햷
햶
햳
햴
햵
4
Savia Art 33 FS
Savia Art 33 FS dSZ
Savia Art 33 FS P
Standard Battery size 13
햶
햲
햷
햳
햴
햵
햲
햳
햴
햵
햶
햷
햸
Protected Microphone Input
(2 on models with directional technology)
Battery compartment with ON/OFF switch
Program switch (optional)
Volume control (optional)
Receiver (Sound outlet) and
wax protection system
Custom made shell
Removal handle (Savia Art 11 only)
5
Preparation
Replacing the battery
1) Remove the protective foil from the new battery.
2) Hold the hearing system with the battery
compartment upwards and open the battery cover.
6
3) Remove the old battery.
4) Insert the new battery. Please ensure that the “+”
sign on the battery (flat side) is on the same side as
the “+” sign on the battery cover.
7
Preparation
5) Gently shut the battery cover, until you feel it
“click” into place.
8
Replacing the battery
!
!
!
!
Handle the battery cover gently and do not use
excessive force.
Do not try to open the cover further than shown
on the drawing.
If there is any resistance when closing the cover,
ensure that the battery is correctly inserted.
The cover will not close if the battery is inserted
upside down.
When your hearing system is not in use, leave the
battery compartments open to allow any moisture
to evaporate.
Low battery warning:
An acoustic signal gives you an early warning that the
battery is approaching exhaustion. You have usually
at least 30 minutes to replace the battery. With very high
quality batteries, this reserve may be higher and
the hearing system will repeat the low battery warning
approximately every 30 minutes.
9
Preparation
Inserting Savia Art in your ear
If possible, select the mute mode (see page 19) before
insertion to avoid whistling.
Alternatively, your hearing care professional may
have activated a delayed activation timer. This function
delays the activation of the hearing system
(for 9 or 15 seconds) after the battery door was closed.
Before insertion, please ensure that you are using the
proper left and right hearing systems. Your hearing
systems are identified as follows:
Blue = left hearing system
Red = right hearing system
10
Grasp the hearing system between the thumb and
index finger, using the hand on the same side you wear
your hearing system. Insert it canal end first into
the ear canal. Tug gently on your ear lobe and push the
hearing system into the correct position.
11
Preparation
Removing Savia Art from your ear
If possible, select the mute mode (see page 19) before
removing your Savia Art to avoid whistling.
• Savia Art with removal handle
Grasp the handle between your thumb and index
finger and pull the hearing system upwards out of
your ear.
12
• Savia Art without a removal handle
Put your thumb behind your lobe, (just below the
hard cartilage) and gently press your ear upward
to push the hearing system out of the canal. In
order to help it along, make chewing movements
with your jaw.
Grasp the protruding
hearing system and remove it.
13
Preparation
Fine tuning based on your personal preferences
The fitting process has limited capabilities of reproducing
the full spectrum of your personal sound environments.
This limitation is now overcome by the ability of Savia
Art hearing system to learn from your real life volume
adjustments. Savia Art hearing system offers a unique
functionality called “Self Learning”. In every environment,
it logs your personal volume changes within the hearing
instrument. This means that every time you change the
volume of your Savia Art hearing system, this correction
is taken into account to apply your preferred volume
automatically when you are in a similar environment next
time.
Self Learning cleverly ensures that your volume
corrections in each environment contribute to a fully
personalized volume setting.
14
Operation
Switching ON/OFF
Switching ON:
The hearing system is switched ON
when the battery cover is closed.
Switching OFF:
To switch the hearing system OFF,
open the battery cover.
15
Operation
When switched ON, your Savia Art hearing system is
automatically set at the preset gain and in your default
hearing program.
Your hearing care professional may have delayed the
activation of your Savia Art hearing system after
switching ON (9 or 15 seconds), in order to avoid any
disturbance while placing it in your ear. The activation
is confirmed by an acoustic signal.
Note:
The mute mode may be used as manual or remote
controlled ON/OFF function, allowing you to switch your
hearing system OFF for a short period of time (i.e. while
inserting or removing the instrument, short breaks etc.).
Please be aware that the mute mode still consumes
some energy from the battery.
16
Controlling the volume (optional)
left
right
up
up
down
down
Preset volume:
Automatically set when hearing system is switched
ON.
To increase volume:
turn the volume control forwards.
To reduce volume:
turn the volume control backwards.
17
Operation
Notes:
• A single beep indicates the default volume setting.
A double beep indicates that you have reached the
limit of your volume control range.
• Phonak’s remote controls (see page 24) can also
control the volume of all Savia Art ITEs that are
remote-controllable, including the models without
manual volume control.
18
Selecting a hearing program
Automatic program selection
The program selection in Savia Art is fully automatic
(mode A). This sophisticated hearing system is able to
recognize different hearing environments and
to automatically select the most appropriate hearing
program.
Program switch (optional)
The program switch allows toggling between the
“Automatic Mode” and the “Mute Mode”. A short melody
confirms the selection of the “Automatic Mode”.
19
Operation
Enhanced program selection:
Upon request, your hearing care professional can
program for you additional individual hearing programs
dedicated to specific hearing situations. Additional
programs are available via remote control (see page 24)
and/or with the optional program switch.
Important:
Ask your hearing care professional to print out the
complete description of your individual hearing
programs and how to access them with your remote
control and/or your program switch.
Telecoil (T-coil) (optional)
Your hearing care professional may have activated
a T-coil in your Savia Art hearing systems. The
programs with T-coil are used to listen to telephones
that are compatible with hearing system or via
inductive loop systems (present in some school settings,
theaters, churches etc.) as well as other wireless
solutions (e.g. Phonak MyLink FM system).
20
EasyPhoneplus (optional)
The EasyPhoneplus function enables your Savia Art
hearing system to automatically select your telephone
program when the telephone handset is held close to
your ear. An acoustic signal confirms the switching.
It automatically returns to the previous hearing program
when the telephone handset is removed from your ear.
Some telephones produce a magnetic field strong enough
to activate your EasyPhoneplus function. Other types of
telephones require an additional magnet fixed on the
receiver to activate this function.
21
Operation
Fixing the EasyPhoneplus magnet
Clean the telephone handset
thoroughly.
Hold the telephone handset
nearly vertically, similarly to
making a telephone call.
Hold the magnet near to the
“listening end” of your
telephone handset and release
it. The magnet will
automatically flip to the
correct side at the right
location.
Use the double sided adhesive
tape to stick the magnet to
the location described before.
Do not cover the sound
openings of your handset.
Make sure the magnet is safely
fixed to the “listening end”
of the telephone handset.
22
Use of EasyPhoneplus
Use the telephone in a normal manner. At the beginning,
you may need to move it slightly to find the optimum
position for a reliable switching and comfortable
hearing.
If necessary, move the magnet to another position on
the handset to increase your comfort of use.
!
!
!
Keep magnets out of reach of children and pets.
If a magnet is swallowed, please seek the advice
of a medical practitioner.
The magnet used to strengthen the magnetic field
of your phone may affect some medical devices or
electronic systems.
Always keep the magnet (or the telephone equipped
with the magnet) at least 30 cm (12”) away from
pacemakers, credit cards, floppy disks or other
magnetically sensitive devices.
Too high distortions during dialing or phoning
may mean that the phone receiver is stressed by
the magnet. To avoid any damage, please move
the magnet to another place on the telephone
receiver.
23
Operation
Remote controls (optional)
Remote controls from Phonak allow a discrete and
convenient control of all the functions of your
Savia Art hearing system:
• Volume up and down
• Program selection
• Automatic mode selection
If you wear two hearing systems, the remote control
will simultaneously control both hearing systems.
This ensures that their volume remains binaurally
balanced.
Phonak offers a complete range of remote controls. Ask
your hearing care professional to demonstrate them
to you and choose the model most convenient for your
lifestyle and your taste.
24
WatchPilot2: exclusive and modern, available for
women and men, with sporty rubber band or elegant
metal band.
SoundPilot2: the most user-friendly access to all
functions of your Savia Art hearing systems.
25
Operation
KeyPilot2: small, easy, convenient.
For detailed information on the use of your remote
control, please refer to its user guide. Your hearing care
professional can also print an individual description
of your hearing programs for you.
26
For best results with your KeyPilot or WatchPilot
remote control, refer to photo.
!
Do not use your remote control in locations
where it is forbidden to use electronic devices, for
instance in airplanes.
27
Wireless Systems –
MyLink (optional)
Your Savia Art hearing system allows you to fully
benefit from the Wireless Systems from Phonak.
Wireless Systems greatly improve communication when
noise, distance or reverberation is a problem. A Wireless
System consists of a transmitter (e.g. SmartLink SX or
EasyLink) and a receiver (MyLink). The transmitter is
placed near the sound source. It may also be directly
connected to your TV set, radio or telephone or linked
via Bluetooth to your mobile phone. The signal is
transmitted wirelessly via the MyLink receiver to the
T-coil of your Savia Art hearing system.
The MyLink receiver
can be worn over
or under your clothes.
28
Using MyLink
1) Wear MyLink around your neck
2) Switch MyLink ON
3) Switch the transmitter
ON (e.g. SmartLink SX)
by holding it in front
of you, from a distance
of 20-30 cm (8-12 inches).
29
Wireless Systems – MyLink (optional)
The transmitter automatically selects the telecoil and
microphone program of your Savia Art so you can
hear the voice picked up by the transmitter and the
voice picked up by the hearing system’s microphone.
4) Your Wireless System is now ready to operate.
To increase / decrease the volume of the wireless
signal, use the MyLink volume control.
Volume up
30
Volume down
For SmartLink users: To increase/decrease the volume
of the Savia Art system, press here:
Please consult the SmartLink SX or EasyLink User
Guide to fully benefit from your Wireless System in all
the different use cases.
5) Switch
MyLink OFF
31
Maintenance
Important points
1) Always use new batteries as replacements. You
can return empty batteries to your hearing care
professional.
2) When your hearing system is not in use, leave the
battery compartment open to allow any moisture
to evaporate.
3) If you will not be using your hearing systems for
a long period of time, store them in their protective
case. Remove the batteries and leave the battery
compartments open. Make sure your hearing systems
are completely dry before closing the case.
4) Protect your hearing systems from excessive moisture
and heat. Always remove your hearing systems
before showering, bathing or swimming. Do not leave
instruments near windows or in a car. Avoid strong
jolts and vibration.
5) Daily cleaning and the use of a drying system is
highly recommended. CleanLine from Phonak is a
complete set of cleansing products. Your hearing care
professional will be glad to advise you. Never use
household cleaning products (washing powder, soap,
etc.) to clean your hearing systems.
32
6) Hair spray, face creams and make-up can damage
hearing systems. Remove them before applying
cosmetics.
7) If you experience any soreness or inflammation
in your ear, contact your hearing care professional.
8) If your hearing system is performing weakly or fails
to operate, clean or replace the wax guard system.
If your hearing system fails to operate after you have
correctly cleaned or replaced your wax protection
system and inserted new batteries, contact your
hearing care professional for advice. Please remember
to bring your remote control, if you use one, together
with your hearing system(s) for service enquiries.
The symbol with the crossed out disposal bin
indicates that this hearing instrument shall not
be treated as household waste. Please hand
over your old or unused hearing instrument to
the applicable collection point for the recycling
of electrical and electronic equipment or bring
your old hearing instrument to your hearing care
professional for appropriate disposal.
By ensuring this product is disposed of correctly,
you will help prevent potential negative effects
on the environment and human health.
33
Warning
!
Hearing systems batteries are toxic when swallowed!
Keep them out of reach of children and pets. If
batteries are swallowed, please seek the advice of
a medical practitioner!
!
Use only hearing systems that have been specially
programmed for you by a hearing care professional.
Other instruments may be ineffective and may, in
certain cases, even damage your hearing.
!
X-ray radiation (e.g. CT scans, MRI scans) may
adversely affect the correct functioning of your
instruments. We recommend that you remove them
before undergoing X-ray procedures and keep them
outside the room.
!
Hearing systems in directional microphone mode
(dSZ) reduce mainly background sounds. Warning
signals coming from behind and vehicles’ horns
approaching from behind are partially or completely
suppressed.
34
Service and Warranty
Phonak offers you a comprehensive global warranty
which becomes effective on the date of purchase. Please
ask your hearing care professional about the details and
duration. This warranty covers any repairs due to defects
in material and/or workmanship. The warranty does not
cover damage from improper handling or care, exposure
to chemicals, immersion in water or undue stress.
Damage caused by third parties or non-authorized service
centers renders the Phonak warranty null and void. This
warranty does not include any services performed by
a hearing care professional in their office. This warranty
applies to the Phonak products listed below:
Serial number – right:
Serial number – left:
Date of purchase:
35
Phonak distributors worldwide
Group companies:
Australia
Austria
Belgium
Brazil
Canada
China
Denmark
France
Germany
Italy
Japan
Jordan
Netherlands
New Zealand
Norway
Poland
Spain
Sweden
Switzerland
United Kingdom
USA
36
(detailed information on
www.phonak.com)
Phonak Australasia Pty. Ltd.
Baulkham Hills N. S. W. 2153
Hansaton Akustische Geräte GmbH
5020 Salzburg
Lapperre N.V., 1702 Groot-Bijgaarden
CAS Produtos Médicos
São Paulo – SP 04363-100
Phonak Canada Limited
Mississauga, Ontario L5S 1V9
Phonak (Shanghai) Co. Ltd.,
Shanghai City 200233
Phonak Danmark A/S, Nitivej 10
2000 Frederiksberg
Phonak France SA, 69500 Bron
Phonak GmbH, 70736 Fellbach-Oeffingen
EC Representative
Phonak Italia S.r.l., 20159 Milano
Phonak Japan Co., Ltd., Tokyo 101-0044
Phonak Middle East, 11181 Amman
Phonak B.V., 3439 ME Nieuwegein
Phonak New Zealand Ltd., Takapuna
Auckland 9
Phonak AS, 0105 Oslo
Phonak Polska Sp. z o.o.,
00-567 Warszawa
Phonak Ibérica S.A., 03008 Alicante
Phonak AB, 117 43 Stockholm
Phonak AG, Phonak Schweiz, 8712 Stäfa
Phonak UK Limited
Warrington, Cheshire WA1 1PP
Phonak LLC, Warrenville, IL 60555-3927
Independent
general distributors:
Manufacturer:
A complete list of Phonak distributors
is available at Phonak's Internet site:
www.phonak.com. Please visit us or
ask your hearing care professional for
information.
Phonak AG, Laubisrütistrasse 28
CH-8712 Stäfa, Switzerland
The CE symbol is confirmation by Phonak AG that
Savia Art products and accessories meet the
requirements of directive 93/42/EEC on medical
devices.
This symbol indicates that Savia Art products comply
with requirements for a BF type applied part according
to EN 60601-1.
Safety notice External devices may only be connected if they have
been tested in accordance with corresponding
IECXXXXX standards. Only use accessories approved by
Phonak AG.
Operating
conditions
The hearing system has been designed for trouble-free
operation under all ordinary climatic conditions.
Transportation Temperature should not exceed limits of –20° / 60°
and storage Celsius at a relative air humidity of 65% for extended
conditions
periods during transportation and storage. Air pressure
between 500 and 1100 hPa is not detrimental to the
instrument.
38
0459
39
www.phonak.com
029-0017-02/V1.01/2006-10/FO Printed in Switzerland © Phonak AG All rights reserved
Your hearing care professional: