1
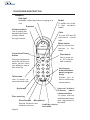
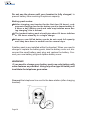
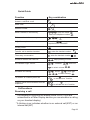
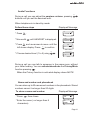
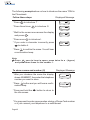
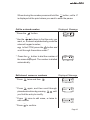
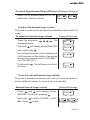
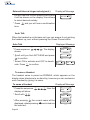
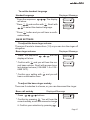
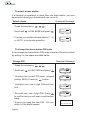
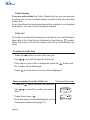
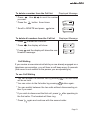
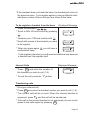
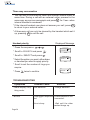
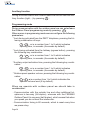
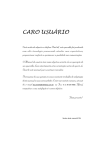
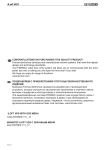
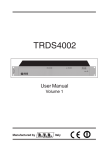
NOTE:
WHEN YOU PURCHASE YOUR FERMAX DECT
TELEPHONE, SPANISH IS DEFAULT LANGUAGE.
TO SET ENGLISH AS HANDSET LANGUAGE
FOLLOW STEPS DESCRIBED ON PAGE 47.
FERMAX DECT DIGITAL TELEPHONE USERS MANUAL REF. 1100
This technical document is edited by FERMAX ELECTRONICA, S.A.E for informative
purposes, and the right to modify technical characteristics at any time and without
previous warning is reserved. These changes would be applied to later editions
of the same.
ENGLISH
Page 30
FERMAX DECT DIGITAL TELEPHONE
USER’S MANUAL
TELEPHONE DESCRIPTION ................................................................ 32
Handset ................................................................................................. 32
Display and icons .................................................................................. 33
Base ...................................................................................................... 34
TELEPHONE INSTALLATION ................................................................ 34
Setting up ............................................................................................... 35
USING THE TELEPHONE ..................................................................... 37
Menu structure ....................................................................................... 37
To switch on the handset ...................................................................... 38
Quick Guide ........................................................................................... 39
Call functions ......................................................................................... 39
Audio Functions ..................................................................................... 41
Phonebook ............................................................................................ 41
Handsets Search .................................................................................. 44
HANDSET SETTINGS ........................................................................... 44
To adjust the handset ringer volume .................................................... 45
To set the external/internal ringer melody ............................................. 45
Auto Talk ................................................................................................ 46
Language selection .............................................................................. 47
BASE SETTINGS ................................................................................... 47
To adjust the base ringer volume ......................................................... 47
To adjust the base ringer melody ......................................................... 47
To select a base station ........................................................................ 48
To change the base station PIN code ................................................... 48
Reset the handset to their original factory settings .............................. 49
NETWORK SERVICES .......................................................................... 49
Caller identification ................................................................................ 49
Calls list ................................................................................................. 50
Waiting call ............................................................................................ 51
USING ADDITIONAL HANDSETS AND BASES ..................................... 52
To register additional handsets ............................................................ 52
TROUBLESHOOTING ........................................................................... 54
FUNCTIONS WITH THE FERMAX ENTRY SYSTEM ............................. 55
Page 31
TELEPHONE DESCRIPTION
Handset
Red light
Indicates either the phone is ringing or in
use
Earpiece
Volume buttons
Use to adjust the
handset and base
volume. Move
through menus.
Redial
To redial one of the
5 last numbers
called
Calls
Digi
t
al
Cl
a
y
rit
To view the last 20
calls/most recent
calls.
Menu button
Use to access the
options in the
menu.
FERMAX
Correction/Privacy
button
Secrecy
Menu
Redial
Use to store up
to 50 names
and numbers.
Volume
During a call press to
mute the call so your
caller cannot hear
you talking to someone close by.
Calls
ABC
2
1
DEF
3
JKL
GH
MN
6
TU
PQ
WX
8
9
YZ
RS
V
7
O
5
I
4
0
Talk button
Conf
R
Use to make, receive and end calls.
Int.
Door opening
Microphone
Special functions and
network services.
Page 32
Conference
button/Outdoor
panel programming
Allows you to
hold a three-way
conversation.
Internal button/
Outdoor panel
communication
Keyboard
Recall button
Phonebook
Auxiliary device
activation
To make internal
calls between handsets registered to
the base.
Display and icons
EXT
INT
HS1
Icons line
Idle screen
Displays the number of the
handset at all the times
Every one of the running operations is associated to a symbol called
icon. Icons meaning depends on their state whether it is fixed or
blinking:
ICON
EXT
INT
STEADY
FLASHING
External line in use
Incoming call
Internal call
Internal call from another
handset
New call in calls list
EXT
INT
3 way conversation in
progress
Battery exhausted
Battery weak
Battery half-full
Battery full
Phonebook
Menu in use
Handset linked to base Handset out of range for
station
base station
Page 33
Base
Contact
points
FERMAX
Page button
Power / In use
light
Charging light
TELEPHONE INSTALLATION
The FERMAX KIT you have acquired is supplied with the following
elements:
Digi
t
al
Cl
a
y
rit
FERMAX
FERMAX
Secrecy
Menu
Redial
Volume
Calls
ABC
2
1
DEF
3
JKL
GH
MN
6
TU
PQ
WX
8
9
YZ
RS
V
7
O
5
I
4
0
Conf
R
Int.
Handset
Page 34
Base
Power adapter
MANU
AL DE
USUA
RIO
FONO
DECT
TELÉ
Phone cable
Battery
User manual
Setting up
Place your DECT FERMAX within 2m of the power and phone sockets, otherwise extension cables will be required.
Make sure the base is at least 1m away from other electrical devices to avoid interference.
Do not place it in the bathroom or other humid areas.
Connect the power supply adapter to the base as shown at figure
below and plug the power supply cable into the mains power
socket.The green Power / In Use light comes on.
Charge the handset battery pack for at least 16 hours. Place the
handset on the base station. The red charging light will come on.
Once the handset is fully charged the display shows the full battery
icon.
Page 35
Do not use the phone until your handset is fully charged, to
prevent battery from reaching its optimum capacity.
Battery pack notes:
√
After charging your handset for the first time (16 hours), subsequent charging time for the battery pack is approximately 68 hours a day. Battery pack and case may become warm during charging, this is normal.
√
The handset battery pack should give about 12 hours talktime
or 150 hours stand-by in a single charge.
√
However, new NiCad battery packs do not reach full capacity
until they have been in normal use for several days.
A battery pack is pre-installed within the handset. When you need to
change or replace the battery pack, take the battery cover out, disconnect the small battery pack plug and replace the battery. Connect your new battery plug and replace battery cover.
WARNING!!
If you need to change your battery pack use only battery with
same features as provided. Using any other type of battery will
invalidate the telephone guarantee.
Connect the telephone line cord to the base station (after charging
handset)
Page 36
Note that telephone line and main supply power must be always
connected.
USING THE TELEPHONE
Menu structure
PHONEBK
Phonebook
menus
ADD
Add entry
DELETE
Delete entry
MODIFY
Modify entry
SETUP
Phone setup
BASE VOL
Base volume adjust
VOLUME 1...5
Volume Level
BASE MEL
Base melody
MELODY 1...5
Select melody
SEL BASE
Select base
VOL OFF
Disconnect volume
BASE 1...4
AUTO
Automatic selection
DEL HS
Delete handset
PIN?
Introduce PIN
PIN CODE
Change PIN code
PIN?
Introduce PIN
PRIORITY
Priority List
ON
Activated
HANDSET 1...5
Select handset
PIN?
Introduce PIN
RETYPE
Confirm PIN
OFF
Deactivated
SELECT
BASE ...
HANDSET 1...5
DIAL MODE
TONE
PULSE
RECALL
Modo de marcación
RECALL 1
RECALL 2
PABX
PABX functions
DEFAULT
Returns to handset
and base default
configuration
PBX1
PIN?
Introduce PIN
PBX2
PIN?
Introduce PIN
PAUSE
Pause configuration
3 SEC
3 seconds
5 SEC
5 seconds
PIN?
Introduce PIN
Page 37
HANDSET
Handset configuration
BEEP
Beeps config.
RING VOL
Call volume adjust
KEYTONE
Keypad sounds
ON or OFF
Activate/Deactivate
LOW BATT
Low battery
OUT RANGE
Out of range
ON or OFF
Activate/Deactivate
ON or OFF
Activate/Deactivate
VOLUME 1...5
Volume level
VOLUME OFF
Volume off
EAR VOL
Ear volume adjust
EAR VOL 1...5
Volume level
INT MEL
Internal call melody
MELODY 1...5
Select melody
EXT MEL
Ext. call melody
MELODY 1...5
Select melody
AUTO ANS
Auto answer
ON
Activate
OFF
Deactivate
NAME
Display message
LANGUAGE
Language selection
.
.
Up to 11 languages
avalaible
.
.
REGISTER
Add new handset
BASE 1...5
Select base
PIN?
Introduce PIN
The previous diagram show us the menus structure. Press
enter the menus and to confirm your selection.
Menu
Redial
to
buttons.
To scroll through the menus you can use
If you make a mistake you can return to the previous menu heading
by pressing the
button. If you press and hold
at any time
you will return to the idle screen. After 30 seconds if no buttons are
pressed the handset will automatically return to idle screen.
Calls
To switch on the handset
To switch the handset on and off
* Press and hold the R button to switch the handset off.
*To switch the handset on press and hold the R button again.
* To switch off the base station, remove the plug from power socket.
Page 38
Quick Guide
Function
Key combination
Answer a call/End a call.
Make a call
Redial a number
Store a number in the memory
Redial
Menu
Menu
Menu
enter the name
enter the telephone number
Menu
Menu
Redial
Dial a number in the memory
Calls
Adjust the earpiece volume
Redial
Press the
during a call until the
required level is reached
Calls
Privacy on/off
Transfer call to another handset
Three-way conversation
Access to Redial and Calls list
Int.
Int.
enter the handset number
enter the handset number
Int.
keep pressing to scroll
Redial
Calls
Set handset ringer volume
Menu
Calls
Menu
Set base unit melody
To answer an outdoor panel call
Outdoor panel communication from the
telephone
Menu
Calls
RING VOL
Redial
to select volume
Menu
Menu
HANDSET
Calls
,
SETUP
Redial
Calls
Calls
Menu
Calls
BASE MEL
to select melody
Menu
and then
* to open the door
or 5 to activate aux. function.
to open the door
Int. and then
JKL
ABC
2
JKL
*
or 5 to activate the aux. function.
Call functions
Receiving a call
* The telephone rings and the display show CALL (If you are
subscribed to a Caller Display service you can see who is calling
on your handset display)
* A blinking icon indicates whether is an external call(EXT) or an
internal call(INT)
Page 39
* To answer a call press
button or if handset is on the base,
simply pick it up and speak.
To make an external call
Normal dialling
* Press
Displayed Message
and white dial tone.
EXT
* Enter the number you want.
Preparatory dialling
Displayed Message
* Enter the number to be dialled and press
the
00340000000
button to dial.
* If you make a mistake, press the
to remove the incorrect digit.
* To finish a call press
base.
button
again or place the handset back on the
* The handset display shows automatically the call lenght during
your call and also for a few seconds after it is complete.
Redial
You can redial up to 5 of the last numbers called. They are stored in
the redial list. If you have stored a name associated to a number in
the phonebook, the name will be displayed instead.
Follow these steps
to enter the redial list. Hold the
* Press
button pressed until you view the next
number, in order of most recent first.
Displayed Message
Redial
* Press the
button. The number is dialled
automatically.
Page 40
00340000000
Audio Functions
During a call you can adjust the earpiece volume, pressing
buttons until you set the dessired level.
Redial
Calls
When telephone is in stand-by mode:
Follow these steps
* Press
Menu
.
* Move with
* Press
Menu
Displayed Message
PHONEBK
Calls
until HANDSET is displayed.
HANDSET
and use arrows to move until the
left shown display. Press
Menu
EAR VOL
to confirm.
* Choose desired level (1 to 5) using
Redial
Calls
.
EAR VOL 1...5
During a call you can talk to someone in the same room, without
your caller hearing. You can activate/deactivate the Privacy/Mute
function pressing
.
When the Privacy function is activated display shows MUTE.
Name and number and phonebook
You can store up to 50 names and numbers in the phonebook. Stored
numbers cannot be longer than 20 digits.
To store a name and number
* Press
Menu
three times.
* Enter the name ( no longer than 8
characters).
Displayed Message
ADD
NAME?
Page 41
The following example show us how to introduce the name TONI in
the Phonebook:
Follow these steps
TU
8
V
* Press
Displayed Message
to introduce T .
MN
6
O
* Press three times
to introduce O.
* Wait for the cursor move across the display
and press 6 .
MN
O
* Press once
GH
4
T_
TO_
TON_
to introduce I.
* If you enter a character incorrectly press
to delete it.
TONI_
Menu
* Press
to confirm the name. You will hear
a confirmation beep.
Note:
Press 1 once to insert a space, press twice for a - (hypen)
and press three times for the number 1.
√
To store a name and number (II)
* After you introduce the name the display
shows NUMBER? then enter the telephone
number you want to store.
Displayed Message
NUMBER?
Menu
* Press
button and you will hear a confirmation beep.
* Press and hold the
the idle screen.
00000000
button to return to
* You may want to enter a pause when storing a Phone Card number
or if you connect your telephone to a switchboard.
Page 42
When storing the number press and hold the
button, until a P
is displayed at the point where you want to enter the pause.
Redial
Call to a stored number
* Press the
Displayed Message
button.
NAME
Redial
buttons to find the entry you
* Use the
want, or, to search alphabetically press the
relevant keypad number;
Calls
e.g. to find TONI, press the 8 button and
scroll through the entries under T
V
TU
* Press the
button to dial the number of
the name displayed. The number is dialled
automatically.
Edit stored names or numbers
* Press
Menu
* Press
Menu
twice and then
Redial
Displayed Message
.
MODIFY
again, and then scroll through
phonebook entries by pressing
you find the entry to modify.
TONI
Redial
Calls
ENTRY
until
Menu
* Press
once to edit name, or twice to
edit number.
* Press
Menu
NUMBER?
to confirm.
Page 43
Delete a entry
Display Message
* Press the sequence
cede to names list.
Menu
Menu
Menu
Calls
to ac-
DELETE?
* Use arrows to find the entry you are going
to delete.
Menu
* Press
twice to delete the displayed entry. Then display will show:
CONFIRM?
Menu
* To confirm press
. To cancel and return
to the previous menu press
.
Handsets Search
You can alert handset users that they are wanted, or locate a
missing handset, with the Page function.
Paging Handsets
Display Message
* Start: press the PAGE button on the base.
The handset will ring and the display will
show:
INT oooo
* Stop: press again the PAGE button or any
key on the handset.
HANDSET SETTINGS
To switch keypad beeps ON and OFF
* Press
Menu
. Use arrow keys to scroll to
HANDSET and press the
Menu
button.
* The display will show BEEP; press twice
the
Page 44
Menu
Displayed Message
button.
HANDSET
BEEP
To switch keypad beeps ON and OFF(cont.) Displayed Message
* Select ON to activate beeps or OFF to
deactivate. Confirm to finish.
ON
OFF
To adjust the handset ringer volume
There are 5 volume levels and also the possibility of disconnect the
ringer.
To adjust the handset ringer volume
* Press the sequence
display will show:
* Scroll with
Menu
Menu
Calls
Calls
Displayed Message
. The
BEEP
until display shows RING VOL
Calls
and confirm with
Menu
RING VOL
.
* You will hear the current volume setting and
it will be shown on the display. Use arrows
to select the required volume (VOLUME 15 o VOLUME OFF).
Menu
* Confirm with
tion tone.
VOLUME 3
. You will hear a confirma-
RING VOL
To set the external/internal ringer melody
There are 5 melodies to choose from, and you have the option to
select a different melody for external and internal calls:
External/internal ringer melody
* Press
Menu
and
Calls
until display shows
HANDSET. Confirm by pressing
* Scroll with
MEL. Press
Calls
Menu
Displayed Message
Menu
HANDSET
.
to either INT MEL or EXT
button.
INT MEL
EXT MEL
Page 45
External/internal ringer melody(cont.)
Displayed Message
* You will hear the current melody setting and
it will be shown on the display. Use arrows
to select desired melody.
* Press
tone.
Menu
MELODY 1
and you will hear a confirmation
Auto Talk
When the handset is on the base unit you can answer it only picking
the handset up, and without pressing the Green Phone button.
Auto Talk
Displayed Message
Menu
* Press sequence
shows:
Menu
Calls
Calls
. The display
BEEP
* Scroll until you find AUTO ANS and press
Menu
AUTO ANS
to confirm.
* Select ON to activate and OFF to deactivate. Press
Menu
ON
OFF
to confirm.
To name a Handset
The handset name is preset as FERMAX, which appears on the
display when telephone is on stand-by, however you can customize
each handset by giving it a name.
To name a Handset
* Press the sequence
display will show:
* Scroll with
Redial
Redial
Displayed Message
Menu
Menu
Calls
Calls
; then the
.
BEEP
NAME
Menu
* After pressing
the current name will be
displayed; delete pressing
and introduce
the new text.
Page 46
FERMAX_
To set the handset language
Handset language
Displayed Message
* Press the sequence
will show:
* Press
Redial
Calls
Redial
Menu
Menu
Calls
Calls
.The display
Menu
and confirm with
HANDSET
. Scroll with
ENGLISH
to select the desired lenguage.
Menu
* Press
button and you will hear a confirmation beep.
BASE SETTINGS
To adjust the base ringer volume
There are 5 levels to choose from (1-5) or you can turn the ringer off
altogether.
Base ringer volume
Displayed Message
* Press the sequence
display will show:
Menu
Menu
Calls
and the
BASE VOL
Menu
* Confirm with
and you will hear the current base volume. Scroll with arrows to select desired volume (VOLUME 1-5 o VOLUME OFF).
* Confirm your setting with
hear a confirmation tone.
Menu
VOLUME 3
and you will
To adjust the base ringer melody
There are 5 melodies to choose, or you can dissconect the ringer.
Base call melody
* Press
Displayed Message
Menu
Menu
Calls
Calls
buttons.
BASE MEL
Menu
* Confirm by pressing
. You will hear the
current melody; scroll with arrows to change
it. Confirm your selection by pressing
Menu
.
Page 47
To select a base station
If a handset is registered to more than one base station, you can
select which base your handset will use (up to 4).
Select a base
Displayed Message
* Press the sequence
* Scroll with
.
Calls
Menu
Menu
Calls
.
to SEL BASE and press
Menu
* Choose your preferred base station (1..4)
or AUTO, to automatic selection.
SEL BASE
BASE 1 o
To change the base station PIN code
If you change the base station PIN, keep a record of the new number
by writing it in the space provided below.
Change PIN
Displayed Message
* Press the sequence
* Scroll with
.
Calls
Menu
Menu
Calls
.
to PIN CODE and press
Menu
* Introduce the current PIN code (original
setting 0000). Press the
Menu
. button.
* Introduce your new 4 digit PIN and confirm.
PIN CODE
PIN?
NEW PIN
Menu
* Re-enter your new 4 digit PIN. Press
to confirm and you will hear a confirmation
beep`.
* Ensure you keep the new PIN . You can
write it in the blank spaces.
Page 48
RETYPE
____
Reset the handset to their original factory settings
You can reset the telephone and change some parameters to the
original/default factory settings. After the RESET the display will go
blank. This will reset:
- Earpiece volume
:
- Handset & Base ringer volume :
- Handset & Base melody :
- PIN code:
- Handset name:
- Handset language:
- Buttons beeps:
- Battery low indicator beeps:
- Out of range warning beeps:
- Auto answer:
- Dialling mode:
- Phonebook:
- Redial List:
- Calls list:
3
3
1
0000
FERMAX
SPANISH
ON
ON
ON
ON
DTMF
DELETED
DELETED
DELETED
IMPORTANT!
When you RESET the telephone ALL the names and numbers
stored in the phonebook will be deleted.
Reset
* Press the sequence
Displayed Message
Menu
Menu
Calls
.
* Scroll to DEFAULT and press the
button.
* Enter the PIN code and press
Menu
Menu
DEFAULT
.
* The display will blink and you will hear a confirmation tone.
PIN?
NETWORK SERVICES
The functions detailed on the next paragraphs are provided by your
network operator. Ask your Customer Service for its availability and
details.
Page 49
Caller Display
If you are subscribed to a Caller Display Service you can see who
is calling you on your handset display, as well as the time and date
of their call.
If you have stored a name associated with a number in your handset
phonebook, the name will be displayed instead.
Calls List
The calls list contains the telephone numbers of your last 20 callers.
symbol.
New calls in the Calls List are indicated by the flashing
When the Calls List is full the oldest entry will be automatically deleted.
To enter the Calls List
* Press the
* Use
Redial
Calls
Calls
button to enter the Calls List.
to scroll through the Calls List.
* If the name of your caller is displayed, press the
the number will be displayed.
* Press
Menu
* Press the
Redial
Calls
Calls
Displayed Message
button to enter the CallsLlist.
to scroll to number you want to
* Press three times
Menu
.
* Enter the name as described before on the
Phonebook section (see page 41).
Page 50
button and
and the time of the call will be displayed.
Store a number from the Calls List
* Use
store.
Menu
ENTRADA
NAME
To delete a number from the Call list
* Press
. Use
you want.
Redial
Calls
* Press the
Menu
Calls
Displayed Message
to scroll to number
button three times.
* Scroll to DELETE and press
Menu
NAME
twice.
DELETE?
To delete all numbers from the Call list
* Press
Calls
* Press
Displayed Message
to enter the Calls list.
; the display will show:
DEL ALL
* Press
and the display will show the confirmation message:
EMPTY
Menu
Call Waiting
If you receive a new external call while you are already engaged on a
telephone conversation, you will hear a soft beep every 5 seconds
(this sound is not audible to the person you are speaking to).
To use Call Waiting
* You can answer the second call by pressing R . The first caller
will be on hold.
* You can return to the fist caller by pressing R button again .
* You can switch between the two calls without disconnecting either if you want.
* If you wish to disconnect the first call, press
the first caller. The handset will then ring.
* Press
after speaking to
again and continue with the second caller.
Page 51
USING ADDITIONAL HANDSETS AND BASES
Up to 5 terminals can be registered on your FERMAX DECT base
(adding handsets + outdoor panels). This allows you to make internal
calls between two handsets while other handset is making an external
call.
Each handset can be registered on up to 4 bases but not
simultaneously (see p.48).
Your DECT FERMAX handset supplied is pre-registered as handset
1 to its base (BASE 1).
√ Only devices full compatible with DECT and GAP standards can
symbol is blinkbe used. When display shows NOT SUB and
ing, the handset is not registered yet on the base. Follow the
process described on the next paragraphs to register it.
√ Although you can register up to 3 additional handsets, only
the FERMAX KIT Handset will be able to fully operate with
the outdoor panel.
To register additional handsets
At the base
* Press and hold PAGE button for at least 10 seconds, until you
hear the validation tone (two beeps), then release the button.
At the handset
* Press
Menu
Displayed Message
button to enter the menu.
* Scroll to REGISTER and press
Menu
REGISTER
.
* The display will show BS 1 2 3 4 (Flashing numbers indicate other bases where
handset is already registered). Enter the
base number where you want to register
the handset (FERMAX KIT Base is 1)
* Enter your 4 digit PIN and press
Menu
.
BS 1 2 3 4
SEARCH 1 2 3
4
* The telephone will try to locate the base, and when they both link,
the handset will be automatically selected and the conection icon
will be shown on the display.
Page 52
* If the handset does not locate the base, the handset will return to
the previous menu. Try to register again by using a different available base number. Ensure that you are closer to the base
To de-register a handset from the base
Menu
Displayed Message
Menu
* Press the sequence
.
* Scroll to DEL HS and confirm by pressing
Calls
Menu
DEL HS
.
Menu
* Introduce your PIN and confirm with
.
* Scroll with arrows to the handset you want
to de-register.
* When you press again
confirmation beep.
Menu
you will hear a
HANDSET 1-5
NOT SUB
To de-register a handset, you will need an additional one because
a handset can’t de-register itself.
Internal Calls
Displayed Message
* Press Int. and enter the number of
the handset you wish to call (1-5).
* To end the call, press the
INT
3
button.
Transferring calls
* During an external call:
* Press Int. and enter the handset number you want to call (1-5).
* The current cald will be on hold. When the internal handset is
answered, press
and the call will be transferred.
* If the call to the second handset is not answered you can revert/
speak to the caller again by pressing Int. .
Page 53
Three-way conversation
* You can talk to one external caller and another internal caller at
same time. During a call with an external caller, proceed in the
same way as previous paragraph and press # for 3 sec. when
internal handset is answered.
* If the internal handset user does not answer your call, press Int.
to return to your external caller.
* A three-way call can only be cleared by the handset which set it
up, pressing # to exit the call.
Handset priority
Displayed Message
Menu
* Press the sequence
Menu
Calls
* Scroll to PRIORITY and press
* Scroll to SELECT and press
.
Menu
Menu
.
.
* Select the option you want, either base
or handset you want to apply priority.
* Scroll to set the number of rings you
require.
* Press
Menu
PRIORITY
twice to confirm.
SELECT
RINGS2
TROUBLESHOOTING
Symptoms
Possible Cause
- Blank display / Any- - Low batteries
thing works
- No line
- Charge batteries
- Unplugged telephone -Check telephone line
line.
connection.
- Line is busy.
Page 54
Solution
- Wait until the other
handset hangs up.
Symptoms
Possible Cause
- Handset cannot link - Out of Range
up with the base sta- Low battery
tion
- You are using more
than 1 base
Solution
- Try to go closer to
base
- Charge battery
- Check that you are
connected to the correct base
- No ring tone on the - The ringer volume - Switch it on
handset
may be switched off
- Check
base is
plugged into the
phone socket
-Buzzing noise on my -The telephone may
radio, TV computer or interfer with other elechearing aid
trical equipment if they
are too close
- Try to move it away
FUNCTIONS WITH THE FERMAX ENTRY SYSTEM,
This telephone along with the FERMAX DECT Outdoor Panel
makes up the FERMAX DECT Entry System, offering a series of
additional functions:
Outdoor panel communication
If we wish to communicate with the FERMAX Outdoor Panel from
the FERMAX DECT Telephone without having received a call from
the panel, we press:
* Press 2 + Int.
If no key is pressed the communication will be cut off after 15
seconds, avoiding the system remaining activated if we make a call
accidentally.
Door opening
During a call or when we have established communication with outdoor panel, we can open the door if we press * .
Page 55
Auxiliary function
During a communication with outdoor panel we can activate the auxiliary function (light,...) by pressing 5 .
Programming mode
During communication with the outdoor panel we can enter/leave
the Outdoor Panel programming mode by pressing: # .
When we are in programming mode we can configure the following
parameters:
* Lock timing activated from the DECT telephone, pressing the following combination of keys :
1 + n , n is a number from 1 to 9 which indicates
opening time, in seconds (4 seconds by default).
* Lock timing activated from the hallway (egress button), pressing
the following key combination:
2 + n , n is a number from 1 to 9 which indicates
opening time, in seconds (4 seconds by default).
* Auxiliary output activation time, pressing the following key combination:
3 + n , n is a number from 1 to 9 which indicates
opening time, in seconds (4 seconds by default).
* Outdoor panel speaker volume, pressing the following key combination:
7 + n , n is a number from 1 to 5 which indicates the
speaker volume level (5 by default).
When we operate with outdoor panel we should take in
consideration:
- Communication with the outside line and other additional telephones is two-way (full-duplex), whereas with the FERMAX
Outdoor Panel it is one-way (half-duplex), which means that when
you speak you do not hear the interlocutor.
- Communication timing is 80 seconds, which is reset every time
we press a key.
Page 56
Page 57