1
Gigabit Color LCD HD
PoE IP Phone (4-Line)
VIP-6040PT
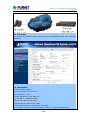
Gigabit Color LCD HD PoE IP Phone (4-Line)
VIP-6040PT
Copyright
Copyright (C) 2014 PLANET Technology Corp. All rights reserved.
The products and programs described in this User’s Manual are licensed products of PLANET
Technology, This User’s Manual contains proprietary information protected by copyright, and
this User’s Manual and all accompanying hardware, software, and documentation are
copyrighted.
No part of this User’s Manual may be copied, photocopied, reproduced, translated, or reduced
to any electronic medium or machine-readable form by any means by electronic or
mechanical including photocopying, recording, or information storage and retrieval systems,
for any purpose other than the purchaser's personal use, and without the prior written
permission of PLANET Technology.
Disclaimer
PLANET Technology does not warrant that the hardware will work properly in all environments
and applications, and makes no warranty and representation, either implied or expressed,
with respect to the quality, performance, merchantability, or fitness for a particular purpose.
PLANET has made every effort to ensure that this User’s Manual is accurate; PLANET
disclaims liability for any inaccuracies or omissions that may have occurred.
Information in this User’s Manual is subject to change without notice and does not represent
a commitment on the part of PLANET. PLANET assumes no responsibility for any inaccuracies
that may be contained in this User’s Manual. PLANET makes no commitment to update or
keep current the information in this User’s Manual, and reserves the right to make
improvements to this User’s Manual and/or to the products described in this User’s Manual, at
any time without notice.
If user finds information in this manual that is incorrect, misleading, or incomplete, we would
appreciate user comments and suggestions.
CE mark Warning
As this is a class B device, in a domestic environment, this product may cause radio
interference, in which case the user may be required to take adequate measures.
Energy Saving Note of the Device
This power required device does not support standby mode operation. For energy saving,
-2-
Gigabit Color LCD HD PoE IP Phone (4-Line)
VIP-6040PT
please remove the DC-plug or push the hardware Power Switch to OFF position to disconnect
the device from the power circuit.
Without removing the DC-plug or switching off the device, the device will still consume power
from the power circuit. In view of Saving the Energy and reducing the unnecessary power
consumption, it is strongly suggested to switch off or remove the DC-plug from the device if
this device is not intended to be active.
WEEE Warning
To avoid the potential effects on the environment and human health as a result of
the presence of hazardous substances in electrical and electronic equipment, end
users of electrical and electronic equipment should understand the meaning of the
crossed-out wheeled bin symbol. Do not dispose of WEEE as unsorted municipal
waste and have to collect such WEEE separately.
Trademarks
The PLANET logo is a trademark of PLANET Technology. This documentation may refer to
numerous hardware and software products by their trade names. In most, if not all cases,
their respective companies claim these designations as trademarks or registered trademarks.
Revision
User’s Manual of PLANET SIP PoE IP Phone
Model: VIP-6040PT
Rev: 1.0 (2014, July)
Part No. EM-VIP-6040PT_v1.0
-3-
Gigabit Color LCD HD PoE IP Phone (4-Line)
VIP-6040PT
Table of Contents
1
INTRODUCTION......................................................................................................................7
1.1
FEATURES .............................................................................................................................. 11
1.2
APPLICATION .........................................................................................................................13
1.3
PRODUCT SPECIFICATIONS ..................................................................................................13
1.4
PHYSICAL SPECIFICATIONS AND PACKAGING ......................................................................16
1.5
KEYPAD ..................................................................................................................................16
1.6
DEFAULT SETTING .................................................................................................................22
1.7
ICON PREVIEW ......................................................................................................................22
2
INITIAL CONNECTION AND LOGIN...........................................................................25
3
INITIALIZATION..................................................................................................................28
4
5
3.1
POWER ON THE VIP-6040PT.............................................................................................28
3.2
STATUS ..................................................................................................................................29
3.3
REGISTRATION ......................................................................................................................30
3.4
IDLE SCREEN .........................................................................................................................32
3.5
LED INSTRUCTION ...............................................................................................................33
3.5.1
Power Indicator LED ..............................................................................................33
3.5.2
Line LED:(Line or Memory Key set as Line)..................................................33
3.5.3
BLF or BLF List Key LED : (Line/Memory Key set as BLF).......................33
3.5.4
Shared Line Key LED : (Line/Memory Key set as Shared Line) ............34
3.5.5
Other Key LEDs........................................................................................................34
3.6
CALL TRANSFER INFO KEY INSTRUCTION ...........................................................................34
3.7
USER INTERFACE ..................................................................................................................36
BASIC SETTING CONFIGURATION.............................................................................38
4.1
WEB LOGIN ...........................................................................................................................38
4.2
ADMINISTRATOR PASSWORD ...............................................................................................39
4.3
BASIC NETWORK SETTING ...................................................................................................40
4.3.1
WAN Port ....................................................................................................................40
4.3.2
PC Port ........................................................................................................................42
4.4
DISPLAY MODE......................................................................................................................43
4.5
LANGUAGE .............................................................................................................................44
4.6
TIME AND DATE ....................................................................................................................46
4.7
RING TONE ............................................................................................................................49
4.8
FONT SIZE .............................................................................................................................52
4.9
VOLUME .................................................................................................................................54
4.10
WALLPAPER .......................................................................................................................55
4.11
SCREEN SAVER .................................................................................................................56
LED STATUS SETTING .......................................................................................................59
5.1
BACKLIGHT ............................................................................................................................59
-4-
Gigabit Color LCD HD PoE IP Phone (4-Line)
VIP-6040PT
6
7
8
5.2
CONTACT MANAGEMENT .......................................................................................................59
5.3
DIRECTORY ............................................................................................................................59
5.4
REMOTE PHONEBOOK ...........................................................................................................65
5.5
CALL HISTORY.......................................................................................................................65
5.6
LDAP PHONEBOOK ...............................................................................................................67
5.7
BROADSOFT PHONEBOOK ....................................................................................................69
5.8
CALL LOG ...............................................................................................................................70
OTHER FEATURE SETTINGS ...........................................................................................71
6.1
DIAL PLAN .............................................................................................................................71
6.2
EMERGENCY CALL .................................................................................................................72
6.3
LED STATUS SETTING..........................................................................................................73
6.4
ACTION URL .........................................................................................................................73
6.5
SOFTKEY LAYOUT ..................................................................................................................74
6.6
PROGRAMMABLE KEY ............................................................................................................75
6.7
EXT. KEY ................................................................................................................................76
BASIC CALL FEATURES.....................................................................................................77
7.1
PLACE A CALL ........................................................................................................................77
7.2
END A CALL ...........................................................................................................................77
7.3
REDIAL A CALL ......................................................................................................................78
7.4
RECEIVE A CALL ....................................................................................................................78
7.5
INCOMING CALL SHOW MODE .............................................................................................79
7.6
AUTO ANSWER ......................................................................................................................79
7.7
CALL HOLD ............................................................................................................................80
7.8
CALL TRANSFER ....................................................................................................................81
7.9
CALL CONFERENCE ...............................................................................................................82
7.10
CALL FORWARD.................................................................................................................83
7.11
CALL RETURN ....................................................................................................................87
7.12
HIDE CALLER ID...............................................................................................................88
7.13
REJECT ANONYMOUS ........................................................................................................88
7.14
CALL MUTE ........................................................................................................................90
7.15
DND ..................................................................................................................................91
7.16
KEY AS SEND ....................................................................................................................91
7.17
NO KEY ENTRY TIMEOUT .................................................................................................92
7.18
KEYPAD LOCK ....................................................................................................................93
7.19
HOT LINE...........................................................................................................................94
FUNCTION KEY FEATURES SETTINGS......................................................................96
8.1
LINE .......................................................................................................................................96
8.2
SPEED DIAL ...........................................................................................................................96
8.3
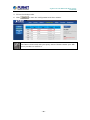
BLF ........................................................................................................................................97
8.4
BLF LIST ...............................................................................................................................99
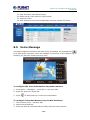
8.5
VOICE MESSAGE ................................................................................................................. 100
-5-
Gigabit Color LCD HD PoE IP Phone (4-Line)
VIP-6040PT
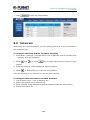
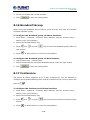
8.6
DIRECT PICKUP ................................................................................................................... 101
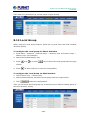
8.7
GROUP PICKUP .................................................................................................................... 102
8.8
CALL PARK ........................................................................................................................... 103
8.9
INTERCOM ............................................................................................................................ 104
8.10
DTMF .............................................................................................................................. 105
8.11
PREFIX ............................................................................................................................. 106
8.12
LOCAL GROUP ................................................................................................................. 107
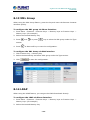
8.13
XML GROUP.................................................................................................................... 108
8.14
LDAP............................................................................................................................... 108
8.15
XML BROWSER ............................................................................................................... 109
8.16
BROADSOFT GROUP ....................................................................................................... 110
8.17
CONFERENCE ................................................................................................................... 110
8.18
FORWARD ........................................................................................................................ 111
8.19
TRANSFER........................................................................................................................ 111
8.20
HOLD ............................................................................................................................... 112
8.21
GROUP LISTENING .......................................................................................................... 112
8.22
DND ................................................................................................................................ 113
8.23
REDIAL............................................................................................................................. 113
8.24
SMS ................................................................................................................................ 114
8.24.1
Send SMS ............................................................................................................ 114
8.24.2
Set SMS Memory Key...................................................................................... 114
8.25
RECORD ........................................................................................................................... 115
8.26
URL RECORD .................................................................................................................. 115
8.27
PAGING ............................................................................................................................ 116
8.28
SHARED LINE .................................................................................................................. 116
8.29
PUBLIC HOLD .................................................................................................................. 117
8.30
PRIVATE HOLD ................................................................................................................ 118
9
UPGRADE ................................................................................................................................ 119
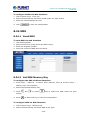
9.1
FACTORY RESET .................................................................................................................. 119
9.2
PCAP FEATURE..................................................................................................................... 119
9.3
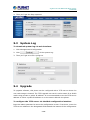
SYSTEM LOG ....................................................................................................................... 120
9.4
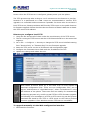
UPGRADE ............................................................................................................................. 120
9.5
CONFIGURATION FILE ......................................................................................................... 122
10
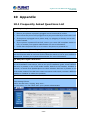
APPENDIX.......................................................................................................................... 123
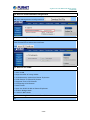
10.1
FREQUENTLY ASKED QUESTIONS LIST ......................................................................... 123
-6-
Gigabit Color LCD HD PoE IP Phone (4-Line)
VIP-6040PT
1 Introduction
Cost-effective, High-performance PoE VoIP Phone
To build high-performance VoIP communications at a low cost, PLANET has launched
a new member of its IP Phone family, the VIP-6040PT enterprise-class 4-Line PoE IP
Phone. It complies with IEEE 802.3af PoE interface for flexible deployment. The
VIP-6040PT makes it simple for the enterprise featuring voice and data system or
expanding voice system to new locations. It helps the company to save money on
long-distance calls; for example, the remote workers can dial in through a Unified
VoIP Communication System just like an extension call but no long-distance call
charge would occur. The VIP-6040PT also allows call to be transferred to anyone at
any location within the voice system, which enables the enterprise to communicate
more effectively and is helpful to streamline business processes.
-7-
Gigabit Color LCD HD PoE IP Phone (4-Line)
VIP-6040PT
Color Screen
The VIP-6040PT is an innovative enterprise-level Color IP Phone, through which
user can use photo caller ID function (upload photo of an extension user) to easily
identify the user. Its sleep mode can auto-switch the photo the user wants , making
the communication between the users colorful.
High-quality HD VoIP Voice
The VIP-6040PT delivers HD voice where both hardware and software HD functions
(G.722. HD Codec, HD speaker) are supported, and its HD handset is the
next-generation of voice quality for telephony audio, making the quality of voice
better than that (toll quality) of the standard digital telephony and even close to that
of a room conversation. HD voice is transmitted in the audio frequency range of
50Hz to 7kHz or higher over telephone lines, resulting in higher quality voice and
clearer communication.
-8-
Gigabit Color LCD HD PoE IP Phone (4-Line)
VIP-6040PT
Standard Compliance
The VIP-6040PT supports Session Initiation Protocol 2.0 (RFC 3261) for easy
integration with general voice over IP system. The VIP-6040PT is able to broadly
interoperate with equipment provided by VoIP infrastructure providers, thus
enabling them to provide their customers with better multi-media exchange
services.
Enhanced, Full-Featured Business IP Phone
The VIP-6040PT is a full-featured enhanced business IP Phone that addresses the
communication needs of the enterprises. It provides 4 voice lines and dual
10/100/1000Mbps Ethernet. Furthermore, the VIP-6040PT delivers user-friendly
design containing a 480 x 320 LCD with color LCD.
The VIP-6040PT supports all kinds of SIP-based phone features including 5-way
conferencing, Transfer (blind/attended), Phonebook , Black list XML , LDAP
Phonebook, Screen Sleep, SMS / Voicemail / Message Waiting, Ring Tone Selection/
Import / Delete, STUN , UPnP and SNMP, among others. Besides office use, the
VIP-6040PT is also the ideal solution for VoIP service offered by Internet Telephony
Service Provider (ITSP).
-9-
Gigabit Color LCD HD PoE IP Phone (4-Line)
VIP-6040PT
Secure, High-quality VoIP Communication
The VIP-6040PT can effortlessly deliver secured toll voice quality by utilizing
cutting-edge 802.1pq QoS (Quality of Service) and 802.1pq VLAN tagging. Using
voice and data VLAN can easily separate the data and voice, thus maintaining the
best quality.
Professional Application
The VIP-6040PT supports Busy Lamp Field (BLF) function that, via the lights on the
phone, enables users to easily identify the status of other phones which are
connected to the same IP PBX, such as busy, idle, ringing, etc. The connected IP PBX
must also support BLF feature. The BLF function is helpful for a receptionist on the
front desk to route all incoming calls smoothly.
- 10 -
Gigabit Color LCD HD PoE IP Phone (4-Line)
VIP-6040PT
1.1
Features
¾ Highlights
Dual 10/100/1000 Gigabit Ethernet
Supports SIP 2.0 (RFC3261)
5-way Conferencing
IEEE 802.3af Power over Ethernet compliant
Color screen and sleep mode
Supports HD voice
Supports Bridged Line Appearance (BLA) and Busy Lamp Field (BLF)
Supports 6 extension consoles; max. 240 definable keys
Phonebook / Black list XML /LDAP Phonebook
VLAN QoS (802.1pq)
TR069 / SNMP
Multiple Languages
¾ Voice Features
HD wideband codec: G.722. HD Codec, HD speaker, HD handset
Full-duplex speakerphone with AEC
G.711u/a-law, G.723.1, G.726, G.729A/B.
DTMF (In-Band, RFC2833, SIP Info)
Acoustic Echo Cancelation (AEC), Acoustic Gain Control (AGC)
Voice Activity Detection (VAD), Comfort Noise insertion
¾ Security Features
HTTPS Server/Client
Transport Layer Security (TLS)
SRTP (RFC3711), SIPS
VLAN QoS (802.1pq)
¾ Telephone Features
TCP, UDP, ICMP, RARP, ARP, DNS, NTP,SNTP, STUN, UPnP, SNMP
4 VoIP Accounts
Menu-driven user interface, XML Idle Screen, Theme,
Screen Sleep
Call hold, Call waiting, Call forward, Call return,
Redial, Call transfer
Caller ID display, DND, Auto-answer
- 11 -
Gigabit Color LCD HD PoE IP Phone (4-Line)
VIP-6040PT
5-way Conferencing
Mute, Speed dial, SMS, Voicemail, Message Waiting
Indication (MWI) LED, Call history
BLF / BLA
Tone scheme, Volume control
Ring tone selection/Import/Delete
Broad and Deep Interoperability
Soft keys programmable
Phonebook, Black list XML / LDAP Phonebook
¾ Network Protocols
TCP, UDP, ICMP, RARP, ARP, DNS, NTP,SNTP, STUN, UPnP, SNMP
Static / DHCP / PPPoE
TFTP / DHCP / PPPoE client
Telnet / HTTP/ HTTPS server
¾ Maintenance and Management
Auto-provision via FTP/TFTP/HTTP/HTTPS
Upgrade via Browser/Phone/Auto-provision
TR069
- 12 -
Gigabit Color LCD HD PoE IP Phone (4-Line)
VIP-6040PT
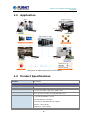
1.2
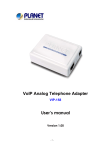
Application
Enterprise IP PBX Deployment of VIP-6040PT
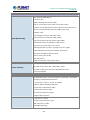
1.3
Product Specifications
Product
VIP-6040PT
Hardware
Lines (Direct Numbers)
Gigabit Color LCD HD PoE IP Phone (4-Line)
Display
3.5" TFT-LCD, 480 x 320 pixel, 262K colors
Feature Keys
Keys: 47 keys including 14 programmable keys
Network Interfaces
2 x 10/100/1000Base-T RJ-45
Auto Negotiation, Auto MDI,
Network-port with 802.3af PoE support
Handset: 1 RJ9 (4P4C)
Headphone: 1 RJ9 (4P4C)
- 13 -
Gigabit Color LCD HD PoE IP Phone (4-Line)
VIP-6040PT
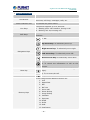
Protocols and Standard
MAC Address (IEEE 802.3)
IPv4 (RFC 791)
Address Resolution Protocol (ARP)
DNS: A record (RFC 1706), SRV record (RFC 2782)
Dynamic Host Configuration Protocol (DHCP) client (RFC 2131)
Internet Control Message Protocol (ICMP) (RFC 792)
TCP (RFC 793)
User Datagram Protocol UDP (RFC 768)
Data Networking
Real-time Protocol RTP (RFC 1889, 1890)
Real-time Control Protocol (RTCP) (RFC 1889)
Differentiated Services (DiffServ) (RFC 2475)
Type of service (ToS) (RFC 791, 1349)
VLAN tagging 802.1p Layer 2 quality of service (QoS)
Simple Network Time Protocol (SNTP) (RFC 2030)
Backward compatible with RFC 2543
Session Timer (RFC 4028)
SDP (RFC 2327)
NAPTR for SIP URI Lookup (RFC 2915)
SIPv2,
Voice Gateway
SDP (RFC 2327), RTP (RFC 1889,1890), RTCP
RFC 2833 X-NSE Tone Events for SIP/RTP, AVT Tone
Events for SIP/RTP
Function
Voice Codec
HD wideband codec: G.722. HD Codec, HD speaker, HD handset
Full-duplex speakerphone with AEC
G.711u/a-law, G.723.1, G.726, G.729A/B.
DTMF (In-Band, RFC2833, SIP Info)
Acoustic Echo Cancelation (AEC)
Acoustic Gain Control (AGC)
Voice Activity Detection (VAD)
Comfort Noise insertion
Security
HTTPS Server / Client
Transport Layer Security (TLS)
SRTP (RFC3711), SIPS
VLAN QoS (802.1pq)
- 14 -
Gigabit Color LCD HD PoE IP Phone (4-Line)
VIP-6040PT
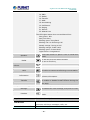
Telephone Features
4 VoIP Accounts
Menu-driven user interface, XML Idle Screen, Theme,
Screen Sleep
Call hold, Call waiting, Call forward, Call return,
Redial, Call transfer
Caller ID display, DND, Auto-answer, 5-way Conferencing
Mute, Speed dial, SMS, Voicemail, Message Waiting
Indication (MWI) LED, Call history
BLF / BLA
Tone scheme, Volume control
Ring tone selection / Import / Delete
Broad and Deep Interoperability
Soft keys programmable
Phonebook, Black list XML/LDAP Phonebook
Network Protocol
TCP, UDP, ICMP, RARP, ARP, DNS, NTP,SNTP, STUN, UPnP, SNMP
Static / DHCP / PPPoE
TFTP / DHCP / PPPoE client
Telnet / HTTP / HTTPS server
Management
Auto-provision via FTP / TFTP / HTTP / HTTPS
Upgrade via Browser / Phone / Auto-provision
TR069
Environments
Power Requirements
5V DC, 1.2 A
IEEE 802.3af Power over Ethernet
Operating Temperature
-10 ~ 50 degrees C
Operating Humidity
10 ~ 95% (non-condensing)
Weight
980 g
Dimensions (W x D x H)
268.5 x 240 x 40 mm
Emission
CE, FCC
Connectors
Two 10/100/1000BASE-T RJ-45 Ethernet ports
Handset: RJ-9 connector
Headphone: RJ-9 connector
RJ-11 ext. connector (future feature)
DC power jack
Built-in speakerphone and microphone
- 15 -
Gigabit Color LCD HD PoE IP Phone (4-Line)
VIP-6040PT
1.4
Physical specifications and packaging
Physical Specifications
¾
Dimensions
Dimensions (W x D x H)
268.5 x 240 x 40 mm
Net Weight
980g (without package)
BASIC PACKAGING
SIP IP Phone Unit
Quick Installation Guide
RJ-45 Cable x 1
Stand x 1
Power Adapter
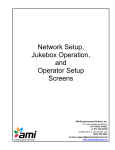
1.5
Keypad
¾ Keypad, LED and function key definitions
- 16 -
Gigabit Color LCD HD PoE IP Phone (4-Line)
VIP-6040PT
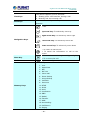
¾ Keypad Description
LCD Screen
Power Indicator LED
To show all the information about the date & time,
accounts, soft keys, messages, calls, etc.
To indicate the power status
The phone supports up to 4 accounts
Line Keys
1. Steady green: idle interface, during a call
2. Blinking red: an incoming call
Soft Keys
Labels automatically to identity their context-sensitive
features.
1. OK.
Up arrow key: To selectively move up
Right arrow key: To selectively move right
Navigation Keys
Left arrow key: To selectively move left
Down arrow key: To selectively move down
1. To return to idle screen.
2. To cancel the information or call on the
screen.
1. To mute the voice during the call (green
Mute Key
light).
2. To un-mute the call.
Conference
To place a conference call
To be configured as different function as:
1. Line
2. Speed Dial
3. BLF
4. BLF List
5. Voice mail
Memory Keys
6. Direct Pickup
7. Group Pickup
8. Call Park
9. Intercom
10. DTMF
11. Prefix
12. Hold
13. Conference
- 17 -
Gigabit Color LCD HD PoE IP Phone (4-Line)
VIP-6040PT
14. DND
15. Redial
16. Transfer
17. SMS
18. Hot-desking
19. Call Return
20. Paging
21. Record
22. Shared Line
The LED lights status when set as Shared line:
Stay green: Idle
Stay red: Busy
Blinking green: Ring Back
Blinking red: An Incoming Call
Steady orange: During a Call
Blinking orange: Public Hold
Blinking green: Private Hold
Light Drown: Unregistered
Speaker
Redial
Press this button to place a call in hands-free
mode.
To dial the previous dialed number.
To act as send key.
To decrease the volume.
Volume
To increase the volume.
Hold
Information
To hold or to resume a call during a conversation.
To show the account status and some other
relevant information.
To transfer a call to a third party.
Transfer
To enable or disable forward feature during the
idle page.
Alphanumeric Keypad
Message
Headset
Key Name
LCD Screen
Power Indicator LED
To enter the phone numbers, letters and so on.
To indicate the new message, and press to read.
To indicate that the phone is or not in headset
mode.
Function Description
To show all the information about the date & time,
accounts, soft keys, messages, calls, etc.
To indicate the power status
- 18 -
Gigabit Color LCD HD PoE IP Phone (4-Line)
VIP-6040PT
The phone supports up to 4 accounts
Line Keys
1. Steady green: idle interface, during a call
2. Blinking red: an incoming call
Soft Keys
Labels automatically to identity their context-sensitive
features.
1. OK.
Up arrow key: To selectively move up
Right arrow key: To selectively move right
Navigation Keys
Left arrow key: To selectively move left
Down arrow key: To selectively move down
1. To return to idle screen.
2. To cancel the information or call on the
screen.
Mute Key
Conference
1. To mute the voice during the call (green light).
2. To un-mute the call.
To place a conference call
To be configured as different function as:
1. Line
2. Speed Dial
3. BLF
4. BLF List
5. Voice mail
6. Direct Pickup
7. Group Pickup
8. Call Park
9. Intercom
Memory Keys
10. DTMF
11. Prefix
12. Hold
13. Conference
14. DND
15. Redial
16. Transfer
17. SMS
18. Hot-desking
19. Call Return
20. Paging
- 19 -
Gigabit Color LCD HD PoE IP Phone (4-Line)
VIP-6040PT
21. Record
22. Shared Line
The LED lights status when set as Shared line:
Stay green: Idle
Stay red: Busy
Blinking green: Ring Back
Blinking red: An Incoming Call
Steady orange: During a call
Blinking orange: Public Hold
Blinking green: Private Hold
Light Drown: Unregistered
Speaker
Redial
Volume
Hold
Information
Press this button to place a call in hands-free
mode.
To dial the previous dialed number.
To act as send key.
To decrease the volume.
To increase the volume.
To hold or to resume a call during a conversation.
To show the accounts status and some other
relevant information.
To transfer a call to a third party.
Transfer
To enable or disable forward feature during the
idle page.
Alphanumeric keypad
To enter the phone numbers, letters and so on.
- 20 -
Gigabit Color LCD HD PoE IP Phone (4-Line)
VIP-6040PT
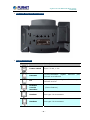
¾ Rear view and panel descriptions
¾ Keypad Description
Port
Port name
Description
Power switch
Input: 5V AC, 1.2 A
Internet
PC
External
console
interface
10/100/1000Mbps
Gigabit
Ethernet
port
Ethernet
port
Connect it to Network
10/100/1000Mbps
Gigabit
Connect it to PC
(Future Feature)
Headset
Port type: RJ-9 connector
Handset
Port type: RJ-9 connector
- 21 -
Gigabit Color LCD HD PoE IP Phone (4-Line)
VIP-6040PT
PACKAGE INFORMATION
1.6
Dimensions (W x D x H)
290 x 210 x 125 mm
Weight
1.1 kg (gross weight)
Carton Dimensions (W x D x H)
595 x 375 x 225 mm
Carton Weight
7 kg (gross weight)
Carton Unit
6 pcs.
Default Setting
Default WAN IP
172.16.0.1
Default subnet mask
255.255.0.0
Default Gateway
172.16.0.254
Default PC IP
192.168.0.1
Default Login User Name
admin
Default Login Password
123
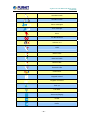
1.7
Icon Preview
Icon
Description
Network available
Network down
Line (Registered successfully)
Line (Unregistered)
Line (Ringing)
Speed Dial
BLF
BLF (Ringing)
BLF (Talking)
Speakerphone mode
- 22 -
Gigabit Color LCD HD PoE IP Phone (4-Line)
VIP-6040PT
Handset mode
Headset mode
Voice messages
Text message
Mute
Do Not Disturb
Volume is 0
Hold
Dialed calls
Received calls
Missed calls
Forward calls
Conference
Keypad locked
Keypad unlocked
Pick up
Call Park
Intercom/Paging
DTMF
Prefix
- 23 -
Gigabit Color LCD HD PoE IP Phone (4-Line)
VIP-6040PT
XML Group
Local Group
XML Browser
LDAP
Broadsoft Group
Conference
Forward
Transfer
Hold
Line on Hold
DND
Redial
Call Return
SMS
Record
Recording
Group Listening
Shared Line
Other Functions
- 24 -
Gigabit Color LCD HD PoE IP Phone (4-Line)
VIP-6040PT
2 Initial Connection and Login
The package should contain the following items plus VIP-6040PT. If any item is
missing or damaged, please contact the seller immediately.
Quick Guide
Handset
Handset Core
RJ-45 Cable
Power Adapter
Stand
Step 1. Handset Connection
Plug one end of the handset cord into the handset and the other end into the
handset jack.
Handset
DC5V
Internet
PC
Ext
Step 2. Connecting Power System
The VIP-6040PT can be powered either by its external AC/DC adapter or by
connecting to an IEEE802.3af/at PSE device such as 802.3af injector / hub or
802.3af/at POE switch.
Once the VIP-6040PT is powered, the LCD screen will prompt for POST.
802.3af/at
PoE Switch
DC5V
Internet
PC
DC5V
DC5V
Internet
Internet
Ext
Note 1: This unit does not include the 5V/1.2A power adapter.
Note 2: Only Internet Port supports POE.
- 25 -
Gigabit Color LCD HD PoE IP Phone (4-Line)
VIP-6040PT
Step 3. Connecting Network
DC5V
Internet
Internet
PC
Ext
PoE Switch
PC
IP PBX
Step 4. Computer Network Setup
Set user computer’s IP address to 192.168.0.x, where x is a number between 2 to
254 (except 1 where is being used for the phone by default). If user dose not know
how to do this, please ask the network administrator.
Connecting user PC to the VIP-6040PT PC port.
DC5V
Internet
PC
PC
Ext
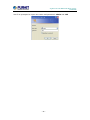
Step 5. Login Prompt
Use Web browser (Internet Explorer 6.0 or above) to connect to 192.168.0.1 (type
this address in the address bar of Web browser).
- 26 -
Gigabit Color LCD HD PoE IP Phone (4-Line)
VIP-6040PT
User’ll be prompted to input user name and password: admin and 123
- 27 -
Gigabit Color LCD HD PoE IP Phone (4-Line)
VIP-6040PT
3 Initialization
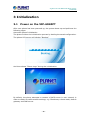
3.1
Power on the VIP-6040PT
After user phone has been powered up, the system boots up and performs the
following steps:
Automatic Phone Initialization
The phone finishes the initialization process by loading the saved configuration.
The phone LCD screen will display "Booting"
And then shows “Planet Logo” during the initialization.
By default, the phone attempts to contact a DHCP server in user network in
order to obtain its valid network settings, e.g. IP address, subnet mask, default
gateway and DNS server.
- 28 -
Gigabit Color LCD HD PoE IP Phone (4-Line)
VIP-6040PT
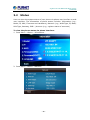
3.2
Status
User can view the system status of user phone via phone user interface or web
user interface. The information of phone status includes: Information (e.g.,
Model, IP, MAC, Firmware and Hardware), Network (e.g., WAN Type, IP, Mask,
LAN Type, Gateway, DNS…) Account (e.g., register status of accounts)
To view the phone status via phone interface:
1. Press Menu →Status →Information…
2. Press Menu →Status →Network
- 29 -
Gigabit Color LCD HD PoE IP Phone (4-Line)
VIP-6040PT
3. Press Menu →Status →Account
To view the phone status via Web interface:
1. Login web page (For how to login, please refer to chapter 2 Initial Connection
and Login)
2. View the information of Version, Account and Network.
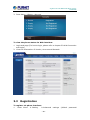
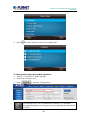
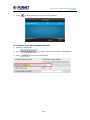
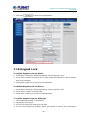
3.3
Registration
To register via phone interface:
Æ Advanced
1. Press Menu Æ Setting
- 30 -
settings
(default
password:
Gigabit Color LCD HD PoE IP Phone (4-Line)
VIP-6040PT
2.
3.
4.
5.
6.
7.
8.
9.
admin) Æ Accounts
Select the desired account
Select Enable for Account active
Fill out the SIP Server
Fill out the Failover SIP server if needed (optional)
Fill out the Outbound Proxy (optional)
Fill out the SIP User ID and Authenticate ID
Fill out the password, name (shown on LCD) and ringtone.
Press Save to save the configuration.
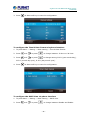
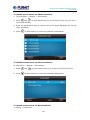
To
1.
2.
3.
4.
register via web interface:
Login web page and click AccountÆBasic
Select the desired Account
Select Yes for Account Activate
Fill out the Primary SIP Server and other account information.
- 31 -
Gigabit Color LCD HD PoE IP Phone (4-Line)
VIP-6040PT
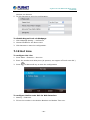
5. Click
to save the configuration.
1. All fields with * must be filled. If changed, it requires a phone
restart.
2. Account Status says whether the account is registered successfully
or not.
3. When changing the account information via phone, it will show
restart note when back to idle page.
3.4
Idle Screen
- 32 -
Gigabit Color LCD HD PoE IP Phone (4-Line)
VIP-6040PT
Field Name
Explanation
Date & Time
It shows the phone’s time & date.
Notice
It shows the phone features status
Line Keys
Soft Key
Default Account
Wallpaper
3.5
This area shows the four line key labels. Line keys are also
can be used as other function keys.
This area shows the soft key labels. The default soft key
labels are “History”, “Directory”, “DND” and “Menu”.
This shows the current user account. User
can
use to change the default user account.
This shows the background picture. User can also change it.
LED Instruction
This part mainly instructs the LED status. The Power LED Status describes on the
premise that the LED setting should all be set to Yes.
3.5.1 Power Indicator LED
LED Status
Description
Blinking green
Ringing or having missed call
Steady Green
Idle status(Power on)
Off
Powered off.
3.5.2 Line LED: (Line or Memory Key set as Line)
LED Status
Description
Steady Green
Hold
Steady Green
Off hook or during a conversation.
Blinking Red
Ringing.
Off
Idle status
3.5.3 BLF or BLF List Key LED: (Line/Memory Key set
as BLF)
LED Status
Description
Steady Green
Idle status for the monitored line
Steady Red
The monitored line is calling or during a call
Blinking Red
The monitored line is ringing.
Off
All other unknown statuses
- 33 -
Gigabit Color LCD HD PoE IP Phone (4-Line)
VIP-6040PT
3.5.4 Shared Line Key LED: (Line/Memory Key set as
Shared Line)
LED Status
Description
Stay green
Idle status
Stay red
The line is busy
Blinking green
Ring Back, Private hold
Blinking red
The line is ringing
Steady orange
During a Call
Blinking orange
Public Hold
Off
Unregistered
3.5.5 Other Key LEDs
LED Status
Description
When using in headset mode, the LED is steady green or
Headset Key
the LED is off.
Message Key
Mute Key
3.6
Info Key
When there is blinking green, it shows there are new
messages or the LED is off.
It is red when the call is muted, or the LED is off.
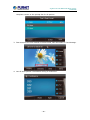
Call Transfer Info Key Instruction
plays many roles in this phone:
1. Go to the Information page.
2. Get the full information of the item with
, meaning the information is not in
full display or there are more options for the item. Press the info key to get the
- 34 -
Gigabit Color LCD HD PoE IP Phone (4-Line)
VIP-6040PT
complete content or the prompt list for all options.
3. Fast access to the new missed or forward calls, New Voicemail or Text Message.
4. Get all other parties’ information during a conference.
- 35 -
Gigabit Color LCD HD PoE IP Phone (4-Line)
VIP-6040PT
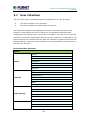
3.7
User Interface
There are two ways to customize specific configurations on user IP phone:
z
The user interface on the IP phone
z
The user interface in a web browser on user PC
The hardware components keypad and LCD screen constitute the phone user
interface, which allows the user to execute all call operation tasks and basic
configuration changes directly on the phone. In addition, user can use the web user
interface to access all configuration settings. In many instances, it is possible to use
both the phone user interface and the web user interface to operate the phone and
change settings. However, in some instances, it is only possible to use the phone or
the web user interface.
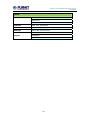
Phone Interface Overview
Option
Model
IP
MAC
Status
Firmware
Hardware
Network
Account
Call Forward
Function Key(Line and Memory key setting)
Key as Send
Features
Hot Line
Anonymous Call
DND
History Setting
Language
Time & Date
Basic Settings
Time & Date Format
DHCP Time
Ring Tone
Front Size
Advanced Settings
Account Registration
Network
Lock
- 36 -
Gigabit Color LCD HD PoE IP Phone (4-Line)
VIP-6040PT
Option
Factory Reset
Password
Auto provision
Directory
Add, view and delete
History
View and delete
Message
Voice Mail set and View.
Display Mode
Display
Wallpaper
Screensaver
- 37 -
Gigabit Color LCD HD PoE IP Phone (4-Line)
VIP-6040PT
4 Basic Setting Configuration
This part will mainly introduce the basic configuration as the Time, Language, and
Volume.
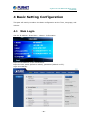
4.1
Web Login
Get the IP address: Press Menu →Status →Information
Input the IP address in the web browser.
Input the user name (default is admin), password (default is 123).
Login successfully.
- 38 -
Gigabit Color LCD HD PoE IP Phone (4-Line)
VIP-6040PT
The PC and phone should be in the same domain. When registering the
accounts on the web and the server port is not “5060”, then “SIP
Server” should be set as “SIP Server’s IP address: server port”; for
example, “192.168.0.122: 5090”.
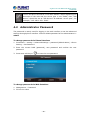
4.2
Administrator Password
The password is mainly used for logging in the web interface or set the advanced
settings through phone interface. And the default password of the administrator is:
admin
To change password via Phone Interface
1. Press Menu → setting → Advanced settings → password (default admin) →Phone
Setting → Set Password
2. Enter the current PWD (password), new password and confirm the new
password.
3. Press save soft key or
to save the new password.
To change password via Web Interface
1. Management → Password
2. Fill out the value
- 39 -
Gigabit Color LCD HD PoE IP Phone (4-Line)
VIP-6040PT
3. Click
to save the configuration.
When user uses the web interface, default user name is admin and
password is 123.
4.3
Basic Network Setting
Planet IP Phone supports three modes of Network: DHCP, Static, and PPPoE.
When the default mode is DHCP, it will obtain IP address and other information
automatically. If user phone cannot contact a DHCP server for any reason, you need
to configure a static IP address manually.
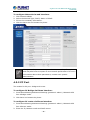
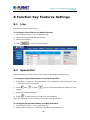
4.3.1 WAN Port
To configure a static IP address via phone interface:
1. Press MenuÆSettingÆAdvanced Settings (password: 123) Æ Network Æ
WANPort Æ Static mode.
2. Enter the parameters: IP, Netmask, Gateway, Pri. DNS (primary dns), sec. DNS
(second DNS) in the corresponding fields.
- 40 -
Gigabit Color LCD HD PoE IP Phone (4-Line)
VIP-6040PT
3. Click Save and restart the phone.
Press the Save soft key to accept the change or the Back soft key to cancel. If you
are using an xDSL modem, you can connect user phone to the Internet via PPPoE
mode. You can set a WAN port to be a PPPoE port. The PPPoE port will perform a PPP
negotiation to obtain the IP address. Contact user system administrator for the
PPPoE user name and password.
To configure PPPoE via phone interface:
1. Press MenuÆSettingÆAdvanced Settings (password: admin) ÆNetworkÆWAN
Port ÆPPPoE mode
2. Enter the User ID and password.
3. Click Save and restart the phone.
To configure DHCP via phone interface:
1. Press MenuÆSettingÆAdvanced Settings (password: 123) ÆNetworkÆWAN
Port ÆDHCP mode
2. Click Save and restart the phone.
- 41 -
Gigabit Color LCD HD PoE IP Phone (4-Line)
VIP-6040PT
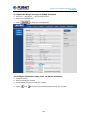
To
1.
2.
3.
4.
configure Network via web interface:
Click NetworkÆBasic
Select the desired Type: DHCP, Static or PPPoE.
Fill out the necessary information.
Click the Save Set and restart the phone.
Wrong network parameters may result in inaccessibility of user phone
and may also have an impact on user network performance. For more
information about these parameters, contact user system
administrator.
4.3.2 PC Port
Two modes for PC port: bridge and router.
To configure PC Bridge via Phone interface:
1. Press MenuÆSettingÆAdvanced Settings (password: admin) ÆNetworkÆPC
Port ÆBridge mode.
2. Click Save and restart the phone.
To configure PC router via Phone interface:
1. Press MenuÆSettingÆAdvanced Settings (password: admin) ÆNetworkÆPC
Port ÆRouter mode.
2. Enter the IP, Network mask and DHCP server
- 42 -
Gigabit Color LCD HD PoE IP Phone (4-Line)
VIP-6040PT
3. Click Save and restart the phone.
To configure Bridge via web interface:
1. Click NetworkÆBasic
2. Select
3. Click
To
1.
2.
3.
and restart the phone
configure Router via web interface:
Click NetworkÆBasic
Select As Router
Fill out the IP address and other necessary information.
4. Click
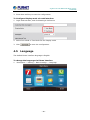
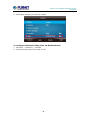
4.4
and restart the phone
Display Mode
This phone supports two Display modes: Text and Icon.
Icon Mode: all items are shown the same as the main with Icon.
Text Mode: Only the 8th main item is shown as Icon; the others are described in
text.
To Configure Display mode via phone interface:
1. Press MenuÆ DisplayÆDisplay Mode
2. Select Text or Icon
- 43 -
Gigabit Color LCD HD PoE IP Phone (4-Line)
VIP-6040PT
3. Press Save soft key to save the configuration.
To Configure Display mode via web interface:
1. Login web interface, and click SettingÆ Preference
2. Select Icon Mode or Text Mode for the Display mode
3. Click
4.5
to save the configuration.
Language
The default Phone interface language is English.
To change the language via Phone interface
1. Press Menu → Setting → Basic Settings → Language.
- 44 -
Gigabit Color LCD HD PoE IP Phone (4-Line)
VIP-6040PT
2.
Press
or Save soft key to save the configuration.
To change the language via Web Interface
1. Setting → Preference →Web Language
2. Select the necessary one.
3.
to save the configuration.
Press
All languages may not be available for selection. The available
languages depend on the language currently picked and loaded to the
IP phone.
- 45 -
Gigabit Color LCD HD PoE IP Phone (4-Line)
VIP-6040PT
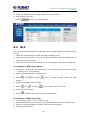
4.6
Time and Date
The time and date shown on the idle page can be set and changed by SNTP server
automatically or manually.
To configure the time and Date by SNTP setting via phone interface
1. To press Menu → Setting → Basic setting → Time & Date → SNTP Settings
2. Press
or
, or
to change the Time zone.
3. Fill out the NTP server1, NTP Server2, and Daylight Saving.
4. Press
or Save soft key to save the configuration.
Press
and all the zones will on display. Select the one you want
and press save or confirm key to save the configuration.
To configure time and date manually via phone interface
1. To press Menu → Setting → Basic setting → Time & Date → Manual Settings
2. Press
and
or change the right time, or you can input the right time.
- 46 -
Gigabit Color LCD HD PoE IP Phone (4-Line)
VIP-6040PT
3. Press
or Save soft key to save the configuration.
To configure the Time & Date Format via phone interface
1. To press Menu → Setting → Basic setting → Time & Date Format
2. Press
and
or press
to change between 12 Hour or 24 Hour.
3. Press
and
or press
to change among Y-M-D (year-month-day),
M-D-Y (month-day-year), D-M-Y (day-month-year).
4. Press
or Save soft key to save the configuration.
To configure the DHCP time via phone interface
1. To press Menu → Setting → Basic setting → DHCP time
2. Press
and
or press
to change between Disable and Enable.
- 47 -
Gigabit Color LCD HD PoE IP Phone (4-Line)
VIP-6040PT
3. Press
or Save soft key to save the configuration.
To configure the Time and Date by web interface
Login: Login name: admin; password: admin (default)
Network → Advanced →NTP Server
Fill out the value in the blank.
To change the Time Zone and Date Display Format via web interface
1. Setting → Preference →Time Zone
2. Select the necessary one.
- 48 -
Gigabit Color LCD HD PoE IP Phone (4-Line)
VIP-6040PT
3.
Press
to save the configuration.
If the IP Phone cannot obtain the time and date from the Simple
Network Time Protocol (SNTP) server, please contact your system
administrator for more information.
4.7
Ring Tone
You can adjust the type and volume of the ring tone.
To adjust the Ring Tone Type via Phone interface:
1. Press Menu → Setting → Basic Settings → Ring Tone
2. Press
3. Press
and
to select the favorite one.
or Save soft key to save the configuration.
- 49 -
Gigabit Color LCD HD PoE IP Phone (4-Line)
VIP-6040PT
To adjust the Ring Tone Type via Web Interface
1. Account → Advanced → Account Ring Tone
2. Select the wanted one.
to save the configuration.
3. Click
To
1.
2.
3.
configure Distinctive Ring Tone via Phone Interface
Press Directory
Select the target contact
Press Detail soft key to edit the contact.
4. Press
and
to select the wanted Ring Tone for the contact
- 50 -
Gigabit Color LCD HD PoE IP Phone (4-Line)
VIP-6040PT
5. Press Save soft key to save the contact.
To configure Distinctive Ring Tone via Web Interface
1. Directory → Directory → Contact
2. Choose the Ring Tone you want to use.
- 51 -
Gigabit Color LCD HD PoE IP Phone (4-Line)
VIP-6040PT
3. Click
4.8
to save the configuration.
→
Font Size
To configure the Time & Date Format via phone interface
1. To press Menu → Setting → Basic setting → Font Size
2. Press
and
or press
to choose the desired font size: 18, 20, 24,
26.
- 52 -
Gigabit Color LCD HD PoE IP Phone (4-Line)
VIP-6040PT
3. Press
or Save soft key to save the configuration.
To configure Font Size via Web Interface
1. Setting→ Preference
2. Find
3. Click
and then choose the desired: 18/20/24/26.
to save the configuration.
- 53 -
Gigabit Color LCD HD PoE IP Phone (4-Line)
VIP-6040PT
4.9
Volume
You can adjust the volume of the phone by the volume keys:
To adjust the Ring tone volume via phone interface:
1. Option 1: To press
and
on the idle page
2. Option 2: To press
and
when the call is ringing.
To adjust the handset volume via phone interface:
Press
and
during a call in handset mode.
- 54 -
and
.
Gigabit Color LCD HD PoE IP Phone (4-Line)
VIP-6040PT
To adjust the headset volume via phone interface:
Press
and
during a call in headset mode.
To adjust the speaker Volume via phone interface:
Press
and
during a call in speaker mode.
4.10 Wallpaper
To change to a preferred design, follow the steps below:
To change the wallpaper via phone interface:
1. Press Menu → Display → wallpaper
2. Press
and
or press Switch soft key to display the different pictures.
- 55 -
Gigabit Color LCD HD PoE IP Phone (4-Line)
VIP-6040PT
3. Press
or Save soft key to save the selected wallpaper picture.
To change the wallpaper via web interface:
1. Click SettingÆPreference
2. Select the desired wallpaper picture
3. Click
to save the setting.
4.11 Screen Saver
There are three types of screen saver: Time & Logo, Photo Switch and Phone.
Time & Logo: When the screensaver works, it will show Time and logo in turn.
Photo Switch: All screensaver pictures are displayed one by one.
Phone: Only selected phone display is used as screensaver.
Text logo: It works with Time & Logo. When the value is entered, it will display the
time and the entered value in turn.
- 56 -
Gigabit Color LCD HD PoE IP Phone (4-Line)
VIP-6040PT
To enable screen saver via Phone interface:
1. To press Menu → Display → Screensaver
2. Press
and
or press Switch soft key to choose the Time-out as 1 min or
2/5/10/30 minutes.
3. Enter the Screensaver type to choose one of the types: Backlight off, Time &
Logo, and Photo
4. Press
or Save soft key to save the selected configuration.
To disable screen saver via Phone interface
To press Menu → Display → Screensaver
1. Press
2. Press
and
or press switch soft key to choose the Time-out as off.
or Save soft key to save the selected configuration.
To upload screen saver via Web interface:
1. Setting → Preference
- 57 -
Gigabit Color LCD HD PoE IP Phone (4-Line)
VIP-6040PT
2.
Choose the picture wanted to use as screen saver.
3. Click
To
1.
2.
3.
to save the uploaded picture.
delete uploaded screen saver phone via Web interface:
Setting → Preference
Select the photo to be deleted.
Click Delete to delete the photo.
1. The uploaded photo size should be less than 2M bytes, name length
should be less than 48, and the File name should be in letters, numbers
or underscore '_' and photo number should be less than 9.
2. The default screensaver photos cannot be deleted.
- 58 -
Gigabit Color LCD HD PoE IP Phone (4-Line)
VIP-6040PT
5 LED Status Setting
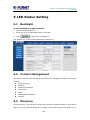
5.1
Backlight
To set Backlight via web interface:
1. Click settingÆPreference
2. Enter the time for Backlight time(in seconds).
to save the configuration.
3. Click
The default is 0, which means Backlight is always on.
5.2
Contact Management
This section provides the operating instructions for managing contacts. The topics
include:
z
Local Directory
z
Blacklist
z
Remote Phonebook
z
Call History
z
LDAP
z
BroadSoft Phonebook
z
CallLog
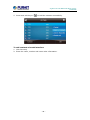
5.3
Directory
In the directory, you can add or delete your friends, business partner or any others’
phone no. So you will not forget their number. Or put some anonymous phone no. in
- 59 -
Gigabit Color LCD HD PoE IP Phone (4-Line)
VIP-6040PT
the blacklist to prevent from being disturbed.
A. To add contact list to local directory
To
1.
2.
3.
add contacts manually via phone interface
Press Menu → Directory → Local Directory
Press Add soft key.
Enter the necessary information as Name, Phone number…
4. Press save soft key or
to add the contacts successfully.
To add contacts from history via phone interface:
1. Press History soft key or press Menu → History → Local history
2. Press
and
to select the targeted one. (Press
and
to switch
among all calls, Dialed calls, Received calls, Missed Calls and Forward Calls).
3. Press Option soft key → Add to Contacts
4. Edit the necessary information as Name, Phone number…
- 60 -
Gigabit Color LCD HD PoE IP Phone (4-Line)
VIP-6040PT
5. Press save soft key or
to add the contacts successfully.
To add contacts via web interface:
1. Click Directory
2. Enter the name, number and some other information.
- 61 -
Gigabit Color LCD HD PoE IP Phone (4-Line)
VIP-6040PT
3. Press
and then press
button.
B: To add contacts to blacklist
To
1.
2.
3.
add blacklist manually via phone interface:
Press Menu → Directory → Blacklist
Press Add soft key.
Enter the necessary information as Name, Phone number…
4. Press save soft key or
to add the contacts successfully.
To add blacklist from history via phone interface:
1. Press History soft key or press Menu → History → Local history
2. Press
and
to select the targeted one.
3. Press Option soft key → Add to Blacklist
4. Edit the necessary information as Name, Phone number…
- 62 -
Gigabit Color LCD HD PoE IP Phone (4-Line)
VIP-6040PT
5. Press save soft key or
to add successfully.
Upload Contacts photo via web interface:
1. Click Directory and select the desired contact.
2. Click Choose file to select the photo for the contact
3.
Click
to upload the photo.
- 63 -
Gigabit Color LCD HD PoE IP Phone (4-Line)
VIP-6040PT
When you place a call from the contact, the phone idle screen will show the contact
photo.
The format of the photo supported is jpg or bmp, and the size should be
less than 128 x 128.
To import or export the contact list
You can manage your phone’s local directory via phone or web user interface. But
you can only import or export the contact list via web interface.
To import an XML file of contact list via web interface:
1. Click on Directory
2. Click Browse to select a contact list file (file format must be .xml) from your
local system.
3. Click Import XML to import the contact list.
To import an XML file of contact list via web interface:
1. Click on Directory
2. Click Export XML to import the contact list.
To import a CSV file of contact list via web interface:
1. Click on Directory
2. Click Browse to select a contact list file (file format must be .csv) from your local
system.
3. Click Import CSV to import the contact list.
To import a CSV file of contact list via web user interface:
1. Click on Directory
- 64 -
Gigabit Color LCD HD PoE IP Phone (4-Line)
VIP-6040PT
2.
Click Export CSV to import the contact list.
5.4
Remote Phonebook
To set Remote Phonebook via web interface:
1. Login the web page and click DirectoryÆRemote Phone Book
2. Fill out the path of the remote file in the Phone Book URL field.
For example, http://192.168.0.254/phonebook/Phonebook.xml
to save the configuration.
3. Fill out the Name and then click
To check the contacts via phone interface:
1. Press DirectoryÆLeft ButtonÆLeft Button, and then you can see the item you set;
press enter and you will find the details.
For more details, please refer to: Remote Phonebook on Planet web page.
5.5
Call History
This phone maintains call history lists of Dialed Calls, Received Calls, Missed Calls
and Forwarded Calls. The call history list supports up to100 entries in all on phone
interface and more than 1500 items. You can check the call history, dial a call, add
a contact or delete an entry from the call history list. You should enable the history
record feature in advance.
- 65 -
Gigabit Color LCD HD PoE IP Phone (4-Line)
VIP-6040PT
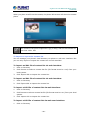
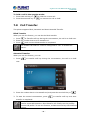
To enable the history record feature via phone interface:
1. Press MenuÆFeatureÆHistory Setting
2. Press
and
or Switch soft key to enable History record.
3. Press Save soft key to save the configuration.
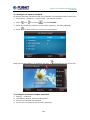
To check the call history via phone interface:
1. Press the History soft key. The LCD screen displays All Calls list.
2. Press Right or Left Key to switch among All Calls, Missed Calls, Received Calls,
Dialed Calls and Forwarded Calls.
3. Press to select the desired entry.
4. Press the Option soft key, and then select Detail from the prompt list.
5. The detailed information of the entry appears on the LCD screen.
To delete an entry from the call history list via phone interface:
1. Press the History soft key.
2. Press Right or Left Key to switch among All Calls, Missed Calls, Received Calls,
Dialed Calls and Forwarded Calls.
3. Press UP or DOWN key to select the desired entry.
- 66 -
Gigabit Color LCD HD PoE IP Phone (4-Line)
VIP-6040PT
4. Press the Delete soft key.
To delete all entries from the call history list via phone interface:
1. Press the History soft key.
2. Press Right or Left Key to switch among All Calls, Missed Calls, Received Calls,
Dialed Calls and Forwarded Calls.
3. Press the Option soft key, and then select Delete All from the prompt list.
4. Press the OK soft key.
5. Press the OK soft key to confirm the deleting or the Cancel soft key to cancel.
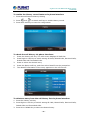
To check the call history via web interface:
1. Click DirectoryÆ Call History
2. Click Dialed List, Missed List, Received List, Forwarded List and you can see the
history list.
To
1.
2.
3.
Dial a call from Call History via web interface:
Click DirectoryÆCall History
Select the desired history item, and click Tel Number.
Then the call is dialed on phone.
5.6
LDAP Phonebook
When using the LDAP feature, you can get the LDAP Phonebook directly.
- 67 -
Gigabit Color LCD HD PoE IP Phone (4-Line)
VIP-6040PT
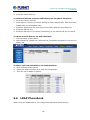
To configure LDAP via web interface:
1. Login the web page and click DirectoryÆLDAP.
2. Fill out LDAP Name Filter:
a) This parameter specifies the name attributes for LDAP searching. The “%”
symbol in the filter stands for the entering string used as the prefix of the
filter condition.
b) For example (cn=%), when the name prefix of the cn of the contact record
matches the search criteria, the record will be displayed on the IP PHONE
LCD.
3. Fill out LDAP Number Filter:
This parameter specifies the number attributes for LDAP searching.
4. Fill out Server Address: Fill out the domain name or IP address of the LDAP
Server.
For example, 192.168.0.124
5. Port (the port of the LDAP Serve) Base, User Name and Password
6. Max. Hits: The maximum number of the search results to be returned by the
LDAP server.
7. LDAP Display Name: The display name of the contact record displayed on the
LCD screen.
8. Fill out the related value and then click Save button to save the settings.
Following is the example screenshot for the configuration.
To Configure LDAP Key
To configure LDAP Key via web interface:
1. Click Function KeyÆMemory KeyÆ choose Memory Key 1 (for example)
- 68 -
Gigabit Color LCD HD PoE IP Phone (4-Line)
VIP-6040PT
2. Select LDAP under the Type section.
3. Click Save to save the configuration.
To Configure LDAP Key via phone interface:
1. Press MenuÆFeatureÆFunction KeysÆMemory Keys as Function KeysÆMemory
Key 1
2. Select LDAP under the Type section.
3. Press save or OK key to save the configuration.
When pressing the LDAP Key, the LCD will display as follows:
5.7
Broadsoft Phonebook
You can access the BroadSoft directory through your phone. You can add local
contacts from the BroadSoft directory. You can also dial a contact from the
BroadSoft directory. You can configure your new phone to access up to 6 BroadSoft
directories. Contact your system administrator for the access to URL of the
BroadSoft directory.
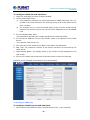
To Configure Broadsoft via web interface:
1. Click DirectoryÆBroadsoft
2. Select the desired Broadsoft Item.
- 69 -
Gigabit Color LCD HD PoE IP Phone (4-Line)
VIP-6040PT
3. Enter the Display name.
4. Enter the Server, port, User and password.
to save the configuration.
5. Click
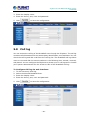
5.8
Call log
You can access the call log of the BroadSoft user through the IP phone. The call log
contains call information such as remote party identification, time and date. You can
check the call log and dial a call from the call log list. The BroadSoft call log allows
users to view and dial the stored numbers in the following lists: missed, received,
and placed. You can configure the IP phone to access up to 3 call log items. Contact
your system administrator for the access to URL of the BroadSoft call log.
To
1.
2.
3.
4.
Configure Call log via web interface:
To click DirectoryÆCall log
Select the desired Broadsoft Item.
Enter the Display name.
Enter the Server, port, user and password
5. Click
to save the configuration.
- 70 -
Gigabit Color LCD HD PoE IP Phone (4-Line)
VIP-6040PT
6 Other Feature Settings
6.1
Dial Plan
Dial plan is a string of characters that governs the way this phone processes the
inputs received from your phone keypad. This phone supports dial plan with the
following accepted digits: 1,2,3,4,5,6,7,8,9,0,*,#
Gamma
x
xx+
Description
any digit from 0-9;
at least 2 digit number;
^
exclude;
,
hear dial tone;
[3-5]
any digit of 3, 4, or 5;
[147]
any digit 1, 4, or 7;
<2=011>
Replace digit 2 with 011 when dialing.
To configure dial plan via web interface:
1. Click Account—Advanced—Dial Plan
2. Fill out the value in dial plan field.
- 71 -
Gigabit Color LCD HD PoE IP Phone (4-Line)
VIP-6040PT
3.
Click SaveSet to save the configuration.
Illegal input will fall back to default: {[x*]+}.
6.2
Emergency Call
Public telephone networks in countries around the world have a single emergency
telephone number (emergency services number) that allows a caller to contact local
emergency services for assistance when required. The emergency telephone
number may differ from country to country. It is typically a three-digit number so
that it can be easily remembered and dialed quickly. Some countries have a different
emergency number for each of the different emergency services.
You can specify the emergency telephone numbers on the IP phone for contacting
the emergency services in an emergency situation.
To configure emergency call via web interface:
1. Click SettingÆFeaturesÆPhone Lock
2. Enter the emergency services number under the Emergency section.
- 72 -
Gigabit Color LCD HD PoE IP Phone (4-Line)
VIP-6040PT
3.
Click SaveSet to save the configuration.
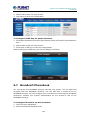
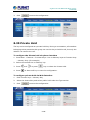
6.3
LED Status Setting
The LED Status setting mainly defines the power indicator LED.
To configure action url via web interface:
1. Click SettingÆPreference
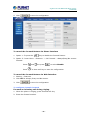
2. Select Yes or No for Power Status, Ringing Status, Miss Calls Status.
3. Click
6.4
for the setting.
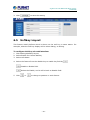
Action URL
To configure action URL via web interface:
1. Click SettingÆAction URL
2. Fill out the needed value in the necessary blank.
- 73 -
Gigabit Color LCD HD PoE IP Phone (4-Line)
VIP-6040PT
3. Click
6.5
to save the setting.
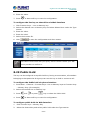
Softkey Layout
This feature mainly defines which is shown on the soft key in some status. For
example, what the soft key display will be when dialing, or talking.
To
1.
2.
3.
configure Soft key via web interface:
Click SettingÆSoftkey Layout
Select Enable for Custom Softkey
Select call States.
4. Select the feature from the disable key to enable key field by
Disable to Enable field.
Delete the Enable, and it will be back to Disable field.
5. Click
or
to change to position or each feature.
- 74 -
Gigabit Color LCD HD PoE IP Phone (4-Line)
VIP-6040PT
6. Click
to save the configuration.
When there are more than 5 items in the Enable field, the last softkey will
display More, and last two items will show on the next page (softkey). You
can check by pressing more.
6.6
Programmable Key
For the default keys as Soft keys, Navigation keys and so on, you can define them as
some specific features, and it works only on the idle page.
To configure Programmable Key via web interface:
1. Click Function KeysÆProgrammable Keys
2. Select the desired Key to set.
3. Click
to save the setting.
- 75 -
Gigabit Color LCD HD PoE IP Phone (4-Line)
VIP-6040PT
4. By clicking
6.7
, all setting of the keys will be back to default.
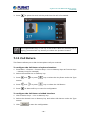
Ext. Key
It only works when there is an expansion module connected with the phone.
- 76 -
Gigabit Color LCD HD PoE IP Phone (4-Line)
VIP-6040PT
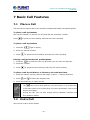
7 Basic Call Features
7.1
Place a Call
There are three ways to dial a call: Handset, Headset and Hands-free speakerphone.
To place a call by Handset
Pick up the handset, or press a line key and dial the necessary number.
Press
or press the send softkey and then the call is sending.
To place a call by Headset:
1. Press the
( light is Green).
2. Enter the desired number.
3. Press
or press the Send softkey and then the call is sending.
Placing a call by hands-free speakerphone
1. Press the
, or press the Line key and then you can hear the dial tone.
2. Press the number.
3. Press
or press the Send soft key and then the call is sending.
To place a call by call history or Directory via web inter face.
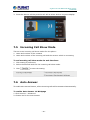
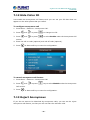
1. Press the History soft key (On the idle page) or Menu → History /Directory
2. Press
and
to select the targeted one.
3. Press Send soft key to make the call.
1. The
key is set to be a send key. You can set the * key as send key
or set some other to be as send keys. For more information, refer to the
Key as Send page
2. During the call, you can also change among Headset, Handset and
Free-speaker modes.
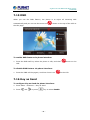
7.2
End a Call
How to end a call in three modes:
- 77 -
Gigabit Color LCD HD PoE IP Phone (4-Line)
VIP-6040PT
To end a call by Handset
1. Press the Cancel soft key or hang up the handset.
To end a call in Headset Mode
1. Press the Cancel soft key or press
.
To end a call in hands-free speakerphone Mode
1. Press the Cancel soft key or press
.
During the conference, just follow either of the above steps to end the call.
7.3
Redial a Call
To redial the last placed call from the IP Phone
1. Press
directly when LCD is on the idle interface.
7.4
Receive a Call
There are three ways to receive a call when the phone is ringing:
To receive a call by handset
Pick up the handset to start the conversation.
To receive a call by headset
Press
to start the conversation.
To receive a call by hands-free speaker
1. Option 1: Press
directly.
2. Option 2: Press Answer soft key.
3. Option 3: Press the Line key (flashes red).
Moreover, some other actions can be done by soft key when the call is
coming.
1. Press the Reject soft key to reject the call. Or press
2. Press Forward to forward to another phone.
- 78 -
to reject the current call.
Gigabit Color LCD HD PoE IP Phone (4-Line)
VIP-6040PT
3. Press the Silence soft key and the call will be silent with no ring tone display.
7.5
Incoming Call Show Mode
There are two incoming call show modes for this phone:
1. name and number of the contacts
2. name and number of the incoming call and the account which is connecting
To set incoming call show mode via web interface:
1. Click settingÆ preference
2. Select the desired mode for the incoming call show mode.
3. Click
7.6
to save the setting.
Auto Answer
To enable auto answer feature, all the incoming calls will be answered automatically.
To enable Auto Answer via Webpage
1. Click Account → Advanced
2. Choose Yes for the Auto Answer.
- 79 -
Gigabit Color LCD HD PoE IP Phone (4-Line)
VIP-6040PT
3. Click Saveset to save the configuration.
To Disable Auto Answer via Webpage
1. Click Account → Advanced
2. Choose No for the Auto Answer.
3. Click Saveset to save the configuration.
7.7
Call Hold
When the hold feature is used, the Hold icon will be shown on the display.
To make a call on hold in three modes:
To hold a call in the handset mode:
1. Press Hold soft key or
2. Press Resume soft key or
to hold the current call.
to resume the call on hold.
To hold a call in the headset mode:
1. Press Hold soft key or
2. Press Resume soft key or
to hold the current call.
to resume the call on hold.
- 80 -
Gigabit Color LCD HD PoE IP Phone (4-Line)
VIP-6040PT
To hold a call in the speaker mode:
1. Press Hold soft key or
2. Press Resume soft key or
7.8
to hold the current call.
to resume the call on hold.
Call Transfer
This phone supports Blind, Attended and Semi-Attended Transfer.
Blind Transfer
When you use this feature, you can do the blind transfer.
or Transfer soft key during the conversation; the call is on hold now.
1. Press
2. Enter the number that is to be transferred.
3. Press
, and now the blind transfer is completed.
The “Enable Call Feature” must be configured to “Yes” to enable this
feature.
Attended Transfer
When you use this feature, you can
1. Press
or transfer soft key during the conversation; the call is on hold
now.
2. Enter the number that is to be transferred, and press the send soft key or
3. To start the second conversation, press
.
or transfer soft key and then
transfer is completed.
To transfer calls across SIP domains, SIP service providers must support
transfer across SIP domains. Blind transfer will usually use the primary
account SIP profile. To use this function, at least one line key should be set
to Auto.
- 81 -
Gigabit Color LCD HD PoE IP Phone (4-Line)
VIP-6040PT
Semi-Attended Transfer
1. Press
or transfer soft key during the conversation; the call is on hold now.
2. Enter the number that is to be transferred, then press
the ring tone.
, and you can hear
or the transfer soft key to enable the Semi-attended transfer to be
3. Press
completed.
To use this function, at least one line key should be set to Auto.
BLF Transfer
1. Set a Programmable Key or line key as BLF. For how to set BLF, please refer to
BLF .
or transfer soft key during the conversation; the call is on hold now.
2. Press
3. Press BLF key to realize Blind, Attended and Semi-Attended Transfer.
7.9
Call Conference
This IP Phone supports up to 5-way conferencing.
5-way conferencing
1. Assuming that Parties A and B are in conversation. Party A wants to bring Parties
C, D and E into a conference.
2. Party A presses line 2 key and the call is placed on hold.
.
3. Party A enters the number of Party C and then presses send soft key or
4. Party C is answering the call.
5. Party A presses
or the conference soft key, and now Parties A, B and C are
in the 3-way conferencing.
6. Party A presses line 3 key and the current 3-way conferencing is placed on hold.
.
7. Party A enters the number of Party D and then presses send soft key or
8. Party D is answering the call.
or the conference soft key, and now Parties A, B, C and D
9. Party A presses
are in the 4-way conferencing.
10. Party A presses line 4 key; the call is placed on hold.
11. Party A enters the number of Party E and then press send soft key or
.
12. Party E is answering the call.
13. Party A presses
or the conference soft key, and now Parties A, B, C, D and E
are now in the 5-way conferencing.
- 82 -
Gigabit Color LCD HD PoE IP Phone (4-Line)
VIP-6040PT
14. Party A ends the call and the conference is finished.
1. If Party C does not answer the call, Party A can continue the
conversation with B;
2. Once Party A hangs up the call, the conference is ended. If Party B or
Party C drops the call, either A&C or A&B can continue to communicate;
3. The conference feature is not available on all servers. For more
information, contact your system administrator;
4. To realize the 5-way conferencing, the line should be all available; and
5. Press
to get all parties information.
7.10 Call Forward
This phone supports static forward (always forward, busy forward and no answer
forward) and dynamic forward.
- 83 -
Gigabit Color LCD HD PoE IP Phone (4-Line)
VIP-6040PT
To configure static forward
To configure always forward
With this feature, all incoming calls will forward immediately to configured number.
1. Press Menu → Features → Call forward →Always Forward.
2. Press
and
or press
to select Disable.
3. Enter the forward to number and on code (optional), off code (optional).
4. Press
or Save soft key to save the configuration.
To configure busy forward
With this feature, the incoming calls are immediately forwarded if the phone is busy.
1. Press Menu →Features → Call forward →Busy forward.
2. Press
and
or press
to select Enable.
3. Enter the forward to number and on code (optional), off code (optional).
4. Press
or Save soft key to save the configuration.
- 84 -
Gigabit Color LCD HD PoE IP Phone (4-Line)
VIP-6040PT
To configure no answer forward
No Answer Forward: Incoming calls are forwarded if not answered after some time.
1. Press Menu →Features → Call forward →No answer forward.
2. Press
and
or press
to select Enable.
3. Enter the forward to number and on code (optional), off code (optional).
4. Press
or Save soft key to save the configuration.
When the Forward feature is enabled, the Icon
To
1.
2.
3.
4.
configure Forward via Web Interface
Setting → Features
Click On for Always, Busy and No Answer
Fill out the Forward with Number
Fill out the on code and the off code (optional)
- 85 -
will display on top of the LCD.
Gigabit Color LCD HD PoE IP Phone (4-Line)
VIP-6040PT
5. Click
to save the configuration
To cancel the forward feature via Phone Interface
1. Option 1: To press the
key to disable the forward feature.
2. Option 2: Press Menu →Features → Call forward →Always/Busy/No answer
Forward.
Press
Press
and
or press
to select Disable.
or Save soft key to save the configuration.
To cancel the forward feature via Web Interface
1. Setting → Features
2. Click Off for Always, Busy and No Answer
3. Click
to save the configuration
To configure dynamic forward
Forward an incoming call during ringing.
1. When the phone is ringing, press Forward soft key.
2. Enter the forward number.
- 86 -
Gigabit Color LCD HD PoE IP Phone (4-Line)
VIP-6040PT
3. Press
or press the send soft key and then the call is forwarded.
The Programmable Key or line key is set as BLF. When an incoming call is
ringing, press this BLF key directly to realize the dynamic forward.
7.11 Call Return
This feature allows you to dial the last phone call you received.
To configure the Call Return via phone interface
1. Press Menu →Features →Function Keys→ Line or Memory Keys as Function Keys
→ Memory key1(for example)
2. Select the wanted Line or Memory key.
3. Press
and
or press
key to select the Key Event under the Type
and
or press
key to select the Call Return.
section.
4. Press
5. Press
or Save soft key to save the configuration
To configure the Call Return via Web interface
1. Click Function keys → Line or Memory key.
2. Select the desired Line or Memory key and select Call Return under the Type
section.
3. Click
to save the configuration.
- 87 -
Gigabit Color LCD HD PoE IP Phone (4-Line)
VIP-6040PT
7.12 Hide Caller ID
Just enable the anonymous call feature and you can set your ID that does not
appear on the other phone that you called.
To configure anonymous call
1. Press Menu →Features →Anonymous Call.
2. Press
and
or press
to change Line ID.
3. Press
and
or press
to select Enable under the Anonymous Call
section.
4. Enter the call on code (optional) and call off code (optional).
5. Press
or Save soft key to save the configuration.
To cancel anonymous call feature
1. Press Menu →Features →Anonymous Call
2. Press
and
or press
key to select Disable under the Anonymous
Call section.
3. Press
or Save soft key to save the configuration.
7.13 Reject Anonymous
If you do not want to be disturbed by anonymous calls, you can set the reject
anonymous call feature, so that you will not hear the unknown calls.
- 88 -
Gigabit Color LCD HD PoE IP Phone (4-Line)
VIP-6040PT
To configure rejecting anonymous call
1. Press Menu →Features →Anonymous Call
2. Press
and
or press
key to change the Line ID.
3. Press
and
or press
key to select Enable under the Rejection
section.
4. Press
or Save soft key to save the configuration
To cancel rejecting anonymous call
1. Press Menu →Features →Anonymous Call
2. Press
and
or press
key to select Disable under the Rejection
section.
3. Press
or Save soft key to save the configuration.
- 89 -
Gigabit Color LCD HD PoE IP Phone (4-Line)
VIP-6040PT
7.14 Call Mute
When you use the Mute feature, other parties will not hear your voice while you can
hear their voice. Call mute applies to all modes (handset, headset, and
speakerphone).
To mute the call during a call (including a conference call)
1. Press the mute key
, then the mute key glows green, and the LCD displays
2. To disable the mute function, press
- 90 -
again.
Gigabit Color LCD HD PoE IP Phone (4-Line)
VIP-6040PT
7.15 DND
When you use the DND feature, the phone is to reject all incoming calls
automatically and you can see the mute icon
the idle page.
shown on the top of the LCD on
To enable DND feature via phone interface:
1. Press the DND soft key when the phone is idle, and then
LCD.
shown on the
To disable DND feature via phone interface:
1. Press the DND soft key again, and then there is no
on the LCD.
7.16 Key as Send
To configure Key as Send via phone interface:
1. Press Menu →Features → Key as Send
2. Press
and
or press
key to select Enable.
- 91 -
Gigabit Color LCD HD PoE IP Phone (4-Line)
VIP-6040PT
3. Press
or Save soft key to save the configuration
To cancel # Key as Send via phone interface:
1. Press Menu →Features → Key as Send
2. Press
3. Press
and
or press
key to select Disable.
or Save soft key to save the configuration
7.17 No Key Entry Timeout
No Key Entry Timeout means that when you entry the number, it will dial out
automatically after some time when you stop enter the number.
To configure No Key Entry Timeout via web interface:
1. Click Webpage Setting → Preference
2. Fill out the blank of No Key Entry Timeout: for example, 5 (seconds). 0 means it
never goes timeout. The send key should be pressed to dial out the number.
- 92 -
Gigabit Color LCD HD PoE IP Phone (4-Line)
VIP-6040PT
3. Click the
to save the configuration.
7.18 Keypad Lock
To enable Keypad Lock via Phone
1. Press Menu--Settings--Advanced Setting--Phone Setting--Lock
2. Press Info or Switch to choose a lock type under All Keys Menu: Key Function,
Key Lock & Answer.
3. Press Save or OK key to save the configuration.
To
1.
2.
3.
disable Keypad Lock via Phone
Press Menu--Settings--Advanced Setting--Phone Setting--Lock
Press Info or Switch to choose Off.
Press Save or OK key to save the configuration.
To
1.
2.
3.
4.
enable Keypad Lock via Webpage
Click Webpage Setting → Preference
Choose the Lock keys.
Fill out the unlock Pin and auto lock time
Fill out the Emergency Number. When the phone is locked, only Emergency
- 93 -
Gigabit Color LCD HD PoE IP Phone (4-Line)
VIP-6040PT
Number can be sent.
5. To click Saveset to save the configuration.
To
1.
2.
3.
disable Keypad Lock via Webpage
Click Webpage Setting → Preference
Choose Disable for the Phone Lock.
Click Saveset to save the configuration.
7.19 Hot Line
To configure Hot Line
1. Press Menu →Features → Hot Line
2. Enter the number and delay time (At present, we support off hook auto dial.).
3. Press
or Save soft key to save the configuration
To configure Hotline auto dial via Web Interface
1. Setting → Features.
2. Fill out the number in the Hotline Number and Hotline Time-out.
- 94 -
Gigabit Color LCD HD PoE IP Phone (4-Line)
VIP-6040PT
3. Click
to save the configuration.
Delete the number and save the configuration, and then the Hotline auto dial is now
cancelled.
- 95 -
Gigabit Color LCD HD PoE IP Phone (4-Line)
VIP-6040PT
8 Function Key Features Settings
8.1
Line
It works the same as Line keys.
To
1.
2.
3.
configure Line Feature via Web Interface
Click Function keys → Line or Memory Key.
Select the wanted Key and set as Line.
Select the Account.
to save the configuration.
4. Click
8.2
Speed Dial
With this feature, you can dial one directory by pressing the definite key.
To configure Speed Dial feature via phone interface
1. Press Menu →Features →Function Keys→Line or Memory keys as Function Keys
→ Memory key1(for example)
2. Press
and
or press
key to select the Speed Dial under the Type
section.
3. Enter the targeted Number.
4. Press
or Save soft key to save the configuration
Then the selected Line or Memory key will work as Speed Dial.
To configure Speed Dial feature via Web Interface
1. Click Function keys → Line or Memory key.
2. Select the wanted Line or Memory key and set as Speed Dial.
- 96 -
Gigabit Color LCD HD PoE IP Phone (4-Line)
VIP-6040PT
3. Enter the desired phone number under the Value section.
4. Select the Account ID
to save the configuration.
5. Click
8.3
BLF
You can use the BLF (Busy Lamp Field) feature to monitor whether his phone is busy
or free.
1. When the monitored line is idle, the light is steady green.
2. When the monitored line is ringing, the light is blinking red. Press the BLF key to
pick the phone up directly.
3. When the monitored line is calling or in a conversation, the light is steady red.
To configure a BLF key by phone
1. Press Menu →Features →Function Keys→Line or Memory keys as Function Keys
→ Memory key1 (for example).
2. Select the targeted Line or Memory key.
3. Press
and
or press
key to select the BLF under the Type
section.
4. Enter the targeted Value Number.
5. Press
and
or press
key to select the Account ID.
6. Enter the Pickup Code.
7. Press
To
1.
2.
3.
4.
or Save soft key to save the configuration
configure a BLF key by web
Click Function keys → Line or Memory key.
Select the desired Line or Memory key and select BLF under the Type section.
Enter the monitored phone number under the Value section.
Select the Account ID
- 97 -
Gigabit Color LCD HD PoE IP Phone (4-Line)
VIP-6040PT
5. Fill out the Pickup code.
6. Click
to save the configuration and then restart.
This feature must work with your proxy server. Please contact your SIP
server provider to confirm it.
- 98 -
Gigabit Color LCD HD PoE IP Phone (4-Line)
VIP-6040PT
8.4
BLF List
To configure BLF List via web interface:
1. Login and click Account
2. Click Advanced and then fill out the Eventlist BLF URL.
3. To configure BLF List Keys
- 99 -
Gigabit Color LCD HD PoE IP Phone (4-Line)
VIP-6040PT
3.1 ClickÆFunction KeysÆMemory Key
3.2 Select the BLF List under the Type section.
3.3. Select Account.
3.4 Click Saveset to save the configuration and then restart the Phone.
8.5
Voice Message
This phone supports Voicemail, and when there is message, the message will
be in light green. Moreover, when the handset is picked up, or the speaker key is
pressed, you will hear some quick busy tone.
To configure the Voice mail feature via phone interface:
1. Press Menu → Messages → Voice Mai l→ Set Voice Mail.
2. Enter the Account 1/2/3/4 NO.
3. Press
To
1.
2.
3.
or Save soft key to save the configuration
configure Voice Mail Memory Key via Web Interface:
Click Function keys → Memory Key.
Select the wanted Key.
Enter the desired voicemail feature codes under the Value section.
- 100 -
Gigabit Color LCD HD PoE IP Phone (4-Line)
VIP-6040PT
4. Fill out the Label displayed on LCD.
5. Select the Account.
to save the configuration.
6. Click
To configure a Voice mail key by phone interface:
1. Press Menu →Features →Function Keys → Line or Memory keys as Function Keys
→ Memory key1 (for example).
2. Select the targeted Line or Memory key.
and
3. Press
or press
key to select the Voice mail under the Type
section.
4. Enter the Value Number.
and
5. Press
or press
key to select the Account ID.
or Save soft key to save the configuration
6. Press
This feature must work with your proxy server. Please contact your SIP
server provider to confirm it.
8.6
Direct Pickup
With this feature, you can pick up the set line when it is ringing.
To configure Direct Pickup feature via phone interface
1. Press Menu →Features →Function Keys → Line or Memory keys as Function Keys
→ Memory key1 (for example)
2. Press
and
or press
key to select the Speed Dial under the Type
section.
3. Enter the value.
4. Press
or Save soft key to save the configuration
Then the selected Line or Memory key will work as Direct Pickup.
To
1.
2.
3.
configure Direct Pickup feature via Web Interface
Click Function keys → Line or Memory key.
Select the wanted Line or Memory key and set as Direct Pickup.
Enter the pickup code and follow the desired phone number under the Value
section.
4. Select the Account ID
- 101 -
Gigabit Color LCD HD PoE IP Phone (4-Line)
VIP-6040PT
5. Click
8.7
to save the configuration.
Group Pickup
With this feature, you can pick up the specified group that you want incoming calls.
To configure the Pick up via phone interface
1. Press Menu →Features →Function Keys → Line or Memory keys as Function Keys
→ Memory key1 (for example)
2. Select the wanted Line or Memory key.
3. Press
and
or press
key to select the Group Pickup under the
Type section.
4. Enter pickup code and follow the desired group number
5. Press
or Save soft key to save the configuration
To configure the Group Pickup via Web interface
1. Click Function keys → Line or Memory key.
2. Select the desired Line or Memory key and select Group Pickup under the Type
section.
3. Enter the pickup code and follow the desired Group number under the Value
section.
- 102 -
Gigabit Color LCD HD PoE IP Phone (4-Line)
VIP-6040PT
4. Click
8.8
to save the configuration.
Call Park
With this feature, you can put a call on hold and continue the conversation from
another phone.
To configure the Call Park via phone interface
1. Press Menu →Features →Function Keys→Line or Memory keys as Function Keys
→ Memory key1 (for example)
2. Select the wanted Line or Memory key.
3. Press
and
or press Switch soft key to select the Key Event under the
Type section.
4. Press
5. Press
and
or press Switch soft key to select the Call Park.
or Save soft key to save the configuration
To configure the Call Park via Web interface
1. Click Function key → Line or Memory key.
2. Select the desired Line or Memory key and select Direct Pickup under the Type
section.
- 103 -
Gigabit Color LCD HD PoE IP Phone (4-Line)
VIP-6040PT
3. Click
8.9
to save the configuration.
Intercom
When using the intercom feature, you can quickly get access to the connection to
the configured one.
To configure intercom feature via phone interface
1. Press Menu →Features →Function Keys→Line or Memory keys as Function Keys
→ Memory key1 (for example)
2. Press
and
or press
key to select the intercom under the type
section.
3. Enter the intercom codes followed by desired number.
4. Press
or Save soft key to save the configuration
Then the selected Line or Memory key will work as intercom.
To
1.
2.
3.
4.
configure Intercom feature via Web Interface
Click Function keys → Line or Memory key.
Select the wanted Line or Memory key.
Enter intercom codes followed by desired number under the Value section.
Select the Account ID.
- 104 -
Gigabit Color LCD HD PoE IP Phone (4-Line)
VIP-6040PT
5. Click
to save the configuration.
This feature must work with your proxy server. Please contact your SIP
server provider to confirm it.
8.10 DTMF
When the key is configured as DTMF key, you are allowed to send out the desired
DTMF number during the conversation. To use this feature, make sure that the DTMF
Tone is on.
To configure the DTMF via Phone Interface
1. Click SettingÆPreference
2. Select On for Keypad DTMF Tone.
to save the configuration.
3. Click
To configure the DTMF via Phone Interface
1. Press Menu →Features →Function Keys→Line or Memory keys as Function Keys
→ Memory key1 (for example)
2. Select the wanted Line or Memory key.
3. Press
and
or press
key to select the DTMF under the Type
section.
4. Enter the value with the desired DTMF number.
5. Press
or Save soft key to save the configuration.
- 105 -
Gigabit Color LCD HD PoE IP Phone (4-Line)
VIP-6040PT
To
1.
2.
3.
configure the DTMF via Web interface
Click Function keys → Line or Memory key.
Select the desired Line or Memory key and select DTMF under the Type section.
Fill out the value with the desired DTMF number.
to save the configuration.
4. Click
8.11 Prefix
If the key is configured as Prefix key, you can set the number prefix (e.g., before the
number plus 9); then you don't input 9, press the key and 9 will display on the LCD
interface.
To configure the Prefix via Phone Interface
1. Press Menu →Features →Function Keys → Line or Memory keys as Function Keys
→ Memory key1 (for example)
2. Select the wanted Line or Memory key.
3. Press
and
or press
key to select the Prefix under the type
section.
4. Enter the value with the number that you want to set as prefix.
5. Press
To
1.
2.
3.
or Save soft key to save the configuration.
configure the Prefix via Web interface
Click Function key → Line or Memory key.
Select the desired Line or Memory key and select Prefix under the Type section.
Fill out the value.
4. Click
to save the configuration.
- 106 -
Gigabit Color LCD HD PoE IP Phone (4-Line)
VIP-6040PT
Then when you press this key, the set value is input directly.
8.12 Local Group
When using the Local Group feature, press the key and enter the local Contacts
interface quickly.
To configure the Local group via Phone Interface
1. Press Menu →Features →Function Keys → Memory keys as Function Keys →
Memory key1 (for example)
2. Select the wanted Memory key.
3. Press
and
or press
key to select the Local group under the type
section.
4. Press
or Save soft key to save the configuration
To configure the Local Group via Web interface
1. Click Function key → Memory Key.
2. Select the desired Key and select Local group under the Type section.
3. Click
to save the configuration.
Then you can press the local group key to access the pre-defined contact group in
the local directory quickly.
- 107 -
Gigabit Color LCD HD PoE IP Phone (4-Line)
VIP-6040PT
8.13 XML Group
When using the XML Group feature, press the key and enter the Remote Contacts
interface quickly.
To configure the XML group via Phone Interface
1. Press Menu →Features →Function Keys → Memory keys as Function Keys →
Memory key1 (for example)
2. Select the wanted Memory key.
3. Press
and
or press
key to select the XML group under the Type
section.
4. Press
or Save soft key to save the configuration.
To configure the XML Group via Web interface
1. Click Function key → Memory Key
2. Select the desired Key and select XML group under the Type section.
3. Click
to save the configuration.
8.14 LDAP
When using the LDAP feature, you can get the LDAP Phonebook directly.
To configure the LDAP via Phone Interface
1. Press Menu →Features →Function Keys → Memory keys as Function Keys →
Memory key1 (for example)
2. Select the wanted Memory key.
- 108 -
Gigabit Color LCD HD PoE IP Phone (4-Line)
VIP-6040PT
3. Press
and
or press
key to select the LDAP under the type
section.
4. Press
or Save soft key to save the configuration.
To configure the LDAP via Web interface
1. Click Function key → Memory Key.
2. Select the desired Key and select LDAP under the Type section.
to save the configuration.
3. Click
8.15 XML Browser
You can use this key feature to access the XML browser quickly. The XML browser
allows you to create custom services which meet your functional requirements on
the server. You can customize practical applications, such as weather report, stock
information, Google search, etc.
To configure the XML Browser via Phone Interface
1. Press Menu →Features →Function Keys → Memory keys as Function Keys →
Memory key1 (for example)
2. Select the wanted Memory key.
3. Press
and
or press
key to select the XML Browser under the
Type section.
4. Fill out the access URL for XML browser.
5. Press
or Save soft key to save the configuration.
To configure the XML Browser via Web interface
1. Click Function key → Memory Key.
2. Select the desired Key and select XML browser under the Type section.
- 109 -
Gigabit Color LCD HD PoE IP Phone (4-Line)
VIP-6040PT
3. Fill out the access URL for XML browser
to save the configuration.
4. Click
8.16 Broadsoft Group
When using the BroadSoft Group feature, press the key and enter the Remote
Contacts interface quickly.
To configure the Broadsoft group via Phone Interface
1. Press Menu →Features →Function Keys→Memory keys as Function Keys →
Memory key1 (for example)
2. Select the wanted Memory key.
3. Press
and
or press
key to select the Broadsoft group under the
type section.
4. Press
or Save soft key to save the configuration.
To configure the Broadsoft group via Web interface
1. Click Function key → Memory Key.
2. Select the desired Key and select Broadsoft group under the Type section.
to save the configuration.
3. Click
8.17 Conference
The Planet IP Phone supports up to 5-way conferencing. You are allowed to
configure the programmable key to be used as a conference key. This key works the
same as
.
To configure the Conference via Phone Interface
1. Press Menu →Features →Function Keys→Memory keys as Function Keys →
Memory key1 (for example)
2. Select the wanted Memory key.
3. Press
and
or press
key to select the Conference under the type
section.
4. Press
or Save soft key to save the configuration
- 110 -
Gigabit Color LCD HD PoE IP Phone (4-Line)
VIP-6040PT
To configure Conference via Web Interface
1. Click Function keys →Memory Key.
2. Select the desired Key and select Conference under the Type section.
to save the configuration.
3. Click
8.18 Forward
If the key is configured as Forward key, press this key under the idle status. The IP
phone will turn to the Always Forward interface and you can set the Forward to
number. When there is any call to the number, it will be forwarded to the set number
automatically.
To configure the Forward via Phone Interface
1. Press Menu →Features →Function Keys → Memory keys as Function Keys →
Memory key1 (for example)
2. Select the wanted Memory key.
3. Press
and
or press
key to select the Forward under the type
section.
4. Enter the Number that is to be forwarded.
5. Press
To
1.
2.
3.
4.
or Save soft key to save the configuration.
configure Forward via Web Interface
Click Function keys →Memory Key
Select the desired Key and select Forward under the Type section.
Enter the Value with the number you want to forward.
Click
to save the configuration.
8.19 Transfer
You are able to configure the key as a transfer key to perform the Blind/Attended
Transfer.
To configure the Transfer via Phone Interface
1. Press Menu →Features →Function Keys → Memory keys as Function Keys →
Memory key1 (for example)
2. Select the wanted Memory key.
- 111 -
Gigabit Color LCD HD PoE IP Phone (4-Line)
VIP-6040PT
3. Press
and
or press
key to select the Transfer un the Type
section.
4. Enter the Number that is to be transferred.
5. Press
To
1.
2.
3.
or Save soft key to save the configuration.
configure Transfer via Web Interface
Click Function keys →Memory Key
Select the desired Key and select Transfer under the Type section.
Enter the Value with the number that is to be transferred.
to save the configuration.
4. Click
8.20 Hold
The key can be configured as a hold key. You can use this key to hold and resume a
call during the conversation.
To configure the Hold via Phone Interface
1. Press Menu →Features →Function Keys → Memory keys as Function Keys →
Memory key1 (for example)
2. Select the wanted Memory key.
3. Press
and
or press
key to select the Hold under the type
section.
4. Press
or Save soft key to save the configuration.
To configure Hold via Web Interface
1. Click Function keys →Memory Key
2. Select the desired Key and select Hold under the Type section.
3. Click
to save the configuration.
8.21 Group Listening
With this feature, you can use Headset, Handset and speaker at the same time.
To configure the Group listening via Phone Interface
1. Press Menu →Features →Function Keys → Memory keys as Function Keys →
- 112 -
Gigabit Color LCD HD PoE IP Phone (4-Line)
VIP-6040PT
Memory key1 (for example)
2. Select the wanted Memory key.
3. Press
and
or press
key to select the group listening under the
Type section.
4. Press
or Save soft key to save the configuration.
To configure Group listening via Web Interface
1. Click Function keys →Memory Key
2. Select the desired Key and select Group listening under the Type section.
to save the configuration.
3. Click
8.22 DND
If the key is configured as DND key, you are allowed to activate the DND function
immediately when you press it and the phone is to reject all incoming calls
automatically. Press it again to deactivate DND mode.
To configure the DND via Phone Interface
1. Press Menu →Features →Function Keys → Memory keys as Function Keys →
Memory key1 (for example)
2. Select the wanted Memory key.
3. Press
and
or press
key to select the DND under the type
section.
4. Press
or Save soft key to save the configuration.
To configure DND via Web Interface
1. Click Function keys →Memory Key
2. Select the desired Key and select DND under the Type section.
3. Click
to save the configuration.
8.23 Redial
If the key is configured as Redial key, you can redial the last placed call from the IP
Phone.
- 113 -
Gigabit Color LCD HD PoE IP Phone (4-Line)
VIP-6040PT
To
1.
2.
3.
configure Redial via Web Interface
Click Function keys →Exp. Key.
Select the desired Key and select redial under the Type section.
Enter the Label displayed on LCD.
to save the configuration.
4. Click
8.24 SMS
8.24.1 Send SMS
To
1.
2.
3.
4.
send SMS via web Interface
Click SettingÆSMS
Select the account (from which the SMS is sent).
Enter the targeted number.
Input the content of SMS and click Send.
8.24.2 Set SMS Memory Key
To configure the SMS via Phone Interface
1. Press Menu →Features →Function Keys→Memory keys as Function Keys →
Memory key1 (for example)
2. Select the wanted Memory key.
3. Press
and
or press
key to select the SMS under the type
section.
4. Press
or Save soft key to save the configuration.
To configure SMS via Web Interface
1. Click Function keys →Memory Key
2. Select the desired Key and select SMS in the Type.
- 114 -
Gigabit Color LCD HD PoE IP Phone (4-Line)
VIP-6040PT
3. Click
to save the configuration.
8.25 Record
With record feature, you can record calls by pressing the record key on the phone.
To configure the record via phone interface
1. Press Menu →Features →Function Keys→Line or Memory keys as Function Keys
→ Memory key1 (for example)
2. Select the wanted Line or Memory key.
3. Press
4. Press
and
or press
key to select the Record.
or Save soft key to save the configuration.
To configure the record via Web Interface
1. Click Function keys → Line or Memory key.
2. Select the desired Line or Memory key and select Record under the Type section.
to save the configuration.
3. Click
This feature must work with your proxy server. Please contact your SIP
server provider to confirm it.
8.26 URL Record
The phone sends HTTP URL request to trigger a recording. Contact your system
administrator for the predefined URL.
To configure the URL record via phone interface
1. Press Menu →Features →Function Keys→ Memory keys as Function Keys →
Memory key1 (for example)
2. Select the wanted Line or Memory key.
3. Press
4. Press
and
or press
key to select the URL Record.
or Save soft key to save the configuration
To configure the record via Web Interface
1. Click Function keys → Memory key.
- 115 -
Gigabit Color LCD HD PoE IP Phone (4-Line)
VIP-6040PT
2. Select the desired Line or Memory key and select URL Record under the Type
section.
to save the configuration.
3. Click
8.27 Paging
With this feature, you can call a phone directly.
To configure the paging via phone interface
1. Press Menu →Features →Function Keys→Memory keys as Function Keys →
Memory key1 (for example)
2. Select the wanted Line or Memory key.
3. Press
and
or press
key to select the Paging.
4. Enter the paging code followed by the number.
5. Press
To
1.
2.
3.
or Save soft key to save the configuration.
configure the Paging via Web interface
Click Function keys → Memory key.
Select the desired Memory key and select Paging under the Type section.
Enter the paging code followed by the number.
to save the configuration.
4. Click
8.28 Shared Line
This feature allows subscribers to share SIP lines. Moreover it also provides status
monitoring of the shared line.
To configure the line key as shared line via phone interface
1. Press Menu →Features →Function Keys→Line or Memory keys as Function Keys
→ Memory key1 (for example)
2. Select the wanted Line or Memory key.
3. Press
and
or press
key to select the Shared Line under the type
and
or press
key to select the Account ID.
section.
4. Press
5. Enter the Label.
- 116 -
Gigabit Color LCD HD PoE IP Phone (4-Line)
VIP-6040PT
6. Enter the Value.
7. Press
or Save soft key to save the configuration.
To configure the line key as shared line via Web Interface
1. Click Function keys → Line or Memory key.
2. Select the desired Line or Memory key and select Shared Line under the Type
section.
3. Enter the Value.
4. Enter the Label.
5. Select the Account ID.
to save the configuration and then restart.
6. Click
This feature must work with your proxy server. Please contact your SIP
server provider to confirm it.
8.29 Public Hold
The key can be configured as a public hold key. During a conversation, all members
belonging to that particular SLA group can use this key to hold or resume a call.
To configure the Public hold via phone interface
1. Press Menu →Features →Function Keys→Line or Memory keys as Function Keys
→ Memory key1 (for example)
2. Select the wanted Line or Memory key.
3. Press
4. Press
and
or press
key to select the Public Hold.
or Save soft key to save the configuration.
To configure public hold via Web Interface
1. Click Function keys →Memory Key.
2. Select the desired Key and select public hold under the Type section.
- 117 -
Gigabit Color LCD HD PoE IP Phone (4-Line)
VIP-6040PT
3.
Click
to save the configuration.
8.30 Private Hold
The key can be configured as a private hold key. During a conversation, all members
belonging to that particular SLA group can use this key to hold the call, but only the
initiator can resume the call.
To configure the Private hold via phone interface
1. Press Menu →Features →Function Keys→Line or Memory keys as Function Keys
→ Memory key1 (for example)
2. Select the wanted Line or Memory key.
3. Press
4. Press
and
or press
key to select the Private Hold.
or Save soft key to save the configuration.
To configure private hold via Web Interface
1. Click Function keys →Memory Key
2. Select the desired Key and select public hold under the Type section.
3.
Click
to save the configuration.
- 118 -
Gigabit Color LCD HD PoE IP Phone (4-Line)
VIP-6040PT
9 Upgrade
9.1
Factory Reset
To set Factory Reset by phone interface
1. Press Menu → Setting → Advanced Setting (default password: admin) →Factory
Reset
2. Press OK soft key on the warning page.
To set Factory Reset via web interface
1. Click Management → Upgrade
and then confirm the setting.
2. Click
9.2
To
1.
2.
3.
Pcap Feature
use pcap via web interface:
Click ManagementÆUpgrade
Click Start and then operate the phone
When the operation is done, click Stop and then click Export.
- 119 -
Gigabit Color LCD HD PoE IP Phone (4-Line)
VIP-6040PT
4. Then you’ll get the Pacp captures.
9.3
System Log
To download system log via web interface:
1. Click ManagementÆConfiguration
of the system Log
2. Click
3. Then you’ll get a txt file: syslog.txt.
.
9.4
Upgrade
To upgrade software, this phone can be configured with a TFTP server where the
new code image is located. The TFTP upgrade can work in either static IP or DHCP
mode using private or public IP address. It is recommended to set the TFTP server
address in either a public IP address or on the same LAN with the phone.
To configure the TFTP server via the Web configuration interface
Input the admin password to enter the configuration screen. From there, enter the
TFTP server address in the designated field towards the bottom of the configuration
- 120 -
Gigabit Color LCD HD PoE IP Phone (4-Line)
VIP-6040PT
screen. Once the TFTP server is configured, please power cycle the phone.
The TFTP process may take as long as 1 to 2 minutes over the Internet or just 20+
seconds if it is performed on a LAN. Users are recommended to conduct TFTP
upgrade in a controlled LAN environment if possible. For those who do not have a
local TFTP server, Planet provides a NAT-friendly TFTP server on the public Internet
for firmware upgrade. Please check the Service section of Planet’s Web site to obtain
this TFTP server’s IP address.
Directory to configure local TFTP
1. Unzip the file and put all of them under the root directory of the TFTP server.
2. The PC running the TFTP server and the UC IP Phone should be in the same LAN
segment.
3. Go to File -> Configure -> Security to change the TFTP server's default setting
from "Receive Only" to "Transmit Only" for the firmware upgrade.
4. Start the TFTP server on the UC IP Phone’s web configuration page.
5. Configure the Firmware Server Path with the IP address of the PC.
6. Update the change and reboot the unit.
When Planet IP Phone boots up, it will send TFTP or HTTP request to
download configuration files. There are two configuration files, one is
“cfg.txt” and the other is “cfg00304fxxxxxx”, where “00304fxxxxxx” is the
MAC address of the phone. These two files are initially for automatically
provisioning purpose only, and for normal TFTP or HTTP firmware upgrade.
The following error messages in a TFTP or HTTP server log can be ignored.
Download and install a free TFTP or HTTP server to the LAN to perform
firmware upgrades. A free Windows version TFTP server is available:
To upgrade manually via the Web configuration interface
1. Download the firmware.
- 121 -
Gigabit Color LCD HD PoE IP Phone (4-Line)
VIP-6040PT
2. Click Management → Upgrade
3. Click Browser or the blank.
4. Select the firmware and then click
5. Restart.
9.5
.
Configuration File
To download configuration file:
1. Click Management Æ Configuration ÆDownload Device Configuration
2. Then you can get a file: cfg.bin
To restore configuration file:
1. Click Management Æ Configuration Æ Restore configuration
2. Select the cfg.bin file and then Click
3. Restart the phone.
- 122 -
.
Gigabit Color LCD HD PoE IP Phone (4-Line)
VIP-6040PT
10 Appendix
10.1 Frequently Asked Questions List
Q1: Why is the phone LCD screen blank?
A1:
1.
Ensure your phone is properly plugged into a functional AC outlet.
2.
Ensure that the phone isn’t plugged into a plug controlled by a switch that is off.
3.
If the phone is plugged into a power strip, try plugging it directly into a wall
outlet instead.
4.
If your phone is powered from PoE, ensure you use a PoE compliant switch or
hub, or contact your system administrator for more information.
5.
Check that the power LED is on to ensure the phone is powered on.
Q2: Why does the phone display "Network Unavailable"?
A2: Ensure that the Ethernet cable is plugged into the Internet port on the phone
and the Ethernet cable is not loose. Ensure that the switch or hub in your network is
operational. Contact your system administrator for more information.
Q3: Why can’t I get a dial tone?
A3: Check for any loose connections and that the phone has been installed properly.
For the Installation instructions, refer to our quick installation guide. Check whether
dial tone is present in one of the audio modes. Switch to the Handset, Headset (if
present) or Hands-Free Speakerphone to check whether dial tone is present in one
of the audio modes. If the dial tone exists in another audio mode, connect a different
handset or headset to isolate the problem.
Q4: Where to set the tone?
A4 : You can set the tone on web interface:
Click SettingÆTones
Define the dial tone, ringing, busy tone…
For the tones, you can check with your system administrator.
- 123 -
Gigabit Color LCD HD PoE IP Phone (4-Line)
VIP-6040PT
Q5: How to download XML Configuration
A5: Click ManagementÆConfigurationÆ
Q6: How to Import TLS certificate
A6: Click ManagementÆTLS Certs
Click Choose file to select the certificate.
Click
.
Q7: How to use LLDP
A7: VLAN Notes include:
1. Voice VLAN
2. Major benefits of using VLANs
3. VLAN discovery method on Planet IP phones
4. LLDP feature on Planet IP phones
5. Supports TLVS of IP Phones
6. Configuring LLDP feature
7. DHCP VLAN
8. Open the DHCP VLAN on Planet IP phones
9. VLAN in Bridge Mode
10. VLAN in NAT Mode
Q8: How to register VIP-6040PT to IPX-2100
A8:
- 124 -
Gigabit Color LCD HD PoE IP Phone (4-Line)
VIP-6040PT
[In IPX-2100]
For extensions, please create a new account and remember their user name and
password.
[In VIP-6040PT]
On Account/Basic page.
Account: Choose your account
Account Active = Yes
Primary SIP Server: 192.168.1.21
SIP Transport = Default is UDP
SIP user ID: 204 (in this case)
Authenticate ID: 204 (in this case)
Authenticate Password: 123456 (in this case)
After saving, user can check the register status in “Account Status” item.
- 125 -
Gigabit Color LCD HD PoE IP Phone (4-Line)
VIP-6040PT
- 126 -