1
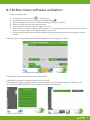
&
User Manual
Energy
V 0.1
®
Last update: August 2012
All software-related descriptions refer to the software V1279. We recommend to update older versions of the system. Small deviations in the description because of software changes are possible.
All listed brands and logos are registered trademarks of their respective owners.
Copyright
All rights reserved. Without the the prior written permission of the publisher, no part of this document for any purpose, be
reproduced or transmitted, and regardless of any form or by any means, electronic or mechanical, this is happening.
If this publication is made available on media by Ekon GmbH, GmbH Ekon grant permission, copies of the information contained in this file is only for private use and not to download or print for redistribution. No part of this publication may be
changed, modified or used for commercial purposes. Ekon is not liable for damages resulting from the use of an illegal modified or altered publication.
The devices comply with the relevant guidelines and standards of the EU.
2
Table of Content
1. Pulse input . . . . . . . . . . . . . . . . . . . . . . . . . . . . . . . . . . . . . . . . . . . . . . . . . . . . . . . . . . . . . . . . . . 4
2. Pulse input of the heat meter. . . . . . . . . . . . . . . . . . . . . . . . . . . . . . . . . . . . . . . . . . . . . . . . . 4
3. Status input . . . . . . . . . . . . . . . . . . . . . . . . . . . . . . . . . . . . . . . . . . . . . . . . . . . . . . . . . . . . . . . . . 4
4. Status output. . . . . . . . . . . . . . . . . . . . . . . . . . . . . . . . . . . . . . . . . . . . . . . . . . . . . . . . . . . . . . . . 4
5. Measuring transducer. . . . . . . . . . . . . . . . . . . . . . . . . . . . . . . . . . . . . . . . . . . . . . . . . . . . . . . . 5
6. Virtual sum. . . . . . . . . . . . . . . . . . . . . . . . . . . . . . . . . . . . . . . . . . . . . . . . . . . . . . . . . . . . . . . . . . 5
7. Power measurment terminal . . . . . . . . . . . . . . . . . . . . . . . . . . . . . . . . . . . . . . . . . . . . . . . . . 5
8. M-Bus-Meter . . . . . . . . . . . . . . . . . . . . . . . . . . . . . . . . . . . . . . . . . . . . . . . . . . . . . . . . . . . . . . . . 6
8.1 General information. . . . . . . . . . . . . . . . . . . . . . . . . . . . . . . . . . . . . . . . . . . . . . . . . . . . . . . . . . . . . . . . . . . . . . . . . 6
8.2 Electrical outlet . . . . . . . . . . . . . . . . . . . . . . . . . . . . . . . . . . . . . . . . . . . . . . . . . . . . . . . . . . . . . . . . . . . . . . . . . . . . . 6
8.3 M-Bus Meter software activation. . . . . . . . . . . . . . . . . . . . . . . . . . . . . . . . . . . . . . . . . . . . . . . . . . . . . . . . . . . . 9
9. Energy counters parameterisation. . . . . . . . . . . . . . . . . . . . . . . . . . . . . . . . . . . . . . . . . . . 10
3
3
MyGEKKO allows to connect several energy counters and control different consumptions.
Log in as configurator.
1. Change to menu Energy / Costs
and select the first free energy counter.
2. Change to IO configuration and select the desired type of counter under “Type of measurement”.
1. Pulse input
For pulse input, configure as DI the input of pulse counter connected to an IO station. Enter the pulse
value of the counter as well. Type the unit of measurement in order to view a correct presentation.
2. Pulse input of the heat meter
For pulse input of the heat meter, configure as DI the input of pulse counter and as AI the supply and
the return temperature connected to an IO station. Enter the pulse value of the counter as well.
3. Status input
For status input, configure as DI the input previously connected to an IO station. Enter an efficiency
and a unit of measurement as well. Once the status input has been switched on, the entered output is
set up.
4. Status output
For status output, configure as DI the output connected to an IO station. Enter an efficiency and a unit
of measurement as well. Once the status output has been switched on, the entered output is set up.
4
5. Measuring transducer
For measuring transducer, configure as AI the input connected to an IO station. Enter a measurement
range (min and max) and a measurement unit as well.
6. Virtual sum
By adding together the efficiencies of different utilities, you obtain the virtual sum. For this purpose,
select the desired utilities (lights, ventilation system, outputs or all of them). It’s possible to define the
efficiencies of single utilities in the IO configuration of the respective utility. Once the utility is on, its
efficiency is added to the sum.
7. Power measurement terminal
You need to be logged in as configurator and have to have completed the main configuration explained in the previous section. Change again to main settings -> I/O configuration
1. Tap ‘>>’ next to number of PWR terminals and you get to the configuration level of the power
measurement terminals.
2. Select ‘Terminal 1’ and tap ‘Configure’. This step needs only be done once for each terminal 1-4.
3. Define the current transformer ratio of the current transformers connected to the terminal.
E.g. for a 100/5A current transformer enter 20 as value.
4. Now all current, voltage, consumption and output values should be visible. If they are wrong
or some show negative currents or consumption, check the electrical connection of the current transformers etc.
5. Done! Now you can use the individual outputs in the load shedding control or in the energy
meters.
Configuration level of the power measurement
terminals
Example Utilisation Sum of outputs in energy
meter
5
8. M-Bus-Meter
8.1 General information
M-Bus (Meter-Bus) is a field bus for consumption data acquisition. The transmission is made serially on
a revers polarity protected two-wire line from the connected slaves (meters) to a master.
As master we use the myGEKKO Touch with attached M-Bus level converter, which is connected to the
Touch or Rio 29 via RS232. All counter values are securely saved in the M-Bus slaves, i.e. in the energy
meters. Hence, no data is lost if there is a power failure. myGEKKO reads the data continually, saves it
and makes it graphically formatted available.
M-Bus characteristics:
• Standardised field bus system (EN1434)
• Two-wire bus with power supply of the bus devices
• No special requirements on the bus cable (electrical installation cable or telephone cable sufficient)
• Optional wiring topology (skein, skein with branches, star)
• Vast reach (up to several kilometres)
• Remote reading of consumption data (heat, water, gas and electricity)
• Communication with sensors and actuators of any type
• Energy monitoring and optimisation
• Leak monitoring
• Usable in industry and private households
• Good availability of system components
• Excellent cost / performance ratio
• Remote access with myGEKKO from anywhere via LAN
myGEKKO & M-BUS:
• 15 min trend/day/month lists with graphical presentation available
• Direct conversion of consumption in Euro and CHF
• Storage on USB flash drives, external NAS drive with enabled NFS or system card
8.2 Elecrical outlet
M-Bus direct energy meter 3 phases 65A
Technical data
6
Voltage
4 phase meter 3x230 / 400V
Stromaufnahme
20mA
Rated current
65A
Frequency
50 / 60 Hz
Outputs
1 S0-Pulse output
Protection class
II
Protection type
IP 20
Dimensions
107 x 89,5 x 64,2 mm
M-Bus energy meter 1 phase 32A
Technical data
Voltage
2 phase meter 1x230V
Stromaufnahme
20mA
Rated current
32A
Frequency
50 / 60 Hz
Outputs
1 S0-Pulse output
Protection class
II
Protection class
IP 20
Dimensioion
17,5 x 95,6 x 68,2 mm
M-Bus interface for 20/60 terminals
Technical daa
Standard loads per 1.5
mA
max 20/60 Terminals
power supply
external 12-24VDC or AC Versorgung
Protection
Overcurrent and short-circuit protection on the M-Bus
Display for
data transmission and system status
Mounting
Rail or wall
Connection details
Interface
Connection via
RIO-29
M-Bus
RIO-29
COM 1
max. 3
per RIO-29
RS232
with M-Bus interface
RS232
USB-COM 1-4
Energy meters
with M-Bus interface and
USB 4-fold RS232 interface
distributor
max. 20/60
(depending on the M-Bus
interface)
7
Energy meter connection directly to the RIO29
The RIO-29 modules have an M-Bus interface, to which the M-Bus meters can be connected directly
without level converter. A maximum of 3 M-Bus meters can be connected to the RIO-29 module.
M-Bus meters can be connected in series and/or parallel to the interface. Caution, plus and minus are
to be distinguished despite polarity protection.
myGEKKO RIO 29
Art. Rio-29
myGEKKO RIO 29
Bottom
Art. Rio-29
Connection of the M-Bus interface to the myGEKKO
The M-Bus interface (ACC-MBU20 / ACC-MBU60) is connected to an RS232 interface. It can be. connected either to the RIO-29, directly to the RS232 interface on the myGEKKO Touch or to the interface
distributor USB/quadruple RS232 (Art. nr. ACC-RS201).
+ -
myGEKKO RIO 29
Art. Rio-29
M-Bus Interfaces
RS232 Interface
RS232 Interface
8
8.3 M-Bus meter software activation
Log in as configurator
1.
2.
3.
4.
5.
6.
Change to the system menu
-> Energy/Costs
Tap the first free green bar and select IO configuration
Tap the title bar and give the counter a name, eg power consumption
Select an M-Bus meter as measurement type
Select a counter from the counter type, eg current
Now enter the secondary address of the counter. This 8-digit number must be noted on the meter
right, or read on meters with a digital display in the menu.
7. In the end you choose from the port interface to which the counter or level transformers are connected.
After the meter is configured a new icon ‘M-Bus’ appears in the Energy/Costs menu.
IO configuration energy meters
Tap the ‘M-Bus’ icon and check the status of the meter.
If the field of the meter is green the meter works correctly.
If the field of the meter is red, the meter is not connected or not configured properly. (TIMEOUT= meter is not found. WRONGMETERTYPE= improperly configured meter type)
Overview M-Bus meter
Status control meter
9
9. Energy counters parameterisation
In menu field “Nominal efficiency” set out the units of measurement for the scale of trends.
Save the updated power/water price under the menu item “Costs per unit”. This way, it’s possible to
monitor the concerning costs as well as the consumption.
If you are using a counter already in use, it’s possible to recover the current status of the counter. Save
units to the left field and decimal fractions to the right field (e.g. counter status = 3,52 right field 3, left
field 0.52). The counter status will get automatically updated.
If you like, you can view the first two counters on the main page.
Furthermore, buttons “Reset counter status” and “Delete daily and monthly lists” are also available.
Energy counters parameterisation
Notice:
In order to save daily and monthly lists, go to System menu -> Recording / Log and define the desired
storage location as well as one folder for the lists file and the trends file respectively.
For further details, see data storage configurations manual
10
Notes
11
www.my-gekko.com
A first class product of Europe!
The result of a close collaboration between
Italy, Switzerland and Germany
12