1
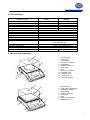
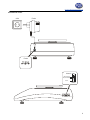
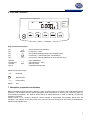
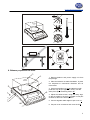
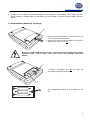
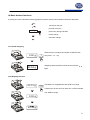
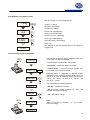
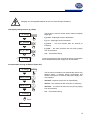
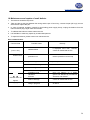
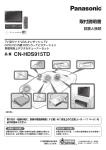
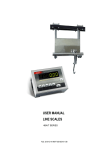
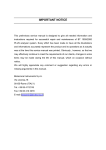
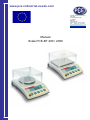
www.pce-industrial-needs.com
Tursdale Technical Services Ltd
Unit N12B
Tursdale Business Park
Co. Durham
DH6 5PG
United Kingdom
Phone: +44 ( 0 ) 191 377 3398
Fax: +44 ( 0 ) 191 377 3357
[email protected]
http://www.industrial-needs.com/
Manual
Scale PCE-BT 200 / 2000
[email protected]
1. Introduction
Electrical balance BT series are designed for use in laboratories and many others technical applications, where
high measurements precision is not required.
All balances are metrologically tested by manufacturer and they are not designed for calibration certificate.
According to order, balances may be calibrated.
Balances classification (PKWiU code) 33.20.31.
2. Completation
Basic set includes:
1. Balance,
2. Pan cover with lid (5 parts),
3. Power supply unit,
4. Accumulators – 6 units (option)
5. Decorating button (option)
6. Instruction manual.
7. Warranty.
3. Security rules
To avoid electrical shock or damage of the balance or connected
peripheral devices, it is necessary to follow the security rules below.
•
All repairs and necessary regulations can be made by authorised personnel only.
•
To avoid fire risk use a feeder of an appropriate type (supplied with the balance). Pay
attention that supply voltage is compatible with specified technical data.
•
Do not use the balance when its cover is opened.
•
Do not use the balance in explosive conditions.
•
Do not use the balance in high humidity.
•
If the balance seems not to operate properly, unplug it from the mains and do not use until
checked by authorised service.
According to legal regulations it if forbidden to dispose electronic
equipment in waste containers.
•
Please return wasted balance to the point of purchase or other company specialised in
recycling of wasted electronic components.
2
[email protected]
4. Technical data
Model of scale
BT200
Capacity (Max)
Reading unit (d)
Linearity
Repeatablity
Pan dimension
Working temperature
Weighing time
Scale dimensions
Scale weight
Power supply
Accumulators
Working time with 1000mAh batteries
200g
0,001g
0,003g
0,003g
φ115mm
BT2000
2000g
0,01g
0,03g
0,03g
145x125mm
+18°C ÷ +33°C
<3s
175x245x80mm
1kg
=12V 160mA
NIMH R3 ( AAA size) – 6pcs
~6 h (back light on)
~16h (back light off)
3 (bAttEry function)
> 5 min (AutoOFF function)
> 30 s (b_LIGHt function)
F2 200g
F2 2000g
Batteries charge indicator
Automatic shut-off time
Automatic back light shut-off time
Calibration weight (OIML)
5. General view of balance
9
1
2
1 – pan welt (pan)
2 – carring pan
( under welt)
3 – information windows
4 – LCD display
5 – balance keyboard
6 – rotary legs
7 – level
8 – pan cover (complex)
9 – keyboard cover
10 – protection rod
11 – protection cap
12 – decorating button
8
11
5
12
10
6
4
7
9
1
2
8
3
5
1 – pan welt (Pan)
2 – carring pan (under welt)
3 – information windows
4 – LCD display
5 – balance keyboard
6 – rotary legs
7 – level
8 – Pan cover (complex)
9 – keyboard cover
6
4
7
3
[email protected]
Connections views:
Feeder
~230V
Feeder
RS232C
RxD (receiver)
TxD (transmitter)
masa
1
2
3
4
5
6
7
8
9
4
[email protected]
6. Keys and indicators
Max
d=
Keys functions description:
key
key
key
key
key
I/
MENU
→T←
→ 0←
indicator
bar indicator
indicator
Max, d
OFF
- switch-on/switch-off (standby),
- numeric key / menu,
- tare (subtract package weight from weighed mass)
- numeric key / data output (print / transmission),
- numeric key / zeroing (balances for direct sale use only),
- result stabilisation,
- load indicator 0 ÷ 100%,
- stand-by mode,
- metrological parameters
Additional functions of keys:
→ 0← -
Next digit,
Decimal point,
→T← -
Next position,
MENU -
end.
7. Workplace preparation for balance
Balance workplace should be choice carefully in order to reduce influence of factors, that could disturb balance
operation. The workplace should assure appropriate work temperature of balance and necessary space for
normal balance operation. The balance should stand on stable table that is made of material non–affecting
magnetic on balance.
Sudden motion of air, vibration, dustiness, violent changes of temperature and humidity above 90% are
forbidden. The balance should stay away from heat sources and devices that emit strong electromagnetic
radiation and magnetic field.
5
[email protected]
+33°C
+18°C
8. Balance preparation for work
9
1
2
1. Remove balance and power supply unit from
the package.
2. Place the balance on stable foundation, in place
not subjected to mechanical vibrations and air
movements.
8
11
5
12
3. Unscrew protection rod 10 and take it out with
protection cap 11 (if it appears in scale). Into the
same place push decorating button 12.
4. Adjust the balance level, using the rotary legs,
so the air bubble in the level 7 located in rear part
of balance, takes the central position.
10
6
5. Connect together walls edges of pan cover 8.
4
7
6. Put pan cover on balance and cover the lid 9.
6
[email protected]
Attention: Pos. 10 and 11 are optional.
If balance was moved from environment with lower temperature to the room with higher
temperature, condensate can be formed on the surface of balance. In this situation it is
forbidden to turn balance on, because balance can be damaged. Before turning on
balance, it should stay in a new environment for 4 hours in order to acclimatization.
9. General principles regarding balance operation
1. During balance operation, in order to confirm its efficiency, it is recommended to check
the weighing precision by putting a object of exactly known weight before and after series of measurements. In case of allowable measurement error exceeding it is recommend to make calibration by
standard weight or contact authorized Service Company to perform balance adjustment.
2. Weighed mass should be placed in the pan centre.
3. The balance enables tare setting in the whole measuring range. It is performed by pressing "→T←" key.
Tare setting does not widen measurement range. It only subtracts tare weight from the mass, currently placed
on the balance. To facilitate the mass control on the pan, and avoid the range exceeding, the balances have the
load indicator, scaled in 0÷100%.
4. The weighing result should be read during the "
" indicator lighting, which indicates the result stabilization.
5. When there is no weighing, but the balance should be ready for operation, it may be switched off by I/
key. It turns balance reading system off and entering into the standby mode that is indicated by OFF.
Balance
turning
on
is
performed
by
pressing "
I/ "
key.
6. In balances with active →0← key (zeroing) before putting weighed mass on the balance, make sure, if
zeroing indicator →0← is displayed if the zero indication is not shown, press →0← key and wait for balance
zeroing and zero indicator appears.
Only then you can put an object on the balance.
7. Balance mechanism is very precision device and sensitive to overload, shocks and impacts.
Do not overload the balance over 20% of maximum load.
Niedopuszczalne jest naciskanie szalki ręką.
Make sure, that pan is secured against accidental stress on the period of transport.
10. Balance operation principles with power supply form accumulator (battery)
1. The balances can be supply from ~230V mains thought power pack delivered with the balance. Moreover
accumulators also can be used. They can be placed in box inside balance. It is possible to use normal
batteries.
In order to exchange accumulators for batteries it is necessary to turn off
charging accumulators, by bAttErY function (bAt OFF option ) that is descrapt
in the further manual part.
2. To extant work time of accumulators (battery), it is possible to turn off display and next balance
automatically. The settings of timer operation is made by b_LIGHT and Auto OFF functions.
7
[email protected]
3. Charging of accumulators is made automatically, when balance is connected to power supply unit (also
during weighing) Charged state of accumulators can be checked by auxiliary function bAttErY (bat VoL
option)
11. Accumulators (batteries) exchange
11
1. Remove pan lid that shields scale pan. Remove pan
cover and put it near the balance.
2. Remove pan welt. Turn around balance and put it on
the pan cover. Open cover 11.
During turning BT200(D) balance around, assure that balance weight does not lean
against the pan. Out of control stress puts on pan could damage mechanical
balance
13
3. Remove accumulator box 12 and then put
accumulators type AAA inward it.
12
The arrangement method of accumulators in the
box.
8
[email protected]
12. Start-up
Leave the pan empty, plug the feeder to the mains (~230V/50Hz) and plug the feeder connector to the 12V
power socket at the back of the scale
The scale proceeds with following start-up actions:
C-1
Basic electronic components tests: C1, C-2, ... C-6.
C-5
bt...
Program version.
-------
Zeroing.
0.00g
Ready.
13. Connecting the balance to a computer or a printer
Balance may send data to the computer or printer through RS232C port.
During the operation with computer the balance sends the
weighing result after the initiating signal from the computer,
key.
or pressing
To cooperate with balance, the computer must have the
program, enabling the balance data receiving and
processing.
AXIS company offers computer programs for cooperation with balances, available on web pages www.axis.pl :
- Test RS232C - program for testing balance serial port (full version),
- ProCell – program allowing for balance cooperation with Excel spreadsheet and other Windows
applications (demo version).
9
[email protected]
Standard transmission parameters: 8bits, 1stop, no parity, 4800bps. To change transmission parameters
use "rS-232" function (see further part of the manual).
Data transmission protocol description (Long protocol)
Computer→Balance: initialising signal S I CR LF (53h 49h 0Dh 0Ah)
Balance→Computer: balance indication in the following format (16Bytes)
Byte
Byte
Byte
Byte
Byte
Byte
Byte
Byte
Byte
1
2, 11 and 14
3÷4
5÷9
10
12
13
15
16
-
sign or space
space
digit or space
digit, decimal point or space
digit
k, l, c, p or space
g, b, t, c or %
CR (0Dh)
LF (0Ah)
Connection cable WK-1 (balance – computer / 9-pin):
BALANS
COMPUTER
Connection cable WD-1 (balance - KAFKA printer):
BALANCE
PRINTER
KAFKA printer internal switches set-up:
SW-1
on
SW-2
off
SW-3
on
SW-4
off
SW-5
off
SW-6
on
SW-7
off
SW-8
off
10
[email protected]
14. Basic balance functions
In further part of this manual the following graphical symbols will be used for balance functions description.
12g
T
-
put load on the pan
-
put load of the pan
-
press a key during indication
-
forced change
-
automatic change
14.1 Normal weighing
When the pan is empty and indication is different than
0.00 g
T
zero press →T← key.
Weighing result should be read when the indicator "
43.04 g
"
lights.
14.2 Weighing with tare
23.13 g
T
The balance is equipped with tare equal to its range.
Total amount of tare and net mass can not be exceeded
max. Balance range.
0.00 g
63.24 g
11
[email protected]
15. Balance special functions
All balances, besides the basic metrological functions: weighing and tare setting, have a set of balance special
functions.
Basic set of includes the following special functions:
- Automatic zeroing function (AutotAt)
- pieces counting (PCS),
- Convert mass units (UnIt)
- Convert percentage (PErCEnt)
- Preparation of recipes (rECIPE)
- Calibration by standard weight / internal calibration option (CALIbr)
- setting of work mode for serial port (rS-232)
- charging a battery settings (bAttErY),
- bright light settings (b-LIGht)
- automatic turning off balance (Auto OFF)
- weight indication resolution settings (rES),
- Activation of above-mentioned functions (ACtIV)
- Return unit to default settings (dEFAULt).
Other functions may be available as options for demand (description of all special functions is presented in the
separate document).
After pressing Menu button, start menu will be displayed. The functions are displayed with the
successive numbers: F1-PCS, F2-AutotAr, ect.
User may change the menu content by activating or deactivating the available special
functions with the Menu update function (ACt).
During the special functions switching the display shows the MODE indicator.
15.1 Autozeroing (AutotAr)
0.01g
AUtOtAr
MENU
T
When AUtotAr function is activated, a balance
automatically keeps zero indication if a pan is empty
or if zero indication is acquired by pressing →T←
key.
To leave the function press MENU key, then with
→T← key chose AUtOtAr and AUt oFF .
Note: Autozeroing function is activated automatically
for 10 min. after switching-on
AUt oFF
AUt on
T
AUT
0.00g
12
[email protected]
15.2 Pieces counting function (PCS)
12.05 g
T
That function allows for counting the identical details,
e.g. tablets or buttons, contained in the weighed
batch.
The measurement takes place in two phases:
- first phase – calculation of single detail weight upon
the basis of sample of specified number of pieces 5,
10, 20, 50, 100, 200, or 500 detils,
0.00 g
- second phase – counting the details in the weighed
batch.
5
23.04 g
MENU
Functions has the following options:
- PCS OFF – function deactivation,
- PCS on – start preparation of recipes
PCS
T
- PCS ... – use the last written unitary mass.
- PCS 5, 10, 20, 50, ect – number of pieces in a batch
- PCS SEt – write free number of pices in a batch
PCS oFF
- PCS MJ – direct write a unitary mass
- out – exit without saving
PCS on
T
Notes:
1. It is recommended, that the single detail weight is
higher than the balance reading graduation, and the
weight of sample, used in the first phase is higher
than 100 of reading graduations.
2. Err-PCS massage indicates that pan is empty or
when the single detail weight is lower than one
reading graduation (user may calculate the pieces,
keeping in mind, that it increases the error).
5
T
0 pcs
12
12 pc s
13
[email protected]
15.3 Weighing unit selection (UnIt)
Use this function to choose weighing unit:
1.60g
MENU
UnIt
T
CArAt
8.00
T
-
CarAt (1 ct= 0,2 g),
-
MGrAM (1mg=0,001g),
-
KGrAM (1kg=1000g),
-
Pound (1 lb=453,592374g),
-
Ounce (1oz=28,349523g),
-
OunCEt (1ozt=31,1034763g),
-
GrAIn (1gr=0,06479891g)
-
PennYW (1dwt=1,55517384g),
-
Gram (1g).
The example at the left presents how to set carats as
weighing unit.
ct
15.4 Percentage weighing (PErCEnt)
100%
This function enables to display weighing result as a
percentage of a reference sample.
0.00 g
A measurement is performed in two phases:
- first phase – weighing a reference sample,
19.07 g
PErCEnt
MENU
T
- second phase – measuring specific sample as a
percentage of the reference sample.
Weighing result is displayed in different format,
depending on the reference sample weight value. For
values of 0÷3,5% of weighing range the format is
“100.0”, for values 3,5÷35% it is “100.00” and
35÷100% - “100.00”
The function has the following options:
PEr oFF
- PEr oFF – disables the function,
- PEr on – stores current indication as 100% and
activates percentage weighing,
PEr on
50%
100.00%
T
- out – exit without change.
Note:
When the function is activated →T← key function
does not change.
50.00%
14
[email protected]
15.5 Weigh summing (rECIPE)
0.00 g
MENU
This function enables to weigh few ingredients in one
container and to display aggregated sum of all
ingredients.
The function has the following options:
rECIPE
T
-rEC oFF – leave the function and display aggregated
sum of all ingredients,
-rEC on – activate the function,
rEC oFF
-rEC Con - return to previous series of weighing,
- out – exit without change.
rEC on
A
T
Before weighing each ingredient (A, B, C, etc.)
remember to tare the balance.
o 10.01g
B
o
o
To read aggregated sum of all previously weighed
components use MENU key, rECIPE and rEC oFF
option.
0.00g
o 10.02g
C
T
T
0.00g
o 10.03g
Note:
When rECIPE function is active, the sign o is
displayed at the left of the display.
When rEC oFF option was used, SUM indicator
disappears after pressing →T← key.
MENU
rECIPE
T
rEC oFF
T
A+ B+ C
30.06g
15
[email protected]
15.6 Calibration with external weight (CALIb)
Calibration with external weight standard in verified balances should be performed in case balance indications
exceed permissible error. To calibrate the balance a service centre should use calibration weight as stated in
Technical Data table (or of better accuracy).
Operations sequence:
0.00g
CALIbr
MENU
T
CAL oFF
- CAL -
Press MENU key to call functions menu and to
choose CALIbr with →T← key.
Calibration function options:
- CAL oFF – turn autocalibration off
- CAL on – start calibration with external weight
- out – exit without saving
Press press →T← to choose CAL on.
...
CAL on
Klawiszem MENU wywołać pojawiające się kolejno
funkcje użytkownika.
Wait until zeroing is finished.
T
When LOAD communicate put a calibration weight on
the pan.
Wait until calibration process is finished and zero
indicated.
0.00g
m
LOAD
m
0.00g
16
[email protected]
15.7 Serial port setting (rS-232)
0.00g
The function enables to set the following transmission
parameters:
MENU
- bAud (4800, 9600, ..., 115200) - transmission speed,
- bitS (7, 8) - the number of bits in a byte,
rS-232
- PArItY (0, 1) - parity control,
T
- Odd (0, 1) – parity control way,
- SendInG - transmission type of result by serial port
baud
- Stb –transmission after used of button and stabilization
of result,
T
- Stb – transmission after used of button
result stabilization,
-4800
without
Stb – automatic transmission after putting load and
result stabilization,
-9600
- Cont. – continuous transmission approx. 10 results per
second.
T
Default parameters are underlined.
In order to set the required parameters activate rS-232
function, select the proper parameter and press →T←
key during displaying of required parameter or option
value.
baud
...
out
On the adjacent diagram setting of transmission rate of
9600 bps is shown. Setting of others parameters is
analogous.
T
After setting of appropriate parameters and options exit
by selecting out.
0.00g
15.8 Charging a battery settings function (bAttErY),
0.00g
bAtterY
Functions has the following options:
T
bAt OFF
bAt on
0.00g
bAttErY function enables to turn on or off charging a
batteries and check charging state during working with
power supply unit
MENU
T
-
bAt OFF – charging accumulators is turned off (this
option is necessary in case of using non-rechargeable
batteries
-
bAt on – charging accumulators is tunr off.
Accumulators are charging after turning off balance by I/
key,
-
bAt VoL – readout of charging accumulators state in %
(return to readout of mass by press MENU key)
-
out – Exit without saving
17
[email protected]
Charging non-rechargeable batteries to test can cause damage of balance.
15.9 Display setting function (b_LIGHt)
0.00g
The function is used to choose action method of display
bright light
MENU
b_LIGHt
T
b_L on
-
b_L OFF – bright light function deactivation,
-
b_L on – bright light function activation,
-
b_L ECO –
inactiving
-
b_L bAt – the same as above but only during supply
from accumulators.
-
out – Exit without saving
T
turn this function after 30 seconds of
Turning bright light function off reduces energy consumption
that is essential with power supply from accumulators.
0.00g
15.10 Automatic turning off balance (Auto OFF)
0.00g
MENU
The function turns balance off automatically without any
balance activity. It reduces energy consumption and
extend working time of balance with power supply from
accumulators:
Auto OFF T
AOF on
0.00g
T
-
AOF OFF – balance will not turn off automatically
-
AOF on – turn balance off after 5 minutes of inactiving
-
AOF bAt – the same as above but only during supply
from accumulators.
-
out – Exit without saving
5m in.
OFF
18
[email protected]
15.11 Reading unit choosing (rESOLUt)
0.00g
rESOLUt
MENU
This function enables to choose reading unit value
(resolution). The function is only available in BT200 and
BT2000.
T
Available reading units:
T
-
wagi BT200: d=0,01g i d=0,001g,
-
wagi BT2000: d=0,1g i d=0,01g.
0.000g
15.12 Function Menu customisation (ACtIV i dEFAULt)
0.00
ACtIV
T
This function enables to select special functions that will
be displayed after pressing MENU key. Easy access to
the most useful functions will shorten operation time and
make work more comfortable.
To differ ActIV function from the function menu,
indicator is displayed at the left side of the display.
AUtOtAr
It is possible to return to default setting by special
function dEFAULt
Operation sequence shown on the picture, presents how
to add RS232C parameters setting function (rS-232) to
the function menu.
rS232
T
To remove a function from the Function Menu choose rS
oFF in the last operation.
rS oFF
rS on
T
19
[email protected]
16. Maintenance and repairs of small defects
1. The balance should be kept clean.
2. Take care that no dirt gets between the casing and the pan. If found any, remove the pan (lift it up), remove
dirt and then replace the pan.
3. In case of improper operation caused by short-lasting power supply decay, unplug the balance from the
mains and then plug it again after few seconds.
4. To calibrate the balance contact nearest service.
5. It is forbidden to make any repairs by unauthorised persons.
6. To repair the balance, please contact our nearest service.
Error communicates:
Communicate
Possible cause
C-1...6
Remedy
selftests failed
if displayed more than 1 minute,
contact an authorised service
protection rod
remove protection rod and cap
pan missing
put the pan on
mechanical damage
contact an authorised service
overloading
remove the load from the pan
mechanical damage
contact an authorised service
unstable ground
vibrations
air flows
place the balance on a stable
ground not affected by mechanical
vibrations and airflows
appear
balance damage
contact an authorised service
------
taring in progress
as above
(over 1 min.)
balance
doesn’t work
L
H
indicator does not
20
[email protected]
Declaration of Conformity
We:
AXIS Spółka z o.o. 80-125 Gdańsk, ul. Kartuska 375B
confirm with all responsibility that BT series balances:
BT200, BT200D, BT2000 i BT2000D
marked with CE mark comply the following:
1. EN 55022 standard Limits and methods of measurement of radio disturbance
characteristics of information technology equipment and IEC 61000-4-3
Electromagnetic compatibility (EMC) - Part 4-3: Testing and measurement
techniques - Radiated, radio-frequency, electromagnetic field immunity test,
harmonised with the Council Directive 89/336/EEC.
Additional information
- Conformity evaluation for the Council Directive 89/336/EEC were carried out
by Laboratorium Badawcze Oddziału Instytutu Elektrotechniki w Gdańsku.
Gdańsk, 23.09.2008 r.
Per pro Director of AXIS Ltd:
Production Manager
Jan Kończak
_________________
Signature
In this direction will find a vision of the measurement technique:
http://www.industrial-needs.com/measuring-instruments.htm
NOTE: "This instrument doesn’t have ATEX protection, so it should not be used in potentially explosive
atmospheres (powder, flammable gases)."
21