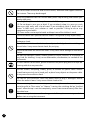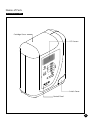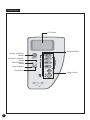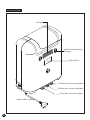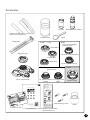
1
Hom e W a t e r P ro c e s s i n g an d Pur ifi c a tion I n str ume n t
U se r Ma nua l
k
a
n
g
e
n
s
u
i
We thank you for purchasing RAW-7.
Please read this user's manual carefully
and use the instrument properly.
There are two levels of precautions, "Caution " and "Warning ",
listed in this book. Please note, improper handlings of the instrument
that can lead to more serious consequences such as injury or death,
are mostly listed in "Warning
" section. Additionally, an action
listed as "Caution " may lead to serious consequences under certain
circumstances. Therefore, they both are important content to your
safety matter. For this reason, please read and follow this instrcution
manual carefully.
We cannot be responsible for the cases of improper installation or use
of the instrument that result in damage to the product or accident.
After reading through for the first time, please keep this instruction
manual in a place where users have easy access to.
In our company, alkaline electrolyzed water, generated from the cathode by electrolysis, is called "Antioxidant Water" , and acidic electrolyzed water, generated from the anode by electrolysis, is called "Electrolyzed Acidic Water". Following in this document, they are
described as KANGENSUI (Antioxidant Water) and Acidic water
(Electrolyzed Acidic Water).
■Please pay special attention to and read carefully the documents with the warning marks that listed below.
Measure of Risks
Mark
Warning
Ignoring the warning marked text and handling the instrument improperly,
may lead to serious accident that results injury or even death.
(The text indicating those critical warnings are colored in red and
surrounded by , in this document.)
Caution
Ignoring the caution marked text and handling the instrument
improperly, may cause injury or property damage.
(The text indicating those cautions are surrounded by □, in this
document.)
■Description of the displayed marks
Mark
Title
Meaning
General
Used for a notice, caution, and warning, of danger in general.
General
Used for a notice of prohibition in general.
General
Used for an instruction to acts of user in general.
Prohibition of use
around watery
environments such as
Used for a notice of prohibition, indicating a possible injury
caused by electronic leakage, by using a non-waterproof
Prohibition of
Used for a notice of prohibition, indicating a possible injury
caused by electric shock, by disassembly of of an equipment.
disassemble
Unplug the power
from the outlet
Used for an instruction to a user to unplug the power from the
outlet, to prevent a possible damage caused by malfunction of
the the equipment or lightning.
Please read - for your safety -
Warning
Please note the following when drinking KANGENSUI.
(1) Do not take medicine with KANGENSUI (Simultaneously). Use regular purified water when
taking medicine.
(2) a person who is Achlorhydria should not drink KANGENSUI at all.
Do not connect with other equipment or use simultaneously.
Do not use undrinkable water. Failing to do so may compromise your health.
A person fits the descriptions below should consult with doctor or pharmacist, prior to
drinking KANGENSUI.
(1) who has chronical disease or is debilitated
(2) who has liver or kidney disease
(3) who is seeing doctor or dentist
If you feel an abnormality on the body, as well as no improvement on the symptoms, when
continously drinking KANGENSUI, please consult with doctor or pharmacist.
A person fits the descriptions below should consult with doctor or pharmacist, prior to
drinking Acidic water.
(1) who has sensitive skin
If you feel an abnormality on your skin when using Acidic water, please stop using it right away
and see a physician.
Do not remodel, decompose, or repair this instrument on your own.
by doing so may cause a serious accident such as fire or electric shock, which we cannot be
responsible for.
Do not use this instrument in a place where there is a lot of moisture, like bathroom.
Similarly, do not pour water directly or wash the instrument in water. Those can cause an
electric shock.
Do not plug or unplug the power plug with wet hands. Similarly, please unplug the
instrument for the maintenance. Failing to do so cause an electric shock.
If you accidentally drop the body of the instrument in the water, make sure to disconnect the
power cable from the electrical outlet, before pulling the body up from the water. It can
cause electric shock. Once recovered from the water, contact your dealer or our company for
the repair, and do not try using it on your own.
1
Caution
Place the body of the instrument on a horizontal position. Do not place it on
unstable surface or the inclined position. It may fall over or fall to cause injury.
DO not place the instrument in a place exposed to direct sunlight, or near a stove,
cooker, or water heater. It may cause a malfunction.
Do not directly connect the instrument to a water heater. It may cause an accident
or a malfunction.
Do not place any objects on top of the body of the instrument. It may cause an
accident or a malfunction .
Please request your dealer or service store if you wish to wall-mount the body of
the instrument, and do not try a wall-mounting installation on your own. It may fall
down and cause an accident.
Do not bent or twist hoses. It may cause a water leakage. Particularly, do not wire or
round the drain hose in vertically higher places than the body of the instrument. It
may cause a malfunction.
Do not use the instrument other than the described supply voltage (200
AC). Failing to do so may cause a fire or an electric shock.
240V
Do not fix the power cable with a tools like staples. It may damage the power cable
and cause a fire or an electric shock.
Do not connect multiple electrical products to a single outlet. It may generates heat
and cause a fire.
Please let water flow on dish washing mode for a minute, prior to drinking
Antioxidant water on KANGENSUI mode, at the beginning of everyday use. If the
instrument has not been used for more than few days, also let water flow on dish
washing mode for three minutes, prior to drinking Antioxidant water on
KANGENSUI mode.
pH 9.0 9.5 is generally suitable for drinking. However, a person drinking
Antioxidant water for the first time, should start with a small amount of the neutral
pH range water.
To store Antioxidant water, please use a sterilized sealed container, and keep it in a
refrigerator. Do not keep it no more than two days for drinking propose. Failing to
do so may impair your health.
Do not drink following types of water. It may impair your health;
(1) pH level is more than 10. Please test water's pH level on a regular basis.
(2) Acidic water
(3) Water containing the pH testing solution
(4) Water, comes from the drain hose
Do not use any processed water for breeding fishes like goldfish or
tropical fish. It may cause environmental changes and fishes may die.
2
Do not use alkali sensitive or acid sensitive dishes, aluminum and copper container,
for instance. Those may be damaged.
When the produced water has unusual odor, please stop drinking, and contact your
dealer right away.
Handling of the pH test solution, please note the following;
(1) Do not drop in your eyes or drink. If you mistakenly drop it in your eye, wash
your eyes right away with a lot of water. If you mistakenly drink it, drink a lot of
water. In both case, see a doctor as soon as possible. Failing to do so may
compromise your health.
(2) Please make sure to cap the bottle and keep it out of the children s reach.
Do not use other than specified calcium lactate. Failing to do so may impair safety.
Do not throw water over the body or wash it with water. It may cause electric
leakage or shock.
Do not block air holes with the hands or objects. Similarly, do not insert things in
the air holes. It may cause electric shock, fire, or injury.
Please do not block the exit of the water. It may cause water leakage or mechanical
failure.
Do not use detergent, bleach, alcohol, benzine, thinner, cleanser, or insecticide of
any kind, for cleaning. It may cause deformation, discoloration, or cracked of the
instrument.
if a dust adheres to the outlet, please disconnect the power plug once and wipe off.
Leaving with dust may cause fire.
Do not scratch, corrupting, modify, pinch, or bundle the power cable. Neither
should not excessively twist, bend, pull, or place heavy objects on the power cable.
It may cause fire or electric shock.
Do not use the instrument, when the power cable or plug is damaged. Neither
when the outlet is loose. It may cause electric shock or fire.
When not using the instrument to process water, please make sure to set the
switching dial to "Raw water" or "Shower". Leaving the switching dial on "purified
water" when the tap is not shut completely, causes water to continuously flow from
the drain hose.
After not using the instrument for a long period of time, please contact your dealer
before start re-using the instrument.
3
k
a
n
g
e
n
s
u
i
Table of contents
For Your Safety
1
Notes on Use
5
Names of Parts
6
Instrument front
6
Control panel
7
Switch pocket
8
Instrument back
9
Accessories
Installation of the body
10
11
How to install the Faucet Stream Router
12
How to connect the hoses
17
Handling the Faucet Stream Router
About the LCD screen
Setting time and timer
18
19
19
Initial display indications
20
Inflow volume
20
20
Accumulated inflow volume, Accumulated time
How to Process Water
Method for measuring the pH
How to use processed water
Antioxidant water
Acidic water
Purified water
Annexing calcium lactate
21
22
22
22
22
22
23
How to replace the water purification cartridge 23
About overheating prevention
24
Maintenance and After-Sales Service
25
Maintainance
25
After-sales service
25
Specifications
25
Checklist
26
Is this a mechnical failure ? Check Here.
27
4
Notes on Use
This instrument is for the drinkable water specified by Ordinance No. 101, Ministry
of Health, Labour and Welfare of Japan, in 2003.
Do not use for following type of water. It may cause a damage to the instrument;
(1) Terribly turbid water
(2) Very hard water
(3) High salinity concentration water
(4) High red rust concentration water
(5) Hot water for more than 50 ℃ (Body of the instrument)
This instrument is intended for general home use.
This instrument has a safety device, called Twin Safety Valve, built-in.
Twin Safety Valve is for;
1. Hot water inflow prevention function.
hot water about 50 ℃ or more, to prevent the inflow the instrument.
2. Relief valve function
Operates at 0.25 0.3MPa, to prevent damage from excessively high tap-water
pressure.
These are the function of Twin Safety Valve.
*Relief valve function, works when the water pressure of inflow rises (0.25
0.3MPa), usually caused by clogging of the cartridge, or bent of the connecting
hoses, for instance.
As cautions for usage, please read P.1 [for your safety] as well.
5
Names of Parts
Ins t r u m e n t f r o nt
Cartridge Cover
LCD Screen
Switch Cover
Control Panel
6
Control Panel
LCD Screen
Range Indicator
Display Switching
Button
Minute (In seconds)
Button
Hour (Minutes)
Button
Timer Indicator
Start Button
Range Switch
7
Switch Pocket
●To control, please remove the switch cover. (How to remove the switch cover, please refer to P.24.)
Drainage Volume Regulating Valve
Regulate a volume of
water flowing out of the
drain hose.
Turning to the right to
increase the flow
volume of drainage, and
turning to the left to
decrease.
※ It has been set to
factory default.
Therefore, do not turn
unless it is necessary.
Low
High
Melody Switch
All switches have been set to
downside as factory default.
1. Functional Confirmation
(Please do not touch)
2. Melody On/Off
(set switch to the upper side for
turning off the melody, when
generating Antioxidant water)
3. Melody volume High/Low
(set switch to the upper side for
increase the melody volume)
4. OFF (Do not touch)
Melody Switch
①OFF
②Melody On/Off
③Melody volume High/Low
④OFF
Drainage Volume
Regulating Valve
Reset Button
(Please press when you replace
the cartridge)
Reset Button
Please press the reset button after replacing the
water purification cartridge. Thereby, the
accumulated inflow volume and
the
accumulated time on the LCD screen will be
back to "0".
※Please press it right after the the initial
installation of the instrument.
8
Instrument Back
Air vent
Holes for wall mounting
(3 points)
Rating Plate
Inflow hose connectiing elbow
Outflow hose connectiing elbow
Drain hose connecting elbow
Power cable
9
Accessories
Test tube
Phenolphthalein solution
Inflow and Outflow hoses (a Twin hose)
Drain hose (a single hose)
Fixing band
Calcium lactate
Spoon
A-set
B-set
C-ring
Faucet aerator adapter
(outward screw)
16mm(White)
Tightening cap
for Japanese model (white)
17.5mm(Blue)
19mm(Gray)
for Foreign model (Gray)
C-set
Faucet Stream Router
Faucet aerator adapter
(inward screw)
for Japanese model for Foreign model
(white)
(Blue)
D-set
Bracket screws
pH測定液
フェノールフタレイン
標準変色表
pH(水素イオン濃度)は、
水道直結連続生成型電解還元水整水器
酸性またはアルカリ性の強さを表わすものです。
pH7.0は中性、7.0未満は酸性、7.0を超えるとアルカリ性です。
pHの測り方
8 .6
1
取扱説明書
k
a
n
g
e
n
u
i
pH測定液[フェノールフタレイン溶液]を
試験管に2滴落とす。
※2滴以外では正確に測れません。
9 .0
フェノール
フタレイン溶液
9 .2
s
試験管
2
9 .5
試験管に還元水を目盛まで入れる。
※目盛丁度以外では正確に測れません。
目盛まで
(段差部分)
9 .8
還元水
(赤変)
1 0 .0
3
1 0 .5
着色した液を左の表と比較する。
※初めて飲用する人は、pH9.0位の還元水
を 少量から飲用してください。その後体
調に応 じてpH、飲用量を調節して飲んで
ください。
※pH9.0∼9.5位が飲用に適しています。
注意
この度は還元粋RW-7をお買い求めいただき
まことにありがとうございました。
ご使用の前にこの取扱説明書をよくお読みのうえ
正しくお使いください。
Wall mounting screws
■pH測定液やpH測定液が入った水は、飲んだり、目に入れた
りしな いでください。
※もし誤って飲んだ場合は水を大量に飲み、また誤って目
に入れ た場合は十分に水洗いし、 医師に相談してくださ
い。
Sucker
■ pH測定液は必ずフタをして、乳幼児の手の届かないところ
に保管 してください。
Warranty card
User's Manual
Discoloration standard table
for pH solution test
10
Installation of the body
Please place the body of the instrument on where it is flat and stable.
Do not place the body of the instrument at the following locations;
(1) Anywhere near a fire or high-temperature (more than 60 ℃) place
(2) Excessive dust or moisture densely place
(3) Anywhere the body is exposed to splash of water, such as in a bathroom and by
an open window.
(4) Anywhere the body is exposed to direct sunlight or other heat generating
When the body is wall-mounted to be used, please note the followings for its
installation;
(1) Please ensure the wall, which the body will be mounted, is structurally strong
enough for the weight of the body.
(2) Use the wall-mounting screw sheets, included in the box, to locate the screw
points.
(3) Drill with the wall-mounting screws, included in the box, into the wall,
till the depth showing in the right picture. (three locations)
(4) Peel off the seals from the wall-mounting holes, located in back of the body,
and fit those holes to the wall-mounted screws to hang the body on th wall.
Please make sure that it is stable.
Plug the power to an outlet (AC200
240V, 50/60Hz).
For installation of the body, please read "For Your Safety" (P.1) as well.
[Ins t a l la t i on Exa m p le]
11
How to install the Faucet Stream Router
[Installation Preparation]
A Faucet Stream Router set comes with seven types of adapter. An adapter that you need
depends on the type of your faucet.
A-set
C−ring
17.5 mm(Blue)
B-set
16mm(White)
19mm(Gray)
C-set
Faucet aerator adapter (Inward screw)
Faucet aerator adapter (outward screw)
for Japanese model
(white)
for Foreign model
(Gray)
D-set
Faucet Stream Router
for Japanese model
(white)
for Foreign model
(Gray)
Bracket screws
[Checking the Water Faucet]
Please check which of the following types of water faucet is used at your home.
TYPE-●
1
TYPE-●
2
by removing the faucet aerator
reveals its outward-groove .
Faucet pipe s diameter
(16mm・17.5mm・19mm)
faucet aerator
Type 1 : Swollen tip
(Please use A-set) → P.13
TYPE-●
3
by removing the faucet aerator
reveals its inward-groove .
Type 2 : Outward-groove
(Please use B-set) → P.14
TYPE-●
4
Round shaped tip faucet
faucet aerator
Type 3 : Inward-groove
(Please use C-set) → P.15
Type 4 : Round shaped tip
(Please use D-set) → P.16
If your faucet fits none of the above types, please contact your dealer or our customer support dial.
12
■Used Parts(A-set)
TYPE-●
1
Cーring
Tightening Cap
The faucet has a swollen tip
16mm(White)
17.5mm(Blue)
Faucet pipe s diameter (16mm・17.5mm・19mm)
(1) Put through the tightening cap to the faucet.
●Be carefull with the direction of the tighting cap.
Faucet Stream Router
19mm(Gray)
(3) Attaching the faucet stream router by screwing
the tighting cap until it is completely tightened,
while pushing it up against the tip of the faucet
and making its rubber grommet to fully contact
the tip of faucet.
(2) Attach the C-ring to the tip of faucet.
●Gently spreading the notches would makes you
easier to attach it.
Tightening Cap
Tightening Cap
Faucet Stream Router
Cーring
Tightening Cap
Faucet Stream Router
Cーring
13
9
This is all for installing the faucet stream router.
※Connecting the hoses to the faucet stream
separator, please see "How to connect the hoses" at
P.17.
■Used Parts(B-set)
TYPE-●
2
Tightening cap
Faucet aerator adapter
(outwardscrew)
for Japanese model
(white)
Faucet aerator can be detached (outward-screw)
(1) Remove the faucet aerator.
Faucet Stream Router
for Foreign model
(Gray)
(3) Attaching the faucet stream router by screwing
the tighting cap until it is completely tightened,
while pushing it up against the tip of the faucet
and making its rubber grommet to fully contact
the tip of faucet.
Tightening Cap
Faucet Aerator
Faucet Stream Router
(2) Put through the tightening cap to the faucet.
●Be carefull with the direction of the tighting cap.
(3) After removing the faucet aerator, attach
the faucet aerator adapter (for Japanese model)
●Try the one (for foreign model), when the faucet
aerator adapter (for Japanese model) does not fit.
Faucet Stream Router
Tightening Cap
Rubber Grommet
for Japanese model
or for foreign model
This is all for installing the faucet stream router.
※Connecting the hoses to the faucet stream
separator, please see "How to connect the hoses" at
P.17.
A coin can be used as a tool for
tightening the faucet aerator adapter.
14
■Used Parts(C-set)
TYPE-●
3
Faucet aerator adapter
(Inwardscrew)
Tightening cap
for Japanese model
(white)
Faucet aerator can be detached (Inward-screw)
(1) Remove the faucet aerator.
Faucet Stream Router
for Foreign model
(Gray)
(3) Attaching the faucet stream router by screwing
the tighting cap until it is completely tightened,
while pushing it up against the tip of the faucet
and making its rubber grommet to fully contact
the tip of faucet.
Tightening Cap
Faucet Aerator
Faucet Stream Router
(2) Put through the tightening cap to the faucet.
●Be carefull with the direction of the tighting cap.
(3) After removing the faucet aerator, attach
the faucet aerator adapter (for Japanese model)
●Try the one (for foreign model), when the faucet
aerator adapter (for Japanese model) does not fit.
Faucet Stream Router
Tightening Cap
Rubber Grommet
for Japanese model
or for foreign model
A coin can be used as a tool for
tightening the faucet aerator adapter.
15
This is all for installing the faucet stream router.
※Connecting the hoses to the faucet stream
separator, please see "How to connect the hoses" at
P.17.
■Used Parts(D-set)
TYPE-●
4
Tightening Cap
Bracket screws
Screws (Four)
Round shaped tip
Faucet Stream Router
※Please prepare a Phillips screwdriver.
(1) Tighten screws evenly so that the faucet is
placed in the center of the bracket.
Bracket screws
Faucet Stream Router
Phillips screwdriver
(2) Attaching the faucet stream router by screwing
the tighting cap until it is completely tightened,
while pushing it up against the tip of the faucet
and making its rubber grommet to fully contact
the tip of faucet.
(3) This is all for installing the faucet stream router.
※Connecting the hoses to the faucet stream
separator, please see "How to connect the hoses"
at P.17.
Faucet Stream Router
16
How to Connect the Hoses
[Connecting the hoses to the body]
To connect the three connecting elbows, which
locate at the bottom of the instrument, and the
three hoses, Inflow and Outflow Hoses (a twin hose)
and Drain Hose (a single hose).
(1) Remove the nuts and inner caps attached to the
elbows, and put those detached nuts through
the three hoses. Please be carefull with the
direction of the nuts.
a view in the back of the instrument.
Inflow
Outflow
[Connecting the hoses
to the faucet stream router]
Connect the other end of the hoses, that are now
connetced to the body of the instrument, to the
faucet stream router.
(1) Adjust the length of the twin hoses by cutting
short to make it appropriately connect between
the body of the instrument and the faucet stream
router.
Remove the nuts attached to the faucet stream
router and put them through into the hoses.
(Please be carefull with the direction of the nuts)
Drainage
Inflow and
Outflow hoses
(Twin hose)
Drain hose
(Single hose)
(2) Deeply insert each connectors into the hoses,
then tightly screw the nuts to fix them.
●Connect he Blue lined hose, which connected to
the inflow elbow connector on the side of the
body, to the inflow connector (also blue marked)
of the faucet stream router, and connect the
other hose to the outflow connector.
(2) Deeply insert each elbows into the hoses,
then tightly screw the nuts to fix them.
a view in the back of the instrument.
Inflow
Faucet Stream Router
Outflow
Outflow
Drainage
Inflow and
Outflow hoses
(Twin hose)
Drain hose
(Single hose)
Inflow
(3) Use included fixing band to fix the hoses.
(3)Use included sucker to fix the drain hose to point
the sink.
Inflow and Outflow hoses are two consecutive
tubes. Therefore, there is a blue line on one of the
hoses to prevent cross-connection of the inflow
and outflow connectors.
●Connect the blue lined hose to the inflow
connecting elbow of the body of the instrument,
as well as to the inflow connector of the faucet
stream router. (they both are also blue marked)
Please make sure to press the reset button after the the initial installation of the instrument
as well as after replacing the water purification cartridge. (The accumulated inflow volume
and the accumulated time on the LCD screen restart from "0")
Please run the water on "acidic water dish washing mode" for 5 minutes, after the initial
installation.
17
Handling the Faucet Stream Router
■Switching Display
Switch Display
Faucet Stream Router
Raw Water
▲
▲
Safety Valve
Shower
Processed
Water
Switching Dial
[Inflow of Antioxidant Water, Electrolyzed
Acidic Water, and Purified Water.]
Set the switching dial to "Processed Water" (to
choose between Antioxidant Water, Electrolyzed
Acidic Water, and purified water, use the water
range botton on the instrument's control panel)
● While not using the instrument, please set the
switching dial to "Raw Water" or "Shower". If the
switching dial is kept on "Processed Water" and
the faucet is left open, water would continuously
run from the drain hose.
● Do not use hot water on "Processed Water"
channel.
[How to Maintenance]
Detach the faucet stream router from the
faucet, and clean the wire mesh, placed
under the rubber grommet, by gently
brushing in the water.
Rubber Grommet
Wire mesh
[Using Raw Water]
Set the switching dial to "Raw Water" or "Shower" to
run the water directly from water tap.
● When you run hot water on "Raw Water" and
"Shower" channel, please use it at 60 ℃ or less.
[Safety Valve]
(1) Water drains from the safety valve under
following circumstances.
High pressure inflow in the faucet stream
router.
(2) Clogging in the water purification cartridge
(3) Bent of the connecting hoses.
※ If water drains from the safety valve, please
refer to the procedures on the checklist at P.28.
18
About the LCD Screen
The LCD screen flashes when the power cable is
plugged. This is called "Standby" state. If no
operation has been performed on the instrument
for 4 minutes, then it automatically goes into
"Power-saving" state. All indicators on the control
panel, as well as the backlight of the LCD screen
goes off, while being in Power-saving state.
When any of the control buttons is touched, the
instrument goes back in Standby state.
When a range button is pressed while being in
Standby state, the LCD screen mutually displays the
selected range and its purposes. This is called
"Range Display" state.
Display of Stanby State
Display of Range Display State
(Color of the Screen)
(Color of the screen)
Display of during inflow
(Blue)
K A N G E N S U I
KANGEN
Intense
displays mutually
(Blue)
KANGEN 3
displays mutually
(Blue)
KANGEN 2
displays mutually
(Blue)
KANGEN 1
displays mutually
(White)
(Green)
Purified Water
displays mutually
A c i d i c
(Orange)
Face-washing
displays mutually
W a t e r
(Orange)
Dish-washing
displays mutually
Setting Time and Timer
(White)
The LCD screen shows like the right figure by
pressing the Switching Display button, while in
Standby or Range-Display state.
Range-Display or
Standby state
⇨The range cannot be changed while setting time
or timer.
Press
the Switching Display
button
Time setting display
(Yellow)
19
Timer setting display
(Yellow)
[Setting Timer]
Inflow Volume
After setting the LCD screen to the Timer setting
display, press the Hour (in minutes) and Minute (in
seconds) buttons to adjust the timer and press the
Start button to set the timer. Thereby, the Start
light flashes as a count-down starts on the screen.
A buzzer sounds when the count-down hits 0
second, at which the timer operation ends and the
flashing of the start light goes off.
During inflow, the inflow volume per minute will be
displayed on the LCD screen.
Inflow Volume Display
⇨Inflow Volume is the sum of the amount of intake
and drainage water.
Accumulated Inflow Volume
and Accumulated Used Time
Timer setting display
Hour, Minute, and Start button
(Control Panel)
⇨Press the start button again to cancel timer.
⇨The timer range is between 00:01∼59:59.
⇨Press down Hour (in minutes) or Minute (in
seconds) buttons to fast-forward the count.
The accumulated inflow volume and accumulated
used time will be displayed in dark blue on the LCD
screen for five seconds, by pressing the lit range
button during inflow or while in range display state.
[Setting Time]
After setting the LCD screen to the Time setting
display, press the Hour (in minutes) and Minute (in
seconds) buttons to adjust the time and press the
Start button to set the time. The set time would
start in 0 second.
Time setting display
Hour, Minute, and Start button
(Control Panel)
⇨Time is displayed in 24 hours.
Accumulated Inflow Volume
⇨It cannot be displayed by pressing the Acidic
Water range buttons.
⇨It cannot be measured accurately if the power
is unplugged even when the instrument is not
being used. ⇨A unit for the accumulated inflow volume is
in 100 Liters, and a unit for the accumulated
used time is in 100 hours. Error Display
During inflow, the LCD screen turns red and a
buzzer sounds.
⇨Press down Hour (in minutes) or Minute (in
seconds) buttons to fast-forward the count.
Initial Usage display
The below figure may sometimes appear on the
LCD screen, when any of the range buttons is
pressed. Please follow the displayed message when
shown.
If the LCD screen turns red, it is a
mechanical failure of the instrument.
Please unplug the power of the
instrument right away and contact
your sales dealer for an assistance.
Initial Usage display
20
How to Process Water
[At first, please check the following.]
Display of the LCD screen
Sound
during
inflow
Condition
of drainage
KANGEN
Intense
KANGEN
3
KANGEN
2
Melody
(1) Press the range button which you want to use.
Display
during infow
K A N G E N S U I
❶Have you read "For Your Safety" at P.1?
❷Have you connected all the hoses and plug the
power cable properly?
❸Have you checked that all buttons on the control
panel works functionally?
❹Have a Water Purification Cartridge and an
Electrolytic Accelerator been installed correctly?
❺If the instrument has not been used for some
time, please check ❶∼❹ listed above,and make
sure it operates safely.
(3) open the faucet. Water substantially flows from
the faucet, after 2 to 3 seconds of inflow.
Acidic Water
flows out of the
drain hose.
※Undrinkable.
KANGEN
1
mutually
displays
Purified Water
KANGEN
1
displays
mutually
W a t e r
KANGEN
2
mutually
displays
mutually
Washing
Face
Washing
Dishes
No
It will be less,
sound
for water conservation.
Buzzer
KANGEN
3
A c i d i c
K A N G E N S U I
KANGEN
Intense
Alkaline water
flows out of
the drain hose.
※Undrinkable
※DO NOT DRINK Water out of the drain hose.
displays
mutually
(4) After using the instrument, please set the channel
to Raw Water or Shower on the faucet stream router.
※the instrument would go in Power-saving state
automatically, after 4 minutes of use.
Purified Water
displays
A c i d i c
Washing
Face
W a t e r
Washing
Dishes
mutually
displays
If inflow volume is excessive, It would
sounds a buzzer and displays
mutually
《ご使用のレンジ》
displays
※If the indicator of desired range button is already
lit, then there is no need to press it again.
(2) Set the channel to Processed Water of the faucet
stream router.
Switching
Display
21
Switching
Display
in red on the LCD screen.
White
deposits
floating
on
Antioxidant water might sometimes
be found in your glass or container,
and they are calcium contained in
water, that are solidified and become
visible. They are harmless when you
drink; however, if you feel anxious
about them, it can be avoided by
lowering the Antioxidant water range
level.
Method for measuring the pH
pH (potential Hydrogen) variers depending on
inflow volume as well as seasonal changes in a
quality of tap water.
Please perform this pH test for Antioxidant water at
least once a month, ever after the initial installation,
to make sure that the pH is in the drinkable range,
10 or less.
Put two drops of pH testing solution
[Phenolphthalein solution], included in the box, into
the test tube, also included.
Phenolphthalein Solution
※It has to be exactly
2 drops to measure
accurately.
Antioxidant Water
●There are four levels of Antioxidant Water in
range. pH would increase in order of KANGEN 1,
KANGEN 2, KANGEN 3, and KANGEN Intense.
●Around pH 9.0 9.5 is generally suitable for
drinking; however, a person, new to drink
Antioxidant water should start with much less pH
contained water of small amount.
●To store Antioxidant water, please use a pet
bottle, and keep it in a refrigerator. Do not keep it
no more than two days for drinking propose.
●Do not drink the water with pH 10 or higher.
●We recommend to drink Antioxidant water about
500mL 1000mL per a day.
Acidic Water
Test Tube
Next, fill the test tube with produced Antioxidant
water, upto the marked level.
Markedlevel
(a step part)
Antioxidant Water
(Red discoloration)
How to Use Processed Water
※It has to be filled up
exactly at the marked
level to measure
accurately.
To check the pH in Red discoloration of Antioxidant
water, use the discoloration standard table for pH
solution test, included in the box.
Around pH9.0 9.5 is suitable for drinking. Do not
drink the water that has been used for testing.
Please make sure to cap the bottle of
pH testing solution after use.
Additionally, keep it out of the
children's reach, or a fire.
●Face Washing mode is for washing face and
cleansing.
●There are two levels of Acidic water in range.
every time the button is pressed, the mode
switches back to back between Face Washing and
Dish Washing.
●To store Acidic water, please use a pet bottle, and
keep it in a refrigerator. Please use it up within
two days, for your sanitation.
●Do not drink Acidic water.
Purified Water
●Purified water is the filtered water, has not been
electrolyzed, yet containing less impurities than
tap water.
●It can be used for taking medicine and making
milk for infant.
●To store Purified water, please use a pet bottle,
and keep it in a refrigerator. Please use it up
within two days, for your sanitation.
Do not press the Purified Water
button while running water on the
Antioxidant Water or Acidic Water
mode. If inflow volume is excessive, It
would sounds a buzzer and displays
in red on the LCD screen.
To use any of the processed water, please
make sure to read "For Your Safety" at P.1.
22
Annexing Calcium Lactate
※Calcium lactate is an auxiliary agent that accelerates
electrolysis of water.
(1) remove the cartridge cover by sliding it to the left.
Cartridge Cover
(4) Combine the annexing tube and its knob part,
and place it back in the body of the instrument.
At this point, please make sure that the O-ring is
NOT twisted and calcium or any other deposits
are NOT adhered to it. They can be a cause of
water leakage.
(2) Remove the annexing tube from the body of the
instrument by turning its knob to the left. Please
refer to the figure below.
Annexing tube's
knob
(Push in and
turn to the right)
(5) Place the cartridge cover back on the body of
the instrument.
Knob
Replacing the Water Purification Cartridge.
When it's time to replace the water purification
carteidge, the LCD screen displays in red.
Annexing Tube
(3) Fill the annexing tube with the included calcium
lactate, up to eighth of the container.
To replace the water purification cartridge, proceed
in following order.
(1) Close the faucet
(2) Remove the cartridge cover by sliding it to the
left.
Cartridge Cover
Calcium Lactae
23
(3) Pull up the cartridge.
●Unlock before pulling it up.
press it with a sharp object,
like a pen.
少
Unlock it before
Pull up
多
Drainage
Volume
Control
Valve
(4) place the new cartridge by pushing it in.
The water, spilled out from the old cartridge and
accumulated inside the body of the instrument,
should be drained completely, before placing a
new cartridge.
lock it after
pushed in
Reset Butoon
Press this when the cartridge is replaced
(8) Place the swich cover back on the body.
(9) Run water for five minutes, before start drinking
it again.
[When not being used for a long period of time]
(1) Close the faucet.
(2) Set the channel on Raw Water or Shower of the
faucet stream router.
(3) Take out the Calcium lactate in the annexing
tube, and wash the tube.
(4) Leave the power plugged. If power is unplugged,
data of the accumulated inflow volume and
accumulated used time will be lost.
(5) When it is not being used for more than few
days, please run water on Dish Washing mode of
Acidic water range, for 3 minutes, before drink
Antioxidant Water from the instrument.
Additionally, the LCD screen shows the initial
usage display.
●when you replace the water purification
cartridge, please call the toll-free number shown
in the replacement alert on the LCD screen.
About Overheating Prevention
(5) Place the cartridge cover back on the body.
(6) Remove the the switch cover, located at the
right bottom conner of the body, by pushing the
grips in to slide it in forth or side while pinching
the entire cover.
Switch Cover
to pinch
This instrument is equipped with a safety device for
overheating
prevention.
The
overheating
prevention device would operates, when heat
inside the instrument is generated by the
Nonstop-production of Antioxidant water or Acidic
water for a period of time.
the LCD screen displays the below figure in red,
while the overheating prevention device operates.
grip
to pinch
(7) check the range indicator is lit, and press the
reset button, in the switch pocket of the
instrument.
●The water purification cartridge replacement alert
on the LCD screen will disappear.
(The accumulated inflow volume and
accumulated used time will go back to 0).
Overheating Prevention Alert
In this case, please close the faucet right away and
stop using the instrument. Thereby, the
overheating prevention alert will disappear from
the LCD screen. Although the instrument will be
ready to use again in two minutes, it will be better
to wait for re-using until the heat goes away
sufficiently.
24
Maintenance and After-Sales Service Specifications
M ai n t e n a n c e
● Please let water flow on Dish Washing mode
for a minute, prior to drinking Antioxidant
water on KANGENSUI mode, at the beginning
of everyday use. In addition to suppressing a
deposition of calcium, it flushes out the water
remaining inside water ways of the body.
● Do not throw water over the instrument or
wash it with water. It may cause an electric
leakage or shock.
● Do not use detergent, bleach, alcohol,
benzine, thinner, cleanser, or insecticide of any
kind, for cleaning. It may cause deformation,
discoloration, or cracked of the instrument.
● Use a soft dry cloth to wipe the surface of the
instrument.
● For maintainance of the faucet stream router,
please also refer "Handling the Faucet Stream
Router" at P.18.
● For disposal of old cartridge, hoses, faucet
stream router, or other consumables, please
follow your local rules.
A f t e r - S a l e s S er vic e
● The water purification cartridge needs to be
replaced periodically to maintain the quality of
water.
Please contact your dealer, when the LCD
screen displays the water purification cartridge
replacement alert.
● To use this product properly, please listen to
the instructions of our service personnel at the
installation site.
● For disposal of the instrument itself,
accessories, or other consumables, please
follow your local rules.
Classification : Home Water Processing and Purification
Instrument
Product Name : KANGENSUI RW-7
Rated Voltage : AC200 240V
Rated Frequency : 50/60Hz
Rating Current : AC2A (max.3A)
Rated Electrolysis Voltage : DC50V (70Vmax.)
Electrode : Platinum-coated titanium plate
Electrode Lifespan : Nominal 4000 hours (Electrolysis
time)
Processed Water Inflow System : 2-way system
Rated Inflow Volume (When using the standard water
purification cartridge) :
Antioxidant Water 6.0 liter per minute (max.)
Acidic Water 6.0 liter per minute (max.)
Purified Water 7.0 liter per minute (max.)
Inflow Pressure : 0.05 0.7MPa
Weight (the body) : about 5kg
Power Cable length : Approximately 2.7m
Size (the body) : 271 (W) × 345 (H) × 138 (D) mm
Calcium Lactate Addition Device : inside the case
annexing method.
※Calcium lactate is an auxiliary agent that accelerates
electrolysis of water.
Water Purification Cartridge Filtration Capacity : 14 tons
of the 13 substances that are subjected to remove,
specified by JIS (Japanese Industrial Standards) ※1
Test results on JIS S 3201 (Tested filtration inflow : 4 liter
per minute)
(It is capable of filtering 38 liter per day, for a year. Its
capability may vary depending on the inflow volume,
pressure, or quality of water.)
Electrolytic tank cleaning methods
: Double Auto-Change Cross-Line System
Power Circuit : Switching Regulator Control System
Unit Circuit Protection : 5A fuse
Unit Circuit Protection : Constant current control circuit
Unit Circuit Protection : Overheating Prevention Device
Unit Circuit Protection : Twin Safety Valve Function (Hot
water inflow prevention, high water pressure inflow
prevention)
This product may chnages
The specifications of this product may change for its
improvement without a notice.
※1 JIS specified 13 substances
1 Chlorine residual (chlorine) 8 Trichlorethylene
9 1,1,1 - trichloroethane
2 Turbidity
Manufactured and distributed by
Trim Electric Machinery Co., Ltd.
5-2-1 Hotarugaoka, Nankoku, Kochi 783-0060
25
3 Chloroform
4 Bromodichloromethane
10 Total trihalomethanes
11 CAT (pesticides)
5 Dibromochloromethane
12 2-MIB (musty odor)
6 Bromoform
7 Tetrachlorethylene
13 Lead solubility
Check List
■Let's check one last time.
□Have you read this manual properly.
□Have you checked water is suitable before processed by the instrument. (See P.5)
□Is the power cable being plugged correctly.
□Are you using the instrument with the descripted power supply voltage (100V AC).
□Is the power cable NOT bent or damaged.
□Is the power cable NOT pluged to an octopus wiring (multiple tap).
□Does the used outlet have NO backlash.
□Have you NOT fixed the power cable with staples.
□Do you place the body on the instrument appropriately. (See P.11)
□Are the hoses NOT bent or twisted. Are hoses NOT wired or placed vertically higher than the body
of the instrument.
□Do you understand what to do if you accidentally drop the instrument in water. (See "for your
safety" P.1)
□Have you properly read the precautions for drinking KANGENSUI. (See P.22)
□Have you properly read the precautions for drinking Acidic Water. (See P.22)
□Do you understand how to save KANGENSUI. (See P.22)
□Have you properly adjusted pH (potential Hydrogen). (See P.22)
26
Is this a mechnical failure ? Check Here.
Is this a mechnical failure ? Check Here.
Before contacting your dealer for a repair service, please check the followings to make sure you need an
assistance.
Despite of following all the listed procedures below, a problem cannot be resolved, or a problem has been
confirmed to be an failure, please stop all operations of the instrument, unplug the power, and contact your
dealer or our customer support dial for an assistance. Do not try to repair or disassemble on your own.
Condition
No response to a
pressed button,
No actions on the
LCD screen.
Water does not
flow out from the
faucet at all.
The stream is too
weak.
Water leakage
from a hose
connector.
Low pH
The water has
unpleasant odor
or taste.
27
The Things to check
●Is the power cable plugged to an outlet
properly?
●Is the fuse, located in the bottom of the body,
being blown?
Procedure
●Plug the power properly.
●If the fuse has been blown,
contact your dealer or our service
counter for help.
●Unplug the power once, and wait
about 10 seconds to plug it in
again.
●Are the hoses being connected properly?
●Is there a bent or twist on any of the hoses?
●Is the faucet opened enough to creat an
adequate pressure?
●Is there a water outage or frozen pipe on your
home water system?
●Is there a clogging on the water purification
cartridge?
(Due to a quality of water, it may last shorter
than its designed capacity)
●Is there an inflow of 50℃ or higher water into
the instrument?
●Connect the hoses properly (see
P.17)
●Straighten the hoses.
●It cannot be used with the water
pressure lower than 0.05MPa.
●Wait a use of the instrument until
a water outage or frozen pipe
being resolved.
●Is a connecting nut attached properly?
●Attach the connecting nut
●Replace the water purification
cartridge (see P.23)
●Do not use hot water. Use the
water, temperature below 50℃.
properly (see P.17)
●Is there a bent or twist on any of the hoses?
●Is the drain hose routed higher than the body
of the instrument?
●Is the inflow volume being too much?
●Is the drainage flow volume set too low?
●Straighten the hoses.
●Route the drain hose lower than
the body of the instrument.
●Adjust the faucet to lower the
inflow volume.
●Adjust the drainage volume
regulating valve to drain more.
●Is there a long period of time since the
instrument last being used.
●Is pH of the water too high?
●Is the instrument being used for an
underground water or well water?
●Is the water purification cartridge being used
more than its designed capacity?
●let water flow on dish washing
mode for a minute, at the eginning
of everyday use. Also do the same
for three minutes, when it is not
being used for more than few days.
●Use a lower range level of
Antioxidant water.
●Use a tap water for the instrument.
●Replace the water purification
cartridge (see P.23)
Condition
There are white
●Refer the right column.
●They are calcium contained in
water, that are solidified and
become visible. They are
harmless when you drink;
however, if you feel anxious
about them, it can be avoided by
lowering the Antioxidant water
range level.
●Refer the right column.
●Adjust the faucet to lower the
inflow volume.
●Refer the right column.
●The water purification cartridge
deposits floating
on Antioxidant
water in a glass or
container.
The LCD screen
displays
Procedure
The Things to Check
《ご使用のレンジ》
in red (instead of
indicating the
inflow volume, it
says "close the
faucet")
The LCD Screen
needs to be replaced (see P.23)
displays In red.
The LCD Screen
●Refer the right column.
●The heat inside the instrument is
high. Stop processing the water
for more than 2 minutes.
(see P.24)
Displays in red.
Water drains out
from the safety
valve of the
faucet stream
router.
●Is the inflow water pressure too high?
●Is the inflow volume too much?
●Is there a clogging on the water purification
cartridge? (Due to a quality of water, it may last
shorter than its designed capacity)
●Is there a bent or twist on any of the hoses?
●It cannot be used with the water
pressure higher than 0.7MPa.
●Adjust the faucet to lower the
inflow volume.
●Replace the water purification
cartridge (see P.23)
●Straighten the hoses.
28
本社/〒812-0016 福岡市博多区博多駅南1- 6 - 9三和ビル ☎092 - 471- 5538(代)
http: // www.sanwa-inf.co.jp
改訂日:平成23年5月6日