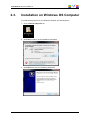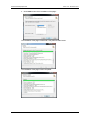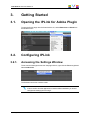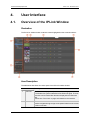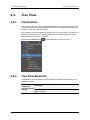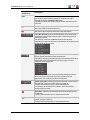
1
USER MANUAL
IPLink for Adobe
Version 1.0 - November 2013
USER MANUAL IPLink for Adobe 1.0
Copyright
EVS Broadcast Equipment SA– Copyright © 2013. All rights reserved.
Disclaimer
The information in this manual is furnished for informational use only and subject to
change without notice. While every effort has been made to ensure that the information
contained in this user manual is accurate, up-to-date and reliable, EVS Broadcast
Equipment cannot be held responsible for inaccuracies or errors that may appear in this
publication.
Improvement Requests
Your comments will help us improve the quality of the user documentation. Do not
hesitate to send improvement requests, or report any error or inaccuracy on this user
manual by e-mail to [email protected].
Regional Contacts
The address and phone number of the EVS headquarters are usually mentioned in the
Help > About menu in the user interface.
You will find the full list of addresses and phone numbers of local offices either at the end
of this user manual (for manuals on hardware products) or at the following page on the
EVS website: http://www.evs.com/contacts.
User Manuals on EVS Website
The latest version of the user manual, if any, and other user manuals on EVS products
can be found on the EVS download center, on the following webpage:
http://www.evs.com/downloadcenter.
I
USER MANUAL IPLink for Adobe 1.0
Table of Contents
TABLE OF CONTENTS
III
1.
1
INTRODUCTION
1.1. Product Description
1
1.2. Media Workflow
1
1.3. Main Features
2
1.4. System Requirements
3
2.
5
INSTALLATION
2.1. Prerequisite
5
2.2. Installation on Mac OS Computer
5
2.3. Installation on Windows OS Computer
7
3.
9
GETTING STARTED
3.1. Opening the IPLink for Adobe Plugin
9
3.2. Configuring IPLink
9
3.2.1. Accessing the Settings Window
4.
3.2.2. General
10
3.2.3. Path Mappings
11
3.2.4. Connection
12
USER INTERFACE
14
4.1. Overview of the IPLink Window
14
4.2. Tree View
16
4.2.1. Introduction
16
4.2.2. Tree View Elements
16
4.2.3. Keyboard Shortcuts
18
4.3. Elements Grid
19
4.3.1. Introduction
19
4.3.2. Grid Header Contextual Menu
19
4.3.3. Sorting the Elements in the Grid
19
4.3.4. Organizing Columns
19
4.3.5. Operations Allowed from the Elements Grid
21
4.4. Quick Text Search Area
21
4.4.1. Introduction
21
4.4.2. Quick Text Search Associated Buttons
22
4.5. Advanced Search Pane
Table of Contents
9
22
4.5.1. Purpose
22
4.5.2. Overview of the Advanced Search Pane
22
III
EVS Broadcast Equipment SA
5.
SEARCHING FOR MEDIA
24
5.1. Filtering Tools
24
5.2. Branch Selection in the Tree
24
5.3. Quick Text Search
24
5.3.1. Purpose and Context of Use
24
5.3.2. Search on Displayed / All Columns
25
5.3.3. Quick Text Search Syntax Rules
26
5.3.4. Autocomplete Function in Quick Text Search Field
26
5.4. Advanced Search
6.
IV
Issue 1.0.E - November 2013
27
5.4.1. Purpose and Context of Use
27
5.4.2. Advanced Search Fields Display
27
5.4.3. Advanced Search Fields Types
28
5.4.4. Search in Free Text Fields
29
5.4.5. Search in Non-Free Text Fields
30
IMPORTING MEDIA INTO PREMIERE PRO
31
6.1. Importing Media into a Project
31
6.2. Importing Media into a Sequence
34
Table of Contents
USER MANUAL IPLink for Adobe 1.0
1.
Introduction
1.1.
Product Description
IPLink for Adobe is a plugin panel extension for use with Adobe Premiere Pro CC.
It can be used in those situations where it is desirable to be able to access clip elements
that are made available for editing by IPDirector whilst the live event is taking place. In
this case, access to the underlying media files are made using shared storage that is
managed by IPDirector.
The IPLink for Adobe plugin panel allows the users to be able to search for clip elements
based upon the IPDirector held metadata (Clips, Bins, Logs) and be able to preview and
use the associated files stored on the shared storage. In this way the users do not have to
navigate and import clip elements directly from the shared storage and allow direct access
to the files from Premiere Pro CC without having to move or copy files to the local
workstation storage.
A main advantage for many live events is that the metadata associated with the event
may be continuously updated by users of the EVS production system. With IPLink for
Adobe, visibility of new or updated metadata is possible from within the panel in Premiere
Pro CC thereby allowing editorial decisions to be made in a timely manner.
1.2.
Media Workflow
Content originating from cameras or other sources is recorded to EVS servers and
managed using IPDirector applications.
Using IPDirector the operator can create clips and initiate jobs to allow the content on the
server to be made available onto nearline storage that is also being managed by
IPDirector. EVS XSquare/XTAccess is used to stream the clip media to the nearline
storage in a format that is compatible with Premiere Pro CC.
The operator can also apply additional metadata and logs to one or several clips.
1. Introduction
1
EVS Broadcast Equipment SA
Issue 1.0.E - November 2013
Within Premiere Pro CC, editors can use the IPLink plugin panel to connect to the EVS
production system and search for clips based upon the metadata held in the IPDirector
database. The connection between the IPLink panel and IPDirector is made via the
IPDirector API. The editor is also able to list the logs that are held in the EVS production
system.
The editor can load the media associated with clips or logs directly into the source video
monitor of Premiere Pro CC and review and play the video content.
The video content can be used in the Premiere Pro CC project by simply marking in-out
points on the loaded clip and editing directly to the sequence timeline. This will import the
clip into the Premiere Pro CC project.
The video files representing the clips are accessed directly on the nearline storage by
Premiere Pro CC over the network.
Once the edit is completed, the sequence is exported from Premiere Pro CC using the
normal export tools within the editing application back onto specified locations on the
nearline storage.
The folder locations on nearline storage are monitored by XSquare/XTAccess and when
the exported media file is discovered, an appropriate job is started to make the media
available to be played out on the EVS server. Alternatively depending upon the XSquare
job profile associated with the nearline folder location, other actions may be executed.
1.3.
2
Main Features
•
Adobe Premiere Pro CC plugin extension panel.
•
Microsoft Windows & Apple Mac OS support.
•
Clips, bins & logsheets accessible.
•
User visibility of clips, bins & logs dependent on user IPDirector login user rights.
•
Customizable metadata fields.
•
Full text search with autocomplete function.
•
Advanced search criteria.
•
User selectable auto-refresh.
1. Introduction
USER MANUAL IPLink for Adobe 1.0
1.4.
•
Load clips directly into Adobe Premiere Pro CC source video monitor.
•
Based on logs, clips are parked at the respective timecode position.
•
Media files accessed directly from EVS IPDirector managed nearline storage, no
transfer of media files to Adobe workstation needed.
System Requirements
IPLink for Adobe can be installed onto a workstation that is running Adobe Premiere Pro
CC.
For further information on operating system support and workstation hardware
requirements to run Adobe Premiere Pro CC refer to the Adobe website
(http://www.adobe.com/products/premiere.html).
The version of IPLink for Adobe that can be installed is dependent on the version of Adobe
Premiere Pro CC that is installed as well as the IPDirector version. Use the following
table to determine which version of IPLink for Adobe should be used:
Adobe Premiere Pro CC
Version
IPLink for Adobe
Version
Compatible IPDirector
Version
7.0.x
7.1.0
1.0.84
06.15.28
06.20.78
Choose the installation package that matches the EVS IPDirector version and the Adobe
Premiere Pro CC workstation operating system.
The EVS IPDirector Web Service API must be reachable from the Adobe Premiere Pro
CC workstations.
The IPDirector nearline storage must be accessible from the Adobe Premiere Pro CC
workstations.
Note
In cases where more than 3 Macs are using the tool connected to an IPDirector
database, a dedicated IPDirector SQL database server should be used.
The following additional software (not provided by EVS) is required to be installed on the
Adobe Premiere Pro CC workstation:
•
Java 7
•
QuickTime (for Microsoft Windows based workstations)
The IPLink for Adobe plugin only handles metadata and the compatibility of file formats
and support for certain features (e.g. growing clips support) is dependent upon file wrapper
and codec combinations.
Adobe Premiere Pro CC is able to handle many different combinations of codec and file
wrapper. To ensure compatibility with the EVS production environment select the codec
and wrapper format that corresponds with the native format handled by the EVS Server
and XSquare/XTAccess.
Typically the file wrapper will be either MXF OP1a (SMPTE) or QuickTime.
1. Introduction
3
EVS Broadcast Equipment SA
Issue 1.0.E - November 2013
Choose the corresponding codec type that matches the essence recorded by the EVS
server.
If there is specific workflow requirements (e.g. growing files) then only some
combinations of codec/wrapper may fulfill the requirement. It is highly recommended that
the workflow be tested before use on a production to ensure that it will fulfill the workflow
needs.
If you are unsure how you may go about doing this, then contact your local EVS
representative for advice.
4
1. Introduction
USER MANUAL IPLink for Adobe 1.0
2.
Installation
2.1.
Prerequisite
In order to install the IPLink for Adobe plugin, ensure the following software is installed on
the Adobe Premiere Pro CC workstation in advance:
•
Adobe Premiere Pro CC (v7.0.x)
•
Adobe Extension Manager CC
•
Java 7
•
QuickTime (if using Adobe Premiere Pro CC on MS Windows operating system)
Note
This software is not provided by EVS.
2.2.
Installation on Mac OS Computer
To install the plugin IPLink on your Mac OS computer, proceed as follows:
1. Click the IPLink setup.dmg icon:
2. Double-click the Install IPLink icon:
2. Installation
5
EVS Broadcast Equipment SA
Issue 1.0.E - November 2013
3. Click Continue to launch the installation process:
You may be asked a number of times to enter the administrator password in order for
the IPLink installer to make changes to the workstation as part of the install process.
Please see your system administrator to obtain the required password.
IPLink for Adobe is being installed:
The plugin is installed:
6
2. Installation
USER MANUAL IPLink for Adobe 1.0
2.3.
Installation on Windows OS Computer
To install the plugin IPLink on your Windows computer, proceed as follows:
1. Click the IPLink setup.exe icon:
2. Click Run in order to run the installation executable:
3. Click Next to access the installation parameters:
2. Installation
7
EVS Broadcast Equipment SA
Issue 1.0.E - November 2013
4. Click Install to launch the installation of the plugin:
The installation of the plugin is launched, it may take several minutes:
The installation of the plugin is then completed:
8
2. Installation
USER MANUAL IPLink for Adobe 1.0
3.
Getting Started
3.1.
Opening the IPLink for Adobe Plugin
To open the IPLink plugin from the Premiere Pro CC, select Extensions > IPLink from
the Window menu:
3.2.
Configuring IPLink
3.2.1.
Accessing the Settings Window
The access the Settings window from the plugin IPLink , right-click the Elements grid and
select Preferences:
The Preferences window contains 3 tabs.
Note
If this is the first time the application is launched after installation you should
configure the settings prior to using it.
3. Getting Started
9
EVS Broadcast Equipment SA
3.2.2.
Issue 1.0.E - November 2013
General
The General tab is used to configure general parameters such as:
•
Sequence template for edit imports.
•
Maximum number of search results: set the max number of elements of the result set
that will be displayed.
•
Request timeout: set the timeout for requests to the IPDirector API.
•
Default search: when selecting Library in the Tree view, the default search (bins, edits
or logsheets) is displayed.
•
Auto-update: enable auto-refresh of the IPLink Elements grid.
•
Search scope: search will be applied against visible metadata columns or will be
applied against all columns that can be viewed for the type of item in IPLink.
Note
The possible metadata columns can be selected using Organize Columns.
10
3. Getting Started
USER MANUAL IPLink for Adobe 1.0
3.2.3.
Path Mappings
The Path mappings tab is used to map the IPDirector nearline paths onto Mac local paths
when IPLink is used on a Mac OS workstation.
By default, if no entry is entered for Server Path or Local Path, then IPLink will try and
perform an intelligent translation of IPDirector paths against the Mac OS filesystem
mounts for the IPDirector nearline filesystem. If however IPLink is unable to make the
appropriate translation then it will be necessary to enter values into the Path Mappings
table.
In the Path Mappings table, enter the information required to translate the IPDirector
nearline path to the Mac volume path where the media is read from.
Note
The Mac volume must have been previously mounted on the workstation using
the Mac ‘Finder’.
3. Getting Started
•
The Server Path is the path defined as a nearline in IPDirector. It must be entered
exactly as it is defined in IPDirector and it is case sensitive.
•
The Local Path is the path by which the Mac will play the media files from the
IPDirector nearline, and needs to be described as a Mac path. It is also case
sensitive.
11
EVS Broadcast Equipment SA
Issue 1.0.E - November 2013
Tip
• The Server Path can be copied directly from the IPDirector Nearline
Management tab in the Remote Installer as illustrated:
•
3.2.4.
The Local Path can be found by connecting to the nearline from the Mac
(using Finder, Go > Connect to Server), then selecting a clip within the
nearline. Hold the CTRL key and click on the clip, then select Get Info (or
use CMD+I keyboard shortcut). The exact path will be shown in the General
Info section under the title 'Where'.
Connection
The Connection tab is used to configure the connection to an IPDirector WS API
instance. You must have an IPDirector WS API running in order for IPLink to properly
connect and operate.
1. Enter the Server IP address or hostname where the IPDirector API instance is
running.
Note
A DNS is needed should the hostname need to be resolved to a network IP
address.
2. Enter the Web Services Server Port to connect to.
Note
By default this is 31016, and should only be changed after consultation of EVS
Support staff.
3. Enter the login and password of the user with which to connect. This should be an
IPDirector user created from within the IPDirector User Manager.
12
3. Getting Started
USER MANUAL IPLink for Adobe 1.0
3. Getting Started
13
EVS Broadcast Equipment SA
Issue 1.0.E - November 2013
4.
User Interface
4.1.
Overview of the IPLink Window
Illustration
The IPLink for Adobe window contains the areas highlighted on the screenshot below:
Area Description
The table below describes the various parts of the IPLink for Adobe window:
14
Area
Description
1.
Tree View
The Tree view displays the clips, bins, edits and logs present in the
EVS Production system and based on the EVS user rights. The tree
branches can be used to filter the items displayed in the Elements
grid.
See section "Tree View" on page 16 for details on the interface.
2.
Breadcrumb
This area shows the location selected in the Tree view. It can be
used to navigate through and get to the parent folder from the current
position in the tree.
4. User Interface
USER MANUAL IPLink for Adobe 1.0
Area
Description
3.
Quick Text
Search area
The Quick Text Search area provides the ability to perform quick
free text searches.
See section "Quick Text Search Area" on page 21.
4.
Refresh
button
This button is used to refresh the contents of the Elements grid
There is a similar Refresh button on the Tree View panel that can be
used to update the Tree View area.
5.
Display
Filter
buttons
This area provides buttons to filter the content of bins based on the
type of the item: clips or edits.
6.
Elements
grid
The Elements grid displays all the items included in the selected
tree branch, or breadcrumb, or resulting from a search.
The total number of results found is shown in the bottom bar.
See section "Elements Grid" on page 19.
7.
Advanced
The Advanced Search area allows augmentation of search filters
Search pane and the available options depends on the item context being
searched for such as clips, edits or logs metadata.
See section "Advanced Search Pane" on page 22.
8.
Application
Version
number
This area displays the version number of the IPLink for Adobe
plugin.
9.
Import
button
This button is used to start the import of the item(s) selected from
the Elements grid into a Premiere Pro CC project.
See section "Importing Media into Premiere Pro" on page 31.
Adaptable Display
The layout of the IPLink for Adobe can be adapted to users' needs:
•
The Tree View and the Advanced Search pane can be hidden by clicking the arrow
icon
•
4. User Interface
or un-hiden by clicking
.
The Tree View and the Advanced Search pane can be enlarged or reduced by clicking
(and holding) the split box control and moving it to the left or to the right:
15
EVS Broadcast Equipment SA
Issue 1.0.E - November 2013
4.2.
Tree View
4.2.1.
Introduction
The Tree view allows the users to navigate and browse the items made available for use,
these may be all the clips made available on the IPDirector managed nearline, edits and
logsheets or clips and edits stored in bins.
Click the arrow next to a tree branch to expand a branch. By browsing the tree structure, a
selection is made and the items available displayed in the Elements grid. See section
"Branch Selection in the Tree" on page 24.
The associated Refresh button
4.2.2.
is used to refresh the Tree view content.
Tree View Elements
The table below mentions which items are displayed in the Elements grid based on the
tree branch selected.
Tree Branch /
Sub-Branch
Storage
16
Description
Shows all the clips present in all the available IPDirector managed
nearline storages.
4. User Interface
USER MANUAL IPLink for Adobe 1.0
Tree Branch /
Sub-Branch
Bins
Description
Shows all the clips or edits which are in bins and bin directories. The
type of items (clips or edits) to display in the Elements grid is
selected by clicking a Display Filter button.
Expanding the Bins view shows the bins and bin directories in the
Tree view.
Bin Directory: shows all the elements which are in all the bins and
directories under the selected directory.
Bin: shows all the elements which are in the selected bin.
Users Bin Directory: shows all the elements which are under all
the System [User] bin directories that are created using the EVS
Production system.
This directory cannot be modified through the IPLink panel.
Expanding the Users Bin Directory view displays the System [User]
bin directories for all the users:
System [User] Bin Directory: shows all the elements which are in
the bins and bin directories for the selected user.
Expanding a System [User] Bin Directory view displays all the bins
and bin directories for the selected user (here: pge). Its name
contains the user logging ID.
This directory and its bins cannot be modified through the IPLink
panel. Only users of the EVS Production system tools and
applications can modify the contents of these bins.
System [User] Bin created by the EVS Production system for the
selected user. Its name contains the user logging ID.
It shows all the elements put in it by the selected user.
It is visible by all the users but it contents cannot be modified
through the IPLink panel.
[User] Bin: created by the selected user under its System [User]
bin directory.
It shows all the elements put in it by the selected user.
[User] Bin Directory: created by the selected user under its
System [User] bin directory.
It shows all the elements put in it by the selected user.
4. User Interface
17
EVS Broadcast Equipment SA
Tree Branch /
Sub-Branch
Edits
Issue 1.0.E - November 2013
Description
Shows all the edits.
Edits may have been created from the IPD Xedio Plugin, the
Director's Cut module of IPDirector or the IPBrowse application.
They can also be created by the IPMosGateway NRCS systems as
Autocreate placeholders.
Note
Limitation: Currently it is not possible to import edits
containing clip elements into Premiere Pro CC using the
IPLink panel. Only placeholder empty edits can be
imported. This allows import of placeholder edits where
specific EVS metadata needs to be associated with the
sequence (e.g. custom metadata fields) once it has been
imported into Premiere Pro CC. In order to import other
types of edits, including those that reference clip
elements, export the edit metadata from IPDirector as a
FCP 7.x EDL XML to a file share and manually import into
Premiere Pro CC.
Tree Branch /
Sub-Branch
Logsheets
Description
Shows all the logs.
Expanding the Logsheets view shows the log sheets and log
directories in the Tree view.
Log Directory: shows all the logs from all the log sheets which are
in the selected directory.
Log Sheet: shows all the logs which are in the selected log sheet.
Log sheet of which all the logs are protected.
Log sheet of which some of the logs are protected.
Log sheet of which none of the logs is protected.
4.2.3.
Keyboard Shortcuts
The following shortcuts can be used in the Tree view:
18
Key
Action / Behavior
Up Arrow
Select the previous line
Down Arrow
Select the next line
Left arrow
Collapses the branch
Right Arrow
Expands the branch
4. User Interface
USER MANUAL IPLink for Adobe 1.0
4.3.
Elements Grid
4.3.1.
Introduction
The Elements grid represents the content of the tree branch selected in the Tree view, or
the content corresponding to the displayed breadcrumb. It can also returns the result of a
search applied with a filtering tool to the elements of a selected branch of the Tree view.
Bins can contain clips or edits. When Bins is selected from the Tree view, the item type
to display will be selected by clicking the corresponding Display Filter button:
clips,
for
for edits.
In the grid, elements are presented in rows and all their associated parameters and
metadata are in columns.
The total number of results found is shown at the bottom right of the Elements grid. The
number of results that are displayed can be adjusted through the Preferences option.
4.3.2.
Grid Header Contextual Menu
Right-clicking the grid header displays the grid contextual menu.
The options are described in the following table:
4.3.3.
Option
Description
Organize
Columns
The Select Columns window opens and allows the users to select the
columns to display and their order.
Preferences
The Preferences window opens. It is used for the configuration.
Sorting the Elements in the Grid
At start of the application, items are sorted with most recent on top.
You can change the sort order of elements in the grid by clicking the column header for the
parameter according to which you want to sort the elements.
The little triangle indicates the sorting order. Clicking the column header again changes
the sorting order from ascending to descending or vice versa.
4.3.4.
Organizing Columns
Columns can be resized and/or re-ordered. This new organization is automatically saved
and remembered. However, it is also possible to reset the column organization to the
default organization.
4. User Interface
19
EVS Broadcast Equipment SA
Issue 1.0.E - November 2013
Resizing Columns
A column can be resized by using the mouse pointer over columns intersection and
dragging it to the right or to the left.
Selecting Columns to Display
To select the columns to display in the grid, proceed as follows:
1. Right-click the column header area.
A menu is displayed.
2. Select Organize Columns.
The Select Columns window opens and shows the list of columns in the current order.
3. To select the column(s) you wish to add to the view, select them in the left pane and
click the right arrow
Use SHIFT + click to select a range of columns.
4. To select the column(s) you wish to remove from the view, select them on the right
pane and click the left arrow
Use SHIFT + click to select a range of columns.
5. Click Save.
Ordering Columns
To change the columns order, proceedas follows:
1. Right-click a column header.
A menu is displayed.
2. Select Organize Columns.
The Select Columns window opens and shows the list of columns in the current order.
3. Select the column name from the Selected Columns pane.
4. Click the appropriate button:
◦
: moves the item before the previous one
◦
: moves the item after the next one
5. Click Save.
20
4. User Interface
USER MANUAL IPLink for Adobe 1.0
Resetting the Column Organization to the Default One
Users can reset the column organization to the default one (columns selection, order,
size,...).
To do so, proceed as follows:
1. Right-click the column headers area.
2. Select Organize Columns.
3. Select the tab corresponding to the type of item for which you want to reset the grid.
4. Click Reset.
5. Click Save.
4.3.5.
Operations Allowed from the Elements Grid
The following actions are possible from the Elements grid:
Operation
Resulting action
Click on an element
line, clip or log
Simply selects the element.
Double-click a clip line
Loads the clip on the source monitor of Premiere Pro CC.
Double-click a log line
Loads the corresponding ‘Protect Media’ clip, as created from
the relevant recorder set as preview in IPDirector, in the
source monitor of Premiere Pro CC, at the log timecode point.
4.4.
Quick Text Search Area
4.4.1.
Introduction
The Quick Text Search is used to perform a search based on free text entered in the
Quick Text Search field. This field is available on the top of the Elements grid. You can
perform a search on displayed columns or a search on all columns (displayed and hidden
columns).
The search is performed on the selected tree branch or breadcrumb.
See section "Quick Text Search" on page 24 for details on the various ways to use this
function.
4. User Interface
21
EVS Broadcast Equipment SA
4.4.2.
Issue 1.0.E - November 2013
Quick Text Search Associated Buttons
The following table gives a description of the buttons located next to the Quick Text
Search field. These buttons may be used not only for the Quick Text Search function but
also for the other search functions in the grid.
Interface
Element
Description
Applies the search again and refreshes the Elements grid.
Clears the applied Quick Text search.
4.5.
Advanced Search Pane
4.5.1.
Purpose
Advanced Search functions are available for detailed search operations. They allow
searches on metadata of the element type selected from the Tree view. The Advanced
Search pane is located on the bottom left part of the IPLink for Adobe window.
See section "Advanced Search" on page 27 for details on the various ways to use this
function.
4.5.2.
Overview of the Advanced Search Pane
Illustration
The Advanced Search pane contains the areas highlighted on the screenshot below:
22
4. User Interface
USER MANUAL IPLink for Adobe 1.0
Area Description
The table below describes the various parts of the Advanced Search pane:
Area
4. User Interface
Description / See also…
1.
Add Search This field gives access to the list of criteria on which users may
Criteria field perform a search. The lists differ according to the selected item type.
See section "Advanced Search Fields Display" on page 27.
2.
Search
Parameters
area
This area displays the list of search parameters selected from the
Add Search Criteria field.
Different types of search parameters exist. See section "Advanced
Search Fields Types" on page 28.
23
EVS Broadcast Equipment SA
5.
Searching for Media
5.1.
Filtering Tools
Issue 1.0.E - November 2013
When the IPDirector database contains large amounts of data, it may become difficult to
find a specific element. The IPLink window offers several ways to refine the list of
elements displayed in the Element grid and speed up your search:
•
Branch selection in the Tree view - Select a branch in the Tree view to limit the list to
specific item types or only a subset of the Tree view.
•
Quick text search - Enter free text in the Quick Text Search field to perform a search
on a specific string.
•
Advanced search filter – Enter specific criteria in the Advanced Search pane to
perform a search on specific metadata associated with the elements.
All these search tools can be combined.
A search can also be facilitated by ordering the Elements grid. See section "Elements
Grid" on page 19 for more information.
5.2.
Branch Selection in the Tree
The Tree view allows the users to browse between clips on IPDirector managed nearline
storage, clips or edits stored in IPDirector bins, edits or logs. By browsing the tree
structure, a selection is made and displayed in the Element grid. The breadcrumb provides
an indication of the tree path to the currently displayed item elements and allows users to
navigate back to the upper level.
See section "Tree View" on page 16 for a description of the user interface elements of the
Tree view.
5.3.
Quick Text Search
5.3.1.
Purpose and Context of Use
The Quick Text Search function is used to perform a search based on free text entered in
the Quick Text Search field. This field is available on the top of the Elements grid:
See section "Quick Text Search Associated Buttons" on page 22 for the description of the
buttons associated to the Quick Text Search field.
24
5. Searching for Media
USER MANUAL IPLink for Adobe 1.0
Users can enter a search string in one of the following ways.
5.3.2.
•
Enter the search string in full in the Quick Text Search field.
•
Start typing a search string in the Quick Text Search field, so the Autocomplete
function displays a list of proposals, and one of them can be selected. See section
"Autocomplete Function in Quick Text Search Field" on page 26.
Search on Displayed / All Columns
Search on Displayed Columns
To activate the Search on Visible Columns option, proceed as follows:
1. Right-click a column header.
A menu is displayed.
2. Select Preferences.
The Preferences window opens.
3. From the General tab, in the Search Scope field, select Visible Columns.
Then, the columns that are taken into consideration for the Quick Text Search are the
ones currently visible in the Elements grid. You can add other columns to the Elements
grid view by right-clicking the grid header and selecting Organize Columns from the
contextual menu.
Search on All Columns
To activate the Search on All Columns option, proceed as follows:
1. Right-click a column header.
A menu is displayed.
2. Select Preferences.
The Preferences window opens.
3. From the General tab, in the Search Scope field, select All Columns.
Tip
If you perform a Search on all columns without having displayed all the columns,
you will not be able to identify in which column the search string has been found.
For the sake of clarity, it is recommended to display all columns when you
perform a Search on all columns.
5. Searching for Media
25
EVS Broadcast Equipment SA
5.3.3.
Issue 1.0.E - November 2013
Quick Text Search Syntax Rules
The string that you enter in the Quick Text Search field is analyzed according to the
following set of rules:
Search
String
Search Result
Logical
Equivalent
Yellow card
Searches for the words yellow and card, even if in
two different fields (columns), for example yellow in
Name and card in Keywords.
For example a clip named "The Yellow Man" with
keywords "Red Card" will be found, since it has
yellow and card in 2 different fields.
"Yellow" AND
"card"
Yellow | card
Searches for yellow or card, even if in two different
fields (columns), for example yellow in Name or
card in Keywords.
"Yellow" OR
"card"
"Yellow card"
Searches for exact matches of Yellow card. Between the quotes, all characters are considered
as characters and not operators or wildcards.
"Yellow card"
card*
Searches for card at the beginning of a word. "card"*
*card*
Searches for all words that include card.
*"card"*
=card
Searches for a whole field that contains only card.
For example, if a field contains yellow card, the
=card condition will not return any result.
Search operators may be combined.
5.3.4.
Autocomplete Function in Quick Text
Search Field
Introduction
The Autocomplete function is a help service for the capture of the search string.
As soon as the users start typing in the Quick Text Search field, the Autocomplete
function provides a list of matching words and sentences known by the system and
containing a word beginning with the typed letters.
26
5. Searching for Media
USER MANUAL IPLink for Adobe 1.0
How to Perform a Quick Text Search with the
Autocomplete Function
To perform a Quick Text search, proceed as follows:
1. Select the tree branch you wish to perform a quick search on.
2. Select the Search on All Columns option from the Preferences window or, if the
Search on Visible Columns option is selected, display the columns you wish to
perform a search on in the Elements grid.
3. Type a search string in the Quick Text Search field.
A list of proposals is displayed as soon as you start to type and it is refined as you go
on typing.
4. Select a line by using the mouse or the
key.
5. Press ENTER.
The search is launched with the selected proposal.
The search results are displayed in the grid.
6. To clear the applied Quick Text Search, click the Clear Quick Text Search button
(white
) to the right of the search field.
5.4.
Advanced Search
5.4.1.
Purpose and Context of Use
The Advanced Search functions are available for more detailed search operations. They
allow searches on clips, edits or logs metadata.
The Advanced Search pane is located on the bottom left part of the IPLink window. Users
can choose the advanced search parameters they want to display.
5.4.2.
Advanced Search Fields Display
Displaying Advanced Search Fields
The list of available advanced search parameters is available by clicking the arrow next to
the Add Criteria field.
5. Searching for Media
27
EVS Broadcast Equipment SA
Issue 1.0.E - November 2013
Depending on the media type (edits, clips or logs) selected in the Tree view, different lists
of advanced search parameters are proposed.
To display an advanced search parameter, select one of the options from the Add
Criteria menu. The selected parameter is displayed in the Advanced Search pane.
Parameters of which values are in the form of an option list have a filter applied as soon as
they are selected. For example, in the case of Color, or Level,...
Hiding Advanced Search Fields
To remove an advanced search field from the Advanced Search pane, click the cross in
the upper right corner of the criterion box. Applied filters are cleared as soon as a search
field is removed.
5.4.3.
Advanced Search Fields Types
Different types of advanced search fields exist:
•
28
free text fields: search data can be entered directly in these fields, e.g. Name field.
5. Searching for Media
USER MANUAL IPLink for Adobe 1.0
•
5.4.4.
field with an option list: an arrow giving access to a list of options is available on the
right of the field or a list of options is displayed in the area for direct selection, e.g.
Level field.
Search in Free Text Fields
Autocomplete Function in Free Text Search Fields
The Autocomplete function is a help service for the capture of the search string. The
Autocomplete function, described in section "Autocomplete Function in Quick Text
Search Field" on page 26 for the Quick Text Search, is also enabled during searches in
free text search fields of the Advanced Search pane.
Preliminary Steps
1. Select the tree branch in the Tree view.
2. Select the Search on All Columns option from the Preferences window or, if the
Search on Visible Columns option is selected, display the columns you wish to
perform a search on in the Elements grid.
3. In the Advanced Search pane, display the search criterion.
How to Perform a Search on Free Text
To enter search values in a free text field of the Advanced Search pane, proceed as
follows:
1. Type a search string in the field.
A list of proposals is displayed as soon as you start to type and it is refined as you go
on typing.
2. Select a line by using the mouse or by pressing the
key.
3. Press ENTER.
The search is launched on the selected tree branch.
The search results are displayed in the grid.
5. Searching for Media
29
EVS Broadcast Equipment SA
5.4.5.
Issue 1.0.E - November 2013
Search in Non-Free Text Fields
Preliminary Steps
Non-free text search fields of the Advanced Search pane give access to an option list to
select a search value.
Before starting a search, do the following steps:
1. Select the tree branch in the Tree view.
2. Select the Search on All Columns option from the Preferences window or, if the
Search on Visible Columns option is selected, display the columns you wish to
perform a search on in the Elements grid.
3. In the Advanced Search pane, display the search criterion.
How to Perform a Search based on an Option List
To set a search criterion from an option list, proceed in one of the following ways:
When the options are displayed in the area, e.g. Level field:
•
Click the appropriate button:
When the options are displayed in a list:
1. Click the arrow next to a search field to display the option list for the corresponding
criterion
2. Select the appropriate value.
30
5. Searching for Media
USER MANUAL IPLink for Adobe 1.0
6.
Importing Media into Premiere
Pro
6.1.
Importing Media into a Project
How to Import Clips into a Project
One or several clips can be imported into a Premiere Pro project.
This can be done in one of the following ways.
Method 1
1. Select one or several clips from the Elements grid.
2. Click the Import button.
A dialog box opens:
3. Do one of the following:
◦
Click the Current Project button to import the clips in the currently opened
project.
◦
Click the Existing Project button to select the project where you want to import
the clips.
Note
Premiere Pro CC will exit the current project and load up the existing saved
project as part of the import.
Method 2
1. Select one or several clips from the Elements grid.
2. Drag the clips onto the project opened in Premiere Pro.
The clips are referenced in the selected Premiere Pro project.
6. Importing Media into Premiere Pro
31
EVS Broadcast Equipment SA
Issue 1.0.E - November 2013
Method 3
1. Double click a clip from the Elements grid which will then load the corresponding
media file in the Premiere Pro CC source monitor panel.
2. Directly edit a marked segment from the Premiere Pro CC source monitor panel into a
sequence timeline.
The corresponding media file is automatically added to the Premiere Pro CC project.
How to Import Logs into a Project
One or several logs can be imported into a Premiere Pro project. Actually, logs are not
imported as such. The import applies to the Protect Media clips associated to the selected
logs, and created from the relevant recorder set as preview in IPDirector.
This can be done in one of the following ways.
Method 1
1. Select one or several logs from the Elements grid.
2. Click the Import button.
A dialog box opens:
3. Do one of the following:
◦
Click the Current Project button to import the logs in the selected project.
◦
Click the Existing Project button to select the project where you want to import
the logs.
Note
Premiere Pro CC will exit the current project and load up the existing saved
project as part of the import.
Method 2
1. Select one or several logs from the Elements grid.
2. Drag the logs onto the project opened in Premiere Pro.
The IPDirector Protect Media clips associated to the selected logs, and created from the
relevant recorder configured as preview in IPDirector, are referenced in the selected
Premiere Pro project.
32
6. Importing Media into Premiere Pro
USER MANUAL IPLink for Adobe 1.0
Method 3
1. Select a log and double click to load the corresponding media file in the Premiere Pro
CC source monitor window.
2. Preview the log and directly edit a marked segment from the Premiere Pro CC source
monitor panel to a sequence timeline.
The corresponding media file is imported into the Premiere Pro CC project.
Log Associated with Multiple Camera Angles
If the log is associated with multiple camera angles, then using the Import button method
(Method 1) to import the log to the current project will end up creating a bin folder in the
Adobe Premiere Pro project panel that contains the corresponding camera angle footage.
To preview the log for the different camera angles, proceed as follows:
1. Load the camera angle into the Premiere Pro CC source monitor.
2. Double click the corresponding log entry in the IPLink panel.
The playhead will be positioned at the log timecode point.
How to Create a Sequence from an Edit
One or several edits can be imported into a Premiere Pro project.
This can be done in one of the following ways.
Only empty edits can be imported into Premiere Pro.
Method 1
1. Select one or several edits from the Elements grid.
2. Click the Import button.
A dialog box opens:
3. Do one of the following:
◦
Click the Current Project button to import the edits in the selected project.
◦
Click the Existing Project button to select the project where you want to import
the edits.
Note
Premiere Pro CC will exit the current project and load up the existing saved
project as part of the import.
6. Importing Media into Premiere Pro
33
EVS Broadcast Equipment SA
Issue 1.0.E - November 2013
Method 2
1. Select one or several edits from the Elements grid.
2. Drag the edits onto the project opened in Premiere Pro.
The edits are referenced in the selected Premiere Pro project.
6.2.
Importing Media into a Sequence
How to Add a Clip into a Sequence
A clip can be added to a Premiere Pro sequence.
To append a clip into an existing sequence, proceed as follows:
1. Select a clip from the Elements grid.
2. Drag the clip into the opened Premiere Pro sequence.
How to Convert an Edit into a Sequence
An edit can be converted into a Premiere Pro sequence.
To do so, proceed as follows:
1. Select an edit from the Elements grid.
2. Drag the edit into the sequence tab in Premiere Pro.
The edit is opened as a Premiere Pro sequence.
34
6. Importing Media into Premiere Pro
Corporate
+32 4 361 7000
North & Latin America
+1 973 575 7811
EVS Headquarters
Liège Science Park
16, rue Bois St Jean
B-4102 Seraing
Belgium
To learn more about EVS go to www.evs.com
Asia & Pacific
+852 2914 2501
Other regional offices
www.evs.com/contact
EVS Broadcast Equipment is continuously adapting and improving its products in accordance with the ever changing
requirements of the Broadcast Industry.
The data contained herein is therefore subject to change without prior notice. Companies and product names are
trademarks or registered trademarks of their respective companies.