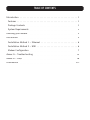
1
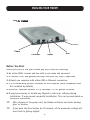
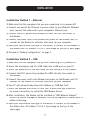
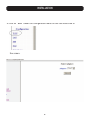
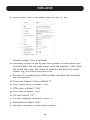
Belkin Tech Support
Australia: 1800 BELKIN
New Zealand: 0800 BELKIN
Singapore: 800 616 1790
US: 310.898.1100 ext 2263
Belkin Corporation
501 West Walnut Street
Compton • CA • 90220 • USA
Tel: 310.898.1100
Fax: 310.898.1111
Belkin Components, Ltd.
7 Bowen Crescent • West Gosford
NSW 2250 • Australia
Tel: +61 (0) 2 4372 8600
Fax: +61 (0) 2 4372 8603
Belkin Components, Ltd.
Express Business Park
Shipton Way • Rushden • NN10 6GL
United Kingdom
Tel: +44 (0) 1933 35 2000
Fax: +44 (0) 1933 31 2000
Belkin Components B.V.
Starparc Building • Boeing Avenue 333
1119 PH Schiphol-Rijk • The Netherlands
Tel: +31 (0) 20 654 7300
Fax: +31 (0) 20 654 7349
P74476au
© 2004 Belkin Corporation. All rights reserved. All trade names are
registered trademarks of respective manufacturers listed.
High-Speed
ADSL Modem
with USB and Ethernet
Connect your PC or network for
high-speed Internet access
User Manual
F5D5730au
TABLE OF CONTENTS
Introduction . . . . . . . . . . . . . . . . . . . . . . . . . . . . . . . . . . . . . . . . . 1
Features . . . . . . . . . . . . . . . . . . . . . . . . . . . . . . . . . . . . . . . . . . . 1
Package Contents . . . . . . . . . . . . . . . . . . . . . . . . . . . . . . . . . . . . . 1
System Requirements . . . . . . . . . . . . . . . . . . . . . . . . . . . . . . . . . . 2
Knowing your Modem . . . . . . . . . . . . . . . . . . . . . . . . . . . . . . . . . . . 3
Installation . . . . . . . . . . . . . . . . . . . . . . . . . . . . . . . . . . . . . . . . . . 5
Installation Method 1 – Ethernet . . . . . . . . . . . . . . . . . . . . . . . . . . 6
Installation Method 2 – USB . . . . . . . . . . . . . . . . . . . . . . . . . . . . . 6
Modem Configuration . . . . . . . . . . . . . . . . . . . . . . . . . . . . . . . . . . 7
Annex A – Troubleshooting. . . . . . . . . . . . . . . . . . . . . . . . . . . . . . . 13
Annex B – FAQs . . . . . . . . . . . . . . . . . . . . . . . . . . . . . . . . . . . . . . 18
Information . . . . . . . . . . . . . . . . . . . . . . . . . . . . . . . . . . . . . . . . 20-
INTRODUCTION
Thank you for purchasing the Belkin High-Speed ADSL Modem with USB and
Ethernet. This Modem will allow you to surf the Web and connect to some
popular game consoles.
Features
• RJ45 Ethernet interface support via crossover cable; USB interface support
• IEEE 802.3 standard 10/100Mbps compliance
• DHCP Server
• ANSI T1.413 Issue 2, ITU-T G.DMT (G.992.1), G.Lite (G.992.2) and
G.hs (G.994.1)
• IP Sharing via NAT routing function (Network Address Translation)
• NAT function for NetMeeting®, ICQ®, CU-SeeMe®, etc.
• PPPoE, PPPoA, Bridged and Routed IP (RFC 1493) Encapsulations
• Full ATM protocol support
• Multi-protocol support: IP, PPP, Transparent bridging, etc.
• Configuration, management, and firmware updates via Web
Browser Interface
• Two-level password protection for device management
• Flash memory for future firmware upgrades
• Simultaneous USB and Ethernet support
Package Contents
• Belkin High-Speed Modem with USB and Ethernet
• Power Adapter
• RJ45 Crossover Cable
• A–B USB Cable
• RJ11 Phone Cable
• CD
1
INTRODUCTION
System Requirements
PC running Windows® 98SE-, Me, 2000, XP
CD-ROM drive (For USB Installation Only)
One free USB port (For USB Installation Only)
One RJ45 Ethernet port (Ethernet Installation Only)
2
KNOWING YOUR MODEM
Front of Modem
(1)
(2)
1. ADSL
ON
OFF
Blinking
ADSL Connected
No ADSL Detected
Connecting/Handshaking
2. LAN
ON
OFF
Blinking
Ethernet Connected
No Ethernet Connection
Data Transmitting
3
KNOWING YOUR MODEM
Back of Modem
RJ11
Power
Ethernet
Reset
USB
Before You Start
Before you start to use your Modem you must have the following:
1. An active ADSL account and line with a user name and password.
2. IP address, DNS, and gateway settings from your ISP only if applicable.
3. At least one computer with either USB or Ethernet connection.
4. TCP/IP networking protocol installed on the computer (most computers have
this installed by default).
5. Microsoft® Internet Explorer 5.0 or Netscape® 4.5 or greater installed.
6. It may be necessary to disable any firewall or anti-virus software during
installation. It may prevent successful installation. This can be reactivated on
successful installation.
TIP:
After plugging in the power cord, the Modem initialises and starts working
after 20 seconds.
TIP:
If you push the Reset button for 20 seconds, all the parameter settings will
revert back to factory default.
4
INSTALLATION
You can connect your equipment in one of two ways: via an Ethernet crossover
cable or a USB connection.
If you are connecting via an Ethernet crossover connection then follow the
diagram below and proceed to “Installation Method 1” on page 6.
If you have chosen to connect via a USB connection, make sure the computer
you are connecting to is switched off. Use the diagram below and then proceed
to “Installation Method 2” one page 6.
5
INSTALLATION
Installation Method 1 - Ethernet
1. Make sure that the computer that you are connecting to is powered off.
2. Connect one end of the Ethernet crossover cable to your Modem’s Ethernet
port; connect the other end to your computer’s Ethernet port.
3. Connect the RJ11 phone line provided for ADSL into the line socket in
the Modem.
4. Connect the power cord to the Modem and power on the Modem; wait 20
seconds for the Modem to initialise, then boot up your computer.
5. Open your web browser and type in the default IP address of the Modem to
the address bar—IP address: 10.0.0.2 (see image on the top of next page).
6. Proceed to “Modem Configuration” on page 7.
Installation Method 2 – USB
1. Make sure that the computer that you are connecting to is powered off.
2. Insert the rectangular end of a USB cable into a USB port on your PC.
3. Insert the square end of the USB cable into the USB port of the Modem.
4. Connect the RJ11 phone line provided for ADSL into the line socket in
the Modem.
5. Connect the power cord to the Modem and power on the Modem; wait 20
seconds for the Modem to initialise, then boot up your computer.
6. Your PC will automatically detect this Modem as “USB Net Card”.
7. Insert the bundled USB driver CD into the CD-ROM drive and follow the
on-screen instructions to install the USB Modem drivers.
8. After installation, the Modem will be installed as “USB Network Adapter”
within the Device Manager of Windows. You will be required to reboot your PC
before continuing.
9. Open your web browser and type in the default IP address of the Modem to
the address bar—IP address: 10.0.0.2 (see image on the top of the
next page).
6
INSTALLATION
Modem Configuration
Enter the default user name and password and click “OK”. If you do not see the
screen below then turn to “Annex A Problem 1”.
Default User Name: admin
Default Password: password
You will then be logged into the web interface of the Modem.
7
INSTALLATION
1. Click on “WAN” under the Configuration menu on the left-hand side of
the screen.
8
INSTALLATION
2. Your screen will look like this.
2a. Click on “Submit” and your screen will look like this:
3. For New Zealand users, change the “VPI” to “0” and the “VCI” to “100”—by
default this is set to 8/35.
For Australian users, the “VPI” is “8” and the “VCI” is “35” as its default.
4. Under the heading PPP on the right you will see the following:
5. Enter the following personal details as given to you by your ISP:
9
INSTALLATION
a. Service Name: Enter in the name of your ISP such as “xyz
Internet provider” (this is optional).
b. Username: As given to you by your ADSL provider. For New Zealand Xtra
account holders, the user name always needs the extension “.xadsl” after
the normal user name, and should be entered in the form of an e-mail
address, e.g. [email protected].
c. Password: As provided by your ADSL provider, remember that passwords
are case-sensitive.
d. Disconnect timeout: Leave as default “0”.
e. MRU: Should be left as default “1452”.
f. MTU: Leave as default “1300”.
g. MSS: Leave as default “1432”.
h. LCP echo interval “10””.
i. LCP echo maximum consecutive failure “6”.
j. Authentication: Select “Auto”.
k. Automatic Reconnect: Should remain checked.
10
INSTALLATION
6. Scroll down to the bottom of the screen and you will see the following.
7. Click the “Submit” button to update the changes and then scroll back to the
bottom of the screen and then click on “Save Configuration”.
8. The screen will change and you will see the following. Click on “Save
& Reboot” to make the change to the Modem.
9. The Modem will restart and the LAN connection will be reestablished between
your PC and your Modem. You will see the following on your web browser.
10. When you see this screen, the Modem has rebooted and is ready to be
connected to ADSL.
11
INSTALLATION
11. On the left of the screen under the Status settings in your browser, click
on “PPP”.
You will see the following:
12. If under Status you do not see “Connected” displayed, ensure that “Connect”
is displayed in the drop-down window and then click on the “Execute”
button.
The Modem will initiate the connection to your ADSL provider and connect
to your ISP. Note that under the “Status” column it will indicate “connected”
once your ADSL connection
is running.
13. You can successfully close this browser window and open a new browser
window and surf the Internet.
12
ANNEX A – TROUBLESHOOTING
Problem
My Internet web browser would not display the login dialogue box when I typed
in the numbers “10.0.0.2”.
Solution
• Check that your browser address bar displays nothing except “10.0.0.2”.
• Check that your PC is configured to accept IP addresses dynamically by doing
the following:
Solution for Windows 98 and Me
1. Go to “Start / Settings / Control
Panel”. In the Control Panel,
double-click on “Network” and
choose the “Configuration” tab.
2. Select “TCP / IP”, or the name
of your Network Interface Card
(NIC) in your PC.
3. Click “Properties”.
4. Select the “IP Address” tab. In
this page, click “Obtain an IP
address automatically”.
5. Then select the “DNS
Configuration” tab.
13
ANNEX A – TROUBLESHOOTING
6. Select the “Disable DNS” radio button and click “OK” to finish
the configuration.
Solution for Windows 2000
14
ANNEX A – TROUBLESHOOTING
1. Go to “Start / Settings / Control Panel”. In the Control Panel, double-click
on “Network and Dial-up Connections”.
15
ANNEX A – TROUBLESHOOTING
2. Double-click “LAN Area Connection”.
3. In the “LAN Area Connection Status” window, click “Properties”.
4. Select “Internet Protocol (TCP/IP)” and click “Properties”.
5. Select “Obtain an IP address automatically” and “Obtain DNS server address
automatically”. Click “OK” to finish the configuration.
16
ANNEX A – TROUBLESHOOTING
Solution for Windows XP
1. Go to Control Panel on your computer and double-click “Network Connections”
and right-click your network connection and select “Properties”.
2. Highlight “Internet Protocol (TCP/IP)” and select “Properties”. If you do
not have TCP/IP displayed in the list then you will need to install TCP
IP before proceeding.
3. Ensure that: “Obtain an IP address automatically” and “Obtain DNS
server address automatically” is selected and then hit “OK” twice.
17
ANNEX B – FAQs
Can I connect two computers to my modem, one via Ethernet and one via
USB, and be on the Internet with both computers at the same time?
Yes, it is possible to have two computers using the Modem at the same time via
USB and Ethernet. It is also possible to share files between the two computers.
Can I connect my Modem to a hub and have multiple computers share the
Internet at the same time?
You can connect your PC to the modem using the USB cable and have the
Ethernet cable from your Modem running into a hub, then attach your additional
computers to the hub and access the Internet at the same time.
I want to create a wireless network. Will this Modem support that feature?
The easiest way to create a wireless network is to connect your desktop machine
to the Modem using USB and then connect either a Belkin 802.11b or 802.11g
Access Point to the Ethernet port of your modem.
Can I connect a wired or wireless router to my Modem?
You can connect a wired or wireless router to your Modem. The Modem will
allocate a WAN IP address to your router and then you can configure the IP
range that you wish to allocate to your client machines by configuring your
router settings. Authentication to your ISP needs to be done on your Modem so
simply connect your router to the Ethernet port of your Modem without running
any setup wizards that may ship with the router.
How do I pass the WAN/Internet IP onto my Router or PC with this Modem?
You will need to set the modem up as a Half Bridge - follow the process below to
do this:
1. Log into the modem’s configuration page through Internet Exlporer - 10.0.0.2
2. Enter username and password (admin, password).
3. Click on “Misc Configuration”.
4. Set PPP Half Bridge to “Enabled”.
5. Click “Submit”.
6. Now set the modem up to connect to your ISP as per the instructions at the
start of the manual.
18
ANNEX B – FAQs
Does the modem have the option to Telnet into it?
No - this option has not been enabled on the modem.
Can I FTP into the modem from the internet?
Yes - but you will need to enable this function first - follow the steps below to
do this:
1. Log into the modem’s configuration page through Internet Exlporer - 10.0.0.2
2. Enter username and password (admin, password).
3. Click on “Firewall”.
4. Click on “Service Filtering”
5. Select “FTP”.
6. Click “Submit”.
7. You can now access your modem via FTP.
Do I need an ADSL filter?
Yes. Belkin recommends using a Filter/Splitter on a line supporting both a
Modem and Phone, and a single Filter on each additional phone line.
Where can I get help to connect my modem to Xtra New Zealand?
The following website has a wealth ofinformatio to assist in your connection
with Xtra New Zealand - http://xtra.co.nz/help/0,,5739-907829,00,html modset
Where can I get help configuring my modem in New Zealand or Australia?
You can call our technical support on the following numbers. Before calling,
ensure that you have your ISP settings such as username and password.
New Zealand – 0800 BELKIN (0800 235 546)
Australia – 1800 BELKIN (1800 235 546)
Where can I get more information on networking my home or office?
You can access our website at www.belkin.com/anz/modems to learn more
about the setup of PC networks using Belkin networking products.
19
INFORMATION
FCC Statement
DECLARATION OF CONFORMITY WITH FCC RULES FOR
ELECTROMAGNETIC COMPATIBILITY
We, Belkin Corporation, of 501 West Walnut Street, Compton, CA 90220, declare under our sole
responsibility that the product,
F5D5730au
to which this declaration relates,
complies with Part 15 of the FCC Rules. Operation is subject to the following two conditions: (1) this
device may not cause harmful interference, and (2) this device must accept any interference received,
including interference that may cause undesired operation.
CE Declaration of Conformity
We, Belkin Corporation, declare under our sole responsibility that the product F5D5730au, to which this
declaration relates, is in conformity with Emissions Standard EN55022 and Immunity Standard EN55024, and
LVD EN61000-3-2 and EN61000-3-3.
ICES
This Class B digital apparatus complies with Canadian ICES-003. Cet appareil numérique de la classe B est
conforme á la norme NMB-003 du Canada.
Belkin Corporation Limited Lifetime Product Warranty
Belkin Corporation warrants this product against defects in materials and workmanship for its lifetime. If
a defect is discovered, Belkin will, at its option, repair or replace the product at no charge provided it is
returned during the warranty period, with transportation charges prepaid, to the authorized Belkin dealer
from whom you purchased the product. Proof of purchase may be required.
This warranty does not apply if the product has been damaged by accident, abuse, misuse, or misapplication;
if the product has been modified without the written permission of Belkin; or if any Belkin serial number has
been removed or defaced.
THE WARRANTY AND REMEDIES SET FORTH ABOVE ARE EXCLUSIVE IN LIEU OF ALL OTHERS, WHETHER ORAL
OR WRITTEN, EXPRESSED OR IMPLIED. BELKIN SPECIFICALLY DISCLAIMS ANY AND ALL IMPLIED WARRANTIES,
INCLUDING, WITHOUT LIMITATION, WARRANTIES OF MERCHANTABILITY AND FITNESS FOR A PARTICULAR PURPOSE.
No Belkin dealer, agent, or employee is authorized to make any modification, extension, or addition to
this warranty.
BELKIN IS NOT RESPONSIBLE FOR SPECIAL, INCIDENTAL, OR CONSEQUENTIAL DAMAGES RESULTING FROM ANY
BREACH OF WARRANTY, OR UNDER ANY OTHER LEGAL THEORY, INCLUDING BUT NOT LIMITED TO, LOST PROFITS,
DOWNTIME, GOODWILL, DAMAGE TO OR REPROGRAMMING, OR REPRODUCING ANY PROGRAM OR DATA STORED
IN, OR USED WITH, BELKIN PRODUCTS.
Some states do not allow the exclusion or limitation of incidental or consequential damages or exclusions
of implied warranties, so the above limitations of exclusions may not apply to you. This warranty gives you
specific legal rights, and you may also have other rights that vary from state to state.
20