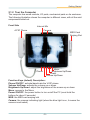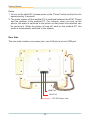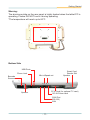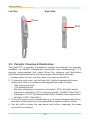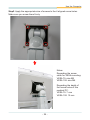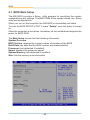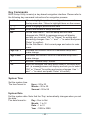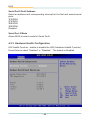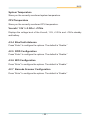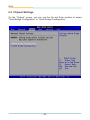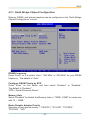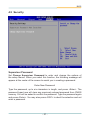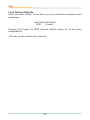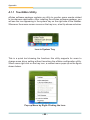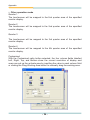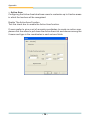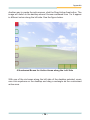
1
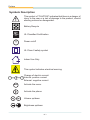
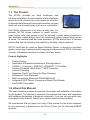
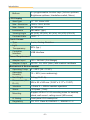
M1726
17" Fanless Intel AtomTM N270
1.6GHz Medical PC
User's Manual
Version 1.2
P/N: 4042172600120P
2015.03
Revision History
Version
Release Time
Description
New format applied
1.2
2015.03
Updated driver installation section
Updated specification
Chapter 3 re-organized.
- II -
Contents
Contents
Revision History............................................................................................. II
Copyright Notice............................................................................................. v
Declaration of Conformity............................................................................. v
Important Safety Instructions..................................................................... viii
Classification................................................................................................. ix
Disposing of Your Old Product.................................................................... ix
Symbols Description...................................................................................... x
Warranty......................................................................................................... xi
Technical Support........................................................................................ xii
Chapter 1 - Introduction................................................................................. 1
1.1. The Product.............................................................................................. 2
1.2. About this Manual................................................................................... 2
1.3. Specifications.......................................................................................... 3
1.4. Scope of Delivery.................................................................................... 5
1.5. Ordering Information............................................................................... 6
Chapter 2 - Getting Started............................................................................ 7
2.1. System Overview..................................................................................... 8
2.1.1. Dimensions......................................................................8
2.1.2 Tour the Computer..........................................................9
2.2. Periodic Cleaning & Disinfection........................................................ 12
2.3. Driver Installation Note......................................................................... 14
2.3.1. Installation Sequence...................................................14
2.3.2. Start to Install................................................................14
2.3.3. Install Chipset Driver....................................................17
2.3.4. Install Graphics Driver..................................................17
2.3.5. Install Audio Driver.......................................................18
2.3.6. Install LAN Driver..........................................................18
2.3.7. Install Touch Screen Driver..........................................19
2.3.8. Install WiFi Driver..........................................................19
2.3.9. Install Function-Keys Driver........................................20
Chapter 3 - Use the Computer..................................................................... 21
3.1. Use Touch Screen................................................................................. 22
3.1.1. The 4 Points Calibration...............................................22
3.1.2. Onscreen Keyboards....................................................25
3.2. Function Keys........................................................................................ 26
-i-
Contents
3.3. Bluetooth................................................................................................ 27
3.4. MSR........................................................................................................ 28
3.5. BarCode................................................................................................. 30
3.6. Smart Card Reader................................................................................ 32
3.7. RFID........................................................................................................ 34
3.8. Camera................................................................................................... 36
3.9. VoIP Phone............................................................................................. 37
3.10. Medical Arm Mounting........................................................................ 38
Chapter 4 - BIOS........................................................................................... 41
4.1 BIOS Main Setup.................................................................................... 42
4.2 Advanced Settings................................................................................ 44
4.2.1 IDE Configuration..........................................................45
4.2.2 Super IO Configuration.................................................47
4.2.3 Hardware Health Configuration...................................48
4.2.4 BlueTooth Antenna.......................................................49
4.2.5 RFID Configuration.......................................................49
4.2.6 Wifi Configuration.........................................................49
4.2.7 Barcode Scanner Configuration..................................49
4.3 Chipset Settings.................................................................................... 50
4.3.1 North Bridge Chipset Configuration...........................51
4.3.2 South Bridge Chipset Configuration...........................52
4.4 Boot Settings......................................................................................... 53
4.4.1 Boot Settings Configuration........................................54
4.4.2 Boot Device Priority......................................................55
4.4.3 Hard Disk Drives...........................................................56
4.5 Security.................................................................................................. 57
4.6 Exit Options........................................................................................... 59
Appendix - Touch Panel............................................................................... 61
A 1.1 TouchMon Utility................................................................................ 62
A 1.2 Touch Screen Configuration Utility.................................................. 65
A 1.2.1 General Tab................................................................65
A 1.2.2 Setting Tab.................................................................67
A 1.2.3 Option Tab..................................................................69
A 1.2.4 Tool Tab......................................................................71
A 1.2.5 Display Tab.................................................................74
A 1.2.6 Edge Compensation Tab...........................................81
- ii -
Contents
A 1.2.7 Hardware Tab.............................................................83
A 1.2.8 About Tab...................................................................84
- iii -
This page is intentionally left blank.
- iv -
Preface
Copyright Notice
All Rights Reserved.
The information in this document is subject to change without prior notice in
order to improve the reliability, design and function. It does not represent a
commitment on the part of the manufacturer.
Under no circumstances will the manufacturer be liable for any direct, indirect,
special, incidental, or consequential damages arising from the use or inability
to use the product or documentation, even if advised of the possibility of such
damages.
This document contains proprietary information protected by copyright.
All rights are reserved. No part of this manual may be reproduced by any
mechanical, electronic, or other means in any form without prior written
permission of the manufacturer.
Declaration of Conformity
CE
The CE symbol on your product indicates that it is in compliance with the
directives of the Union European (EU). A Certificate of Compliance is available
by contacting Technical Support.
This product has passed the CE test for environmental specifications when
shielded cables are used for external wiring. We recommend the use of
shielded cables. This kind of cable is available from ARBOR. Please contact
your local supplier for ordering information.
FCC Class B
This device complies with Part 15 of the FCC Rules. Operation is subject to
the following two conditions:
(1)This device may not cause harmful interference, and
(2)This device must accept any interference received, including interference
that may cause undesired operation.
NOTE:
This equipment has been tested and found to comply with the limits for a
Class B digital device, pursuant to Part 15 of the FCC Rules. These limits
are designed to provide reasonable protection against harmful interference
in a residential installation. This equipment generates, uses and can radiate
radio frequency energy and, if not installed and used in accordance with
-v-
Preface
the instructions, may cause harmful interference to radio communications.
However, there is no guarantee that interference will not occur in a particular
installation. If this equipment does cause harmful interference to radio or
television reception, which can be determined by turning the equipment off
and on, the user is encouraged to try to correct the interference by one or
more of the following measures:
-- Reorient or relocate the receiving antenna.
-- Increase the separation between the equipment and receiver.
-- Connect the equipment into an outlet on a circuit different from that to which
the receiver is connected.
-- Consult the dealer or an experienced radio/TV technician for help.
IEC 60601-1/EN60601-1/EN60601-1-2
This product complies with the system standard IEC 60601-1 Medical Electrical
Equipment Part 1: General Requirements for Safety. And therefore, the product
is exclusively interconnected with IEC 60601-1 certified equipment in the patient environment.
Equipment connected to the analog or digital interfaces of the unit must comply
with the respective IEC standards (e.g. IEC 60601-1 for medical equipment).
Furthermore all configurations shall comply with the current version of the standard for SYSTEMS IEC 60601-1-1. Everybody who connects additional equipment to the signal input part or signal output part configures a medical system,
and is therefore responsible that the system complies with current version of
the requirements of the system standard IEC 60601-1-1. If in doubt, consult the
technical service department or your local representative.
- vi -
Preface
RoHS
ARBOR Technology Corp. certifies that all components in its products are in
compliance and conform to the European Union’s Restriction of Use of Hazardous Substances in Electrical and Electronic Equipment (RoHS) Directive
2002/95/EC.
The above mentioned directive was published on 2/13/2003. The main purpose of the directive is to prohibit the use of lead, mercury, cadmium, hexavalent chromium, polybrominated biphenyls (PBB), and polybrominated diphenyl
ethers (PBDE) in electrical and electronic products. Member states of the EU
are to enforce by 7/1/2006.
ARBOR Technology Corp. hereby states that the listed products do not contain
unintentional additions of lead, mercury, hex chrome, PBB or PBDB that exceed a maximum concentration value of 0.1% by weight or for cadmium exceed
0.01% by weight, per homogenous material. Homogenous material is defined
as a substance or mixture of substances with uniform composition (such as solders, resins, plating, etc.). Lead-free solder is used for all terminations (Sn(9696.5%), Ag(3.0-3.5%) and Cu(0.5%)).
SVHC / REACH
To minimize the environmental impact and take more responsibility to the earth
we live, Arbor hereby confirms all products comply with the restriction of SVHC
(Substances of Very High Concern) in (EC) 1907/2006 (REACH --Registration,
Evaluation, Authorization, and Restriction of Chemicals) regulated by the European Union. All substances listed in SVHC < 0.1 % by weight (1000 ppm).
- vii -
Preface
Important Safety Instructions
Read these safety instructions carefully:
1. Read all cautions and warnings on the equipment.
2. Place this equipment on a reliable surface when installing. Dropping it or
letting it fall may cause damage
3. Make sure the correct voltage is connected to the equipment.
4. For pluggable equipment, the socket outlet should be near the equipment
and should be easily accessible.
5. Keep this equipment away from humidity.
6. Disconnect this equipment from the A/C outlet before cleaning it. Use a moist
cloth. Do not use liquid or sprayed detergent for cleaning.
7. To fully disengage the power to the unit, please disconnect the power from the AC outlet.
8. Do not scratch or rub the screen with a hard object.
9. Never use any of the solvents, such as Thinner Spray-type cleaner, Wax,
Benzene, Abrasive cleaner, Acid or Alkaline solvent, on the Medical Display.
Harsh chemicals may cause damage to the cabinet and the touch sensor.
10. Remove dirt with a lightly moistened cloth and a mild solvent detergent.
Then wipe the cabinet with a soft dry cloth.
11. The openings on the enclosure are for air convection and protect the equipment
from overheating. DO NOT COVER THE OPENINGS.
12. Position the power cord so that people cannot step on it. Do not place
anything over the power cord.
13. If the equipment will not be used for a long time, disconnect it from the power
source to avoid damage by transient overvoltage.
14. Never pour any liquid into openings. This may cause fire or electrical
shock.
15. Never open the equipment. For safety reasons, the equipment should be
opened only by qualified service personnel.
16. If one of the following situations arises, get the equipment checked by
service personnel:
a. The power cord or plug is damaged.
b. Liquid has penetrated into the equipment.
c. The equipment has been exposed to moisture.
d. The equipment does not work well, or you cannot get it to work according
to the user’s manual.
e. The equipment has been dropped or damaged.
f. The equipment has obvious signs of breakage.
- viii -
Preface
17. The sound pressure level at the operator’s position, according to
IEC 704-1:1982, is no more than 70dB(A).
18. Keep this User’s Manual for later reference.
19. DO NOT LEAVE THIS EQUIPMENT IN AN UNCONTROLLED
ENVIRONMENT WHERE THE STORAGE TEMPERATURE IS BELOW
-20° C (-4° F) OR ABOVE 60° C (140° F). THIS MAY DAMAGE THE
EQUIPMENT.
UL Class II Classification: With respect to electric shock, fire
and mechanical hazards only, in accordance with UL-60601-1
and CAN/CSA C22.2 No. 601.1.
E322565
Classification
• Powered by Class II power supply
• No applied part
• Degree of protection against the ingress of water: IPX0
• Mode of operation: Continuous
• The equipment is not suitable for use in the presence of a flammable
anesthetic mixture with air or nitrous oxide: Not AP or APG Category.
Disposing of Your Old Product
• Within the European Union
EU-wide legislation, as implemented in each Member State,
requires that waste electrical and electronic products carrying the
mark (left) must be disposed of separately from normal household
waste.
This includes monitors and electrical accessories, such as signal cables or
power cords. When you need to dispose of your display products, please
follow the guidance of your local authority, or ask the shop where you
purchased the product, or if applicable, follow any agreements made between
yourself. The mark on electrical and electronic products only applies to the
current European Union Member States.
• Outside the European Union
If you wish to dispose of used electrical and electronic products outside the
European Union, please contact your local authority so as to comply with the
correct disposal method.
- ix -
Preface
Symbols Description
This symbol of “CAUTION” indicates that there is a danger of
injury to the user or a risk of damage to the product, should
warning notices be disregarded.
Battery Recycle
UL Classified Certification
E322565
37GC
Power on/off
UL Class II safety symbol
Indoor Use Only
This symbol indicates electrical warning.
Change of electric current:
Internal: positive current
External: negative current
Activate the menu
MENU
MENU
Activate the phone
Volume up/down
Brightness up/down
MENU
-x-
Preface
Warranty
This product is warranted to be in good working order for a period of one year
from the date of purchase. Should this product fail to be in good working order
at any time during this period, we will, at our option, replace or repair it at no
additional charge except as set forth in the following terms. This warranty
does not apply to products damaged by misuse, modifications, accident or
disaster.
Vendor assumes no liability for any damages, lost profits, lost savings or any
other incidental or consequential damage resulting from the use, misuse of,
or inability to use this product. Vendor will not be liable for any claim made by
any other related party.
Vendors disclaim all other warranties, either expressed or implied, including but
not limited to implied warranties of merchantability and fitness for a particular
purpose, with respect to the hardware, the accompanying product’s manual(s)
and written materials, and any accompanying hardware. This limited warranty
gives you specific legal rights.
Return authorization must be obtained from the vendor before returned
merchandise will be accepted. Authorization can be obtained by calling or
faxing the vendor and requesting a Return Merchandise Authorization (RMA)
number. Returned goods should always be accompanied by a clear problem
description.
- xi -
Preface
Technical Support
All ARBOR products are built to the most accurate specifications to ensure
reliable performance in the harsh and demanding conditions typical of industrial environments. Whether your new equipment is destined for the laboratory or the factory floor, you can be assured that your product will provide
the reliability and ease of operation. Your satisfaction is our primary concern.
We want you to get the maximum performance from your products. So if you
run into technical difficulties, we are here to help. For the most frequently
asked questions, you can easily find answers in your product documentation.
These answers are normally a lot more detailed than the ones we can give
over the phone. So please consult this manual first. If you still cannot find the
answer, gather all the information or questions that apply to your problem,
and with the product close at hand, call your dealer. Our dealers are well
trained and ready to give you the support you need to get the most from your
products. In fact, most problems reported are minor and are able to be easily
solved over the phone. We are always ready to give advice on application
requirements or specific information on the installation and operation of any
of our products. Please do not hesitate to call or e-mail us at:
http://www.arbor.com.tw
E-mail: [email protected]
Contact Information
Add: 10F., No.700, Zhongzheng Rd., Zhonghe Dist., New Taipei City
235, Taiwan
TEL: 886-2-8226-9396
- xii -
Introduction
1
Chapter 1
Introduction
Chapter 1 - Introduction
-1-
Introduction
1.1. The Product
The M1726 provides an ideal healthcare and
infotainment platform for both medical staff and patients
due to the multi-connectivity, multi-expansion, excellent
multimedia entertainment and communication services
which will make hospital stay much more comfortable.
Our Patient Infotainment is all about quality care. For
patients, M1726 allows patients to watch movies,
make phone calls, play games or surf on the web. It adds some chirpiness to
their bedsides, eases anxiety from their minds and makes hospital stay just like
at home. For medical staff and care providers, M1726 allows them to retrieve
patient data and lab results at the bedside to facilitate instant treatment.
M1726 could also be used as Expert Medical Station, a terminal of excellent
graphic computing to achieve quality imaging for diagnosis and PACS. It features
a variety of hardware modules to lessen clinicians’ works.
Product Highlights
•
•
•
•
•
•
•
•
•
•
Fanless Design
Applicable for Bedside Infotainment, Self-registration
UL60601-1 Compliant ; EN60601-1/EN60601-1-2 Certified
Soldered Onboard Intel® Atom™ N270 Processor
Fanless Operating
Seamless Flush Front Panel for Easy Cleaning
Water-proof, Dust Resistant
Multi-connectivity (Bluetooth/WLAN/GbE LAN)
Integrated VOIP Phone, Camera and Smart Card Reader
Intel® SSD Compatible
1.2. About this Manual
This user’s manual provides the general information and installation instructions
for the product. The manual is meant for the experienced users and integrators
with hardware knowledge of personal computers. If you are not sure about any
description in this manual, consult your vendor before further handling.
We recommend that you keep one copy of this manual for the quick reference
for any necessary maintenance in the future. Thank you for choosing ARBOR
products.
-2-
Introduction
1.3. Specifications
System
CPU
Intel® Atom™ N270 1.6GHz processor
Graphics
Controller
Intel® GMA950
Memory
2GB DDR2 SO-DIMM memory module installed
Chipset
Intel® 945GSE + ICH7M
Storage
2.5" 320GB SATA HDD installed
OS Support
Windows 7 Embedded / Windows 7 Professional /
Windows XP Embedded / Windows XP Professional
/ Ubuntu and Fedora Linux compliant
Peripherals & Devices
Camera
1 x 2.0 megapixels CMOS camera
Wi-Fi
Integrated WLAN 802.11 b/g/n
Bluetooth
1 x Bluetooth 2.1+EDR module
Smart Card
Reader
1 x Smart Card Reader
TV Card
IR, TV tuner card (optional)
Barcode Scanner 1 x 2D Barcode Scanner (optional)
RFID
1 x Integrated ISO 15693/14443A/14443B RFID
reader
MSR
Magnetic Stripe Reader
I/O Interface
Serial Port
1 x RS-232 port
USB Port
3 x USB 2.0 ports
LAN
2 x Gigabit Ethernet controllers
Audio I/O
2 x speakers (0.5W), Microphone built-in
1 x Mic-in,1 x speaker-out on bottom line
RJ9
1 x RJ-9 connector for VOIP phone
VOIP
1 x VOIP phone
Button
Buttons
1 x system power on/off button
-3-
Introduction
Buttons
6 x programmable function keys (Volume up/down,
Brightness up/down, Handsfree switch, Menu)
LCD Display
Size/Type
17" TFT Color LCD
Max. Resolution
1280 x 1024, SXGA
Max. Colors
16.7M colors
Luminance
380 cd/m² (typ.)
Viewing Angle
85 (H/R), 80 (H/L), 85 (V/U), 85 (V/D) (CR=10)
Contrast Ratio
1000 : 1
Touch Screen
Type
4 wire, Analog Resistive
Light
Transparency
80% (typ.)
Controller
Interface
USB Interface
Power Requirement
Adapter Input
100 ~ 240VAC (Full Range)
Adapter Output
20VDC, 3A, 60W (Max.) with medical certificate
Mechanical & Environmental
Operating Temp.
0 ~ 45ºC (32 ~ 113ºF)
Operating
Humidity
10 ~ 95% (non-condensing)
Net Weight
6.9 kg (15.21 lb)
Dimensions (W x
D x H)
406 x 55 x 340 mm (15.98" x 2.17" x 13.39")
Vibration
1 Grms/ 5 ~ 500Hz/ random operation
Shock
10G/peak (11ms)
Mounting
Support VESA-75/100 mounting holes for desktop
stand, wall-mount, ceiling mount (M6 screw)
IP Rating
Front panel IP65 waterproof
Regulatory
CE, FCC Class B, EN60601-1, EN60601-1-2
-4-
Introduction
1.4. Scope of Delivery
Upon opening the package, carefully inspect the contents. If any of the items
is missing or appears damaged, contact your local dealer or distributor. The
package should contain the following items:
1 x M1726
1 x User’s Manual
1 x Driver CD
1 x Power Cord (left: French standard cordset)
1 x Power Cord (right: American standard cordset)
1 x Power Adapter
1 x Phone
1 x Telephone Handset Curly Cable
2 x Cover Kits & Screws Kit
-5-
Introduction
1.5. Ordering Information
M1726
17” fanless Intel® Atom™ N270 medical PC with
camera, WiFi, Bluetooth, Barcode Scanner, MSR,
RFID
ARM-1552M
Wall-mount hospital arm (VESA-75/100) L=1907
mm
ARM-1682M
Wall-mount hospital arm w/ wall box (VESA-75/100)
L=1847 mm
ARM-1752M
Ceiling-mount hospital arm (VESA-75/100) L=1857
mm
-6-
Getting Started
2
Chapter 2
Getting Started
Chapter 2 - Getting Started
-7-
Getting Started
2.1. System Overview
Understanding the computer help you jump seamlessly from component to
component on the computer. This section will quickly familiarize you with the
computer.
2.1.1. Dimensions
The following illustration shows the dimensions of the M1726, with the
measurements of width, depth, and height called out.
Unit: mm
-8-
Getting Started
2.1.2 Tour the Computer
The computer has some controls, I/O ports, mechanical parts on its enclosure.
The following illustration shows the computer in different views, with all the said
components called out.
Front Side
Internal Mic
AC’97 Phone
Camera
Phone
MSR Card
Swiping Slot
Menu
Brightness Up/Down
Power
Volume Up/Down
Function Keys (default) Description:
Phone ON/OFF: activate/deactivate the VOIP phone
Volume Up/Down: adjusts the volume up or down
Brightness Up/Down: adjust the brightness of the screen up or down
Menu: access to the Menu
Power ON/OFF: the power button to turn on/off the PC (must hold the
buttons for about 2 seconds)
MSR: the MSR card swiping slot
Camera: the camera indicating light (when the blue light is on, it means the
camera is activated)
-9-
Getting Started
Notes:
1. To turn on the tablet PC, please press on the “Power” button and hold on for
approximately 2 seconds.
2. The audio system of this medical PC is switched between the AC97’ Phone
and the speaker of the medical PC. For instance, when you pick up the
phone, the audio is switched to the phone so that phone conversation can
be carried out. When the phone is hung off, back on the medical PC, the
audio is automatically switched to the system.
Rear Side
The rear side contains one power jack, one LAN port and one USB port.
USB Port
LAN Port
DC-IN Power Jack
- 10 -
Getting Started
Warning:
The aluminum plate on the rear panel is highly heated when the tablet PC is
operating. Please DO NOT touch it during operating.
*The temperature will reach up to 60°C.
Bottom Side
USB Ports
Phone Jack
Barcode
Scanner
Mic-in/Speak-out
Smart Card
Reader Slot
Speaker
PCIe Card (for optional TV card)
DC-IN Power Jack
Speaker
COM Port
(RS-232)
LAN
- 11 -
Getting Started
Left Side
Right Side
Phone
RFID
2.2. Periodic Cleaning & Disinfection
This panel PC is generally employed in medical environment, for example,
hospitals, as bedside infotainment (information plus entertainment). It is
strongly recommended that users follow the cleaning and disinfection
instructions described below to ensure proper maintenance activities.
1. Always power off your unit first, when you clean or disinfect it.
2. To wipe the outer case, use lint-free cloth, lightly moistened with warm
water and a mild, non-abrasive cleaning solution made of either:
• 70% isopropyl alcohol
• 10% bleach solution
• Dimethyl ethylbenzyl ammonium chlorides 0.125%, dimethyl benzyl
ammonium chlorides 0.125%, Isopropyl alcohol 14.850% (Sani-Cloth®)
• Isopropanol 17.2%; Diisobutylphenoxyethyl dimethyl bezyl ammonium
chlorides 0.28% (CaviCide®)
3. The touch screen can be wiped down (e.g. to remove fingerprints) during
operation while powered on using standard computer screen solution.
4. Use dry cloth to clean the rear panel and bottom, especially the areas
around the connectors.
- 12 -
Getting Started
Caution:
• Do not spill liquids on or around the Medical PC.
• Do not use other solutions than the ones mentioned above.
• Do not touch, press or rub the display panel with abrasive cleaning
compounds, instruments, brushes, or rough-surface materials.
• Never spray cleaning liquids or foam onto the Medical PC or soak it for
cleaning.
• Do not use solvents to clean the unit.
• Do not clean, disinfect, or sterilize any part of the system by autoclaving or
with the use of ethylene oxide gas; doing so may damage the unit.
• Never spray or squirt any type of liquid onto the Medical PC; if a spray, gel
or foam is needed, spray the liquid onto a cloth and then use the cloth to
wipe or rub down the component.
• Always avoid contamination to minimize the need for disinfectants.
• Do not spill, spray, or squirt liquids to the power block and the power
cable.
- 13 -
Getting Started
2.3. Driver Installation Note
The M1726 supports Windows 7 and the subsequent examples are based on the OS.
Find the necessary device drivers on the CD that comes with your purchase.
2.3.1. Installation Sequence
Always follow the sequence below to install the drivers to prevent errors:
Chipset → Graphics → Audio → LAN → Touch Screen → Wi-Fi
The other drivers and software can be installed by random sequence as long as the
aforesaid drivers are installed first.
2.3.2. Start to Install
Before installing the drivers (and utilities), prepare the following:
1. a USB keyboard
2. a USB CD-ROM drive
Follow the guideline below to install device drivers and utilities:
1. Connect the computer to external power by the power cable and adapter included in
the accessory box.
power outlet
power cable
power adapter
- 14 -
the computer
Getting Started
2. Have the USB CD-ROM drive. Connect the CD-ROM drive to the computer (, and
sometimes the connection to power supply is also needed depending on the feature
of your CD-ROM drive).
Sometimes it is necessary to
connect the USB CD-ROM drive
to power supply (depending on
the feature of your CD-ROM
drive).
Connect the USB CD-ROM
drive to the computer
3. Power on the computer if it isn’t powered on yet.
4. Insert the driver CD to the CD-ROM drive.
Insert the driver CD to the
CD-ROM drive
5. In a few seconds, a dialog opens asking whether to auto-run the driver CD or open
the CD contents in Windows Explorer.
- 15 -
Getting Started
6. Click/tap Run AUTORUN.EXE to auto-run the driver CD, which allows easier
installation of drivers.
The installer then opens.
7. Click/tap Win7 Driver Install.
OR
Click/tap the Browse CD button to view the CD contents in Windows Explorer.
A list of device drivers then opens onscreen.
8. Click on the title of a driver to install it. Always follow the sequence described
earlier to install the drivers.
- 16 -
Getting Started
2.3.3. Install Chipset Driver
To install the chipset driver:
1. Launch the driver installer described earlier and open the driver list. The driver list
then opens onscreen.
2. Click/tap the Chipset icon
.
3. Follow the onscreen instructions to proceed.
2.3.4. Install Graphics Driver
To install the graphics driver:
1. Launch the driver installer described earlier and open the driver list. The driver list
then opens onscreen.
2. Click/tap the VGA icon
.
3. Follow the onscreen instructions to proceed.
- 17 -
Getting Started
2.3.5. Install Audio Driver
To install the audio driver:
1. Launch the driver installer described earlier and open the driver list. The driver list
then opens onscreen.
2. Click/tap the Audio icon
.
3. Follow the onscreen instructions to proceed.
2.3.6. Install LAN Driver
To install the LAN driver:
1. Launch the driver installer described earlier and open the driver list. The driver list
then opens onscreen.
2. Click/tap the LAN icon
.
3. Follow the onscreen instructions to proceed.
- 18 -
Getting Started
2.3.7. Install Touch Screen Driver
To install the touch screen driver:
1. Launch the driver installer described earlier and open the driver list. The driver list
then opens onscreen.
2. Click/tap the Touch Screen icon
.
3. Follow the onscreen instructions to proceed.
After the touch screen driver is installed, the touch screen is ready-to-use. See section
3.1. Use Touch Screen to know how to use the touch screen.
2.3.8. Install WiFi Driver
To install the WiFi driver:
1. Launch the driver installer described earlier and open the driver list. The driver list
then opens onscreen.
2. Click/tap the WiFi icon
.
3. Follow the onscreen instructions to proceed.
- 19 -
Getting Started
2.3.9. Install Function-Keys Driver
To install the Function keys’ driver:
1. Launch the driver installer described earlier and open the driver list. The driver list
then opens onscreen.
2. Click/tap the Function keys icon
.
3. Follow the onscreen instructions to proceed.
After the function keys driver is installed, the function keys on front panel, such as Menu,
Brightness Up/Down, Volume Up/Down, are ready to use.
The rest driver or utilities installation are similar to this one. Be aware that HD Decoder
is for TV Card, which is optional; that means you should purchase this module before
installing its driver.
- 20 -
Use the Computer
3
Chapter 3
Use the Computer
Chapter 3 - Use the Computer
- 21 -
Use the Computer
3.1. Use Touch Screen
The computer comes with a resistive touch screen, which locates user's touch by the
force applied on it. As a resistive touch screen, it needs the operation with a pointed object
such as a stylus or simply your fingertip so it takes the minimum force to trigger actions
from the touch screen.
Touch control is the main way and an intuitive way to interact with the computer. Users
are able to manipulate icons, graphic buttons, menus, property sheets, the onscreen
keyboard or any onscreen items with touch control.
When everything is installed correctly as previous chapter suggests, the touch screen is
likely to work imprecisely because the touch screen hasn't been calibrated yet. Follow
next section to calibrate the touch screen.
3.1.1. The 4 Points Calibration
Find a program in All Programs named "Configure Utility".
Touch Screen Utilities in All Program
- 22 -
Use the Computer
Step1: Switch to “Tools” to do 4 Points Calibration. Whenever you feel lost
in accuracy, do calibration again to adjust the accuracy for proper functioning.
Step 2: And then the whole screen becomes white while a red point rounded by a red circle like bull’s-eye shows up.
Also, a stopwatch in grey circle starts to count down from the 15th second.
Step 3: Touch red point until the grey stopwatch shows 'OK'.
Step 4: Repeat Step 3 for each corner of the screen.
If there is no action taken within 15 seconds, calibration task will abort automatically. Keep in mind that the utility may always repeat countdown if users
make an ineffective touch-and-hold action.
- 23 -
Use the Computer
Press the Red Point to Perform Calibration
Press and Hold
The Calibration of Individual Point Finished
- 24 -
Use the Computer
3.1.2. Onscreen Keyboards
The computer doesn’t have a physical keyboard to receive user’s text input. To input text
on the computer, it relies on either an external USB keyboard or the “onscreen keyboard”.
An "onscreen keyboard" is a virtual keyboard with all the standard keys.
•
Tap Start button | All Programs | Accessories | Ease of Access | On-screen
Keyboard.
The (extended) onscreen keyboard opens.
- 25 -
Getting Started
3.2. Function Keys
Once you’ve installed Function keys’ driver, the function keys on front panel
can be used. For instance, press the “Menu” button to activate the Menu
window. It provides the accesses to “Brightness Up/Down”, “Volume Up/
Down”, same as Brightness or Volume control buttons on front panel.
To exit the Menu, just click “Close”.
- 26 -
Use the Computer
3.3. Bluetooth
Use mouse or finger to tap “Bluetooth Places” icon on desktop to activate a
program named “BlueSoleil”.
Double-tap the “soleil” (, which means “sun” in French,) in the center of the BlueSoleil
window to trigger the search for the Bluetooth devices within the wireless coverage of the
computer. If any device is discovered, its icon will show around the “soleil” within a few
seconds. Tap and hold the icon for further paring and data exchange with this device.
- 27 -
Use the Computer
3.4. MSR
Left-click the mouse or finger-tap on “MSR Configure” in All Programs to
activate the MSR configuration window as below.
- 28 -
Use the Computer
Then, click or finger-tap “Scan” to enable the program.
Remember, when you swipe the card, always make sure the magnetic stripe
faces left side.
Facing left
- 29 -
Use the Computer
3.5. BarCode
Barcode scanner needs no driver or program to activate it. Whenever an
object approaches the sensor, it will automatically flash for a while.
You may open a “Word” or “Text” file to scan the information contained in
barcode, as below:
- 30 -
Use the Computer
M1726 supports these 1D and 2D barcodes:
Linear
2D
Code 39
PDF417
Code 128
MicroPDF417
Codabar
MaxiCode
UPC
Data Matrix
EAN
QR Code
Interleaved 2 of 5
Aztec
Reduced Space Symbology Code 93
Aztec Mesa
Codablock
Code 49
Postal
UCC Composite
Postnet (US)
OCR
Planet Code
OCR-A
BPO 4 State
OCR-B
Canadian Post
Japanese Post
KIX (Netherlands) Post
- 31 -
Use the Computer
3.6. Smart Card Reader
The Smart Card Reader test program is included in driver CD. Drag the folder
named DemoTool to desktop from :\M1726 driver CD\SmartCard\DemoTool\
and execute Demo9520.exe inside the folder.
Insert a card into reader, make sure the chip facing upwards.
- 32 -
Use the Computer
Click connect and the card’s information will be displayed in column below.
- 33 -
Use the Computer
3.7. RFID
To activate RFID test program, double click the icon on desktop. (it will automatically appear on desktop once you have installed the driver properly). After
that, the RFID Demo AP window will jump out immediately. Set as below and
click “Connect” to have the device connected.
Choose Reader under Mode to test the device.
- 34 -
Use the Computer
Select “Inventory” on top menu bar.
You may use a RFID tag to do the demo test.
- 35 -
Use the Computer
Then, click “Start” to see its information in list.
3.8. Camera
A video camera is built in the tablet PC. Use desired program to test the device. When it’s enabled, you will see a blue light beside the camera.
The blue light
Camera image
- 36 -
Use the Computer
3.9. VoIP Phone
The VoIP phone (Voice Communication by IP) is software activated. Users can
install desired software to enable phone communication. (one widely known
example is Skype).
Note:
The audio system of this medical PC is switched between the AC97’ Phone
and the speaker of the medical PC. For instance, when you pick up the
phone, the audio is switched to the phone so that phone conversation can be
carried out. When the phone is hung off, back on the medical PC, the audio
is automatically switched to the system.
- 37 -
Use the Computer
3.10. Medical Arm Mounting
This tablet PC can be mounted on a wall-mount, desktop-stand, or hospital
arm for convenient operation. To mount it on a hospital arm, some tools are
required:
Cross-headed screwdriver
The screws (with the proper size)
Step1: Align the screw holes of the arm’s VESA bracket with those on the rear
panel of the tablet PC.
- 38 -
Use the Computer
Step2: Apply the appropriate size of screws to the 4 aligned screw holes.
Make sure you screw them firmly.
Notes:
Regarding the screw
sizes for VESA mounting:
VESA 75: size M6
VESA 100: size M6
Regarding the depth of
the screw holes of this
medical PC:
VESA 75: 7 mm
VESA 100: 12 mm
- 39 -
This page is intentionally left blank.
- 40 -
BIOS
4
Chapter 4
BIOS
Chapter 4 - BIOS
- 41 -
BIOS
4.1 BIOS Main Setup
The AMI BIOS provides a Setup utility program for specifying the system
configurations and settings. The BIOS RAM of the system stores the Setup
utility and configurations.
When you turn on the computer, the AMI BIOS is immediately activated.
To enter the BIOS SETUP UTILITY, press “Delete” once the power is turned
on.
When the computer is shut down, the battery on the motherboard supplies the
power for BIOS RAM.
The Main Setup screen lists the following information
System Overview
BIOS Version: displays the current version information of the BIOS
Build Date: the date that the BIOS version was made/updated
Processor (auto-detected if installed)
Speed: displays the processor speed
System Memory (auto-detected if installed)
Size: lists the memory size information
- 42 -
BIOS
Key Commands
BIOS Setup Utility is mainly a key-based navigation interface. Please refer to
the following key command instructions for navigation process.
“←”“→”
Move to highlight a particular configuration screen from
the top menu bar / Move to highlight items on the screen
“↓” “↑”
Move to highlight previous/next item
Enter
Select and access a setup item/field
Esc:
On the Main Menu – Quit the setup and not save
changes into CMOS (a message screen will display
and ask you to select “OK” or “Cancel” for exiting and
discarding changes. Use “←” and “→” to select and press
“Enter” to confirm)
On the Sub Menu – Exit current page and return to main
menu
Page Up / +
Increase the numeric value on a selected setup item /
make change
Page Down -:
Decrease the numeric value on a selected setup item /
make change
F1
Activate “General Help” screen
F10:
Save the changes that have been made in the setup and
exit. (a message screen will display and ask you to select
“OK” or “Cancel” for exiting and saving changes. Use “←”
and “→” to select and press “Enter” to confirm)
System Time
Set the system time.
The time format is:
Hour : 00 to 23
Minute : 00 to 59
Second : 00 to 59
System Date
Set the system date. Note that the ‘Day’ automatically changes when you set
the date.
The date format is:
Day : Sun to Sat
Month : 1 to 12
Date : 1 to 31
Year : 1999 to 2099
- 43 -
BIOS
4.2 Advanced Settings
The “Advanced” setting page provides you the options to configure the details
of your hardware, such as IDE, Super IO (input/output), Hardware Health,
Bluetooth, WIFI and Barcode scanner.
- 44 -
BIOS
4.2.1 IDE Configuration
Primary IDE Master
Select the item to configure it. Press <Enter> to access its the sub menu.
Note: When entering the setup, BIOS automatically detects the presence of
IDE devices. This page shows the status of auto-detected IDE devices.
- 45 -
BIOS
IDE Configuration Sub Menu
Type
This setting determines the type of the IDE device. The default value is Auto.
LBA/Large Mode
This setting enables or disables support for IDE drives with capacities greater
than 528MB. The default value is Auto.
Block (Multi-Sector Transfer)
This setting enables or disables to support IDE drives using Block Mode. The
default value is Auto.
PIO Mode
This setting determines the IDE Programmed I/O mode. The default value is
Auto.
- 46 -
BIOS
DMA Mode
This setting determines the IDE DMA mode. The default value is Auto.
S.M.A.R.T.
This setting determines the IDE Self-Monitoring, Analysis and Reporting
Technology mode. The default value is Auto.
32Bit Data Transfer
This setting determines support for IDE drives that permit 32-bit accesses.
The default value is Enabled.
4.2.2 Super IO Configuration
Configure Serial Port Addresses for port 1 and port 2, and also the Serial
Mode 2.
Use the Up and Down arrow buttons to select an item and press “+” or “-” to
change the values.
- 47 -
BIOS
Serial Port1/Port2 Address
Select an address and corresponding interrupt for the first and second serial
ports:
3F8/IRQ4
2F8/IRQ3
2E8/IRQ3
3E8/IRQ4
Disabled
Serial Port 2 Mode
Allows BIOS to select mode for Serial Port2
4.2.3 Hardware Health Configuration
H/W Health Function: enable or disable the H/W (Hardware Health Function).
Press Enter to select “Enabled” or “Disabled.” The default is Enabled.
- 48 -
BIOS
System Temperature
Show you the currently monitored system temperature.
CPU Temperature
Show you the currently monitored CPU temperature.
VcoreA / 1.5V / +3.3Vin / +12Vin
Displays the voltage level of the VcoreA, 1.5V, +3.3Vin and +12Vin standby
and battery.
4.2.4 BlueTooth Antenna
Press “Enter” to configure the options. The default is “Enable.”
4.2.5 RFID Configuration
Press “Enter” to configure the options. The default is “Enable.”
4.2.6 Wifi Configuration
Press “Enter” to configure the options. The default is “Enable.”
4.2.7 Barcode Scanner Configuration
Press “Enter” to configure the options. The default is “Enable.”
- 49 -
BIOS
4.3 Chipset Settings
On the “Chipset” screen, you can use the Up and Down buttons to select
“North Bridge Configuration” or “South Bridge Configuration.”
- 50 -
BIOS
4.3.1 North Bridge Chipset Configuration
Memory, DRAM, and internal graphics can be configured on the “North Bridge
Chipset Configuration” screen.
DRAM Frequency
Press “Enter” on it to select “Auto,” “400 MHz” or “500 MHz” for your DRAM
frequency. The default is “Auto.”
Configure DRAM Timing by SPD
Press “Enter” on this option and then select “Enabled” or “Disabled.”
The default is “Enabled.”
*SPD = Serial Presence Detect.
Memory Hole
Select “Disabled” to disable the Memory Hole or “15MB - 16MB” to create one
with 15 ~ 16MB.
Boots Graphic Adapter Priority
Selection of boot device priority -- “PEG/PCI,” “PCI/IGD,” “PCI/PEG,”
“PEG/IGD,” “IGD.”
- 51 -
BIOS
Internal Graphics Mode-Select
Select “Disabled,” “Enabled, 1MB” or “Enabled, 8MB” to allocate the amount
of memory for the internal graphic processor.
DVMT Mode Select
Options: “Fixed Mode,” “DVMT Mode” or “Combo Mode.”
DVMT/Fixed Memory
Allocates “64MB,” “128MB” or “Maximum DVMT for DVMT/Fixed Memory.
4.3.2 South Bridge Chipset Configuration
USB, audio, or PCI-E settings can be configured on the “South Bridge Chipset
Configuration” screen.
- 52 -
BIOS
USB Functions
selects the number of USB ports to be enabled.
Options: “Disabled,” “2 USB ports,” “4 USB ports,” “6 USB ports” and “8 USB
ports.”
USB 2.0 Controller
if your computer has USB 2.0 ports, please choose “Enabled” to activate the
USB 2.0 ports. The default is “Enabled.”
Audio Controller
Defines your audio options. Choose “Azalia” or “Disabled.” The default is
“Azalia.”
*Azalia is known as the code name for high definition audio.
PCIE Port 0 /1 /2
Select options for PCI-E ports: “Auto,” “Enabled,” “Disabled.” The default is
“Auto.”
4.4 Boot Settings
Set your device booting preferences.
- 53 -
BIOS
4.4.1 Boot Settings Configuration
Quick Boot
During the power on self test, the BIOS checks the hardware devices and
counts the system memory. But all of these system tests are needed every
time you boot, and can be turned off to save time. Enable this setting to turn
those tests which are not needed.
Quiet Boot
This setting determines if the BIOS should hide the normal POST messages
with the motherboard or system manufacture’s full-screen logo. When it is
enabled, the BIOS will display the full-screen logo during the boot-up
sequence, hiding normal POST messages. When it is disabled, the BIOS will
display the normal POST messages instead of the full-screen logo.
Bootup Num-Lock
This setting determines whether the Num Lock key should be activated at
boot up.
- 54 -
BIOS
4.4.2 Boot Device Priority
This setting determines the sequence that the BIOS uses to look for a boot
device from which to load the operating system during the DOS boot
process.
- 55 -
BIOS
4.4.3 Hard Disk Drives
This function displays the information of HDD detected.
- 56 -
BIOS
4.5 Security
Supervisor Password
Set Change Supervisor Password to enter and change the options of
the setup menus. When you select this function, the following message will
appear at the center of the screen to assist you in creating a password.
Enter New Password:
Type the password, up to six characters in length, and press <Enter>. The
password typed now will clear any previously entered password from CMOS
memory. You will be asked to confirm the password. Type the password again
and press <Enter>. You may also press <ESC> to abort the selection and not
enter a password.
- 57 -
BIOS
With a password created, a Password Check item appears. Set this item to
Setup, you will be prompted to enter the password every time you try to enter
the BIOS Setup utility. This prevents an unauthorized person from changing
any part of your system configuration.
You can also have the BIOS to request a password every time your system
is rebooted by setting it to Always. This would prevent unauthorized use of
your computer.
To clear the password, just leave the field blank and press <Enter> when you
are prompted to enter a new password. Once the password is cleared, the
following message will appear at the center of the screen.
Password Uninstalled.
- 58 -
BIOS
4.6 Exit Options
Save Changes and Exit
Pressing <Enter> on this item and it asks for confirmation:
Save configuration changes and exit setup?
Pressing <OK> stores the selection made in the menus in CMOS - a special
section of memory that stays on after you turn your system off. The next
time you boot your computer, the BIOS configures your system according to
the Setup selections stored in CMOS. After saving the values the system is
restarted again.
Discard Changes and Exit
Exit system setup without saving any changes.
<ESC> key can be used for this operation.
- 59 -
BIOS
Load Optimal Defaults
When you press <Enter> on this item, you get a confirmation dialog box with
a message:
Load Optimal Defaults?
[OK]
[Cancel]
Pressing [OK] loads the BIOS Optimal Default values for all the setup
configurations.
<F9> key can be used for this operation.
- 60 -
Appendix
Appendix
Touch Panel
Appendix - Touch Panel
- 61 -
Appendix
A 1.1 TouchMon Utility
eGalax software package contains an utility to monitor some events related
to touchscreen application. After installing the eGalax software package, you
will see the icon appearing in the system tray on the right side of the taskbar.
Whenever the mouse cursor moves on the tray icon, a tool tip shows as below.
Icon in System Tray
This is a quick tool showing the functions this utility supports for users to
change some driver setting without launching the eGalax configuration utility.
When users right click on the tray icon, a context menu pops up as the figure
shown below.
Pop-up Menu by Right-Clicking the Icon
- 62 -
Appendix
Apply To Touchscreen
When users select this function, the sub-menu shows all of the eGalax
devices installed in the system. Users can choose the devices to which the
next function configuration to be applied. TouchMon allows the configuration
to be applied to all of the eGalax devices or some specified devices.
Apply to Touchscreen
Mouse Mode
The Mouse mode has a sub-menu to show all of the mouse emulation modes
the utility supports.
Mouse Mode Selection
- 63 -
Appendix
Beep
This function allows users to change the beep mode between "Beep On
Touch," "Beep On Release," "Beep From System Beep," and "Beep From
Sound Card." The change is applied to the specified devices immediately.
Auto Right Click
Users can enable/disable the auto right click function. The change is applied
to the specified devices immediately.
Display Button
Click this function to show/hide the right button window.
4 Points Calibration
Click this item to launch the 4 points calibration (for more details, please
refer to 2.3.1 The 4 Points Calibration.
Calibration Utility
Click this item to launch the eGalax utility.
Support Rotation
When ticked, this utility will correct the touchscreen mapping to match with the
monitor display orientation whenever it detects the monitor rotation changed.
This correction will be done automatically if the system video adapter driver
supports Microsoft Win32 APIs for monitor rotation. If the video adapter driver
does not support Microsoft Win32 API for monitor rotation, the utility will pop
up a one-point calibration window to correct the orientation mapping.
Exit
Click this item to terminate the TouchMon windows service. After this windows
service is terminated, all functions supported by the utility are disabled.
- 64 -
Appendix
A 1.2 Touch Screen Configuration Utility
Besides the TouchMon pop-up menu, users can also double click the icon on
the desktop or the shortcut on the All Programs menu to run the touch screen
configuration utility. By default the General tab shows up in the eGalax window
when the utility is launched.
A 1.2.1 General Tab
The General tab shows the touchscreen controller installed.
Add
The Add button is used for serial RS-232 controllers only. Press this button to
search the eGalax serial controllers connected with the system COM ports.
Whenever it finds a new eGalax serial controller, a new serial controller icon
will be added in the controller list of the window automatically.
The USB eGalax device supports plug and play, the icon denoting USB
controller will be added in the controller list automatically when the USB
controller is connected with the system USB port. And, the icon will be
removed as soon as the device is disconnected from the system USB port.
- 65 -
Appendix
Add
The Add button is used for serial RS-232 controllers only. Press this button to
search the eGalax serial controllers connected with the system COM ports.
Whenever it finds a new eGalax serial controller, a new serial controller icon
will be added in the controller list of the window automatically.
The USB eGalax device supports plug and play, the icon denoting USB
controller will be added in the controller list automatically when the USB
controller is connected with the system USB port. And, the icon will be
removed as soon as the device is disconnected from the system USB port.
Remove
This function button is used for serial RS-232 controllers only. The button
will be greyed and disabled automatically when the selected controller in the
controller list window is not RS-232 type. Press to remove and uninstall the
selected serial RS-232 controller from the system. Then, this serial RS-232
icon in the controller list window disappears automatically.
The USB eGalax device supports plug and play, the icon denoting USB
controller will be added in the controller list window automatically when the
USB controller is connected with the system USB port. And, the icon will be
removed automatically as soon as the device is disconnected from the system
USB port.
Monitor Mapping
The utility supports multiple monitors and displays system. This function will
help users to do monitor mapping. After clicking the button, please follow the
instructions showing on the screen.
- 66 -
Appendix
A 1.2.2 Setting Tab
The Setting tab allows users to adjust the settings including beep timing,
linearization style, mouse click, etc.
Beep
• Beep On Touch
Tick this check box to generate a beep sound when the touchscreen is
pressed.
• Beep On Release
Tick this check box to generate a beep sound when you release your finger
or the stylus from the touch screen.
• Beep From System Beep
Tick this check box to make the beep from the system speaker.
• Beep From Sound Card
Tick this check box to make the beep from the sound card.
• Frequency
Move the slide bar to the left or right to decrease/increase the frequency of
the beep sound.
• Duration
Move the slide bar to the left or right to decrease/increase duration of the
beep sound.
- 67 -
Appendix
Linearization Style
Select the radio button of 9 points or 25 points calibration for linearization.
Double Click Time
The Double Click Time group is used to set system double click time. Change
this value will affect the double click behavior for all of the mice devices in
the system. Two continuous clicks at the same area within this specified time
period will be recognized as a double click event.
Double Click Area
The Double Click Area group is used to set the system double click area.
Change this value will affect the double click behavior for all of the mice
devices in the system. Two continuous click at this specified area within the
specified double click time will be recognized as a double click event.
Mouse Emulation mode
There are 5 mouse emulation modes for eGalax touchscreen controllers.
Press the button to switch between the emulation modes:
• Normal Mode
It provides all the mouse functions, including the dragging function.
• Click On Touch
Click action is executed as soon as users touch the panel.
• Click On Release
Click action will not be executed until finger leaves the panel.
• Click On Touch Without Moving Cursor
Driver will report a mouse click at the first touch point, then the cursor does
not move until a lift-off event occurs.
• Click On Release Without Moving Cursor
Driver will report a mouse click at the lift-off point, then the cursor does not
move during touchdown.
- 68 -
Appendix
A 1.2.3 Option Tab
By pressing the Option button, another window shows up above the eGalax
utility for some advanced functions configuration.
The advanced functions include:
• Enable Constant Touch
Enable Constant Touch to force driver to stop reporting touch point when the
movement is within the range which users can adjust. Therefore, users can
see a stabilized cursor instead of a chattering cursor when users touch the
same point with unwanted noise.
• Enable Auto Right Click
Tick this check box to force driver to report a right click mouse event to OS
when users do a continuing touch till time out. This feature makes users to do
right click more easily with touchscreen.
• Enable Touch
Tick this check box to start reporting touch point.
- 69 -
Appendix
The advanced functions include:
• Enable Constant Touch
Enable Constant Touch to force driver to stop reporting touch point when the
movement is within the range which users can adjust. Therefore, users can
see a stabilized cursor instead of a chattering cursor when users touch the
same point with unwanted noise.
• Enable Auto Right Click
Tick this check box to force driver to report a right click mouse event to OS
when users do a continuing touch till time out. This feature makes users to do
right click more easily with touchscreen.
• Enable Touch
Tick this check box to start reporting touch point.
• Enable Cursor Stabilization
Tick this check box to stabilize the cursor so that we can see a stable cursor
under noisy environment
• Constant Touch Area
Move the slide bar to the left or right to adjust the parameter for the Constant
Touch function. This is a criterion to judge whether the currently touched point
is the same as the previous touched point. If the difference between the two
points is within this area, it will be recognized as the same touch point and the
driver does not generate a new mouse event for this new touched point.
• Auto Right Click Time
Move the slide bar to the left or right to decrease/increase the right click time
for the Auto Right Click function. If the touchscreen is touched and held for
over this time setting, the driver generates a mouse right click event.
- 70 -
Appendix
A 1.2.4 Tool Tab
Besides viewing the linearization curve of the touchscreen, users can also
perform the multi-points calibration and the draw test by clicking the buttons
on the tab.
• Linearization Curve
Linearization curve of the touchscreen is displayed here for reference and
troubleshooting purpose.
• Clear and calibrate
Press this button to erase the 25 points calibration/linearization parameters
and force users to do 4 points calibration again. That is because once the 25
points calibration data is cleared, the 4 points calibration data will be invalid.
Therefore, it needs to perform the 4 points calibration.
- 71 -
Appendix
• Linearization
The Linearization (this function may be 25 or 9 points calibration depending
on the linearization style, see the Setting tab) function is used to compensate
the touchscreen linearity. After linearization is completed, the linearity of the
touchscreen will be shown in the Linearity Curve window.
Pressing this button, the whole screen appears in white and a red point rounded by a red circle with arrows shows up. Meanwhile, the countdown in the
grey circle starts with the number 15. Please touch each of the red point and
hold until the grey circle shows 'OK'. If users do nothing within 15 seconds,
the calibration task abort automatically. Note that the utility may always repeat
the countdown from the beginning if users make an ineffective touch-and-hold
action.
• Draw Test
This function is used for testing the drawing position related to the display
screen on panel. Press this button and then the screen appears in a 8 x 8 grid
pattern (see the figure below).
In drawing test window, users can verify the panel linearity, calibration capability,
and drawing line quality. Then click the Clear button to clear the window. To
quit the drawing test, users can click the Quit button or right click the mouse
button.
- 72 -
Appendix
Drawing Test Grid
- 73 -
Appendix
A 1.2.5 Display Tab
eGalax driver utility supports multiple monitors display system. To work with
multiple monitors system, users need to configure properly to map the touchscreen working area to the correct system display area.
Note: TouchMon is another utility for eGalax touchscreen system. This tray
icon utility can monitor the system monitor display configuration change and
correct the touchscreen monitor mapping relationship automatically as soon
as the system monitor display configuration is changed. We strongly suggest
the user to make sure TouchMon is launched for multiple monitors system.
• Enable Multiple Monitors
Tick this check box to enable multiple monitor support. If not ticked, the touchscreen is mapped to the primary monitor automatically.
When enabled, users can double click on the monitor area in the monitor
geometry window to assign the monitor area where the touchscreen will be
mapped. In other words, the touchscreen will work with the selected monitor.
Then the rectangle lines of the selected monitor area will appears in white and
the other monitor rectangle lines will be grey.
- 74 -
Appendix
• Map to main display if system has only one display monitor
Tick this check box to enable the function mapping the touch panel to the main
display when the system has only one display monitor.
• Operation Mode
eGalax driver support split display mode for those applications which do not
map the touchscreen to the full screen of the monitor.
»» Full screen
The touchscreen will be mapped to the full screen of the specified monitor.
»» Right screen
The touchscreen will be mapped to the right half screen of the specified
monitor.
»» Left screen
The touchscreen will be mapped to the left half screen of the specified
monitor.
»» Upper screen
The touchscreen will be mapped to the upper half screen of the specified
monitor.
»» Lower screen
The touchscreen will be mapped to the lower half screen of the specified
monitor.
- 75 -
Appendix
»» Other operation mode
Quarter 1
The touchscreen will be mapped to the first quarter area of the specified
monitor display.
Quarter 2
The touchscreen will be mapped to the 2nd quarter area of the specified
monitor display.
Quarter 3
The touchscreen will be mapped to the 3rd quarter area of the specified
monitor display.
Quarter 4
The touchscreen will be mapped to the 4th quarter area of the specified
monitor display.
Customized
With the Customized radio button selected, the four column fields labelled
Left, Right, Top, and Bottom show the current resolution of display and
users can set up the activate area by inputting the value in each column field
or clicking the Drag Working Area button to manually drag the working area.
- 76 -
Appendix
DragWorkingArea
With the DragWorkingArea button clicked, the image will switch back to the
desktop. Users can customize the working area by dragging a rectangle on
the desktop. Then click Confirm to set the working area, or click Quit to cancel.
Dragging a Rectangle to Set the Working Area
- 77 -
Appendix
»» Active Area
Configuring the Active Area tab allows users to customize up to 6 active areas
in which the touches will be recognized.
Enable The Active Area Function
Tick this check box to enable the Active Area function.
If users prefer to give a set of accurate coordinates to create an active area,
please click the arrow to pull down the Active Area List and choose among the
6 areas and type in the coordinates in each column fields.
- 78 -
Appendix
Another way to create the active areas, click the Drag Active Area button. The
image will switch to the desktop where 6 boxes numbered from 1 to 6 appear
in different colors along the left side. See the figure below.
6 Numbered Boxes for Active Areas along the Left Side
With one of the six boxes along the left side of the desktop selected, users
can click anywhere on the desktop and drag a rectangle as the customized
active area.
- 79 -
Appendix
When the active areas are defined, click the Confirm button in the lower left
corner to have the configuration take effect.
If you want to cancel a particular active area, simply click the box on the left
side and click the Clear button. As the figure shown below, Area 4 is now
cleared. Once everything is done, click Confirm. Users can 'Quit' anytime
during customizing the active areas.
- 80 -
Appendix
A 1.2.6 Edge Compensation Tab
In some case, if it is difficult to touch items at the edges of the touch panel,
users can set adjustment to reach the edges of the screen image.
Users can set the stretch percentage for the four edges of the screen by move
the slide bars or click the buttons. Please refer to the instructions below.
Top
If users set the Edge to <Smaller>, eGalax will reduce the horizontal position
of the top edge. If users set the Edge to <Larger>, eGalax will extend the
horizontal position of the top edge.
Bottom
If users set the Edge to <Smaller>, eGalax will reduce the horizontal position
of the bottom edge. If users set the Edge to <Larger>, eGalax will extend the
horizontal position of the bottom edge.
Left
If users set the Edge to <Smaller>, eGalax will reduce the vertical position of
the left edge. If users set the Edge to <Larger>, eGalax will extend the
vertical position of the left edge.
- 81 -
Appendix
Right
If users set the Edge to <Smaller>, eGalax will reduce the vertical position of
the right edge. If users set the Edge to <Larger>, eGalax will extend the
vertical position of the right edge.
In some case, cursor will be behind the finger when users touch the panel. If
users can not see the cursor when they touch down on the panel, users can
set X Axis or Y Axis to move the cursor.
Offset X Axis
If users set the Offset X Axis to <Smaller>, cursor will be moved a pixel of X
Axis to left. If users set the Offset X Axis to <Larger>, cursor will be moved a
pixel of X Axis to right.
Offset Y Axis
If users set the Offset Y Axis to <Smaller>, cursor will be moved a pixel of Y
Axis to top. If users set the Offset Y Axis to <Larger>, cursor will be moved a
pixel of Y Axis to bottom.
Support Edge Compensation
Users can tick the check box to enable the Edge Compensation support. Click
the +10% and -10% buttons to adjust the edge parameters.
+10%
Clicking the +10% button, the top, bottom, left and right edges will
simultaneously extend 10% of orientation to touch screen, and the cursor will
be moved 10 pixel of X and Y Axis to right and top.
-10%
By contrast, clicking the -10% button, the top, bottom, left and right edges will
contract 10% of orientation to touch screen, and the cursor will be moved 10
pixel of X and Y Axis to left and bottom.
Default
If users want the value back to the default value, click the Default button.
- 82 -
Appendix
A 1.2.7 Hardware Tab
This tab shows the controller model type and firmware version.
Click the Hardware Setting button to configure the sensitivity and delay time
of the touch screen.
- 83 -
Appendix
A 1.2.8 About Tab
This tab provides a general overview of the eGalax driver.
- 84 -
This page is intentionally left blank.
- 85 -