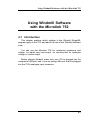
1
Microlink 752 Manual Biodata Limited Manual Code: 752PDF-1.2 Issue Date: November 2015 Information in this document is subject to change without notice. Biodata Limited 2015 10 Stocks Street Manchester M8 8QG UK Telephone: +44 (0)161 834 6688 Facsimile: +44 (0)161 833 2190 E-mail: [email protected] http://www.microlink.co.uk/ Table of Contents Table of Contents 1 Introduction 2 Installing the Microlink 752 USB Unit 2.1 Introduction 2.2 Plugging the Microlink 752 into the Computer 2.3 The Microlink’s Lights 2.4 Using Several Microlink 752 Units 2.5 Analogue Input Connection Notes 2.6 Digital Input and Output Connection Notes 2.7 Counter Connection Notes 2.8 Analogue Output Connection Notes 2.9 Specifications 2.10 The 59x Screw Terminal Units 3 Installing and Configuring Windmill Software 3.1 Introduction 3.2 What is Windmill Software? 3.3 Installing Windmill Software 3.4 Configuring Your System 4 Using Windmill Software with the Microlink 752 4.1 Introduction 4.2 Options in SetupIML 4.3 The Rest of the Windmill Software Suite 1.1 2.1 2.1 2.1 2.2 2.2 2.4 2.11 2.13 2.14 2.17 2.19 3.1 3.1 3.1 3.1 3.3 4.1 4.1 4.2 4.7 I Introduction Introduction Thank you for purchasing the Microlink 752 Resistance Measurement and Control Package. This Manual tells you: • About the Microlink 752 unit and how to connect your signals (Chapter 2) • How to install the Windmill software (Chapter 3) • How to use Windmill software with the 752 unit (Chapter 4) To use the 752 system you need a PC with a USB port. It should be running Windows 98SE or later. 1.1 Installing the Microlink 752 USB Unit Installing the Microlink 752 USB Unit 2.1 Introduction The Microlink 752 unit plugs into the USB (universal serial bus) socket of your PC. It provides 8 resistance inputs (or 16 voltage inputs), 24 digital inputs/outputs, 8 counters and 2 analogue outputs which can be voltage or current. You can use the 752 to measure temperatures using resistance temperature devices (RTD or Pt100). Other variable resistance transducers can also be monitored. The 752 has two 37-way connectors: one for analogue input connections and one for digital, counter and analogue output connections. If you prefer you can make your connections to screw terminals, using one of the optional Microlink 59x range of external units. This chapter tells you how to connect your signals to the Microlink 752, and about the 59x screw terminal units. After making your connections see Chapter 3 for details of installing the Windmill software. 2.2 Plugging the Microlink 752 into the Computer Plugging the Microlink into your PC could not be easier: just use the USB cable provided. You don’t have to switch off your computer first—or even restart Windows. The Microlink 752 is powered from the USB port: unless you are using current outputs (Section 2.8) you don’t need an extra power supply unit. 2.1 Microlink 752 ManualThe Microlink’s Lights If you have several 752 units, make sure their ID codes are set (Section 2.4) before plugging them into the PC. 2.3 The Microlink’s Lights The Microlink 752 has a green light labelled ENUM and a red light labelled BUSY. Neither of these will come on until you have installed the Windmill software. ENUM ENUM stands for Enumerated. This is lit when the Microlink has been powered on by the USB plug and play controller. It is a good indication that the Windmill USB driver software has been correctly loaded. BUSY This is lit for the duration of each USB communication. It is not active until the Microlink has been enumerated. 2.4 Using Several Microlink 752 Units As you can connect up to eight Microlink 752s to the USB, each one must have some way of identifying itself. This is provided by 3 pins on the digital connector. (If you have just the one Microlink 75x, its ID Code will be 0 and you can ignore this section.) The pins in question are numbers 28, 9 and 10. You set an ID code by connecting these pins to 0 V, as follows. 2.2 ID Code Pin 10 Pin 9 Pin 28 0 no no no 1 no no yes 2 no yes no 3 no yes yes 4 yes no no 5 yes no yes 6 yes yes no 7 yes yes yes Installing the Microlink 752 USB Unit See the Pin Connections Table on page 2.16 Make a note of the ID Codes, you’ll need them when using Windmill ConfIML to install the driver software. For quick identification you may find it helpful to label your 752s with their codes. Set the ID code before connecting the Microlinks to the PC. Using Several Microlink 752 Units2.3 Microlink 752 ManualAnalogue Input Connection Notes 2.5 Analogue Input Connection Notes The Microlink 752 provides 16 differential analogue input channels. You can use these to monitor 16 voltages or 8 resistance devices (such as RTDs), or a combination of the two. For example, you can measure 12 voltages and 2 resistances. The 752 uses an integrating analogue-to-digital converter, where the integration time and resolution are under software control. You set these with the Windmill ConfIML program, which starts automatically when you install the software. 2.5.1 Differential Inputs All the inputs are differential: for each input signal there are two signal wires. The measurement is the difference in voltage between the two wires. The two signals go into separate high-impedance amplifiers which monitor the voltage between the input and ground. The outputs of the two amplifiers are then subtracted to give the difference between the + and – inputs. For small signals differential inputs are much better than single-ended inputs, because the subtraction of the voltages on each of the input wires means that any voltage common to both wires is removed, so reducing noise. It is important to remember that the voltages at both inputs must be within the amplifier operating range. A classic error is to connect a battery between positive and negative inputs with no other connection. Although the difference between the inputs is well defined, the actual voltage at each input could be anything. Connecting one end of the battery to the 0 V input, either direct or via a resistor, would solve the problem. The 0 V of the Microlink 752 is connected to computer earth, which is usually connected to the mains earth. When making your connections you should follow this policy. a. If your signal source is “floating”, i.e. has no reference to mains earth, then you must provide a reference by connecting one end of it to the 0 V input, either direct or via a resistor. The resistor could 2.4 Installing the Microlink 752 USB Unit have any value up to several MΩ. However large values could cause 50 Hz problems if your signal source has much leakage to earth. b. If your signal source is itself earthed then you should connect only positive and negative inputs. You should make no connection to Microlink 752 earth. Figure 2.1 For floating signals you need to connect one end of the signal to the 0 V input on pin 19 2.5.2 Resistance Measurement When monitoring resistance you use adjacent pairs of input channels Each even numbered channel monitors the voltage across the test resistor (see page 10 for input channel numbering). Each odd numbered channel is used as: + input for lead compensation – input to supply the resistance measuring current of 1 milliamp. Remember that you can assign channel functions on a channel by channel basis. This means that you can measure, say, 2 resistances (4 channels) and 12 voltages (12 channels). Analogue Input Connection Notes2.5 Microlink 752 ManualAnalogue Input Connection Notes When the resistance to be measured is small, the resistance in the leads to the RTD can significantly affect accuracy. The odd numbered channel arrangement gives excellent results for all wiring configurations, including 2 wire, 3 wire, 4 wire and 4 wire compensated. 2 Wire In this configuration lead resistance is an additive error, but can be tolerated in those applications which do not require high absolute accuracy. Figure 2.2 Two Wire Configuration 3 Wire This is probably the most widely used configuration. The resistance of 1 lead is measured and used to perform a compensation for the resistances in the other leads to the RTD. Figure 2.3 Three Wire Configuration 4 Wire This is the configuration that gives the most accurate measurement. The measuring current is applied via 2 of the leads, and the voltage drop across the RTD is measured with a high input impedance device using the other 2 leads. Figure 2.4 Four Wire Configuration 2.6 Installing the Microlink 752 USB Unit 4 Wire Compensated In this arrangement, the resistance across the dummy leads is measured and used as compensation. Figure 2.5 Four Wire Compensated Configuration Resistance Connections When an even numbered channel is programmed for resistance measurement, the adjacent odd channel is used to supply the 1 mA constant current and measure the lead resistance. A 2 wire connection to channel 0 is shown below. Figure 2.6 Two Wire Connection to Channel 0 The measurement current flows from the –ve of channel 1 via the resistor to 0 V. Channel 0 measures the voltage across the resistor. Since lead resistance measurement is not needed the +ve of channel 1 is connected to 0 V. A 3 wire connection to channel 2 is shown in Figure 2.7. The measurement current flows from the –ve of channel 3 via the resistor to 0 V. Channel 2 measures the voltage across the resistor and one lead. The Analogue Input Connection Notes2.7 Microlink 752 ManualAnalogue Input Connection Notes +ve of channel 3 measures the voltage across one lead. Software subtracts the two measures to determine the resistance. Figure 2.7 Three Wire Connection to Channel 2 A 4 wire connection to channel 6 is shown in Figure 2.8. The measurement current flows from the –ve of channel 7 via the resistor to 0V. Channel 6 measures the voltage across the resistor with no contribution from lead resistance. The +ve of channel 7 is connected to 0V since lead resistance measurement is not needed. Figure 2.8 Four Wire Connection to Channel 6 2.8 Installing the Microlink 752 USB Unit 2.5.3 Input Voltage Range The Microlink 752 operates correctly with input voltages in the range ±11 V. The inputs will reject voltages which are common to both positive and negative inputs. These common mode voltages could be as big as 13 V. 2.5.4 Maximum Input Voltage The input multiplexers are protected against dc voltages of 33 V above the power supply. This means +48 V if the computer is switched on, +33 V if it is switched off. If the over-voltage is transient then protection extends as far as +300 V. When a voltage above the power supply is applied to the unit its protection mechanism comes into ac tion, and this draws some current from the signal source. This effect can be a problem when the computer is switched off as it now draws current from any signal. This current is limited by 4K7 resistors. Extra series resistors can be added to reduce this fault current. 2.5.5 Unconnected Inputs You can leave unused inputs unconnected, but if you attempt to read from these unconnected inputs do not expect to get 0 V. They could be any value. If another connected channel has recently been read, the unconnected input will return a similar value. This is not crosstalk. It occurs because the input capacitance of the amplifier is charged to the voltage of the previous channel and has little incentive to change when connected to an open circuit. 2.5.6 Analogue Input Pin Numbers Make your connections to the analogue 37-way D connector as detailed in the following table. Analogue Input Connection Notes2.9 Microlink 752 ManualAnalogue Input Connection Notes Microlink 752—16 Analogue Inputs Pin Connections for 37-Way D Plug (Wiring View) +15 V 37 + Auxiliary 36 + Input 15 35 + Input 14 34 + Input 13 33 + Input 12 30 + Input 11 31 + Input 10 30 + Input 9 29 + Input 8 28 + Input 7 27 + Input 6 26 + Input 5 25 + Input 4 24 + Input 3 23 + Input 2 22 + Input 1 21 + Input 0 20 19 0V 18 –15 V 17 – Auxiliary 16 – Input 15 15 – Input 14 14 – Input 13 13 – Input 12 12 – Input 11 11 – Input 10 10 – Input 9 9 – Input 8 8 – Input 7 7 – Input 6 6 – Input 5 5 – Input 4 4 – Input 3 3 – Input 2 2 – Input 1 1 – Input 0 Please read the Analogue Input Connection Notes on the previous pages before making your connections. 2.10 Installing the Microlink 752 USB Unit 2.6 Digital Input and Output Connection Notes The Microlink 752 provides digital input to the computer and output control by the computer. Its 24 general purpose input and output lines are arranged in 3 groups or ports. Each port can be either input or output (set using the Windmill SetupIML program). All ports power-up as inputs. The ports are referred to as Port 0 to Port 2. Port 2 also functions as 8 event counters, detailed in Section 2.7. 2.6.1 Input Voltages All inputs are high impedance CMOS type. They are TTL and 5 V CMOS compatible. Input voltages should be within the range 0 to 5 V. Higher Voltages can be dealt with by the addition of resistor networks. This can be conveniently done on a 590 unit (Section 2.10). Input protection can be provided in a similar manner. 2.6.2 Contact Closures You can interface to contact closures using a resistor to tie the input to either 5 or 0 V. The contact then switches the line to either 0 or 5 V. The resistor can be fitted to a 590 unit. 2.6.3 Noisy Inputs Input Filters can be fitted to a 590 unit if required. 2.6.4 Output Drive The outputs are TTL and 5 V CMOS compatible. They can drive 15 LSTTL loads. You can increase the output drive by using additional transistors, which can be fitted to the 590 unit. Currents of 1 amp can easily be switched. 2.6.5 Power-Up State The 752 unit will power-up as all inputs. If you intend to use the card to control outputs then you may want to define logic states at power-up. This can be done by resistors which tie the lines to either 0 or 5 V, mounted on a 590 unit. Digital Input and Output Connection Notes2.11 Microlink 752 ManualDigital Input and Output Connection Notes 2.6.6 Pin Numbers Make the I/O connections to the digital 37-way connector. See the Pin Connections Table on page 2.16. 2.12 Installing the Microlink 752 USB Unit 2.7 Counter Connection Notes The 752 provides eight 16-bit totalise (event) counters which can each count up to 65535. These are located on Port 2 of the digital I/O connector. If you are using counters set Port 2 as an input only, using the Windmill SetupIML software. The 752 unit monitors the state of the 8 input lines once every millisecond and maintains a count for each of them. It does this whether or not you intend to use the lines as counters. You can still read Port 2 as a normal digital input, even if you are also using it to count. 2.7.1 Input Voltages See Section 2.6.1 for safe voltage levels. 2.7.2 Count Inputs A valid count is declared if the input is low for 2 milliseconds then high for two milliseconds. This gives a theoretical maximum count speed of 250 Hz. 2.7.3 Pin Numbers Make the counter connections to Port 2 of the Digital Connector. The counter pin numbers are on page 2.16. Counter Connection Notes2.13 Microlink 752 Manual 2.8 Analogue Output Connection Notes Two analogue output channels are provided. These are available as either voltage or current. Wire to the one that you want. The voltage outputs are 0–10.240 V. The current outputs are 0–20.480 mA. Voltage Current Range 0–10.240 V 0–20.480 mA Value per bit 2.5 mV 0.05 mA The virtue of this arrangement is that many real-world systems that are nominally 10 V, may in fact require slightly more voltage because of production tolerances. The analogue output pin numbers are on page 2.16. 2.8.1 Current Output This output produces a current which is proportional to the voltage on the voltage output. This means that it can potentially produce current even if you are using a voltage range. If you do not wish to use a current output, leave it unconnected. The current outputs are current sink: the current flows into the current output and then to 0 V. To use the current output you will need an external power supply (6 to 30 V) and a load to drive. The power supply must be of sufficient voltage that with 20 mA flowing: Supply Voltage > voltage across load + voltage drop in wiring + 6 The 6 V is the minimum voltage at the current output that will enable it to sink 20 mA. The power supply and load can be connected in 2 ways. The simplest is to connect the power supply negative to 0 V and to connect the load between power supply positive and the current output. An alternative is to connect the power supply positive to current output and to connect the load between power supply negative and 0 V. If the external circuit already has an earth connection you may be forced into one 2.14 Installing the Microlink 752 USB Unit of these arrangements. Remember that the 0 V of the computer is normally connected to supply earth. LOAD + Power Supply V _ 6-30 V Current Output 0V Current Output + Power Supply V _ 6-30 V 0V LOAD Figure 2.9 Current Output Connections 2.8.2 Digital Input/Output, Counter and Analogue Output Pin Connections Table The pin numbers given on the next page are those for the digital I/O, counters and analogue output 37-way D socket. The analogue input pin numbers are on page 2.10. Analogue Output Connection Notes2.15 Microlink 752 ManualAnalogue Output Connection Notes Microlink 752—Pin Connections for Digital Inputs/Outputs, Counters and Analogue Outputs Output 1 Voltage output 37 Output 0 Voltage output 36 Output 1 Current output 35 Output 0 Current output 34 Port 2 Bit 0 33 Port 2 Bit 2 32 Port 2 Bit 4 31 Port 2 Bit 6 30 Not used 29 ID Code 0 28 Port 1 Bit 0 27 Port 1 Bit 2 26 Port 1 Bit 4 25 Port 1 Bit 6 24 Port 0 Bit 0 23 Port 0 Bit 2 22 Port 0 Bit 4 21 Port 0 Bit 6 20 19 0V 18 0V 17 0V 16 0V 15 0V 14 Port 2 Bit 1 13 Port 2 Bit 3 12 Port 2 Bit 5 11 Port 2 Bit 7 10 ID Code 2 9 ID Code 1 8 Port 1 Bit 1 7 Port 1 Bit 3 6 Port 1 Bit 5 5 Port 1 Bit 7 4 Port 0 Bit 1 3 Port 0 Bit 3 2 Port 0 Bit 5 1 Port 0 Bit 7• Please read the Connection Notes on the previous pages before making your connections. 2.16 Installing the Microlink 752 USB Unit 2.9 Specifications 2.9.1 Microlink 752 Unit Dimensions (mm) 180 x 120 x 40 Maximum number of 752s 8 Maximum length of cable 5 m per cable Maximum distance from PC can be increased by use of USB hubs 2.9.2 Analogue Inputs Max. number of voltage inputs 16 Max. number of resistance inputs 8 Maximum safe input voltage Computer on ±48 V Computer off ±33 V Transient ±300 V Voltage Ranges ±10 V, ±1 V, ±100 mV, ±10 mV Resistance Ranges 0–100 Ω, 0–1000 Ω Common mode range ±13 V Relative accuracy of ranges gain = 1000 ±0.1% gain = 1, 10, 100 ±0.05% A-D performance (set from software) Resolution (bits) Integration Time (msec) 12 2.5 13 5 14 10 15 20 16 40 18 160 Maximum speed of sampling 10 reads per second per channel up to a maximum of 80 reads per second Maximum linearity error ±0.02% Input impedance 100 MΩ Specifications2.17 Microlink 752 ManualSpecifications 2.9.3 Digital Inputs and Outputs Maximum number of inputs Maximum number of outputs Power-up state Maximum speed Voltage Inputs Compatibility Range Voltage Outputs Compatibility Drive 24 24 all inputs 160 channels per second TTL and 5 V CMOS 0 to 5 V TTL and 5 V CMOS 15 LSTTL loads 2.9.4 Counters Maximum number of counters Resolution Type of counters Maximum count speed Compatibility Input voltage range 8 16 bits Event (totalise) 160 counts per second TTL and 5 V CMOS 0 to 5 V 2.9.5 Analogue Outputs Number of outputs Resolution Output voltage range Current Outputs Output current range Maximum safe voltage range Voltage drop from current output to 0 V at 20 mA 2.18 2 voltage or 2 current 12 bits 0–10.240 V 0–20.480 mA 30 V 6 V Maximum Installing the Microlink 752 USB Unit 2.10 The 59x Screw Terminal Units The Microlink 59x range provides screw terminals for the Microlink 752, allowing signals to be permanently wired. These boxed 59x units sit next to the Microlink 752. Extra facilities are available when components are fitted, such as protection from high voltages. There are two units available to the Microlink 752. 590 590-8A Screw Terminals Screw Terminals and Current Measurement The 59x range is optional, so you can ignore this section if you have bought just the Microlink 752 and Windmill package. 2.10.1 590 Unit—Screw Terminals The 590 is a boxed screw terminal card. Extra facilities are available with this card, including: • noise filtering, • input protection from high voltages, • higher voltage inputs than normal, • contact closure inputs, • ac inputs, • biasing to ground, • external current source switching, • programmable resistance, • special output ranges. Connection The 590 unit has space for 3 rows of 18 screw terminals. The row nearest the front panel is connected to pin 19 of the analogue input D connector on the front of the Microlink. This pin is connected to 0 V. The other 2 rows are connected to pins 1–18 and 20–37 as indicated by the small figures by the terminals. 2.19 Microlink 752 Manual RTDs with 590 Units When using connection boxes with RTDs, care must be taken not to introduce errors due to lead resistance. For this purpose two 0 V paths are provided. • Current Return should be used for measuring the current flow to 0 V. • 0 V itself should be reserved. FITTING APPLICATION COMPONENTS Series Components Component positions S1 to S37 (0.4 inch pitch) are available to mount components in series with D-type pins 1 to 37. Only S1 and S37 are named on the PCB because of lack of space. However the numbering sequence is the same as that of the nearby B1 to B37 components. To fit a component in series with, for example, pin 10 • Place the component in the S10 position (level with B10), • Solder it on the copper side, • Cut the track under S10 at the point where it narrows. The main application of series components is series protection resistors. These could have any value from hundreds of ohms to megohms depending on requirements. Parallel Components Component positions P0 to P17 (0.2, 0.3, 0.4 inch pitch) are provided to mount components across analogue inputs 0 to 15, 16 is the auxiliary input, 17 completes the pattern. Components can be simply soldered into these positions. Input Filters Low pass analogue input filters can be produced by fitting resistors in the 2 series elements of an analogue channel, and a capacitor in the parallel element. For instance a filter can be implemented on channel 1 by fitting resistors to S2 and S21 and 2.20 Installing the Microlink 752 USB Unit a capacitor to P1. Typical values would be 10 KΩ and 1 µF. These would produce a cut off frequency of about 8 Hz. 2.10.2 590-8a Unit—Screw Terminals with Current Measurement The 590-8A is a boxed milliamp current detection card, arranged as 8 current and 8 voltage inputs. The same extra facilities are available with this card as with the 590. 2.21 Installing and Configuring Windmill Software Installing and Configuring Windmill Software 3.1 Introduction There are two steps to installing and configuring the Windmill measurement and control software. 1. Install the software onto the hard disk. 2. Tell the software about your measurement hardware. For installation you will need a personal computer with a USB port that is running Windows 98SE or later. 3.2 What is Windmill Software? Windmill is a ready-to-run suite of applications for data acquisition and control. You can be up and running in very little time as no programming is required. The standard suite includes data logging, charting and output control applications. You can also transfer data directly into third-party applications like Microsoft Excel or Access. Other Windmill modules are available—see the Windmill Software Internet catalogue for details http://www.windmillsoft.com/. 3.3 Installing Windmill Software 1. Connect the 752 data acquisition unit to your computer, as detailed in Chapter 2. 2. Install the Windmill software: Insert the CD. The Installation software should run automatically. If not select Run from the Start menu and type d:setup (where d: is your CD drive). Introduction3.1 Microlink 752 ManualInstalling Windmill Software 3. When installation is complete the Windmill Configuration program, ConfIML, automatically starts. This asks for details of your hardware. See Section 3.4 for details. 3.3.1 Upgrading From Earlier Versions of Windmill You can run Windmill alongside earlier versions of the software. Once you are happy that you no longer need a previous copy of Windmill simply run its “Uninstall” program to delete it. 3.3.2 Running Several Copies of Windmill Unless you have bought a multiple licence, you are only permitted to run one copy of the software at any one time. Please contact your supplier if you require a multiple licence. 3.3.3 Installing under Windows 7, 8 and Later For Windows 8 and 10 see http://www.windmill.co.uk/usb-device-windows8.html For Windows 7 see http://www.windmill.co.uk/install-hardware-windows7.html 3.2Installing and Configuring Windmill Software Installing and Configuring Windmill Software 3.4 Configuring Your System The Windmill Configuration program, ConfIML, records the details of your data acquisition hardware. It will run at the end of the installation process, and you should run it again from Windows whenever your acquisition hardware changes—for example when you install additional units. Figure 3.1 The ConfIML Main Window The first thing you need to do is press the Add button to include your Microlink 752 unit. 3.4.1 Adding New Hardware The Add IML Hardware dialogue lists the acquisition and control devices for which you have installed drivers. Select the Microlink 752 unit and press the Add button. This will take you to the Hardware Settings dialogue (Section 3.4.2). Configuring Your System3.3 Microlink 752 ManualConfiguring Your System 3.4.2 Changing Hardware Settings ConfIML needs to know some information about your 752 unit. Press the Help button or see below if in doubt about the answers. Which Type of Card do you have? Choose the Microlink 752. ID Code of the 752 Unit? As you can connect several 752s to your PC, you need to tell ConfIML which one you are currently configuring. Do this by selecting the correct ID Code. If you have only one 752 its ID Code is 0. (There should be as many ID codes as there are 752 units connected, and each code should be different. If not, change the codes on individual units as detailed in Section 2.4.) Which Type of Transducer Connection Unit is Attached? There are three options. Which you choose depends on the 59x units you have connected. None/General Purpose Choose this if you: • are not using a 59x unit, • are using a 590 screw terminal voltage unit, or • are using a 590-8A screw terminal current unit. Thermocouple Choose this if you are using a 593 thermocouple terminal unit. This monitors the temperature of connections, which is essential when using thermocouples. You can use channels not required for thermocouples for general voltage measurement. Strain Bridges Choose this if you are using a 594 strain gauge bridge connection unit. This monitors an external bridge excitation supply so that strain gauge outputs can be converted into readings in 3.4Installing and Configuring Windmill Software Installing and Configuring Windmill Software microstrain. Again, you can use channels not required for strain for general voltage measurement. Select the Integration Time (Resolution) This allows you to select the trade off between speed, precision and noise rejection. Seven settings are available—the slower the speed, the better the precision and the more random noise is averaged out. The exact speeds and resolutions vary with the computer, transducer type and so on, but the following table gives some typical figures. Setting 12-bit 13-bit 14-bit 15-bit 16-bit 18-bit Typical Speed Voltage Resolution 80 reads/sec 64 reads/sec 48 reads/sec 32 reads/sec 16 reads/sec 6 reads/sec 5 mV in ±10 V 3 mV in ±10 V 1.5 mV in ±10 V 0.8 mV in ±10 V 0.4 mV in ±10 V 0.1 mV in ±10 V Settings from 15-bit to 18-bit will be effective at removing 50 Hz mains noise as these integrate over one or more complete mains cycles. The resolution figures show the ability to detect small changes. The absolute accuracy will depend on several factors including your transducers. Interval Between Automatic Recalibrations (in Minutes)? This selects how frequently the software pauses to perform a recalibration of the Microlink 752 using its stable on-board reference voltages. This will cancel any errors introduced by temperature or power supply changes since the last recalibration, but can take up to a second to complete. During this time, no readings may be taken. You can vary the interval from 1 to 1440 minutes (24 hours), but every 20 minutes is generally sufficient. Configuring Your System3.5 Microlink 752 ManualConfiguring Your System 3.4.3 752 Devices After making your choices and pressing OK, the ConfIML Summary window appears showing your 752 as four hardware devices: 752 analogue inputs, 752 digital ports, 752 event counters and 752 analogue outputs. 3.4.4 Setting the Working Directory When you use Windmill you will create two types of files, those which hold data and those which hold the Windmill programs’ settings. You can specify a default folder in which to store these files— known as the Working Directory. Initially the working directory is set to wherever you installed Windmill. To change this, press the Directory button. Choose a new directory (folder) and press Save. Windmill will create two sub-directories under this choice, called setup and data. By default, all the Windmill settings will be stored in “setup” and all the data you collect stored in “data”. 3.4.4 Saving the Settings Save your settings and they will be used every time you run Windmill. You do not need to run ConfIML again, unless you add more units or want to change the settings. After closing ConfIML start the SetupIML program and choose how you wish to use the hardware. Refer to the next chapter and SetupIML’s Help file (setupiml.hlp) for details. 3.4.5 The Software Signal Generator In addition to data acquisition and control hardware, ConfIML lists the Software Signal Generator. This is a special driver which simulates a device with seven channels, each channel producing a different signal. No special hardware is required—the data values are produced by calculation. The Software Signal Generator lets you experiment and practise with Windmill, without being concerned about the hardware 3.6Installing and Configuring Windmill Software Installing and Configuring Windmill Software To install the signal generator you first need to add it to the list of devices. In the ConfIML Summary window press the Add button (Section 3.4.1). Select Software Signal Generator and again press the Add button. You’re taken to the Hardware Settings dialogue (Section 3.4.2) where you can choose options for five of the channels. Press the Help button in this dialogue for more information on the signal generator. 3.4.6 The IML Device Icon Whenever you run a Windmill program one or more IML Device icons will appear. Different icons identify different hardware drivers, software signal generators and so on. The Windmill applications can’t run without these, so don’t close them whilst using Windmill. Configuring Your System3.7 Using Windmill Software with the Microlink 752 Using Windmill Software with the Microlink 752 4.1 Introduction This chapter explains which settings in the Windmill SetupIML program apply to the 752, and about the rest of the Windmill software suite. You can use the Microlink 752 for monitoring resistance and voltage, for digital input and output, for counting and for analogue voltage or current output. Before starting Windmill make sure your 752 is plugged into the computer’s USB port, and, if you are using a 59x unit, that it is plugged into the 752’s analogue input connector. 4.1 Microlink 752 ManualOptions in SetupIML 4.2 Options in SetupIML SetupIML is the Windmill program that lets you save libraries of setup files, each holding details about how you want to use individual channels. A Windmill 752 is shown as four devices in SetupIML: Analogue Inputs, Digital Inputs, Event Counters and Analogue Outputs. Choose one from SetupIML’s Device menu. Now double-click a channel to configure it. Full details of using SetupIML are in its Help file (setupiml.hlp) and Chapter 3 of the Windmill User Manual. 4.2.1 Analogue Inputs The input channels are numbered 0 to 15. Using SetupIML you can configure each channel as follows: • enable or disable • re-name • set to a specific input range or allow the software to pick the range automatically • give a new units name, scale factor and offset • set alarm levels • set engineering unit conversion Special Hardware Commands The channel dialogue boxes will have the “Special” button enabled. This allows access to the following commands: Recalibrate Forces an immediate recalibration of the whole board. This is in addition to the periodic calibration cycles which happen automatically. Cal_Interval Displays the time between automatic calibration cycles, as selected in ConfIML (described in Section 3.4.2). Resolution Displays the resolution and integration time for this card, as selected in ConfIML (described in Section 3.4.2). 4.2Using Windmill Software with the Microlink 752 Using Windmill Software with the Microlink 752 Show_Cal_Data Used only during manufacturer’s test procedures. 4.2.2 Digital Ports Setting the Direction of the Port: Input or Output The Windmill 752 unit provides three digital ports, each with 8 lines. You can use each port for input or output. You can explicitly control the choice, or it can be deduced automatically by the software. All ports start as inputs, but if any data is sent to a port by a Windmill program it immediately switches to output mode. Output lines can also be controlled by the alarm detection features of the input channels. This will cause the whole port to switch to output mode. You can also use port 2 for event counting—in which case you must set it as an input. The channels are numbered as follows: 0100 Line 0 of port 0 0101 Line 1 of port 0 0102 Line 2 of port 0 .. ... 0107 Line 7 of port 0 0108 Direction control signal for port 0 0109 not used 0110 Line 0 of port 1 0111 Line 1 of port 1 ... ... 0117 Line 7 of port 1 0118 Direction control signal for port 1 0119 not used 0120 Line 0 of port 2 0121 Line 1 of port 2 ... ... 0127 Line 7 of port 2 0128 Direction control signal for port 2 0129 not used Options in SetupIML4.3 Microlink 752 ManualOptions in SetupIML Renaming Channels and Digital States In SetupIML you can replace the channel numbers with meaningful names. By default, each channel is linked to a single line and the two digital states are called ON and OFF. You can also change these names to more suitable ones, for example FAST and SLOW or OPEN and SHUT. Grouping I/O Lines into Multi-Bit Channels SetupIML lets you group the lines within each port into multi-bit channels, which are displayed or controlled as single values transferred via the first channel in the group. Multi-bit values can be chosen as binary, decimal or hexadecimal, e.g. Binary Decimal Hexadecimal 11 3 3 1010 10 A 10001 17 11 11111111 255 FF Channels 0108, 0118 and 0128 are the direction control signals for ports 0, 1 and 2 respectively. When set to 0, the whole port is used for input; when 1, the port is used for output. These channels can be viewed and also altered, but they are normally disabled and must be explicitly enabled from SetupIML before use. As noted above, direction control can usually be sensed auto matically by the software. 4.4Using Windmill Software with the Microlink 752 Using Windmill Software with the Microlink 752 4.2.3 Event Counters The Windmill 752 unit provides eight 16-bit event counters. The default names are 0200, 0201, 0202, etc. Each counter starts at zero and counts pulses on the corresponding input lines, to a maximum of 65535. They can be reset to zero at any time by sending “0” to the channel using the AnalogOut, Graphics or Test-Seq programs. No other values can be sent to the counters. You can use SetupIML to: • change the names • enable or disable each channel • choose one of two operating modes—accumulating count or resetting count • apply a scale factor or offset to the count Accumulating Count Simply keeps counting until explicitly reset. Resetting Count Starts again from zero after each reading. This shows the number of pulses since the last reading, but it can only be used where a single program is reading the counter. If several different programs were accessing the counter simultaneously, they would all be resetting it at different times, so the results would be unpredictable. Scale Factor and Offset SetupIML lets you apply a scale factor and offset to the count. For example, if the pulses came from a flow meter which pro duced one pulse for each 50 millilitres, then a scale factor of 0.05 would give a reading in litres. Options in SetupIML4.5 Microlink 752 ManualOptions in SetupIML 4.2.4 Analogue Outputs The 752 provides two analogue output channels. They are called 0300 and 0301 by default, but you can use SetupIML to change the names. The output is controlled by sending values to the channels using the AnalogOut control panel or one of the optional Windmill programs such as Graphics. The default units are percent of full scale. The 12-bit digital-to-analogue converter can produce 4096 equally spaced steps between 0% and 99.976% of full scale. The software will always pick the step closest to the value you have requested. Using SetupIML, you can define a scale factor and offset which will change the percentage figures into your chosen units using this formula: Engineering Units = (Scale x Percentage) + Offset For example: setting scale factor to 0.1024 and offset to zero, the numbers used by the software will be 0 to 10.24, which would represent the actual output voltage if the hardware was wired in this way. You could then also change the name of the units from “percent” to “volts”. 4.6Using Windmill Software with the Microlink 752 Using Windmill Software with the Microlink 752 4.3 The Rest of the Windmill Software Suite The Windmill suite of software that comes with the 752 comprises: ConfIML; SetupIML; the display and control panels—AnalogOut, DigitalOut & DDE Panel; Logger and Chart. The display and control panels let you send data to, or display data from, any number of analogue and digital channels. Logger logs data to disk from up to 100 channels whilst Chart displays moving charts of data from up to 8 channels. For more channels, or different logging and charting speeds, simply run more instances of Logger and Chart. Full details of all these programs are given in their on-line Help files and the Windmill User Manual. Should you need more sophisticated analysis or presentation, you can share data with other Windows applications using dynamic data exchange (DDE). For example, you can process data as it’s collected using Microsoft Excel. See the DDE Panel Help file for more details. There are many other optional programs in the Windmill range. Graphics lets you design and create your own Windmill displays— process mimics, wiring diagrams, bar charts, annunicator panels…whatever you wish. Test-Seq interprets a file of commands, and controls a test-rig accordingly. Replay replays a data file graphically. For details of other optional programs see http://www.windmill.co.uk/programs.html. To be informed when new Windmill products are launched, be given data acquisition hints and tips, and read articles on measurement and control; subscribe to the free Monitor newsletter (ISSN 1472-0221) at http://www.windmill.co.uk/newsletter.html. 4.7 Index Index 590 screw terminal unit 2.19 590-8A current unit 2.19-20 ac input 2.19 analogue input 2.4-10, 4.2 analogue output 2.16 biasing to ground 2.19 changing hardware settings 3.3 ConfIML 2.4, 3.3-7 contact closure 2.11, 2.19 counter 2.13, 2.16, 4.5 current input 2.20 current output 2.16 differential inputs 2.4-5 digital input and output 2.11-12, 2.16, 3.2-3 earth 2.4-5 event counter 2.13, 2.16, 4.5 filter 2.20 ground 2.4-5 high voltage 2.19 id code 2.2-4 input see analogue input see digital input and output input filter 2.20 input protection 2.19-20 installing Microlink 752 unit 2.1-19 Windmill software 3.1-2 introduction 2.1 low pass filter 2.20 moving Windmill software 3.2 multi-bit channels 4.4 new hardware 3.3 noise 2.19-20 output 2.11 see analogue output see digital input and output plug 2.1 power 2.1 programmable resistance 2.19 range 2.9 resistance 2.5-7, 2.19 screw terminals 2.19 SetupIML 4.2-6 software see Windmill software specifications 2.17-18 totalise counter 2.13, 2.16, 4.5 upgrading Windmill software 3.2 voltage input see analogue input see digital input and output Windmill software 2.1, 3.1-7 ConfIML 3.3-7 installing 3.1-2 moving 3.2 other modules 4.7 SetupIML 4.2-6 upgrading 3.2 i