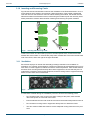
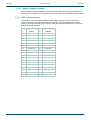
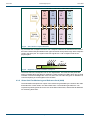
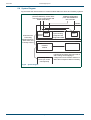
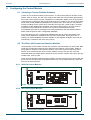
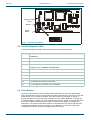
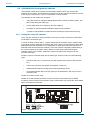
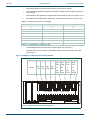
1
User Manual Sirius 600 Medium-scale router offering a mix of AES, SDI, ASI and HD and 3G signals in one frame snellgroup.com Sirius 600 www.snellgroup.com Contents Contents 1. Introduction. . . . . . . . . . . . . . . . . . . . . . . . . . . . . . . . . . . . . . . . . . . . . . . . . . . . . . . . . 4 1.1 Design Features . . . . . . . . . . . . . . . . . . . . . . . . . . . . . . . . . . . . . . . . . . . . . . . . . . 4 1.2 Sirius 600 User Manuals . . . . . . . . . . . . . . . . . . . . . . . . . . . . . . . . . . . . . . . . . . . . 5 2. Quick Start Guide . . . . . . . . . . . . . . . . . . . . . . . . . . . . . . . . . . . . . . . . . . . . . . . . . . . . 2.1 Router Configuration . . . . . . . . . . . . . . . . . . . . . . . . . . . . . . . . . . . . . . . . . . . . . . . 2.2 Sirius 600 Control . . . . . . . . . . . . . . . . . . . . . . . . . . . . . . . . . . . . . . . . . . . . . . . . . 2.2.1 Master Sirius 600 Frames Only . . . . . . . . . . . . . . . . . . . . . . . . . . . . . . . . 2.2.2 Slave Sirius 600 Frames Only . . . . . . . . . . . . . . . . . . . . . . . . . . . . . . . . . 6 6 7 7 7 3. Installation . . . . . . . . . . . . . . . . . . . . . . . . . . . . . . . . . . . . . . . . . . . . . . . . . . . . . . . . . 8 3.1 System Components . . . . . . . . . . . . . . . . . . . . . . . . . . . . . . . . . . . . . . . . . . . . . . . 8 3.2 Sirius 600 Cards 1 & 2 Compatibility . . . . . . . . . . . . . . . . . . . . . . . . . . . . . . . . . . . 8 3.2.1 Sirius 600 Compatibility Rules . . . . . . . . . . . . . . . . . . . . . . . . . . . . . . . . .11 3.3 Card locations in Sirius 620 (7U) Frame . . . . . . . . . . . . . . . . . . . . . . . . . . . . . . . 13 3.4 Card Location in a Sirius 610 (4U) Frame - Video and Audio Combinations . . . 14 3.5 Sirius 610 (4U) Frame Options . . . . . . . . . . . . . . . . . . . . . . . . . . . . . . . . . . . . . . 15 3.6 Card Locations in Sirius 610 (4U) Frame - Audio Only . . . . . . . . . . . . . . . . . . . . 15 3.7 Card Locations in Sirius 630 (16U) Video or Unbalanced AES Router Frame . . 16 3.8 SDV Router Configurations . . . . . . . . . . . . . . . . . . . . . . . . . . . . . . . . . . . . . . . . . 18 3.9 AES Router Configurations . . . . . . . . . . . . . . . . . . . . . . . . . . . . . . . . . . . . . . . . . 18 3.10 Inserting and Removing Cards . . . . . . . . . . . . . . . . . . . . . . . . . . . . . . . . . . . . . 20 3.11 Ventilation . . . . . . . . . . . . . . . . . . . . . . . . . . . . . . . . . . . . . . . . . . . . . . . . . . . . . 20 3.12 Fan Module . . . . . . . . . . . . . . . . . . . . . . . . . . . . . . . . . . . . . . . . . . . . . . . . . . . . 21 3.13 Power Supplies . . . . . . . . . . . . . . . . . . . . . . . . . . . . . . . . . . . . . . . . . . . . . . . . . 21 3.14 Rear Panel Control Connections and Switches . . . . . . . . . . . . . . . . . . . . . . . . 22 3.15 Control Connector Pinouts . . . . . . . . . . . . . . . . . . . . . . . . . . . . . . . . . . . . . . . . 25 3.15.1 'EXP' Connector Pinout . . . . . . . . . . . . . . . . . . . . . . . . . . . . . . . . . . . . 25 3.15.2 'RS485-1 and 2' Connector Pinouts . . . . . . . . . . . . . . . . . . . . . . . . . . . 26 3.15.3 'Config A and B' RS232 Connector Pinouts . . . . . . . . . . . . . . . . . . . . . 26 3.15.4 RS485 Port 3 Pinout . . . . . . . . . . . . . . . . . . . . . . . . . . . . . . . . . . . . . . 27 3.15.5 Alarms Pinouts . . . . . . . . . . . . . . . . . . . . . . . . . . . . . . . . . . . . . . . . . . . 27 3.15.6 Balanced AES Reference Pinout . . . . . . . . . . . . . . . . . . . . . . . . . . . . . 28 3.16 Using the AES Reference . . . . . . . . . . . . . . . . . . . . . . . . . . . . . . . . . . . . . . . . . 29 3.17 Using the Video Reference . . . . . . . . . . . . . . . . . . . . . . . . . . . . . . . . . . . . . . . . 29 4. Sirius Gold . . . . . . . . . . . . . . . . . . . . . . . . . . . . . . . . . . . . . . . . . . . . . . . . . . . . . . . . 4.1 Ventilation . . . . . . . . . . . . . . . . . . . . . . . . . . . . . . . . . . . . . . . . . . . . . . . . . . . . . . 4.2 Frame Layout . . . . . . . . . . . . . . . . . . . . . . . . . . . . . . . . . . . . . . . . . . . . . . . . . . . 4.2.1 Front Layout . . . . . . . . . . . . . . . . . . . . . . . . . . . . . . . . . . . . . . . . . . . . . . 4.2.2 Inserting and Removing Cards. . . . . . . . . . . . . . . . . . . . . . . . . . . . . . . . 4.2.3 Rear Layout . . . . . . . . . . . . . . . . . . . . . . . . . . . . . . . . . . . . . . . . . . . . . . 4.3 Sirius Gold Cards . . . . . . . . . . . . . . . . . . . . . . . . . . . . . . . . . . . . . . . . . . . . . . . . 4.3.1 Sirius Gold Crosspoint Cards. . . . . . . . . . . . . . . . . . . . . . . . . . . . . . . . . 4.3.2 Sirius Gold Fan Monitoring and Reference Card (2428) . . . . . . . . . . . . 4.3.3 Sirius Gold Monitoring Card (2429) . . . . . . . . . . . . . . . . . . . . . . . . . . . . 4.4 Monitoring Architecture . . . . . . . . . . . . . . . . . . . . . . . . . . . . . . . . . . . . . . . . . . . . 4.4.1 Sirius Gold Monitoring Card (2429) . . . . . . . . . . . . . . . . . . . . . . . . . . . . 4.5 Sirius Gold Rear Connectors. . . . . . . . . . . . . . . . . . . . . . . . . . . . . . . . . . . . . . . . 4.5.1 Sirius Gold Inputs and Outputs . . . . . . . . . . . . . . . . . . . . . . . . . . . . . . . 4.6 Connecting Your Router . . . . . . . . . . . . . . . . . . . . . . . . . . . . . . . . . . . . . . . . . . . 4.6.1 Controlling Your Router . . . . . . . . . . . . . . . . . . . . . . . . . . . . . . . . . . . . . 4.6.2 Configuration . . . . . . . . . . . . . . . . . . . . . . . . . . . . . . . . . . . . . . . . . . . . . 4.7 Power Supplies . . . . . . . . . . . . . . . . . . . . . . . . . . . . . . . . . . . . . . . . . . . . . . . . . . 4.7.1 Releasing the door . . . . . . . . . . . . . . . . . . . . . . . . . . . . . . . . . . . . . . . . . 4.7.2 Fitting the Door. . . . . . . . . . . . . . . . . . . . . . . . . . . . . . . . . . . . . . . . . . . . 4.7.3 Power Supplies . . . . . . . . . . . . . . . . . . . . . . . . . . . . . . . . . . . . . . . . . . . 4.7.4 Removing a Power Supply Unit (PSU). . . . . . . . . . . . . . . . . . . . . . . . . . Issue 1 Rev 3 Page 2 30 30 32 32 33 33 34 34 35 38 38 38 40 40 43 43 43 43 44 44 44 45 © 2014 Snell Limited Sirius 600 www.snellgroup.com Contents 4.7.5 Fitting a Replacement Power Supply . . . . . . . . . . . . . . . . . . . . . . . . . . . 45 4.8 Specification . . . . . . . . . . . . . . . . . . . . . . . . . . . . . . . . . . . . . . . . . . . . . . . . . . . . 45 5. The Nebula Control System. . . . . . . . . . . . . . . . . . . . . . . . . . . . . . . . . . . . . . . . . . . 5.1 Controlling Sirius . . . . . . . . . . . . . . . . . . . . . . . . . . . . . . . . . . . . . . . . . . . . . . . . . 5.2 Control Module Functions . . . . . . . . . . . . . . . . . . . . . . . . . . . . . . . . . . . . . . . . . . 5.3 An Example Multi-level System. . . . . . . . . . . . . . . . . . . . . . . . . . . . . . . . . . . . . . 5.4 Control Module and Editor Versions . . . . . . . . . . . . . . . . . . . . . . . . . . . . . . . . . . 5.4.1 2430 Control Module . . . . . . . . . . . . . . . . . . . . . . . . . . . . . . . . . . . . . . . 5.4.2 2431 Interface Module . . . . . . . . . . . . . . . . . . . . . . . . . . . . . . . . . . . . . . 5.4.3 2432 Control Module . . . . . . . . . . . . . . . . . . . . . . . . . . . . . . . . . . . . . . . 5.4.4 2433 Interface Module . . . . . . . . . . . . . . . . . . . . . . . . . . . . . . . . . . . . . . 5.4.5 2434 and 2435 . . . . . . . . . . . . . . . . . . . . . . . . . . . . . . . . . . . . . . . . . . . . 5.4.6 Snell Router Editor . . . . . . . . . . . . . . . . . . . . . . . . . . . . . . . . . . . . . . . . . 5.4.7 Nebula Editor . . . . . . . . . . . . . . . . . . . . . . . . . . . . . . . . . . . . . . . . . . . . . 5.5 Dual Redundant Controller Operation . . . . . . . . . . . . . . . . . . . . . . . . . . . . . . . . . 5.6 System Diagram . . . . . . . . . . . . . . . . . . . . . . . . . . . . . . . . . . . . . . . . . . . . . . . . . 47 47 47 48 48 49 49 49 49 49 49 49 50 51 6. Configuring the Control Module . . . . . . . . . . . . . . . . . . . . . . . . . . . . . . . . . . . . . . . 6.1 Choosing a Fixed or Editable Database . . . . . . . . . . . . . . . . . . . . . . . . . . . . . . . 6.2 The Sirius 600 Control and Interface Modules . . . . . . . . . . . . . . . . . . . . . . . . . . 6.2.1 2430/2/4 Control Modules . . . . . . . . . . . . . . . . . . . . . . . . . . . . . . . . . . . 6.2.2 2431/3/5 Interface Modules . . . . . . . . . . . . . . . . . . . . . . . . . . . . . . . . . . 6.3 2441/3/5 Configuration Switches. . . . . . . . . . . . . . . . . . . . . . . . . . . . . . . . . . . . . 6.3.1 Switch Descriptions . . . . . . . . . . . . . . . . . . . . . . . . . . . . . . . . . . . . . . . . 6.4 2441/3/5 Diagnostic LEDS . . . . . . . . . . . . . . . . . . . . . . . . . . . . . . . . . . . . . . . . . 6.5 Reset Buttons . . . . . . . . . . . . . . . . . . . . . . . . . . . . . . . . . . . . . . . . . . . . . . . . . . . 6.6 Control Port Details . . . . . . . . . . . . . . . . . . . . . . . . . . . . . . . . . . . . . . . . . . . . . . . 6.7 Control Protocol Descriptions . . . . . . . . . . . . . . . . . . . . . . . . . . . . . . . . . . . . . . . 6.7.1 Snell General Switcher Protocol (SW-P-02) . . . . . . . . . . . . . . . . . . . . . 6.7.2 Snell Multi-Drop Communications Protocol (SW-P-06) . . . . . . . . . . . . . 6.7.3 Snell Simple Switcher Protocol (SW-P-03) . . . . . . . . . . . . . . . . . . . . . . 6.8 2430/2432/2434 Configuration Switches. . . . . . . . . . . . . . . . . . . . . . . . . . . . . . . 6.8.1 Setting the 4-way DIP switches . . . . . . . . . . . . . . . . . . . . . . . . . . . . . . . 6.8.2 Selecting Serial RS485-2, RS485-3, or Ethernet Control . . . . . . . . . . . 6.8.3 Level Mapping in a Sirius 630 (16U) . . . . . . . . . . . . . . . . . . . . . . . . . . . 6.8.4 Level Mapping in a Sirius 620 (7U) . . . . . . . . . . . . . . . . . . . . . . . . . . . . 6.8.5 Level Mapping in a Sirius 610 (4U) . . . . . . . . . . . . . . . . . . . . . . . . . . . . 6.8.6 Examples of Non-square Configurations . . . . . . . . . . . . . . . . . . . . . . . . 52 52 52 52 52 53 53 54 54 55 55 55 56 56 57 57 59 60 60 60 61 7. Using the Ethernet Port . . . . . . . . . . . . . . . . . . . . . . . . . . . . . . . . . . . . . . . . . . . . . . 63 7.1 Connecting Sirius 600 to a Network . . . . . . . . . . . . . . . . . . . . . . . . . . . . . . . . . . 63 7.2 Configuration Tool . . . . . . . . . . . . . . . . . . . . . . . . . . . . . . . . . . . . . . . . . . . . . . . . 63 8. Troubleshooting . . . . . . . . . . . . . . . . . . . . . . . . . . . . . . . . . . . . . . . . . . . . . . . . . . . . 64 9. Specification . . . . . . . . . . . . . . . . . . . . . . . . . . . . . . . . . . . . . . . . . . . . . . . . . . . . . . . 9.1 General . . . . . . . . . . . . . . . . . . . . . . . . . . . . . . . . . . . . . . . . . . . . . . . . . . . . . . . . 9.1.1 Control . . . . . . . . . . . . . . . . . . . . . . . . . . . . . . . . . . . . . . . . . . . . . . . . . . 9.1.2 Reference. . . . . . . . . . . . . . . . . . . . . . . . . . . . . . . . . . . . . . . . . . . . . . . . 9.1.3 Power Supplies . . . . . . . . . . . . . . . . . . . . . . . . . . . . . . . . . . . . . . . . . . . 9.1.4 General . . . . . . . . . . . . . . . . . . . . . . . . . . . . . . . . . . . . . . . . . . . . . . . . . 9.1.5 Temperature Range . . . . . . . . . . . . . . . . . . . . . . . . . . . . . . . . . . . . . . . . Issue 1 Rev 3 Page 3 67 67 67 67 67 67 67 © 2014 Snell Limited Sirius 600 www.snellgroup.com Introduction 1. Introduction The Sirius 600 range consists of four self-contained, multi-format, multi-level signal routers with a maximum size of 512 x 512. The use of a generic broadband crosspoint has given the Sirius 600 range the ability to pass any digital signal type, up to and including 3D-SDI, through the same crosspoint matrix. Input and output processing is performed by modular, signal specific, Input/Output cards. Standard input and output cards have eight signal paths, and are available in SD-SDI, HD-SDI and 3G-SDI and AES audio formats. The system is further enhanced by the addition of video and audio ADC and DAC cards, enabling full analogue/digital conversion as required. The Sirius 600 range includes four sizes of chassis, each offering specific maximum router configurations, but using the same input and output cards, and thereby offering efficient and cost effective upgrade paths. The Sirius 600 range may be summarized as follows: • Sirius Gold (39U): Maximum of 512 x 512 (up to HD-SDI rates) • Sirius 630 (16U): maximum 256x256 using four 256x64 crosspoint cards • Sirius 620 (7U): maximum 128x128 using four 128x32 crosspoint cards • Sirius 610 (4U): maximum 64x64 using two 128x32 crosspoint cards The Sirius 610 (4U) frame can offer: • between 128x1 and 64x64 (increments of 8) routing, all signal types The Sirius 600 series design philosophy provides a solution for systems undergoing an analogue to digital, or SDV to HDTV transition, and provides the platform for an array of modular enhancements and options. The Sirius 600 product range includes: • SDV crosspoint modules, for cost effective routing up to 360Mb/s • HDTV crosspoint modules, for routing all digital signals up to 3 Gb/s Sirius 600 series uses the Snell Nebula control system, common to many Snell routers, allowing the direct connection of up to 32 control panels or Under Monitor Displays to the chassis. The user may select a pre-configured database to get the system up and running, or use a Windows based editor to customize the router to their own specific requirements. Nebula also allows the configuration of crosspoint salvoes, route protects and inhibits, multi-level operation and connection to Snell's Aurora router controller. The Sirius 600 chassis may control other Sirius 600, Freeway or Halo routers as slave systems using a control bus expansion connection, although an existing Freeway cannot control any Sirius 600 router. Sirius 600 has been designed with true input and output monitoring available as an option. Additional modules have analogue and digital, video and audio outputs, such that any input or output may be accessed, on both video and audio levels within a single frame. 1.1 Design Features Sirius 600, despite it's innovative design, has many of the features associated with Snell's hardware products, giving it a robustness and ease of maintenance essential in critical signal applications. All modules are 'hot-pluggable'; surge suppression circuitry, and phased power-up allow quick and safe module swapping, this is further aided by the retention of crosspoint and configuration data in non-volatile control card memory. All modules are addressed by their position in the frame, rather than by jumper settings, and the careful consideration of power routing and driver voltage levels ensures that mis-plugged modules are not damaged. If dual control cards are fitted; crosspoint, configuration and database information is synchronized between the two cards. Changeover is automatic in the event of failure, and the tri-state buffering of all control signals ensures that changeover is also transparent to both the internal and any external systems. Issue 1 Rev 3 Page 4 © 2014 Snell Limited Sirius 600 www.snellgroup.com Introduction All the frames are non-expandable, therefore there is no requirement for signals to be bussed or 'rippled' through crosspoint cards, all signals are routed point to point, using discrete buffering, thereby maintaining signal integrity and quality. This approach also allows the router to be part equipped or 'partitioned' with no loss of functionality. A further advantage of maintaining a short, quality, signal path is that the re-clocking of digital signals on the output stage, usually a necessity on traditional routers, is no longer an essential requirement. Because some of the digital signal types currently used do not necessarily benefit from re-clocking, a full specification, non-re-clocking router is a distinct advantage. This allows the user to opt for non-re-clocking outputs without degrading the system specification, and at the same time providing a cost-effective and signal-independent solution. The Sirius 600 video router operates in a mixed standard environment, providing both 525 and 625 line references are supplied to the frame, ensuring SMPTE RP168 compliant switching between sources of the same standards. The Sirius 600 audio router is designed to work with mixed stereo and mono channels, where the necessary combining and switching is applied at both the input and output stages, for both the analogue and digital formats. The audio signal mode of each channel may either be stored in the database, or configured dynamically from a standard master control panel. The dual redundant power supply units only supply 48 volts, all modules convert this to the required levels locally, which not only makes the power routing simple, but provides thorough power rail de-coupling between modules. 1.2 Sirius 600 User Manuals Sirius 600 is a modular product with an unknown number of permutations of router configuration, a single user manual for all users is not possible. What each user will receive is a core manual, giving general information for the Sirius 600 frames, control card configuration details and database information. They will also be supplied with supplement user manuals describing each crosspoint, input and output module currently available. Finally, the Nebula User Guide will also be supplied, along with the database editor software, allowing the user to configure the system to their own requirements. Module upgrades and additions will only affect the appropriate supplements, and simplify the documentation process. General information on Snell products is now contained in a separate user manual, detailing warranty, customer support and EMC compliance data. In summary, the following user manuals are available: Issue 1 Rev 3 • Sirius 600 user guide: Sirius Gold (39U), Sirius 630 (16U), Sirius 620 (7U), Sirius 610 (4U), control module and database • Nebula User Guide • Sirius 600 Crosspoint Cards • 3G Crosspoint Cards • Sirius 600 SDI Input/Output cards • Sirius 600 Audio Converters • Sirius 600 AES Input/Output cards • Sirius 600 Video Converters • Sirius 600 Monitoring • Sirius 600 HD Input/Output cards • Sirius 600 3G Input/Output Cards • General Information for Snell products Page 5 © 2014 Snell Limited Sirius 600 www.snellgroup.com Quick Start Guide 2. Quick Start Guide 2.1 Router Configuration Do you have a 16U, 7 U or 4U frame ? Sirius 630 (16U) or Sirius 620 (7U) Sirius 610 (4U) With the front door removed , compare the modules in your system with the diagrams in Section 3.3 and 3.7 and the module list in Section 3. 1 Does the router have 4999 modules fitted? Yes No You have a balanced AES router , compare it with the diagram in Section 3.6 to determine the size . Compare your frame with the diagram in Section 3.4, and the list in Section 3.1 to determine the size . Does the frame have a 2430 /2/4 or 2431 /3/5 control module (s) ? 2430 /2/4 You have a Master Sirius frame , which can run as a stand-alone, and can also control other 'slave' frames , see Section 5 2431/3/5 You have a Slave Sirius frame, which must connect to a Master Sirius frame , see Section 5 Determine how many levels of what size you require by setting the switches on the front of the 2430 /1 /2/3 /4/5 module using the diagram in Section 6.7 Fig 1. Issue 1 Rev 3 Router Configuration Page 6 © 2014 Snell Limited Sirius 600 www.snellgroup.com Quick Start Guide 2.2 Sirius 600 Control 2.2.1 Master Sirius 600 Frames Only Will you run the Sirius standalone , or connect it to another control system, like Aurora? Standalone Do your system dimensions lie within those specified by the 'fixed' database settings (see Nebula guide )? Will it use the 'fixed' database , see the Nebula guide, or a user specified editable database ? Editable Fixed Set the 2441 /3/5 switches for fixed database and the ports for 'panel' mode, see Section 6.2. Connect the control panels to the RS485 ports with the appropriate address setting, see the Nebula guide. Fig 2. Aurora No Create a database using the editor , see the Nebula guide . Set the 2441 /3/5 switches for 'editable database ', see Section 6.2, Load the database into the frame. Yes Set the 2441 /3/5 switches for fixed database and remote control , see Section 5.3, and connect either of the RS485 ports to Aurora. Configure the Aurora database to match your system's physical configuration . Router Configuration 2.2.2 Slave Sirius 600 Frames Only Using a control bus expansion cable , connect the frame to a Master frame . Check the slave configuration by referring to the 2431/3/5 switches, see Section 6.7. Configure the master system as above. Fig 3. Issue 1 Rev 3 Router Configuration Page 7 © 2014 Snell Limited Sirius 600 www.snellgroup.com Installation 3. Installation The Sirius 600 range of routers is supplied in 16U, 7U or 4U frames with integral power supplies and cooling. All cards and modules are accessible from the front after the door has been opened or removed, and all signal and control cables are connected to rear panels. Ventilation air is taken from the left hand side of the frame, and exhausted on the right hand side, and this must be considered when mounting the unit (see Section 3.12). If you experience any difficulties with any Sirius 600 frame, please refer first to Section 8 Trouble Shooting, and then if you are still having difficulties contact customer support as detailed in the General Information user manual. 3.1 System Components The following table identifies all major Sirius 600 components; all modules are marked with a four-digit part number. Use this table to check the compatibility of module types in your system: 3.2 Sirius 600 Cards 1 & 2 Compatibility Snell's Sirius 600 Router range contains both established and current products. The range can be classified as Series 1 and Series 2. Note: It is important NOT to mix certain Series 1 cards with Series 2 cards. Table 1. identifies whether the card is a series 1 or series 2 card and gives an indication on compatibility. Please read section 3.2.1.1 The table is correct at time of printing; if you are in any doubt please consult your Snell representative. Snell Sirius 600 Card Description Card Module Rear Connector SDV Output, Non-Re-clocking 3996 1764 SDV Output Re-clocking 3995 1764 AES Input, Asynchronous (Crash), Balanced 4992 1763 AES Output, Asynchronous (Crash), Balanced 4996 1766 AES Input, Synchronous (clean), Balanced 4993 1763 AA Input, Balanced 4790 1767 AA output Balanced 4795 1768 SDV Input 3994 1762 SDV Output, Non-Re-clocking 3999 1774 SDV Output Re-clocking 3998 1774 3992 3993 3997 1774 SERIES I cards (Can be mixed with Series 2 xpoint card) SERIES I cards (Cannot be mixed with Series 2 xpoint card) SERIES I cards (Cannot be mixed with Series 2 xpoint card) SERIES 2 cards (Can be mixed with Series I xpoint card) SERIES 2 cards HD Input HD Output Table 1. Issue 1 Rev 3 Sirius 600 Cards 1 & 2 Compatibility Page 8 © 2014 Snell Limited Sirius 600 www.snellgroup.com Snell Sirius 600 Card Description Installation Card Module Rear Connector 3G cards 3G Re-clocking Input 3973 Coax 3972 3971 Fibre 3G Re-clocking Output 3978 1774 3G Re-clocking Output 3965 3966 3G/HD/SD Re-clocking Fibre Output 3976 3974 AES Input, Asynchronous (Crash), Balanced 4992 1763 AES Output, Asynchronous (Crash), Balanced 4996 1766 AES Input, Synchronous (Clean), Balanced 4993 1763 AES Output, Synchronous (Clean), Balanced 4997 1766 AV Input 3790 1762 AV Output 3795 1764 AA Input, Balanced 4791 1767 AA Output, Balanced 4796 1768 SERIES 2 cards (Can be mixed with Series I xpoint card) SERIES 2 cards SERIES 2 cards (Can be mixed with Series I xpoint card) Table 1. Sirius 600 Cards 1 & 2 Compatibility (Continued) Table 2. is a comprehensive list of Snell Sirius 600 Cards and Modules. The list contains both legacy and current product. Please check availability. Series Card Description Sirius 600 1 Input/Output Cards 1 3995 SDV Re-clocking Output 1 3996 SDV Non-Re-clocking 1 1764 Rear panel for SDV 3995/6 and analogue Video o/p 1 4992 AES Asynchronous Input 1 4993 AES Synchronous Input 1 4996 AES Synchronous or Asynchronous Output 1 4999 AES In/Out Sirius 610 (4U) frame with 4911 Crosspoints 1 4790 Stereo Analogue Audio I/P 1 4795 Stereo Analogue Audio O/P Sirius 600 1 Input/Output Cards –Timecode & Data 1 4793 Balanced Timecode Input 1 4797 Balanced Timecode Output 1 4794 Balanced Data Input 1 4798 Balanced Data Output Sirius 600 1 and 2 Audio Rear Panels 1/2 1763 AES 16 Channel Input Balanced 1/2 1770 AES 16 Channel Input Balanced 1/2 1762 AES 8 Channel I/P Unbalanced 1/2 1766 AES 16 Channel Output Balanced Sirius 610 (4U), Sirius 620 (7U), Sirius 630 (16U) 1771 AES 16 Channel Output Balanced Sirius 620 (7U) only 1/2 Table 2. Issue 1 Rev 3 Snell Sirius 600 Cards and Modules Page 9 © 2014 Snell Limited Sirius 600 www.snellgroup.com Series Card Description 1/2 1764 AES 8 Channel Output Unbalanced 1/2 1767 Analogue Audio Input 1/2 1768 Analogue Audio Output Installation Sirius 600 1 Crosspoints Legacy product – Check availability 128x32 HD/SDV/Audio Crosspoint Sirius 610 (4U)/Sirius 620 (7U) 1 3906 Legacy product – check availability 256x64 Audio Crosspoint Audio/AES/Data/Timecode 1 4909 Legacy product – check availability 256x64 SDV/Audio Crosspoint Sirius 630 (16U) 1 3909 Legacy product – check availability 128x32 SDV/Audio Crosspoint Sirius 610 (4U)/Sirius 620 (7U) 1 3907 Legacy product – check availability 128x32 in Sirius 610 (4U)/Sirius 620 (7U) frame with 4992/1/5 modules 1 4911 128x64 Audio Sirius 610 (4U) with 4999 modules Crosspoint Legacy product – check availability Sirius 600 2 Input/Output Cards 2 3994 SDV Input 2 3998 SDV Re-clocking Output module 2 3999 SDV Non-Re-clocking Output module 2 3790 Composite Video Input 2 3795 Composite Video Output module 2 1762 SDV & Analogue Video Input module 2 1774 HD & Sirius 600 2 SD Outputs 2 1764 SDV rear panel for SDV 3995/6 and Analogue Video Output modules. 2 3972 3G Re-clocking Input 2 3973 3G Input rear (use with 3972 for co-ax) 2 3971 3G Input rear (use with 3972 for fibre) 2 3993 HD Input BNC module 2 3992 HD Input module 2 3991 HD Re-clocking Input 2 3997 HD Re-clocking Output 2 3978 3G Re-clocking Output (uses 1774 rear) 2 1774 3G/HD & Sirius 600 2 SD Outputs 2 3965 3G Re-clocking Output (uses 3966 rear) 2 3966 3G Re-clocking Output rear 2 3991 HD Re-clocking Input module 2 3970 HD/SD Fibre Input Table 2. Issue 1 Rev 3 Snell Sirius 600 Cards and Modules (Continued) Page 10 © 2014 Snell Limited Sirius 600 www.snellgroup.com Installation Series Card Description 2 3976 3G/HD/SD Re-clocking Fibre Output (uses 3974 rear) 2 3974 3G Fibre Output rear 2 3975 HD/SD Fibre Output 1310nm 2 3977 HD/SD Fibre Output 1550nm 2 4992 AES Asynchronous switching Input 2 4993 AES Synchronous switching Input 2 4996 AES Asynchronous switching Output 2 4997 AES Synchronous switching Output 2 4791 Stereo Analogue Audio Input 2 4796 Stereo Analogue Audio Output 4998 AES Input/Output Card for Sirius 610 (4U) frame with Audio crosspoint 2 Should not be mixed with other input or output card types Sirius 600 2 Input/Output Cards Timecode & Data 2 4792 Timecode Balanced Input module 2 4799 Timecode Balanced Output module 2 4788 Data Balanced Input module 2 4789 Data Balanced Output Sirius 600 2 Crosspoint Options 2 4993 128x32 / 128x64 Audio Crosspoint Module for Sirius 610 (4U) and Sirius 620 (7U) frames. Operates as 128x32 in Sirius 620 (7U) frames and Sirius 610 (4U) frames with 4992/4993/4996/4997 modules, and as 128x64 in Sirius 610 (4U) with 4998 modules. 2 3912 128x32 HD/SD/Audio Crosspoint Module for Sirius 610 (4U) and Sirius 620 (7U) frames 2 3962 128x32 3GHD/SD/Audio Crosspoint Module for Sirius 610 (4U) and Sirius 620 (7U) frames 2 4908 256x64 Audio Crosspoint Module. Routes Audio / AES, data and timecode. 2 3908 256x64 HD/SD/Audio Crosspoint Module for Sirius 630 (16U) Frame. 2 3969 256x64 3GHD/SD/Audio Crosspoint Module for Sirius 630 (16U) Frame. 2 3913 Sirius 600 Gold 256x64 HD / SD / Audio Crosspoint Module. Routes signals from 2MBit/s to 1.5GBit/s Table 2. Snell Sirius 600 Cards and Modules (Continued) 3.2.1 Sirius 600 Compatibility Rules Do not use Sirius 600 1 Audio modules, Timecode or data in a frame with any Sirius 600 2 cards or Sirius 600 1 4911's (Sirius 610 (4U)/Sirius 620 (7U)) or 4909's (Sirius 630 (16U)) i.e. Sirius 600 1 Audio 4790's & 4992/4993's: DO NOT USE with all Sirius 600 2 crosspoint cards. Can only be used with Sirius 600 1 crosspoint cards except the 4911's (Sirius 610 (4U)/Sirius 620 (7U)) or 4909's (Sirius 630 (16U)). The following cards are derived from the Sirius 600 1 4992/1 and hence also can only be used with Sirius 600 1 Crosspoint cards 4911/9's except the 4911's (Sirius 610 (4U)/Sirius 620 (7U)) or 4909's (Sirius 630 (16U)): • Issue 1 Rev 3 4999's (Sirius 600 1) AES Input/Output combined. Page 11 © 2014 Snell Limited Sirius 600 www.snellgroup.com • 4793 Sirius 600 1 Timecode I/P • 4794 Sirius 600 1 Data I/P. Installation DO NOT USE with all Sirius 600 2 crosspoint cards. Always use the correct rear panels. i.e Sirius 600 1 with 1 and Sirius 600 2 with 2. e.g. Sirius 600 1 3996 (3999) SDV Non-Re-clocking and 3995 (3998) SDV Re-clocking use the 1764 (1774) rear panel. Issue 1 Rev 3 Page 12 © 2014 Snell Limited Sirius 600 www.snellgroup.com Installation 3.3 Card locations in Sirius 620 (7U) Frame Fig 4. shows the location and function of cards in the Sirius 620 (7U) frame. Main and Backup PSUs 121-128 113-120 105-112 97-104 89-96 81-88 73-80 65-72 65-72 73-80 81-88 89-96 97-104 105-112 113-120 121-128 Control Card A Control Card B Fan Module 1-8 9-16 17-24 25-32 33-40 41-48 49-56 57-64 57-64 49-56 41-48 33-40 25-32 17-24 9-16 1-8 Input Cards 8 Inputs per Card Input and Output Monitoring Card for Entire Frame Output Cards 8 Inputs per Card Output Cards 8 Inputs per Card Input Cards 8 Inputs per Card Input and Output Monitoring Card for Entire Frame Fig 4. Issue 1 Rev 3 Card locations in Sirius 620 (7U) Frame Page 13 © 2014 Snell Limited Sirius 600 www.snellgroup.com Installation 3.4 Card Location in a Sirius 610 (4U) Frame - Video and Audio Combinations This allows a mix of video and audio cards. The rear connections can either be balanced or unbalanced but separate input and output cards must be used. in 113-120 OR out 9-16 in 121-128 OR out 1-8 monitor slot 15 slot 16 slot 17 OR out 25-32 in 97-104 in 105-112 OR out 17-24 OR out 33-40 in 89-96 slot 14 OR out 41-48 OR out 49-56 in 73-80 in 81-88 OR out 57-64 in 57-64 in 49-56 in 41-48 in 33-40 in 25-32 in 17-24 in 9-16 in 1-8 PSU 2 PSU 1 Separate input and output boards (SDV, AES, HD) in 65-72 Views from front of frame crosspoint inputs 1-128 (out 1-32) crosspoint inputs 1-128 (out 33-64) Table 3. slot 13 slot 12 slot 11 slot 10 slot 9 slot 8 slot 7 slot 6 slot 5 control A slot 4 slot 3 slot 2 slot 1 control B Card Location in a Sirius 610 (4U) Frame This router configuration allows 'non square' sizes to be constructed, as summarized in the next section. Note: If an AES crosspoint card is fitted it is important to set the switches on this crosspoint card to match those of the control cards. Router 4911 Inserted 4911 Switch settings Configuration SW1 SW2 Control card switch settings SW3-3 SW3-4 Square NO N/A N/A ON ON Square YES ON ON ON ON Non-square NO N/A N/A OFF ON Non-square YES OFF ON OFF ON Table 4. Issue 1 Rev 3 Router Configuration Page 14 © 2014 Snell Limited Sirius 600 www.snellgroup.com Installation 3.5 Sirius 610 (4U) Frame Options Fig 4. shows that it is possible to replace output cards with input cards in a Sirius 610 (4U) frame. This 'trade-off' not only results in a non-square router, but also allows for the number of crosspoint cards to be reduced in certain configurations, giving a highly flexible and cost effective solution for a number of applications, see Table 5. Number of input cards Number of output cards Number of crosspoint cards Maximum router size 8 8 2 64x64 10 6 2 80x48 12 4 1 96x32 14 2 1 112x16 16 0 0 128x1 (using monitoring module) Table 5. Note: Sirius 610 (4U) frame Options The above configurations apply only to video, unbalanced AES and balanced AES using separate input and output cards. The following table is a review of the rules for matching Input/Output modules with crosspoint modules for the above configurations: 4911 Switch settings Control card switch settings SW1 SW2 SW3-3 SW3-4 ON OFF ON OFF Table 6. 3.6 Card Locations in Sirius 610 (4U) Frame - Audio Only out 1-8 monitor out 9-16 out 17-24 out 25-32 in 57-64 in 49-56 in 41-48 in 33-40 out 33-40 out 41-48 out 49-56 out 57-64 in 25-32 in 17-24 in 9-16 in 1-8 PSU 2 Separate input and output boards (audio only) PSU 1 This frame only allows a mix of audio cards as an AES crosspoint card is fitted. The rear connections can either be balanced or unbalanced but separate input and output cards must be used. crosspoint inputs 1-64 (out 1-64) control B Table 7. control A Card Locations in Sirius 610 (4U) Frame - Audio Only This router CANNOT be mixed format and it must be equipped to use separate input and output AES cards. It is important to set the switches on the AES crosspoint card to match those of the control cards. 4911 Switch settings Control card switch settings SW1 SW2 SW3-3 SW3-4 OFF OFF OFF OFF Table 8. No other switch settings are valid. Issue 1 Rev 3 Page 15 © 2014 Snell Limited Sirius 600 www.snellgroup.com Installation 3.7 Card Locations in Sirius 630 (16U) Video or Unbalanced AES Router Frame The Sirius 630 (16U) frame uses physically larger crosspoint cards than used in the Sirius 610 (4U) and Sirius 620 (7U) frames, and each is equipped with 256x64 crosspoints. These fit vertically into the centre of the frame, and the user must note that the two on the right side of the frame are fitted 'upside down' with respect to the two on the left. The input and output cards are the same types as used in the Sirius 610 (4U) and Sirius 620 (7U) frames, and occupy four 'quadrants' of the chassis, all with their card ejectors towards the outside of the frame. If input and output monitoring is required, four cards are fitted, one serving each frame quadrant, the master output card being in the top left hand position. If the frame is to be fitted with any video DAC cards, these will receive their analogue and digital references respectively from the monitoring cards fitted in positions 1 and 4, which in turn must be supplied with a suitable black and burst signal. This will not provide input and output monitoring, which if required will need the full compliment of four monitoring cards. The user must refer to the Sirius 600 monitoring user guide for full details. The fan and power supply modules are the same as used in the Sirius 610 (4U) and Sirius 620 (7U) frames. With four power supplies fitted, the frame has full power supply redundancy, since only two are required to power a fully equipped frame, although it is necessary to fit four power supplies in order to achieve adequate cooling. Issue 1 Rev 3 Page 16 © 2014 Snell Limited Sirius 600 www.snellgroup.com Installation Fig 5. shows the card positions and functions in a Sirius 630 (16U) frame: Monitoring Card 2 1-8 3998 3998 Monitoring Card 1 2 624 26 24 121 - 128 3998 9 - 16 3998 POWER SUPPLY 1 113 - 120 17 - 24 399 8 3998 105 - 112 25 - 32 399 8 3998 97 - 104 33 - 40 3998 3998 89 - 96 41 - 48 3998 396 9 396 9 49 - 56 3998 81 - 88 399 8 3998 73 - 80 57 - 64 399 8 3998 65 - 72 57 - 64 3994 3994 65 - 72 49 - 56 SOU RCES 1-256 D EST INATIONS 1-64 73 - 80 3994 41 - 48 3994 3994 3994 3994 89 - 96 25 - 32 3994 3994 97 - 104 SOURC ES 1- 256 DESTIN ATIONS 65- 128 C ONTROL CARD A 3994 17 - 24 3994 105 - 112 9 - 16 3994 3994 113 - 120 1-8 3994 3994 121 - 128 SOUR CES 1-256 D ESTINATIONS 129-192 3994 SOUR CES 1-256 DEST INATIO NS 1 93-256 168 - 161 209 - 216 217 - 224 3994 3994 201 - 208 176 - 169 3994 3994 193 - 200 184 - 177 3994 3994 Monitoring Card 4 3994 3994 BACKUP POWER SUPPLY 1 192 - 185 2 624 Monitoring Card 3 2 62 4 160 - 153 225 - 232 CONTR OL CARD B 3994 152 - 145 233 - 240 3994 3994 144 - 137 241 - 248 3994 3994 136 - 129 249 - 256 3994 3998 136 - 129 249 - 256 3998 3998 144 - 137 241 - 248 39 69 152 - 145 3998 39 69 3998 233 - 240 3998 160 - 153 225 - 232 3998 3998 168 - 161 217 - 224 3998 3998 3998 BAC KU P POWER SUPPLY 2 3994 430 81 - 88 33 - 40 3994 POWER SUPPLY 2 176 - 169 209 - 216 3998 3998 184 - 177 201 - 208 3998 FAN MODU LE 3998 192 - 185 193 - 200 3998 193 2 Fig 5. Issue 1 Rev 3 Card Locations in Sirius 630 (16U) Video or Unbalanced AES Router Frame Page 17 © 2014 Snell Limited Sirius 600 www.snellgroup.com Installation 3.8 SDV Router Configurations Table 9. lists all the Serial Digital Video configurations: Frame size Sirius 610 (4U) Sirius 620 (7U) Sirius 630 (16U) Table 9. [1] Crosspoint cards Input cards Output cards 8x3990/4 8x3998/9 10x3990/4 6x3998/9 12x3990/4 4x3998/9 14x3990/4 2x3998/9 16x3990/4 none none 128x1 [1] 16x3998/9 4x3962 128x128 max 12x3998/9 3x3962 128x96 max 8x3998/9 2x3962 128x48 max 4x3998/9 1x3962 128x32 max 32x3998 4x3969 256x256 max 24x3998 3x3969 256x192 max 16x3998 2x3969 256x128 max 8x3998 1x3969 256x64 max 16x3990/4 32x3990/4 Router size 64x64 2x3962 80x48 96x32 1x3962 112x16 SDV Router Configurations This configuration requires a 2429 Monitoring card to provide an output Fig 5. shows card positions for all the configurations. In a Sirius 610 (4U) frame, input cards may be 'traded off' against output cards to create non-square routers and use the surplus crosspoints. This is not possible in a Sirius 620 (7U) frame where the full crosspoint capacity is being used, however, any Sirius 620 (7U) configuration may be 'sub-equipped' to create smaller router dimensions. 3.9 AES Router Configurations The 4911 AES crosspoint card is primarily designed for use in the Sirius 610 (4U) frame using 4999 combined Input/Output cards, giving a maximum router size of 128x128, but it may also be used in other configurations where cost effective AES routing is required. The restriction with using 4999 cards is that balanced D type connectors only may be used. Unbalanced AES routers must use 4992/4993 input cards and 4996 output cards, which may then be used with any crosspoint cards, with the knowledge that the 4911 is the most cost effective. The 4911 card has a greater number of crosspoints accessible than the video crosspoint cards when used in a Sirius 610 (4U) frame, meaning that a 128x64 AES router can be built using one crosspoint card and separate Input/Output cards. These extra crosspoints cannot be accessed in a Sirius 620 (7U) frame, for which the 4911 card works as a direct replacement for the video crosspoint cards, but at a lower cost. These different configurations must be setup using switches, both on the crosspoint card and the host control card. The user must refer to both the control card section of this manual, and the 4911 user guide for full configuration details. Issue 1 Rev 3 Page 18 © 2014 Snell Limited Sirius 600 www.snellgroup.com Installation Table 10. lists the full range of AES router options: Connector type Frame size Input cards Output cards Crosspoint cards Balanced Sirius 610 (4U) 4993 4997 3962/4911 Max router size 64x64 64x32 128x128 Sirius 620 (7U) 4993 4997 128x96 3962/4911 128x64 128x32 256x256 Sirius 630 (16U) 4993 4997 256x192 3962/4911 256x128 256x64 Sirius 610 (4U) 4993 4997 3962/4911 [1] 64x64 64x32 128x128 Sirius 620 (7U) 4993 4997 3962/4911 Unbalanced 128x96 128x64 128x32 256x256 Sirius 630 (16U) 4993 4997 3969 256x192 256x128 256x64 Table 10. [1] AES Router Configurations In this configuration the 4911 crosspoint card may be switched to use only 32 of its outputs, and therefore be used in conjunction with a video crosspoint card for a multi-level system. See the AES crosspoint user guide for details. It is noted that the most cost effective option for a balanced AES router is the Sirius 610 (4U) frame using combined Input/Output cards, this however will result in a 'square' router. Non-square routers may be constructed using the separate input/output card types, with the knowledge that the full crosspoint capacity may not be used. The user should refer to Section 3 of the main Sirius 600 user manual for a front view of card positions in the Sirius 610 (4U), Sirius 620 (7U) and Sirius 630 (16U) frames, and also for a full table of non-square router configurations. Issue 1 Rev 3 Page 19 © 2014 Snell Limited Sirius 600 www.snellgroup.com Installation 3.10 Inserting and Removing Cards Fig 6.shows that all card handles locate into the metalwork of the Sirius 600 frame in such a way that allows easy insertion and removal. Pulling the bottom of the handle outwards will lever the card out of its socket for removal. When inserting the module, the handle must be lifted and located in the frame as shown, before using the handle to push the card fully home. Static precautions must be observed when inserting and removing all system modules. Fig 6. Inserting and Removing Cards Cards in the bottom of a Sirius 620 (7U) frame are fitted upside down, and therefore their handles are at the bottom. In a Sirius 630 (16U) frame, handles are to the left in the left hand side of the frame, and to the right in the right hand side. 3.11 Ventilation Each frame employs an internal fan assembly providing horizontal cross ventilation to maintain a cool, internal, air temperature. Frames may therefore be mounted directly on top of each other, or other equipment, without the need for vertical separation. Care should however be taken when mounting frames directly above other equipment to ensure that they are not subjected to excessive heat from that equipment, and that cooling vents in equipment directly above or below them are not obstructed. Fig 7. Ventilation It is therefore essential during the installation process to observe the following points: Issue 1 Rev 3 • Do not obstruct the vents on the unit to allow cooling to take place, allow at least 40mm free space on each side of the frame • Ensure that both the fans and vents have access to the ambient temperature room air • Do not obstruct cooling vents in equipment directly above or below the frame. • The door must be fitted and closed to ensure adequate cooling when the unit is powered Page 20 © 2014 Snell Limited Sirius 600 www.snellgroup.com Installation 3.12 Fan Module The 1932 fan module is fitted in the Sirius 620 (7U) and Sirius 630 (16U) frames, and provides additional ventilation to the integral power supply fans. The three DC powered radial fans have their current consumption constantly checked in order to detect failure due to stalling, disconnection or burning out. Two LEDs are located on the front edge of the card as follows: • Green: power is supplied to the module • Red: any fan fault Any faults are also reported to the Alarms connector on the rear of the frame, and also as serial data to the Ethernet port. 3.13 Power Supplies Sirius 600 frames are fitted with auto-sensing 1931 power supply units which will operate from mains voltages between 100 and 240VAC ±10%, with frequencies of 50/60Hz. These PSU's automatically adapt to the supplied mains (line) input voltage, therefore no user adjustment of the PSU is required. The supplies are rated at 500 Watts and provide a single 48 Volt DC rail. The PSU's are self-contained, plug-in modules with an integrated IEC mains input connector, which is accessed at the rear of the frame. For additional safety, the IEC connector is fitted with an integrated fuse holder. Cooling for the power supplies is integrated into the unit using internal fans. These are powered from an internally derived 12 Volt rail. For EMC and safety reasons the mains, chassis and signal earths are permanently connected together within the frame. With the front door opened, two LED's are visible on each PSU, one indicating that the 48 Volt power rail is active and the other indicating the health of the fan units. The fans are internally monitored for a number of fault types: • Fan disconnected • Fan stalled • Fan power rail failure Fault conditions may also be monitored on a rear panel connector, and by interrogating the control card via the Ethernet port, both of which are detailed in a later section. NOTE: The fans in the Sirius 600 PSU have a sensitive monitoring circuit to ensure detection of any failed fans. The circuit is affected by many factors, including temperature, air restriction in the frame and also air inlet restrictions, plus the ageing of the fans themselves. It is possible after a few weeks of operation or during commissioning that the fan fail alarm may trigger when all fans are active and working, causing the fan fail LED to light or flash intermittently. If this happens the fan alarm sensitivity needs to be adjusted. This is done as follows: Issue 1 Rev 3 1. Remove power from the PSU 2. Remove it from the frame 3. Locate the fan adjust potentiometer on the side of the PSU 4. Turn the potentiometer ¼ turn clockwise 5. Reinstall the PSU, re-establish power and check for failure alarm Page 21 © 2014 Snell Limited Sirius 600 www.snellgroup.com Installation 6. If the alarm remains repeat, turning another ¼ turn clockwise (It should not be necessary to adjust more than ½ turn, in total) 7. If the fault alarm is still present return the unit to Snell or your local dealer, as described in 'General Information' on the user manual CD. Fan Fig 8. Fan Adjustment It is not possible to adjust the fan fail on the bench with power connected, as the alarm is affected by the flow of air through the unit, which will be different on a bench to in a frame. 3.14 Rear Panel Control Connections and Switches All Sirius 600 frames have a COMMON set of rear control connections and switches, as follows: Issue 1 Rev 3 • Two RJ45 Ethernet control sockets, one for each control or interface module, available as an option to RS485 port control number 2 • A rotary Hex switch, not currently used • Two 9 pin D type sockets configured as RS232, for connecting the PC Router Editor to the main and backup control cards • 9 pin D type socket for a timecode (LTC) input, not currently used • 15 pin D type socket for power supply and fan alarm relay contact outputs. Two are fitted on the Sirius 630 (16U) frame to accommodate the extra PSUs • two 9 pin D type sockets configured as RS485, configurable as remote control or multi-drop panel and UMD connections • a third 9 pin D type socket, only active when a 2434 control module is used, and a customer specified control protocol has been implemented by Snell, the port may be configured as RS232 or RS485 using a jumper setting • 9 pin D type socket for a balanced AES reference signal, and a BNC for an unbalanced AES reference, and a switch to select which is in use. Two BNCs and two switches are fitted on the Sirius 630 (16U) frame as two AES references are required. The second balanced reference uses other pins on the single 9 pin D type socket. Note that modifications to some early Sirius 630 (16U) frames fixed the AES references as either balanced or unbalanced, in which case there is no switch • a loop through analogue 625 line black and burst reference input • a loop through analogue 525 line black and burst reference input • a terminated HD tri-level reference input, only active if 2434 or 2435 control cards used • 37 pin D type control bus for frame expansion to other Sirius 600 or Freeway frames Page 22 © 2014 Snell Limited Sirius 600 www.snellgroup.com Installation Fig 9. shows the rear panel on the Sirius 610 (4U) and Sirius 620 (7U) frames: CTRL A CTRL B ADDR EXP RS232 configure ports for Master and Slave control modules, disabled on Idle controller LTC ALARMS HDTV reference if 2434 control card in use 2 1 RS 4 85 3 Third serial port only active on 2434 module if Snell have implemented a custom protocol U B 62 5 52 5 Switch to select balanced (D type) or unbalanced (BNC) AES reference Fig 9. Issue 1 Rev 3 Rear Panel on the Sirius 610 (4U) and Sirius 620 (7U) Frames Page 23 © 2014 Snell Limited Sirius 600 www.snellgroup.com Installation Fig 10. shows the rear panel on the Sirius 630 (16U) frame: RS232 configure ports for Master and Slave control modules, disabled on Idle controller Switches to select balanced (D type) or unbalanced (BNC) AES references Relay contacts for PSUs 1 and 2, and fan card Relay contacts for PSUs 3 and 4 HDTV reference input Third serial port only active on Sirius 600 630 module if Snell have implemented a custom protocol Fig 10. Rear Panel on the Sirius 630 (16U) Frame Issue 1 Rev 3 Page 24 © 2014 Snell Limited Sirius 600 www.snellgroup.com Installation 3.15 Control Connector Pinouts Fig 9. shows the control connectors on the rear panel of the Sirius 610 (4U) and 620 (7U) frames. Fig 10. shows the control connectors on the rear panel of the Sirius 630 (16U) Frame. 3.15.1 'EXP' Connector Pinout The Parallel control connector provided on both Master and Slave frames, extends the internal crosspoint control bus to the rear of each frame. This permits Master and Slave frames to be interconnected using the control cable supplied with Slave frames to construct multi-level routing switchers. Pin Function Pin Function 1 Enable 20 H/Shake 2 Level A3 21 Level A2 3 Level A1 22 Level A0 4 Dest A6 23 Dest A5 5 Dest A4 24 Dest A3 6 Dest A2 25 DestA1 7 Dest A0 26 A6 Source 8 A5 Source 27 A4 Source 9 A3 Source 28 A2 Source 10 A1 Source 29 A0 Source 11 Aud 0 30 Aud 1 12 Aud 2 31 F/Sync 13 Strobe 32 Dest A7 14 A7 Source 33 N/C 15 N/C 34 N/C 16 N/C 35 N/C 17 N/C 36 N/C 18 N/C 37 Chassis 19 Chassis Table 11. Issue 1 Rev 3 'EXP' Connector Pinout Page 25 © 2014 Snell Limited Sirius 600 www.snellgroup.com Installation 3.15.2 'RS485-1 and 2' Connector Pinouts 9 way 'D' type fixed sockets on frame. These ports are configured in the system database as either 'General Switcher' or 'Multi-drop' protocol, see Section 6 The pinout for these modes is as follows. Pin Pinout of socket when configured as: Multi-drop General Switcher 1 CHASSIS CHASSIS 2 Rx- Tx- 3 Tx+ Rx+ 4 0V 0V 5 n/c n/c 6 0V 0V 7 Rx+ Tx+ 8 Tx- Rx- 9 CHASSIS CHASSIS Table 12. 'RS485-1 and 2' Connector Pinouts 3.15.3 'Config A and B' RS232 Connector Pinouts This connector is configured so that it may be directly connected, pin for pin, with the COM port of a PC. 9 way 'D' type fixed sockets on frame. Pin Function 1 N/C 2 Rx 3 Tx 4 N/C 5 0V 6 DTR COMMON 7 RTS 8 CTS 9 Table 13. Issue 1 Rev 3 N/C 'Config A and B' RS232 Connector Pinouts Page 26 © 2014 Snell Limited Sirius 600 www.snellgroup.com Installation 3.15.4 RS485 Port 3 Pinout The configuration of this port is determined by the customer-defined protocol implemented by Snell. The port can either be RS485 or RS232 with pinouts as shown: RS232 RS485 Pin Function Pin Function 1 GND 1 GND 2 Tx 2 Tx- 3 Rx 3 Rx+ 4 GND 4 GND 5 N/C 5 N/C 6 GND 6 GND 7 DO NOT CONNECT 7 Tx+ 8 DO NOT CONNECT 8 Rx- 9 GND 9 GND Table 14. RS485 Port 3 Pinout 3.15.5 Alarms Pinouts One 15 way 'D' type fixed socket on Sirius 620 (7U) and Sirius 610 (4U) frame, and two on Sirius 630 (16U) to accommodate the extra PSUs. Note that the following states are for a powered frame which is functioning correctly: All Frames All Frames Pin 1 PSU 1 RELAY NORMALLY CLOSED 2 PSU 1 RELAY NORMALLY OPEN 3 FAN 1 RELAY NORMALLY CLOSED 4 FAN 1 RELAY NORMALLY OPEN 5 PSU 2 RELAY NORMALLY CLOSED 6 PSU 2 RELAY NORMALLY OPEN 7 FAN 2 RELAY NORMALLY CLOSED 8 FAN 2 RELAY NORMALLY OPEN 9 FAN CARD RELAY COMMON 10 PSU 1 RELAY COMMON 11 FAN 1 RELAY COMMON 12 FAN CARD RELAY NORMALLY OPEN 13 PSU 2 RELAY COMMON 14 FAN 2 RELAY COMMON 15 FAN CARD RELAY NORMALLY CLOSED Table 15. Issue 1 Rev 3 Function Alarms Pinouts - All Frames Page 27 © 2014 Snell Limited Sirius 600 www.snellgroup.com Installation The relay contacts change state to indicate any power or fan failure within the master frame. Pin Function 1 PSU 3 RELAY NORMALLY CLOSED 2 PSU 3 RELAY NORMALLY OPEN 3 FAN 3 RELAY NORMALLY CLOSED 4 FAN 3 RELAY NORMALLY OPEN 5 PSU 4 RELAY NORMALLY CLOSED 6 PSU 4 RELAY NORMALLY OPEN 7 FAN 4 RELAY NORMALLY CLOSED 8 FAN 4 RELAY NORMALLY OPEN 9 NOT CONNECTED 10 PSU 3 RELAY COMMON 11 FAN 3 RELAY COMMON 12 NOT CONNECTED 13 PSU 4 RELAY COMMON 14 FAN 4 RELAY COMMON 15 NOT CONNECTED Table 16. Alarms Pinouts - Sirius 630 (16U) Frame 3.15.6 Balanced AES Reference Pinout 9 way 'D' type fixed socket on frame. Pin Function Sirius 610 Function Sirius 630 (16U) 1 Ground Ground 2 AES balanced + AES balanced 1 + 3 Ground Ground 4 AES unbalanced Not connected 5 Not connected AES balanced 2 + 6 Ground Ground 7 AES balanced - AES balanced 1 - 8 Not connected Not connected Not connected AES balanced 2 - 9 Table 17. Issue 1 Rev 3 Balanced AES Reference Pinout Page 28 © 2014 Snell Limited Sirius 600 www.snellgroup.com Installation 3.16 Using the AES Reference In order to perform 'click-less' switching of digital audio signals, a 'cut' must be made during a point in the data stream when no audio is present. For this to happen all the digital audio signals must be 're-framed', or time-aligned synchronous with the AES reference, at the input stage. The Sirius 600 AES input and Input/Output cards are capable of re-framing AES audio at fixed sample frequencies, and the user must refer to the relevant user manual supplement for configuration details. Note that in a frame containing both a video and audio level, an audio cut is performed at the first audio pre-amble following a television field boundary (as derived from the video reference input). In this mode the router will switch each input according to the video reference configured in the system database, see Section 6. In an audio only frame, the switch will occur at the next audio pre-amble. The Sirius 600 router can accept unbalanced or balanced digital audio references, via the appropriate rear connectors. The Sirius 630 (16U) router needs two identical AES reference signals. These must not be wired together, as each input is terminated internally and one signal cannot drive the whole frame. The selector switch(es) next to the connectors must then be switched as follows: Unbalanced: use BNC(s) for reference(s) Balanced: use 9pin D type for reference(s) U B Fig 11. 3.17 Using the Video Reference Sirius 600 allows for vertical interval switching of both PAL and NTSC line standards. This is possible because reference signals of both standards can be connected to the master frame, and the control card will switch routes according to information held in it's database. This functionality is only restricted when the Nebula fixed database is in use, and the user must select the system reference to be either 525 or 625, see Section 6 of this manual for details. When a configured database is in use, you can individually select different references for each source. See the Nebula User Guide for details on editing the database. The Sirius 600 control card will switch NTSC video signals half way through line 10 of the next field, and PAL signals half way through line 6, providing a valid analogue reference signal is supplied to the frame, and the database is configured appropriately. The control card has status LEDs to indicate the presence of each reference, see Section 6.3. If no reference is detected, a 'crash' switch will be implemented. The database editor also allows the user to select between field and frame switching, on a source by source basis, for use in situations where associated equipment may not be field precise. The Sirius 630 (16U) frame, because it uses the 2434 control card, is further enhanced by including a 1080i HDTV reference input, which may only be selected when a configured database is in use. Issue 1 Rev 3 Page 29 © 2014 Snell Limited Sirius 600 www.snellgroup.com Sirius Gold 4. Sirius Gold Sirius Gold is a multi-format, expandable modular system, for high-end applications of 512 x 512 and above. The innovative design fully integrates with the existing Snell product range whilst incorporating latest design and best of breed technologies. Some of the key features are: • Broadband Crosspoints • Modularity • Built-in Nebula Control System • Serial or Ethernet Control 4.1 Ventilation As with any large routing system ventilation is an important consideration. Sirius Gold uses an active fan assisted ventilation system. The graphic shows the airflow through the frame. As can be seen air is drawn in at the bottom and distributed throughout the router. Key areas have their own ventilation system such as the Input/Output cards, the crosspoint cards, the power supplies, and the rear spine. Red Arrows Input/Output Modules Yellow Arrows Crosspoints Green Arrows PSUs Blue Arrows Rear connections (Spine Boards) Fig 12. Sirius Gold ventilation Flow The Crosspoint and Control cards (yellow arrows) have air sucked in at the bottom side vents. The air is forced up through the mid-section of the router by a push-pull system of fans. The fans at the bottom suck air in through the bottom side vents, and the fans at the top, pull the air up through the cards ensuring a smooth and continuous flow of air. The air then exits through the rear vents. Issue 1 Rev 3 Page 30 © 2014 Snell Limited Sirius 600 www.snellgroup.com Sirius Gold The Input and Output cards (red arrows) use a custom designed ventilation shaft system. Again air is sucked in at the bottom and forced up the shaft. The shaft has a series of holes, which direct air across the cards, and again out through the side vents. Because, in some applications, the rear spine has active components a dedicated airflow (Blue arrows) is used. The system uses a series of eight fans mounted on the back. The air is sucked into the rear cavity and over the active components and vented through the sides. The power supply modules (green arrows) are a sealed unit design and have an integral fan cooling system. They suck air in through their front grill and exit at the rear. Although Sirius Gold does use a sophisticated ventilation system, it is important not to leave the front doors open for an extended period of time. It is also important to leave an area free around the router to allow for airflow. Fig 13. The 1932 Fan Module In addition to the rear fans, Sirius Gold uses four 1932 fan modules; three fitted in the bottom and one in the top cavities. The three DC powered radial fans have their current consumption constantly checked in order to detect failure due to stalling, disconnection or burning out. Two LED's are located on the front edge of the card as follows: • Green: power is supplied to the module • Red: any fan fault Any faults are also reported to the Alarms connector on the rear of the frame, and also as serial data to the Ethernet port. Note: Ensure the flow of air through the vents is not restricted. This unit is very heavy. Issue 1 Rev 3 Page 31 © 2014 Snell Limited Sirius 600 www.snellgroup.com Sirius Gold 4.2 Frame Layout 4.2.1 Front Layout 2434 Control Card A 2434 Control Card B 2 42 9 2 42 8 2 43 4 24 2 3 8 x 2427 Local MonitoringCard 2428 Fan Monitor & Reference Card 2429 Monitoring Card 4 x 1908 PSU’s (1 located above each group of 16 cards) 19 32 3 99 1 39 91 3 99 1 39 91 3 99 1 39 91 3 99 1 39 91 3 99 1 39 91 3 99 1 39 91 3 99 1 39 91 3 99 1 39 91 3 99 1 39 91 3 99 1 39 91 3 99 1 24 27 24 27 39 97 39 97 39 97 39 97 39 97 39 97 39 97 39 97 39 97 39 97 39 97 39 97 39 97 39 97 39 97 39 97 39 97 39 97 39 97 39 97 39 97 39 97 39 97 3 91 3 3 91 3 39 97 3 91 3 24 27 3 91 3 39 97 39 97 39 97 39 97 39 97 39 97 39 97 39 97 39 97 39 97 3 99 7 39 97 3 99 7 39 97 3 99 7 39 97 3 99 7 39 97 3 99 7 39 97 3 99 7 39 97 3 99 7 39 97 3 99 7 39 97 3 99 7 39 97 3 99 7 3 99 1 39 91 3 99 1 39 91 3 99 1 39 91 3 99 1 39 91 3 99 1 39 91 3 99 1 39 91 3 99 1 39 91 3 99 1 3 99 1 39 91 39 91 3 99 1 3 99 1 39 91 16 x Input Cards 3 99 1 Inputs 24 27 39 91 39 91 39 91 3 99 1 3 99 1 39 91 3 99 1 39 91 39 91 3 99 1 1 93 2 19 32 Ventilation Unit 1 93 2 3 x 1932 Fan Module 4 x Crosspoint Cards Inputs Outputs 39 97 3 91 3 39 97 39 97 24 27 16 x Input Cards 16 x Output Cards 39 97 3 91 3 16 x Output Cards 3 91 3 39 97 3 91 3 24 27 16 x Output Cards 39 97 39 97 39 97 16 x Input Cards 39 97 39 97 39 97 Inputs 39 91 Outputs 3 99 1 39 91 4 x Crosspoint Cards Outputs 39 91 3 99 1 Inputs 39 91 3 99 1 Outputs 39 91 3 99 1 16 x Output Cards 39 91 3 99 1 16 x Input Cards 24 27 24 27 1932 Fan Module Fig 14. Front View of Snell Sirius Gold Router Fig 14. shows the front view of the router with the doors removed. The 39U frame may have up to 128 Input/Output cards fitted depending on the configuration. The Input and Output Card area is divided into eight sections. Each compartment (see Fig 15.) may have up to 16 cards plus one Local Monitoring card. Local Monitoring Card 2427 3991 3991 3991 3991 3991 16 x Input Modules Inputs 3991 3991 3991 3991 3991 3991 3991 3991 3991 3991 3991 Fig 15. Example of Input Card Layout This example shows 16 x 3991 HD Input cards plus 1 x 2427 Local Monitoring Card. Each card is held in place by side runners and electrically connected at the rear by a multi-pin socket. The card is designed to move freely in the side runners. If any resistance is felt, stop Issue 1 Rev 3 Page 32 © 2014 Snell Limited Sirius 600 www.snellgroup.com Sirius Gold immediately and re-position the card until it runs smoothly. The card fits firmly into the socket and should never be forced as damage may occur. Sirius Gold is compatible with all current Sirius Gold Audio and Video Input/Output cards. Take the usual electrostatic precautions when handling the cards. Electrostatic Damage Static precautions must be observed when inserting and removing all system modules Table 18. 4.2.2 Inserting and Removing Cards For details on Inserting and Removing cards see section 3.10. 4.2.3 Rear Layout Fig 16. shows the rear view of the Sirius Gold. For the purposes of this document, the sections in the Sirius Gold frame are lettered as follows, when looking at the frame from the front (the side with the door): 129 129 - 256 385 - 448 INPUTS 136 128 192 200 72 64 249 256 8 1 441 448 8 1 185 193 313 449 - 512 385 - 512 D 392 320 64 136 c 65 57 264 192 185 512 72 65 456 384 128 200 E 321 328 256 249 384 392 384 377 448 456 328 320 321 313 512 264 257 441 449 H 505 OUTPUT 65 - 128 OUTPUT 193 - 256 121 193 OUTPUT INPUTS 1 - 64 OUTPUT 257 F 1 - 128 57 129 505 OUTPUT INPUTS OUTPUT OUTPUT 449 377 321 - 384 A OUTPUT 385 257 - 320 B 121 G INPUTS 257 - 384 Fig 16. Inserting and Removing Cards Issue 1 Rev 3 Page 33 © 2014 Snell Limited Sirius 600 www.snellgroup.com Sirius Gold 4.3 Sirius Gold Cards 4.3.1 Sirius Gold Crosspoint Cards The Crosspoint cards are large PCB's (16U) and care should be taken when handling them both from a physical and an electrostatic point of view. 2 42 7 2 42 7 39 91 3 99 1 3 99 1 39 91 39 91 3 99 1 3 99 1 39 91 3 99 1 39 91 39 91 3 99 1 3 99 1 39 91 39 91 3 99 1 39 91 3 99 1 3 99 1 39 91 39 91 3 99 1 3 99 1 39 91 39 91 3 99 1 3 99 1 39 91 3 99 1 39 91 39 91 3 99 1 2 42 7 2 42 7 3 99 7 3 99 7 3 99 7 3 99 7 3 99 7 3 99 7 3 99 7 3 99 7 3 99 7 3 99 7 3 99 7 3 99 7 3 99 7 3 99 7 3 99 7 3 99 7 3 99 7 3 99 7 3 99 7 3 99 7 3 99 7 3 99 7 3 99 7 3 99 7 3 99 7 3 99 7 3 913 3 913 3 913 3 99 7 3 913 2 42 7 39 13 3 99 7 3 99 7 3 99 7 3 99 7 3 99 7 3 99 7 3 99 7 3 99 7 3 99 7 3 99 7 3 99 7 3 99 7 399 7 3 99 7 399 7 3 99 7 399 7 3 99 7 399 7 3 99 7 399 7 3 99 7 399 7 3 99 7 399 7 3 99 7 399 7 3 99 7 399 7 3 99 7 399 7 2 42 7 4 x Crosspoint modules 2 42 7 39 13 3 99 7 39 13 3 99 7 39 13 39 13 3 99 7 39 13 2 42 7 3 99 7 39 13 39 13 39 13 39 13 39 13 39 13 3 99 7 3 99 7 4 x Crosspoint modules 3 99 1 39 91 3 99 1 39 91 3 99 1 39 91 3 99 1 39 91 3 99 1 39 91 3 99 1 39 91 3 99 1 39 91 3 99 1 39 91 3 99 1 39 91 3 99 1 39 91 3 99 1 39 91 3 99 1 39 91 3 99 1 39 91 3 99 1 39 91 3 99 1 39 91 3 99 1 39 91 Fig 17. Sirius Gold Crosspoint Cards Fig 17. shows the arrangement of the Sirius Gold Crosspoints, located in the front middle section of the frame. • 3913 HD, SD, and AES Crosspoint Crosspoints are normally supplied and fitted in pairs. Fig 17. shows that the two cards are mounted vertically, and a factory fitted link card passes signals between cards fitted in the top and bottom halves of the frame. To allow a more direct signal path the bottom card is reverse mounted facing the opposite direction (see graphic). Issue 1 Rev 3 Page 34 © 2014 Snell Limited Sirius 600 www.snellgroup.com 1 Inputs 1 - 256 64 129 Sirius Gold 192 257 320 385 448 256 x 64 256 x 64 256 x 64 256 x 64 Xpoint Xpoint Xpoint Xpoint 256 x 64 256 x 64 256 x 64 256 x 64 Xpoint Xpoint Xpoint Xpoint Inputs 257 - 512 65 128 193 256 321 384 449 512 Fig 18. Sirius Gold Crosspoint Structure Fig 18. shows the crosspoint structure. The crosspoint cards are as viewed from the front of the frame. Routes that pass between the upper and lower frame pass through both crosspoint cards in the same pair. The system uses four logical 512 x 128 crosspoint cards in four physical pairs. Test Points LED’s 3913 Fig 19. Edge View of Sirius Gold 3913 Crosspoint The Sirius Gold 3913 Crosspoint has no user adjustments. The main four test points are easily accessible along the edge for measuring. There are also four LED's which give a visual indication of the three voltage rails: 3V3, 2V5, and 1V2. The Hello LED gives an indication of control and polling as it interrogates each condition. 4.3.2 Sirius Gold Fan Monitoring and Reference Card (2428) The 2428 buffers and produces copies of the references generated by the 2429 for the video and audio ADC / DAC cards in the Sirius Gold frame. The 2428 also generates the 12V required for powering the 8 fans in the rear of the Sirius Gold frame, and has fan fail detectors for monitoring these fans. Issue 1 Rev 3 Page 35 © 2014 Snell Limited Sirius 600 www.snellgroup.com Sirius Gold FAIL Fan 5 Fan 6 Fan 7 Fan 8 Fan 9 Fan 10 Fan 11 Fan 12 AN625 AN525 DG625 DG525 ANVID AES VLOCK 3V3 5V 12V Fig 20. Sirius Gold Fan Monitoring and Reference Card (2428) The 2428 has the following inputs: • 625 line analogue video (from the same rear connector panel reference input). • 525 line analogue video (from the same rear connector panel reference input). • 625 line digital video (via a dedicated rear panel connector). • 525 line digital video (via a dedicated rear panel connector). • Balanced AES (via a dedicated rear panel connector). • Unbalanced AES (via a dedicated rear panel connector). FAIL Fan 5 SW1 Fan 6 Fan 7 Fan 8 Fan 9 Fan 10 Fan 11 Fan 12 AN625 AN525 DG625 1 2 3 4 DG525 ANVID AES VLOCK 3V3 5V 12V Fig 21. Fan and Monitoring Card Showing SW1 Switch SW1 defines which of the two analogue video inputs is used as a reference (see Table 19.). The AES references will run at a sample rate of 32kHz, 44.1kHz or 48kHz. When the AES reference is locked to analogue video or is free running, an AES reference is generated, and switches on the 2428 determine the sample rate generated. When the AES reference is locked to the balanced or unbalanced AES input the sample rate will follow that applied to the Issue 1 Rev 3 Page 36 © 2014 Snell Limited Sirius 600 www.snellgroup.com Sirius Gold input. The phase shifted AES reference output leads the other AES reference outputs by approximately 1uS (@ 48kHz). This signal feeds the 2434 controller to provide the correct switching point. A 2428 must be fitted if the crosspoint switching point is required to be referenced to an AES reference. The 2428 generates sixteen 27MHz clocks and 4 color field ID signals which feed the ADC & DAC cards in the frame. There are eight 27MHz clocks 625 line operation, and another eight 27MHz clocks for 525 line operation. For each standard 2 color field ID signals are also supplied. For each standard a corresponding digital video and analogue video reference must be applied to the rear of the frame. Analogue video references are obtained from the same connector that feeds the 2434 controller, and the digital video references have their own dedicated connector. The 27MHz clocks are derived from the digital video references as this provides a low jitter clock, and the color field ID is derived from the analogue reference. The 2428 needs both an analogue and digital reference applied if it is to correctly generate the reference required for the video ADCs/DACs. The 2428 provides eight 12v power lines for driving the fans in the rear of the frame, LEDs on the front edge of the card indicate if a fan has failed. SW Position Purpose Sets the analogue video input used as a reference by the AES generator: 1 2 On (0) – 625 line analogue input Off (1) – 525 line analogue input 1 3 FS0 1 4 FS1 (On = 0) 1 FS2 2 Table 19. Switch Descriptions FS [2..0] Sampling Frequency (kHz) 000 Audio Clock Generation Disabled 001 32 010 44.1 011 48 Table 20. 4.3.2.1 Replacing a Rear Fan There are eight fans fitted to the rear of the frame. As previously described they are monitored and the appropriate LED will indicate a failure. The fans are very reliable, but it is important in the case of a failure to be able to replace them safely and speedily. The fans are hot swappable but great care should be taken not to drop tools inside the frame. The fan assembly edges are sharp. Issue 1 Rev 3 Page 37 © 2014 Snell Limited Sirius 600 www.snellgroup.com Retaining screws Sirius Gold Retaining screws Fig 22. Rear Fan Screws 1. Unscrew the four retaining screws, see Fig 22. The screws are of the captive type and will remain with the assembly. 2. The fans may be electrically disconnected using the plug and socket connector (stereo jack). There is no need to unsolder any of the leads; the replacement fan is supplied with a pre-fitted plug. There is also no need to unscrew the fan from its assembly, as the supplied replacement is a complete assembly. 3. Connect the power lead plug (Stereo Jack) of the replacement fan assembly into the socket. The fan should power-up. Be very careful of the exposed rotating fan blades. 4. Position the power lead safely in the cavity, and screw assembly back onto the router frame. 5. The fan fail LED should now be showing normal. When the fan assembly is removed, the fan blades are exposed, so care should be taken to keep fingers clear whilst the fans are rotating. 4.3.3 Sirius Gold Monitoring Card (2429) The Sirius Gold Monitoring Card (2429) is described in section 4.4.1. 4.4 Monitoring Architecture Each Input/Output card carries an 8x1 crosspoint which routes any of that cards inputs/outputs to a dedicated monitoring output. The monitoring outputs from each Input/Output card are then routed through the motherboard to the 2427 card. A 2427 card is fitted in each section of the frame and contains a 16 x 2 crosspoint feeding a video monitoring output and an audio monitoring output. The two monitoring outputs from each 2427 card are carried through the motherboard to the 2429 fitted at the top. The 2429 contains a 16x2 crosspoint that feeds a video monitoring output and an audio monitoring output on the rear of the frame. An analogue copy of each of these signals is also provided. It is therefore possible to simultaneously monitor a video signal and an audio signal from any slot in the frame. 4.4.1 Sirius Gold Monitoring Card (2429) The 2429 card is a monitoring card for use in Sirius Gold only. The 2429 card is strongly based on the 2426 card, but has some modifications to allow it to work properly with signals originating from the lower half of the frame. The 2429 card also has the reference generation circuitry removed, as this is not required on the Sirius Gold (in a Gold frame references are generated from the 2428 card). Issue 1 Rev 3 Page 38 © 2014 Snell Limited Sirius 600 www.snellgroup.com 128 cards (64 Inputs plus 64 Output s) Sirius Gold Local Monitoring Car d 2427 8 x cards Monitoring Card 2429 16 x 2 XPT 8x1 XPT Table 21. 16 x 2 XPT Video Monitoring Audio Monitoring (Balanced) Overview of the Sirius Gold Monitoring The video and audio monitoring outputs from every 2427 card feed into the 2429 card, and the 2429 card has a 16 x 2 crosspoint, which allows audio and video to be simultaneously monitored. The video monitoring signal is re-clocked before being fed to the rear connector. Table 22. TP7 TP3 TP2 TP1 -12VA 0V +12VA +5V +3V3 5V SW1 TP6 3V3 The audio monitoring signal is fed out in both balanced and unbalanced formats, and an analogue audio copy is also provided. 1 2 3 4 2429 Monitoring Card The key voltage rails may be measured at the test points along the edge. The two LED's indicate the presence of the 3V3 and 5V voltages. There are no customer user adjustments on the 2429 card. Issue 1 Rev 3 Page 39 © 2014 Snell Limited Sirius 600 www.snellgroup.com Sirius Gold 4.5 Sirius Gold Rear Connectors HD Syncs AES Out Ethernetconfiguration ports used in place of RS-485 Port 2 A B AES Ref & LTC A B AES Ref Unbalanced RS-232 C onfiguration Port IP Address MSN/ LSN Audio Out SDI Ref 525 SD I Ref 625 1 AV Out (not used) 2 Alarms 3 SDI Out AN Video looping Ref 525 Table 23. AN Video looping Ref 625 R S485 Panel / C ontrol Ports For connecting other router frames Sirius Gold Rear Connectors 4.5.1 Sirius Gold Inputs and Outputs Table 24. lists the Sirius Gold ports and connectors: 625 looping analogue reference 2 x BNC 525 looping analogue reference 2 x BNC AES unbalanced reference 1 x BNC AES balanced reference 1 x 9-way Timecode - LTC only 1 x 9-way ** (for future use) Looping HD Syncs (Tri-level syncs) 2 x BNC Ethernet to each control card 2 x RJ45 RS-232 port - configuration 1 per card 2 x 9-way RS-422 control ports 3 x 9-way External controller Automation Spare (could be emergency x-y panel) GPI failure signals Table 24. 1 x 37-way Sirius Gold Connectors There is an internal communications port between the 2 controllers, and two local SPI buses to the top row and bottom row of cards for internal monitoring information. ** these functions are not currently implemented, but the connections are provided for any future developments. The third port is for customer protocol via the Beck chip - see The Sirius Gold System User Guide 5.8.2. All the ports can be configured to any of the protocols currently implemented on routers such as General Switcher, General Remote etc. This increases the flexibility of the ports for the user. Issue 1 Rev 3 Page 40 © 2014 Snell Limited Sirius 600 www.snellgroup.com 4.5.1.1 Sirius Gold Expansion Port 37 way 'D' type fixed socket Pin Description Pin Description 1 Enable (Freeway) 20 Handshake 2 Level A3 21 Level A2 3 Level A1 22 Level A0 4 Dest A6 23 Dest A5 5 Dest A4 24 Dest A3 6 Dest A2 25 Dest A1 7 Dest A0 26 Source A6 8 Source A5 27 Source A4 9 Source A3 28 Source A2 10 Source A1 29 Source A0 11 Audio 0 30 Audio 1 12 Audio 2 31 F Sync 13 Strobe 32 Dest A7 (Sirius Gold) 14 Source A7 (Sirius Gold) 33 Not Connected 15 Not Connected 34 Not Connected 16 Not Connected 35 Not Connected 17 Not Connected 36 Reserved 18 Not Connected 37 0V 19 OV Table 25. 4.5.1.2 Expansion Port Connections Alarm Connector 37 way 'D' type fixed socket Note that the following states are for a powered frame, which is functioning correctly. Pin 1 PSU 1 relay normally open 2 PSU 1 relay normally closed 3 PSU 2 relay common 4 PSU 3 relay normally open 5 PSU 3 relay normally closed 6 PSU 4 relay common 7 FAN CARD 1 relay normally closed 8 FAN CARD 1 relay normally open 9 FAN CARD 2 relay common 10 FAN CARD 3 relay normally closed 11 FAN CARD 3 relay normally open 12 FAN CARD 4 relay common 13 FAN CARD 5 relay normally closed 14 FAN CARD 5 relay normally open 15 FAN CARD 6 relay common 16 Table 26. Issue 1 Rev 3 Function Not connected Alarm Connector Port Connections Page 41 © 2014 Snell Limited Sirius 600 www.snellgroup.com Pin Function 17 Not connected 18 Not connected 19 GND 20 PSU 1 relay common 21 PSU 2 relay normally open 22 PSU 2 relay normally closed 23 PSU 3 relay common 24 PSU 4 relay normally open 25 PSU 4 relay normally closed 26 FAN CARD 1 relay common 27 FAN CARD 2 relay normally closed 28 FAN CARD 2 relay normally open 29 FAN CARD 3 relay common 30 FAN CARD 4 relay normally closed 31 FAN CARD 4 relay normally open 32 FAN CARD 5 relay common 33 FAN CARD 6 relay normally closed 34 FAN CARD 6 relay normally open 35 Not connected 36 Not connected 37 Not connected Table 26. Sirius Gold Alarm Connector Port Connections Router Monitoring Status Reporting: This is done through the Ethernet port using SNMP protocol. The power supplies report fan fail or power fail status. The cards are able to report what type they are, the crosspoint cards are able to relay video standard detection and some audio cards can report valid signals however this is not currently available to the system controllers. 4.5.1.3 Ethernet Port: Any router database configuration is done through the RS232 ports using the Snell router editor program. Configuration of the Ethernet set-up is via a custom program or using a web browser. Panel names and source destination names will all be done on a remote PC using editors and downloaded to the router database. Online changes can also be done. IP addressing is achieved by setting each router with a unique static IP address. The units are shipped with dynamic IP enabled. There is a custom piece of software shipped with the router that enables the user to find the device on their network and to configure it as required. The chip can be given a unique name, location and system identifier, to show up on a local SNMP client. Issue 1 Rev 3 Page 42 © 2014 Snell Limited Sirius 600 www.snellgroup.com Sirius Gold 4.6 Connecting Your Router Table 23. shows the rear connectors. If SMPTE RP168 compliant switching is required, an appropriate reference must be connected such as an analogue video 'black and burst' feed of either 625 line PAL, 525 line NTSC SD, or a tri-level sync; or all three for a mixed standard system. A digital audio router may require a balanced or unbalanced AES reference if it is not being run synchronously with video. To connect a Nebula database editor, use the 'RS232 configuration port' for 'CTRL A', this will work unless a controller changeover has occurred, in which case the 'CTRL B' port must be used. An external control system may be connected using an Ethernet or RS485 serial port. Ensure that the jumpers on the 2434 control card are configured appropriately by referring to the 'Configuring the control module section of the main Sirius Gold user guide. 4.6.1 Controlling Your Router Every Sirius Gold router must have at least one control card; this may be a 2434 or 2435. Two of the same type may be fitted for redundancy. The 2434 card is the Nebula controller, which holds the system database. The 2435 is an 'interface' card and is only fitted in frames that are 'slaved' to frames with a 2434 Nebula controller. The only difference between the two card types is that the 2434 is fitted with a 2445 sub-board, and the 2435 is not. 4.6.2 Configuration The configuration is described in the Nebula manual. 4.7 Power Supplies The Power supplies are fitted in the top section of the frame. The door is constructed of heavy gauge metal and care should be taken when removing it from the frame. Fig 23. Sirius Gold Top Door Issue 1 Rev 3 Page 43 © 2014 Snell Limited Sirius 600 www.snellgroup.com Sirius Gold 4.7.1 Releasing the door The door is held in place by two side catches, see Fig 24. Support the weight of the door and turn the knurled knobs CCW to release the catches. The catches have a self return spring mechanism and need to be held open. Take care as the doors are relatively heavy and upon release will separate from the frame completely. Fig 24. Door Catch 4.7.2 Fitting the Door Offer the door up to the frame and press firmly to fit into place. Ensure that each of the catches click into place before supporting the weight. 4.7.3 Power Supplies Sirius Gold uses a minimum of two PSU's, which may be fitted, in any of the slots. The normal redundancy configuration uses four power supplies. Fig 25. Power Supplies HIGH VOLTAGE The Power Supplies are sealed units They do not contain any serviceable items Each power supply is a sealed unit and does not contain any serviceable items. The units have auto-sensing inputs, which can accept inputs of between 100 - 240 Vac ±10% 50/60Hz. The IEC mains connectors are fitted with a 10A fuse and should always be replaced with the same type. The output is 48V and is fed to all the frame cards. All four power PSU's are always live and are electrically arranged to share the load equally between them. The units are hot swappable. Issue 1 Rev 3 Page 44 © 2014 Snell Limited Sirius 600 www.snellgroup.com Sirius Gold 4.7.4 Removing a Power Supply Unit (PSU) The units are located in the top of the frame and are heavy, so be prepared to support their weight. 1. Remove the retaining plate by turning the two knurled knobs CCW. The screws are spring-loaded and captive; they will not separate from the retaining plate. 2. Using a screwdriver or a similar tool, release and swing the handle into the serviceable position. 3. Pull the PSU slowly out whilst supporting its weight. Fig 26. Right-Hand PSUs 4.7.5 Fitting a Replacement Power Supply 1. Offer the PSU to the frame. Keeping the unit straight and level, push into place. 2. Close handle by rotating upwards and inwards. 3. Fit retaining plate. 4. PSU will now be live. 4.8 Specification General PSU monitor Failure alarm relay and reported on SNMP I/F Fan monitor Failure alarm relay and reported on SNMP I/F Control Control 2 x RS-485, panel/remote control 2 x Ethernet Configuration 1 x RS-232 main (1 x RS-232 backup optional) Expansion 1 x parallel port Reference Analogue loop through 625 and 525. AES-11 for audio. HD tri level sync Issue 1 Rev 3 Page 45 © 2014 Snell Limited Sirius 600 www.snellgroup.com Sirius Gold Connectors Power 3 way IEC PSU/Fan monitor 37 - way D-type socket Control 9 way D-type socket Configuration 9 way D-type socket Control expansion 37 way D-type socket AES Ref 9 way D-type socket or BNC Mechanical Gold - 39U high 19 inch rack mounting x 490mm (19 inch) deep Environmental Cooling Fan assisted 0-40°C air inlet temperature (operating) 0-70°C storage. Issue 1 Rev 3 Page 46 © 2014 Snell Limited Sirius 600 www.snellgroup.com 5. The Nebula Control System 5.1 Controlling Sirius All Master Sirius routers are supplied with a built-in 'Nebula' control system, meaning that control panels and Under Monitor Displays may be directly connected to the unit. Any router control system requires a 'database' of configuration details, such as the number of logical levels, signal types and control panel functions. For ease of use, such a database is supplied with Nebula, known as a 'fixed' database, the exact details of which are described in the Nebula User Guide. Alternatively, the user may connect a database editor to the unit, using the supplied software and a cable, and use either a sample database, or edit their own custom database. The sample databases are located on the Snell user manual CD ROM, in the control section and are described in the Nebula User Guide. 5.2 Control Module Functions The control module is fundamental to the operation of the Sirius routing system. It is a microprocessor-based module with battery backed-up non-volatile memory (NVRAM). The system code is contained in flash memory, allowing rapid boot-up and easy code upgrades. The NVRAM holds a record of the system crosspoint settings (known as the 'tally table'), ensuring that the router status is maintained following power interruptions or signal card removal. It also holds an exact record of the router crosspoint hardware, known as the 'configuration', which allows the control card to check that all crosspoints are present following a reset or power down. Finally, the system database is also held in this memory. The control module connects to all router crosspoint cards using a parallel control bus, this is used to detect card presence and for setting crosspoints. Input and output cards are detected by the control module using a serial bus, while PSUs and fan modules connect to the controller via logic lines, which pass all status data. All external communication is passed through the control module, whether it is for remote control of the router, or for the connection of control panels and Under Monitor Displays. Finally, the control module detects reference signals, both audio and video, and determines at what point to make a crosspoint switch, in the absence of valid reference signals a 'crash' switch will be implemented. The control module has configuration switches which determine the operation of the system, details of these switches are given in the next section of this manual. Some of these switches are used to configure the number and size of logical levels that the user wishes to implement, these levels must then correspond to the database in use. At its upper limit, Sirius may have 8 levels, each of 256x256 in size. Such a configuration would require eight 16U Sirius frames, one being designated the 'master', and containing the control module, the others being 'slave' frames, requiring only an 'interface' module. The smallest level size permitted is 16x16, which would allow 8 levels of 16x16 to occupy a single 7U frame, under the control of a single control module. An important distinction between the Sirius 16U frame and the 7U version is the level 'boundary'. A fully equipped 7U router may be 'partitioned' into different levels, usually of different signal types. For instance, a 7U frame could contain a 64x64 video level and a 64x64 audio level. The smallest level size for a 7U frame is 16x16, and all levels can only be a multiple of this dimension, i.e. 32x32, 48x48, 64x64, 80x80, 96x96, 112x112 or 128x128. In a 16U frame the level boundary is 32, therefore the smallest level size is 32x32, and level sizes increase by 32x32 up to a maximum of 256x256. This level partitioning is configured using HEX switches on the control and interface cards, as detailed in the next chapter. Issue 1 Rev 3 Page 47 © 2014 Snell Limited Sirius 600 www.snellgroup.com 5.3 An Example Multi-level System 256x256 mixed SDV/analogue Master Sirius frame with control module configured for 1 level of 256x256 and 5 level database 128x128 HDTV Slave Sirius frame with interface module configured for 1 level of 128x128 64x64 balanced AES Slave Sirius frame with interface module configured for 2 levels of 64x64 Freeway frame, no control card, 2 crosspoint cards set to be level 5 64 port RS422 Fig 27. Example Multi-level System General notes for configuring a multi-level system: • The Sirius control module must be in the first frame in the control chain. • The Sirius frame with the control module is known as the Master frame. • The Master frame does not have to contain the primary level. • Slave Sirius frames need an interface module in place of a control module. • Slave Freeway frames do not require a control module. • Control interconnect cables are supplied with Slave Sirius or Freeway frames. • Slave AES or Analogue Audio levels require an AES reference to ensure click-free switching, see Section 3.12, but do not need a video reference. 5.4 Control Module and Editor Versions Since the Sirius 4U and 7U frames were developed as replacements for Freeway, they were able to make use of the system structure built into the Freeway control card, which is now used as the basis for these frames. However, with the development of the Sirius 16U frame, and the consequent increase in the maximum router size from 128x128 to 256x256, a new control structure was required. For this reason there are currently two builds of Sirius control module, the 2430 for the 4U and 7U frames, based around the Freeway control card, and the 2432 for the 16U frame, based around a new control card. Later updates for Sirius Gold means that Sirius 600 systems are now supplied with a 2434 controller which expands the maximum router size to 512 x 512. Issue 1 Rev 3 Page 48 © 2014 Snell Limited Sirius 600 www.snellgroup.com 5.4.1 2430 Control Module The Sirius 4U and 7U control module consists of a 2445 processor sub-board fitted to a 2434 carrier card. The 2445 has the same electronics as the Freeway control card and uses battery-backed RAM to hold the database, tally table and configuration data. 5.4.2 2431 Interface Module Used in the 4U and 7U Sirius Slave frame, and consists of the 2430 control module without the 2441 sub-board. 5.4.3 2432 Control Module A new build of carrier card, with a new design of control module sub-board, now designated 2443. The 2443 uses newer technology for the Non-Volatile RAM, known as FRAM (Ferro-electric RAM), for which no battery is required. Replaces the 2430 for use in all frames. 5.4.4 2433 Interface Module Used in all Sirius Slave frames, and consists of the 2432 control module without the 2443 sub-board. Replaces the 2431. 5.4.5 2434 and 2435 • 2434: Updated version of 2432 using Nebula V3 databases. Expands the router size to 512 x 512. • 2435: Updated slave interface to be used with the 2434 controllers in expanded systems. 5.4.6 Snell Router Editor Early 4U and 7U Sirius routers used the same control processor as Freeways, fitted to a 2430 Sirius controller. These cards use the Snell router editor for database configuration. 5.4.7 Nebula Editor 2432 control cards have a different database structure and additional features. These cards require the Nebula Editor. Note: Issue 1 Rev 3 Important Notes: • 2430s will not work with Nebula Editors • 2432s will not work with Snell Router Editors • 2430s cannot be mixed with 2432s in the same frame • 2431s cannot be mixed with 2433s in the same frame • 2434s cannot be mixed with 2430s or 2432s in the same frame • 2435s cannot be mixed with 2430s or 2432s in the same frame Page 49 © 2014 Snell Limited Sirius 600 www.snellgroup.com 5.5 Dual Redundant Controller Operation Since the Sirius control module not only holds the database, but is also the channel of communication with the routing switcher, its failure would render the system inoperable. When dual control modules are fitted, a fully redundant control system is available, where changeover is both transparent and immediate. When two control modules are fitted in a Sirius control system, one must be designated 'Master' and the other as 'Slave', using switches on the module. See the next section of this manual. In a dual control system one module will always be 'ACTIVE' while the other is 'IDLE'. In the event of the 'ACTIVE' controller failing, the 'IDLE' controller will take over control of the frame and become 'ACTIVE'. On power up, the control module designated MASTER will become 'ACTIVE'. Every main loop, the software checks whether a changeover has occurred. When a controller changes state from 'IDLE' to 'ACTIVE', a message is issued to the remote control ports, such that any external system, such as Aurora, will be able to report the change. All data is synchronised constantly between the dual controllers, using an internal serial link. This data includes the tally table, configuration and database, ensuring that in the event of a changeover no crosspoints change and all configuration parameters remain the same. Since all control ports and reference signals connect only to the active controller, using tri-state drivers, a controller changeover will be transparent to the user. A controller changeover may be forced by the user by either pressing the reset button on the active controller, or by removing the active controller. In the event of a second controller, configured as a slave, being plugged into a single controller system, all data is automatically transferred from the active controller. Do not press the reset on the ACTIVE control module or remove the ACTIVE module after plugging in the IDLE controller. It takes up to ten minutes to download the database. If the reset is pressed during this time ALL DATABASE SETTINGS WILL BE LOST, and the default database and tally table loaded. Both the Master and Slave modules have an RS232 configuration port, and only one of these will ever be active at any time, being the port associated with the Active controller. The RS232 port for the Idle controller will always be disabled. If the user needs to load or edit a system database, they must connect the editor to the active port, any attempted connection to the idle controller will fail. Issue 1 Rev 3 Page 50 © 2014 Snell Limited Sirius 600 www.snellgroup.com 5.6 System Diagram Fig 28. shows the interconnection of control modules within the Sirius and Freeway systems: Serial ports for remote control (General Switcher), and/or direct connection to control panels and UMDs (Multi-drop) 2 RS232 configuration ports. Port disabled on Idle controller Master Frame 2434 Control bus for connecting Master frames to slave Sirius and Freeway frames Control Module 2445 Serial link for synchronizing crosspoint and configuration data 2434 2445 Slave Frame 2435 Interface Module Freeway slave frame (no control card required) 2435 Logical limit of system size is 8 levels of 5122 routing, level mapping is configured on 2434 module switches in Sirius and crosspoint cards in Freeway Fig 28. System Diagram Issue 1 Rev 3 Page 51 © 2014 Snell Limited Sirius 600 www.snellgroup.com Configuring the Control Module 6. Configuring the Control Module 6.1 Choosing a Fixed or Editable Database In order to use the built-in Nebula control system, or control Sirius 600 from another control system, such as Aurora, the user must configure the Sirius 600 control module appropriately. Any router control system requires a 'database' of configuration details, such as the number of logical levels, signal types and control panel functions. For ease of use, the control module has a 'fixed' control database embedded in it's program code, which the user may select to activate, enabling a basic system to be controlled 'out-of-the-box', either locally or remotely. Full details of this database are described in the Nebula User Guide. If the user needs to program the system with their own data, such as source and destination names, non-standard level sizes or the ability to use audio parameters, then the Windows based editor will be required to edit a 'configurable' database. If the user decides to use a 'configurable' database they should refer to the Nebula User Guide, which explains the installation and connection of the editor. Having done this, a selection of 'sample' databases are also available on the supplied CD ROM, which may be used directly, or edited for the users own purpose. 6.2 The Sirius 600 Control and Interface Modules The Sirius 600 control module consists of a processor sub-board fitted to a carrier card. Both cards have configuration switches which determine the operation of the system, details of these switches are given in the following sections. If the users system includes any slave frames, each of these will also have a control module, but it will not have the processor sub-board fitted, this module will be referred to as the 'interface' module and is given the part number 2431, 2433 or 2435. There are three builds of Sirius 600 control module, the 2430, 2432 and 2434 for use with the Sirius 610 (4U) and Sirius 620 (7U) Master frames only, and its replacements the 2432 and 2434 for use with all frames. 6.2.1 2430/2/4 Control Modules RESET 2441 HC12 STATUS 1 2 3 gnd 3v3 5v pwr Fig 29. 2430/2/4 Control Module 6.2.2 2431/3/5 Interface Modules 2 3 4 5 6 RESET 7 8 2441 HC12 STATUS 1 2 3 gnd 3v3 5v pwr Fig 30. 2431/3/5 Interface Module Issue 1 Rev 3 Page 52 © 2014 Snell Limited Sirius 600 www.snellgroup.com Configuring the Control Module 6.3 2441/3/5 Configuration Switches These switches are basic to the operation of the control system, it is therefore important that reference is made to the following table before the system is used: Function Switch SW 2 Selection OFF ON 1 MASTER/SLAVE SELECT SLAVE MASTER 2 P CLOCK SELECT 10 MHz 20 MHz 3 SYSTEM RUN MODE NORMAL TEST 4 RS232 PORT BAUD RATE 9Sirius 600 38400 5 DEFAULT TRIGGER SELECT 625 525 6 RE-CONFIGURE MANUAL AUTO 7 DATABASE TYPE FIXED CONFIGURE 8 CONTROL MODE GENERAL SWITCHER PANELS Table 27. 2441/3/5 Configuration Switches 6.3.1 Switch Descriptions SW2_1 Master/Slave select is used, in dual control situations, to assign Master/Slave status to the 244X control modules. One module would be set to MASTER and the other to SLAVE so that on reset or power up the Master 244X powers up first and, hence, always becomes the active controller. SW2_2 P clock select is used to select between 10 MHz and 20MHz uP clock frequency, the lower rate is only used for debugging purposes. SW2_3 System Run Mode determines which mode of operation the Sirius 600 powers up in (i.e. NORMAL or TEST). NORMAL is the standard mode of operation. TEST selects a special test mode where various features of the 244X hardware can be tested by Snell. SW2_4 RS232 port BAUD rate select. This port is used by the Windows database editor which runs on a PC using it's COM port. The editor software will automatically detect the BAUD rate configured, and therefore this rate only needs changing to 9Sirius 600 BAUD if the PC being used has difficulty communicating at 38400 BAUD. SW2_5 Default trigger select is used to select between 625 or 525 reference to be assigned to each source for the fixed databases. SW2_6 Reconfigure selects between AUTOmatic reconfigure of cards in the system on power-up or reset and MANUAL, in which the system configuration is compared to that held in non-volatile memory. It is recommended that during initial configuration the switch be set to AUTO, and when the final desired configuration is achieved, the switch changed to MANUAL. In this way the control card will always look for the intended system card configuration, and if cards or slave systems appear after the initial power-up, they will not be de-configured from the system. SW2_7 Database Type selects whether to use the fixed, non-editable database or the editable one. SW2_8 Control mode is used in conjunction with sw2_7 to select which protocol the serial control ports will use. 'GENERAL' configures both RS485 ports to support General Switcher protocol. 'PANELS' configures both RS485 Remote ports to support Multi-drop Communications protocol. See the next section for a description of these protocols. Issue 1 Rev 3 Page 53 © 2014 Snell Limited Sirius 600 www.snellgroup.com Configuring the Control Module Diagnostic LEDs Switch 2 Reset Button Fig 31. 2441/3/5 Control Module 6.4 2441/3/5 Diagnostic LEDS The 8 yellow diagnostic LEDS on the 2441/3/5 have the following definitions: LED Function 1 POWER ON 2 RESET 3 CONTROL CARD ACTIVE Flashing at 2Hz - ACTIVE CONTROLLER 4 Flashing at 1Hz - STANDBY CONTROLLER 5 CROSSPOINT SET - FLASHES WHEN SET 6 NO HANDSHAKE FROM A MODULE 7 525 REFERENCE INPUT DETECTED 8 625 REFERENCE INPUT DETECTED 4,8 4 on & 8 flashing: R/W error with RAM 4,7 Table 28. 4 on & 7 flashing: Checksum error in EPROM 2441/3/5 Diagnostic LEDS 6.5 Reset Buttons The 2430, 2432 and 2434 control modules have reset buttons on the front edge labelled 2440, 2442 and 2444, which perform exactly the same function as the reset button on the sub board (which is not normally accessible). This reset causes the processor to re-boot, a process that takes only a few seconds, it will NOT lose the system database or change any crosspoint settings. If switch 2_6 on the 2441/3/5 card is set to 'AUTO', a reset will also force the control module to interrogate all the cards in the frame and update it's configuration information. It is therefore important to perform a reset whenever the system size has been increased or decreased, and then set switch 2_6 to MANUAL, to avoid over-writing this configuration should the system be partially powered on a reset. Issue 1 Rev 3 Page 54 © 2014 Snell Limited Sirius 600 www.snellgroup.com Configuring the Control Module All modules also have a Reset button labelled 'HC12', which forces the on-board processor, common to both modules, to re-boot. This action will not cause any change of status, but will interrupt all control functions for several seconds. Both modules may be safely 'hot plugged', which performs the same function as a reset. 6.6 Control Port Details Sirius 600 has three serial and two Ethernet ports available on the rear connector panel as follows: • 2 x RS485 ports (9 pin D type), common to both control cards but only connected to the active controller, configured by the system database • 1 x RS232 Editor port for each control card (9 pin D type) for connecting directly to a PC COM port • 1 x Ethernet port (RJ45) for each control card, available as an alternative to the second RS485 port, as configured by the 2445/2/4/4 jumper setting (see Section 5.8.3). The second RS485 port must be configured for General Switcher protocol in the database for this port to function. • A third serial port available as an alternative to the Ethernet port (2432 and 2434 only), as configured by the jumper settings, which also configure this port to be RS232 or RS485. This port is intended for a customer specified control protocol implemented by Snell, and therefore by default will be inactive. When using the Fixed Database (as selected by control module switch 2_7), the RS485 ports must then be configured using control module switch 2_8. See the previous section for these details. When using an editable database, the user must select from one of four protocols for each of these ports, as follows: • General Switcher Protocol (SW-P-02) • Multi-drop Communications Protocol (SW-P-06) • General Remote Control Protocol (SW-P-08), not available with fixed database • Simple Switcher Protocol (SW-P-03), not available with fixed database 6.7 Control Protocol Descriptions 6.7.1 Snell General Switcher Protocol (SW-P-02) Snell General Switcher Communication Protocol is the preferred method of controlling Snell routers. It uses numbers in the range 0 to 1023 to set, acknowledge and poll crosspoints via a single router control module. Sirius 600 ports must be configured for this protocol if the router is to be controlled by an Aurora control system. If the Sirius 600 is a multi-level router, and configured as such in it's database, all levels may be controlled using an appropriate destination offset in the Aurora database settings. For example: Issue 1 Rev 3 Page 55 © 2014 Snell Limited Sirius 600 www.snellgroup.com Configuring the Control Module Aurora Sirius 600 Port to Matrix Assignments Database settings Level 1: Level 1: source offset 0 128 sources destination offset 0 128 destinations Level 2: source offset 0 destination offset 128 Level 2: General switcher protocol Level 3: 128 destinations Level 3: source offset 0 128 sources destination offset 256 Table 29. 128 sources 128 destinations Example General Switcher Protocol In summary, in order for Aurora (or any system using General Switcher protocol) to control a multi-level Sirius 600, the user must have knowledge of the local database in use, only then can the router control module direct the correct the data to the correct crosspoints. The normal electrical parameters for this port are: • RS485 on a 9 pin D type socket configured as 'device' • 8 bit data • 1 stop bit • EVEN parity • 38.4K baud Although labeled 'RS485', this port is actually software configured to be point to point, as with RS422, when using this protocol. The full specification for this protocol is available from Snell, or on our website (www.Snell.com/documentation). 6.7.1.1 Snell General Remote Control Protocol (SW-P-08) This protocol has been developed to provide a common method of interfacing Snell router control systems to a variety of standard and custom applications. An example of the use of this protocol would be the interfacing of the Sirius 600 system to an Aurora Soft Panel control system, or to a TSL Under Monitor Display system. General Remote protocol allows the controlling system to access and control all system parameters, using the database configured names, as well as level, source and destination numbers. The full specification for this protocol is available from Snell. 6.7.2 Snell Multi-Drop Communications Protocol (SW-P-06) This protocol is designed to communicate between a Snell router control system and router control panels and Under Monitor Displays. Up to sixteen 'devices' may be 'daisy-chained' onto one multi-drop control port, each device requires a unique address, identified using a rotary HEX switch. The control system database must hold configuration data for all devices. The full specification for this protocol is available from Snell. 6.7.3 Snell Simple Switcher Protocol (SW-P-03) Similar to General Switcher Protocol but with reduced capability, such as only being able to address 128 destinations. Has the advantage of being able to set more crosspoints per video frame than General Switcher. The port may also be configured for baud rates up 230kbaud. Issue 1 Rev 3 Page 56 © 2014 Snell Limited Sirius 600 www.snellgroup.com Configuring the Control Module 6.8 2430/2432/2434 Configuration Switches The 2430/2/4 module has a number of configuration switches which are critical to the operation of the system. These switches are active for both the control and interface versions of the module; see Section 6.1.2 for an explanation of these modules. The switches on this module are as follows: • 4-way DIP switch for setting the Master/Slave mode in a dual controller system, and also for identifying the frame type • 8 rotary HEX switches for setting up the level mapping • 2 jumpers for selecting between RS485 or Ethernet port operation • 1 jumper to select RS232 or RS485 for the third serial port (2432 and 2434 only) 6.8.1 Setting the 4-way DIP switches The 4-way DIP switches on these modules must be set correctly to match the master/slave mode and the host frame type. In a dual controller system, that is, a master frame with two 2430/2/4 control modules fitted, one module must be configured as 'Master' and one as 'Slave'. See the section entitled 'Dual Redundant Controller Operation' for an explanation. A slave Sirius 600 frame may also be fitted with dual 2431/3/5 interface modules, which then operate completely independently to the control modules in the master frame. Master or slave mode is selected using the 'CONFIG' switch; on a 2430/2/4 module this mode must match that configured on the 2441/3/5 sub-board. Positions 3 and 4 of the DIP switch set the frame type, which must be one of the following types: • Any Sirius 620 (7U), or a Sirius 610 (4U) with 'square' levels (16x16, 32x32, 64x64 etc.) • A Sirius 610 (4U) with non-square levels (96x32, 120x8 etc.) • A Balanced AES Sirius 610 (4U) (using 4999 Input/Output cards) • An Unbalanced AES Sirius 610 (4U) with up to 64 destinations, with only one 4911 crosspoint card Positions 5,6 and 7 are not used Position 8 is used to define the frame as Sirius 610 (4U) or Sirius 620 (7U) for SNMP monitoring. It has no effect on the function of the controller when not running the router SNMP agent on the Ethernet interface. Fig 32. 4-way DIP Switch Issue 1 Rev 3 Page 57 © 2014 Snell Limited Sirius 600 www.snellgroup.com Configuring the Control Module Table 30. lists the 4-way DIP switch settings. Switches ON OFF 1 Master Slave 2 Defines 2430/2/4 (with 2431/3/5) Defines 2430/2/4 (without 2431/3/5) 3 4 5,6,7 8 Table 30. See table below. Not used Sirius 610 (4U) Sirius 620 (7U) 4-way DIP Switch Settings Switches 3 and 4 3 4 All systems with ’square’ levels ON ON Sirius 610 (4U) with non-square levels OFF ON Combined AES in Sirius 610 (4U) (4999 Input/Output cards) ON OFF Unbalanced 64x64 in Sirius 610 (4U) (1x4911 crosspoint card) OFF OFF Table 31. DIP Switch Settings for Switch 3 and 4 2441/3/5 configuration switch 1 Table 32. ON: Master, OFF: Slave 2441/3/5 configuration switch It is important that when configuring a control module, the 2430/2/4 configuration switch 1 setting matches the 2441/3/5 configuration switch 1 setting. If a 4911 crosspoint card is fitted, SW1 positions 1 and 2 on the 4911 must be set to match switches 3 and 4 of the host 243X Issue 1 Rev 3 Page 58 © 2014 Snell Limited Sirius 600 www.snellgroup.com Configuring the Control Module 6.8.2 Selecting Serial RS485-2, RS485-3, or Ethernet Control The Sirius 600 controller has several user selectable options for control interfaces. RS485 ports 2 and 3 and the Ethernet port can be selected using jumpers and functionality changed using different software loaded onto the Ethernet interface chip. Fig 33. shows a diagram of the Serial/Ethernet interfaces: 2441/3/5 Port 1 RS485-1 RS485 System Controller and Database Port 2 Network RS485-2 ETHERNET Interface/Protocol and Translator ENET Functionality defined by the software installed PL5 and PL6 RS485 Network RS485-3 PL7 485/232 Select Fig 33. Serial RS485-2, RS485-3, or Ethernet Control All control modules have the Ethernet port available. On the 2430/2/4 this may be used to control the router using General Switcher protocol over SNMP, and on the 2431/3/5 it will issue alarm and status information for the host frame using General Switcher protocol format. The user may select either the second or third RS485 port, or the Ethernet port, using jumpers PL5, 6 and 7, see Table 33. and Table 34. Select Ethernet or RS485 Control Ethernet port configured for General Switcher over SNMP, RS485 port 2 disabled PL5 & 6 set to NETWORK OR RS485 port 2 disabled, serial control now via RS485 port 3 using internal protocol translation (using software loaded via the ethernet port) PL5 & 6 set to RS485 Table 33. RS485 port 2 enabled with protocol as set in database, Ethernet disabled Select Ethernet or RS485 control Select RS232 or RS485 on Third Serial Port PL7 set to RS232 or RS485 Table 34. Important: Issue 1 Rev 3 Selects unbalanced or balanced configuration using pinouts specified in the agreed protocol Select RS232 or RS485 on third serial port These settings must be the same on both the A and B control cards in any frame, or the port functionality will be lost in the event of a master/slave changeover. Page 59 © 2014 Snell Limited Sirius 600 www.snellgroup.com Configuring the Control Module 6.8.3 Level Mapping in a Sirius 630 (16U) The level mapping in a Sirius 630 (16U) is exactly the same as in a Sirius 620 (7U) with the important difference that the level boundary is 32 instead of 16. The smallest level size for a Sirius 620 (7U) is 16x16, and all levels can only be a multiple of this dimension, i.e. 32x32, 48x48, 64x64, 80x80, 96x96, 112x112 or 128x128. In a Sirius 630 (16U) the level boundary is 32, therefore the smallest level size is 32x32, and level sizes increase by 32x32 up to a maximum of 256x256. Therefore the 8 HEX switches on a Sirius 600 630 control card correspond to blocks of 32 outputs, see Table 35. HEX Switch Destination Range Table 35. A B C D E F G H 1-32 33-64 65-96 97-128 129-160 161-192 193-224 225-256 Level Mapping in a Sirius 630 (16U) 6.8.4 Level Mapping in a Sirius 620 (7U) Every Master and Slave Sirius 600 frame must have the level mapping configured to reflect the desired system operation. This mapping must also lie within the database configuration in use, whether it is the fixed or configured database. Level mapping describes how many routing levels, and of what size, exists in the system. A single Sirius 600 frame may contain up to eight levels of differing sizes, and it is the level mapping switches that determine this. The level mapping is set up with eight rotary HEX switches on the front edge of the control and interface module, which are labelled like this: Fig 34. Level Mapping in a Sirius 620 (7U) Each switch defines which level each block of 16 sources and destinations are allocated to, with numbering starting at zero, see Table 36. HEX Switch Position 0 1 2 3 4 5 6 7 Control Routing Level 1 2 3 4 5 6 7 8 HEX Switch A B C D E F G H 97-112 113-128 Destination Range Table 36. 1-16 17-32 33-48 49-64 65-80 81-96 Level Mapping in a Sirius 620 (7U) 6.8.5 Level Mapping in a Sirius 610 (4U) If a Sirius 610 (4U) has 'square' levels, the level mapping is configured exactly as with the Sirius 620 (7U) in the previous section, except that switches E to H will be unused, because the total router size will not exceed 64x64. Switches E to H should be left set to 0. A Sirius 610 (4U) has the extra flexibility that it may be configured to have non-square levels, see Section 3.4, in which case the HEX switches have extended meaning. The following is an explanation of how to set the HEX switches in a Sirius 610 (4U) with non-square levels: • Issue 1 Rev 3 Each switch corresponds to 2 Input/Output card slots, switch A to the right most slots, switch H to the left most Page 60 © 2014 Snell Limited Sirius 600 www.snellgroup.com Configuring the Control Module • Each switch therefore sets the level number for 16 inputs or outputs • Any level may be partially equipped as 8 inputs or outputs, but the adjacent slot must be left empty • HEX switches corresponding to output cards are set between 0 and 7 for levels 1 to 8 • HEX switches corresponding to input cards are set between 8 and F for levels 1 to 8 Table 37. lists the Levels, inputs and outputs: Control level Inputs Outputs 1 0 8 2 1 9 3 2 A 4 3 B 5 4 C 6 5 D 7 6 E 8 7 F Table 37. Level Mapping in a Sirius 610 (4U) • Unused HEX switches must be set to expand inputs, and not set to 0 • Switches 3 and 4 on the 2434/1 configuration switch must be set to ON, OFF (see Section 6.7.1) 6.8.6 Examples of Non-square Configurations HEX Switch H G F E D C O/ps O/ps 49-64 33-48 Range I/ps I/ps I/ps I/ps 1-16 17-32 33-48 49-64 or or B A O/ps 17-32 O/ps 1-16 or or i/ps i/ps i/ps i/ps 65-80 81-96 97-112 113-128 1 Input Cards 64 64 Output Cards 1 Fig 35. Examples of a Non-square Configuration Issue 1 Rev 3 Page 61 © 2014 Snell Limited Sirius 600 www.snellgroup.com 6.8.6.1 Configuring the Control Module Example 1 Level 1: 32x32 Level 2:16x16 Level 3: 16x16 6.8.6.2 HEX Switch H G F E D C B A Set 8 8 9 A 2 1 0 0 HEX Switch H G F E D C B A Set 8 8 8 8 8 8 0 0 H G F E D C B A 9 9 [1] 9[1] 1 0 Example 2 Level 1: 96x32 6.8.6.3 Example 3 Level 1: 32x16 Level 2: 32x16 HEX Switch Set [1] 6.8.6.4 8 8 9 Unused switches set to match previous input level setting. Example 4 Level 1: 32x16 Level 2: 16x8 Level 3: 16x8 HEX Switch H G F E D C B A Set 8 8 9 A A [1] 2 1 0 [1] Issue 1 Rev 3 Unused switches set to match previous input level setting. Page 62 © 2014 Snell Limited Sirius 600 www.snellgroup.com Using the Ethernet Port 7. Using the Ethernet Port The Sirius 600 rear panel has two RJ45 type Ethernet connectors fitted, one each for the A and B control modules. Only one of these ports will ever be active, the port connected to the idle controller will be disabled. The user must ensure that the control module is correctly configured, by referring to Chapter 6. If dual controllers are fitted, both control modules must be configured to use the Ethernet port, otherwise communication will be lost in the event of a changeover. In summary, the following must be configured to activate the Ethernet port: • PL5 and PL6 on 2434 set to 'NETWORK', RS485 port 2 will be disabled • RS485 port 2 protocol must be set to General Switcher protocol in database The port is configured for connecting to a 10 Base T Ethernet Hub, and when configured correctly, will allow the router to be controlled, and for status information to be requested, using Snell’s General Switcher protocol over SNMP. Ethernet support for Sirius 600 is provided using a 'SC12' chip, which is a 80186 processor system complete with RAM, NVRAM, serial and Ethernet ports all in one package. The chip has system software and configuration files, which may all be loaded and edited using a software tool supplied with the system. This tool may also be used to test the Ethernet connection, control basic router functions and view the status. This chapter describes the software configuration of the SC12 chip using the supplied configuration tool. 7.1 Connecting Sirius 600 to a Network A standard CAT5 patch cord may be used to connect the Sirius 600 active Ethernet port to a 10 Base T hub or switch. By default, the SC12 chip is configured for DHCP, meaning that a DHCP Server must be present on the same network segment in order an IP address to be assigned. Without this, the Snell configuration tool must be used to manually assign an address. The SC12 chip includes TELNET and FTP servers in order to support the configuration tool. 7.2 Configuration Tool A separate configuration tool is provided for configuration of the ethernet interface on the Sirius 600. For information, refer to the separate user manual, which describes how to configure the ethernet interface, and the available protocols. Issue 1 Rev 3 Page 63 © 2014 Snell Limited Sirius 600 www.snellgroup.com Troubleshooting 8. Troubleshooting This chapter is a brief guide for diagnosing faults associated with a Sirius 600 router. It should be noted that Sirius 600 frames contain no user serviceable parts, therefore should this product require servicing, you should refer to Snell or your local distributor. All the following assume that at least one power supply is powered and functioning in each frame in the system, that the frames are correctly cooled and ventilated, and that all cards are fully seated in their sockets. The PC Editor will not connect 'on-line' • Check that the cable is connected to the correct Sirius 600 port, see section 3.14 • Check that the router has a 2430/2/4 module fitted, and is therefore a Master frame • Check that the correct editor is being used, Nebula for Sirius 600, 630 and the Router Editor for 2434 • Check the Editor is configured for the correct PC COM port, see the Nebula guide • Check the baud rate and parity setting in the editor matches the 2441/3/5 switch setting, see section 6.3 • Check cable continuity The control panels connected to Sirius 600 do not function • Check whether you are using the 'fixed' or 'editable ' database, see section 6.1 • If 'fixed', check that the 2441/3/5 module is set for 'Multi-drop' protocol setting, see section 6.3 • If 'editable', check the protocol settings with the on-line editor • Check the correct Sirius 600 port is being used, RS485 1 or 2 • If using RS485 port 2 for control panels, check that it is not jumper selected as an Ethernet port, see section 6.8.2 • Check the panel HEX address against the database setting • Check the panel DIP switch settings against the table in the Nebula guide • Check cable continuity The external control system does not control Sirius 600 • Check whether you are using the 'fixed' or 'editable ' database, see section 6.1 • If 'fixed', check that the 2441/3/5 module is set for 'General Switcher' protocol, see section 6.3 • If 'editable', check the protocol settings with the on-line editor • Check cable interconnections • Check electrical characteristics and protocol of controlling device are compatible with that configured into the database The panel status changes, but the route does not make Issue 1 Rev 3 • Check the appropriate input, output and crosspoint cards all exist in the frame • Check all cards are fully seated in the frame Page 64 © 2014 Snell Limited Sirius 600 www.snellgroup.com Troubleshooting Some routes make, but not others • If using 4911 audio crosspoints check that the switch settings on the cards are correct, see section 3.6 and 6.7.1. • Check that the relevant input, output and crosspoint cards exist in the frame • Make sure the 2441/3/5 card is configured for 'auto reconfigure', see section 6.3, and reset the frame • Check that the 2430/1/2/3/4/5 switches match the system requirements, see section 6.8 The panel is communicating but there are no (or incorrect) responses to button presses - panels not in self-test • Check cable interconnections • Check that the panel has been configured in the database as the correct type • Ensure that each panel on the multidrop chain has a unique serial address • Check that the panel configuration switches are set correctly, see the Nebula guide Video or audio routes do not switch 'cleanly' • The Sirius 600 router is designed for SMPTE RP168 compliant video switching. • When using audio clean switch modules audio signals can be switched without causing disturbance to the audio data stream. • Check that video and audio references are plugged to the correct rear connections • Check that the correct AES reference is selected from the rear panel switch • If using a 'fixed' database, check that the 2441/3/5 card has the correct reference selected, see section 6.3 • If using an 'editable' database, check the source references with the on-line editor • Check the 2441/3/5 card LED status for correct reference detection, see section 6.4 • Check that the analogue video references are correctly terminated The panel controls the wrong destination • Check that the panel is assigned correctly in database • Check the panel is set to the correct address The panel cannot select a crosspoint? • • Issue 1 Rev 3 Check database for: • panel assignment • level active • route not inhibited • no override active • level controllable Check router level address Page 65 © 2014 Snell Limited Sirius 600 www.snellgroup.com Troubleshooting The Master unit is switching but Slave levels are not following • Ensure that the SLAVE bus cable is fitted correctly • Check that the Master and Slave routers have the appropriate level mappings set by the switches on the 2430/1/2/3/4/5 modules, see section 6.8 • Check the database is set up for a multi-level system Dual redundant controllers are not functioning correctly • Check that switch settings on each card for master/slave are correct - see section 6.8 Ethernet control not working, RS485 port 3 not working • Issue 1 Rev 3 Check controller configurations, see section 6.8.2. Remember both controllers must be set up the same way. Page 66 © 2014 Snell Limited Sirius 600 www.snellgroup.com Specification 9. Specification For the specification of specific signal types refer to the module user manual supplements. 9.1 General 9.1.1 Control RS485 ports: 2; independently configurable for either; driving chains of 16 multidrop devices (panels/under monitor displays) OR for external control RS232 ports: 2; for system database configuration, one for each control module fitted Parallel ports 1; for control of slave Sirius 600, Freeway, Halo or Axis routers Ethernet 2; 1 each for the master and slave control modules, used instead of RS485 port for external control 9.1.2 Reference Analog video 1 each of 525/625 line PAL/NTSC looping, high impedance High Definition TV 1 terminated input for tri-level signal to SMPTE274M (1080i) Digital audio selectable between unbalanced AES (75ohm BNC) and balanced AES (9pin D type) 9.1.3 Power Supplies Supply: 100Vac to 240Vac auto sensing Power: 4U – 400W max 7U – Sirius 600W max Sirius 630 (16U) – 1100W max 4U x 19' rack mounting x 500mm deep 9.1.4 General Frame Size: 7U x 16U x Power: 4U 20 Kg max 7U 30 Kg max Sirius 630 (16U) 50 Kg max 9.1.5 Temperature Range Issue 1 Rev 3 Operating: 0 °C to +40 °C Storage: 10 °C to +70 °C Page 67 © 2014 Snell Limited