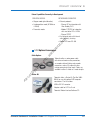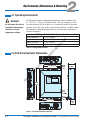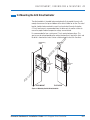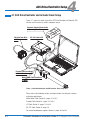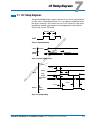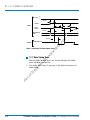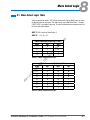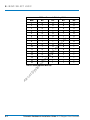
1
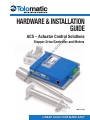
HARDWARE & INSTALLATION
GUIDE
il.
co
m
ACS – Actuator Control Solutions
Ai
r-O
il
Sy
st
e
m
s,
I
nc
.w
w
w
.a
iro
Stepper Drive/Controller and Motors
3604-4173_00
LINEAR
LINEAR SOLUTIONS
SOLUTIONS MADE
MADE EASY
EASY
il.
co
m
iro
.a
w
w
nc
.w
s,
I
m
st
e
Sy
r-O
il
Ai
Tolomatic reserves the right to change the design or operation
of the equipment described herein and any associated motion
products without notice. Information in this document is
subject to change without notice.
201102031042
Contents
List of Figures...................................................................................................iii
List of Tables....................................................................................................iv
Health and Safety Regulations........................................................................vi
Safety Symbols..............................................................................................v
EMC Wiring Guidelines................................................................................. vii
Proper and Safe Use of Product.................................................................... vii
Handling and Unpacking.............................................................................. viii
Product Warnings.......................................................................................viiii
il.
co
m
1. Product Overview...................................................................................1-1
1.1 The ACS Stepper Drive/Controller for Actual Control Solutions................1-1
.a
iro
1.1.1 The ACS Stepper Drive/Controller Basic Overview..........................1-1
1.1.2 Optional Accessories................................................................... 1-1
2. Environment, Dimensions & Mounting..................................................2-1
2.1 Operating Environment.........................................................................2-1
2.2 Dimensions.........................................................................................2-1
2.3 Mounting the ACS Drive/Controller........................................................2-2
nc
.w
w
w
3. Starter Kit................................................................................................3-1
4.1 ACS Drive/Controller and Actuator Basic Setup......................................4-1
4.1.1 Setup Procedures........................................................................4-2
st
e
m
s,
I
4. ACS Drive/Controller Setup....................................................................4-1
Sy
5. Connections & Cables............................................................................5-1
Ai
r-O
il
5.1 Connections & Cables Overview...........................................................5-1
5.2 Motor Power Connection and Cable......................................................5-1
5.3 Encoder Connection and Cable.............................................................5-2
5.4 I/O Connection and Cable.....................................................................5-3
5.5 Input Power Connection.......................................................................5-4
5.6 RS-232 Connection.............................................................................5-5
5.7 RS-485 Connection.............................................................................5-6
5.8 Ethernet Connection.............................................................................5-6
5.9 Cable Routing......................................................................................5-7
6. Specifications and Wiring......................................................................6-1
6.1 Digital Inputs.....................................................................................6-1
6.1.1 Specifications..............................................................................6-1
6.1.2 Typical Wiring Diagrams...............................................................6-2
6.2 Digital Outputs...................................................................................6-2
Tolomatic Hardware & Installation Guide: ACS Stepper Drive/Controller i
co n te n ts
6.2.1 Specifications..............................................................................6-2
6.2.2 Typical Wiring Diagrams...............................................................6-3
6.3 Input Power.......................................................................................6-3
6.3.1 Drive Specifications.....................................................................6-4
6.3.2 Typical Input Power Wiring...........................................................6-4
6.3.3 Power Supply Selection................................................................6-5
6.3.4 Suggested Power Supplies...........................................................6-5
7.
I/O Timing Diagrams.............................................................................7-1
il.
co
m
7.1 I/O Timing Diagrams..........................................................................7-1
7.1.1 Move Timing Rules......................................................................7-2
8. Move Select Logic.................................................................................8-1
8.1 Move Select Logic Tables...................................................................8-1
iro
.a
9. LED Codes and Faults...........................................................................9-1
w
w
9.1 LED Codes.........................................................................................9-1
nc
.w
9.2 Fault Descriptions and Recovery.........................................................9-1
10. Troubleshooting...................................................................................10-1
s,
I
10.1.1 Troubleshooting the ACS Drive/Controller......................................10-1
Appendix 1...................................................................................................A1-1
st
e
m
Motors...................................................................................................A1-1
Appendix 2...................................................................................................A2-1
Ai
r-O
il
Sy
Product Warranty...................................................................................A2-1
ii
Tolomatic Hardware & Installation Guide: ACS Stepper Drive/Controller
List of Figures
Mounting the ACS Drive/Controller......................................................... 2-1
Figure 3-1
ACS Drive/Controller and ERD Actuator Basic Setup................................ 3-1
Figure 5-1
Motor Power Connection on ACS Drive/Controller................................... 5-1
Figure 5-2
Motor Power Cable 3604-1767/1766.................................................... 5-2
Figure 5-3
Encoder Connection on ACS Drive/Controller.......................................... 5-2
Figure 5-4
Encoder Cable 3604-1768.................................................................... 5-3
Figure 5-5
I/O Connection on ACS Drive/Controller.................................................. 5-3
Figure 5-6
I/O Cable 3604-1770............................................................................ 5-4
Figure 5-7
Input Power Connection......................................................................... 5-4
Figure 5-8
RS-232 Connection............................................................................... 5-5
Figure 5-9
RS-232 Pin Connection......................................................................... 5-5
il.
co
m
Figure 2-1
Figure 5-10 RS-485 Connection for Future ACS Drive/Controller Programmability....... 5-6
iro
Figure 5-11 Ethernet Connection for Future ACS Drive/Controller Programmability...... 5-6
.a
Figure 5-12 Cable Routing for Top and Side Mounted Connectors.............................. 5-7
Digital Input Circuit................................................................................ 6-1
Figure 6-2
Input Source (switched) Connection........................................................ 6-1
Figure 6-3
Input Source (PNP) Connection.............................................................. 6-2
Figure 6-4
Input Sink (switched) Connection........................................................... 6-2
Figure 6-5
Input Sink (NPN) Connection.................................................................. 6-2
Figure 6-6
Output Circuit....................................................................................... 6-3
Figure 6-7
Digital Output Sinking Connection.......................................................... 6-3
Figure 6-8
Digital Output Sourcing Connection........................................................ 6-3
Figure 6-9
ACS Drive/Controller Logic and Main Power Supplies.............................. 6-4
Sy
st
e
m
s,
I
nc
.w
w
w
Figure 6-1
Figure 6-10 ACS Drive/Controller Single Supply – Main Power................................... 6-4
Ai
r-O
il
Figure 6-11 ACS Drive/Controller External Cutoff Switch for Emergency Stop.............. 6-5
Figure 7-1
Input Requirement................................................................................. 7-1
Figure 7-2
System Startup Timing.......................................................................... 7-1
Figure 7-3
Jog Move Timing................................................................................... 7-1
Figure 7-4
Absolute & Incremental Move Timing..................................................... 7-2
Tolomatic Hardware & Installation Guide: ACS Stepper Drive/Controller iii
ACS Starter Kit Contents........................................................................ 3-1
Table 3-2
D-sub to RJ12 Converter Wiring............................................................ 3-1
Table 5-1
Motor Power Connection PIN Outs......................................................... 5-1
Table 5-2
Motor Power Cable and Connector Parts................................................ 5-2
Table 5-3
Encoder Connection PIN Outs................................................................ 5-2
Table 5-4
Encoder Cable and Connector Parts....................................................... 5-3
Table 5-5
I/O Connection PIN Outs........................................................................ 5-4
Table 5-6
I/O Cable and Connector Parts............................................................... 5-4
Table 5-7
Input Power PIN Outs............................................................................ 5-5
Table 5-8
Input Power Cable Parts........................................................................ 5-5
Table 5-9
RS-232 PIN Outs and Connection.......................................................... 5-5
Table 5-10
RS-232 Cable Parts.............................................................................. 5-5
Table 6-1
Opto-isolated Digital Input Specifications................................................ 6-1
Table 6-2
Digital Output Specifications.................................................................. 6-3
Table 6-3
Drive Specifications............................................................................... 6-4
Table 6-4
Maximum Power Supply Current for Tolomatic Motors............................. 6-5
Table 6-5
Recommended Switching Power Supplies.............................................. 6-6
Table 6-6
Recommended Linear Regulated Power Supplies.................................... 6-6
Table 6-7
Recommended Linear Unregulated Power Supplies................................. 6-6
Table 6-8
Fuses................................................................................................... 6-6
Table 8-1
4 Move Commands Mode Logic............................................................. 8-1
Table 8-2
8 Move Commands Mode Logic............................................................. 8-1
Table 8-3
16 Move Commands Mode Logic........................................................... 8-2
Table 9-1
LED Indicators....................................................................................... 9-1
Table 9-2
Safety Faults......................................................................................... 9-1
Table 9-3
Critical Faults........................................................................................ 9-2
Table 10-1
Troubleshooting Descriptions............................................................... 10-1
Table A-1
Tolomatic Motor Specifications............................................................. A1-1
Table A-2
Tolomatic Motor Part Numbers............................................................. A1-1
Table A-3
Encoder Specifications........................................................................ A1-1
Ai
Sy
st
e
m
s,
I
nc
.w
w
w
.a
iro
il.
co
m
Table 3-1
r-O
il
List of Tables
Table A-4NEMA 11 Motor Connection PIN Outs.................................................. A1-2
Table A-5NEMA 17 Motor Connection PIN Outs.................................................. A1-2
Table A-6NEMA 23 Motor Connection PIN Outs.................................................. A1-2
Table A-7
iv
Encoder Connections and Connector PIN Outs...................................... A1-2
Tolomatic Hardware & Installation Guide: ACS Stepper Drive/Controller
Health and Safety Regulations
Read completely through the applicable sections of the manual before the
equipment is unpacked, installed or operated. Pay careful attention to all of the
dangers, warnings, cautions and notes stated in the manual.
Serious injury to persons or damage to the equipment may result if the information
in the manual is not followed.
Safety Symbols
il.
co
m
Items that are specifically marked DANGER!, WARNING!, CAUTION! or NOTE! are
arranged in a hierarchical system and have the following meaning:
DANGER!
w
nc
.w
WARNING!
w
.a
iro
Indicates a very hazardous situation which, if not avoided, could result in death or
serious injury. This signal word is limited to the most extreme situations.
s,
I
Indicates a potentially hazardous situation which, if not avoided, could result in
death or serious injury.
m
CAUTION!
r-O
il
Sy
st
e
Indicates a potentially hazardous situation which, if not avoided, may result in
property damage, minor or moderate injury.
CAUTION!
Ai
Indicates hot surfaces. Avoid contact.
NOTE!
Information that requires special attention is stated here.
Tolomatic Hardware & Installation Guide: ACS Stepper Drive/Controller v
health a n d safet y regulatio n s
EMC Wiring Guidelines
Cable routing
It is recommended that the power and signal cables for the ACS drive/controller be
routed as far apart as possible to minimize system noise.
NOTE! The standard cables from Tolomatic are not flex rated and have a minimum
bend radius of 3.75 inches. Any repeated flexing or excessive bending can result in
broken conductors and intermittent faults.
Shielding and grounding
w
.a
iro
il.
co
m
When cabling the system, shielded cables are recommended. The standard cables
provided by Tolomatic have an overall shield with drain wires. The metal angle
bracket on the drive/controller is also a case ground and should be tied to earth
ground. To minimize EMI and ensure system reliability, all shield drain wires from all
cables should be tied to a common earth ground.
w
Proper and Safe Use of Product
nc
.w
Protection circuits and external fuses
s,
I
m
st
e
Fail Safe Emergency Stop Recommendations
A means for a fail safe e-stop is highly recommended to ensure equipment and
personal safety. The e-stop should provide a means to remove main power from the
actuator to cease and prevent any unwanted motion.
Ai
r-O
il
The manufacturer takes no
responsibility whatsoever
if the equipment is
modified or if the
equipment is used in any
way beyond performance
specifications.
Unauthorized
modifications or changes
to the equipment are
stricly forbidden and void
all warranties.
Sy
WARNING!
A fuse should be added to the input power line to protect the drive/controller and
power supply from any potential over current conditions that may occur. (See
Section 6: Specifications & Wiring, page 6-6)
Device Damage Prevention
To prevent permanent damage to the device, proper care should be taken not to
exceed published voltage, current, temperature, and load ratings. In addition, proper
wiring should be verified and safety measures checked before applying power.
Personal Safety
During normal operation the motor can become hot. It is highly recommended to
display proper safety notices and implement proper safety measures to prevent
contact with hot surfaces.
vi
Tolomatic Hardware & Installation Guide: ACS Stepper Drive/Controller
health a n d safet y regulatio n s
Handling and Unpacking
CAUTION!
Product Warnings
The following precautions should be observed to prevent erratic behavior or
damage:
• Do not short circuit the motor power at the power connector. Doing so may
damage the drive power electronics. The motor/cable is part of the current
regulation circuitry. For a short occurring in a motor, the motor leads should
provide enough resistance and inductance to prevent dangerous peak currents
from occurring.
il.
co
m
Proper ESD measures
should be taken to avoid
static electricity from
contacting the signal and
power lines of the drive,
motor and encoder.
When unpacking and handling, care should be taken not to drop the drive/controller
as this can damage the connectors and internal electronics.
iro
• Do not reverse bias the power unit.
.a
• Do not apply voltages above the maximum rated voltage.
nc
.w
w
w
• Do not expose drive to conductive contaminants, moisture, or excessive
temperature.
Ai
r-O
il
Sy
st
e
m
s,
I
• Do not dissassemble or modify the drive/controller.
Tolomatic Hardware & Installation Guide: ACS Stepper Drive/Controller vii
Product Overview
1
1.1 The ACS Stepper Drive/Controller for Actuator Control Solutions
Tolomatic’s ACS drive/controller is a stepper drive and controller intended for use
with electric actuators. Tolomatic's Motion Interface software allows the user to
select the compatible Tolomatic electric linear actuator of choice. The software
automatically sets most of the necessary parameters to create the desired motion
of the selected actuator reducing setup and programming time. (See Tolomatic
Motion Interface Software Manual 3600-4167 for more information).
il.
co
m
1.1.1 ACS Stepper Drive/Controller— Basic Overview
Dual Ethernet ports Coming Soon!
Dual Purpose Heat Sink •Removes heat from drive
for optimal performance
• Panel mounting
nc
.w
w
w
.a
iro
•Internal switch for daisy chaining up to 255 ACS axes
Protocols:
•Ethernet/IP • Modbus TCP • Ethernet TCP/IP
m
Feedback st
e
r-O
il
Ai
Power Connection •For Digital Encoder
Sy
•8 Digital Inputs
•4 Digital Outputs
•24 Vdc Opto-Isolated
•NPN or PNP
•Configurable
s,
I
Digital i/0 •24Vdc
Motor Power •24Vdc Stepper Motors
rs485 COM PORT LED indicators Coming Soon!
•Power & Fault indicators
rs232 COM PORT •Networking Port
•Drive Configuration Port
ACS Basic Drive/Controller (3604-9651) Capabilities
• 4, 8, or 16 move command modes
(absolute, incremental or jog) for infinite
position capability
• Adjustable motion profile parameters
(velocity, accel/decel, force). Parameters
are independently configurable for each
move
• Ability to reduce holding current for
energy savings
1-1
•End point correction
•Zone output based on position
• Force limiting capacity
•Configurable digital I/O
(24 Vdc Opto-Isolated)(NPN or PNP)
•Compatible with most
24 Vdc stepper motors
Tolomatic Hardware & Installation Guide: ACS Stepper Drive/Controller
product overview :1
Future Capabilities Currently in Development
OPERATING MODES:
NETWORKING CAPABILITIES
• Stepper mode (pulse/direction)
• Ethernet protocols:
• Analog position mode (0-10Vdc or
4-20mA)
- Ethernet I/P for integration with
Allen Bradley PLCs
• Pneumatic modes
- Modbus TCP/RTU for integration
with most other PLCs & HMIs
- Ethernet TCP/IP
il.
co
m
• Dual ethernet ports with internal
switch for daisy chaining
.a
iro
• Modbus RTU over RS-485
Tolomatic offers a motor power cable
with drive and motor mating connectors,
an encoder cable with drive and encoder
connectors, and an I/O cable with drive
mating connector to flying leads. Cables are
available in either 3-meter or 5-meter lengths.
Sy
st
e
m
s,
I
nc
.w
Cable Options
w
w
1.1.2 Optional Accessories
Ai
r-O
il
Starter Kit
Tolomatic offers a Starter Kit (Part No. 36049044) for use with optional USB computer
connections. The kit includes:
USB to RS-232 converter
Adapter cable for RJ12 to D-sub
Tolomatic Motion Interface Software CD
Tolomatic Hardware & Installation Guide: ACS Stepper Drive/Controller 1-2
Environment, Dimensions & Mounting
2.1 Operating Environment
WARNING!
Do not expose the drive to
conductive contaminants,
moisture, or exceed
temperature settings.
2
The ACS drive/controller is designed to be operated in ambient conditions from
0° – 40°C (32° – 104°F), and humidity from 0 – 90% non-condensing. There is
no ingress protection (IP) for the drive, so it is important to protect the drive from
coming in contact with water or other conductive contamination. In addition, proper
ESD procedures should be observed to prevent static discharge and damage to
electronic components.
ACS Stepper Drive/Controller Operating Conditions
77° F, 25° C Nominal
Operating Temperature
32°-104° F, 0°-40° C Non Freezing
Storage Temperature
32°-158° F, 0°-70° C
Humidity
0-90% non-condensing
iro
il.
co
m
Ambient Temperature
3.55 [90.2] (2)
0.80
[20.3]
(2)
1.38
[34.9]
Ai
r-O
il
Sy
st
e
m
s,
I
nc
.w
w
2.2 ACS Drive/Controller Dimensions
w
.a
Table 2-1: ACS Operating Conditions
PART #:
MODEL #:
SERIAL #:
5.80
[147.3]
www.tolomatic.com
RoHS
COMPLIANT
Made in U.S.A.
Ø.17
[4.3]
TYP.
4.29 [109.0]
0.12
[2.9]
TYP.
0.88
[22.2]
(2)
Figure 2-1: ACS Drive/Controller Dimensions
2-1
Tolomatic Hardware & Installation Guide: ACS Stepper Drive/Controller
E n viro n me n t , dime n sio n s & mou n ti n g : 2
2.3 Mounting the ACS Drive/Controller
The drive/controller is intended to be mounted vertically to provide the vents with
enough clearance on the top and bottom of the drive to allow for air flow. The metal
bracket should also be mounted to a metal surface for best thermal dissipation.
A 2-inch head space is recommended from the drive vents to another surface to
ensure the proper Ambient temperature ratings are maintained.
il.
co
m
It is recommended to have a minimum of 1-inch spacing between drives. This
spacing may be relaxed providing the ambient temperature is kept within limits and
the drive is mounted to a metal surface suitable enough to heat sink the drives.
Metal Mounting
Surface
Clearance for
Air Vents
Clearance for
Air Vents
Ai
r-O
il
Sy
st
e
m
s,
I
nc
.w
w
w
.a
iro
Metal Mounting
Surface
BOOK MOUNT
FLAT MOUNT
Figure 2-1 Mounting the ACS Drive/Controller
Tolomatic Hardware & Installation Guide: ACS Stepper Drive/Controller 2-2
Starter Kit
3.1 Starter Kit
3
Tolomatic offers a basic Starter Kit for the ACS stepper drive/controller that can be
used to convert a USB connection to a serial port.
s,
I
nc
.w
w
w
.a
iro
il.
co
m
The kit includes an RJ12 cable, a D-sub to RJ converter, a USB to RS232 converter
and a CD with the Tolomatic Motion Interface software.
m
ACS Drive/Controller Starter kit: PN 3604-9044
st
e
ITEM
TOLOMATIC PART NUMBER
MFR PART NUMBER
3604-1783
Assmann PN:
Sy
RJ12 Cable
r-O
il
D-sub to RJ Converter
Ai
USB to RS232 Converter
Tolomatic Motion Interface
AT-S-26-6/6/B-7/R-R
3604-1782
Assmann PN:
AT-23065-R
3604-1795
Keyspan PN:
USA19-HS
3604-9526
–
Software CD
Table 3-1: ACS Starter Kit Contents
Tolomatic also offers a Programming Cable Kit (3604-9043) which includes the
RJ12 cable and D-sub to RJ12 Converter.
3-1
Tolomatic Hardware & Installation Guide: ACS Stepper Drive/Controller
starter kit : 3
The D-sub to RJ12 converter should to be wired as follows:
WIRE COLOR
D-SUB
Yellow
2
Green
3
Red
4
Black
5
White
7
NOTE: The brown wire is not used.
il.
co
m
Table 3-2: D-Sub to RJ12 Converter Wiring
Ai
r-O
il
Sy
st
e
m
s,
I
nc
.w
w
w
.a
iro
NOTE: Pinout assumes RJ12 cable is reversed.
Tolomatic Hardware & Installation Guide: ACS Stepper Drive/Controller 3-2
ACS Drive/Controller Setup
4.1 ACS Drive/Controller and Actuator Basic Setup
4
Figure 3-1 shows the simple setup of the ACS Drive/Controller, the Tolomatic ERD
actuator and the necessary cables and power source.
Customer Supplied Power Cable
to Power Input on Drive
LIED URCE
P
P
SU ER SO
POW dc
24V
il.
co
m
RS-232 Cable to PC
st
e
m
s,
I
nc
.w
w
w
.a
iro
I/O Cable from Drive
to PLC
r-O
il
Sy
Encoder Cable from Drive
to Motor Encoder
Ai
Motor Power Cable from Drive
to Motor
Figure 3-1: ACS Drive/Controller and ERD Actuator– Basic Setup
Please refer to the following sections and page numbers for cable part numbers
and wiring specifications:
Motor Power Cable: Section 5– pages 5-1 to 5-2
Encoder Cable: Section 5– pages 5-2 to 5-3
I/O Cable: Section 5– pages 5-3 to 5-4
RS-232 Cable: Section 5– page 5-5
For recommended power supplies: Section 6– pages 6-5 to 6-6
4-1
Tolomatic Hardware & Installation Guide: ACS Stepper Drive/Controller
A C S D R I ve / C o n troller S E T U P : 4
4.1.1 Setup Procedures
1. Install drive/controller and actuator into appropriate fixtures.
2. Wire the 24Vdc power supply to the drive. See Section 6: Power Supply
Selection.
3. Wire input and output signals to the desired logic device. See Section 5:
Connections and Cables.
4. Attach motor and encoder cables.
6. Configure ACS Drive/Controller.
Ai
r-O
il
Sy
st
e
m
s,
I
nc
.w
w
w
.a
iro
7. Program the logic device.
il.
co
m
5. Attach serial programming cable and install the Tolomatic Motion Interface
software.
Tolomatic Hardware & Installation Guide: ACS Stepper Drive/Controller 4-2
Connections & Cables
5.1 Connections and Cables Overview
5
All cables for the ACS Drive/Controller can be ordered through Tolomatic with the
exception of the power supply. When using cables other than those provided by
Tolomatic, reference the cable mating connector style to ensure the proper cabling
is supplied.
w
.a
iro
il.
co
m
FUTURE ETHERNET
Expansion
nc
.w
ENCODER
Connection MOTOR
Connection
POWER
CONNECTION
w
I/O
Connection
RS232
COM PORT
m
s,
I
LED
INDICATORS
RS485
COM PORT
WARNING!
r-O
il
Sy
st
e
5.2 Motor Power Connection and Cables
Ai
Do not connect or
disconnect motor cables
while the drive is powered.
6
3
4
1
Figure 5-1: Motor Power Connection on ACS Drive/Controller
PIN numbers
SIGNAL
cable wire color
1
Motor A+
Red
2
Shield
Shield
3
Motor B+
Green
4
Motor A-
White
6
Motor B-
Black
Table 5-1: Motor Power Connection PIN Outs
5-1
Tolomatic Hardware & Installation Guide: ACS Stepper Drive/Controller
ALL CONDUCTORS ARE 20 AWG
USE OVERALL SHIELD WITH 20 AWG DRAIN WIRE
CONDUCTOR COLORS ARE UNIQUE
RoHS COMPLIANT
MUST BE RATED 60°C OR BETTER
COLOR OF JACKET IS GRAY
100V MIN WORKING VOLTAGE
CABLE TO BE TESTED FOR CONTINUITY AND SHORTS
BAG INDIVIDUALLY
co n n ectio n s & cables : 5
TYCO P/N:
1586000-6
1
3
4
6
2
TYCO P/N:
794954-6
1
01
RED
GRN
WHT
BLK
3
4
6
2
5000.0
196.85
The ACS Drive/Controller has a maximum output of 2.5A peak.
196.85 [5000.0]
1.00 MAX.
[25.40 MAX.]
1.00
[25.40]
1.00
[25.40]
1.00 MAX.
[25.40 MAX.]
SHRINK TUBING
01
TYCO P/N: 1586000-6
TYCO P/N: 794954-6
Figure 5-2: Motor Power Cable 3604-1767/1766
tolomatic
Part no.
DRIVE MATING
CONNECTOR
DRIVE
contacts
Motor
mating
connector
Motor
Contacts
Motor Power: 3-meter
3604-1766
Tyco PN:
794954-6
Tyco PN:
1586315-3
Tyco PN:
1586000-6
Tyco PN:
1586314-3
Motor Power: 5-meter
3604-1767
Tyco PN:
794954-6
Tyco PN:
1586315-3
Tyco PN:
1586000-6
Tyco PN:
1586314-3
.a
iro
il.
co
m
Cable
w
w
Table 5-2: Motor Power Cable and Connector Parts
nc
.w
5.3 Encoder Connection and Cable
r-O
il
Sy
st
e
m
s,
I
The ACS Drive/Controller has an encoder port that supports differential quadrature
encoders. Single ended encoders may be used with additional external circuitry. It is
highly recommeneded to use differential encoders as they are more resistant to noise
issues. The drive can supply +5Vdc power to the feedback device up to 100mA.
1
13
14
Ai
2
Figure 5-3: Encoder Connection on ACS Drive/Controller
PIN numbers
SIGNAL
cable wire color
1
ENC A+
Blue
2
ENC A-
Orange
3
ENC B+
Yellow
4
ENC B-
Gray
5
NA
NA
6
NA
NA
9
Signal Ground
Black
12
+5Vdc
Red
13
Case Ground
NA
Table 5-3: Encoder Connection PIN Outs
Tolomatic Hardware & Installation Guide: ACS Stepper Drive/Controller 5-2
2
3
4
5
6
1
2
12
3
4
ORG
RED
YEL
GRY
5: co n n ectio n s & cables
118.11 [3000.0]
SHRINK TUBING
MOLEX P/N: 51021-0600
JST P/N: PHDR-14VS
Figure 5-4: Encoder Cable 3604-1768
tolomatic DRIVE MATING
Part no.
CONNECTOR
Encoder: 3-meter
3604-1768
Encoder: 5-meter
3604-1769
DRIVE MATING
contacts
Encoder
mating
connector
ENCODER
MATING
Contacts
JST PN:
JST PN:
Molex PN:
Molex PN:
PHDR-14VS
SPHD-001T-P0.5
51021-0600
50079-8100
JST PN:
JST PN:
Molex PN:
Molex PN:
PHDR-14VS
SPHD-001T-P0.5
51021-0600
50079-8100
il.
co
m
Cable
iro
Table 5-4: Encoder Cable and Connector Parts
2
29
30
st
e
m
s,
I
1
nc
.w
w
w
.a
5.4 I/O Connection and Cable
Sy
Figure 5-5: I/O Connection on ACS Drive/Controller
cable wire color
1
Input 1
Red/Black/White
2
Input 2
Orange/Green
3
Input 3
Red/White
4
Input 4
Green/White
5
Input 5
Blue/White
6
Input 6
White/Black/Red
7
Input 7
White/Red
8
Input 8
Orange/Red
9
Input COM
Green/Black
10
Output 1 -
Red/Black
11
Output 1 +
White
12
Output 2 -
White/Black
13
Output 2 +
Blue
14
Output 3 -
Blue/Black
15
Output 3 +
Orange
Ai
5-3
SIGNAL
r-O
il
PIN numbers
Tolomatic Hardware & Installation Guide: ACS Stepper Drive/Controller
co n n ectio n s & cables : 5
PIN numbers
RED/BLK/WHT
ORG/GRN
RED/WHT
GRN/WHT
BLU/WHT
WHT/BLK/RED
WHT/RED
ORG/RED
GRN/BLK
WHT
WHT/BLK
BLU
16
Output 4 -
Orange/Black
17
Output 4 +
Red
20
Case Ground
Shield
23
NA
Blue/Red
ALL24CONDUCTORS ARE 20NA
AWG
USE OVERALL SHIELD WITH 20 AWG DRAIN WIRE
CONDUCTOR
COLORS ARENA
UNIQUE
25
RoHS COMPLIANT
26 BE RATED 60°C OR NA
MUST
BETTER
COLOR OF JACKET IS GRAY
27MIN WORKING VOLTAGE
NA
100V
CABLE TO BE TESTED FOR CONTINUITY AND SHORTS
28INDIVIDUALLY
NA
BAG
Red/Green
29
Signal Ground
30
Analog Ground
iro
Table 5-5: I/O Connection PIN Outs
Green
Black/Red
Green/Black/White
Black/White/Red
Black
Black/White
w
1.00
[25.40]
1.00
[25.40]
4.00 [101.6]
nc
.w
w
1.00 MAX.
[25.40 MAX.]
.a
118.11 [3000.0]
BLU/BLK
ORG
ORG/BLK
RED
RED/BLK
BLU/RED
RED/GRN
GRN/BLK/WHT
BLK/WHT/RED
BLK
BLK/WHT
GRN
BLK/RED
SHRINK TUBING
FLYING LEADS
JST P/N: PHDR-30VS
s,
I
Figure 5-6: I/O Cable 3604-1770
st
e
m
Cable
tolomatic DRIVE MATING CONNECTOR
Part no.
DRIVE mating contacts
3604-1770
JST PN: PHDR-30VS
JST PN: SPHD-001T-P0.5
I/O: 5-meter
3604-1771
JST PN: PHDR-30VS
JST PN: SPHD-001T-P0.5
Sy
I/O: 3-meter
r-O
il
Table 5-6: I/O Cable and Connector Parts
5.5 Input Power Connection
Ai
1
2
3
4
5
6
7
8
9
11
12
13
14
15
16
17
10
23
24
27
28
29
30
25
26
20
cable wire color
il.
co
m
JST P/N:
PHDR-30VS
SIGNAL
CAUTION!
The input power is connected via pins on the drive with customer supplied cabling.
The input power mating connector is supplied by Tolomatic.
Reversing polarity of
the input power will
damage the actuator drive
electronics.
1
Figure 5-7: Input Power Connection
Tolomatic Hardware & Installation Guide: ACS Stepper Drive/Controller 5-4
5 : co n n ectio n s & cables
PIN numbers
SIGNAL
1
Main Power +24Vdc
2
Keep Alive +24Vdc
3
NA
4
Ground – Power
1
Table 5-7: Input Power PIN Outs
INPUT POWER MATING CONNECTOR
Customer Supplied
OnShore PN: ED950/4
il.
co
m
Cable
Table 5-8: Input Power Cable Parts
iro
5.6 RS-232 Connection
r-O
il
Sy
st
e
m
s,
I
nc
.w
w
w
.a
The RS-232 port connector is a standard RJ12 type connector and will mate with
standard RJ12 connectors and cables.
Figure 5-8: RS-232 Connection
Ai
The ACS Stepper Drive/Controller uses five signals from the RS-232 port and will
need to be properly wired to the PIN diagram shown below. RS-232 baud rate is set
at 38400 bps, 1-stop bit, no parity and no flow control. The RS-232 cable itself is a
straight through cable.
PIN 1
SHIELD
PIN numbers
description
2
TX
3
RX
4
Programming
5
Ground
6
Reset
Table 5-9: RS-232 PIN Outs and Connection
5-5
Tolomatic Hardware & Installation Guide: ACS Stepper Drive/Controller
co n n ectio n s & cables : 5
Cable
RJ12
tolomatic Part no.
Customer Supplied or 3604-1787
D-sub to RJ12
3604-1782
Table 5-10: RS-232 Cable Parts
5.7 RS-485 Connection
m
s,
I
nc
.w
w
w
.a
iro
il.
co
m
At the time of publication of this User Guide, the RS-485 port is available for future
networking capability with the ACS Drive/Controller.
Sy
st
e
Figure 5-10: RS-485 Connection for Future ACS Drive/Controller Neworking Capability
Ai
r-O
il
5.8 Ethernet Connection
At the time of publication of this user guide, the ACS Stepper Drive accommodates
two Ethernet ports for future networking capability.
Figure 5-11: Ethernet Connection for Future ACS Drive/Controller Programmability
Tolomatic Hardware & Installation Guide: ACS Stepper Drive/Controller 5-6
5 : co n n ectio n s & cables
5.9 Cable Routing
Over time, liquid contaminants such as oil and cleaning solutions may accumulate
on the cables and in the connectors if they are an exposed type. To minimize the
introduction of contaminants into the connector, route the cables so that there is a
loop in the cable just prior to its attachment to the connector.
iro
il.
co
m
Two examples are shown below depending on the orientation of the connectors.
Units mounted in such a way that the connectors are on the bottom surface of the
actuator require no looping.
Side
Mount
Loop
st
e
m
s,
I
nc
.w
w
w
.a
Top
Mount
Loop
Ai
r-O
il
Sy
Figure 5-12 Cable Routing for Top and Side Facing Connectors
5-7
Tolomatic Hardware & Installation Guide: ACS Stepper Drive/Controller
6
Specifications & Wiring
6.1 Digital Inputs
6.1.1 Specifications
The ACS Drive/Controller has a total of 8 opto-isolated digital inputs. These digital
inputs are optoisolated from the controller's drive circuitry and can be wired either
as sinking or sourcing. All of the digital inputs have a common return.
5K
INPUT
TO INTERNAL
CIRCUITRY
2K
il.
co
m
INPUT COMMON
Figure 6-1: Digital Input Circuit
INPUT CIRCUIT DIAGRAM
iro
Opto-isolated Digital Input Specifications
0 to 28Vdc
.a
Input Voltage Range
w
On State Voltage Range
nc
.w
On State Current:
0 to 5Vdc
w
Off State Voltage Range
16 to 28Vdc
1.9mA
24Vdc (nominal)
3.4mA
28Vdc (maximum)
4.2mA
s,
I
16Vdc (minimum)
7KΩ
Off State Current (maximum)
0.4mA
Update Rate (maximum)
2ms
st
e
m
Nominal Input Impedance (24V)
6.1.2 Typical Wiring Diagrams
Ai
r-O
il
Sy
Table 6-1: Opto-Isolated Digital Input Specifications
+
INPUT
24V POWER SUPPLY
-
INPUT COMMON
GND
Figure 6-2: Input Source INPUT
(switched)
Connection
SOURCED
(SWITCHED) CONNECTION
Tolomatic Hardware & Installation Guide: ACS Stepper Drive/Controller 6-1
6 : S P E C F I C A T I O N S & W I R I N G
+
INPUT
-
INPUT COMMON
24V POWER SUPPLY
GND
il.
co
m
Figure 6-3: Input Source INPUT
(PNP) Connection
SOURCED (PNP) CONNECTION
+
.a
INPUT
nc
.w
w
w
-
iro
24V POWER SUPPLY
INPUT COMMON
GND
Figure 6-4: Input Sink (switched) Connection
st
e
m
s,
I
INPUT SINK (SWITCHED) CONNECTION
+
INPUT COMMON
-
Ai
r-O
il
Sy
24V POWER SUPPLY
INPUT
GND
Figure 6-5: Input Sink (NPN) Connection
INPUT SINK (NPN) CONNECTION
6.2 Digital Outputs
6.2.1 Specifications
The ACS Drive/Controller has four digital outputs. These digital outputs are optoisolated from the drive circuitry and can be configured for sinking or sourcing. The
outputs are protected against over current and short circuit conditions. Once an
over current condition is present, the output turns off until the load is removed.
6-2
Tolomatic Hardware & Installation Guide: ACS Stepper Drive/Controller
S P E C I F I C A T I O N S & wiri n g : 6
OUT +
33
INTERNAL
CIRCUITRY
OUT -
Figure 6-6: Output Circuit
OUTPUT CIRCUIT
Digital Output Specifications
24V
il.
co
m
Maximum Switched Voltage
Output Voltage drop (20mA)
2V
Maximum Continuous Current
20mA
80mA
iro
Fold Back Current
2ms
.a
Update Rate (10KOhm Load)
30uA
w
Output Leakage Current
nc
.w
w
Table 6-2: Digital Output Specifications
+
OUTPUT +
LOAD
m
s,
I
6.2.2 Typical Wiring Diagrams
st
e
24V POWER SUPPLY
-
r-O
il
Sy
OUTOUT -
Figure 6-7: Digital Output Sinking Connection
Ai
DIGITAL OUTPUT SINKING WIRING DIAGRAM
+
OUTPUT +
OUTOUT -
24V POWER SUPPLY
-
LOAD
Figure 6-8: Digital Output Sourcing Connection
DIGITAL OUTPUT SOURCING WIRING DIAGRAM
Tolomatic Hardware & Installation Guide: ACS Stepper Drive/Controller 6-3
6 : S P E C F I C A T I O N S & W I R I N G
6.3 Input Power
6.3.1 Drive Specifications
CAUTION!
ACS Internal Drive Specifications
Voltage above the absolute
maximum can result in
permanent damage to
the ACS internal drive
components.
Current - Maximum
4A
Voltage - Nominal
20-28 V
Over Voltage
30 V
1
Under Voltage
18 V
Absolute Maximum Voltage
35 V
il.
co
m
2
Logic Current Draw Maximum (24V)
1
Drive will shut down at 30V; any voltage above the absolute max voltage can result in permanent
damage.
2
Drive will turn off below 18V.
w
w
.a
Do not reverse bias the
power inputs. Doing so
will result in permanent
damage to the drive.
iro
Table 6-3: ACS Internal Drive Specifications
WARNING!
100mA
nc
.w
The drive and logic (keep alive) power share the same ground. Drive logic circuitry
can be powered from the keep alive input or the main drive power.
m
6.3.2 Typical Wiring Diagrams
Sy
st
e
FUSE
MAIN POWER
FUSE
+
KEEP ALIVE
+
24V POWER SUPPLY
24V POWER SUPPLY
-
POWER GROUND
Ai
r-O
il
Do not short circuit the
motor power at the power
connector. Doing so may
damage the drive power
electronics. The motor/
cable is part of the current
regulation circuitry. For a
short occuring in a motor,
the motor leads should
provide enough resistance
and inductance to prevent
dangerous peak currents
from occurring.
s,
I
WARNING!
CASE GROUND
LOGIC
ANDMain
MAIN Power
POWER SUPPLIES
Figure 6-9: ACS Drive/Controller Logic
and
Supplies
FUSE
MAIN POWER
+
24V POWER SUPPLY
POWER GROUND
CASE GROUND
Figure 6-10: ACS Drive/Controller Single Supply – Main Power
SINGLE SUPPLY MAIN POWER
6-4
Tolomatic Hardware & Installation Guide: ACS Stepper Drive/Controller
S P E C I F I C A T I O N S & wiri n g : 6
FUSE
MAIN POWER
EMERGENCY
STOP
FUSE
+
KEEP ALIVE
24V POWER SUPPLY
POWER GROUND
il.
co
m
CASE GROUND
EXTERNAL CUTOFF FOR EMERGENCY STOP
iro
Figure 6-11: ACS Drive/Controller External Cutoff Switch for Emergency Stop
6.3.3 Power Supply Selection
.a
WARNING!
nc
.w
w
w
Both unregulated and regulated power supplies can be used to power the ACS
Drive/Controller. Unregulated supplies can be a better choice depending on the
application as they have a larger output capacitance, which can make them better
at supplying peak current without faulting out.
st
e
m
s,
I
The ACS Drive/Controller is intended to run off of an isolated DC power source. The
power supply current that will be required will depend on the motor power needed
in the installation. If operating more than one drive on the same power supply, add
the required power supply rating for each actuator. Maximum power supply current
for Tolomatic motors are shown below.
Ai
r-O
il
Sy
All installations should
provide a means for a
hardware emergency stop
that removes power from
the drive in an emergency
condition. The drive
emergency stop function
should not be relied on
when safety is required.
It is recommended to
disconnect only the + bus
power and keep the power
ground line connected.
Maximum Power Supply Requirements for Tolomatic Motors
MOTOR
MAXIMUM AMPERAGE
MAXIMUM WATTS @ 24 Vdc
NEMA 11
2.3 A
55.2
NEMA 17
3.4 A
81.6
NEMA 23
4A
96
Table 6-4: Maximum Power Supply Current for Tolomatic Motors
To size the power supply, the following formula can also be used to estimate
maximum current required:
Motor Current (amps rms) * 2.2 + 0.1
For example, if the motor is rated at 1 Arms, the calculation would look like:
1 Arms * 2.2 + 0.1 = 2.3A
Tolomatic Hardware & Installation Guide: ACS Stepper Drive/Controller 6-5
6: S P E C F I C A T I O N S & W I R I N G
The drive can supply a maximum of 2.5A peak (1.77 Arms), so the drive will not
use more than 4 Amps.
Supply power = current x 24V
Example: If 2.3A is needed, 2.3A x 24V = 55.2W.
6.3.4 Suggested Power Supplies
Power Output
il.
co
m
Switching Power Supplies
CUI PN: VGS-25-24
CUI PN: VGS-50-24
iro
CUI PN: VGS-75-24
50W
75W
150W
.a
TDK-Lambda PN: LS150-24
25W
nc
.w
w
w
Table 6-5: Recommended Switching Power Supplies
Linear Regulated Power Supplies
Power Output
28W
Power One PN: HN24-3.6-AG
80W
Power One PN: HD24-4.8-AG
115W
m
s,
I
Power One PN: HB24-1.2-AG
Sy
st
e
Table 6-6: Recommended Linear Regulated Power Supplies
r-O
il
Linear Unregulated Power Supplies
Power Output
Acopian PN: U24Y500
120W
Acopian PN: U24Y350
84W
Ai
Table 6-7: Recommended Linear Unregulated Power Supplies
Fuses (Slow Blow Type)
Bus Fuse: 4A
Logic Power Fuse: 1A
Table 6-8: Fuses
6-6
Tolomatic Hardware & Installation Guide: ACS Stepper Drive/Controller
I/O Timing Diagrams
7.1 I/O Timing Diagrams
7
The opto-isolated digital inputs require a minimum of 2ms of time to guarantee that
the input signal is registered by the drive. This is an important consideration to take
into account, especially if limit switches are used. If limit switches are used, careful
consideration should be used to prevent missed triggering due to high velocities.
Output timing assumes 10K Ω load.
2ms min
2ms min
il.
co
m
INPUT
Figure 7-1 Input Requirement
MAIN POWER
.a
INPUT
iro
INPUT REQUIREMENT
w
3s max
SYSTEM
STATUS
SYSTEM READY
nc
.w
w
SYSTEM STARTUP
Figure 7-2 System Startup Timing
Sy
st
e
m
s,
I
SYSTEM STARTUP TIMING
E-STOP
H
L
2ms min
10ms min
ENABLE
START
MOTION
2ms min
MOTION SELECT
LINES
Ai
r-O
il
INPUT
2ms min
2ms max
OUTPUT
MOTION
COMPLETE
Figure 7-3 Jog Move Timing
JOG TIMING
Tolomatic Hardware & Installation Guide: ACS Stepper Drive/Controller 7-1
7 : I / O T imi n g D iagrams
H
E-STOP
L
2ms min
2ms min
ENABLE
2ms min
INPUT
START
MOTION
2ms min
2ms min
MOTION SELECT
LINES
il.
co
m
2ms max
MOTION COMPLETE
iro
OUTPUT
TIMING
nc
.w
w
w
.a
Figure 7-4 Absolute & Incremental Move
Timing MOTION
START
7.1.1 Move Timing Rules
s,
I
1. While the Motion Complete signal is low, the drive will ignore Start Motion
pulses and Motion Selection lines.
Ai
r-O
il
Sy
st
e
m
2. If the enable signal is low or E-stop signal is high, the drive will ignore start
motion pulses.
7-2
Tolomatic Hardware & Installation Guide: ACS Stepper Drive/Controller
8
Move Select Logic
8.1 Move Select Logic Table
The three operating modes, 4/8/16 move commands, require digital inputs to select
the desired move for execution. The digital inputs are called Move Select 1 through
4 (MS1-MS4) in the digital input map. To select the desired move command refer to
the three logic tables below.
NOTE 1: MS# stands for Move Select #
il.
co
m
NOTE 2: 1 = On; 0 = Off
4 Move Commands Mode Logic Table
0
0
1
1
iro
0
1
0
1
.a
1
2
3
4
ms2
w
ms1
nc
.w
w
move
s,
I
Table 8-1: 4 Move Commands Mode Logic
m
8 Move Commands Mode Logic Table
ms1
ms2
ms3
1
2
3
4
5
6
7
8
0
1
0
1
0
1
0
1
0
0
1
1
0
0
1
1
0
0
0
0
1
1
1
1
Ai
r-O
il
Sy
st
e
move
Table 8-2: 8 Move Commands Mode Logic
Tolomatic Hardware & Installation Guide: ACS Stepper Drive/Controller 8-1
8 : move select logic
16 Move Commands Mode Logic Table
ms1
ms2
ms3
ms4
1
2
3
4
5
6
7
8
9
10
11
12
13
14
15
16
0
1
0
1
0
1
0
1
0
1
0
1
0
1
0
1
0
0
1
1
0
0
1
1
0
0
1
1
0
0
1
1
0
0
0
0
1
1
1
1
0
0
0
0
1
1
1
1
0
0
0
0
0
0
0
0
1
1
1
1
1
1
1
1
iro
.a
w
w
nc
.w
s,
I
il.
co
m
move
Ai
r-O
il
Sy
st
e
m
Table 8-3: 16 Move Commands Mode Logic
8-2
Tolomatic Hardware & Installation Guide: ACS Stepper Drive/Controller
LED Codes and Faults
9.1 LED Codes
9
LED Indicators
Green, Off
Motor is not powered
Green, On
Motor is powered
Red, On and Solid
A critical fault has occured
Red, On and Blinking
A safety fault has occured
Table 9-1: LED Indicators
.a
iro
il.
co
m
To clear a fault, the enable input needs to be lowered, and then raised. Faults can
also be cleared by the PC software. Faults that result in a blinking red LED indicator,
are cleared automatically once the fault condition is no longer present.
w
w
9.2 Fault Descriptions and Recovery
r-O
il
Sy
st
e
m
s,
I
nc
.w
Faults are broken up into safety faults and critical faults. Safety faults are
configurable. If a safety fault is enabled and configured for disable motor, the fault
will be latched until it is cleared in the same manner as the critical faults. If the fault
is configured as a stop motion, the fault will be cleared automatically once the fault
condition is no longer present. All critical faults will disable the motor when they
occur. To clear these faults, the fault condition cannot be present. The enable input
must be lowered, then raised.
Ai
Positive Limit Switch
Safety Faults Table
Positive limit switch has been reached. If configured as a
stop motion, motion will be allowed in the reverse direction.
The fault will be cleared once the positive limit switch input
is no longer active and a move in the negative direction is in
progress.
Negative Limit Switch
The negative limit switch has been reached. If configured as
stop motion, motion will be allowed in the positive direction.
The fault will be cleared once the negative limit switch input
is no longer active and a move in the positive direction is in
progress.
Tolomatic Hardware & Installation Guide: ACS Stepper Drive/Controller 9-1
9 : L E D i n dicators a n d faults
Safety Faults Table
Position Error
If an encoder is present, the position error fault can be
enabled. If encoder position and commanded postion differ
by a larger magnitude than the position error, the position
error fault will be activated. If fault is configured as a stop
motion, fault will be cleared on next move command.
NOTE: If force is less than 100%, a position will not be
triggered. Instead, it will stop and hold position (push mode).
E-Stop
If an input is configured as an E-stop and fault is enabled,
il.
co
m
the fault will be activated when the signal level on the pin is
high. If fault is configured as a stop motion, it will be cleared
once the E-stop input is lowered. Motion will not be allowed
iro
until E-stop has been cleared.
w
.a
Table 9-2: Safety Faults
nc
.w
w
Critical Faults Table
Feedback Error
Feedback device is malfunctioning.
Over Current
If a short circuit occurs from output to ground, this fault will be
m
Motor Over Temp
s,
I
triggered.
st
e
Drive Over Temp
Not implemented in this release.
Drive temperature is greater than the maximum allowed
temperature (75˚C).
Main power voltage exceeds the maximum voltage (30V).
Drive Under Voltage
Main power voltage below the minimum voltage (18V).
r-O
il
Sy
Drive Over Voltage
Ai
Table 9-3: Critical Faults
9-2
Tolomatic Hardware & Installation Guide: ACS Stepper Drive/Controller
10
Troubleshooting
10.1 Troubleshooting
10.1.1 Troubleshooting the ACS Drive/Controller
Troubleshooting Table
Symptom / Trouble
Possible cause / resolution
No communication to drive
1. Check power connection.
2. Verify the wiring of the communication cable.
il.
co
m
3. Verify baud rate and serial port number.
4. Verify that the communication cable is plugged in
securely.
iro
5. Verify that all drivers are up-to-date.
1. The load is too large.
.a
Actuator cannot move load
w
w
2. There is too much friction.
s,
I
nc
.w
3. Side load is excessive.
st
e
m
Drive is overheating
Ai
r-O
il
Sy
Actuator is operating erratically
4. Power supply does not have enough current capability.
5. Current limits are set too low.
1. Ambient temperature is too high.
2. Cooling is insufficient.
1. Current is set to low.
2. Following error is set too low.
3. Determine if power supply has enough current.
4. Check to see if any faults are being generated.
5. Verify that the drive has been configured properly for
the actuator.
No response from drive in I/O
1. Verify the enable signal is on.
mode
2. Verify that all of the I/O are configured properly.
3. Verify wiring to the actuator and drive.
Red and Green LEDs on, both
solid and no communication
1. Verify serial programming cable and cycle power to
drive.
2. Verify that the RJ12 cable is a reversed type.
3. Verify all connections are plugged in securely.
Table 10-1: Troubleshooting Descriptions
Tolomatic Hardware & Installation Guide: ACS Stepper Drive/Controller 10-1
Appendix 1
Motors
There are currently three different motor selections available from Tolomatic–a
NEMA 11, NEMA 17 and NEMA 23–available for operation with the ACS Drive/
Controller. Each motor is available with an optional differential incremental encoder.
All motors come with a short 150mm cable and connector on the motor body.
Tolomatic Motor Specifications
NEMA 11
NEMA 17
NEMA 23
Resistance
3.5 Ω
2.4 Ω
1.5 Ω
Inductance
2.3 mH
Rated Current
1 Arms
Maximum Torque
1500 RPM
Degree per Step
1.8°
w
Rotor Inertia
900 RPM
1050 RPM
1.8°
1.8°
0.028 lb-in^2
0.075 lb-in^2
3.7 mH
1.5 Arms
2 Arms
4.4 in-lbs
.a
Maximum RPM
6.25 in-lbs
4.5 mH
iro
0.813 in-lbs
il.
co
m
SPEC
w
0.006 lb-in^2
nc
.w
Table A-1: Tolomatic Motor Specifications
s,
I
Tolomatic Motor Part Numbers
TOLOMATIC PART NUMBER
m
MOTOR
3604-1780
st
e
NEMA 11 with Encoder
3604-1779
NEMA 17 with Encoder
3604-1776
NEMA 17 without Encoder
3604-1775
r-O
il
Sy
NEMA 11 without Encoder
3604-1778
NEMA 23 without Encoder
3604-1777
Ai
NEMA 23 with Encoder
Table A-2: Tolomatic Motor Part Numbers
Encoder Specifications
MOTOR TYPE
ENCODER
Bipolar Stepper,
Differential; 500 line
1.8˚ per Step
(2000 count post quad)
CABLE CONNECTOR
CABLE TERMINAL
PART NUMBER
PART NUMBER
794954-6
50212-8000
Table A-3: Encoder Specifications
A1-1
Tolomatic Hardware & Installation Guide: ACS Stepper Drive/Controller
NEMA11 Motor Connections
TYCO Mating Connector: 51065-0600; Molex Terminals: 50212-8000
WIRE COLOR
TYCO PIN
MOLEX PIN
SIGNAL
Black
6
6
B-
Green
3
4
B+
Red
1
3
A+
Blue
4
1
A-
Table A-4: NEMA11 Motor Connection PIN Outs
TYCO PIN
Black
Green
SIGNAL
6
1
B-
3
3
B+
1
4
A+
4
6
A-
.a
nc
.w
w
w
Red
Blue
JST PIN
iro
WIRE COLOR
il.
co
m
NEMA17 Motor Connections
TYCO Mating Connector: PHR-6; JST Terminals: SPH-002T-P0.5S
s,
I
Table A-5: NEMA17 Motor Connection PIN Outs
st
e
m
NEMA23 Motor Connections
TYCO Mating Connector: XHP-6; JST Terminals: SXH-001T-P0.5
TYCO PIN
JST PIN
SIGNAL
Black
6
1
B-
Green
3
3
B+
Red
1
4
A+
Blue
4
6
A-
Ai
r-O
il
Sy
WIRE COLOR
Table A-6: NEMA23 Motor Connection PIN Outs
ENCODER Connections: US Digital PN E8P-500-197-D-D-M-B
Molex Mating Connector: 510221-0600; Molex Contacts: 50079-8100
WIRE COLOR
MOLEX PIN
SIGNAL
Blue
2
ENC A+
Orange
3
ENC A-
Yellow
5
ENC B+
Gray
6
ENC B-
Black
1
Signal Ground
Red
4
+5VDC
Table A-7: Encoder Connections and Connector PIN Outs
Tolomatic Hardware & Installation Guide: ACS Stepper Drive/Controller A1-2
Appendix 2
Product Warranty
Tolomatic, Inc. warrants all products manufactured by it to be free from defects
in material and workmanship for a period of one year from date of shipment by
Tolomatic. If, within this period, any product is proven to be defective by Tolomatic,
the product will either be repaired or replaced at Tolomatic’s option.
This warranty shall not apply to:
1. Products not manufactured by Tolomatic. Warranty of these products will
conform and be limited to the warranty actually extended to Tolomatic by its
supplier.
il.
co
m
2. Damage to the product caused by circumstances beyond the control of
Tolomatic, such as negligence, improper maintenance, or storage.
iro
3. This warranty shall be void in the case of: any repairs or alterations made to
the product by parties other than Tolomatic.
Ai
r-O
il
Sy
st
e
m
s,
I
nc
.w
w
w
.a
The foregoing warranties are exclusive and in lieu of all other express and implied
warranties. Tolomatic is not subject to any other obligations or liabilities for
consequential damages.
A2-1
Tolomatic Hardware & Installation Guide: ACS Stepper Drive/Controller
il.
co
m
iro
.a
w
w
nc
.w
s,
I
m
st
e
Sy
r-O
il
Ai
Copyright © 2011 Tolomatic, Inc. All rights Reserved.
All brand and product names are trademarks of their respective
owners. Information in this document is believed to be accurate at
time of publication.
201102031630
il.
co
m
iro
.a
w
w
nc
.w
s,
I
m
st
e
Sy
r-O
il
Ai
3800 County Road 116, Hamel, MN 55340
Phone: 763.478.8000
Toll Free: 1.800.328.2174
Fax: 763.478.8080
Email: [email protected]
www.tolomatic.com