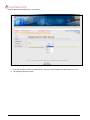
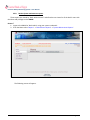
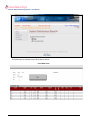
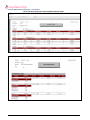
1
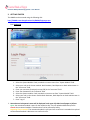
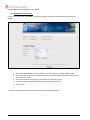
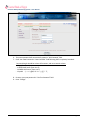
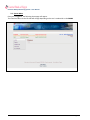
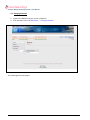
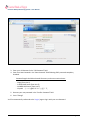
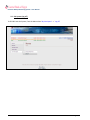
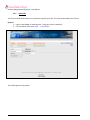
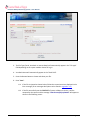
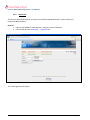
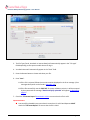
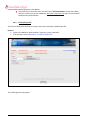
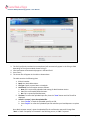
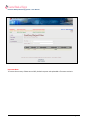
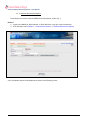
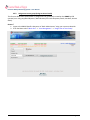
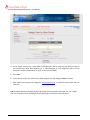
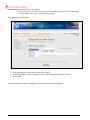
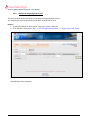
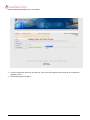
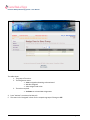
Domestic Money Monitoring System – User Manual Identifier: Revision: DMMS.001 1 Effective Date: 28/4/2010 Document Catalog Number: 2010/04/P004 Central Bank of Egypt Author: Hoda Sadek- Payment systems and Business Technology Sector Domestic Money Monitoring System DMMS USER MANUAL User Guide Central Bank of Egypt Visit CBE web site to retrieve a User Guide Copy Domestic Money Monitoring System http://cbe.org.eg/public/DMMS_UserGuide.pdf DMMS User Manual. Ver01 Page 1 Domestic Money Monitoring System – User Manual USER MANUAL TABLE OF CONTENTS DMMS User Manual .................................................................................................................................... 1 1. SYSTEM OVERVIEW .............................................................................................................................. 3 2. SYSTEM SUMMARY .............................................................................................................................. 3 3. 4. 5. 2.1. User Access Levels ....................................................................................................................... 3 2.2. User Creation and assigning access levels Process .................................................................... 4 2.3. Contingencies and Alternate Modes of Operation .................................................................... 4 2.4. Reporting Business Cycle Overview: ........................................................................................... 5 GETTING STARTED ................................................................................................................................ 6 3.1. Logging On ................................................................................................................................... 6 3.2. Logging on for the first time........................................................................................................ 7 3.3. System Menu ............................................................................................................................... 9 3.4. Changing Password ................................................................................................................... 10 3.5. Exit System (Log off) .................................................................................................................. 12 USING the DMMS (ONLINE) ............................................................................................................... 13 4.1. User environment requirements .............................................................................................. 13 4.2. System business function- role matrix ..................................................................................... 13 4.2.1. Upload file ............................................................................................................................. 14 4.2.2. Replace file ............................................................................................................................ 17 4.2.3. Confirm/Reject file ................................................................................................................ 19 4.2.4. Review "File Status" and "Maintenance Reports" .............................................................. 22 4.2.5. Assign user to user group (Assign to Access levels) ............................................................. 26 4.2.6. Activate the assigned group to users ................................................................................... 31 4.2.7. De-activate the assigned group to users .............................................................................. 34 4.2.8. Review System maintenance reports ................................................................................... 37 APPENDICES:....................................................................................................................................... 40 5.A. System Static Data ..................................................................................................................... 40 5.B. Input Files Upload Process-Error messages ............................................................................... 40 5.C. Input reports Templates ............................................................................................................ 41 DMMS User Manual. Ver01 Page 2 Domestic Money Monitoring System – User Manual 1. SYSTEM OVERVIEW Domestic Money Monitoring System "DMMS" is an online-automated web based system providing efficient, secure and accurate flow of data from the market to CBE, as well as enhancing the level of analysis achieved by generating a variety of diverse Business reports. DMMS Contains 3Sub-systems: Funds, Interbank and Interest Rates. 2. SYSTEM SUMMARY The System is managing Input and Output Reports of Funds, Interbank and Interest Rates. Each of those will be managed separately. Banks must adhere to the time and frequency of sending the Input Reports. The Uploaded Input report must be exactly similar to the designed template executed specially for DMMS and described in the Instruction Manual The DMMS Processes are triggered by 3 time parameters: 1- Opened Business Day: FUNDS and INTEREST RATES: Once CBE opens a business day for funds and/or Interest rates, banks Reporters / Reviewers are allowed to start uploading / confirming the input report files, only for the opened sub-system and till Cut-off time. INTERBANK: Once CBE opens a business day for Interbank, banks Reporters can start uploading the input file while Bank Reviewers are not allowed to Confirm/ reject the file before the fulfillment of the 2 following conditions : A. All banks have successfully uploaded their Interbank Input report files. B. The Cut-off time is exceeded. 2- Cut-Off time: At Cut-off time, the reporting process is terminated and DMMS will not accept any Input File upload/Replace but the Confirmation Process will still be open for banks reviewers to confirm / Reject the uploaded files for all opened sub-systems till business day closure. 3- Closed Business Day: Once the business day is closed for a specific Sub-system, it can not be accessed by banks. 2.1. User Access Levels To ensure the accuracy of data sent to CBE, it is mandatory to report via 2 levels: 1- Bank Reporter : DMMS profile enabling Banks users to upload / Replace The input report file on the DMMS. 2- Bank Reviewer : DMMS profile enabling Banks users to confirm / Reject The uploaded input report file. A third user inside the Bank will be responsible of assigning the above privileges to the bank's users on each subsystem while complying with CBE rules and procedures: DMMS User Manual. Ver01 Page 3 Domestic Money Monitoring System – User Manual 3- Bank Administrator : DMMS profile enabling Banks users to assign/Remove users (already registered on the DMMS (by CBE-operators) to/from the above mentioned access levels. (Review process in 2.2) 2.2. User Creation and assigning access levels Process Banks must provide CBE with all the employees' names and usernames (minimum 3 users, One for each access level) required having access to the DMMS by filling the "DMMS-User Creation" template. The required template can be downloaded from http://cbe.org.eg/public/DMMS_UserCreationtemplate.pdf CBE-DMMS OPERATOR will create the required usernames for each bank according to the received templates. Each BANK ADMINISTRATOR will assign each user to a role on a specific subsystem (Bank Reporter-Subsystem or Bank Reviewer-Subsystem) while complying with CBE announced rules and procedures. 2.3. Contingencies and Alternate Modes of Operation If any Technical or communication problem occurs disabling the bank reporter from using the system to report the file, CBE information technology technical support could be contacted for help through: To get CBE Information Technology technical support, please follow the following contacts: Fax. Tel. Email +202 25976020 +202 27701444 [email protected] If the Problem still exist due to any outstanding factors, CBE-Operator must be contacted, early enough before cut-off time, to get permission to send a soft copy of the input report file (according to the announced structured formats into the DMMS-technical instruction manual) by e-mail using the following contacts: Tel. Email +202 2770-1616 [email protected] Pls. follow the latest announced procedures always from CBE regarding technical support (a soft copy can be retrieved from the internet URL http://cbe.org.eg/public/DMMS_UserGuide.pdf ). DMMS User Manual. Ver01 Page 4 Domestic Money Monitoring System – User Manual 2.4. Reporting Business Cycle Overview: Open Business Day Once a subsystem (FUNDS, INTEREST RATES, INTERBANK) status on the DMMS is OPEN (as illustrated in 3.1), the reporting process will start. Reporting Process – UPLOADING/REPLACING Bank reporter uploads the Input Report file for the opened sub-system (Using the Upload / Replace File Function) as per the record description described in the Technical Instruction Manual delivered to banks (Templates are available in Appendix 5.C). This can be done till Cut-off time. One of the following 2 scenarios will occur while uploading the file: File is rejected by the system: Bank reporter check the error message, make the required corrections and Upload the Input file again. File is accepted by the system and successfully uploaded. Bank Reporters are allowed to upload/replace the input file as long as time didn't exceed Cut-off time, no matter what the file status is. (Valid, Not Valid, Accepted, Rejected) Reporting Process – CONFIRMING For FUNDS and INTEREST RATES Sub-systems ONLY: Once the file is successfully uploaded, Bank Reviewer reviews and Confirm or Reject the Input file uploaded by the Bank Reporter Using the Confirm/Reject File Function. This function can still be done after cut-off time and till the business day is closed. If the input File is confirmed, File is sent to CBE. If the Input File is Rejected, Bank reporter will replace the Input file with a new one using the Replace File Function as long as Cut-off time is not exceeded. For INTERBANK Sub-system: Bank Reviewers review and confirm or Reject the Input file uploaded by the Bank Reporter Using the Confirm/Reject File Function after fulfillment of the following 2 conditions: A. All banks have successfully uploaded their Interbank Input report files. B. The Cut-off time is exceeded. DMMS User Manual. Ver01 Page 5 Domestic Money Monitoring System – User Manual 3. GETTING STARTED The DMMS can be accessed using the following URL: http://DMMS.extra.cbeapplications.biz/DMMS/loginpage.aspx 3.1. Logging On 1- Select the System Module: Fund, Interbank or Interest rates from "System Module" field. 2- Select your role on the chosen module: Bank Reviewer, Bank Reporter or Bank Administrator in the "Connect as" field. 3- Enter your username (Previously sent to CBE) in the "username" field. 4- Enter Your Password in the "Password" field. 5- Select the System module: Fund, Interbank or Interest rate from "System Module" field. 6- Select your role on the chosen module: Bank Reviewer, Bank Reporter or Bank Administrator in the "Connect as" field. 7- Press "Log-in" Note that each subsystem's status will be displayed in the upper left labels on all pages as follows: Open: the mentioned module is open for the respective day. You can upload and Review Input file. Closed: the mentioned module is closed and can not be accessed by banks. Reporting Time exceeded: The mentioned module is still open but cut-off time is exceeded. No upload will be allowed but Bank's Reviewers can confirm the file. DMMS User Manual. Ver01 Page 6 Domestic Money Monitoring System – User Manual 3.2. Logging on for the first time If this is your first time on the DMMS, you will be required to change the preset automatic password as follows: 1- Select the System Module: Fund, Interbank or Interest rates from "System Module" field. 2- Select your role on the chosen module: Bank Reviewer, Bank Reporter or Bank Administrator in the "Connect as" field. 3- Enter your username (Previously sent to CBE) in the "username" field. 4- A preset password will automatically appear in the "Password" field. 5- Press "Log-in" You will be automatically redirected to the following 'Change Password' page: DMMS User Manual. Ver01 Page 7 Domestic Money Monitoring System – User Manual 6- The preset password will automatically appear in "Old Password" field. 7- Enter Your New Password in "New Password" field following CBE's complexity Standards. - Password length should be at least 8 Characters, and must contain at least: 1 Digit (from 0 to 9) 1 UPPER CASE Letter (from A to Z) 1 LOWER CASE Letter (from A to Z) 1 Symbol : | \ < > ! @ # $ % ^ & * ) (({ } / ?) 8- Re-enter your new password in "Confirm Password" field. 9- Press "Change". DMMS User Manual. Ver01 Page 8 Domestic Money Monitoring System – User Manual 3.3. System Menu Once you're logged in, the following home page will appear. The Functions Menu on the left side will change depending on the user's credentials on the DMMS. DMMS User Manual. Ver01 Page 9 Domestic Money Monitoring System – User Manual 3.4. Changing Password 1- Logon to the DMMS using your system credentials. 2- From the Menu select 'My Workspace' 'Change Password'. The Following Screen will appear: DMMS User Manual. Ver01 Page 10 Domestic Money Monitoring System – User Manual 3- Enter your old Password in the "Old Password" field. 4- Enter Your New Password in the "New Password" field following CBE's password complexity Standard. Password length should be at least 8 Characters, and must contain at least: - 1 Digit (from 0 to 9) 1 UPPER CASE Letter (from A to Z) 1 LOWER CASE Letter (from A to Z) 1 Symbol : | \ < > ! @ # $ % ^ & * ) (({ } / ?) 5- Re-enter your new password in the "Confirm Password" field. 6- Press "Change" You'll be automatically redirected to the 'Log in' page to log in with your new Password. DMMS User Manual. Ver01 Page 11 Domestic Money Monitoring System – User Manual 3.5. Exit System (Log off) To SECURLY exit the System, from the Menu select 'My Workspace' 'Log off' DMMS User Manual. Ver01 Page 12 Domestic Money Monitoring System – User Manual 4. USING THE DMMS (ONLINE) The system functions' menu that appears for each user depends on the role chosen for Login. Each user can view only the permitted functions. 4.1. USER ENVIRONMENT REQUIREMENTS PC with OS Windows XP-SP3 at least, with updated Antivirus agent and connected to CBE Internal/Extranet trusted network. MS-Internet explorer Web Browser (version7 at least) to access the DMMS. Ms Excel2003 and Acrobat Reader applications. N.B. Input files uploaded by banks MUST be in excel format, using MS-Office 2003 ONLY, and following the latest record description provided by CBE that can be found on URL: http://cbe.org.eg/public/DMMS_instructionmanual.pdf 4.2. SYSTEM BUSINESS FUNCTION- ROLE MATRIX Role Bank Reporter Bank Reviewer Bank Administrator DMMS User Manual. Ver01 Supported Functions Upload file Replace file Review 'file status' and system maintenance reports Confirm/Reject Review 'file status' and system maintenance reports Assign users to user groups Activate / Deactivate assigned user groups. Review system maintenance reports Page 13 Domestic Money Monitoring System – User Manual 4.2.1. Upload file This function allows Bank Reporter to upload the required report file. This must be done before Cut-off time. How To? 1- Logon to the DMMS as "Bank Reporter "using your system credentials. 2- From the Menu select 'Bank Input' 'Upload File'. The Following Screen will appear: DMMS User Manual. Ver01 Page 14 Domestic Money Monitoring System – User Manual 3- The File Type (Funds, Interbank or Interest Rates) will automatically appear in the "File type" field depending on the system module chosen for log in. 4- Your Bank Name will automatically appear in the "Bank Field". 5- Press the Browse Button to locate and select your file. 6- Press "Save". 6.A If the File is rejected as shown below, follow the corrective actions displayed in the Error message. (Error messages description can be found in Appendix A-9) 6.B If the file successfully met the FIRST SET of system validations criteria, it will be accepted by the system and the message "Data Successfully uploaded" will appear as shown in the following screen: DMMS User Manual. Ver01 Page 15 Domestic Money Monitoring System – User Manual 1- Successfully 7- Check the "File Status Report" described in 4.2.4.1 to ensure that the file is valid. To replace a successfully uploaded file before the bank reviewer Action; the Bank reporter can still use the same "Upload" Function described in 4.2.1. To replace a successfully uploaded file after the bank reviewer has confirmed / rejected the file, bank reporter must use the “Replace” function as described in 4.2.2. Important Notes: A successfully uploaded Input report doesn’t mean that it’s valid. Bank Reporter MUST check the "File Status Report" to ensure that the File is Valid. A file with status "Not Valid" that is not valid in the "File Status Report” means that it didn’t meet the second set of system validations (described in Appendix A-9) and can’t be Accepted OR Rejected by Bank Reviewer. DMMS User Manual. Ver01 Page 16 Domestic Money Monitoring System – User Manual 4.2.2. Replace file This function allows Bank Reporter to replace a successfully uploaded file after it's been confirmed / Rejected by Bank Reviewer. How To? 1- Logon to the DMMS as "Bank Reporter "using your system credentials. 2- From the Menu select 'Bank Input' 'Replace Files'. The Following Screen will appear: DMMS User Manual. Ver01 Page 17 Domestic Money Monitoring System – User Manual 3- The File Type (Funds, Interbank or Interest Rates) will automatically appear in the "File type" Field depending on the system module chosen for log in. 4- Your Bank Name will automatically appear in the "Bank" Field. 5- Press the Browse Button to locate and select your file. 6- Press "Save". 6.A If the File is rejected, follow the corrective actions displayed in the Error message. (Error messages description can be found in Appendix A-9) 6.B If the file successfully met the FIRST SET of system validations criteria, it will be accepted by the system and the message "Data Successfully uploaded" will appear as displayed in page 16. 7- Check the "File Status Report" described in 4.2.4.1 to ensure that the file is valid. Important Notes: A successfully uploaded Input report doesn’t mean that it’s valid. Bank Reporter MUST check the "File Status Report" to ensure that the File is Valid. DMMS User Manual. Ver01 Page 18 Domestic Money Monitoring System – User Manual A file with status "Not Valid" that is not valid in the "File Status Report” means that it didn’t meet the second set of system validations (described in Appendix A-9) and can’t be Accepted OR Rejected by Bank Reviewer. 4.2.3. Confirm/Reject file This function allows Bank Reviewer to accept / reject the successfully uploaded input file. How to? 1- Logon to the DMMS as 'Bank Reviewer' using your system credentials. 2- From the Menu select 'Bank Input' 'Confirm / Reject File'. The Following Screen will appear: DMMS User Manual. Ver01 Page 19 Domestic Money Monitoring System – User Manual 3- The File Type (Funds, Interbank or Interest Rates) will automatically appear in the File type Field depending on the system module chosen for log in. 4- Your Bank Name will automatically appear in the Bank Field. 5- Press "Save". 6- The chosen file will appear in the table as shown above. The table contains the following data: 1. #: Serial number. 2. Bank: Your bank abbreviation. 3. File Type: Funds, Interest Rates or Interbank. 4. Confirmed: The confirmation status as follows: a. New: File is successfully uploaded and waiting for Bank Reviewer Action. b. Yes: File is confirmed by Bank Reviewer. c. No: File is rejected by Bank Reviewer. 5. File Data: To review the uploaded input file, Press the "View" button and the file will be displayed. 6. Action: To accept / reject the uploaded file. a. Press "Accept" to send the uploaded input file to CBE. b. Press "Reject" to refuse the uploaded input file and allow your Bank Reporter to replace it. Once Bank reviewer accept / reject the uploaded file, the confirmation status will change from "New" to "Yes" if accepted, as illustrated in the following screen, or "NO" if rejected. DMMS User Manual. Ver01 Page 20 Domestic Money Monitoring System – User Manual Important Note: To ensure the accuracy of data sent to CBE, the bank reporter who uploaded a file cannot review it. DMMS User Manual. Ver01 Page 21 Domestic Money Monitoring System – User Manual 4.2.4. Review "File Status" and "Maintenance Reports" 1.1..1. File Status Report This Report displays the status of Uploaded Input Reports for each Subsystem and a description of the errors if the file is rejected by the system. How to? 1- Logon to the DMMS as 'Bank Reporter' or 'Bank Reviewer' using your system credentials. 2- From the Menu select 'Reports' 'File Status'. The following screen will appear: DMMS User Manual. Ver01 Page 22 Domestic Money Monitoring System – User Manual 3- The File Type (Funds, Interbank or Interest Rates) will automatically appear in the File type Field depending on the system module chosen for log in. 4- Your Bank Name will automatically appear in the Bank Field. 5- All the Input reports of the required module will appear in the table as shown above. The table contains the following data: 1- Bank: Your bank abbreviation. 2- File Type: Funds, Interest Rates or Interbank. 3- Deleted: shows if the file was deleted and replaced as follows: a. New: File is active. b. Yes: File has been deleted and replaced. A crossed out line shows that this file has been successfully replaced. 4- Valid: Shows if the file was accepted by the system a. Yes: the file is successfully uploaded and met the system validations b. No: the file didn't meet the system validations and is rejected by the system 5- Confirmed: The confirmation status as follows: a. New: File is successfully uploaded and waiting for Bank Reviewer Action. b. Yes: File is confirmed by Bank Reviewer. c. No: File is rejected by Bank Reviewer. 6- Error Log: displays the errors in the uploaded file rejected by the system. (Appendix A-9) 7- Entry time: Time and date of file uploading 8- View: To view the input file, Press the "View" button and the file will be displayed. 9- Total no. of Valid and confirmed files. DMMS User Manual. Ver01 Page 23 Domestic Money Monitoring System – User Manual 1.1..2. Business Maintenance Reports These Reports are used to view the DMMS Static data (Names, Codes, IDs,…). How to? 1- Logon to the DMMS as 'Bank Reporter' or 'Bank Reviewer' using your system credentials. 2- From the Menu select 'Reports' 'Maintenance Reports' 'Business Maintenance Reports'. A list of available reports will be displayed as shown in the following screen: DMMS User Manual. Ver01 Page 24 Domestic Money Monitoring System – User Manual Example: Currency Maintenance Report DMMS User Manual. Ver01 Page 25 Domestic Money Monitoring System – User Manual 4.2.5. Assign user to user group (Assign to Access levels) This function allows bank administrator to assign each user (previously created on the DMMS by CBE operator) to a user group (Bank Reporter / Bank Reviewer) for each subsystem (Funds, Interbank, Interest Rates). How to? 1- Logon to the DMMS-Specific subsystem as "Bank Administrator "using your system credentials. 2- From the Menu select 'Admin Site' 'User Management' 'Assign User to User Group'. DMMS User Manual. Ver01 Page 26 Domestic Money Monitoring System – User Manual The following screen will appear: 3- From the combo box select the user name you want to assign to a group (Access level), or use the "Find" function to search for users with different search criteria as described later. DMMS User Manual. Ver01 Page 27 Domestic Money Monitoring System – User Manual 4- In the 'Assign' column, Put a check mark in the check box next to the group you want to assign to the selected user either Bank Reporter_IB or Bank Reviewer_IB. This assignment will be on the subsystem chosen by Bank Admin to log in (In this case Interbank). 5- Press Save. 6- In the 'Active' column, the status of the newly assigned role will change to New (as shown) 7- Bank Admin must activate the assignment as described in 4.2.6 to allow the user to work with the new role. N.B. Both Bank Reviewer and Bank Reporter privileges can be assigned to the same user, but a single user can not perform both Uploading and reviewing actions to the same input file report. DMMS User Manual. Ver01 Page 28 Domestic Money Monitoring System – User Manual To search for users with different search criteria, Bank Admin can use the "Find" function by pressing "Find" in the 'Assign users to user group' page. The following screen will appear: 3- From the combo box, select the required search criteria. 4- In the empty field, enter the respective name or Code to show the required list of users. 5- Press "Find" The following table will appear showing a list of the required users and their details: DMMS User Manual. Ver01 Page 29 Domestic Money Monitoring System – User Manual 6- Press select, to select the user you want to assign to a group. 7- Follow the same steps described in 4.2.5 DMMS User Manual. Ver01 Page 30 Domestic Money Monitoring System – User Manual 4.2.6. Activate the assigned group to users This function allows Bank administrator to activate the assigned group to users. Any assigned role must be activated by bank admin to allow user to use it. How to? 1- Logon to the DMMS as "Bank Admin "using your system credentials. 2- From the Menu select 'Admin Site' 'User Management Activation' 'Assign User to User Group' The following screen will appear: DMMS User Manual. Ver01 Page 31 Domestic Money Monitoring System – User Manual 2. From the combo box select the required user. Only users with assigned roles waiting to be activated will appear in this list. 3. The following table will appear: DMMS User Manual. Ver01 Page 32 Domestic Money Monitoring System – User Manual The table shows: 1. The group of Functions. 2. The Assignment status: New: assigned and waiting to be activated. No: Not assigned. Yes: Assigned and active. 3. The Action required: Activate: to activate New assignments. 4. Press "Activate" to activate the New role. 5. The status in the 'Assigned' column for the respective group will change to YES DMMS User Manual. Ver01 Page 33 Domestic Money Monitoring System – User Manual 4.2.7. De-activate the assigned group to users This function allows Bank administrator to de-activate the assigned group from users. i.e. Remove Users’ privileges (Access Level) over a specific subsystem. How to? 1- Logon to the DMMS as "Bank Admin "using your system credentials. 2- From the Menu select 'Admin Site' 'User Management Deactivation' 'Assign User to User Group' The following screen will appear: DMMS User Manual. Ver01 Page 34 Domestic Money Monitoring System – User Manual 3- From the combo box select the required user. Only users with assigned roles will appear in this list. 4- The following table will appear: DMMS User Manual. Ver01 Page 35 Domestic Money Monitoring System – User Manual The above table displays: 1. The group of Functions. 2. The Assignment status: No: Not assigned. Yes: Assigned and active. 3. The Action required: Deactivate: to deactivate active assignments. 5- Press "Deactivate" to deactivate the assigned role. 6- The status in the 'Assigned' column for the respective group will change to No , Indicating that this user (‘user_13’ into our example) has no longer the mentioned privilege (Bank Reviewer into our example) over the above mentioned subsystem (‘Interbank’ in our example) DMMS User Manual. Ver01 Page 36 Domestic Money Monitoring System – User Manual 4.2.8. Review System maintenance reports These reports are viewed by "Bank Administrators" and allow them to view a list of the bank's users with their data and privileges on the DMMS. How to? 1- Logon to the DMMS as 'Bank Admin' using your system credentials. 2- From the Menu select 'Reports' 'Maintenance Reports' 'System Maintenance Reports'. The following screen will appear: DMMS User Manual. Ver01 Page 37 Domestic Money Monitoring System – User Manual The following is an example of each of the above reports: List of Bank Users DMMS User Manual. Ver01 Page 38 Domestic Money Monitoring System – User Manual List of User Groups (Access Levels) members and their status DMMS User Manual. Ver01 Page 39 Domestic Money Monitoring System – User Manual 5. APPENDICES: 5.A. System Static Data The document attached is just a sample of System static data; the latest (updated) static data is available through the DMMS system itself – System Maintenance reports section. Sample of DMMS static data.xls 5.B. Input files upload process-Error messages Error description Displayed Error Message 1- General Errors Business date in the report does not match the opened day on the system Sheet summary and its header value are not identical Invalid Business Day The Bank ID is not found OR not active Invalid Bank ID The currency ID is not found Number of digits after the decimal point exceeded the allowed no. for numeric values Number of digits after the decimal point exceeded the allowed no. for percentage values 2- Fund Module errors Invalid CURRENCY ID ' Numeric / Fractional length exceeded. Percentage / Fractional length exceeded. The Fund ID is not found OR not active Invalid Fund ID The Investment Manager ID OR not active Invalid Investment Manager ID The Fund Type ID is not found OR not active Invalid Fund Type ID The Fund Sub Type ID is not found OR not active Invalid Fund Sub-type ID' Error in the report header, Cell A1 Fund’s current amount doesn’t equal the total Asset Allocation OR Current amount doesn’t equal Total Holdings. No of certificates must equal : previous no + new certificates – Redeemed certificates Error in the Fund Data: Investment manager, Type, Sub-type,.. 'FUND AMOUNT FAILED, ' 'FUND CERT FAILED, ' Mismatching Fund Data Method of calculation must be HTM OR MTM OR empty. ASSET TBONDS YIELD FAILED, ' 'ASSET CBONDS YIELD FAILED, ' 'ASSET TBILLS YIELD FAILED, ' … Invalid Method Of Calculation. 3- Interbank Module: The Lender Bank ID is not found OR not active The Borrower Bank ID is not found OR not active The Interbank data doesn’t match the data received from the other bank. Check that MATURITY_DATE = START_DATE + NUMBER_OF_DAYS The Category ID is not found OR not active OR Incorrect Invalid Lender ID Invalid Borrower ID 'INTERBANK DATA MISS MATCH, ' Invalid MATURITY Date Invalid CATEGORY ID The type of Deal must be 'N' OR 'R' Invalid TYPE OF DEAL The specified yield is out of the accepted range. 4- Interest Rates Module: The type of Deal must be 'L' OR 'D' DMMS User Manual. Ver01 Invalid TYPE OF DEAL Page 40 Domestic Money Monitoring System – User Manual 5.C. Input reports Templates 5.C.1. Funds Input file Fund Template v001-28042010.xls 5.C.2. Interbank Input File Interbank Template v001-28042010.xls 5.C.3. Interest Rates Input File Interest Rate Template v001-28042010.xls DMMS User Manual. Ver01 Page 41