1
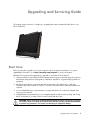
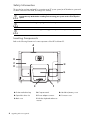
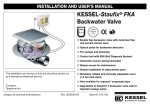
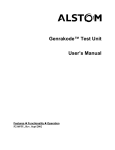
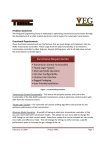
Upgrading and Servicing Guide
Copyright Information
The only warranties for Hewlett-Packard products and services are set forth in the express statements accompanying such products and
services. Nothing herein should be construed as constituting an additional warranty. HP shall not be liable for technical or editorial
errors or omissions contained herein.
HP assumes no responsibility for the use or reliability of its software on equipment that is not furnished by HP.
This document contains proprietary information that is protected by copyright. No part of this document may be photocopied,
reproduced, or translated to another language without the prior written consent of HP.
Hewlett-Packard Company
P.O. Box 4010
Cupertino, CA 95015-4010
USA
Copyright © 2008 Hewlett-Packard Development Company, L.P.
May be licensed in the United States by one or both of U.S. Patents Nos. 4,930,158 and 4,930,160 until August 28, 2008.
Microsoft and Windows are U.S. registered trademarks of Microsoft Corporation. The Windows Vista is either a registered trademark
or trademark of Microsoft Corporation in the United States and/or other countries/regions.
HP supports lawful use of technology and does not endorse or encourage the use of our products for purposes other than those
permitted by copyright law. The information in this document is subject to change without notice.
Table of Contents
Start Here.....................................................................................................................................1
Safety Information ....................................................................................................................2
Locating Components................................................................................................................2
Opening the Computer .............................................................................................................3
Removing and Replacing a Memory Module ....................................................................................7
Removing a Memory Module .....................................................................................................8
Replacing a Memory Module...................................................................................................10
Removing and Replacing the Hard Disk Drive .................................................................................14
Removing the Hard Disk Drive .................................................................................................14
Replacing a Hard Disk Drive....................................................................................................17
Table of Contents
iii
iv
Upgrading and Servicing Guide
Upgrading and Servicing Guide
This guide provides instructions for replacing or upgrading the memory and the hard disk drive in your
HP TouchSmart PC.
Start Here
Before you decide to upgrade or service the computer, refer to the product specifications for system
upgradability information. Go to http://www.hp.com/support for product information.
Read the following items before attempting to upgrade or service the HP TouchSmart PC.
These procedures assume familiarity with the general terminology associated with personal computers,
and with the safety practices and regulatory compliance required for using and modifying electronic
equipment.
Write down and save the computer model and serial numbers, all installed options, and other
information about the computer. It is easier to consult this information than to open and examine the
computer.
It is recommended that you use an antistatic wrist strap and stand on a conductive foam pad when
working on the computer.
Hewlett-Packard recommends that you use a magnetic-tipped screwdriver when opening and closing
the HP TouchSmart PC, to make it easier to remove and install the screws.
WARNING: Always disconnect the HP TouchSmart PC from the power source before removing
the memory cover or the back cover. Failure to do so before you open the HP TouchSmart PC
or perform any procedures can result in personal injury or equipment damage.
Upgrading and Servicing Guide
1
Safety Information
This product has not been evaluated for connection to an “IT” power system (an AC distribution system with
no direct connection to the earth, according to IEC 60950).
WARNING: Please read “Additional Safety Information” in the Limited Warranty, Support, and
System Recovery Guide before installing and connecting your system to the electrical power
system.
WARNING: Avoid touching sharp edges inside the computer.
WARNING: Take care when lifting or moving your computer. The computer is heavy.
Locating Components
Refer to the following illustration to locate components of the HP TouchSmart PC.
A
B
C
H
D
G
E
2
F
A: Pocket media drive bay
D: Computer stand
G: Hard drive/memory cover
B: Optical disc drive slot
E: Power adapter connector
H: Connector cover
C: Back cover
F: Wireless keyboard and mouse
receiver
Upgrading and Servicing Guide
Opening the Computer
To avoid injury and equipment damage, always complete the following steps in order, when opening the
HP TouchSmart PC.
1 Remove all media and external devices (CDs, DVDs, memory cards, USB devices, pocket media drive,
and external hard disk drives) from the HP TouchSmart PC.
CAUTION: Static electricity can damage the electronic components of the HP TouchSmart PC or
optional equipment. Ensure that you are discharged of static electricity by briefly touching a
grounded metal object.
2 Tap the Windows Vista start button™
, and then tap Shut Down.
WARNING: To reduce the risk of personal injury from electrical shock or hot surfaces,
disconnect the power cord from the wall outlet, and allow the internal system components to
cool before touching them.
3 After the system has completely shut down, disconnect the power adapter (A) from the back of the
HP TouchSmart PC.
A
Upgrading and Servicing Guide
3
4 Remove the connector cover by inserting your finger under the gap on the bottom-left side of the
cover (A), and then pulling gently.
A
5 Disconnect all other attached cables from the back of the HP TouchSmart PC.
6 Place the computer face-down on a soft flat surface. HP recommends that you set down a blanket,
towel, or other soft cloth to protect the touch screen surface from scratches or other damage.
4
Upgrading and Servicing Guide
7 Apply additional pressure to lift the computer stand as far as it will go to an upright position, about
90 degrees (A) from the computer, and then move the latch to the right until it is in the locked
position (B).
B
A
8 Remove the screw that secures the hard disk drive/memory cover to the back of the computer.
Upgrading and Servicing Guide
5
9 Insert your fingertips just under the cover, and then pull up firmly to release the tabs.
10 Slide the cover out toward you to remove it, and then set it aside.
To replace a memory module, see “Removing and Replacing a Memory
Module” on page 7.
To replace a hard disk drive, see “Removing and Replacing the Hard Disk
Drive” on page 14.
6
Upgrading and Servicing Guide
Removing and Replacing a Memory Module
Your HP TouchSmart PC comes with random access memory (RAM), which temporarily stores data and
instructions on your computer. The HP TouchSmart PC ships with one or two memory modules that you can
replace.
Before you begin
Observe the following requirements before removing and replacing the memory module.
The motherboard contains sockets for SO-DIMMs (small outline dual in-line memory modules). A memory
module with the key slot circled is shown in the following illustration.
To determine which type and speed of memory module your HP TouchSmart PC uses, and for specific
memory module information and specifications, go to www.hp.com/support
CAUTION: Using the wrong type of memory module could damage the computer.
Upgrading and Servicing Guide
7
Removing a Memory Module
1 Before you begin this procedure, follow the procedures in “Start Here” on page 1.
2 Locate the memory module EMI shield (A), hook a finger through the shield loop, and then lift it up and
out of the way (B).
B
A
CAUTION: When handling a memory module, be careful not to touch any of the contacts.
Doing so may damage the module.
CAUTION: Do not pull the memory module out of the socket. Use the latches of the retaining
clips to remove the module.
8
Upgrading and Servicing Guide
3 Push the two latches of the retaining clips away from the memory module. It may be easier to push one
latch at a time. The memory module pops up at an angle. Both memory modules can be removed by
using the same procedure.
4 Lift the memory module from the memory socket. Note the key slot on the connector edge.
5 Store the memory module in antistatic packaging.
Upgrading and Servicing Guide
9
Replacing a Memory Module
Upgrade the memory in your HP TouchSmart PC with memory of the same type and speed as the memory
originally installed. The capacity for both memory modules must match for optimal performance. Both
memory modules can be installed by using the same procedure listed below.
CAUTION: When handling a memory module, be careful not to touch any of the contacts.
Doing so may damage the module.
1 Remove the memory module. See “Removing a Memory Module” on page 8.
2 Align the new memory module with the socket, so that the key slot on the connector edge is the same
as the module that you removed.
NOTE: The sockets are keyed. If the module slot does not match the socket, turn the memory
module over.
10
Upgrading and Servicing Guide
3 Slide the memory module all the way into the memory slot, until the gold edge is almost completely
hidden in the slot, and then push down the outer edge of the memory module until the retaining clips
snap into place.
CAUTION: The memory module must be inserted all the way into the slot before it is snapped
down into place; otherwise it will not work properly. In the following illustration, a memory
module is installed incorrectly (A), with the gold edge showing.
A
Upgrading and Servicing Guide
11
4 Replace the memory module EMI shield.
5 Replace the hard disk drive/memory cover by lowering it into place, and sliding it so the slots on the
cover fit into the grooves under the computer stand.
The cover snaps into place with a click as the side tabs engage with the grooves in the computer.
When the cover is replaced properly, it will be flush with the larger back cover.
12
Upgrading and Servicing Guide
6 Replace the screw that secures the hard disk drive cage to the chassis.
NOTE: If a blank screen is displayed after you replace or add a memory module, the memory is installed
incorrectly, or it is the wrong type of memory. Remove and reinstall the memory module.
You have completed this procedure successfully!
Now, place the computer upright on a flat surface with the stand in a safe and open position.
10° min.
40°max
Reconnect power cables and peripherals.
Upgrading and Servicing Guide
13
Removing and Replacing the Hard Disk Drive
You can replace or upgrade the hard disk drive.
The hard disk drive is a Serial ATA (advanced technology attachment) drive, which uses a narrow
data cable.
CAUTION: Before removing the hard disk drive, back up any personal files on the hard disk
drive to an external storage device, such as a DVD. Failure to do so may result in data loss.
After replacing the hard disk drive, you need to run System Recovery using recovery discs
to load the factory-installed files. For details about the recovery procedure, refer to the
Limited Warranty, Support, and System Recovery Guide included with your HP TouchSmart PC.
Removing the Hard Disk Drive
1 Complete the procedures to prepare the HP TouchSmart PC. See “Start Here” on page 1.
WARNING: To reduce the risk of personal injury from electrical shock or hot surfaces,
disconnect the power cord from the wall outlet, and allow the internal system components to
cool before touching them.
2 Locate the hard disk drive EMI shield (A), and then lift the shield up and out of the way (B), using the
shield loop.
B
A
14
Upgrading and Servicing Guide
3 While the hard disk drive is still in the computer, disconnect the power and data cables on the hard
disk drive, by pressing down the latches and then removing them from the drive.
4 Remove the shipping screw just to the left of the cables.
5 Pull up on the hard disk drive tab (A), and then pull the drive from its bay (B).
A
B
Upgrading and Servicing Guide
15
6 With a Phillips screwdriver (magnetic-tipped recommended), remove the four screws that secure the
hard disk drive to the cage, and then slide the hard disk drive out of the cage.
Your hard disk drive cage may look slightly different from the illustration.
7 Place the hard disk drive in an anti-static bag.
16
Upgrading and Servicing Guide
Replacing a Hard Disk Drive
1 If necessary, remove the hard disk drive. See “Removing the Hard Disk Drive” on page 14.
CAUTION: Take care when handling a hard disk drive. Do not bang or shake it. It can be easily
damaged.
2 Slide the hard disk drive into the cage and then replace the four screws.
Your hard disk drive cage might look different from the illustration.
Upgrading and Servicing Guide
17
3 Slide the hard disk drive cage into the bay until you hear the click indicating it is engaged.
4 Connect the power and data cables to the hard disk drive.
18
Upgrading and Servicing Guide
5 Replace the shipping screw that holds the hard disk drive cage to the computer.
Upgrading and Servicing Guide
19
6 Replace the hard drive EMI shield, pressing it firmly into place so the tabs engage.
20
Upgrading and Servicing Guide
7 Replace the hard disk drive/memory cover by lowering it into place, and sliding it so the slots on the
cover fit into the grooves under the computer stand.
The cover snaps into place with a click as the side tabs engage in the computer. When the cover is
replaced properly, it will be flush with the larger back cover.
8 Replace the screw that secures the hard disk drive cage to the chassis.
Upgrading and Servicing Guide
21
You have completed this procedure successfully!
Now, place the computer upright on a flat surface with the stand in a safe and open position.
10° min.
Reconnect power cables and peripherals.
22
Upgrading and Servicing Guide
40°max
Copyright © 2008 Hewlett-Packard Development Company, L.P.
The information contained herein is subject to change without notice.
Printed in xxxxx
24
Upgrading and Servicing Guide