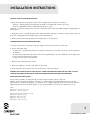
1
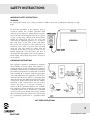
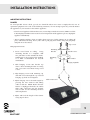
sundial™
HQI Pendant Light Fixture
Instructions for Model#1055 & 1056
Important Safety Instructions
Installation Instructions
Troubleshooting
Warranty
.......
.......
.......
.......
Page
Page
Page
Page
2
4
8
9
EMAIL: [email protected]
WWW.CURRENT-USA.COM
05-2006-JEE
Safety Instructions
WARNING
To guard against injury, basic safety precautions should be observed, including the following:
READ AND FOLLOW ALL SAFETY INSTRUCTIONS
DANGER
To avoid possible electric shock, special care should be taken since water is employed in the use of
aquarium equipment. For each of the following situations, do not attempt repairs by yourself; return the
appliance to an authorized service facility for service or discard the appliance:
1. If electrical components of the fixture get wet, unplug the appliance immediately.
2. Carefully examine the fixture after installation. It should not be plugged in if there is water
on parts not intended to be wet.
3. Do not operate fixture if it has a damaged cord or plug, or if it is malfunctioning or
damaged in any manner. See the drip loop instructions on the next page for proper power
cord installation.
4. If the plug or receptacle does get wet, DON’T unplug the cord. Disconnect the fuse or
circuit breaker that supplies power to the fixture. Then, unplug and examine for presence
of water in the receptacle.
5. Close supervision is necessary when any appliance is used by or near children.
6. To avoid injury, do not contact hot parts such as lamps and the like.
7. Always unplug the fixture from an outlet when not in use, before putting on or taking off
parts, and before cleaning. Never yank cord to pull plug from outlet. Grasp the plug and pull
to disconnect.
8. Do not use the fixture for other than intended use. The use of attachments not recommended
or sold by the fixture manufacturer may cause an unsafe condition.
9. Do not install or store the fixture where it will be exposed to the weather or to temperatures
below freezing.
10. Make sure the fixture is securely installed before operating it.
11. Read and observe all the important notices on the fixture.
12. If an extension cord is necessary, a cord with a proper rating should be used. A cord rated
for less Amperes or watts than the fixture rating may overheat. Care should be taken to
arrange the cord so that it will not be tripped over or pulled.
SAVE THESE INSTRUCTIONS
WWW.CURRENT-USA.COM
Safety Instructions
IMPORTANT SAFETY INSTRUCTIONS
WARNING
To guard against injury, basic safety precautions should be observed, including the following on drip
loops:
To avoid the possibility of the appliance plug or
receptacle getting wet, position aquarium stand
and tank to one side of a wall-mounted receptacle
to prevent water from dripping onto the receptacle
or plug. A “drip loop,” shown in the figure below,
should be arranged by the user for each cord
connecting an aquarium appliance to a receptacle.
The “drip loop” is that part of the cord below
the level of the receptacle, or the connector if an
extension cord is used, to prevent water traveling
along the cord and coming in contact with the
receptacle. If the plug or receptacle does get wet,
DON’T unplug the cord. Disconnect the fuse or
circuit breaker that supplies power to the appliance.
Then, unplug and examine for presence of water in
the receptacle.
GROUNDING INSTRUCTIONS
This appliance should be grounded to minimize
the possibility of electric shock. This appliance is
equipped with an electric cord having an equipment
grounding conductor and a grounding type plug. The
plug must be plugged into an outlet that is installed
and grounded in accordance with all appropriate
codes and ordinances. This appliance is for use on a
nominal 120-volt circuit, and has a grounding plug
that looks like the plug illustrated in (A) to the right.
A temporary adapter which looks like the adapter
illustrated in (B) and (C) below may be used to
connect this plug to a two-pole receptacle as
shown in (B) if a grounded outlet is not available.
The temporary adapter should be used only until
a grounded outlet can be installed by a qualified
electrician. The green-colored rigid ear (lug, and the
like) extending from the adapter must be fastened
to a permanent ground such as a grounded outlet
box.
SAVE THESE INSTRUCTIONS
WWW.CURRENT-USA.COM
Installation Instructions
Congratulations on purchasing your new sundial HQI LIghting Pendant
Please carefully read all instructions and warnings below and enjoy your new lighting system.
In order to validate your warranty, please fill out the enclosed registration card or go online to our
website http://www.current-usa.com to register your product electronically.
The SunDial HQI system is designed to be used as a stand alone lighting fixture that hangs over an
aquarium tank.
Pendant must be used over a completely covered aquarium - direct water contact and moisture from
evaporation can damage the bulbs and endcaps.
Pendant is not designed to be set directly on an aquarium top or installed inside a hood, canopy.
Ballasts and electrical connections must be kept away from moisture - a GFCI protected outlet must be
used when installing this fixture.
Note: Read all instructions and warnings listed within this manual.
Please also read all warnings affixed to the fixture.
The SunDial HQI system comes with the hardware for hanging the pendant over an aquarium. Please
ensure instructions for hanging kit are followed exactly.
mounting Instructions
Carefully remove the components from packaging.
1. Set fixture on a flat surface with glass lens facing up. Remove
end panel screws as shown and slide glass lens from fixture.
2. Remove plastic sleeves from lamps and reinstall. Using a soft cloth, ensure that the HQI lamp is seated
firmly in sockets. Make sure only to touch the HQI lamp at the flat ends of the lamp.
3. Slide glass lens back onto fixture and re-attach end panel with screws. Please note that before
programming timers, we highly recommend you turn the main power switch on the fixture to the on
position. This will allow the timers to energize the lamps and turn the cooling fan on.
WWW.CURRENT-USA.COM
Installation Instructions
mounting Instructions
DANGER
To avoid possible electric shock, special care should be taken since water is employed in the use of
aquarium equipment. For each of the following situations, do not attempt repairs by yourself. Return
the appliance to your retailer or discard the appliance.
• If an electrical appliance falls into the water, or water drips onto the electronics, DON’T reach for
it! First unplug it and then retrieve it. If electrical components of the appliance get wet, unplug the
appliance immediately.
• Always unplug appliance from an outlet when not in use, before putting on or taking off
parts, and before cleaning. Never yank cord to pull plug from outlet. Grasp the plug fully
and pull out to disconnect.
Cap screws
Hanging Instructions:
1. Locate wood beam in ceiling.
Using
mounting bracket as a template, drill
two pilot holes in the intended locations.
NOTE: Due to the weight of the SunPod,
it is NOT recommended for drywall
installations.
Mounting
Bracket
Mounting
Cap
Wood Screws
Wire Outlet
Hanging CapBolts
2. Slide hanging screws into bracket top
down. Place mounting bracket on ceiling
and screw into wood beam using wood
screws.
3. Align hanging screws with mounting cap
and slide screws through the cap. Thread
hanging cap bolts on and tighten.
Cable Connectors
4. Adjust hanging wire to desired height by
pressing the wire outlet in and sliding
cable in and out. NOTE: Ensure that the
fixture is unplugged from the AC outlet!
Slide cable connectors into the keyhole
slots located on the mounting brackets
and hang fixture.
5. Adjust and level the height of the fixture
using Step#4 above.
WWW.CURRENT-USA.COM
installation instructions
Model #1055 150 watt Set-Up Instructions
The Sundial 150 watt pendant HQI features internal electronic ballasts for both the SunPaq Dual Actinic
lamps and HQI lamp. This allows the use of integrated timers on the fixture. Please follow the following
steps for programming the timers:
1. Set the current time - Turn the rotary disc till the "Arrow" points to the current time.
2.
Set the "Turn On" time:
A. There are 96 push down plastic slices (gray color) on the rotary disc. Each slice or tab stands for 15 minutes.
B. If the desired Turn On time is for 8 hours (480 minutes), 32 tabs would have to be depressed between the desired time increments.
C. Depress tabs and set the On time.
3. Plug the fixture into the power outlet and activate timers by sliding switch on the timer to the "ON"
position.
Model #1056 250 watt Set-Up Instructions
The Sundial 250 watt pendant HQI features internal electronic ballasts for both the SunPaq Dual Actinic
lamps and and external ballast for the HQI lamp. This allows the use of external timers with the fixture.
Please follow the following steps for ballast connection and programming the timers:
hqi ballast connection
Note: turn off all power and ensure switches are in the off position before connecting the metal halide
HQI ballast(s) connection.
Instructions
1. Unwrap all twist ties and un-wrap all connection cords.
2. Locate the metal halide HQI connection plug at the end of the cord(s) coming from the lighting
fixture.
3. Ensure that the metal halide ballast is disconnected from power and that the ballast is in the OFF
position.
4. Align the metal halide HQI connection plug with the corresponding plug on the ballast assembly.
5. Plug the connection plug into the ballast and ensure it is firmly seated.
6. Place the metal halide ballast in a cool, dry area with adequate ventilation. It is not recommended to
stack ballasts on top of each other. Allow a minimum of 4" around ballast for ventilation.
Starting Instructions
1. Ensure all ballasts are in OFF position and that HQI connection plugs are seated firmly into the HQI
ballasts.
WWW.CURRENT-USA.COM
Installation Instructions
250 watt start-up instructions cont'd
2. Plug all cords into the automatic timers. The configuration for timers is as follows:
Timer#1 - SunPaq Lamps & Cooling Fan Cord (We recommend 11-12 hours per day)
Timer#2 - HQI Ballast (We recommend 6-10 hours per day)
NOTE: It is extremely important to run the cooling fan when either the SunPaq lamps or HQI lamp are
in operation.
3. Plug timers into a grounded GFCI outlet. Turn all fixture and timer switches to ON position. Note: It
may take 5-10 minutes before HQI lamps reaches full intensity.
4. Observe and ensure that all lamps and cooling fans are in operation.
24 hour programmable timer instructions
1. Set the current time - Turn the rotary disc till the "Arrow" points to the current time.
2.
Set the "Turn On" time:
A. There are 96 push down plastic slices (black color) on the rotary disc. Each slice or tab stands for
15 minutes.
B. If the desired first Turn On time is for 8 hours (480 minutes), 32 tabs would have to be depressed between the desired time increments.
C. Depress tabs and set the On time.
3. Plug the timer into the power outlet.
4. Plug your appliance cord into the outlet on the timer.
5. Push down the slide switch at the side of the timer to the On position.
WARNING: This TImer IS rated AT 120V, 15A max. do not add extension cords to this timer. use this
timer to only control one device. Keep away from moisuture and humid environments.
Guidelines for setting timers
Proper time schedules are important if a 24 hour "Dawn to Dusk" effect is desired.
Ideally, set the Dual Actinic lamps to turn on 1 to 2 hours before the HQI lamp turns on. Leave the
Dual Actinics on with the HQI lamp 9 to 10 hours for a complete light spectrum over the tank. Shut the
HQI lamp off and allow the Dual Actinic to stay on for another 1 to 2 hours to complete the cycle.
Guide:
Dual Actinic - 10-11 hours per day
HQI Lamp - 9-10 hours per day
Example Timer Program (7 days per week)
Dual Actinic - Turn on at 8 am
HQI Lamp - Turn on at 9 am
HQI Lamp - Turn off at 7 pm
Dual Actinic - Turn off at 8 pm
WWW.CURRENT-USA.COM
troubleshooting
Troubleshooting
Metal Halide HQI Lamp Will Not Fire:
1. Ballast or fixture is not turned on.
2. Lamp is not seated properly in the HQI socket. Disconnect power and remove fixture from aquarium. Remove the glass lens
over the HQI lamp and with a soft cloth, remove lamp then re-seat properly into socket.
3. Oxidation is on the HQI socket pins. Allow all lamps to cool for 30 minutes. Remove glass lens over HQI lamp and with a
soft cloth, remove the HQI lamp. Look for signs of oxidation on the HQI socket connection pins. If oxidation is found, remove
it from the socket using a small piece of steel wool. Re-seat the lamp properly back into the socket and re-install glass lens and
fixture.
4. Connection between the HQI lamp connector cord and ballast is not secure (250w units only.) Turn power off and reconnect
connector cord to ballast assembly.
5. GFCI has tripped.
6. Timers are programmed incorrectly.
Metal halide HQI lamp has changed color:
1. All HQI lamps require a "burn-in" period of 72-100 hours of operation.
SunPaq Dual Actinic lamps will not light up:
1. Dual Actinic lamp or ballast cord is not plugged in.
2. Dual Actinic fixture lamp switch is not turned on.
3. Timer for Dual Actinic lamps is not programmed correctly.
4. GFCI has tripped.
One lamp looks like a different color than the other lamp:
1. This fixture includes SunPaq Dual Actinics (460nm Blue lamps (super bright blue color) & 420nm Actinic blue (softer purple
color.)) Both wavelengths are required for the optimum spectrum for coral and invertebrate growth.
NOTE: For further information on this fixture or replacement parts, please visit www.current-usa.com.
Warning:
THE FOLLOWING INSTRUCTIONS MUST BE COMPLIED WITH TO AVOID RISK OF PERSONAL INJURY, PROPERTY DAMAGE
AND POOR LAMP PERFORMANCE.
This Metal Halide lamp is constructed of an outer glass bulb with an internal arc-tube. Metal Halide arc-tubes operate at high
pressure and at very high temperatures and can unexpectedly rupture due to internal causes or external factors such as a ballast
failure or misapplication. An arc-tube rupture can burst and shatter the outer glass bulb resulting in the discharge of glass
fragments and extremely hot particles. In the event of such rupture, THERE IS A RISK OF PERSONAL INJURY, PROPERTY
DAMAGE, BURNS AND FIRE. Always operate fixture with glass lens on.
TO REDUCE THESE RISKS:
1. Only operate lamp in an enclosed fixture with a lens/diffuser material able to contain hot lamp fragments.
2. Only operate lamp with compatible ballast and fixture.
3. Only operate lamp in horizontal operating position.
4. Lamp must be turned off for a minimum of fifteen minutes at least once a week.
5. Never expose an operating lamp to moisture or salt spray.
6. Replace lamp if outer glass bulb is cracked, scatched or damaged in any way.
7. Replace lamp at or before the end of rated life (9-12 months.)
ELECTRICAL SHOCK AND BURN HAZARD: Do not remove or insert lamp while power is on. If outer glass bulb is broken,
shut off power immediately and remove lamp after it has cooled.
WWW.CURRENT-USA.COM
warranty
Current USA, Inc. One-Year Limited Warranty
Current USA, Inc. warrants this product against defects in materials and workmanship for a period of ONE
(1) YEAR from the date of original retail purchase. Light Bulbs carry a 3 month warranty.
Warranty on all Products, including Aquariums, is limited to replacement of the product and does not cover
fish loss, personal injury, property loss or direct, incidental or consequential damage arising to the use of
this product. Warranty on all Products, including Aquariums, is limited to replacement of the product and
does not cover fish loss, personal injury, property loss or direct, incidental or consequential damage arising
to the use of this product.
Note: Current-USA, Inc. One-Year Limited Warranty does not cover damage caused by the following:
Improper installation, saltwater corrosion, and electrical surges.
If you discover a defect, Current USA, Inc. will, at it’s option, repair or replace the product at no charge to
you, provided you return it during the warranty period. It is required that you present this warranty card
and a copy of the bill of sale as proof of original purchase date, in the event the product needs repairs,
within the warranty period. Please see your dealer for return options. This warranty applies only to
products by or for Current USA, Inc. that can be identified by trade name, or logo affixed to them. CurrentUSA, Inc. does not warrant any products that are not Current-USA, Inc. products. This warranty does not
apply if the product has been damaged by accident, abuse, misuse or misapplication or if the product has
been modified without the written permission of Current-USA, Inc.; or if any Current-USA, Inc. logos have
been removed or defaced.
THE WARRANTY AND REMEDIES SET FORTH ABOVE ARE EXCLUSIVE AND IN LIEU OF ALL OTHERS,
WHETHER ORAL OR WRITTEN, EXPRESS OR IMPLIED. Current USA, Inc. SPECIFICALLY DISCLAIMS
ANY AND ALL IMPLIED WARRANTIES, INCLUDING BUT NOT LIMITED TO LOST PROFITS, DOWNTIME,
GOODWILL, DAMAGE TO OR REPLACEMENT OF EQUIPMENT AND PROPERTY, AND ANY COSTS OF
RECOVERING ANIMALS, PLANTS, TANKS OR OTHER AQUARIUM RELATED ITEMS AND/OR EQUIPMENT.
Current USA, Inc. IS NOT RESPONSIBLE FOR SPECIAL, INCIDENTAL, OR CONSEQUENTIAL DAMAGES
RESULTING FROM ANY BREACH OF WARRANTY, OR REPLACEMENT OF EQUIPMENT OR PROPERTY,
OR ANY COSTS OF RECOVERING OR REPRODUCING ANY EQUIPMENT, ANIMALS OR PLANTS USED
OR GROWN WITH Current USA, Inc. PRODUCTS.
Some jurisdictions do not allow the exclusion or limitation of incidental or consequential damages or
exclusions of implied warranties, so the above limitations or exclusions may not apply to you. This
warranty gives you specific legal rights, and you may also have other rights that vary form jurisdiction to
jurisdiction.
WWW.CURRENT-USA.COM