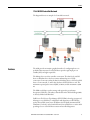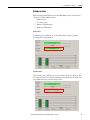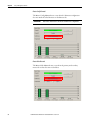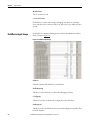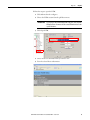
1
User Manual
EtherNet/IP and ControlNet to PROFIBUS PA Linking
Device
Catalog Numbers 1788-EN2PAR, 1788-CN2PAR
Important User Information
Solid-state equipment has operational characteristics differing from those of electromechanical equipment. Safety
Guidelines for the Application, Installation and Maintenance of Solid State Controls (publication SGI-1.1 available from
your local Rockwell Automation® sales office or online at http://www.rockwellautomation.com/literature/) describes some
important differences between solid-state equipment and hard-wired electromechanical devices. Because of this difference,
and also because of the wide variety of uses for solid-state equipment, all persons responsible for applying this equipment
must satisfy themselves that each intended application of this equipment is acceptable.
In no event will Rockwell Automation, Inc. be responsible or liable for indirect or consequential damages resulting from the
use or application of this equipment.
The examples and diagrams in this manual are included solely for illustrative purposes. Because of the many variables and
requirements associated with any particular installation, Rockwell Automation, Inc. cannot assume responsibility or
liability for actual use based on the examples and diagrams.
No patent liability is assumed by Rockwell Automation, Inc. with respect to use of information, circuits, equipment, or
software described in this manual.
Reproduction of the contents of this manual, in whole or in part, without written permission of Rockwell Automation,
Inc., is prohibited.
Throughout this manual, when necessary, we use notes to make you aware of safety considerations.
WARNING: Identifies information about practices or circumstances that can cause an explosion in a hazardous environment,
which may lead to personal injury or death, property damage, or economic loss.
ATTENTION: Identifies information about practices or circumstances that can lead to personal injury or death, property
damage, or economic loss. Attentions help you identify a hazard, avoid a hazard, and recognize the consequence.
SHOCK HAZARD: Labels may be on or inside the equipment, for example, a drive or motor, to alert people that dangerous
voltage may be present.
BURN HAZARD: Labels may be on or inside the equipment, for example, a drive or motor, to alert people that surfaces may
reach dangerous temperatures.
IMPORTANT
Identifies information that is critical for successful application and understanding of the product.
Allen-Bradley, Rockwell Software, Rockwell Automation, RSLogix, RSNetWorx, FactoryTalk, ControlLogix, and TechConnect are trademarks of Rockwell Automation, Inc.
Trademarks not belonging to Rockwell Automation are property of their respective companies.
Table of Contents
Preface
Introduction. . . . . . . . . . . . . . . . . . . . . . . . . . . . . . . . . . . . . . . . . . . . . . . . . . . . . . . 7
About the Linking Device. . . . . . . . . . . . . . . . . . . . . . . . . . . . . . . . . . . . . . . 7
Network Diagrams . . . . . . . . . . . . . . . . . . . . . . . . . . . . . . . . . . . . . . . . . . . . . . . . . 8
1788-EN2PAR EtherNet/IP Network . . . . . . . . . . . . . . . . . . . . . . . . . . . 8
1788-CN2PAR ControlNet Network . . . . . . . . . . . . . . . . . . . . . . . . . . . 9
Features . . . . . . . . . . . . . . . . . . . . . . . . . . . . . . . . . . . . . . . . . . . . . . . . . . . . . . . . . . . 9
General Precautions . . . . . . . . . . . . . . . . . . . . . . . . . . . . . . . . . . . . . . . . . . . . . . 10
Additional Resources . . . . . . . . . . . . . . . . . . . . . . . . . . . . . . . . . . . . . . . . . . . . . 11
Chapter 1
Installation
Hardware . . . . . . . . . . . . . . . . . . . . . . . . . . . . . . . . . . . . . . . . . . . . . . . . . . . . . . .
Power Connection . . . . . . . . . . . . . . . . . . . . . . . . . . . . . . . . . . . . . . . . . . .
PA Network Connections . . . . . . . . . . . . . . . . . . . . . . . . . . . . . . . . . . . .
ControlNet and EtherNet/IP Connections. . . . . . . . . . . . . . . . . . . . .
Shielding . . . . . . . . . . . . . . . . . . . . . . . . . . . . . . . . . . . . . . . . . . . . . . . . . . . .
PROFIBUS PA Physical Network Design Guidelines . . . . . . . . . . . . . . .
Power Supply . . . . . . . . . . . . . . . . . . . . . . . . . . . . . . . . . . . . . . . . . . . . . . . .
Grounding/Earthing . . . . . . . . . . . . . . . . . . . . . . . . . . . . . . . . . . . . . . . . .
Cable Path . . . . . . . . . . . . . . . . . . . . . . . . . . . . . . . . . . . . . . . . . . . . . . . . . . .
Cable Lengths. . . . . . . . . . . . . . . . . . . . . . . . . . . . . . . . . . . . . . . . . . . . . . . .
Cable Type and Minimum Requirements . . . . . . . . . . . . . . . . . . . . . .
Cable Color Coding . . . . . . . . . . . . . . . . . . . . . . . . . . . . . . . . . . . . . . . . . .
Termination Guidelines . . . . . . . . . . . . . . . . . . . . . . . . . . . . . . . . . . . . . .
Set the Linking Device Network Address. . . . . . . . . . . . . . . . . . . . . . . . . . .
Hardware Switches Location . . . . . . . . . . . . . . . . . . . . . . . . . . . . . . . . . .
Set the ControlNet Node Address . . . . . . . . . . . . . . . . . . . . . . . . . . . . .
Set the EtherNet/IP Address . . . . . . . . . . . . . . . . . . . . . . . . . . . . . . . . . .
Ethernet Switch Settings . . . . . . . . . . . . . . . . . . . . . . . . . . . . . . . . . . . . . .
ControlNet Switch Settings . . . . . . . . . . . . . . . . . . . . . . . . . . . . . . . . . . .
Software Installation . . . . . . . . . . . . . . . . . . . . . . . . . . . . . . . . . . . . . . . . . . . . .
AOP Version . . . . . . . . . . . . . . . . . . . . . . . . . . . . . . . . . . . . . . . . . . . . . . . .
Firmware Revision. . . . . . . . . . . . . . . . . . . . . . . . . . . . . . . . . . . . . . . . . . . .
13
13
14
15
15
16
16
16
17
17
18
18
18
19
19
19
20
21
21
22
22
22
Chapter 2
Set Up in RSLogix 5000 Software
Add the 1788-EN2PAR Linking Device to the I/O Tree . . . . . . . . . . . .
Add the 1788-CN2PAR Linking Device to the I/O Tree. . . . . . . . . . . .
Configure the Linking Device . . . . . . . . . . . . . . . . . . . . . . . . . . . . . . . . . . . . .
Configure the PA Master . . . . . . . . . . . . . . . . . . . . . . . . . . . . . . . . . . . . . . . . .
Configure the Field Devices. . . . . . . . . . . . . . . . . . . . . . . . . . . . . . . . . . . . . . .
Configure PV With Single Format. . . . . . . . . . . . . . . . . . . . . . . . . . . . .
Configure PV With Multiple Formats . . . . . . . . . . . . . . . . . . . . . . . . .
Valve Positioner Configuration . . . . . . . . . . . . . . . . . . . . . . . . . . . . . . . . . . .
PROFIBUS PA Redundancy Setup. . . . . . . . . . . . . . . . . . . . . . . . . . . . . . . .
Hardware. . . . . . . . . . . . . . . . . . . . . . . . . . . . . . . . . . . . . . . . . . . . . . . . . . . .
Software . . . . . . . . . . . . . . . . . . . . . . . . . . . . . . . . . . . . . . . . . . . . . . . . . . . . .
MultiMaster Mode . . . . . . . . . . . . . . . . . . . . . . . . . . . . . . . . . . . . . . . . . . .
Redundant PA Code Example. . . . . . . . . . . . . . . . . . . . . . . . . . . . . . . . . . . . .
Rockwell Automation Publication 1788-UM058A-EN-P - October 2012
23
24
25
27
28
28
29
30
32
32
35
37
39
3
Table of Contents
Chapter 3
Logix Assemblies
PA Master Input Image . . . . . . . . . . . . . . . . . . . . . . . . . . . . . . . . . . . . . . . . . . . 41
Field Device Input Image . . . . . . . . . . . . . . . . . . . . . . . . . . . . . . . . . . . . . . . . . 42
Field Device Output Image. . . . . . . . . . . . . . . . . . . . . . . . . . . . . . . . . . . . . . . . 44
Chapter 4
Diagnostics
Linking Device is Offline. . . . . . . . . . . . . . . . . . . . . . . . . . . . . . . . . . . . . . . . . .
Field Device Is Not Detected . . . . . . . . . . . . . . . . . . . . . . . . . . . . . . . . . . . . . .
Field Device Is Not Configured. . . . . . . . . . . . . . . . . . . . . . . . . . . . . . . . . . . .
Field Device Faults . . . . . . . . . . . . . . . . . . . . . . . . . . . . . . . . . . . . . . . . . . . . . . .
Web Interface. . . . . . . . . . . . . . . . . . . . . . . . . . . . . . . . . . . . . . . . . . . . . . . . . . . .
Device Type Manager. . . . . . . . . . . . . . . . . . . . . . . . . . . . . . . . . . . . . . . . . . . . .
45
46
48
48
50
50
Chapter 5
Technical Specifications and
Certifications
Technical Specifications . . . . . . . . . . . . . . . . . . . . . . . . . . . . . . . . . . . . . . . . . . 53
Certifications . . . . . . . . . . . . . . . . . . . . . . . . . . . . . . . . . . . . . . . . . . . . . . . . . . . . 54
Dimensions . . . . . . . . . . . . . . . . . . . . . . . . . . . . . . . . . . . . . . . . . . . . . . . . . . . . . . 55
Appendix A
Linking Device Display Status
Main Page . . . . . . . . . . . . . . . . . . . . . . . . . . . . . . . . . . . . . . . . . . . . . . . . . . . . . . . 57
PA Master Page . . . . . . . . . . . . . . . . . . . . . . . . . . . . . . . . . . . . . . . . . . . . . . . . . . 58
Field Device Page. . . . . . . . . . . . . . . . . . . . . . . . . . . . . . . . . . . . . . . . . . . . . . . . . 59
Appendix B
PA Topology
Glossary
Index
4
Master Mode 0 . . . . . . . . . . . . . . . . . . . . . . . . . . . . . . . . . . . . . . . . . . . . . . . . . . .
Master Mode 1 . . . . . . . . . . . . . . . . . . . . . . . . . . . . . . . . . . . . . . . . . . . . . . . . . . .
Master Mode 2 . . . . . . . . . . . . . . . . . . . . . . . . . . . . . . . . . . . . . . . . . . . . . . . . . . .
Master Mode 3 . . . . . . . . . . . . . . . . . . . . . . . . . . . . . . . . . . . . . . . . . . . . . . . . . . .
Master Mode 4 . . . . . . . . . . . . . . . . . . . . . . . . . . . . . . . . . . . . . . . . . . . . . . . . . . .
Master Mode 5 . . . . . . . . . . . . . . . . . . . . . . . . . . . . . . . . . . . . . . . . . . . . . . . . . . .
Master Mode 6 . . . . . . . . . . . . . . . . . . . . . . . . . . . . . . . . . . . . . . . . . . . . . . . . . . .
Master Mode 7 . . . . . . . . . . . . . . . . . . . . . . . . . . . . . . . . . . . . . . . . . . . . . . . . . . .
Master Mode 8 . . . . . . . . . . . . . . . . . . . . . . . . . . . . . . . . . . . . . . . . . . . . . . . . . . .
Master Mode 9 . . . . . . . . . . . . . . . . . . . . . . . . . . . . . . . . . . . . . . . . . . . . . . . . . . .
Master Mode 10. . . . . . . . . . . . . . . . . . . . . . . . . . . . . . . . . . . . . . . . . . . . . . . . . .
Master Mode 11. . . . . . . . . . . . . . . . . . . . . . . . . . . . . . . . . . . . . . . . . . . . . . . . . .
Master Mode 12. . . . . . . . . . . . . . . . . . . . . . . . . . . . . . . . . . . . . . . . . . . . . . . . . .
Master Mode 13. . . . . . . . . . . . . . . . . . . . . . . . . . . . . . . . . . . . . . . . . . . . . . . . . .
Master Mode 14. . . . . . . . . . . . . . . . . . . . . . . . . . . . . . . . . . . . . . . . . . . . . . . . . .
Master Mode 15. . . . . . . . . . . . . . . . . . . . . . . . . . . . . . . . . . . . . . . . . . . . . . . . . .
Master Mode 16. . . . . . . . . . . . . . . . . . . . . . . . . . . . . . . . . . . . . . . . . . . . . . . . . .
.................................................................
.................................................................
Rockwell Automation Publication 1788-UM058A-EN-P - October 2012
61
61
61
62
62
62
62
63
63
63
63
64
64
64
64
65
65
67
71
Preface
Introduction
This user manual describes the installation and operation of the 1788-EN2PAR
and 1788-CN2PAR linking devices.
About the Linking Device
The 1788-EN2PAR linking device provides a fast and integrated solution for
adding PROFIBUS PA (process automation) field devices to any Logix platform.
This linking device provides a direct link between PROFIBUS PA and
EtherNet/IP with no intermediate PROFIBUS DP (decentralized peripherals)
layer required.
The 1788-CN2PAR linking device provides a fast and integrated solution for
adding PROFIBUS PA field devices to any Logix platform. This linking device
provides a direct link between PROFIBUS PA and ControlNet with no
intermediate PROFIBUS DP layer required.
Hereafter, both modules are referred to as the linking device.
Integration into the RSLogix™ 5000 environment is seamless when you use the
add-on-profiles (AOPs) of the linking device, and the process variables of each
field device appear in engineering units without any required user logic. The
entire PROFIBUS PA configuration is done within the RSLogix 5000
environment. Additional process variable (PV) statuses and diagnostic
information is also available.
The linking device supports a maximum of 24 field devices and supplies 500 mA
per trunk.
The linking device lets you view detailed diagnostics from each field device using
its device type manager (DTM) directly from the Logix environment with FDT
ThinFrame. You can view a scope trace of the signal of each field device and
provide extended statistics with regards to packet count (send, received, class 1,
class 2, and so on).
Rockwell Automation Publication 1788-UM058A-EN-P - October 2012
7
Preface
Network Diagrams
1788-EN2PAR EtherNet/IP Network
The diagram below is an example of an EtherNet/IP network.
8
Rockwell Automation Publication 1788-UM058A-EN-P - October 2012
Preface
1788-CN2PAR ControlNet Network
The diagram below is an example of a ControlNet network.
Features
The AOP provides an intuitive graphical interface for configuring devices. A
predefined data structure for each field device provides eight input process
variables (PVs) and eight output PVs.
The linking device uses four controller connections. The data for the 24 field
devices is distributed over the four common industrial protocol (CIP)
connections. Connection A has the data for the linking device as well as four field
devices. Connections B, C, and D have the data of four field devices each. The
minimum requested packet interval (RPI) is 100 ms, and the maximum is 3000
ms.
The HSProcessUtility is used to manage and register the general status
description (GSD) files. The utility is launched from the AOP in RSLogix 5000,
or directly in Microsoft Windows.
Field Device Tool/Device Type Manager (FDT/DTM) technology is supported,
allowing access to field device configuration and diagnostics via FDT Frames
such as FactoryTalk® AssetCentre. In addition, the Rockwell Automation FDT
ThinFrame (read only) can be launched from a FactoryTalk View or via the AOP
providing access to each field devices status and extended diagnostics.
Rockwell Automation Publication 1788-UM058A-EN-P - October 2012
9
Preface
Built-in power conditioners and protection are provided, helping to minimize
installation space requirements. The PA segment is divided between two physical
ports (A and B) with individual protection and a supply of 500 mA per port. See
PA Network Connections on page 14.
The basic diagnostics of the linking device, as well as the field devices, is found in
the input assemblies. The advanced configuration is found only through the
AOP.
To assist with troubleshooting a 128 x 128 pixel display provides access to the
status of the linking device including network voltages and currents, internal
temperature, and communication quality to each field device.
A built-in Web server also provides remote access to network and field device
data.
General Precautions
Read and understand all precautions before using the linking device.
ATTENTION: Environment and Enclosure
This equipment is intended for use in a Pollution Degree 2 industrial environment,
in overvoltage Category II applications (as defined in IEC 60664-1), at altitudes up
to 2000 m (6562 ft) without derating.
This equipment is not intended for use in residential environments and may not
provide adequate protection to radio communication services in such
environments.
This equipment is supplied as open-type equipment. It must be mounted within an
enclosure that is suitably designed for those specific environmental conditions that
will be present and appropriately designed to prevent personal injury resulting
from accessibility to live parts. The enclosure must have suitable flame-retardant
properties to prevent or minimize the spread of flame, complying with a flame
spread rating of 5VA or be approved for the application if nonmetallic. The interior
of the enclosure must be accessible only by the use of a tool. Subsequent sections
of this publication may contain additional information regarding specific enclosure
type ratings that are required to comply with certain product safety certifications.
In addition to this publication, see the following:
• Industrial Automation Wiring and Grounding Guidelines, publication 1770-4.1,
for additional installation requirements.
• NEMA Standard 250 and IEC 60529, as applicable, for explanations of the
degrees of protection provided by enclosures.
10
Rockwell Automation Publication 1788-UM058A-EN-P - October 2012
Preface
ATTENTION: Prevent Electrostatic Discharge
• This equipment is sensitive to electrostatic discharge, which can cause internal
damage and affect normal operation. Follow these guidelines when you
handle this equipment:
• Touch a grounded object to discharge potential static.
• Wear an approved grounding wrist strap.
• Do not touch connectors or pins on component boards.
• Do not touch circuit components inside the equipment.
• Use a static-safe workstation, if available.
• Store the equipment in appropriate static-safe packaging when not in use.
ATTENTION: Do not place the module in direct sunlight. Prolonged exposure to
direct sunlight could degrade the liquid crystal display (LCD).
Additional Resources
These documents contain additional information concerning related products
from Rockwell Automation.
Resource
Description
ControlLogix Enhanced Redundancy System User Manual, publication 1756-UM535
Provides information specific to enhanced redundancy systems including design and planning
considerations, installation procedures, configuration procedures, and maintenance and
troubleshooting methods.
ControlLogix EtherNet/IP Module Installation Instructions, publication 1756-IN603
Provides hardware installation instructions for the ControlLogix® EtherNet/IP.
EtherNet/IP Modules in Logix5000 Control Systems User Manual, publication
ENET-UM001
Describes how you can use EtherNet/IP communication modules with your Logix5000
controller and communicate with various devices on the Ethernet network.
RSNetWorx for ControlNet Getting Results Guide, publication CNET-GR001
Provides information on how to install and navigate the RSNetWorx™ for ControlNet software.
It explains how to effectively use the RSNetWorx for ControlNet software and how to access
and navigate the online help.
NetLinx Selection Guide, publication NETS-SG001
Provides information for planning and implementing NetLinx Open Network Architecture
networks, including ControlNet and EtherNet/IP networks.
Industrial Automation Wiring and Grounding Guidelines, publication 1770-4.1
Provides general guidelines for installing a Rockwell Automation industrial system.
Product Certifications website, http://www.ab.com
Provides declarations of conformity, certificates, and other certification details.
You can view or download publications at
http://www.rockwellautomation.com/literature/. To order paper copies of
technical documentation, contact your local Allen-Bradley distributor or
Rockwell Automation sales representative.
Rockwell Automation Publication 1788-UM058A-EN-P - October 2012
11
Preface
Notes:
12
Rockwell Automation Publication 1788-UM058A-EN-P - October 2012
Chapter
1
Installation
Hardware
ATTENTION: Do not wire more than one conductor on any single terminal.
Power Connection
The power supply must be compliant with CE safety extra low voltage (SELV) or
protected extra low voltage (PELV), and UL Class 2 or limited voltage/current
requirements.
We recommend a 24…32V DC power supply for the linking device to operate
correctly. No additional power supplies or power conditioners are required. The
power supply connection is described here.
IMPORTANT
Do not use additional power supplies or power conditioners with the
1788-EN2PAR and 1788-CN2PAR linking devices.
Rockwell Automation Publication 1788-UM058A-EN-P - October 2012
13
Chapter 1
Installation
PA Network Connections
The PA network must be connected via the PA
terminal on the linking device. The PA network
connection and pin-out is described here.
Pin
Description
Right/Top (red)
PA +
Middle (green)
PA -
Left/Bottom
Shield
The PA segment is split between two physical ports,
A and B.
The PA network connections are described here.
14
Rockwell Automation Publication 1788-UM058A-EN-P - October 2012
Installation
Chapter 1
ControlNet and EtherNet/IP Connections
Two Bayonet Neill-Concelman (BNC) connectors on the base of the
1788-CN2PAR linking device provide connections for single or dual
ControlNet media. The dual port EtherNet/IP switch provides connections for
multiple EtherNet/IP topologies, including device level ring (DLR). The
EtherNet/IP port can also be used as a connection point in the field to access the
Web server or asset manage tools.
The ControlNet connections are described here.
Shielding
Ground the linking device shield connection to a clean earth connection.
Connect the shield to the PA media so that connectivity runs through all
junction boxes, but is not connected to the field device shield or grounded at the
device.
Do not attach the PA media shield to the field device. Tape the media shield back
to avoid accidental contact with other conductors or ground.
Rockwell Automation Publication 1788-UM058A-EN-P - October 2012
15
Chapter 1
Installation
IMPORTANT
If the shield is not correctly connected, surrounding noise from the
environment on the PA bus can cause the PA data to be corrupted resulting in a
low success rate and device connections being lost. According to section 12.8.5
of IEC61158-2 (Physical Layer Specification), 90% of the full length of the cable
must be shielded.
See Grounding/Earthing on page 16 for more details for shield connections.
PROFIBUS PA Physical
Network Design Guidelines
This section provides additional guidelines for the design on your PA network.
Power Supply
Verify that the power supply is not over specified for the application; otherwise,
the Switch mode generates noise when sufficient current is not being drawn.
Table 1 shows an example of current consumption for a typical application.
Table 1 - Current Consumption Example
Linking device current consumption at 24V = 260 mA
PA bus current consumption for a specific application at 24V = 150 mA
Total = 410 mA
The minimum allowed input voltage is 24V DC, and the maximum is 32V DC.
IMPORTANT
Do not use a 24V DC, 10 A power supply. We recommend using a 24V DC, 1 A
power supply.
You must calculate the correct cable length and distance from the power supply
for your installation. If the cable is too long, it can cause voltage drops in the
supply rail when sufficient current is being drawn. See Cable Lengths on page 17
to help you determine the proper cable length for your installation.
Grounding/Earthing
According to section 12.8.7 of IEC61158-2 (Physical Layer Specification), PA
signal wires (PA+ or PA-) must not be connected to ground/earth at any stage of
the network. The shield must be grounded/earthed at only once place.
To do this, connect the cable shield to the PROFIBUS PA connector as shown in
Shielding on page 15, and connect ground/earth to the shield of the power
connector as shown in Power Connection on page 13.
16
Rockwell Automation Publication 1788-UM058A-EN-P - October 2012
Installation
Chapter 1
Cable Path
Do not route the PROFIBUS PA cable near any motors, high-voltage, or
high-current cables. Motors and high-voltage/high-current cables can generate
noise that decreases the communication signal quality of the PA cable resulting in
PA packets being corrupted, and possible field device timeouts.
Cable Lengths
The maximum cable length is determined by the load and the voltage drop.
Consider these factors when determining the proper cable length for your
installation:
• The more field devices and junction boxes that are connected, the bigger
the load will be. The bigger the load, the more the signal attenuates which
can cause the signal to become unreadable.
• The bigger the load and the longer the cable, the bigger the voltage drop
across the cable. This can cause the voltage at the end of a long cable to
drop below the allowed PROFIBUS PA level. See Figure 1 for a cable
length calculation example.
Figure 1 - Cable Length Calculation Example
DC resistance per conductor:
24 Ω/km
Total cable resistance:
48 Ω
Total current consumption:
(4 x 40 mA) + (16 x 15 mA)
= 320 mA
Total voltage drop:
48 Ω x 320 mA
= 15.36V
Rockwell Automation Publication 1788-UM058A-EN-P - October 2012
17
Chapter 1
Installation
Cable Type and Minimum Requirements
According to section 12.8.2 of IEC61158-2 (Physical Layer Specification), the
PROFIBUS PA cable must meet the following minimum requirements:
• Impedance at 31.25 kHz of 100 Ω ± 20%
• Maximum attenuation of 3 dB/km
• Conductor cross-sectional are 0.8mm2 (18 AWG)
• Shield coverage of at least 90%
• Maximum DC resistance of 24 Ω/km per conductor
• Maximum capacitive unbalanced to the shield of 4nF/km
Cable Color Coding
According to section 12.8.8 of IEC61158-2 (Physical Layer Specification), the
color coding of the PROFIBUS PA cable must match the descriptions in the
following table.
Cable Strand
Color
PA cable positive (+)
Red
PA cable negative (-)
Green
Non-IS PA cable
Black
IS PA cable
Blue or blue/black
Termination Guidelines
The PA bus cable must be terminated at the beginning and end of the cable. You
can set the linking device to be internally terminated. Depending on the
architecture, the terminators can be made at different location. See Appendix B
for the different architectures and the correct termination locations.
Verify that the junction boxes are not terminated internally. More than two
terminators will cause the communication signal to become slewed and
attenuated, which causes the signal to become unreadable.
According to section 12.8.6 of IEC61158-2 (Physical Layer Specification), the
terminator impedance is equal to a 100 Ω resistor in series with a 1μF capacitor.
18
Rockwell Automation Publication 1788-UM058A-EN-P - October 2012
Installation
Set the Linking Device
Network Address
Chapter 1
This section describes the network address switches.
Hardware Switches Location
The hardware switches are located under the front cover of the linking device.
Use the Page button to toggle between different diagnostics on the display.
Set the ControlNet Node Address
To set the ControlNet node address of the 1788-CN2PAR linking device, use the
hardware switches behind the front cover.
Rockwell Automation Publication 1788-UM058A-EN-P - October 2012
19
Chapter 1
Installation
Set the EtherNet/IP Address
The linking device uses an RJ45 connector to connect to an Ethernet network.
The linking device ships with BOOTP enabled. To set the IP address of the
1788-EN2PAR linking device, use a BOOTP server or use the hardware
switches.
IMPORTANT
20
Power down the linking device before changing the Ethernet switch settings.
The IP address is set during powerup.
Rockwell Automation Publication 1788-UM058A-EN-P - October 2012
Installation
Chapter 1
Ethernet Switch Settings
This table describes the Ethernet switch settings.
Ethernet Switch Setting
Description
To set the IP address of the linking device to the 192.168.1.xxx sub net, set the
switches to the required last three digits.
In this example, the linking device will start up with IP address: 192.168.1.123.
To set the IP address of the linking device via a BOOTP server, set the switches to
888 (factory default setting).
Power up the linking device and set the IP address using any BOOTP server.
Once the new IP address has been set, power down the linking device, return the
switches to 000, and power up the linking device.
Normal setting after setting IP address with BOOTP.
The 000 setting disables BOOTP and holds the IP address.
The linking device has the option to run the firmware that it was originally shipped
with.
If the power was cycled while upgrading the firmware, the linking device may not
start up because the firmware was corrupted.
Set the switches to 777 to set the linking device into Safe mode and upgrade the
firmware again.
ControlNet Switch Settings
The linking device connects to a ControlNet network using a BNC connector.
Set the ControlNet node address with the switches under the front cover.
This example shows a linking device set to the
ControlNet address of 12.
Rockwell Automation Publication 1788-UM058A-EN-P - October 2012
21
Chapter 1
Installation
Software Installation
You need the AOP for RSLogix 5000 to configure
and manage the linking device.
The installation of the AOP includes the
HSProcessUtility that is used to manage DTMs
and GSD service libraries.
You can download the AOP install file from the
product website, www.hiprom.com.
Go to the page for your linking device and click the
link for the AOP Setup software on the right side
of the page (1788-EN2PAR linking device shown).
AOP Version
The AOP version of the linking device is shown on the display during the
start-up process.
TIP
You can also click the upper-left corner of the profile window and click About
Module Profile to view the AOP version.
Firmware Revision
The firmware revision is printed on the linking device and displayed on the
screen during powerup. The Web server also provides the firmware revision.
22
Rockwell Automation Publication 1788-UM058A-EN-P - October 2012
Chapter
2
Set Up in RSLogix 5000 Software
Add the 1788-EN2PAR
Linking Device to the I/O Tree
The 1788-EN2PAR linking device must be added to the I/O tree of the Logix
controller. The linking device must be added to an Ethernet bridge module, such
as an Allen-Bradley® 1756-EN2T or 1756-EN2TR module.
Follow these steps to add the linking device to the I/O tree of the Logix
controller. This example uses the 1756-EN2T module.
1. Right-click the Ethernet bridge and choose New Module.
2. Select the linking device that you want to add to the Ethernet bridge.
3. Click the General tab and set the name, description, and IP address.
4. Set the requested packet interval (RPI) for the linking device.
The linking device RPI defaults to 300 ms. You can change this if needed,
depending on the field device count and update times required.
IMPORTANT The RPI determines the amount of Class 1 data requests sent for the field
devices that are configured on the PA bus. If there are many field devices
configured on the bus and the RPI is set too low, the class 1 data
(PVs and status) do not update each cycle, and class 2 data responses are
very slow.
See Class 2 MPPF on page 27 in the master configuration.
5. Click OK to add the linking device to the I/O tree.
Rockwell Automation Publication 1788-UM058A-EN-P - October 2012
23
Chapter 2
Set Up in RSLogix 5000 Software
Add the 1788-CN2PAR
Linking Device to the I/O Tree
The 1788-CN2PAR linking device must be added to the I/O tree of the Logix
controller. The linking device must be added to a ControlNet bridge module,
such as an Allen-Bradley 1756-CNB or 1756-CNBR module.
Follow these steps to add the linking device to the I/O tree of the Logix
controller. This example uses the 1756-CNBR module.
1. Right-click the ControlNet bridge and choose New Module.
2. Select the linking device to add to the ControlNet bridge.
3. Click the General tab and set the name, description, and ControlNet node
address.
4. Set the RPI for the linking device.
The linking device RPI defaults to 300 ms. You can change this if needed,
depending on the field device count and update times required.
IMPORTANT The RPI determines the amount of Class 1 data requests sent for the field
devices that are configured on the PA bus. If there are many field devices
configured on the bus and the RPI is set too low, the class 1 data
(PVs and status) do not update each cycle, and class 2 data responses are
very slow.
See Class 2 MPPF on page 27 in the master configuration.
5. Click OK to add the linking device to the I/O tree.
24
Rockwell Automation Publication 1788-UM058A-EN-P - October 2012
Set Up in RSLogix 5000 Software
Configure the Linking Device
Chapter 2
After the linking device is added to the I/O tree you can configure the device
properties.
1. Right-click the linking device and choose Properties.
2. Click the Configuration tab to open the configuration page for the linking
device.
Process Catalog
Launches the HSProcessUtility that manages the GSD files and DTMs. If you
load new GSD files or DTMs, you must launch the HSProcessUtility and update
(compile) the libraries.
IMPORTANT
You cannot configure a field device for cyclic communication unless the GSD file
is in the process utility catalog and the catalog has been updated (compiled).
Rockwell Automation Publication 1788-UM058A-EN-P - October 2012
25
Chapter 2
Set Up in RSLogix 5000 Software
Download
Downloads the configuration to the linking device. The linking device saves the
configuration in non-volatile memory. Cycle power for the configuration to take
effect.
IMPORTANT
After the configuration has been downloaded to the linking device, you must
cycle power for the new configuration to take effect.
Upload
Uploads the configuration from the linking device to the RSLogix project.
IMPORTANT
You must click the Apply button in the AOP to save the configuration to the
RSLogix project.
Scan
Finds the field devices on the local PA bus and applies a default configuration to
each device according to the GSD file of the manufacturer. The AOP scans up to
the max scan address (see Max Scan Address on page 27).
Add Device
Manually adds a device that is not currently connected. The same default
configuration is applied to the field device that is added.
Copy Device
Copies a field device configuration and applies it to all other locations.
TIP
If you want to replicate the configuration to many devices, the Copy Device
button can speed up the process.
Delete Device
Deletes a device from the tree.
Delete All
Deletes all field devices from the configuration.
26
Rockwell Automation Publication 1788-UM058A-EN-P - October 2012
Set Up in RSLogix 5000 Software
Configure the PA Master
Chapter 2
Topology Mode
You must choose the correct topology mode for the application. The graphical
representation must match the actual topology. See Appendix B for available
options. Use this setting to configure redundant linking devices, redundant PA
media, and the internal PA segment terminators.
PA Node
The PA master (linking device) needs a node number to operate on the PA bus.
The default is node number 1.
Max Scan Address
When the linking device is operating, a background scan probes each unused
node number to see if any new field devices were connected. The background
scan runs to the max scan address, then restarts at one.
TIP
This also determines the max scan address for the scan function
(see Scan on page 26).
Slave Timeout
The time in milli-seconds (ms) that the PA master gives for a reply from a field
device before retrying the request.
IMPORTANT
If the timeout is set too low, some field devices will not be able to reply in time,
resulting in lost packets. If the timeout is set too high and a field device has
gone offline, it might take a long time before the PA master will time-out that
field device.
Slave Retry
The slave retry limit sets the number of times the PA master re-requests data
before dropping the connection. The default setting is 5.
IMPORTANT
Do not modify the default setting. Setting the limit above 5 can slow down
communication.
Class 2 MPPF
Used to determine the minimum amount of acyclic data requests allowed per
cyclic scan.
Slew Compensation
IMPORTANT
Do not adjust this setting. Doing so can cause communication problems.
Rockwell Automation Publication 1788-UM058A-EN-P - October 2012
27
Chapter 2
Set Up in RSLogix 5000 Software
Configure the Field Devices
This section describes how to configure a single PV and Multiple PVs for a slot.
Configure PV With Single Format
Each field device can have multiple PVs, and each PV can have a different format.
In most cases the default configuration correctly configures each PV, but if you
want to add, remove, or change PVs, the format might need to change. Table 2
shows the available PV format options.
Table 2 - Process Variable (PV) Format Options
1 Byte
1 Byte with Status
2 Bytes
2 Bytes with Status
3 Byte
3 Byte with Status
4 Bytes
4 Bytes with Status
Real
Real with Status
IMPORTANT
If you are not certain about the format of the PV, refer to the user manual of the
field device being used.
To choose the PV format, follow these steps.
1. From the Device pull-down menu, choose the device that you want to
configure.
2. From the Slot pull-down menu, choose the type of PV.
3. From the format options pull-down menu, choose the format for the PV.
4. Click Ok to save the PV formats.
28
Rockwell Automation Publication 1788-UM058A-EN-P - October 2012
Set Up in RSLogix 5000 Software
Chapter 2
Configure PV With Multiple Formats
In some cases (for example, positioner field devices), there are multiple input and
output PVs per slot. See Valve Positioner Configuration on page 30 for details.
IMPORTANT
You must select the number of inputs and outputs, and their respective PV
formats, as shown in the user manual of the field device. In the input image of
the field device, the PV is set per the manual slot configuration.
To configure multiple PV formats for the slot, follow these steps.
1. Select the Manual Config check box and click the Configure button to
open the Slot Configuration dialog box.
2. Select the check boxes for the input and output PVs that you want to
configure.
3. From the pull-down menu, choose the PV formats for the selected inputs
and outputs.
4. Click Ok to save the PV formats.
Rockwell Automation Publication 1788-UM058A-EN-P - October 2012
29
Chapter 2
Set Up in RSLogix 5000 Software
Valve Positioner
Configuration
A valve positioner typically has only one slot that has multiple predefined inputs
and outputs. Consult the user manual of the device to verify the definition for
each option. One of the most basic options is to configure the valve positioner to
receive a setpoint from the ControlLogix controller via the linking device and to
return to the defined position.
Follow these steps for setting the valve positioner.
1. From the Device pull-down menu, choose the device that you want to
configure.
2. From the Slot pull-down menu, choose the output/input option for the
valve positioner.
After you choose an output/input option the data format option is
replaced by a Configure button and the Manual Config option is checked.
3. Click the Configure button.
The Slot Configuration dialog box opens.
30
Rockwell Automation Publication 1788-UM058A-EN-P - October 2012
Set Up in RSLogix 5000 Software
Chapter 2
4. Configure the input and output formats for the slot configuration.
IMPORTANT
Refer to the manufacturer's manual for the valve positioner to verify
the correct data format for each option.
In this example, the setpoint sent to the valve positioner is a real value with
a 1-byte status. The actual position returned by the valve positioner is also
a real value with a 1-byte status, with an added 1 byte with status discrete
position.
5. Use the AOP to download the configuration to the linking device.
A real value can now be written into the output PV tag for that field device
in RSLogix 5000 (as shown below).
TIP
Refer to example code CN2PAR_FieldDevice_Outputs.ACD.
IMPORTANT
You must send a Good/Valid PV status to the field device output. Refer to the
field device user manual for the needed status values. Typically, if you send a
PVStatus value of 0x80 (-128), the field device will accept the position given. If
you do not send a Good/Valid PV status to the field device output, the valve
postioner will not use the position supplied and will return to a Safe state.
Rockwell Automation Publication 1788-UM058A-EN-P - October 2012
31
Chapter 2
Set Up in RSLogix 5000 Software
PROFIBUS PA Redundancy
Setup
The linking device provides PROFIBUS PA and Ethernet architectures. This
section describes the PROFIBUS PA redundancy options that are available, and
highlights the benefits and sets required to implement them.
Hardware
This section describes the hardware redundancy for media and master devices.
Media Redundancy
For media redundancy you can select from dual trunk or ring redundant media
architecture. When selecting the architecture, you must select the correct setup in
the linking device AOP. See Software on page 35 for more details. Below are
examples of dual trunk and ring architectures.
IMPORTANT
To create the redundant media architecture, you must use the 1788-PARJB
junction box.
Figure 2 - Dual Trunk Media Redundancy
IMPORTANT
When using dual trunk redundancy, the total difference in cable length
between trunk cable A and trunk cable B must not exceed 250 m (820 ft). This
applies even when using multiple junction boxes.
Figure 3 - Ring Media Redundancy
32
Rockwell Automation Publication 1788-UM058A-EN-P - October 2012
Set Up in RSLogix 5000 Software
IMPORTANT
Chapter 2
When using ring redundancy, you must enable the auto-terminate function on
the 1788-PARJB junction box. Refer to the1788-PARJB Quick Start Guide,
publication 1788-QS005, for details. Failure to enable the auto-terminate
function might cause network termination issues that can cause the network
to become unstable.
Limitations
The linking device can support a maximum count 24 field devices and 500 mA
current supply per trunk.
Benefits
The network is protected against a segment open circuit and short circuit
conditions, as long as a functional path exists to each instrument.
In a ring architecture you can use bit 0 of the MasterStatus in the Logix input
assembly to determine if the ring is healthy. A 1 indicates the ring is closed and
operational, while a 0 indicates there is a break in the ring.
Master Redundancy
The linking device can support a maximum of two PA masters on a single
PROFIBUS PA network. Configure the PA master using the various
architectures in the software setup. You must select the correct setup before
downloading the configuration. Figure 4 is an example of a MulitMaster setup.
When using only single trunk architecture, you can add any IEC61158 junction
box.
Figure 4 - MultiMaster Redundancy
IMPORTANT
When using certain MulitMaster architectures (such as ring redundancies), you
must enable the auto-terminate function on the 1788-PARJB junction box.
Refer to the 1788-PARJB Quick Start Guide, publication 1788-QS005, for
details. Failure to enable the auto-terminate function might cause network
termination issues that can cause the network to become unstable.
Rockwell Automation Publication 1788-UM058A-EN-P - October 2012
33
Chapter 2
Set Up in RSLogix 5000 Software
You can have both master and media redundancy running simultaneously as
shown in Figure 5.
Figure 5 - MultiMaster and Media Redundancy
Additional junction boxes can be added to the dual trunk. See Appendix B for
the different redundancy configurations.
IMPORTANT
When using dual trunk architecture, you must use the 1788-PARJB junction
box.
Limitations
A maximum of two linking devices can be added to a single network.
Benefits
Master redundancy protects against the loss of communication to a master
device, as well as a failure on a master device.
34
Rockwell Automation Publication 1788-UM058A-EN-P - October 2012
Set Up in RSLogix 5000 Software
Chapter 2
Software
IMPORTANT
You must choose the architecture used in the field before downloading the
configuration. If the incorrect architecture is chosen, the network will not
function correctly.
Media Redundancy
If the dual trunk redundancy is selected, you can view the PA Bus, and Channel A
and Channel B diagnostics (voltage, current, and so on) as shown in Figure 6.
Figure 6 - PA Bus and Channel A/B Diagnostics
Rockwell Automation Publication 1788-UM058A-EN-P - October 2012
35
Chapter 2
Set Up in RSLogix 5000 Software
A short on either bus is indicated in RSLogix 5000, or in the AOP as shown in
Figure 7.
Figure 7 - Bus Short/Open Circuit
IMPORTANT
The linking device can only detect a short/open circuit on either of the trunks
connected directly to the linking device. If there is a fault between two
junction boxes, you will only see the fault by looking at the junction boxes in
the field. The junction boxes will indicate a fault on either a trunk or a drop.
The PA network will keep operating, but we recommend that you remove the
short on the trunk, and use the AOP to reset the bus.
You must also reset the trunk on the 1788-PARJB junction box, since this will
also be tripped.
36
Rockwell Automation Publication 1788-UM058A-EN-P - October 2012
Set Up in RSLogix 5000 Software
Chapter 2
MultiMaster Mode
When running in redundant master mode (MultiMaster mode), the PA master
can be in one of three different states:
• Primary Active
• Secondary Active
• Master Config Mismatch
• Master Node Mismatch
Primary Active
The Primary Active linking device is the primary master which is currently
providing all the communication.
Secondary Active
The Secondary Active linking device is the secondary master (hot backup). The
secondary master does not provide communication until the primary master has
not communicated for a certain amount of time.
Rockwell Automation Publication 1788-UM058A-EN-P - October 2012
37
Chapter 2
Set Up in RSLogix 5000 Software
Master Config Mismatch
The Master Config Mismatch state occurs when the PA master configuration
does not match the other PA master on the PA network.
IMPORTANT
Both masters must have the same master and field device configurations.
Master Node Mismatch
The Master Node Mismatch state occurs when the primary and secondary
masters do not have the same node address.
38
Rockwell Automation Publication 1788-UM058A-EN-P - October 2012
Set Up in RSLogix 5000 Software
Redundant PA Code Example
Chapter 2
When running in MulitMaster mode, the data appears twice in the Logix
controller (once for each PA master). A combination of PA master status,
MulitMaster active, and field device connection statuses are used as criteria.
The example code in Figure 8 provides an AOI to control the redundant PA.
Figure 8 - Example of Redundant PA Code
Rockwell Automation Publication 1788-UM058A-EN-P - October 2012
39
Chapter 2
Set Up in RSLogix 5000 Software
Notes:
40
Rockwell Automation Publication 1788-UM058A-EN-P - October 2012
Chapter
3
Logix Assemblies
PA Master Input Image
Each linking device uses a total of four connections from the Logix controller,
regardless of the field device count. Therefore, the input and output image of
each linking device is divided into four sections, A through D. Connection A has
the data for the linking device as well as four field devices. Connections B, C, and
D have the data of four field devices each. Figure 9 shows the input image of the
PA master.
Figure 9 - PA Master Input Image
Bus A/B Tripped
If too much current is drawn (> 500 mA) on Bus A or Bus B, a trip occurs and the
bus is no longer functional. The trip is indicated in the input image.
NewFieldDevice
This bit is set when a new field device is found that is not in the configuration of
the PA master.
MultiMasterActive
This bit is set after the two PA master modules have synchronized, and they have
the same node number and the same configuration.
IMPORTANT
Both PA Masters must have exactly the same configuration (master and field
devices) for the masters to be able to synchronize.
MasterMode
This shows the current topology that is implemented (see Appendix B).
Rockwell Automation Publication 1788-UM058A-EN-P - October 2012
41
Chapter 3
Logix Assemblies
ModuleStatus
This is currently reserved.
Connection Status
If a field device is online and running (exchanging cyclic data), then the field
device index bit in the connection status is set. If the device goes offline, the bit is
cleared.
Field Device Input Image
Each field device displays its PA diagnostics as well as all available PVs and their
status as shown in Figure 10.
Figure 10 - Field Device Input Image
PANode
The node number of the field device on the PA bus.
OnlineRunning
This bit is set when the device is online and exchanging cyclic data.
ConfigFault
This bit is set if there is a fault in the configuration of the field device.
ExtDiagAvail
This bit is set when the field device has extra extended diagnostics available. This
bit can be dynamic.
42
Rockwell Automation Publication 1788-UM058A-EN-P - October 2012
Logix Assemblies
Chapter 3
ParameterFault
This bit is set if there is a fault in the parameterization of the field device.
ParameterReq
This bit is set if the device has not received its parameterization.
FreezeMode
This bit is set if you enable Freeze mode in the parameterization of the field
device and a global control is sent to freeze the device PVs.
SyncMode
This bit is set if you enable Sync mode in the parameterization of the field device
and a global control is sent to synchronize the device PVs.
WatchDog
This bit is set if the watchdog is enabled in the parameterization of the field
device.
PAIdent
This is the identity number of the specific field device.
PVReal1…PVReal8
If you set a process variable to be a Real format, the data is displayed in this
section.
PVStatus1…PVStatus8
If you set a process variable to have a Status, the status value for the each PV is
displayed in this section.
Refer to the user manual of the field device for the
definition of the PV status. In general, the status
definitions are as follows:
• Good = a value ≥ 0x80
• Uncertain = a value from 0x40…0x7F
• Bad = a value < 0x40 (for example, 0…0x3F)
PVInt1…PVInt8
If you set a process variable to be a 1-byte to 4-byte format, the data is displayed in
this image.
Rockwell Automation Publication 1788-UM058A-EN-P - October 2012
43
Chapter 3
Logix Assemblies
Field Device Output Image
Each field device displays its PA diagnostics as well as all available PVs and their
status as shown in Figure 11.
Figure 11 - Field Device Output Image
PVInt1…PVInt8
If you are using a field device that requires an output, the data must be updated in
the output image of that field device. If a real value must be sent, use the copy
function to update the PVInt.
IMPORTANT
Refer to the Redundant PA Code Example on page 39 for a detailed example of
how to update data for output modules.
PVStatus1…PVStatus8
If you set a process variable to be a 1-byte to 4-byte format, the data is displayed in
this image.
IMPORTANT
44
Some field devices (such as valve positioners) operate correctly only after a
valid status (for example, ≥ 80h) is sent with the process variable. See Valve
Positioner Configuration on page 30 for more details.
Rockwell Automation Publication 1788-UM058A-EN-P - October 2012
Chapter
4
Diagnostics
Linking Device is Offline
Use these diagnostic checks to help you identify and fix the problem when the
linking device goes offline.
Table 3 - Linking Device Is Offline Diagnostic Checks
Symptom
Checks
Does the linking device have power, and did it powered up?
Verify that the LCD backlight is on and information is displayed on the LCD screen.
Can you ping the linking device?
Verify that the linking device is on the same local Ethernet network when a ping is sent, and the computer
network address is the same subnet.
Example:
• Linking device IP address: 172.30.187.120
• Linking device subnet mask: 255.255.255.0
• Computer IP address: 172.30.187.1…172.30.187.254
Does the linking device have an IP address?
Look at the linking device LCD and verify that there is an IP address,
or that BOOTP is active.
The I/O tree in RSLogix shows an orange triangle next to the
linking device, and the module cannot be seen from the RSLogix
Add-On Profile (AOP).
Verify that the IP address of the linking device is in the same subnet range as that of the Allen-Bradley Ethernet
module.
• Linking device IP address: 172.30.187.1…172.30.187.254
• Linking device subnet mask: 255.255.255.0
• Ethernet module IP address: 172.30.187.1…172.30.187.254
• Ethernet module subnet mask: 255.255.255.0
Verify that no duplicate IP address exists on network.
Look at the LCD on the linking device to see if it indicates an IP conflict.
Verify that the Ethernet cable is plugged into the linking device.
Verify that the Ethernet status indicators are on, or flashing.
Note: the status indicators flash when there is data exchange.
• Yellow status indicator = 10 Mbit/s
• Green status indicators = 100 Mbit/s
EtherNet/IP
Ethernet Port 1
Status Indicators
Ethernet Port 2
Status Indicators
Verify that the Ethernet cable length from the linking device to the switch is less than 330 ft (100 m).
Rockwell Automation Publication 1788-UM058A-EN-P - October 2012
45
Chapter 4
Diagnostics
Field Device Is Not Detected
Use these diagnostic checks to help you identify and fix the problem when a field
device is not detected.
Table 4 - Field Device Is Not Detected Diagnostic Checks
Symptom
Checks
Are the PA node addresses set on the field devices?
If you are using the soft address setting, add only one field device at a time and set the node address before
adding the next field device. If you do not set the node address before adding the next field device, the field
devices default to a node address of 126.
Verify that the PA node address does not conflict with existing field devices on the network.
Verify that the PA node address is
less than or equal to the max scan
address in the linking device AOP.
The linking device AOP scan reports NO DEVICES FOUND when
linking devices are connected.
Verify that the field device has power.
If a display is present, verify that the display is illuminated.
If no display is present, check the voltage across the PA terminal in the field device using a voltmeter (verify
correct polarity). Refer to the field device manual to see minimum input voltage. Note that the longer the cable
and the bigger the load (number of field devices and junction boxes), the bigger the voltage drop across the
cable.
See Cable Lengths on page 17 and Table 1 on page 17 for a description of cable length guidelines.
Verify that the PROFIBUS PA network cable is not in a noisy environment. Keep away from power cables, drives,
and other sources of noise.
Verify that the cable shield is connected at the linking device and at the junction box, and not at the field device.
Verify that the shield is not touching the instrument casing or gland.
Tape off the cable end.
Verify that the network is sufficiently terminated (not over or under terminated).
Typically, a terminator is placed at the start and end of the PROFIBUS PA network. Depending on the network
architecture, the linking device can terminate the start of the PROFIBUS PA network.
See Termination Guidelines on page 18 and Appendix B for termination guidelines and network architectures.
Verify that the network topology
setting in AOP matches the physical
network topology.
See Configure the PA Master on
page 27 and Appendix B for
configuring the topology in AOP and
network architectures.
46
Rockwell Automation Publication 1788-UM058A-EN-P - October 2012
Diagnostics
Chapter 4
Table 4 - Field Device Is Not Detected Diagnostic Checks (continued)
Symptom
Checks
Check the PA bus voltage in the AOP.
Check if the PA bus has tripped.
The linking device AOP scan reports NO DEVICES FOUND when
linking devices are connected.
Verify that the cable used in the PA network is in compliance with section 12.8.2 of IEC61158-2 (Physical Layer
Specification).
The PROFIBUS PA cable must meet the minimum requirements described in Cable Type and Minimum
Requirements on page 18.
Verify that the shield on the power connector of the
linking device is connected to a clean, high-quality
ground.
Verify that the shield of the PROFIBUS PA connector is
connected to the shield of the cable.
Do not connect the shield at the field devices.
Verify that a low-noise power supply is feeding the linking device.
Rockwell Automation Publication 1788-UM058A-EN-P - October 2012
47
Chapter 4
Diagnostics
Use these diagnostic checks to help you identify and fix the problem when the
field device is not configured.
Field Device Is Not
Configured
Table 5 - Field Device Is Not Configured Diagnostic Checks
Symptoms
Checks
The field device is attached but is not producing process variables
in the controller.
Devices are blue or switch blue/red. This condition usually
indicates the configuration is incorrect.
Verify that the field device configuration is correct.
Note that certain field devices require an output process variable (for example, a set-point for valve positioner) to
stay connected.
If the configuration is incorrect, the field device switches between green and blue. The field device indicates
green after it is configured, but changes to blue (not-configured) when it does not receive any process variables.
Refer to the manual for the field device for more information regarding PROFIBUS PA configuration.
See all checks in Field Device Is Not Detected on page 46.
Use these diagnostic checks to help you identify and fix the problem when the
field device indicates faults.
Field Device Faults
Table 6 - Field Device Faults Diagnostic Checks
Symptoms
Checks
Verify that the field device has power.
If a display is present, verify that the display is illuminated.
If no display is present, check the voltage across the PA terminal in the field device using a voltmeter (verify
correct polarity). Refer to the field device manual to see minimum input voltage. Note that the longer the cable
and the bigger the load (number of field devices and junction boxes), the bigger the voltage drop across the
cable.
See Cable Lengths on page 17 and Table 1 on page 17 for a description of cable length guidelines.
Verify that the cable is not damaged or is not near a source of noise.
Replace a damaged cable, and route the cable away from any source of noise.
The field device indicates red in the AOP.
The field device indicates Err on LCD of module.
No process variable is found in the process variable tag of the field
device.
Read the status indicators on the junction box (if short-circuit protection is provided and indicated).
Verify that the linking device can see the field device when doing a scan in the AOP?
If the linking device cannot see the field device, see all checks in Field Device Is Not Detected on page 46.
Check the field device
PV status in RSLogix.
If the field device has
an error that affects
the PV, the PV status
changes from GOOD
to UNCERTAIN or BAD.
48
Rockwell Automation Publication 1788-UM058A-EN-P - October 2012
Diagnostics
Chapter 4
Table 6 - Field Device Faults Diagnostic Checks (continued)
Symptoms
Checks
Launch the DTM
and see if the
device has any
errors.
The field device indicates red in the AOP.
The field device indicates Err on LCD of module.
No process variable is found in the process variable tag of the field
device.
Check the scope trace in the AOP:
• Is there any noise on the bus?
• Is the slew rate ok? The wave
must not be triangular.
• Is the signal amplitude
modulated? This is typically
when there is noise on the
shield.
• Is the voltage level ok?
Has the environment changed?
Is there a new source of noise, such as drives, motors, HT cables, or other noise sources?
Has the PA configuration been changed?
Have any new field devices been added to the bus?
Rockwell Automation Publication 1788-UM058A-EN-P - October 2012
49
Chapter 4
Diagnostics
Web Interface
To view detailed status and diagnostic information for the device in the Web
server, enter the IP address of the device into the address field of a Web browser
and press enter.
For example, linking device IP address 196.135.145.234
IMPORTANT
Device Type Manager
50
If data is not being updated, turn off page caching or try a different Web
browser.
You can use the DTM in the profile with the HSThinFrame, or with an
FDT Frame (for example, FactoryTalk® AssetCentre).
IMPORTANT
The HSThinFrame can only view diagnostics of the field device. You need an
FDT Frame to configure and parameterize the field device.
IMPORTANT
The 1788-CN2PAR linking device can process Class 2 data (DTMs) on either the
ControlNet or Ethernet interface. This helps preserve the unscheduled
bandwidth of the ControlNet network.
The 1788-EN2PAR linking device can only process Class 2 data (DTMs) on the
Ethernet interface.
IMPORTANT
The correct DTM must be installed and the HSProcessUtility DTM catalog must
be updated for the correct DTM to display in the pull-down list.
Rockwell Automation Publication 1788-UM058A-EN-P - October 2012
Diagnostics
Chapter 4
Follow these steps to open the DTM.
1. Click Advanced in the config tree.
2. Choose the DTM revision from the pull-down menu.
IMPORTANT You may be presented with multiple DTMs of the same device but with
different revisions. You must select the correct DTM and revision for the
specific field device.
3. Click Open DTM.
4. Choose the device information that you want to view.
5. View the selected device information.
Rockwell Automation Publication 1788-UM058A-EN-P - October 2012
51
Chapter 4
Diagnostics
Notes:
52
Rockwell Automation Publication 1788-UM058A-EN-P - October 2012
Chapter
5
Technical Specifications and Certifications
Technical Specifications
Attribute
1788-EN2PAR, 1788-CN2PAR
Power requirements
Input: 24…32V DC, 0.75 A, Class 2/SELV
PA: 0.5 A at 24V DC per trunk
Power is connected to the linking device using the 4-way
Phoenix connector.
Power consumption
0.26 A at 24V DC (with no field devices attached)
Power dissipation
12.24 W at 24V DC
Isolation voltage
30V (continuous), basic insulation type, network channels to
power, and network channels to network channels.
No isolation between redundant network channels.
Type tested at 500V DC for 60 seconds.
Temperature
IEC 60068-2-1
IEC 60068-2-2
IEC 60068-2-14
Operating/Storage: 0…50 °C (32…122 °F)
Surrounding air, max: 50 °C (122 °F)
Relative humidity
IEC 60068-2-30
5…95% noncondensing
Shock
IEC 60068-2-27
Operating: 15 g
Nonoperating: 30 g
Vibration
IEC 60068-2-6
0.5 g at 10…500 Hz
Emissions
CISPR 11
IEC 61000-6-4
Group 1, Class A
ESD
IEC 61000-4-2
6 kV contact discharge
8 kV air discharge
Conducted RF
IEC 61000-4-6
10 V rms with 1 kHz sine-wave
80% AM from 150 kHz…80 MHz
Radiated RF
IEC 61000-4-3
10 V/m with 1 kHz sine-wave 80% AM from
80…2000 MHz
10 V/m with 200 Hz 50% Pulse 100% AM at
900 MHz
10 V/m with 200 Hz 50% Pulse 100% AM at
1890 MHz
3 V/m with 1 kHz sine-wave 80% AM from
2000…2700 MHz
EFT/B
IEC 61000-4-4
±4 kV at 5 kHz on power ports
±3 kV at 5 kHz on ControlNet, Ethernet, and PA ports
Surge
IEC 61000-4-5
±1 kV line-line (DM) and ±2 kV line-earth (CM) on power ports
±1 kV line-earth(CM) on ControlNet ports
±2 kV line-earth(CM) on Ethernet and PA ports
Immunity
Enclosure type rating
IP00, NEMA/UL Open Type
Rockwell Automation Publication 1788-UM058A-EN-P - October 2012
53
Chapter 5
Technical Specifications and Certifications
Certifications
Attribute
1788-EN2PAR, 1788-CN2PAR
DC power connections
0.205... 0.823 mm2 (24...18 AWG)
Solid or stranded copper wire rated at 75 °C (167 °F) or greater
1.2 mm (3/64 in) insulation max
Ethernet conductors
CAT5 STP/UTP
Terminal torque
0.22…0.25 N•m (2.0…2.2 lb•in)
Certification
1788-EN2FFR, 1788-CN2FFR
c-UL-us
UL Listed Industrial Control Equipment, certified for US and Canada. See UL File E320594.
CE
EN 61326-1: Meas./Control/Lab., Industrial Requirements
EN 61000-6-2: Industrial Immunity
EN 61000-6-4: Industrial Emissions
EN 61131-2: Programmable Controllers (Clause 8, Zone A and B)
C-Tick
AS/NZS CISPR 11: Industrial Emissions
EtherNet /IP
ODVA conformance tested to EtherNet/IP specifications
KC
Korean Registration of Broadcasting and Communications Equipment, compliant with
Article 58-2 of Radio Waves Act, Clause 3
See the Product Certifications link at http://www.ab.com for Declarations of
Conformity, certificates, and other certification details.
54
Rockwell Automation Publication 1788-UM058A-EN-P - October 2012
Technical Specifications and Certifications
Dimensions
Chapter 5
This drawing provides the dimensions for the linking device. Both linking devices
have the same dimensions (1788-CN2PAR linking device shown). Dimensions
are in mm (in).
80.0 (3.14)
136.0 (5.35)
59.3 (2.33)
152.0 (5.98)
Rockwell Automation Publication 1788-UM058A-EN-P - October 2012
55
Chapter 5
Technical Specifications and Certifications
Notes:
56
Rockwell Automation Publication 1788-UM058A-EN-P - October 2012
Appendix
A
Linking Device Display Status
The display of the linking device provides status and diagnostic data using one of
three page formats: main page, PA master page, or field device page. Use the
display Page button behind the front cover to scroll through the pages (see
Hardware Switches Location on page 19 for location of the Page button).
Main Page
The main page is the default
display, and the linking device
returns to this page after
10 seconds.
PA Bus A/B: Displays the bus
voltages on each port.
IP: Displays the current IP address
or BOOTP if enabled.
CNet MAC:Displays the current
ControlNet node address
(1788-CN2PAR linking device
only).
STS: Displays the current status
(see Table 7).
Table 7 - STS Status Descriptions
Status Message
Description
ok
No events.
new device found
A new field device is on the bus.
redundancy ok
Masters are synchronized.
redundancy err
The master linking devices are out of sync.
bus A tripped
PA bus A has tripped because of over current.
bus B tripped
PA bus B has tripped because of over current.
SAFE MODE
The linking device has been set into safe mode.
not owned
No connection to a Logix controller.
Rockwell Automation Publication 1788-UM058A-EN-P - October 2012
57
Appendix A
Linking Device Display Status
The lower portion of the main page shows the communication quality to each
field device represented as a percentage of data packets sent compared to data
packets received for each field device index (see Table 8).
Table 8 - Field Device Communication Quality
PA Master Page
Display
Communication Quality
>>>
95+
>>
80+
>
70+
X
60+
XX
50+
XXX
Below 50
???
Unknown
The next page accessed by the
Page button is the PA Master page.
Bus A/B: Displays the bus
voltages and currents.
Temperature: Displays the
internal temperature of the linking
device.
External Pwr: Displays the power
supply voltage.
PA Node: Displays the node
address of the linking device.
Bus A/B Enabled: PA Bus A and/or PA Bus B is enabled for communication.
Bus A/B Tripped: PA Bus A and/or PA Bus B has tripped indicating that there
was an over-current on either port.
Bus A/B Term: The linking device is configured to terminate PA Bus A and/or
PA Bus B.
58
Rockwell Automation Publication 1788-UM058A-EN-P - October 2012
Linking Device Display Status
Field Device Page
Appendix A
The next 23 Field Device pages
display the status of each of the
field device indices.
PANode: Displays the PA node
address.
Ident: Displays the ident (identity)
number of the specific field device.
Status: Displays the field device
status (see Table 9).
Table 9 - Field Device Status Descriptions
Status Message
Description
Not Connected
The device cannot be seen.
Online
The device is online but not configured.
ConfigRunning
The device is configured and exchanging data.
N/A
The device has not been added to the configuration.
Success: Displays the data packets received as a percentage of packets sent for the
previous 100 packets.
Pckt Send: Displays the total number of data packets sent from the field device.
Pckt Recv: Displays the total number of data packets received from the field
device.
Bad CRC: Displays the total number of bad CRC packets received.
No Reply: Displays the total number of data requests to which the field device
did not responded.
Rockwell Automation Publication 1788-UM058A-EN-P - October 2012
59
Appendix A
Linking Device Display Status
Notes:
60
Rockwell Automation Publication 1788-UM058A-EN-P - October 2012
Appendix
B
PA Topology
Master Mode 0
Single Master
A Bus Only
Terminated at the
linking device.
Master Mode 1
Single Master
A Bus Only
Not terminated at
the linking device.
Master Mode 2
Single Master
B Bus Only
Terminated at the
linking device.
Rockwell Automation Publication 1788-UM058A-EN-P - October 2012
61
Appendix B
PA Topology
Master Mode 3
Single Master
B Bus Only
Not terminated at
the linking device.
Master Mode 4
Single Master
Dual Bus
Terminated at the
linking device.
Master Mode 5
Single Master
Dual Bus
Not terminated
at the linking
device.
Master Mode 6
Single Master
Split Bus
Terminated at the
linking device.
62
Rockwell Automation Publication 1788-UM058A-EN-P - October 2012
PA Topology
Master Mode 7
Appendix B
Single Master
Split Bus
Not terminated at
the linking
device.
Master Mode 8
Single Master
Ring Bus
Master Mode 9
MultiMaster
A Bus Only
Terminated at the
linking devices.
Master Mode 10
MultiMaster
A Bus Only
Shared termination
at the linking
devices.
Rockwell Automation Publication 1788-UM058A-EN-P - October 2012
63
Appendix B
PA Topology
Master Mode 11
MultiMaster
A Bus Only
Not terminated at
the linking
devices.
Master Mode 12
MultiMaster
B Bus Only
Terminated at the
linking devices.
Master Mode 13
MultiMaster
B Bus Only
Shared termination
at the linking
devices.
Master Mode 14
MultiMaster
B Bus Only
Not terminated at
the linking
devices.
64
Rockwell Automation Publication 1788-UM058A-EN-P - October 2012
PA Topology
Master Mode 15
Appendix B
MultiMaster
Dual Bus
Terminated at the
linking devices.
Master Mode 16
MultiMaster
Dual Bus
Shared termination
at the linking
devices.
Rockwell Automation Publication 1788-UM058A-EN-P - October 2012
65
Appendix B
PA Topology
Notes:
66
Rockwell Automation Publication 1788-UM058A-EN-P - October 2012
Glossary
The following terms and abbreviations are used throughout this manual.
For definitions of terms not listed here, refer to the Allen-Bradley Industrial
Automation Glossary, publication AG-7.1.
1788-CN2PAR linking device Provides a gateway between ControlNet and a PROFIBUS PA network.
1788-EN2PAR linking device Provides a gateway between EtherNet/IP and a PROFIBUS PA network.
1788-PARJB junction box Provides fault-tolerant connections for a PA network.
AO Abbreviation for an analog output; signal is generated by the host system and
transmitted to a field device.
AOP Abbreviation for add-on-profile; provides an intuitive graphical interface for
configuring devices.
BOOTP A protocol to boot a diskless workstation and receive the boot information from
a server.
bridge An interface in a Profibus network that interconnects two or more PA networks.
bus A Profibus cable between a Host and field devices connected to multiple
segments, sometimes through the use of repeaters.
channel A path for a signal.
CIP Acronym for Common Industrial Protocol; a communication protocol, or
language, between industrial devices. CIP provides seamless communication for
devices on DeviceNet, ControlNet, and EtherNet/IP networks.
configurable Capability to select and connect standard hardware modules to create a system;
or the capability to change functionality or sizing of software functions by
changing parameters without having to modify or regenerate software.
configuration Physical installation of hardware modules to satisfy system requirements; or the
selection of software options to satisfy system requirements.
connector Coupling device used to connect the wire medium to a fieldbus device or to
another segment of wire.
ControlNet network An open control network that uses the producer/consumer model to combine
the functionality of an I/O network and peer-to-peer network, while providing
high-speed performance for both functions.
cycle Scanning of inputs, execution of algorithms and transmission of output values to
devices.
device The term in this manual refers to the instruments that make up the
fieldbus system.
Rockwell Automation Publication 1788-UM058A-EN-P - October 2012
67
Glossary
DO Abbreviation for discrete output; signal is generated by the host system and
transmitted to a field device.
DTM Acronym for Device Type Manager; used to connect to the field device and
configure the parameters.
Ethernet Physical and data link layer defined by IEEE 802 standards used by EtherNet/IP.
EtherNet/IP An open, industrial networking standard that supports both real-time I/O
messaging and message exchange.
GSD Acronym for General Status Description; used to define the class 1 capabilities of
the field device.
link A logical link is a connection between function blocks; a physical link is a
connection between fieldbus devices.
linking device As a bridge, enables peer-to-peer communication between PA devices without
the need for host system intervention. As a gateway, connects the PA network to
other plant control and information networks, such as EtherNet/IP and
ControlNet.
network A network as applied in this document is the termination of one or more fieldbus
segments into an interface card of the Host system.
node The connection point at which media access is provided.
node address A node address is a unique address identifier for a device assigned to a Profibus
network. A PROFIBUS network can have as many as 126 devices connected on
it, where each device on the network must have a unique node address between 0
and 126.
offline Perform tasks while the Host system is not communicating with the
field devices.
online Perform tasks, such as configuration, while the Host system is communicating
with the field devices.
Profibus Network A Profibus network uses RS485 to connect devices (for example, controllers,
drives, motor starters and other equipment in automation systems). A Profibus
network can support a maximum of 126 devices. Each device is assigned a unique
node address and transmits data on the network at the same data rate. A cable is
used to connect devices on the network. It contains the bus signal. Devices can be
connected to the network in a daisy chain connection.
PV Acronym for Process Variable, which is the primary value.
68
Rockwell Automation Publication 1788-UM058A-EN-P - October 2012
Glossary
redundancy The duplication of devices for the purpose of enhancing the reliability or
continuity of operations in the event of a failure without loss of a
system function.
ring bus A network where signals are transmitted from one station and replayed through
each subsequent station in the network. Signal can travel in either direction of the
ring so it creates network redundancy; if the ring breaks in one place the nodes
can still communicate.
RSLogix Software that provides a programming environment for sequential, process, drive,
and motion control programming. The RSLogix environment provides an IEC
61131-3 compliant interface for controls programming.
signal The event or electrical quantity that conveys information from one point to
another.
terminator Impedance-matching module used at or near each end of a transmission line that
has the same characteristic impedance of the line. Terminators are used to
minimize signal distortion, which can cause data errors. PA terminators convert
the current signal transmitted by one device to a voltage signal that can be
received by all devices on the network.
topology The shape and design of the PROFIBUS PA network.
trunk The main communication highway between devices on a PROFIBUS PA
network. The trunk acts as a source of main supply to spurs on the network.
Rockwell Automation Publication 1788-UM058A-EN-P - October 2012
69
Glossary
Notes:
70
Rockwell Automation Publication 1788-UM058A-EN-P - October 2012
Index
Numerics
1788-PARJB junction box 32, 33, 34, 36
A
altitude for derating 10
AOP
version 22
auto-terminate function, junction box 33
C
cable length, maximum 17
cable path, route to avoid noise 17
certifications 54
communication signal
attenuated 18
slewed 18
unreadable 18
communication signal quality 17
conducted RF 53
conductors
Ethernet 54
power 54
ControlNet
connections 15
node address 19
node address switches 21
corrupted PA packets 17
current consumption example 16
D
default display 57
derating 10
dimensions 55
display, linking device 57
dual trunk redundancy 35
E
earth ground 15
EFT/B 53
electrostatic discharge 11
emissions 53
enclosure type 53
ESD 53
Ethernet switch settings 21
extended diagnostics 42
F
fault between junction boxes 36
FDT ThinFrame 50
field device communication quality indicators
58
field device input image
ConfigFault 42
ExtDiagAvail 42
FreezeMode 43
OnlineRunning 42
PAIdent 43
PANode 42
ParameterFault 43
ParameterReq 43
PVInt1…PVInt8 43
PVReal1…PVReal8 43
PVStatus1…PVStatus8 43
SyncMode 43
WatchDog 43
field device output image
PVInt1…PVInt8 44
PVStatus1…PVStatus8 44
field device page
bad CRC 59
Ident 59
no reply 59
PANode 59
Pckt Recv 59
Pckt Send 59
status 59
success 59
field device timeouts 17
firmware revision 22
firmware, flashing 21
G
global control 43
ground, shield 16
ground/earth 16
grounding 15
GSD files 25
H
H1 network connection 14
hardware switches 19
HSProcessUtility 25
HSThinFrame 50
I
immunity
conducted RF 53
EFT/B 53
ESD 53
radiated RF 53
surge 53
internal PA segment terminators 27
IP address
setting via BOOTP 21
setting via Ethernet switches 21
isolation voltage 53
Rockwell Automation Publication 1788-UM058A-EN-P - October 2012
71
Index
J
junction boxes 17
junction boxes, termination 18
L
linking device configuration
add device 26
copy device 26
delete all 26
delete device 26
download 26
process catalog 25
scan 26
upload 26
linking device display 57
linking device internally terminated 18
M
main page display
CNet MAC 57
IP 57
not owned 57
PA bus A/B 57
status descriptions
bus A tripped 57
bus B tripped 57
new device found 57
ok 57
redundancy err 57
redundancy ok 57
safe mode 57
STS (status) 57
STS status descriptions 57
maximum cable length 17
MultiMaster mode
config mismatch 38
N
network address switches 19
network connection, H1 14
network diagram
ControlNet network 9
EtherNet/IP network 8
node address, ControlNet 19, 21
noise, avoiding 17
P
PA master configuration
class 2 MPPF 27
max scan address 27
PA node 27
slave retry 27
slave timeout 27
slew compensation 27
topology mode 27
PA master input image 41
bus A/B tripped 41
connection status 42
MasterMode 41
ModuleStatus 42
MultiMasterActive 41
NewFieldDevice 41
PA master page
bus A/B 58
bus A/B enabled 58
bus A/B term 58
bus A/B tripped 58
external pwr 58
PA node 58
temperature 58
PA network connection 14
PA segment 14
PA topology, multi-master
A bus only
not terminated at linking device 64
shared termination 63
terminated at linking device 63
B bus only
not terminated at linking device 64
shared termination 64
terminated at linking device 64
dual bus
shared termination 65
terminated at linking device 65
PA topology, single master
A bus only
not terminated at linking device 61
terminated at linking device 61
B bus only
not terminated at linking device 62
terminated at linking device 61
dual bus
not terminated at linking device 62
terminated at linking device 62
ring bus 63
split bus
not terminated at linking device 63
terminated at linking device 62
Page button 19
power
additional supplies 13
conditioners 13
conductors 54
connection 13
consumption 53
dissipation 53
requirements 53
supply 13
supply connection 13
power supply
recommended 16
PROFIBUS DP layer 7
PROFIBUS PA cable minimum requirements 18
PV format options 28
R
radiated RF 53
72
Rockwell Automation Publication 1788-UM058A-EN-P - October 2012
Index
redundancy
hardware
master redundancy 33
media redundancy 32
software 35
media redundancy 35
redundant
linking devices 27
master mode 37
PA code, example 39
PA media 27
requested packet interval 23
maximum 9
minimum 9
RF
conducted 53
radiated 53
RPI 23
S
Safe mode 21
Safe state 31
segment terminators 27
shield
at power connector 16
at PROFIBUS PA connector 16
shield ground 16
shielding 15
signal attenuation 17
T
temperature
operating 53
storage 53
terminal torque 54
termination locations 18, 61
terminator impedance 18
V
valve positioner 30
voltage drop 17
calculating 17
Rockwell Automation Publication 1788-UM058A-EN-P - October 2012
73
Index
74
Rockwell Automation Publication 1788-UM058A-EN-P - October 2012
Rockwell Automation Support
Rockwell Automation provides technical information on the Web to assist you in using its products.
At http://www.rockwellautomation.com/support, you can find technical manuals, technical and application notes, sample
code and links to software service packs, and a MySupport feature that you can customize to make the best use of these
tools. You can also visit our Knowledgebase at http://www.rockwellautomation.com/knowledgebase for FAQs, technical
information, support chat and forums, software updates, and to sign up for product notification updates.
For an additional level of technical phone support for installation, configuration, and troubleshooting, we offer
TechConnectSM support programs. For more information, contact your local distributor or Rockwell Automation
representative, or visit http://www.rockwellautomation.com/support/.
Installation Assistance
If you experience a problem within the first 24 hours of installation, review the information that is contained in this
manual. You can contact Customer Support for initial help in getting your product up and running.
United States or Canada
1.440.646.3434
Outside United States or Canada
Use the Worldwide Locator at http://www.rockwellautomation.com/support/americas/phone_en.html, or contact your local Rockwell
Automation representative.
New Product Satisfaction Return
Rockwell Automation tests all of its products to ensure that they are fully operational when shipped from the
manufacturing facility. However, if your product is not functioning and needs to be returned, follow these procedures.
United States
Contact your distributor. You must provide a Customer Support case number (call the phone number above to obtain one) to your
distributor to complete the return process.
Outside United States
Please contact your local Rockwell Automation representative for the return procedure.
Documentation Feedback
Your comments will help us serve your documentation needs better. If you have any suggestions on how to improve this
document, complete this form, publication RA-DU002, available at http://www.rockwellautomation.com/literature/.
Rockwell Otomasyon Ticaret A.Ş., Kar Plaza İş Merkezi E Blok Kat:6 34752 İçerenköy, İstanbul, Tel: +90 (216) 5698400
Publication 1788-UM058A-EN-P - October 2012
Copyright © 2012 Rockwell Automation, Inc. All rights reserved. Printed in the U.S.A.