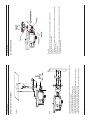
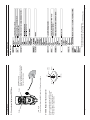
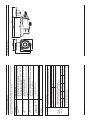
1
www.visionhitech.co.kr
Printed In Korea/2012.04.11
Vision bldg, 150-3 Simgok-dong, Wonmi-ku, Buchon-city, Gyeonggi-do, Korea
VISION HI-TECH Co.,Ltd.
www.visionhitech.co.kr
VISION HI-TECH Co.,Ltd.
VN7XEH-12L VN7XEH-50L
Super Night Vision Outdoor Camera
User Manual
2
9.Specification ------------------------------------------------------------- 12
8.Dimension (mm) -------------------------------------------------------- 11
7.Troubleshooting guide ------------------------------------------------- 10
6.OSD Menu tree ----------------------------------------------------------- 9
5.1.How to mount to Ceiling / Wall
5.2.3-Axis Adjustment
5.3.Lens external adjustment, EXT-Video
5.4.OSD Manual for functions control
5.Installation ---------------------------------------------------------------- 6~8
4.Package --------------------------------------------------------------------- 5
3.Disclaimer of warranty --------------------------------------------------- 5
2.Limitation of liability ------------------------------------------------------- 4
1.Precautions ----------------------------------------------------------------- 4
Table of Contents
3
4
This publication is provided “AS IS” without warranty of any kind, either express
or implied, including but not limited to, the implied warranties of merchantability,
fitness for any particular purpose, or non-infringement of the third party's right.
This publication could include technical inaccuracies or typographical errors.
Changes are added to the information herein, at any time, for the improvements
of this publication and/or the corresponding product(s).
2. Limitation of liability
●
●
●
●
●
●
●
●
●
●
●
●
Camera x 1
4. Package
VISION HI-TECH Co.,Ltd.
Instruction manual x 1
www.visionhitech.co.kr
VN7XEH-12L VN7XEH-50L
Super Night Vision Outdoor Camera
User Manual
4
5
(6) Any claim or action for damages, brought by any person or organization
being photogenic subject, due to violation of privacy with the result of that
surveillance-camera's picture, including saved data, for some reason,
becomes public or is used for the purpose other than surveillance.
(5) Any problem, consequential inconvenience, or loss or damage, arising out of
the system combined by the devices of third party.
(4) Inconvenience or any loss arising when images are not displayed, due to any
reason or cause including any failure or problem of the product;
(3) Unauthorized disassemble, repair or modification of the product by the user;
(2) Personal injury or any damage caused by inappropriate use or negligent
operation of the user;
(1) Any damage and loss, including without limitation, direct or indirect, special,
consequential or exemplary, arising out of or relating to the product;
In no event shall seller be liable to any party or any person, except for
replacement or reasonable maintenance of the product, for the cases, including
but not limited to below:
Please read the manual carefully before the installation in order to set up the
camera correctly and to obtain the best picture quality.
Please keep the manual in good condition for your future reference and service
application.
Installation and services should be only carried out by an authorized personnel
according to local safety regulations.
If any liquid or solid matter gets into the housing, immediately disconnect the
camera from power supply and have it checked by your authorized dealer
before reusing..
Avoid installing the camera at extremely hot or cold places.
If you are not a certified person, never try to dismantle the camera. To avoid
electric shock, never remove the screws or covers. There are no parts inside
that need maintenance by the user. All maintenance should be carried out by
qualified personnel.
Avoid installing the camera at a place of high humidity.
Avoid installing the camera at the place exposed to gas or oil.
Keep the top glass of the lens always clean in order to obtain the best picture
quality all the time. Be careful not to be stained by fingerprint.
Don't face the camera directly toward sunlight or sunlight reflecting area.
CCD may go defective at this condition.
Please give a special attention to keep the unit from dangerous drop or external
shock during the process of transportation or handling.
Never try to touch the camera in wet hand. It may cause an electric shock.
Do not expose the camera to radioactivity. It causes a serious damage on the
CCD.
●
3. Disclaimer of warranty
1. Precautions
6
① Drill three screw holes on the wall plate to fix three plastic anchors (supplied) in the holes.
② Fix the plastic anchors in the holes.
③ Position the mounting bracket on the screw points.
④ Fix the mounting bracket by tightening the screws.
⑤6OLJKWO\ORRVHQEROW$WKHQDGMXVWWLOWÛDQGURWDWLRQÛRIWKHFDPHUDXVLQJD
serration on the bracket and tighten the bolt firmly.
⑥6OLJKWO\ORRVHQEROW%WKHQDGMXVWSDQÛRIWKHFDPHUDDQGWLJKWHQWKHEROWILUPO\
(Wall)
7
①3DQÛ
Slightly loosen Pan bolt then adjust pan of the camera using a serration on the
bracket and tighten the bolt firmly .
②7LOWÛ
Slightly loosen Tilt bolt then adjust tilt of the camera using a serration on the bracket and
tighten the bolt firmly.
③5RWDWLRQÛ
Slightly loosen Tilt bolt then adjust rotation of the camera using a serration on the bracket
and tighten the bolt firmly.
5-2. 3-Axis Adjustment
5-1. How to mount to Ceiling/ Wall
(Ceiling)
5. Installation
5. Installation
Focus
8
How to use tactile switch on the OSD control
Push – to enter the menu, to save settings.
Push up or down – to select functions
Push left or right – to adjust levels.
5-4. OSD Manual for functions control
LEFT (L)
DOWN (D)
UP (U)
RIGHT (R)
MENU
(PUSH)
ZOOM & FOCUS
Make your adjustments by turning the
Zoom & Focus dials at the underside
front end of the camera
- How to use
Connect Extra video output (BNC cable) to LCD monitor as a picture.
Zoom
5-3. Lens external adjustment, EXT-Video
5. Installation
*
*
* Some menu is excluded in IR LED cameras.
For detailed information regarding OSD menu, refer to OSD guide.
*
*
OSD Menu tree
6. OSD Menu tree
9
10
56
communi
cation fails.
Problems
3OHDVHFKHFNWKHVHWWLQJRI:+,7(%$/6(783PHQX
* Please check that direction of camera turns toward the Sun.
56&RQWURO3RUW
,QLWLDOYDOXH
121( (1$%/(
%$8'5$7( 8$5702'( 5(73.7
* We recommend that you make ground connection between camera and controller
for safe communication control.
&DPHUD,'
,WHP
3OHDVHFKHFNLIWKHLQLWLDOYDOXHRIWKH56&RPPXQLFDWLRQVHWXSPDWFKHV
between camera and OSD Controller or DVR.
56&RPPXQLFDWLRQHVWDEOLVKPHQWLQLWLDOYDOXH
&RQWURO%RDUG&RQQHFWLRQ3RUW
&211(&7,217(50,1$/75;
&211(&7,217(50,1$/75;
3OHDVHFKHFNWKHSRODULW\EHWZHHQ56&RQWURO3RUWDQG56FDEOH
Troubleshooting
The camera is not working
properly, and the surface of
the camera is hot.
Color is not correct.
The screen flickers
continually.
The image on the screen is
dark.
The image on the screen is
dim.
Troubleshooting
* Please check that the power cord and line connection between
the camera and monitor are fixed properly.
* Please check that you have properly connected VIDEO cable
to the camera VIDEO output jack.
* Is lens stained with dirt? Clean your lens with soft, clean cloth.
* Set the monitor to proper condition.
* if the camera is exposed to too strong light, change the camera
position.
* Adjust the contrast feature of the monitor.
,I\RXKDYHDQLQWHUPHGLDWHGHYLFHVHWWKHȍ+L=SURSHUO\
(Please check the impedance)
* Please check that you have properly connected the camera to
an appropriate power source.
Problems
Nothing appears on the
screen.
If there are problems in operating, please refer to the checklist below. If the problem persists,
please contact the agent where this product is purchased.
7. Troubleshooting guide
8. Dimension (mm)
11
1/3" Sony 960H Ex-view HAD CCDⅡ
NTSC : 976(H) x 494(V), PAL : 976(H) x 582(V)
650TV Lines(Color)/ 700TV Lines(B/W)
Internal
NTSC : 525 Lines PAL : 625 Lines 2:1 Interlaced
1.0Vp-p Composite 75 Ohms
More than 52dB (AGC Off)
0Lux (w/IR ON)
NTSC:1/60~1/10,000 sec. PAL:1/50~1/10,000 sec.
6WDQGDUGȖ Û.aÛ.$XWR
Image sensor
Effective Pixels
H. Resolution
Synchronizing system
Scanning system
Video output
S/N ratio
Min. Illumination
Shutter Speed
Gamma Correction
White Balance
0.005%
12VDC/24VAC
500mA/12VDC, 200mA/24VAC
20,000 hours
2.8~12mm Varifocal DC Iris (CIR-700M30)
Smear Effect
Power source
Operating current
MTBF of IR
Lens
108.8(W) x 146.3(H) x 297.3(L)
1,200
Measurement (mm)
Weight (Approx. g)
ATW / Push /Push Lock / User 1, 2/ Anti CR/ Manual
BLC/HLC/Off
Mirror(On/Off), Brightness, Contrast, Sharpness, HUE, Gain
On/Off
On/Off (4 Zone setting available)
NR Mode/ Y Level/ C Level
On/ Off
English/ Germany/ French/ Russian/ Spanish/
White Balance
Backlight
Picture Adjust
ATR
Privacy Mosaic
NR
Camera ID
Language
12
*Specifications are subject to change without prior notice for better improvement.
Portuguese/ Japanese
Auto/ Manual
Shutter/ AGC
FUNCTION
-10°C ~ 50°C (Humidity : 0% RH ~ 90% RH),
Operating temp./Humidity
5~50mm Varifocal DC Iris (CIR-700M50
Standard : -6dB ~ 44.8dB Auto
Gain Control
(ATW/ Push/ Push lock/ User1/2, Anti CR, Manual)
Super Night Vision Outdoor Camera
Class
9. Specification
MEMO
13
14
MEMO
MEMO
15