1
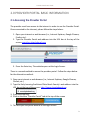
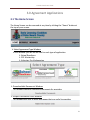
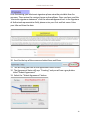
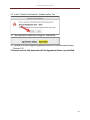
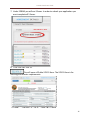
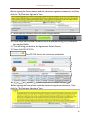
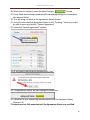
Provider Portal User Guide Welcome to the Palm Beach Provider Web Portal The Palm Beach Provider Portal allows childcare providers with internet access the ability to submit their application for a School Readiness, Children Services Council Scholarship or Voluntary Prekindergarten agreement online. The information for each provider is secure and viewable only by entering your User ID and password. The Palm Beach Provider Portal is managed by the Early Learning Coalition of Palm Beach County. Please contact your Coalition System Specialists listed below for any questions and assistance. Tamara Liddie (Providers A-F)* Barbara Amezquita (Providers G-O)* 561-214-7444 561-214-7420 [email protected] [email protected] Jonathan Geasey (Providers P-Z)* Claudia Calitto (School & Head Start Sites) 561-214-7440 561-214-7428 [email protected] [email protected] * If you are a Home Care Provider your System Specialist is designated by your last name. *If you are a child care center your System Specialist is designated by your first name of your license. Provider Portal User Guide USER MANUAL FOR THE PALM BEACH CHILD CARE PROVIDER PORTAL Created: April 24, 2014 Revised: April 29, 2014 Funded by: Provider Portal User Guide 1.0 INTRODUCTION This user guide provides information about the features and use of the screens on the Palm Beach Child Care Provider Portal, referred to as the Provider Portal. 1.1 About This Guide Purpose This user guide provides a basic description of the use and features of screens used in the Portal. Use of this Guide This user guide provides step-by-step instructions for site navigation. It provides detailed screen information and instructions for accessing and completing screens needed to submit a childcare agreement application. Graphics The graphic illustrations in this guide are screen captures that show all of the provider portal screens required to submit a childcare agreement application. The entries seen in the illustrations in this guide are not actual provider data. 1.2 About the Palm Beach Child Care Provider Portal The Provider Portal is an online web based application designed for providers to create and submit their childcare agreement application(s) online. It also allows the provider to upload documents required to support their agreement application(s). All the screens on the Provider Portal use drop-down menus and point-and-click techniques to provide an easy-to-use method for providers. 2 Provider Portal User Guide 2.0 PROVIDER PORTAL BASIC INFORMATION 2.1 Accessing the Provider Portal The provider must have access to the internet in order to use the Provider Portal. Once connected to the internet, please follow the steps below: 1. Open your internet or web browser (i.e., Internet Explorer, Google Chrome, Firefox, etc.). 2. Type the Provider Portal web address into the URL bar at the top of the screen: providers.elcpalmbeach.org 3. Press the Enter key. The website opens at the Login Screen. There is a second method to access the provider portal. Follow the steps below for the alternative method: 1. Open your internet or web browser (i.e., Internet Explorer, Google Chrome, Firefox, etc.). 2. Type the Early Learning Coalitionof Palm Beach County’s web address into the URL bar at the top of the screen: http://www.elcpalmbeach.org 3. Press the Enter key. 4. Click on the blue “Provider Portal” tab at the top of the screen 5. This will open the portal website at the login screen 3 Provider Portal User Guide 2.2 Creating an Account If this is the first time accessing the portal, you must create a User Name and Password. The following are step by step instructions for creating a new account. 1. Open the portal login screen 2. On the right side of the screen find “Create Account” 3. Enter User Name (email address) 4. Re-enter your User Name 5. Create a password. Passwords are required to be at least 7 characters in length. They must contain characters from 3 of the following 4 categories: • Upper case letters, • Lower-case letters, • Numbers 0-9, and • Non-alphanumeric characters such as $, #,*. *Remember passwords are case sensitive 6. Re-enter your password 7. Enter your provider ID. This is either your EIN (Employer Identification Number) or SSN (Social Security Number), which can both be found on your W-9 form. 8. Enter your provider extension. This information can be found on your attendance sheets. If you do not know this information, please contact your Coalition System Specialist. 4 Provider Portal User Guide 9. Below the provider extension you will see an attestation which states: The undersigned represents and warrants that he/she has full and complete authority to access and submit information on behalf of the entity listed below. 10. Enter the Name of the Child Care Business. 11. Select a title. Please note: Only an Owner, Director, or Authorized Representative of the childcare site can create a Login Account. 12. Enter your first name. 13. Enter your last name. 14. Enter your phone number 15. Enter your e-mail address to be used by the Coalition for future communication 16. Enter a security question. You can use any question. It is recommended you use a question that ONLY you will be able to answer. 17. Enter the answer for your security question. 18. Select the blue “Create Account” button. *Review all the information for accuracy *User accounts can only be created one time 5 Provider Portal User Guide 2.3 Logging in 1. Open the portal login screen 2. On the left side of the screen find “Login” 3. Enter User Name (email address) 4. Enter your password *Remember passwords are case sensitive 5. Select the blue “Login” button. For security reasons, if an incorrect password is entered too many times in a row, you will be locked out of the portal. If a lockout occurs, you will need to contact your coalition system specialist. • If you forget your password, click on the reset password link. 6 Provider Portal User Guide 2.4 Resetting your Password Select the reset password link on the bottom right hand side of the login window 1. Enter User Name (email address) 2. Enter your provider ID. This is either your EIN (Employer Identification Number) or SSN (Social Security Number), which can both be found on your W-9 form. 3. Enter your provider extension. This information can be found on your attendance sheets. If you do not know this information, please contact your Coalition System Specialist. 4. Create a password. Passwords are required to be at least 7 characters in length. They must contain characters from 3 of the following 4 categories: • Upper case letters, • Lower-case letters, • Numbers 0-9, and • Non-alphanumeric characters such as $, #,*. *Remember passwords are case sensitive 5. Re-enter your password 6. Select the blue “Reset Password” button. *Review all the information for accuracy *User accounts can only be created one time 7 Provider Portal User Guide 3.0 Agreement Applications 3.1 The Home Screen The Home Screen can be accessed at any time by clicking the “Home” button at the top of your screen. Select Agreement Type Window In this window you will see an icon for each type of application School Readiness CSC Scholarship Voluntary Pre-Kindergarten Downloadable Documents Window This window contains supporting documents for providers Helpful Information Links Window This window has links to other web pages that are useful to providers 8 Provider Portal User Guide 3.2 New School Readiness/CSC Scholarship Agreement The procedure is the same for both the School Readiness and CSC Scholarship agreement applications. Starting on the Home Screen you will select the “School Readiness” or “CSC Scholarship” icon. This example will be for a School Readiness agreement application. 1. After selecting the School Readiness icon you will be taken to the School Readiness dashboard 2. Select “New School Readiness 2014-2015 Agreement” or “New CSC Scholarship 2014-2015 Agreement” 3. A window will appear and ask you to verify that this is the agreement you wish to create. 4. Select “Yes” 5. This will bring you to the Agreement Details screen. 6. The Agreement status will say “Creating” 9 Provider Portal User Guide 7. Under Form, select “School Readiness 2014-2015” 8. This will bring you to the first page in the application. 10 Provider Portal User Guide 9. Fill out the agreement page by page. To move onto the next tab, click “Next” at the top of the screen. The information you will enter in this tab will be based on licensing requirements. Captures your accreditation and Gold Seal information Curriculum, licensed capacity, and vacancy information The setting and the environment of your facility Any additional fees your program charges Meals provided and other facility information These are the rates you charge the public. *As a reminder, the Coalition cannot pay more than its maximum rate. Information about your program’s operating hours and schedule Is for extra services you may provide and for staff education Additional information including financial assistance and transportation This tab has 6 pre-populated designated holidays. Also, if applicable, it has room for up to 6 additional reimbursed “floating” holidays. Non-reimbursable closures are also entered here. Insurance information: general liability, which is required Auto and worker’s compensation, if applicable 11 Provider Portal User Guide Prior to entering your electronic signature please view the printable form for accuracy. Then review the contract terms and conditions. Once you have read the “electronic signature statement” click the acknowledgement box. In the Signature of Authorized representative field, please enter your first and last name. Enter your title and then the date. 10. Scroll to the top of the screen and select Save and Close. 11. This will bring you back to the Agreement Detail Screen. 12. The Agreement Status still says “Creating” and you will see a gray button titled “Submit Agreement.” 13. Select the “Submit Agreement” button. 12 Provider Portal User Guide 14. In the “Submit Confirmation” window select “Yes.” 15. The Agreement Status will change to “Submitted.” 16. Upload all of your supporting documentation into the document library (Section 3.4) *Contracts are not fully executed until the Agreement Status says certified. 13 Provider Portal User Guide 3.3 New Voluntary Pre-Kindergarten Agreement 1. Start on the Home Screen 2. Select the icon that says VPK. This will bring you to the VPK Dashboard. 3. Select “New VPK Fall 2014-2015 Agreement” 4. A window will appear and ask you to verify that this is the agreement you wish to create. Select “Yes” 5. This will bring you to the Agreement Details screen. 6. Scroll down to Agreement status which should say “Creating.” 14 Provider Portal User Guide 7. Under FORMS you will see 5 forms. In order to submit your application you must complete all 5 forms. 8. First Click OEL-VPK 10. This will open a fill-able VPK 10 form. The VPK 10 form is for licensing and director requirements. 15 Provider Portal User Guide Before signing the forms please read the electronic signature statement, and then click the “By Electronic Signature” box. 9. When you are finished, select the Save Changes button 10. If any fields were missed a window will be displayed asking you to complete the required fields. 11. This will bring you back to the Agreement Details Screen. 12. Next, click OEL-VPK 11A. The VPK 11A form is for instructor credentials. Before signing the form please read the electronic signature statement. Then click the “By Electronic Signature” box. 16 Provider Portal User Guide 13. When you are finished, select the Save Changes button. 14. If any fields were missed a window will be displayed asking you to complete the required fields. 15. This will bring you back to the Agreement Details Screen. 16. If you need more room on your VPK 11A click the yellow button next to the OEL-VPK 11A form. 17. This will open a new OEL-VPK 11A form. 18. Next Click OEL-VPK 11B. The VPK 11B form records all of your VPK Class Calendars. Before signing the form please read the electronic signature statement. Then click the “By Electronic Signature” box. 19. When you are finished, select the Save Changes button. 20. If any fields were missed a window will be displayed asking you to complete the required fields. 21. This will bring you back to the Agreement Details Screen. 17 Provider Portal User Guide 22. If you need more room on your VPK 11B click the yellow button next to the OEL-VPK 11B form. 23. Next click OEL-VPK 20. This will open a new OEL-VPK 11B form. The VPK 20 form is your State of Florida Voluntary PreKindergarten Education Program Statewide Provider Agreement. Before signing the form, please read the document fully and enter any applicable information into the fields. Then click the “By Electronic Signature” box. 24. When you are finished select the Save Changes button. 25. If any fields were missed a window will be displayed you to complete the required fields. 26. This will bring you back to the Agreement Details Screen. asking 27. Next click VPK Guidelines. This document outlines the procedures for making changes to your VPK program. Before signing the form please read the document fully. 18 Provider Portal User Guide 28. When you are finished, select the Save Changes button. 29. If any fields were missed a window will be displayed asking you to complete the required fields. 30. This will bring you back to the Agreement Details Screen. 31. You will notice that the Agreement Status is still “Creating,” but now you will be able to see a gray button “Submit Agreement”. 32. Select the “Submit Agreement” button. 33. In the submit confirmation window select “yes.” 34. The Agreement Status will now change to Submitted. 35. Upload all of your supporting documentation into the document library (Section 3.4). *Contracts are not fully executed until the Agreement Status says certified. 19 Provider Portal User Guide 3.4 Uploading Documents Start on your home screen. The document library can be accessed from any agreement application. For example, if you upload any documents with your School Readiness Agreement Application, the documents will also be available for your CSC Scholarship Agreement Application or your VPK Agreement Application. 1. First select your agreement type. 2. This will bring you to the agreement dashboard. 3. The document library is on the right side of the screen 4. Each folder is for a specific type of document. Accreditation and gold seal certificates Completed direct deposit form Auto insurance certificate if your program transports children Liability insurance certificate: General Liability insurance is required by all providers. * As a reminder the coalition must be listed as additionally insured 20 Provider Portal User Guide Worker’s compensation certificate if required by law License certificate or exemption letter Rates you charge the public *Provider name must be on it All VPK instructor affidavits of good moral character All VPK instructor background screenings Providers on Probation who have chosen curriculum or staff development plan If you have chosen to purchase an approved curriculum it must be the package that is listed on the Florida Office of Early Learning’s website. Providers must show proof of purchase and proof that staff have participated in training by the publisher. To do this, upload a receipt and certificate from the training for at least one staff member. If you have chosen the staff development plan you must upload the transcripts for the VPK Director, Lead, and Assistant instructors documenting that all of the required staff development trainings have been completed. Director Credentials Certificate and/or DCF transcript VPK instructor education information Completed W-9 form 21 Provider Portal User Guide 5. Select the “Add New Document” button. 6. To find the document on your computer select “Browse.” 7. Select the file, and click the “open” button at the bottom of the search window 8. Select the folder you wish to upload the document in by using the “Select Category” drop down menu. 9. Please enter a document description and expiration date, if applicable 10.To finish, select the “Upload Document” button 11.You will now see that the folder you uploaded a document in is black. This means there is at least one document in the folder. 12.If you would like to view the document you uploaded click on the name of the folder. 13.All documents uploaded in that folder will be listed. 22 Provider Portal User Guide 3.5 Accessing an Agreement in Creating mode, or Submitted mode 1. From your home screen click the desired agreement icon (SR, CSC, or VPK). 2. The status of your agreement will be displayed. 3. If an agreement is in “Creating,” “Submitted,” or “Rejected” mode you can make changes to it. *You can always upload documents into the document library. 4. Click “View the Agreement Details.” 5. For School Readiness and CSC Scholarship click the blue link at the bottom of the screen. For Voluntary Pre-Kindergarten click on the form you wish to view or edit. 3.6 Agreement Status Definitions Creating: Provider is in the process of completing an initial application Submitted: Provider has submitted the agreement to the Coalitionfor review Reviewing: Coalition is reviewing the agreement, provider can no longer make changes Reviewed: Coalition’s review found no errors or missing information on its initial review and is sent for certification Rejected: Coalition’s review found errors or missing information and sent the application back to the provider for editing. Certified: Agreement has been certified and executed by the coalition. Documents can be uploaded into the document library during any status of the agreement. Including, after the agreement has been certified. 23 Provider Portal User Guide 3.7 Flow Chart 1. 2. 3. 4. Provider creates an agreement Provider submits agreement Coalitionreviews agreement (provider can no longer make changes) Coalitionaccepts for certification or rejects the agreement back to the provider. a. If rejected the provider makes changes and re-submits 5. If the application is complete it will be certified 6. If the application is not complete it will either go back to the provider for resubmission or continue to be reviewed by the coalition a. Once the agreement is complete it will be certified 24 Provider Portal User Guide Creating Provider makes changes Reviewing Rejected Provider makes changes Submitted ELC makes changes Reviewed Is application complete? Yes No Agreement Certified 25