1
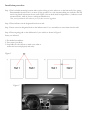
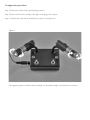
Garage Parking Indicator
User Manual
Installation/Configuration/Maintainence/Use
Installation procedure
Step 1: Find a suitable mounting location either on the ceiling or in the rafters or on the back wall of the garage.
Recommended location is 8 ft. or more off the ground. For a unit accommodating two stalls the unit will
need to be placed in between the two stalls. Figure 1 shows both install configurations. a.) indicates a wall
mounted device, while b.) shows a ceiling mounted device.
Note: you may mount the device wherever you see fit, these are mere suggestions.
Step 2: Place indicator unit in designated location on wall.
Step 3: Insert screws in designated holes in the indicator unit. Use a screwdriver to screw them into the wall.
Step 4: Place targeting pad on the dashboard of your vehicle as shown in Figure 2.
Items you will need:
1. Flat headed screwdriver.
2. Two screws (provided.)
3. Step ladder or other object to stand on in order to
mount the laser unit properly and safely.
Figure 1
a.)
b.)
Figure 2
Power unit installation
Step 1: Remove the light bulb on your garage door opener.
Step 2: Screw in the power adaptor provided.
Step 3: Attach the power cord to adaptor.
Step 4: Attach the power cable to the indicator unit. If needed, use the extension cable provided. Secure the power
unit with ties (provided). The completed setup should resemble the figure below.
Figure 3
E
C
D
A - Light bulb
B - Power Adaptor
C - Power Cord
D - Light bulb socket
E - Power Supply
B
A
Configuration procedure
Step 1: Position the vehicle in the typical parking location.
Step 2: Power on the laser by turning on the light on the garage door opener.
Step 3: Aim the laser such that the beam hits the center of the target area.
Figure 4
The supporting arms of the laser units are ridgid, yet adjustable enough to aim the beam of the laser.
Use description
As you approach your garage while driving, use the automatic garage door opener as normal. The laser will automatically
turn on with the garage door opener light. As you enter the garage, look for the laser beam to hit the hood of your
vehicle. Pay attention to the beam as it travels up the hood, while making sure that nobody is standing in the way
of the vehicle. When the beam is within the target box of the target pad, you are within 1 inch in each direction of
your predetermined parking spot. If you find that you have parked too far left or right, simply use the extensions
of the targeting pad as a guide to how far off your desire parking spot you are, and adjust accordingly. The laser will
automatically turn off with the garage door opener light goes off.
Maintenance procedure
The laser devices are designed to point rigidly in the same direction that it was originally aimed, and should not
require reconfiguration. However, if you notice a significant change in the accuracy of the beam, simply repeat the
configuration procedure as outlined in this user manual.
Safety tips!
- When either laser is not needed, flip the appropriate switch located beneath each laser unit to
deactivate the laser. This is is useful for garages that has just one parking stall.
- The white light at the tip of the laser unit indicates that the laser is on, and serves as both a
warning when no car is present, and a convenience when parking a vehicle.
CAUTION!
This product contains low intensity lasers. Do not stare into laser beam.