1
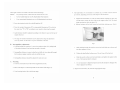
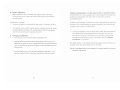
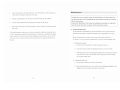
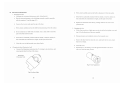
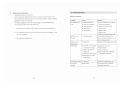
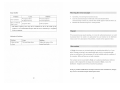
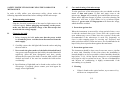
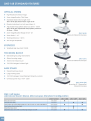
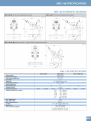
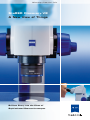
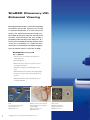
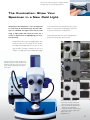
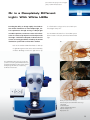
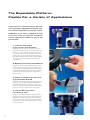
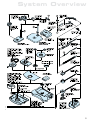
THE REGIONAL TRAINING WORKSHOP ON LARVAL FISH IDENTIFICATION
AND FISH EARLY LIFE HISTORY SCIENCE
SEAFDEC/TD, SAMUT PRAKAN, THAILAND
16 – 31 MAY 2007
TRD 06: Stereomicroscope User Manual
SAFETY INSTRUCTIONS FOR USING THE COMPOUND
MICROSCOPE
In order to fully utilize your microscope safely, please notice the
following important instructions before starting with the microscope.
A.
Before turning on the power
Plug the electrical connection of the stand or light source to the
electrical supply. Before plugging and turning on the power,
make sure that the operation voltage of the microscope does
match with the voltage supply.
B.
Changing the bulb
1. Before changing the bulb, make sure that the power switch
is off and the power cord has been disconnected from the
main supply.
2. Carefully remove the old light bulb from the socket and plug
the new bulb in.
3. Never touch the glass surface of the bulb with naked hand.
Any grease stain brought onto the bulb by the naked hand will
negatively affect the heat dissipation and, thus, greatly
shorten the life span of the bulb. Clean the bulb surface with
alcohol and tissue if the user has touched the bulb surface
accidentally.
4. Specifications of light bulb can be found on the surface of the
microscope. If required, please contact your local agent for
supply of new light bulbs.
C.
Care and cleaning of the microscope
To take good care of the microscope, the user should avoid the
attack of dust and water. If dust and water come to the
microscope, fungus will eventually grow and kill the microscope.
Please notice that once fungus is grown, even after cleaning, the
microscope will have a good chance to be re-infected again.
Moreover, grease stain and fingerprints will distort the image,
which should be avoided.
1. Protection against dust
When the instrument is not used for a long period of time, cover
it with the enclosed dust cover. Never leave the eyepiece tube
open without any covers. Either leave the eyepiece in the tube
(recommended if the microscope is used very frequently) or
cover it with wrapping paper or covering cap. Eyepieces and
other optical accessories, when not in use, are recommended to be
kept in a dry box to protect them against dust and water.
2. Protection against water
The instrument should be kept away from water source, pipeline
or water sink. Humidity in the room where the instrument is
located should be as low as possible (relative humidity should be
kept below 70 %). All the optical accessories are recommended
to be kept in a dry box when not in use. The use of dehumidifier
and 24-hour air conditioning is highly recommended if the
surrounding is very humid.
3. Cleaning
a.
P.1
If dust is found on the optical surface, try to remove it by
air blower or compressed air.
P.2
b.
•
•
For fingerprints, grease stain or dust which cannot be
removed by air blower, two possible methods are
recommended:-
The microscope should always be kept vertical when
being moved.
5. Electrical parts of the microscope
Breathe lightly on the glass surface and wipe with a piece
of clean cloth, lens paper or cotton swab. Please notice
that small cotton fibre may be left onto the lens surface if
a cotton swab is used.
Dip a cotton swab or lens paper with a small amount of
absolute alcohol, and clean the lens surface carefully. No
other aggressive solvents should be used.
In no circumstances should the user clean any lens surface
with dry cotton swab, cloth or lens paper. This will scratch
the lens surface causing irreparable damage. Water is not
recommended for cleaning of lens as it will leave some water
stain on the lens surface and if water residue is left on the lens,
fungus can grow causing irreparable damage.
4. Moving the microscope
a.
The microscope should not be moved around whenever it
is possible.
b.
If moving is unavoidable, the user should ensure that,
before moving, the eyepieces are firmly locked in the
eyepiece tube and all objectives are tightly screwed onto
the nosepiece.
c.
d.
The user should move the microscope with both hands,
one hand holding the bottom of the stand and the other
hand holding the upper limb of the microscope. When
moving the microscope, it is always best to have the
eyepiece tube facing" away from the user.
P.3
a.
Before plugging in the power cord with the supply, make
sure that the supplying voltage matches with the operation
voltage of the equipment.
b.
Turn off the equipment before plugging in the power card
with the supply.
c.
The best practice is to turn the voltage clown to the lowest
before turning off the equipment.
d.
Do not turn the power on and off, off and on immediately
as this will shorten the life span of the bulbs and may
cause damage to the electrical system.
e.
Users should observe all local safety regulations of the
region. The equipment is manufactured according to CE,
UL and other Safety Instruction. However, users do have
full responsibility to use this equipment safely.
* * SHOULD YOU HAVE ANY PROBLEMS CONCERNING USING
THE MICROSCOPE, PLEASE CONTACT YOUR AGENT
IMMEDIATELY. WE ARE ALWAYS READY TO HELP IN ALL
ASPECTS. * *
* * BECAUSE OF TECHNOLOGICAL ADVANCEMENT, THESE
SAFETY INSTRUCTIONS ARE SUBJECT TO CHANGE WITHOUT
PRIOR NOTICE AND WITHOUT OBLIGATION. * *
YOUR LOCAL AGENT:-
P.4
Microscopy from Carl Zeiss
SteREO Discovery.V8
A New View of Things
Brilliant Entry into the Class of
Sophisticated Stereomicroscopes
SteREO Discovery.V8:
Enhanced Viewing
New high-performance optics – this is the outstanding
performance feature that Carl Zeiss has focused
on with the development of its latest entry level
model in the sophisticated stereomicroscope class.
The SteREO Discovery.V8 impresses with enhanced
resolution, increased contrast and, most notably, a
perceptibly improved stereoscopic impression. As a
result, it offers a image brilliance that is without equal
in this class of instrument. For a visible increase in
information in all biomedical and industrial applications, the time has come for a new view of things.
SteREO Discovery.V8
at a glance:
• Supreme ease of operation and ergonomic
viewing posture
• Zoom range of 8 : 1
• Optimized optics design for a visible increase
in image information
• Manual focusing drive with adjustable click
stops
• Manual and motorized stands with high stability
• Generous specimen space with high working
distance
• Illumination and contrast methods based on
cold light and LED
PCB
Laterally grazing reflected light
Objective: Plan S 1.0x
Magnification: 16x*
2
Mouth parts of the common housefly
Oblique illumination in brightfield
transmitted light
Objective: PlanApo S 1.0x
Magnification: 80x*
* Magnification when looking into the SteREO Discovery.V8
Wafer structure
Darkfield reflected light
Objective: PlanApo S 1.5x
Magnification: 120x*
SteREO Discovery.V8
The Optical System: More Than
the Sum of its Individual Components
Today, anyone developing a stereomicroscope that
stereoscopic impression of the microscopic image.
sets new standards with its optical system has to work
Even on our SteREO Discovery.V8 entry level model.
constructively at the very limits of physical feasibility,
taking full advantage of every new possibility offered
Another area we focused on during practical realiza-
by state-of-the-art optical design. With experience and
tion was the systematic minimization of stray light for
innovativeness, you don’t have to look any further
the entire optical system. For exceptionally brilliant
than the optical systems from Carl Zeiss.
contrast and a new image quality with greater information content.
The innovative simultaneous design process during
optical modeling has resulted in a standardized optical concept for all SteREO microscopes. For significantly improved resolution and a perceptibly better
3 ranges of high-quality objectives
Achromat S: high-contrast images with a pronounced stereoscopic impression
Plan S: flat, distortion-free object fields
PlanApo S: precisely detailed resolution with no color fringes
4
Parfocally harmonized for needle-sharp
images over the entire magnification
range from 1x to 8x: the new zoom
body of SteREO Discovery.V8
Contrasts with variable optimization in brightfield, darkfield
and oblique light: the transmitted light equipment S
The Illumination: Show Your
Specimen in a New Cold Light
The quality of the illumination – this is all-important
source outperforms conventional fiber-optic systems
for contrasting in stereomicroscopy. The new fiber-
thanks to several practical advantages, and offers
optic CL 1500 ECO cold light source with its wide
excellent performance at a superb price!
range of light guides and accessories offers you a
variety of opportunities for highlighting your struc-
Incidentally, lamps and filters can be changed quick-
tures perfectly.
ly and conveniently. Even when stacked.
Designed for slimline, space-saving light guides, opti-
a.
mized for flicker-free live images on the monitor,
providing constant light output even if the line voltage fluctuates, and with ventilation as quiet as a
whisper – the high-intensity CL 1500 ECO cold light
The fiber-optic CL 1500 ECO cold light source
illuminates the specimen precisely with intensive
infrared-free light. Here with a twin-arm goose
neck for oblique reflected light with a targeted
shadow effect.
b.
c.
SMD-Board with white solder resist
Reflected light with different light guides
a. Linear slit light for lateral grazing light
b. Fiber-optic annular slit illuminator for
shadow-free 360° reflected light
c. Annular slit illuminator with polarization
filter device to minimize reflective glare
Objective: Plan S 1.0x
Magnification: 15x
5
Quiet, durable and offering the best in daylight
quality: VisiLED LED illumination
Or in a Completely Different
Light: With White LEDs
Providing the ability to change rapidly from shadow-
to 4 illumination settings can be stored and repro-
free annular illumination to lateral oblique light, con-
duced again at any time.
trast optimization through turning of oblique light
around the specimen, continuous rotation of the illumi-
The MC1500 multicontroller of the VisiLED system
nation for a stereoscopic impression of the object in the
allows control of reflected, transmitted and blended
live image – and all this at the push of a button! The list
light.
of new contrasting possibilities offered by the VisiLED
illumination system with its white LEDs is endless!
a.
Each of the annular VisiLED illuminators is made up
of eight LED segments that can be switched variably.
A further advantage of noise-free light sources: up
The VisiLED HCT contrast stage offers a wide range
of contrasts. It contains separate LED illuminators for
brightfield and darkfield, and sliders for finely adjustable oblique light. The LEDs are controlled using
the MC1500 multicontroller.
b.
c.
Mouth parts of the common housefly
Transmitted light with VisiLED HCT contrast stage
a. Brightfield
b. Lateral darkfield
c. Oblique brightfield illumination
Objective: PlanApo S 1.0x
Magnification: 80x
6
The Expandable Platform:
Flexible For a Variety of Applications
A typical feature of stereomicroscopes is their mod-
1.
ular system design. Equipped with intelligent interfaces and fully integrated into the Carl Zeiss systems,
SteREO Discovery.V8, with its comprehensive range
of accessories, offers you a great deal of freedom in
terms of organizing your workplace to suit your own
practical needs.
1. Interface with digital
image worlds: documentation
SteREO Discovery.V8 creates a connection for a variety of
digital photo and video cameras, via various phototubes, with
interface 60N. For the simple documentation of stereomicroscopic images, consumer cameras, with their good price/performance ratio, are often recommended. Anyone wishing to
satisfy higher demands should use the high-resolution AxioCam
microscope cameras and the AxioVision imaging software
from Carl Zeiss.
2. Brilliant fluorescence: PentaFluar S
PentaFluar S is the name of the retrofittable fluorescence equipment for stereomicroscopes belonging to the SteREO Discovery
family. With up to five different filter blocks in the magazine
and special high-performance light sources, this is an outstanding addition for contemporary fluorescence applications in
stereomicroscopy.
2.
3.
3. Better in position: the binocular
ergo-phototube S 5-45°
Ergonomics is also about choosing a relaxed sitting position when
operating a microscope. The viewing angle and height have to
coincide. The ergotube allows a free choice of viewing angle
between 5 and 45 degrees. Intermediate tubes and two working
positions for the eyepiece clamps vary the viewing height.
4. Vertical 2D impression:
the objective slide
A must for documentation with subsequent image analysis, e.g.
digital object measurements: the S/doc objective slide for the
SteREO Discovery family of microscopes. Positioned directly
beneath the zoom body, it enables the objective to be shifted
precisely under one of the stereoscopic beam path for a vertical
view of your specimen.
7
4.
8
System Overview
9
SteREO Discovery.V8:
The Technical Data
Objectives
Eyepieces
Description
Factor
FWD
(mm)
WPL 10x/23 Br. foc
PL 16x/16 Br. foc
W 25x/10 foc
Magnification
Object Field (mm) Magnification
Object Field (mm) Magnification
Object Field (mm)
PlanApo S
0,63x
81
6,3x … 50,4x
36,5 … 4,6
10,1x … 80,6x 25,4 … 3,2
15,8x … 126x 15,9 … 2,0
PlanApo S
1,0x
60
10x … 80x
23,0 … 2,9
16x … 128x
16,0 … 2,0
25x … 200x
PlanApo S
1,5x
30
15x … 120x
15,3 … 1,9
24x … 192x
10,7 … 1,3
37,5x … 300x 6,7 … 0,8
Plan S
1,0x
81
10x … 80x
23,0 … 2,9
16x … 128x
16,0 … 2,0
25x … 200x
10,0 … 1,3
Achromat S
0,3x
253
3x … 24x
76,7 … 9,6
4,8x … 38,4x
53,3 … 6,7
7,5x … 60x
33,3 … 4,2
Achromat S
0,5x
151
5x … 40x
46,0 … 5,8
8x … 64x
32,0 … 4,0
12,5x … 100x 20,0 … 2,5
Achromat S
0,63x
115
6,3x … 50,4x
36,5 … 4,6
10,1x … 80,6x 25,4 … 3,2
15,8x … 126x 15,9 … 2,0
Achromat S
1,0x
69
10x … 80x
23,0 … 2,9
16x … 128x
16,0 … 2,0
25x … 200x
Achromat S
1,5x
28
15x … 120x
15,3 … 1,9
24x … 192x
10,7 … 1,3
37,5x … 300x 6,7 … 0,8
10,0 … 1,3
P.O.B. 4041, 37030 Göttingen, Germany
Phone: +49 551 5060 660
Fax:
+49 551 5060 464
E-mail: [email protected]
www.zeiss.de/stereo-discovery
Subject to change.
Carl Zeiss MicroImaging GmbH
Printed on environmentally-friendly
paper, bleached without the use of
chlorine.
10,0 … 1,3
46-0087 e 03.2006