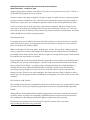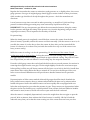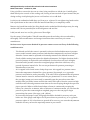
1
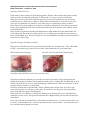
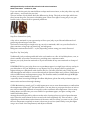
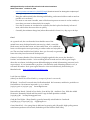
Wildsight Kimberley Cranbrook & Cranbrook Food Action Committee Meat Preservation -‐ October 21, 2014 Pressure Canning There are a number of good reasons to can meat. For one thing, doing so can save a lot of future cooking (for those times when you need to prepare a meal in a hurry), it tenderizes the meat, and it's also a practical solution to the "overstuffed freezer" problem. Many people hesitate to go this route because they think it might be dangerous. However, that simply isn't so. Canning meat is as safe as is processing any other low-‐acid food in the same manner. You just have to follow the correct procedures. Bacterial growth is hindered by the acid in food, and meat is very low in acid. Worse yet, certain harmful bacteria thrive where natural acidity is low, and these cannot readily be destroyed at the boiling point of 212°F. To can meat, therefore, you must superheat it to 240°F, which means it must always be processed by pressure canning, not with boiling water baths, which are fine for preserving such high-‐acid foods as fruits. Be aware, too, that the flavor and texture of any canned meat will depend upon the breed, the feed, and the manner in which the animal was handled at the time—and immediately after—it was killed. Successful pressure canning Preparing & understanding the equipment… Make sure the pressure canner is working properly before preparing food. Clean lid gaskets and other parts according to the manufacturer’s directions; make sure all vent pipes are clear and contain no trapped material or mineral deposits. Clean the petcock and safety valve of the pressure canner by drawing a string through the openings. Today’s pressure canner may have a dial gauge for indicating the pressure or a weighted gauge, for indicating and regulating the pressure. Weighted gauges are usually designed to "jiggle" several times a minute or to keep rocking gently when they are maintaining the correct pressure. Read your manufacturer’s directions to know how a particular weighted gauge should rock or jiggle to indicate that the proper pressure is reached and then maintained during processing. Dial gauge canners will usually have a counterweight or pressure regulator for sealing off the open vent pipe to pressurize the canner. This weight should not be confused with a weighted gauge and will not jiggle or rock as described for a weighted gauge canner. Pressure readings on a dial gauge canner are only registered on the dial and only the dial should be used as an indication of the pressure in the canner. One manufacturer now makes a dual-‐gauge canner; read the manufacturer’s user manual for information on when and how to use either the weighted gauge or the dial. You should have the gauge inspected if the cover has been submerged in water or Wildsight Kimberley Cranbrook & Cranbrook Food Action Committee Meat Preservation -‐ October 21, 2014 dropped, gauge glass is broken or has fallen out, parts are rusty, pointer is not in the “0” block, or if you believe the gauge may not be accurate. Pressure canners come deep enough for one layer of quart or smaller size jars, or deep enough for two layers of pint or smaller size jars. The USDA recommends that a canner be large enough to hold at least 4 quart jars to be considered a pressure canner for the USDA published processes. Look over all your jars for nicks and cracks, and wash the containers and their closures in hot, soapy water, rinse them well, and keep them in hot water until they're ready for use. "One-‐trip" jars, such as the ones in which you buy commercially made mayonnaise, peanut butter, or instant coffee, should not be used for canning purposes. Preparing the meat… To prepare the meat, cut slabs of about an inch thick, slicing across the grain, then cut with the grain until you have pieces of an appropriate size for the jars you're using. (If it's to be used for stew, cut the meat into uniform cubes.) Make certain that you trim away gristle, bruised spots, and fat. Too much fat is likely to give the meat a strong flavor and may also damage the compound used for sealing the jars. Furthermore, you should not let meat stand in water, with the exception of strong-‐flavored game, which should be soaked in salt water before it is canned. Only enough food for one canner load should be prepared at a time. Special care should be taken in filling the jars, leaving 1 inch headspace—the area in the jar between the inside of the lid and the top of the food or liquid— to achieve proper venting and sealing. If too little headspace is allowed, the food may expand and bubble when air is being forced out from the lid during processing, leaving a deposit on the rim of the jar or lid that will prevent the container from sealing correctly. If there is too much headspace, the food at the top is likely to discolor, and/or the jar may not seal properly because insufficient processing time won't drive all the air out of the container. Hot Packed or Cold Packed? Hot packing means the meat and liquid have been pre-‐cooked in some way, and are still hot when put into jars for canning. Cold packing is generally raw meat, but any liquid added is generally heated. Always follow a recipe that details the method of preparation (some meats need special treatment via brines, others no liquid is recommended) and detailed pressure and processing time amounts. Hot packing and cold packing generally have different requirements for processing. Breakdown of processing times & treatments for specific varieties and cuts of meat: http://nchfp.uga.edu/how/can5_meat.html Wildsight Kimberley Cranbrook & Cranbrook Food Action Committee Meat Preservation -‐ October 21, 2014 After the food has been packed in the jar, any air bubbles present should be removed by running a clean wooden spoon or plastic paddle between the food and the jar. Knives and other metal devices are not recommended, since they may nick the bottoms of the jars, leading to breakage. The tops of the jars, screw threads, and top surfaces of rubber rings (if they're used) should be wiped with a clean, damp cloth, as particles of food that remain in such places could prevent a tight seal. When placing closures on your containers, follow the manufacturer's directions carefully, since the method varies with the type of jar used. Pressurizing & Processing… Center the canner over the burner. The burner and range must be level. Your pressure canner can be damaged if the burner puts out too much heat. In general, do not use on an outdoor LP gas burner or gas range burner over 12,000 BTU’s. Check your manufacturer’s directions for more information about appropriate burners. Put the rack and hot water into the canner. If the amount of water is not specified with a given food, use enough water so it is 2 to 3 inches high in the canner. Longer processes require more water. Some specific products (for example, smoked fish) require that you start with even more water in the canner. Always follow the directions with USDA processes for specific foods if they require more water be added to the canner. For hot packed foods, you can bring the water to 180 degrees F ahead of time, but be careful not to boil the water or heat it long enough for the depth to decrease. For raw packed foods, the water should only be brought to 140 degrees F. Place filled jars, fitted with lids and ring bands, on the jar rack in the canner, using a jar lifter. When moving jars with a jar lifter, make sure the jar lifter is securely positioned below the neck of the jar (below the ring band of the lid). Keep the jar upright at all times. Tilting the jar could cause food to spill into the sealing area of the lid. Fasten the canner lid securely. Leave the weight off the vent pipe or open the petcock. Turn the heat setting to its highest position. Heat until the water boils and steam flows freely in a funnel-‐shape from the open vent pipe or petcock. While maintaining the high heat setting, let the steam flow (exhaust) continuously for 10 minutes. After this venting, or exhausting, of the canner, place the counterweight or weighted gauge on the vent pipe, or close the petcock. The canner will pressurize during the next 3 to 10 minutes. Start timing the process when the pressure reading on the dial gauge indicates that the recommended pressure has been reached, or, for canners without dial gauges, when the weighted gauge begins to jiggle or rock as the manufacturer describes. Wildsight Kimberley Cranbrook & Cranbrook Food Action Committee Meat Preservation -‐ October 21, 2014 Regulate the heat under the canner to maintain a steady pressure at, or slightly above, the correct gauge pressure. One type of weighted gauge should jiggle a certain number of times per minute, while another type should rock slowly throughout the process – check the manufacturer’s directions. Loss of pressure at any time can result in under-‐processing, or unsafe food. Quick and large pressure variations during processing may cause unnecessary liquid losses from jars. IMPORTANT: If at any time pressure goes below the recommended amount, bring the canner back to pressure and begin the timing of the process over, from the beginning (using the total original process time). This is important for the safety of the food. De-‐pressurizing… When the timed process is completed, turn off the heat, remove the canner from the heat (electric burner) if possible, and let the canner cool down naturally. (Lift the canner to move it; do not slide the canner. It is also okay to leave the canner in place after you have turned off the burner. It is better to do so than to let jars inside the canner tilt or tip over if the canner is too heavy to move easily.) While the canner is cooling, it is also de-‐pressurizing. Do not force cool the canner. Forced cooling may result in food spoilage. Cooling the canner with cold running water or opening the vent pipe before the canner is fully depressurized are types of forced cooling. They will also cause loss of liquid from jars and seal failures. Forced cooling may also warp the canner lid. Even after a dial gauge canner has cooled until the dial reads zero pounds pressure, be cautious in removing the weight from the vent pipe. Tilt the weight slightly to make sure no steam escapes before pulling it all the way off. Newer canners will also have a cover lock in the lid or handle that must release after cooling before the lids are twisted off. Do not force the lid open if the cover locks are not released. Manufacturers will provide more detailed instructions for particular models. Depressurization of older canner models without dial gauges should be timed. Standard size heavy-‐walled canners require about 30 minutes when loaded with pints and 45 minutes when loaded with quarts. Newer thin-‐walled canners cool more rapidly and are equipped with vent locks that are designed to open when the pressure is gone. These canners are depressurized when the piston in the vent lock drops to a normal position. Some of these locks are hidden in handles and cannot be seen; however, the lid will not turn open until the lock is released. After the canner is completely depressurized, remove the weight from the vent pipe or open the petcock. Wait 10 minutes; then unfasten the lid and remove it carefully. Lift the lid with the underside away from you so that the steam coming out of the canner does not burn your face. Wildsight Kimberley Cranbrook & Cranbrook Food Action Committee Meat Preservation -‐ October 21, 2014 Using a jar lifter, remove the jars one at a time, being careful not to tilt the jars. Carefully place them directly onto a towel or cake cooling rack, leaving at least one inch of space between the jars during cooling. Avoid placing the jars on a cold surface or in a cold draft. Let the jars sit undisturbed while they cool, from 12 to 24 hours. Do not tighten ring bands on the lids or push down on the center of the flat metal lid until the jar is completely cooled. Remove ring bands from sealed jars. Ring bands can be washed and dried and put away for using another time. Put any unsealed jars in the refrigerator and use first. Label jars and store in a cool, dry place out of direct light. Dry the canner, lid and gasket. Take off removable petcocks and safety valves; wash and dry thoroughly. Follow maintenance and storage instructions that come from your canner manufacturer. Serious errors in processes obtained in pressure canners can occur if any of the following conditions exist: -‐ -‐ -‐ The altitude at which the canner is operated is above sea level and adjustments in pressure are not made. Internal canner pressures (and therefore temperatures) are lower at higher altitudes. Canners must be operated at increased pressures as the altitude increases. Check reliable canning instructions for altitude adjustments. For higher elevations, half a pound of pressure is required for each additional 1,000 feet above sea level. At higher elevations and if pressure canner has a weighted gauge rather than a dial one, use 15 pounds of pressure instead of 10. Do not raw-‐pack meats for pressure processing at altitudes above 6,000 feet. Air is trapped in the closed canner during the process. Air trapped in a pressure canner lowers the temperature obtained for a given pressure (for example, 10 or 15 pounds pressure) and results in under-‐processing. To be safe, USDA recommends that all pressure canners must be vented 10 minutes before they are pressurized. To vent a canner, leave the vent pipe (steam vent) uncovered (or manually open the petcock on some older models) after you fill the canner and lock the canner lid in place. Heat the canner on high until the water boils and generates steam that can be seen escaping through the open vent pipe or petcock. When a visible funnel-‐shape of steam is continuously escaping the canner, set a timer for 10 minutes. After 10 minutes of continuous steam, you can close the petcock or place the counterweight or weighted gauge over the vent pipe to begin pressurizing the canner. (See steps 3 and 4 below.) An inaccurate dial gauge is used. Dial gauges should be checked for accuracy each year before use. If the gauge reads high or low by more than two pounds at 5, 10 or 15 pounds pressure, replace it. If it is less than two pounds off in accuracy, you can make adjustments needed to be sure you have the required pressure in your canner. Wildsight Kimberley Cranbrook & Cranbrook Food Action Committee Meat Preservation -‐ October 21, 2014 Canned Kokanee Fish (McRae’s family recipe) Kokanee fish, preferably freshly caught (can be frozen first too) Per 250g tin or jar: ½ tsp pickling salt 1 tsp vinegar 1 tsp oil De-‐scale (by running sharp filet knife against the grain). Remove fins and head. Cut in 2 inch pieces (no need to remove bones), then pack in jars or tins, leaving 1 inch headspace. Add the vinegar, salt, oil to each jar. Pressure can 90 minutes at 15 lbs pressure. This results in a product similar to the canned salmon you buy at the grocery store, but comes from a lot closer to home! Jars or Tins? Tins can be a novelty, as you create a finished product that looks much like that you would buy at the grocery store. The drawback with using tins, although they are cheaper to buy new than jars, is they can’t be reused. You also need to buy or borrow a can sealer, generally a $150-‐$250 investment. Good ‘ol mason jars can be reused many times, and it’s easy to find them used at thrift stores. Always use new jar lids to ensure a good seal! Jars and rings can be reused many times. Source of tins for home canning: http://www.wellscan.ca/ Jerky This is one of the more accessible ways of preserving meat, particularly well-‐suited to beef, wild game, bison, & turkey. You can be creative with seasonings, depending on the marinade you choose – from spicy to sweet and everything in between. The Excalibur food dehydrator, available for loan through Wildsight: (www.wildsight.ca/apples) makes jerky making quick and easy. With any dehydrator you’re using, it’s always a good idea to test the heater and temperature gauge with a digital thermometer to ensure it’s correct. Temperature of 155 F is important for safe processing! Jerky making is a great way to use up less tender cuts of meat, such as flank or round steaks or rump roasts. If you hunt wild game or buy part of a locally raised animal, you will always end up with some of these cuts. The process of making jerky transforms raw meat to a ‘shelf stable’ product, high in protein and an easily transportable snack for all ages. The addition of nitrites (usually in the form of curing salts) add a lot of preserving power to a jerky marinade. There has been controversy in recent years about potential negative effects on health. The decision of whether to use or not use nitrites remains a personal one, but when you don’t use nitrites it’s safer to keep your jerky in the fridge or freezer (as opposed to room temp) to ensure freshness is maintained. Salt is another preservative, also serving to draw water out of meat. It’s not a required ingredient, but very commonly included in jerky recipes. Wildsight Kimberley Cranbrook & Cranbrook Food Action Committee Meat Preservation -‐ October 21, 2014 Step One: Select Your Cut Flank steak is what is shown in the following photos. Flank is a flavorful but fairly lean cut that holds up well to marinating and drying. It’s also small, so it’s easy to work with at home. Other good cuts for jerky come from the round. Eye of round is excellent, but top or bottom round are fine too. Flap meat is similar to flank, and if well-‐trimmed of excess fat can be used. If you opt for a different cut of beef for your jerky, here’s a couple things to keep in mind: Keep it lean! Fat in jerky makes it more prone to rancidity and spoiling. Your jerky meat doesn’t have to be completely devoid of fat, but the leaner the meat the longer the jerky will last. Avoid well-‐marbled cuts. Keep it fresh! A high-‐salt marinade and dehydration is what makes beef jerky shelf stable. The way I make jerky, the meat isn’t really cooked, so it is vitally important that you start with very fresh, well-‐handled meat. This isn’t the place to use the markdown manager’s special meat that’s 2 hours from its sell-‐by date. Step Two: Prepare and Trim Your Beef The goal is to trim the beef of any excess fat and silverskin. Use a sharp knife – I like a filet knife for this – and remove any pockets of fat or shiny, thick membranes on your flank steak. Flank steak before trimming: After the excess fat has been trimmed away: Step Three: Slice With The Grain Or Across The Grain? The thinner and more uniform you can make your slices, the better. Using a sharp knife and slightly freezing the beef before slicing makes it much easier. Carefully slice the thick slab of meat into two thinner pieces, as if you were butterflying a chicken breast. Then cut each piece of meat into thin strips 1/8-‐inch to 1/4-‐inch thick. The fibers of meat have a directionality. This is called the grain of the meat. If you slice your meat with the grain, you will get a chewy jerky. If you slice across the grain, your jerky will be easier chew but more prone to falling apart. Flank steak has a very distinct, course grain. When you are looking down on a whole flank set widthwise in front of you, this grain is horizontal with a slight fanning out towards the wide end of the flank. If you cut across the grain (like below), those fibers are all kept very, very short so there isn’t a lot of “chew” to the finished jerky – it comes out easier to chew, almost brittle – and there also isn’t a lot to hold the jerky together as it dries. Wildsight Kimberley Cranbrook & Cranbrook Food Action Committee Meat Preservation -‐ October 21, 2014 If you cut with the grain, the muscle fibers are kept much more intact, so the jerky dries very well, and is chewy – more work for your jaw! The two batches of jerky below show the difference in slicing. The jerky on the right, which was sliced across the grain, was prone to breaking apart. There is no right or wrong way to cut your beef for jerky, it comes down to personal preference. Step Four: Season Your Jerky A dry-‐rub or marinade is your opportunity to flavor your jerky as you like and add some food-‐ preserving salt and sugar to the mix. The basics of seasoning are simple: mix up your rub or marinade, add it to your sliced beef in a glass container or large zip-‐top plastic bag, and refrigerate. Refrigerate marinated meat for 6 – 24 hrs, depending on how strong you want it flavoured. Step Five: Dry Your Jerky Traditionally, jerky was hung and dried in the cool smoke over a fire. A food dehydrator, oven, or electric smoker are modern conveniences, providing more consistent results. Remove your jerky from the marinade or dry rub and shake off any extra marinade or clumps of spices. DEHYDRATOR: Lay your jerky slices out on parchment paper in a single layer with no overlap in your dehydrator. Set your dehydrator to 155 degrees. Dry at 155-‐degrees (this is typically the highest setting on a dehydrator with a heater unit) for 4-‐8 hours, until the jerky is fully dry and dark throughout and bends to a tear without beads of moisture. Make sure you have a dehydrator with a reliable heater and temperature gauge. The Excalibur model, available through Wildsight for loan, is a trusted model for such uses. *especially when borrowing Wildsight Excalibur dehydrator, please line with parchment paper to ensure easier and more thorough cleaning* OVEN: Maintaining a steady 175°F is really important so use an oven thermometer to confirm that the temperature reaches 175°F and remains there. You may have to prop open the door an inch or two with a wadded up dishtowel or hot pad in order to maintain the temperature. Line as many baking sheets as will fit into your oven with foil or parchment paper, and place cooling racks inside each baking sheet. Arrange the meat strips side-‐by-‐side across the racks, leaving at least 1/4-‐inch of space between strips. Place the racks of meat in the oven and cook until completely dry. This can take 2 -‐ 5 hrs, depending on the thickness and moistness of the meat, and how chewy you want it to be. Check the oven temperature regularly to ensure it does not get too low (some finicky oven pilot lights can go out at such a low temperature) and adjust as needed. Wildsight Kimberley Cranbrook & Cranbrook Food Action Committee Meat Preservation -‐ October 21, 2014 Official recommendations call for a heat-‐pasteurization step in the oven following drying for either dehydrator or oven method: Place dried strips on a baking sheet, close together but not touching or overlapping. Heat in a pre-‐heated 275°F oven for 10 minutes to an internal temperature of 160°F – strips thicker than ¼” (when raw) may require longer to reach 160°F. Remove oven-‐heated samples from the oven, cool to room temperature, and package. The post-‐ drying oven-‐heating treatment is an extra safety precaution, and you can store jerky at room temperature with more confidence. SMOKER: There are cold and hot smokers, hot smokers preserve the meat a lot more effectively, whereas cold smokers recommend a salty brine to ensure shelf stability. Both impart a lot of flavour through the smoking process. Smoke for anywhere from 8-‐16 hrs, depending on cuts, variety and quantity of meat. Follow instructions for recipe, and refill wood chips (hardwood) as needed. Step Six: Store Your Jerky Let your jerky cool completely to room temperature before storing it away. If you put warm jerky into a mason jar or plastic bag, moisture will form in the container. This can spoil your jerky, causing it to mold. Store it in an air-‐tight container in the refrigerator or freezer to be extra safe when extra preservative agents (such as nitrates) are not used. Store up to 6 months in fridge, 1 year in freezer. Beef Jerky Recipes: Alton Brown’s Classic Beef Jerky Balanced and tangy, neither too sweet nor too spicy. Classic flavour. Ingredients: 1 flank steak, 1 1/2 to 2 pounds 2/3 cup Worcestershire sauce 2/3 cup soy sauce 1 tablespoon honey 2 teaspoons freshly ground black pepper 2 teaspoons garlic powder or 2 cloves smashed, minced garlic 1 teaspoon red pepper flakes Trim and slice flank steak. Combine remaining ingredients in a small bowl to make the jerky marinade. Add prepared flank steak to the marinade. Refrigerate marinating flank steak for 24 hours. Drain flank steak, lay out on trays of food dehydrator and dry thoroughly, 4-‐6 hours. Wildsight Kimberley Cranbrook & Cranbrook Food Action Committee Meat Preservation -‐ October 21, 2014 Honey Garlic Beef Jerky This is basically spicy beef candy -‐ savory, sweet and spicy all together. Ingredients: 1 flank steak, 1 1/2 to 2 pound 1/2 cup honey 2 tbsp granulated garlic 2 tbsp kosher salt 2 tbsp cracked black pepper ¼ cup apple cider (optional) Trim and slice flank steak. Warm the honey in a small saucepan, to make it more free-‐flowing. Add the remaining ingredients to the honey, stir together and let cool. Add prepared flank steak to the marinade. Refrigerate marinating flank steak for 24 hours. Drain flank steak, lay out on trays of food dehydrator and dry thoroughly, 4-‐6 hours. Five Spice Teriyaki Beef Jerky Sweet and salty without too much kick. Ingredients: 1 flank steak, 1 1/2 to 2 pounds 1 cup soy sauce 3/8 cup brown sugar 1 tsp five spice powder 1 tbsp ground ginger 1 tsp ground cumin Trim and slice flank steak. Combine remaining ingredients in a small bowl to make the jerky marinade. Add prepared flank steak to the marinade. Refrigerate marinating flank steak for 24 hours. Drain flank steak, lay out on trays of food dehydrator and dry thoroughly, 4-‐6 hours. Beef or Turkey Jerky *If using turkey, use extra caution. Ensure internal temperature of 165 degrees F* Adapted from Lobel's Meat Bible Makes 1 to 2 pounds Ingredients: 3 pounds flank steak or boneless, skinless turkey breast 1/2 cup soy sauce 1/4 cup sesame oil 1/4 cup brown sugar 2 tablespoons chili-‐garlic paste, optional 2 tablespoons sesame seeds 2 teaspoons ground pepper 1 1/2 teaspoons powdered ginger Wildsight Kimberley Cranbrook & Cranbrook Food Action Committee Meat Preservation -‐ October 21, 2014 Unwrap the meat, pat it dry with paper towels, and set it on a plate or baking sheet. If using a flank steak that is folded up in its packaging, uncurl it. Cover the meat with plastic wrap and freeze it for 1 to 2 hours until firm but not frozen solid. Combine the soy sauce, sesame oil, brown sugar, chili-‐garlic paste, sesame seeds, ground pepper, and ginger in a large zippered plastic bag or glass baking dish. Add the sliced meat and coat with the marinade. Refrigerate for at least 3 hours, preferably overnight, turning a few times to distribute the marinade. When you are ready to dry the jerky, remove the meat from the refrigerator and let it come to room temperature for about an hour. Dry with preferred method. http://www.thekitchn.com/recipe-‐homemade-‐beef-‐or-‐turkey-‐95962 Wet Brined Jerky (from Kent Popovich) Ingredients: 6 lbs lean meat, 10 TBS curing salt (Morton's Tender quick, from Safeway) 1/2 cup brown sugar or molasses Garlic powder 4 tablespoon black pepper ½ cup of Worcestershire sauce ½ cup of soya sauce 2 quarts water Remove all fat from the meat. Combine the rest of the ingredients. Soak the meat in the solution about 24 hours Dump in the sink to drain. Let stand to air-‐dry for an hour or so. I make the brine at 5pm, then 5pm the next day, I drain in sink until bedtime. Then smoke the next morning. Smoke meat for 8 to 12 hours or until ready. Test the meat by twisting a strip of meat. About 150-‐ 160 degrees F. Temp is very important. It should be flexible but stiff like a piece of rope. Remove and let stand until cool. As long as you stick to the same ratio. 6lbs of meat, 10tbs curing salt, 2 quarts of water. You can add any flavour changes that spin your wheels. Some people rub spices on the air dried meat before smoking. Driscoll’s Jerky Ingredients: Deer or Elk Round Steaks or Rump Roast Soy Sauce Worchestershire Sauce Brown Sugar Optional: hot sauce Play around with amounts, according to amount of meat and desired sweetness. Marinade, fully covered, stirring once or twice, for 24 hrs. Drain marinade. Dry in smoker or dehydrator 6-‐8 hrs. Wildsight Kimberley Cranbrook & Cranbrook Food Action Committee Meat Preservation -‐ October 21, 2014 Ground Beef Jerky *there is more risk involved with using ground beef to make jerky, since the meat is ground there is more blending of the outer and inner cuts of meat, increasing the likelihood of introducing bacteria to the process. Use extra caution, and ensure internal temperature of 165 degrees F. When possible, using whole cuts is preferable. Ingredients: 2-‐3 lbs of grass fed ground beef (or venison, elk, bison, etc.) 1-‐3 TBSP sea salt (to taste) Pepper (to taste) Garlic powder Coconut aminos (optional) Other spices to taste: Mexican flavour with cumin & cilantro; Chinese variation with ginger & fermented soy sauce; Italian version with oregano, basil, marjoram, extra garlic & pepper Preheat the oven to its lowest setting. On most ovens this is 170 degrees F. Lightly rub olive oil over the bottom of a large baking sheet with a lip. Mix any desired spices in with the ground meat. Using the side of a glass or a rolling pin, roll the meat evenly around the baking sheet. It should be around 1/4 inch thick. If it is too thick, use a second baking sheet. Using a butter knife, lightly score the meat to make the sizes you want for the jerky. You can also skip this step and use kitchen scissors to cut into strips when it’s done. Brush with coconut aminos or fermented soy sauce if desired and sprinkle with a little extra sea salt. Put in the oven or dehydrator for 8-‐12 hours or until hardened. It is a good idea to flip once. Store out of the fridge for a couple weeks, or keep in the freezer if you aren’t going to use it before then. The jerky will harden up more after taking it out, so don’t let it get too dry in the oven. It also cooks down a lot, so make more than you think you will need. (many thanks to Kent Popovich for the following tips on hanging and cuts of meat:) Why Hang Meat before butchering? This is a common debate among hunters and butchers. To hang or not to hang? The reason for doing so is to allow the process of lactic acid conversion to work in the aging meat, breaking down the meat while tenderizing it. Aging is different than rotting, and the most important factor making the difference is temperature. As a general rule, if you kill an animal, you never cut the meat in the first 24 hrs since rigamortis remains active within this period which is essentially the tensing of muscles after death, resulting in tougher meat. There isn’t a right or wrong answer to whether you hang or not hang, but if you do hunt and are considering it, here are a few things to think about: -‐ Always maintain a temperature between 1-‐4 degrees C (34-‐39 degrees F) in the enclosed room you have hung meat Wildsight Kimberley Cranbrook & Cranbrook Food Action Committee Meat Preservation -‐ October 21, 2014 -‐ -‐ -‐ -‐ -‐ http://m.youtube.com/watch?v=1XtHG7EP3wg# (Thanks to Patrick for sharing this simple way of creating a temperature-‐controlled space) Hang the whole animal (after skinning and bleeding, and remove bullet wound as much as possible as it can fester) Cut meat on cut meat is trouble, most of the bacteria present on meat is on the outside, so never hang cut meat in cheesecloth, for example Use a fan to increase air circulation in enclosure, but don’t place fan directly in front of meat, which dries the outer skin too quickly Generally the minimum hang time (when this method is chosen) is 7 days, up to 28 days Cuts? As a general rule, the cuts from the front shoulder area of the animal have more developed muscle structure (eg: chuck, crossrib & blade roasts) and for that reason, are less tender meat, so is available at lower cost but requires more processing to render tender and enjoyable to eat. The cuts from back hind end (sirloin, butt, eye of round) are generally better since they have less muscle development. Gwinner’s Country Butcher (Uwe Gwinner) is highly regarded in the area as the ‘butcher’s butcher’ and welcomes visitors – he loves talking about his trade and can talk in great length about the art of meat, including reasons behind hanging an animal & fermenting processes (such as prosciutto). It is recommended to pay him a visit when the rush of hunting season is over, so wait until December. He is open regular hours for visits and sells directly from his shop in Meadowbrook: www.gwinnerscountrybutcher.com Local Sources of Meat: (taken from the EK Local Food Guide ‘14, excerpts in farmer’s own words) BE Ranch -‐ Local beef, born and raised in Skookumchuk. No hormones, antibiotics, pesticides or food additives. Government inspected.1/4, 1/2 or whole. (250)427-‐3126 or (250)422-‐3254 [email protected] Bowron Bison Ranch -‐ Raised in Fort Steele, Grass & Hay Fed , Antibiotic-‐Free, With No Added Hormones, Humanely Raised and Harvested. Large & small quantities available. (250)489-‐4786 [email protected] Cindy & Clint Pighin -‐ Sheep (lambs), grass-‐fed naturally raised lambs in Cranbrook. (250)489-‐9745 or (250)426-‐7345 [email protected] Cutter Ranch Ltd. -‐ Our young farm is dedicated to growing safe, flavourful, high quality pasture raised meats products such as lamb, Berkshire pork and chicken. Bull Valley. Wildsight Kimberley Cranbrook & Cranbrook Food Action Committee Meat Preservation -‐ October 21, 2014 (250)429-‐4006 [email protected] HighField Ranch -‐ Grass-‐fed, hormone & antibiotic free, free-‐range beef from Wood’s Corner. (250)427-‐5200 [email protected] Kootenay All Natural Beef -‐ We do not use anti-‐biotics, growth hormones, pesticides or herbicides & practice low-‐stress livestock handling techniques. Animals are processed locally. Wycliffe. (250) 427-‐3300 [email protected] Silvertip Ranch -‐ Organically raised beef from the Bull Valley. (250)429-‐3483 [email protected] Thibeault Ranch -‐ Our Ranch is located just above IdleWild Park on 300 acres. Beef. (250)489-‐5649 [email protected] BOLTER Family Farm -‐ We practice pasture rotation on our 85 acres property in Jaffray for the cows, chickens, meat birds and turkeys. No animal receives medicated feed, hormones or antibiotics. (250) 429-‐3888 [email protected] SOURCES: http://www.motherearthnews.com/real-‐food/canning-‐meat-‐the-‐right-‐way-‐ zmaz83sozshe.aspx?PageId=1#axzz3GEq69600 http://nchfp.uga.edu/publications/uga/using_press_canners.html http://www.nwedible.com/2014/01/beef-‐jerky.html http://wellnessmama.com/2201/ground-‐beef-‐jerky/ http://www.mommypotamus.com/beef-‐jerky-‐recipe/ Lots of good recipes using wild game: http://honest-‐food.net/ An interesting read about nitrites (you can find many articles arguing many sides of this debate, and this is in no means meant as an argument for either side of the debate, it’s an interesting read to understand where nitrites originally came from): http://www.takepart.com/article/2014/10/08/cured-‐meat-‐nitrites-‐cancer?cmpid=foodinc-‐fb Getting into detail about jerky, many recipes to explore: Jerky by A.D. Livingston Wildsight Kimberley Cranbrook & Cranbrook Food Action Committee Meat Preservation -‐ October 21, 2014 WILDSIGHT AND CFAC ACKNOWLEDGE THE SUPPORT OF: