1
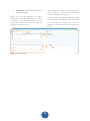
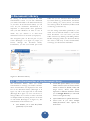
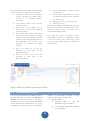
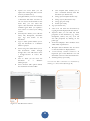
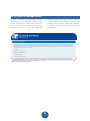
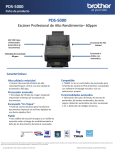
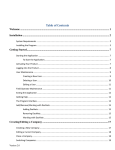
Connect & Construct Platform User Manual 2.0 Contents Contents .................................................................................................................................................................. 2 Glossary ................................................................................................................................................................... 3 Getting Started ........................................................................................................................................................ 4 Introduction ............................................................................................................................................................ 5 1. 2. 3. 4. 5. Login and main menu ..................................................................................................................................... 6 1.1 Log on to the C&C Platform ................................................................................................................... 6 1.2 Main menu ............................................................................................................................................ 6 1.3 Your profile ............................................................................................................................................ 6 1.4 Search in Alfresco .................................................................................................................................. 7 Your Personal Dashboard ............................................................................................................................... 8 2.1 My Sites ................................................................................................................................................. 8 2.1 My Tasks ................................................................................................................................................ 9 2.2 My Activities .......................................................................................................................................... 9 Projects and Sites ......................................................................................................................................... 10 3.1 Create a Site......................................................................................................................................... 10 3.2 Change the settings of a Site ............................................................................................................... 10 3.3 Navigating on Sites .............................................................................................................................. 10 3.4 Site Members ...................................................................................................................................... 11 Document Library ......................................................................................................................................... 13 4.1 Main Functionalities of the Document Library .................................................................................... 13 4.2 The Document Viewer ......................................................................................................................... 14 4.3 Version Control .................................................................................................................................... 16 4.4 Manage Aspects and Permissions ....................................................................................................... 16 4.5 Tagging................................................................................................................................................. 17 4.6 Workflows............................................................................................................................................ 17 IFC Library ..................................................................................................................................................... 19 5.1 How to structure your sub-projects .................................................................................................... 19 5.2 Main Functionalities of the IFC Library ................................................................................................ 20 6. Project Management .................................................................................................................................... 23 7. Calendar ....................................................................................................................................................... 24 8. Discussion ..................................................................................................................................................... 25 Need more help?................................................................................................................................................... 26 2 Glossary Alfresco The Connect & Construct Platform is based on the Open source Document Management System (DMS) Alfresco. Dashboard The Dashboard is the main screen on which projects, tasks, activities are shown. Dashlet Dashlets are used to give an overview of information and activities. They can also be used to navigate through the Platform. Document Viewer The Document Viewer previews documents, spreadsheets, presentations, and .PDF files. Google Docs Google Docs is a Google application that can be used to create and maintain documents (.DOC), spreadsheets (.XLS) and presentations (.PPT). Google can only be accessed via a Google-account. iCal Feed iCal Feed enables synchronisation of the Site Calendar with a mailclient. When using the iCal Feed a .ICS files will be download that subsequently can be imported in a mail-client (e.g. Microsoft Outlook, Google Mail, etcetera) Main bar The Main bar is where all the main functionalities of platform are shown independent of sites. Site Site is a digital project environment. Site bar The Site bar is used for navigation in Sites. Site Dashboard The Site Dashboard is the main screen of a Site, where the main functionalities of a site and the site activities are shown. Tag Tags are keywords that can be used to make documents, discussions, calendar events, etcetera, easier to detect. Version Control Version control enables the storage of changes in content in the Document Library. It ensures that everyone has access to the most recent version. Workflow Workflows are tasks that can be assigned to project members. 3 Getting Started Step 1: Log into the User Dashboard (Section 1 & 2) Step 2: Set up a project Site (Section 3) Step 3: Make agreements and design the project management structure (Section 6) Step 4: Add and manage project members (Section 3.4) Step 5: Upload documents in the document Library (Section 4.1 & 4.2) Step 6: Actively use version control (Section 4.3) Step 7: Manage aspects and permissions (Section 4.4) Step 8: Use tags (Section 4.5) Step 9: Start workflows (Section 4.6) Step 10: Upload, download, and merge your 3D IFC models (Section 5) Step 11: Use and synchronise your calendar (Section 7) Step 12: Start discussions (Section 8) What if I lost my log-in details? If you lost your log-in details or your access is denied, please contact: [email protected] 4 Introduction The Connect & Construct (C&C) Platform is a smart ICT solution to make it easier to exchange information digitally within your projects. The Platform development is part of a European Commission, DG Enterprise and Industry initiative, which aims to increase the competitiveness of the European Construction sector through ICT. It helps you to communicate in an efficient way during construction projects and offers you many benefits: You can easily keep all parties up-to-date on ongoing tasks, responsibilities, deadlines, etc. File incompatibility is history because of a common exchange standard for 3D models. This user manual will guide you through the C&C Platform. It explains the main functionalities of the C&C Platform such as how to create projects, upload documents, notify project members, create meetings, set deadlines, and more. You can shares large files through a central repository. You can control document versions, to make sure you and your partners are using the most recent information. You can limit document access by setting user rights. This manual is targeted towards project managers who can create projects in the C&C Platform and add members. 5 1. Login and main menu 1.1 Log on to the C&C Platform The C&C Platform is built on the Open Source document management system Alfresco. Therefore, all e-mails concerning the Platform are sent by an Alfresco account ([email protected]). Please be aware that your mail-client might see this as SPAM. If you use the Platform, please do not delete e-mails from [email protected], as they might contain important information about your projects, documents, partners, and 3D models. Figure 1 - Login Screen When you have successfully logged on to the C&C Platform you will enter your personal Dashboard (see Section 2). You have received an e-mail from Alfresco containing: your username, password and link to the C&C Platform. To log on to the Platform, please follow the link in the invitation using the log-in details provided in the e-mail. Click on Login to access the Platform. 1.2 Main menu The main menu functionalities are shown in the Main bar at the top of your browser (Rectangle A in Figure 2). These functionalities entail the following: Home: Allows you to return to your personal dashboard (see section 2). My files: Allows you to store files that no other users of the Platform can access. Sites: Activates a drop down menu where you can access the following: Recent Sites: Displays all the sites you have accessed recently. Site Finder: Allows you to search for Sites (see Section 3) Create Site: Allows you to create a Site. 1.3 Favorites: Displays the Sites you have added to your favorites. Tasks: You can assign tasks (or Workflows) to other Members and they can assign tasks to you. My tasks will display the tasks that you have been assigned to and Workflows I’ve Started will display tasks that you have assigned to others (independent of Sites). Connect & Construct help: The Help-section provides you with information on the technical requirements for the C&C Framework and provides useful links for document viewers. Furthermore, it lists contact details for (technical) support. Your profile You can access your personal profile by clicking on your name in the upper right corner of the screen (Rectangle B in Figure 2). This will activate a drop-down menu that contains the following functionalities: 6 1.4 Set Status: You can set a status that other members can see (e.g. activities, thoughts, etc.). My profile: You can add additional information (e.g. job title, location, contact information, etc.), view sites you are a member of, view members you are following, view members that follow you, set notifications, and view a list of documents/folders you have deleted. Change password: Set a new password. Help: Opens the Help-functionality of Connect and Construct. Logout: Log-out of the Platform. Search in Alfresco The search function on the top-right of your screen will allow you to search all site content you have permission to access (Rectangle C in Figure 2). B. A. Figure 2 - Main bar 7 C. 2. Your Personal Dashboard You enter your personal dashboard when you log on to the C&C Platform. Your dashboard contains all the information about your projects (called my sides), what your recent activities were and what tasks have been assigned to you. The dashboard is divided into four blocks or Dashlets: My sites (Section 2.1) My tasks (Section 2.2) Welcome: Contains a welcome text with a brief explanation of the C&C Platform. My Activities (Section 2.3) You are also able to customize your dashboard by clicking on Customize Dashboard (Rectangle A) on the top right (not recommended). A. Figure 3 - Personal dashboard 2.1 My Sites In My Sites you can find the Sites you are a member of. You can access the Sites by clicking on the name displayed in blue. For easy access to your Sites, you can also add Sites to your favorites by clicking on Favorite, displayed below each Site. You can access your Favorites via Sites in the Main bar . From this screen you can also create a site by clicking on Create Site (top right). Further information on creating sites is given in Section 3. By default, the Sites are displayed in alphabetical order. You can filter the Sites your are a member of by clicking on All. You can filter by My Favorites and Recent, which will display the Sites you have most recently accessed. Figure 4 - My Sites 8 2.1 My Tasks The My tasks section shows all the tasks that have been assigned to you, both active and completed. By default your tasks are sorted by date. You can also sort them manually by clicking on the arrow next to Active Tasks. To assign a task to one of your business partners, click on Start Workflow.(see Section 4.6). Figure 5 - My Tasks 2.2 My Activities In My Activities all recent activities are shown. By default all the activities of members of Sites you are a member of are shown. You can manually sort the activities by clicking on either Everyone’s activities, all items or in the last 7 days. Figure 6 - My Activities 9 3. Projects and Sites On the C&C platform an online project environment is called a Site. Sites you are a member of are shown in the My Sites section of 3.1 your personal Dashboard. You can access sites by clicking on the name of the Site, displayed in blue. Create a Site To create a new Site, click on Create Site on either your personal Dashboard or via Sites in the main Alfresco bar. When you click on Create Site your browser will open a new window. In this window you will be required to fill in a Name, URL-name (is filled automatically), Description of the project (not mandatory to fill), Type (always by default on Collaboration Site not to be changed) and Visibility. To ensure that your documents are only viewed in a secured project environment, the use of the Private option is recommended. Site managers will be able to change the level of protection at all times (see Section 3.2). Visibility allows you to set the level of security for your Site. You can use three levels of protection: Public: Everyone using the C&C Platform can see the project and become a member. Moderated site membership: The Site is still Public and others can see the project, but they have to ask permission to become a member and see content. Private: One can only become a member when being invited by the project/site manager. 3.2 Figure 7 - Create a Site Change the settings of a Site Site managers can, at all times, change the settings of a Site. You can edit site details by clicking on Settings and Edit Site Details next to the site name (Rectangle A). You will be presented with the same screen as when you create a Site (see Section 3.1), where you will be able to change the settings of the Site. A. Figure 8 - Edit Site Details 3.3 Navigating on Sites When you open a Site, you will enter the Site Dashboard. Like your own personal Dashboard, the Site Dashboard is divided in Dashlets (a Side Dashboard consists of 2 dashlets): Main Functionalities: 10 Document Library (see Section 4) IFC Library (see Section 5) Project Management (see Section 6) Calendar (see Section 7) Discussions (see Section 8) Site Activities: All recent activities on the site are shown here. You can also navigate through these main functionalities via the Site bar on the top-right (Rectangle A). You can always return to the Site Dashboard by clicking on the Site name and by clicking on Site Dashboard in the Site bar. By clicking on ‘Home’ (left at the top black header) you will return to your personal dashboard which gives an overview of all sites your at allowed to visit. A. Figure 9 - Navigating on Sites 3.4 Site Members Sites are created to share information among Site Members. Site Managers are able to add or remove site members. This enables you to always safeguard the confidentiality of your projects. There are two ways to invite Site members: 1. By clicking on Add Users next to the site name (Rectangle A in figure 10). 2. By clicking on Invite People (Rectangle B in figure 10) in the Site Members section (accessed via the Site bar). A . To add existing site members you can search for members by filling in their name under Members and by clicking on search (Rectangle A in figure 11). Subsequently, you can add the requested member to your list of invitations by clicking on Add (Rectangle B in figure 11). You can repeat this process for each member you want to invite. Furthermore, you can select a different role for each member. Roles enable you to determine to what extent the member has access to the documents stored in the document library. Site members can have the following roles: B Manager: full rights to all content. Collaborator: full rights on their own content, but they cannot delete content of other members. Contributor: full rights on their own content, but they cannot edit/delete content of other members. Figure 10 - Add Site Members When adding Site members you can either add existing members of the C&C Platform or invite external users. 11 After adding site members and specifying their role you can send your invitations by clicking on Invite (Rectangle C in figure 11). Consumer: cannot create own content: read-only member. Please note that Site Managers can always change the roles of Site Members afterwards by navigating to Site Members in the Site bar. To the right of each member you can change their role and remove them if you will. To add external members fill in their first name, last name and e-mail address under Add external users.. (Rectangle D in figure 11). After you clicked on Add, they will receive an invitation by e-mail. A. B. C. D. Figure 11 - Site Members 12 4. Document Library By clicking on Document Library in the Main functionalities section of your Site dashboard you will be forwarded to the Document Library of your Site. In the Document library you can store all your documents. Beforehand, it is important to discuss/make clear agreements with your Site Members on what to save in which way (see Section 6 to find more information on how to structure your projects). folder tree you are. Documents filters documents by certain details (e.g. all documents, documents you are editing, etc.), Library shows your folder tree and Tags filters all documents/folders based on their tag (see Section 4.5). You can arrange each folder specifically to your needs. You can add sub-folders as well as standalone documents. You can create your own folder structure by deleting and adding folders. Besides managing folders, the document library also offers a wide array of other functionalities to manage your documents and folders. The navigation pane on the left part of your screen (Rectangle A in figure 12) helps you browse through the document library. Furthermore, you can see in which part of the A. Figure 12 - Document Library 4.1 Main Functionalities of the Document Library The Document Library offers you several functionalities to manage your folders and files. These functionalities are displayed in the main bar of the Document library (Rectangle A in figure 13) and on the right side of each folder (Rectangle B in figure 13). You can choose to change folders one-at-a-time or make a selection of multiple folders by ticking the box on the left of each folder (Rectangle C in figure 13). The functionalities in the main bar are: Select: Enables you to select files/folder specifically to your needs. 13 Create: This option allows you to create folders. Moreoveryou can create content online via Plain Text, HTML, XML, and Google DocsTM, where each option represents a different document format (to use Google DocsTM you will need to have a Google account). Upload: Click here to upload documents. Selected items: If you select multiple folders/documents their options are shown here. More functionalities are offered on the right side of the screen next to each folder. These entail: Download (*): Allows you to download a .zip-file containing the folder and its content or to download separate documents View in Browser: Allows you to view the document online. Upload New Version: Allows you to upload a new version of the document you have selected. Edit Offline: This option temporarily takes the document offline for editing purposes. Other Site Members will not be able to access the document until you have uploaded a new version of the document (or cancelled the editing session). Copy to (*): Allows you to copy the document to other parts of the Document Library. Move to (*): Allows you to move the document to other parts of the Document Library. Delete document/folder (*): Select to delete the document. Start Workflow: This enables you to start a workflow directly from this document (see Section 4.6). Manage permissions (*) (see Section 4.4). Publish: [not used] By default the Document Library will only show Download, View in Browser and Upload New Version. When you click on More, the entire list of functionalities will be shown. For folders the options are limited to those marked with an asterix (*). Additionally, you can View Details, Manage Rules, and Manage Aspects (see Section 4.4). Manage Rules is not used in the C&C platform. A. B. C. Figure 13 - Main Functionalities of the Document Library 4.2 The Document Viewer You can open documents and display them in the C&C Platform by opening the Document Viewer. The Document viewer is opened by clicking on the name of the document displayed in blue. The Platform will forward you to a page that displays the document online and offers a number of functionalities divided in eight categories (Rectangle A in figure 14): Document actions: Download: Click to save the document on your hard-drive. View in Browser: Opens the document in your browser. 14 Upload new version: Here you can replace the existing file with a newer version (see Section 4.3). Edit offline: When you want to change a document and make sure that no one can access the document in the mean time, you can select this option. The document will become available again when you upload a new version or cancel your editing session. Edit Properties: Allows you to edit the name, title, description, document type, tags and author of the document. Copy to..: This option enables you to copy the document to a different folder or project. Edit in Google docs: This allows you to edit documents online through Google docs. You will need to have a Google-account to access this option. Move to..: Here you can move the document to a different folder/project. Delete document: This option deletes the document from the folder. Start workflow: This enables you to start a workflow directly from this document (see Section 4.6). Manage permissions (See Section 4.4) Manage aspects: (See Section 4.4) Change type: [not used]. Publish: [not used]. Tags (see Section 4.5) Share: You can share the document by copying the link displayed in this section. Properties: Here you can find the main properties of the documents (e.g. name, description, author, size, etc.). You can also edit properties by clicking on the paint sign. Permissions: Displays what members have which kind of permission. Workflows: The workflows that are active on this document are displayed here. Version History: Version control is an important part of the Platform. You can find older versions of this document here. Publishing History: [not used] You can also add a comment to a document by clicking on Add Comment (Rectangle B). A. B. Figure 14 - The Document Viewer 15 4.3 Version Control Version control allows you to upload a newer version of a document without losing the old version. When you upload a new version, the old version is stored and the new file is uploaded with an increment version number. The C&C Platform makes a distinction between: Minor changes: This will increase the version number by a tenth (i.e. 1.0 → 1.1) and should be used in case the document is only slightly changed. Major changes: This will increase the version number with one point (i.e. 1.0 → 2.0) and should be used in case the document is change to a large extent. Figure 15 - Upload New Version After uploading a new version of you can find the old versions by Document viewer and checking History on the right side of the Section 4.2). The Platform will send you notifications when changes in a document have been made. When you want to stop receiving these notifications, you can do this by opening your profile (see Section 1). You can upload a newer version of a document by clicking on Upload new version in the Document Library or in the Document Viewer (see Section 4.1 and 4.2). 4.4 a document, opening the the Version screen (See Manage Aspects and Permissions Very often it is important to clarify who (permissions) can do what (aspects) with a document or a folder. You can do this via manage aspects and manage permissions. Managing permissions is available for both folders and documents, while managing aspects is only available for folders. explanation of the roles)(Rectangle A in figure 16). However, as a Site Manager you can change these roles manually per folder and per document. This for example allows you to make a document accessible/editable for everyone or to restrict the rights of a member for specific documents. You can change the permissions by clicking on Inherit permissions (Rectangle B in figure 16). This will delete all the permissions project members have over this document. Subsequently, you can add project members you want to have access to the document/folder by clicking on Add User/Group (Rectangle A in figure 17). Click on Search and Add to add the member and specify a role to determine what permission this project member has with respect to this document/folder (Rectangle B in figure 17). When you manage aspects of a folder you manage what members can do with it. The C&C Platform offers you a wide array of options that you can select. You can add and delete these options. The most important aspects are already activated by default (e.g. versionable, taggable). Manage permissions allows you to change who can access/change a document or a folder. By default a member’s site role applies to every document and folder (see Section 3.4 for an 16 B. A. Figure 16 - Inherit Permissions A. B. Figure 17 - Set Permissions 4.5 Tagging In the C&C Platform you can use Tags to make documents, discussions, calendar events, etcetera, easier to detect. Tags are very similar to keywords. In other words, when you add certain tags to documents, project members can find them by processing the tag in the search engine. When you, for example, make a communication plan (see Section 6), you can best agree on what tags to use, to make the information exchange go even smoother. You can add tags when uploading a document and afterwards via Edit properties in the Document Viewer (see Section 4.2) Tags are added by filling in a word (Rectangle A in figure 18) and by pressing [Enter]. 4.6 A. Figure 18 - Tagging You can also sort discussions/ documents/workflows by a specific tag by clicking on the tag in the navigation pane of for example the project library (see Section 4.1). Workflows The Connect & Construct Platform enables you to assign tasks to project members by creating workflows. Workflows can be created directly via your personal Dashboard, via the Document Library, or via the Document Viewer (See Section 2 and Section 2.2, 4.1, and 4.2). workflow you want to start (Rectangle A in Figure 19). The C&C Platform distinguishes: Group review and approve: This allows you to ask a group to review and approve a document. New Task: Enables you to assign a task to a colleague. Pooled review and approve: Allows you to set up a review and approval of content On your dashboard you can create a workflow by clicking on Create workflow at My tasks. A new screen will ask you to select what kind of 17 for multiple users, where they can do this only one at a time. Review and approve: Allows you to set up a review and approval of content for multiple users at the same time. Send document(s) for Review: Allows you to set up a review and approval of documents for one or more Members. To find the document(s) that is (are) to be revised and approved, click on Add. You can find the documents by selecting the project in Sites (Rectangle A in Figure 20) and opening the correct folder. It is important that you give the workflow a Message, or title, because a workflow is not tied to a specific project. It is suggested that you explain what project the workflow is about and what the goal of the workflow is. The next step is to fill in all the information needed for the assignee to complete the workflow. You can add a Message, Due date, Priority, Review Group, Items, and select whether email notifications must be send. Additionally for a group, pooled and parallel review, you can select the percentage of approval required for overall approval of the document. A. A. Figure 20 - Adding Documents to Workflows By clicking on Start workflow, the task will be send to the assignee by e-mail. You can find tasks that have been assigned to you on your personal Dashboard. You can find your tasks and tasks you have assigned to others via Tasks in the black main menu. Figure 19 - Starting a Workflow 18 5. IFC Library By clicking on IFC Library on your Site Dashboard you will be forwarded to the IFC Library of your Site. In the IFC library you can store all your 3D IFC models. Different from the Document library in the IFC library folders are called sub-projects. figure 21) and then Refresh (Rectangle C in figure 21). When opening a sub-project the central section (Rectangle D in figure 21) shows which and when IFC models have been uploaded by Site members. The sub-projects and models in the IFC library by default use the measurement unit Meter. To change the unit of measurement, go to View project details (Rectangle E in figure 21) and select the unit of measurement of your choice. The folder tree on the left hand side of your screen (Rectangle A in figure 21) allows you to navigate through all sub-projects you have created in the IFC library. You can see the subprojects by clicking on the folder icon on the left side of the Site name. By default a main folder, or project, is created with the same name as your Site directly under the IFC Library. You cannot delete this folder. For the remainder you are free to create as many sub-projects as you feel appropriate for your specific project. In each sub-project you can also create as many layers of sub-projects as you want. Hence, in each subproject you can create another (sub-)sub-project, et cetera. The sub-projects have to be structured in a specific way in order to be able to use all the functionalities in the IFC library. To find out how to structure the sub-projects, see section 5.1 How to structure your subprojects. You can create sub-projects by clicking on Create sub-project in the main menu (Rectangle B in A. C. E. B. D. Figure 21 – IFC Library 5.1 How to structure your sub-projects To be able to use all functionalities of the IFC library you should structure the sub-projects in a specific way. Instead of storing a range of different IFC models in one folder (like in the Document library), you should store only one IFC model in a sub-project folder. For each different IFC model, you should thus create a different sub-project first. Only upload different 19 versions (if applicable) of one IFC model in a sub project folder, create another sub project folder for another project. New versions of the design of the ‘Floors’ and the ‘Walls’ can still be uploaded in the same subsub-project via Upload New Version. However, when uploading a model of a different part of the school (for instance the structure), a new sub-sub-project must be created (e.g. ‘Structure’). If you want multiple parties (e.g. architects, structural engineers, etc.) to work on different parts of the model at the same time, these different parts should each get their own subsub-project. Each party will then be able to upload their own part of the model in their own sub-sub-project without having to touch other parts of the 3D model. Again only one part of the model (and its different versions) should be stored in one sub-sub project. Only by doing it in this way, you will be able to view and merge (parts of) the 3D models. Finally, in the IFC Library you are not able to delete the models itself. To delete a model, you will have to delete the entire sub-project in which the model is stored. Hence, it is strongly advised to store each different model in a separate sub-project. You can delete sub-projects by going to View project details (Rectangle A in figure 22) and subsequently by clicking on Delete this project (Rectangle B in figure 22). A practical example is the following: The team ‘Test C&C’ does multiple construction projects together. One of the projects is the renovation of a school. Therefore the project manager creates the sub-project ‘School’ in the IFC library. The project manager has asked team member A to design the floors in the IFC standard. Team member B is responsible for the walls. Therefore the project manager creates two sub-sub-projects: ‘Floors’ and ‘Walls’. Team member A uploads his design of the floors in the sub-sub-project ‘Floors’. Team member B uploads his design of the walls in IFC in the sub-subproject ‘Walls’. In the end the folder structure will look as follows: A. B. Figure 22 - Delete Sub-projects 5.2 Main Functionalities of the IFC Library The IFC library functionalities: provides the following press the refresh button (rectangle E in figure 23) Upload IFC models: select the name of the sub-project/ sub-sub-project in the folder tree, click on Upload new version and choose the correct file (Rectangle A in 23). After selecting the file press the save button to start the uploading. After a couple of minutes (depending on the size of your document) the model will appear in you sub-project / sub-sub project after you Please note that only 3D models in the IFC standard can be uploaded in the IFC library. Most 3D modelling software allows exportation to IFC format. We recommend to use the ‘Refresh’ button after you have uploaded an IFC model to make sure the models appears in your sub-sub project. 20 Download IFC models: point to the right side of the model with your mouse and click on Download’ (Rectangle B in figure 23). You can then select the format/standard in which you would like to download the IFC model. View and merge IFC models: you can view IFC models on two levels: the subsub-project level, allowing you to view a part of the 3D model (e.g. the walls) and the sub-project level, allowing you to see the whole model (e.g. the school) which consists of the underlying IFC models in the sub-sub projects. The latter merges the different parts of the models stored in the sub-sub-projects into one single model (if you have structured the sub-projects as described in section 5.1). When you have clicked on View in 3D a new window opens. You can choose which objects and layers of the model you would like to see by using the tick boxes on the left side of the screen (Rectangle A in figure 24). You can view parts of the model by pointing to the right side of a model in a sub-sub project and clicking on View in 3D (Rectangle B in figure 23). You can view the whole model by selecting a sub-project in the project tree and clicking on View in 3D in the main menu (Rectangle D in figure 23). Please note that when you have uploaded multiple versions of for instance the walls in sub-sub-project ‘Walls’, the IFC library will merge the model you have uploaded most recently. E. D. Browse through IFC objects: you can browse through a list of all IFC objects (e.g. entities, relations, etc.) stored in a model, by pointing to the right side of a model and clicking on Browse IFC objects (Rectangle B in figure 23).1 View project details: by clicking on view project details (rectangle D in figure 23) you can change the name of your IFC model, delete the IFC model and change the measurement unit of the specific IFC model. ___________ 1 Here you can also find the GUID and Oic codes to adapt or add elements of the IFC model in your own software. C. A. B. Figure 23 - IFC Library - Main Functionalities 21 A. Figure 24 - IFC Library - View in 3D 22 6. Project Management In order to effectively and efficiently exchange information, it is recommended to first set up a project management structure. This structure is set up by the Site manager and the Project Management section on your Site dashboard explains the five basic steps you have to take to set up a structure that defines what you will exchange, when and how. Each of the steps link to ready-to-use templates and relevant platform functionalities. Figure 25 - Project Management 23 7. Calendar Each Site has a Calendar that you can use to schedule meetings, set deadlines, et cetera. You can find the calendar on the Site Dashboard of each project. After opening the calendar a standard calendar will be presented. You can schedule an event by clicking on Add event (Rectangle A in figure 26). A new window is opened where you can fill in all the information required for this event (e.g. subject. start date, end date, location, etc.). To bring this event under the attention of other members, you can also tag projects, members, folders and documents in this event (see Section 4.5). compatible with .ics-files (e.g. Microsoft Outlook). This will synchronise the agenda of your project with the agenda of your mail-client. Please note that the synchronization of events only happens manually. You will thus have to import an .ics-file in your mail-client every time you want to update your calendar. When you add an event on the calendar other project members will not be notified automatically by e-mail. The event will however show up in the recent activities Dashlet. It is thus important that you keep track of the calendar to make sure that your personal calendar is up to date. Furthermore, the C&C Platform offers an iCal Feed (Rectangle B in figure 26). When you click on iCal feed, you will be asked to download a .icsfile. You can import this file into your mail-client B. A. Figure 26 - Calendar 24 8. Discussion The C&C Platform enables you to start and respond to discussions. You can find a discussion by clicking on Discussions on the Site Dashboard. In this part of the Platform all the current discussions are shown and you can choose to either select and respond to an existing discussion or create a new discussion. A new discussion is created by clicking on New topic. (rectangle A in figure 27) You can give the new topic a subject and the text box enables you to express your views and make your point. To bring the discussion under the attention of Site members, you can give tags to the discussion (see Section 4.5). You cannot invite people to this discussion, but they will see a notification on their Site dashboard. A. Figure 27 - Create Discussions 25 Need more help? If you need more help to work with the Connect and Construct platform, please contact us through our Yammer network Connect and Construct pilots (https://www.yammer.com/connectconstructpilots/) or by emailing to [email protected]. 26