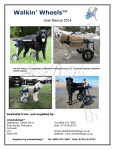
1
V
SORRENTO DISPLAY
(Refrigerated & Ambient)
REFRIGERATED
MODEL NUMBERS
SOR70F2
SOR100F2
SOR70F3
SOR100F3
SOR70B2
SOR100B2
SOR70B3
SOR100B3
AMBIENT
MODEL NUMBERS
SOA70F2
SOA100F2
SOA70F3
SOA100F3
SOA70B2
SOA100B2
SOA70B3
SOA100B3
Thank you for buying a Victor Unit. We hope and expect that you will get many years of
satisfactory use from your purchase.
In order to achieve the best results from your equipment please read, and follow, the
installation, operating, cleaning and maintenance instructions below. Failure to follow
them may affect the warranty.
1.
UNPACKING AND ASSEMBLY
All protective coating used on stainless steel surfaces of the display must be removed.
The exposed surfaces can then be wiped clean with a damp cloth, using a mild
detergent or soap if necessary.
DO NOT USE ANY ABRASIVE MATERIAL OR FORM OF BLEACH FOR CLEANING PURPOSES.
Please see cleaning section of this manual.
2.
INSTALLATION
Position the appliance where it is to be used and ensure that it is level.
Do not site the appliance in the immediate vicinity of a heat source
Site the appliance so as to leave at least 250mm behind the rear air vents. These vents
must not be covered.
Do not position the appliance so as to obstruct air vents on either the operator or
customer sides of the appliance. Adequate airflows are vital to the correct functioning
of the refrigeration system. Avoid placing the appliance in areas subject to strong
draughts or under air conditioning systems. Avoid areas subject to high humidity (i.e.
Conservatories) as the appliance will act as a de-humidifier, and create excessive
amounts of water.
The appliance is fitted with a 13 Amp fused plug and only requires connection to a
suitable 13 Amp socket outlet. This model is suitable for 230 – 240V A.C. supply only.
Ensure that the electricity supply is as stated on the model’s data plate.
1
Important:
Wires in the mains lead are coloured in accordance with the following
code:
Green and Yellow
Blue
Brown
Warning:
-
Earth
Neutral
Live
This appliance must be earthed, do not touch internal wiring.
As the colours of the wires in the mains lead on this appliance may not correspond with
the coloured markings identifying the terminals in your plug, proceed as follows:
(a)
The wire which is coloured green and yellow must be connected to the terminal
in the plug, which is marked with letter E or the sign .
(b)
The wire which is coloured blue must be connected to the terminal which is
marked with the letter N or is coloured black.
(c)
The wire which is coloured brown must be connected to the terminal which is
marked with the letter L or is coloured red.
3.
USE AND BEST PERFORMANCE
REFRIGERATED MODELS
THIS APPLIANCE IS DESIGNED TO WORK IN AN AMBIENT TEMPERATURE OF UP TO A
MAXIMUM 32OC WITH A RELATIVE HUMIDITY OF 60%.
The display is designed to maintain food placed inside at between 3o and 5oC, food
placed in the display must be at or below this temperature, before being placed in the
display.
The refrigeration system is operated by a green on / off switch marked ‘REFRIGERATION’,
which will illuminate when the refrigeration is switched on.
The refrigeration system is controlled by a microprocessor control which is factory set and
requires No adjustment, the digital display will show the air temperature within the
display, not the food temperature.
Other buttons on the controller are of no
consequence to the user and are for factory or service engineer use only.
To obtain the best performance, the following procedure is suggested:
(a)
Switch on the refrigeration system via the switch located on the control panel.
(b)
Depending on the ambient temperature, allow the display 30 to 90 minutes to
reach the required temperature.
(c)
Load the display as required, when loading shelves please ensure that adequate
space is left all round to allow air flows around the cabinet.
2
All refrigeration systems frost up when operating. Your Sorrento has a microprocessor
control, programmed to defrost periodically. No manual defrost is required. The
refrigeration system will automatically defrost every 2 hours for approximately 20 minutes.
The controller will display ‘df’ during the defrost cycle. Water collected from the defrost
operation is automatically evaporated.
Please remember the refrigeration system is not designed to chill food, but is designed to
maintain it at a satisfactory temperature before serving.
AMBIENT MODELS
These appliances are for displaying produce at room temperature, they do not have a
refrigeration system. The appliance should have suitable electrical supply to power the
light, which is turned on and off via a switch located on the control panel.
4.
CLEANING
SWITCH OFF THE UNIT AT THE MAINS BEFORE CLEANING.
On 1000mm long units, rear sliding doors may be removed by holding them (one at a
time) at the sides and lifting so that the bottom of the door comes out of its track. Tilt the
bottom of the door towards you and the door will come free.
Hinged doors on the 700 long units may be removed by opening the door and undoing
the screws fixing the door into the hinges.
Front service models have removable flaps to aid cleaning. Lift the flaps up and slide the
flaps out of the hinges. When replacing the flaps ensure they are central within the
hinges, as the flaps will not shut correctly and may break if not.
Back service models have a hinge up front cover to facilitate cleaning. Undo the two
thumb screw fasteners in the bottom front corners of the cover and hinge it up.
Shelves can be removed by lifting them up and taking them out of the cabinet. When
replacing the shelves ensure that the shelves go in mesh side up and that they fit down
properly on the supports.
From time to time it may be necessary to clean the Acrylic side panels. These can be
removed by undoing the four thumb screws and lifting out the panels. The sides must be
replaced afterwards as they are an important part of the refrigeration system.
Cleaning stainless steel, plastic, plastic coated steel and painted surfaces.
Use warm water and soap or washing up liquid on a soft cloth for cleaning these
surfaces. You should soak the cloth in soapy water and then squeeze it out before
starting to clean the display cabinet. When clear the unit should be wiped down with a
clean damp cloth.
Do not use abrasive cleaners, e.g. Vim or Jif or scouring pads, pan scrubbers, etc.
3
To eliminate statically induced dust from acrylic and other plastic surfaces, a solution of
dishwasher rinse aid water can be used. Rinse a soft cloth in a solution of 20 parts water
to 1 part rinse aid and squeeze out. Wipe over acrylic surfaces. Do not wipe off.
Make sure that you have replaced all the items removed before switching on. Ensure
that the unit is running properly before reloading.
CORRECTLY APPLIED THE ABOVE INSTRUCTIONS WILL RESULT IN CONTINUOUS GOOD
LOOKS!
5.
BEFORE YOU CALL AN ENGINEER
Troubleshooting
Before you call the service engineer, you should consult the list below and see if any of
the suggestions is of help in solving your problem. You may even be charged during the
guarantee period if the service engineer finds that the problem was soluble by taking
one of the actions below.
The refrigeration system is not working:
Check to see if the fridge switch is lit, if not, switch it on.
Check that the unit is on at the mains/plugged in and switched on.
Check that the fuse in the plug is good.
Check to see if the fridge switch is lit.
The refrigeration system is working but the food is not getting cold enough:
Check that the doors and flaps are shut.
Did the food go in at the right temperature? (Between 3o and 5oC).
Are there proper gaps around the food to allow adequate air circulation?
Have the side panels been replaced after cleaning?
Has the routine maintenance been carried out in the last 6 months?
The light does not come on:
Check to see if refrigeration system is working.
Rotate lamp slightly to improve contact.
Rotate starter to improve contact.
Replace lamp.
Replace starter.
6.
MAINTENANCE & SPARES
IMPORTANT:
You must disconnect the appliance from the mains before removing any
components which have been fastened using screws, etc.
Only a qualified service engineer should attempt to access the refrigeration system or
remove any screw fixed panels.
4
User Replaceable Items
You don't need a service engineer to replace some parts on your Sorrento display. Just
order the spares and when they arrive, fit them yourself.
Parts which you can easily replace yourself are:
Shelves, Doors, Flaps, Fluorescent lamp and Starter for fluorescent light.
Flaps can be removed by lifting up and sliding them sideways out of the hinge.
WARNING:
Switch off electrical power at the mains or unplug the lead before changing
any of the lighting components.
The Fluorescent tube can be removed by twisting a quarter turn and lifting out. Remove
end caps from polycarbonate sleeve and remove florescent tube.
Starters are located on the rear of the unit and may be removed by twisting and pulling.
Replace the items by reversing the above procedures.
Routine Maintenance
The Sorrento refrigeration system WILL pick up dust from the air which builds up on certain
parts, causing them to lose effectiveness. It is important to call a service engineer to
examine, and clear, the system as necessary every 6 months.
To access the condenser for cleaning the access panel inside the cabinet must be
removed. First remove the shelves then undo the access panel. Clear condenser with a
brush and clean away the dust.
Occasional lubrication of the door track on 1000 models will ensure a smooth easy
action and long life of sliding parts.
Spare parts are available for all models of equipment. These can be obtained by
contacting your distributor.
When ordering any spare parts always quote the model and serial number.
PLEASE USE THE BOX PROVIDED BELOW TO RECORD YOUR MODEL AND SERIAL NUMBER
FOR FUTURE INFORMATION, THIS CAN BE FOUND ON THE DATA LABEL ON THE APPLIANCE.
MODEL NUMBER
6.
SERIAL NUMBER
WARRANTY
As a manufacturer of catering equipment, Victor Manufacturing Ltd offers warranty on
all goods manufactured by the company and supplied by its United Kingdom
Distributors.
5
Victor Manufacturing Ltd is renowned for its reliability and Victor Manufacturing Ltd
provides on-site warranty in case of failure included in the purchase price, which covers
the costs of spare parts and labour on your Victor Manufacturing Ltd goods from the
date of invoice for a period of 12 months.
The Victor Manufacturing Ltd warranty does not affect any legal rights you have against
the person who supplied your Victor Manufacturing Ltd goods or any other legal right
against Victor Manufacturing Ltd under the laws of the United Kingdom – it is an addition
to those rights.
All goods sold by Victor Manufacturing Ltd are subject to the Company’s standard
conditions of sale, a copy of which is available upon request.
Where the goods and components supplied by Victor Manufacturing Ltd are of the
company’s design and manufacture, Victor Manufacturing Ltd will make good any
defects in those goods provided Victor Manufacturing Ltd liability will be limited to the
following:
It is the purchaser’s responsibility to prove that the unit is under warranty, e.g. receipt of
purchase, invoice number, serial number, etc.
Damaged in transit claims must be reported in writing to the company within 3 days of
receipt for your claim to be validated. Damaged goods will not be replaced or repaired
if they have been used.
Victor Manufacturing Ltd must authorise all warranty repairs prior to the commencement
of work. Work carried out on goods prior to authorisation will not be covered nor will any
resultant damage.
All warranty will be immediately invalidated if in the reasonable opinion of Victor
Manufacturing Ltd, unauthorised repairs or modifications have been made to the goods,
in the case of accident, misuse, or damage caused by improper installation and altered
or missing serial numbers. Victor Manufacturing Ltd will not provide warranty repairs if in
our opinion the problem resulted from externally caused damage, use outside the goods
specification, faults caused by inexperienced or non-approved repairers. All warranty
will be immediately invalidated if installation of equipment is not in accordance with
Victor Manufacturing Ltd installation instructions supplied.
Customer adjustments explained in the operating manual are not covered by Victor
Manufacturing Ltd on-site warranty. Assistance can be received by contacting the
warranty desk.
The liability of Victor Manufacturing Ltd and its appointed engineers are limited to the
cost of repairs (parts and labour only) of the unit under warranty. Loss of food or other
damages caused by faulty goods are not covered by the warranty.
No fault found warranty calls and installation errors are not covered under Victor
Manufacturing Ltd warranty and will result in a charge being made for the callout and
on-site labour for our appointed engineer. The Victor Manufacturing Ltd warranty does
not cover the replacement of used consumables, or parts that require period adjustment
or lubrication, unless the part is faulty.
6
You must have evidence that routine maintenance has been carried out by a qualified
engineer in accordance with the instruction manual. This is of particular importance with
refrigerated and gas fuelled appliances. Work made necessary by lack of routine
maintenance or cleaning is not covered by this warranty and will be chargeable.
Victor Manufacturing Ltd parts and labour warranty is valid for the United Kingdom
Mainland only. (Parts only all areas outside the United Kingdom Mainland.)
Some parts are automatically not covered by the Victor Manufacturing Ltd warranty
(e.g. panels, glass, lamps, shelves, etc.) Many surface finishes including paint and plastic
coated steel can be scratched and damaged if not properly cared for; such damage is
not covered by the Victor Manufacturing Ltd warranty.
IF YOUR EQUIPMENT FAILS
Refer to the instruction manual.
description of the fault you have.
If the problem still cannot be resolved, prepare a
Make sure you have your proof of purchase document (Invoice number or serial
number) and the model number of the equipment that has failed.
Contact the warranty department on the following numbers:
Warranty Desk Telephone No:
Warranty Desk Fax No:
Warranty Desk Email address:
Emergency Warranty Telephone No:
01274 230 026 (Office Hours)
01274 230 020 (Office Hours)
[email protected]
07799 435 376 (All Other Times)
Warranty repairs are carried out between 9:00 a.m. and 5:00 p.m. Monday – Friday.
Access required outside normal working hours may incur charges.
Registered Office:
Victor Manufacturing Ltd
Lonsdale Works, Gibson Street, Bradford, BD3 9TF
Tel: 01274 722 125
Fax: 01274 307 082
Email: [email protected]
7