1
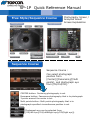
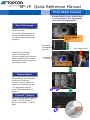
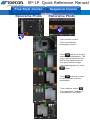
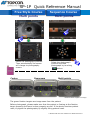
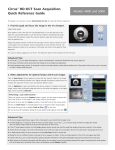
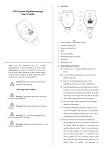
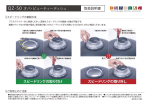
SP-1P Quick Reference Manual
According to each facility’s needs, the examiner can select from
two courses: [Free Style Course] & [Sequence Course]
Free Style Course
Immediately after switching on
the device, the examiner can
start photography.
Suitable for a facility where mostly
photographs central cornea.
Sequence Course
Input patient ID, name, positions
to photograph, OD/OS.
Suitable for a facility where doctors
give orders for a position to
photograph.
Peripheral area can be also selected.
If central part
is difficult to
photograph
↓
Go to
peripheral area
Photograph
these positions
for this patient.
SP-1P Quick Reference Manual
Free Style/Sequence Course
Photography Screen /
Analyzed Result
Screen Explanation
Sequence Course
Sequence Course:
Can select photograph
position from
[Center]/[Panorama]/[Multi
points], and photograph eye
from [OS/OU/OD].
CENTER button: Centering photography is set.
Panorama button: Panorama photography that is to photograph
3 points around the center is set.
Multi points button: Multi points photography that is to
photograph specified circumference position is set.
Photograph eye can be selected from
[OS(Left eye)/OU(Left&Right eye)/OD(Right eye)].
SP-1P Quick Reference Manual
Free Style Course
Immediately after switching
on the device, the examiner
can start photography.
Start Photograph
Default is set to photograph
central cornea.
Touch the [Photographing
Position Selecting Button]
to change the photograph
position.
Photographing
Position Selecting
Button
Changing
photograph
position
Press the [Up/Down]
button to adjust the
chinrest height until the eye
height mark of the chinrest
reaches the same height as
the patient’s eye.
Display Result
Automatically the analyzed
result will be shown.
Touch [printer] button to
show the printing item list.
*To photograph again,
touch [Rephotographing]
button.
Printout / Output
List of printing items will be
shown. Touch [printer]
button to printout / output
data.
Eye height mark
Up/Down
chinrest
Touch central
cornea
SP-1P Quick Reference Manual
Sequence Course
Input patient ID, name, positions
to photograph, OD/OS.
Input Patient Info.
Direct / Barcode input available.
*Without inputting data, you can
move to the photography setting
screen.
Select Photograph
Eye and Position
Photography
setting screen
Photograph position can be
selected from [center],
[panorama], [multi points].
Eye height mark
Start Photograph
Press the [Up/Down]
button to adjust the
chinrest height until the eye
height mark of the chinrest
reaches the same height as
the patient’s eye.
Display Result
Automatically the analyzed
result will be shown.
Touch [printer] button to
show the printing item list.
*To photograph again,
touch [Rephotographing]
button.
Printout / Output
List of printing items will be
shown. Touch [printer]
button to printout / output
data.
Up/Down
chinrest
Touch central
cornea
SP-1P Quick Reference Manual
Free Style Course
Panorama Photo
Sequence Course
Panorama Photo
Touch central cornea.
Then automatically
photography starts.
Touch
and move to next
position and photograph. The
green fixation target moves
and let the patient stare at
this green fixation target.
*For rephotographing, touch
button.
Touch
again and move
to next position and then
photograph.
Touch analyze button
The integrated 3 images of
panorama will be shown.
.
SP-1P Quick Reference Manual
Free Style Course
Sequence Course
Multi points
Multi points
Select the photograph position.
Then automatically the screen
will change to photography
screen.
Center
Panorama
Select the photograph
position and then
photograph by touching
button.
Multi points
*Green fixation targets are image.
The green fixation targets are image seen from the patient.
Before photograph, please make sure that the patient is fixating at the fixation
target properly and focus is done properly as well. If the device touches patient
nose, try again the photography by slightly tilting patient head.
**Please refer the user manual for detail instruction.