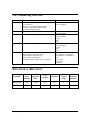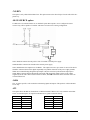
1
USER MANUAL
RIO-47xxx
Manual Rev. 1.0f
By Galil Motion Control, Inc.
Galil Motion Control, Inc.
270 Technology Way
Rocklin, California 95765
Phone: (916) 626-0101
Fax: (916)626-0102
Email: [email protected]
URL: www.galilmc.com
Rev Date 3/2009
Contents
CONTENTS ...................................................................................................................................................... I
CHAPTER 1 OVERVIEW ..............................................................................................................................1
INTRODUCTION ...............................................................................................................................................1
PART NUMBERING OVERVIEW ........................................................................................................................2
RIO-47XX0 VS. RIO-47XX2 ...........................................................................................................................2
Microcomputer Section .............................................................................................................................3
Communication .........................................................................................................................................3
CHAPTER 2 GETTING STARTED...............................................................................................................4
RIO-471XX .....................................................................................................................................................4
RIO-472XX .....................................................................................................................................................5
INSTALLING THE RIO BOARD .........................................................................................................................6
Step 1. Configure Jumpers ........................................................................................................................6
Step 2. Connecting Power to the RIO........................................................................................................6
Step 3. Install the Communications Software............................................................................................7
Step 4. Establish Communications between RIO and the Host PC ...........................................................7
Communicating to the RIO using Galil Software......................................................................................7
Using Non-Galil Communication Software ..............................................................................................8
CHAPTER 3 COMMUNICATION ..............................................................................................................11
INTRODUCTION .............................................................................................................................................11
RS232 PORT .................................................................................................................................................11
RS232 - Port 1 .........................................................................................................................................11
RS-232 Configuration .............................................................................................................................11
ETHERNET CONFIGURATION .........................................................................................................................12
Communication Protocols .......................................................................................................................12
Jumper Configuration for 10BaseT .........................................................................................................12
Addressing...............................................................................................................................................12
RIO-471x0
Contents ● i
Email from the RIO.................................................................................................................................13
Communicating with Multiple Devices...................................................................................................14
Handling Communication Errors ............................................................................................................14
Multicasting.............................................................................................................................................15
Unsolicited Message Handling................................................................................................................15
Other Protocols Supported ......................................................................................................................15
MODBUS WITH THE RIO ...............................................................................................................................16
Sending Modbus Packets.........................................................................................................................16
Modbus Exceptions .................................................................................................................................17
Function Code 1 ($01) - Read Coils........................................................................................................18
Function Code 2 ($02) - Read Discrete Inputs ........................................................................................20
Function Code 3 ($03) - Read Holding Registers ...................................................................................22
Function Code 4 ($04) - Read Input Registers ........................................................................................25
Function Code 5 ($05) - Write Single Coil .............................................................................................28
Function Code 6 ($06) - Preset Single Register ......................................................................................30
Function Code 7 ($07) – Read Exception Status.....................................................................................32
Function Code 15 ($0F) – Write Multiple Coils .....................................................................................34
Function Code 16 ($10) – Write Multiple Registers ...............................................................................36
Analog IO Ranges ...................................................................................................................................39
DATA RECORD ..............................................................................................................................................40
QR and DR Commands...........................................................................................................................40
RIO Data Record .....................................................................................................................................40
Explanation of Status Information...........................................................................................................41
CHAPTER 4 I/O .............................................................................................................................................42
INTRODUCTION .............................................................................................................................................42
SPECIFICATIONS ............................................................................................................................................42
44 pin D-Sub Connector (Digital I/O) – RIO-471xx...............................................................................42
26 pin D-Sub Connector (Analog I/O) ....................................................................................................43
Screw Terminals – RIO-472xx................................................................................................................43
High Power Sourcing Outputs.................................................................................................................44
Low Power Sinking Outputs ...................................................................................................................44
Digital Inputs...........................................................................................................................................45
Analog Outputs .......................................................................................................................................47
Analog Inputs ..........................................................................................................................................47
Analog Process Control Loop .................................................................................................................49
Pulse Counter Input .................................................................................................................................50
STANDARD OPTIONS .....................................................................................................................................50
-DIN ........................................................................................................................................................50
-NO DIN..................................................................................................................................................51
-08-15 SOURCE option ..........................................................................................................................51
-16Bit.......................................................................................................................................................51
-422 .........................................................................................................................................................51
-0-7 or -8-15 SINK/SOURCE .................................................................................................................53
-HS ..........................................................................................................................................................53
-10V12-Bit ..............................................................................................................................................53
-10V16-Bit ..............................................................................................................................................53
CHAPTER 5 APPLICATION PROGRAMMING......................................................................................54
OVERVIEW ....................................................................................................................................................54
EDITING PROGRAMS .....................................................................................................................................54
PROGRAM FORMAT .......................................................................................................................................54
Using Labels in Programs .......................................................................................................................55
Special Labels .........................................................................................................................................55
Commenting Programs............................................................................................................................55
Program Lines Greater than 40 Characters..............................................................................................56
ii Contents
RIO-471x0
Lock Program Access using Password....................................................................................................56
EXECUTING PROGRAMS - MULTITASKING.....................................................................................................57
DEBUGGING PROGRAMS ...............................................................................................................................58
Trace Commands.....................................................................................................................................58
Error Code Command .............................................................................................................................58
RAM Memory Interrogation Commands ................................................................................................58
Operands .................................................................................................................................................58
Debugging Example:...............................................................................................................................59
PROGRAM FLOW COMMANDS .......................................................................................................................59
Interrupts .................................................................................................................................................59
Examples: ................................................................................................................................................60
Conditional Jumps...................................................................................................................................61
Using If, Else, and Endif Commands ......................................................................................................63
Stack Manipulation..................................................................................................................................64
Auto-Start Routine ..................................................................................................................................64
Automatic Subroutines for Monitoring Conditions.................................................................................64
MATHEMATICAL AND FUNCTIONAL EXPRESSIONS........................................................................................67
Mathematical Operators ..........................................................................................................................67
Bit-Wise Operators..................................................................................................................................67
Functions .................................................................................................................................................68
VARIABLES ...................................................................................................................................................69
Programmable Variables .........................................................................................................................69
OPERANDS ....................................................................................................................................................70
Examples of Internal Variables: ..............................................................................................................70
Special Operands (Keywords).................................................................................................................70
ARRAYS ........................................................................................................................................................71
Defining Arrays.......................................................................................................................................71
Assignment of Array Entries ...................................................................................................................71
Using a Variable to Address Array Elements..........................................................................................72
Uploading and Downloading Arrays to On Board Memory....................................................................72
Automatic Data Capture into Arrays .......................................................................................................72
Deallocating Array Space........................................................................................................................73
INPUT OF DATA (NUMERIC AND STRING)......................................................................................................74
Input of Data............................................................................................................................................74
OUTPUT OF DATA (NUMERIC AND STRING) ..................................................................................................74
Sending Messages ...................................................................................................................................74
Displaying Variables and Arrays.............................................................................................................76
Formatting Variables and Array Elements ..............................................................................................76
PROGRAMMABLE I/O ....................................................................................................................................77
Digital Outputs ........................................................................................................................................77
Digital Inputs...........................................................................................................................................78
Analog Inputs ..........................................................................................................................................78
Analog Outputs .......................................................................................................................................79
APPENDIX......................................................................................................................................................80
ELECTRICAL SPECIFICATIONS .......................................................................................................................80
Input/Output ............................................................................................................................................80
Power Requirements................................................................................................................................80
PERFORMANCE SPECIFICATIONS ...................................................................................................................80
RIO-47xx0...............................................................................................................................................80
RIO-47xx2...............................................................................................................................................80
CERTIFICATIONS ...........................................................................................................................................81
ETL .........................................................................................................................................................81
CE............................................................................................................................................................81
ROHS ......................................................................................................................................................81
CONNECTORS ON THE RIO............................................................................................................................81
RIO-471x0
Contents ● iii
44 pin D-Sub Connector – RIO-471xx....................................................................................................81
26 pin D-Sub Connector – RIO-471xx....................................................................................................82
Screw Terminals – RIO-472xx................................................................................................................82
¹J2 RS-232 Port: DB-9 Pin Male ............................................................................................................83
J1 Ethernet Port: 10/100 Base-T (RJ-45) ................................................................................................83
J5 Power: 2 pin Molex for 18-36VDC (if not using Power over Ethernet) .............................................83
JUMPER DESCRIPTION FOR RIO ....................................................................................................................84
RIO DIMENSIONS ..........................................................................................................................................85
RIO-471xx...............................................................................................................................................85
RIO-472xx...............................................................................................................................................86
ACCESSORIES AND OPTIONS .........................................................................................................................87
LIST OF OTHER PUBLICATIONS .....................................................................................................................88
CONTACTING US ...........................................................................................................................................88
TRAINING SEMINARS ....................................................................................................................................89
WARRANTY...............................................................................................................................................90
INDEX .............................................................................................................................................................91
This page is left blank intentionally
iv Contents
RIO-471x0
Chapter 1 Overview
Introduction
Derived from the same fundamentals used in building the Galil motion controllers, the RIO-47xxx is a
programmable remote I/O controller that conveniently interfaces with other Galil boards through its Ethernet
port. The RIO is programmed exactly the same way as a DMC (Digital Motion Controller) with the
exception of a few revised commands and the removal of all motion-related commands. Communication
with the RIO even works the same way as with other Galil controllers, and it utilizes the same software
programs. Interrogation commands have been included to allow a user to instantly view the entire I/O status,
I/O hardware, or Ethernet handle availability (see the TZ, ID and TH commands).
The purpose of an RIO board is to offer remote I/O in a system and the ability to synchronize complex
events. To do this, the RIO consists of two boards – a high speed processor with integrated Ethernet and an
I/O board consisting of digital inputs, digital outputs, analog inputs, and analog outputs. If different I/O
requirements are required –a custom I/O board can be made to mate up directly with the RIO processor.
RIO-471x0
Chapter 1 Overview ● 1
Part Numbering Overview
RIO-47102
Highlights
Metal case
0-5V Analog IO
8 high power optoisolated digital outputs
8 low power optoisolated digital outputs
16 optoisolated digital inputs
Same as RIO-47100 but with expanded memory
RIO-47120
Same as RIO-47100 but with +-10V analog IO
RIO-47122
Same as RIO-47120 but with expanded memory
RIO-47200
Same as RIO-47100 except
-Screw terminals instead of D-Subs
-Din rail mount with metal cover
-All 16 outputs are high power
-No analog outputs (contact factory if required)
RIO-47100
Standard Options
-DIN
-08-15 SOURCE
-DIN
-08-15 SOURCE
-DIN
-08-15 SOURCE
-16 Bit
-422
-HS
-DIN
-08-15 SOURCE
-16 Bit
-422
-HS
-422
-0-7 SINK or -0-7 SOURCE
-8-15 SINK or -8-15SOURCE
-HS
-10V12-Bit
-10V16-Bit
-NO DIN
For details on all the options please see Chapter 4 I/O
RIO-47xx0 vs. RIO-47xx2
Controller
# of
array
elements
# of
program
lines
# of
variables
# of labels
# of
control
loops
# of
Ethernet
handles
RIO-47xx0
400
200
126
62
2
3
RIO-47xx2
1000
400
256
126
6
5
2 Chapter 1 Overview
RIO-471x0
RIO Functional Elements
Microcomputer Section
The main processing unit of the RIO is a specialized 32-bit Freescale Microcomputer with 32KB SRAM and
256KB of Embedded Flash memory. The SRAM provides memory for variables, array elements and
application programs. The flash memory provides non-volatile storage of variables, programs, and arrays; it
also contains the RIO firmware. The RIO can process individual Galil Commands in approximately 40
microseconds.
Communication
The communication interface with the RIO consists of one RS-232 port (default is 115 kBaud/s) and one
10/100Base-T Ethernet port (jumper configurable).
There are four status LEDs on the RIO that indicate operating and error conditions on the controller. Figure
1-1 shows a diagram of the LED bank followed by the description of the four lights.
PWR
ERR
LNK
ACT
Figure 1-1 - Diagram of LED bank on the RIO
Green Power LED (PWR) - The green status LED indicates that the power has been applied
properly to the RIO.
Red Status/Error LED (ERR) - The red error LED will flash on briefly at power up. After the
initial power up condition, the LED will illuminate for the following reasons:
1. The reset line on the controller is held low or is being affected by noise.
2. There is a failure on the controller and the processor is resetting itself.
3. There is a failure with the output IC that drives the error signal.
Green Link LED (LNK) – The green LED indicates there is a valid Ethernet connection. This
LED will show that the physical Ethernet layer (the cable) is connected.
Activity (ACT) – The amber LED indicates traffic across the Ethernet connection. This LED will
show both transmit and receive activity across the connection.
RIO-471x0
Chapter 1 Overview ● 3
Chapter 2 Getting Started
RIO-471xx
Figure 2-1: - Outline of RIO-471xx (units in inches)
4 Chapter 2 Getting Started
RIO-471x0
RIO-472xx
Figure 2-2: - Outline of RIO-472xx (units in centimeters)
RIO-471x0
Chapter 2 Getting Started ● 5
Installing the RIO Board
Installation of a complete, operational RIO system consists of 4 steps:
Step 1. Configure jumpers
Step 2. Connect power to the RIO
Step 3. Install the communications software
Step 4. Establish communications between the RIO and the host PC
Step 1. Configure Jumpers
Power Input Jumpers (AUX vs PoE)
The RIO can be powered using either a 18-36V DC power input or a PoE (Power over Ethernet) switch to
deliver power over the Ethernet cable. The default configuration is the 18-36VDC power input. If PoE is
used, the four jumpers on JP6 (located next to Ethernet connector) must be moved from AUX to PoE.
Master Reset and Upgrade Jumper
Jumpers labeled as MRST and UPGD are located at J5, next to the reset button. The MRST jumper is for a
master reset. When MRST is jumpered, the RIO will perform a master reset upon a power cycle to the board
or when the board reset button is pushed. Whenever the I/O board has a master reset, all programs, arrays,
and variables stored in EEPROM will be erased – this will set the RIO board back to factory defaults.
The UPGD jumper enables the user to unconditionally update the board firmware. This jumper is not
necessary for firmware updates when the RIO board is operating normally, but may be necessary in cases of
a corrupted EEPROM. EEPROM corruption should never occur under normal operating circumstances;
however, corruption is possible if there is a power fault during a firmware update. If EEPROM corruption
occurs, your board may not operate properly. In this case, install the UPGD jumper and use the update
firmware function in the Galil software to re-load the system firmware.
Setting the Baud Rate on the RIO
The default baud rate for the RIO is 115K (jumper OFF).
The jumper labeled “19.2,” also located at JP5, allows the user to select the serial communication baud rate.
The baud rate can be set using the following table:
19.2
BAUD RATE
OFF
115k
ON
19.2k
Step 2. Connecting Power to the RIO
Since the RIO can be powered using either a 18-36V DC power input or a PoE (Power over Ethernet) switch,
there are two possible connection options shown here:
1) EXT: 18-36VDC power input is the default configuration. The four jumpers on JP6 will be located on the
side labeled EXT. Apply a DC power supply in the range of 18-36V to the 2-pin molex connector. The
6 Chapter 2 Getting Started
RIO-471x0
power supply should be capable of delivering up to 4 Watts. The RIO uses Molex Pitch Mini-Fit, Jr.™
Receptacle Housing connectors for connecting DC Power. For more information on the connectors, go to
http://www.molex.com/.
Note: The part number listed below is the connector that is found on the controller. For more information see
the Molex website. http://www.molex.com/
Molex Part Number
Pin Part Number (x2)
Type
39-31-0020
44476-3112
2 Position
Warning: Damage can occur if a supply larger than 36VDC is connected to the board.
2) PoE: Power over Ethernet. This configuration needs the four jumpers on JP6 to be placed on the side
labeled PoE. Once this is done, the controller will derive its power directly from the Ethernet cable. A PoE
style switch can be used such as the FS108P from Netgear.
Applying power will turn on the green LED power indicator.
Step 3. Install the Communications Software
After applying power to the computer, install the Galil software that enables communication between the I/O
board and your PC. It is strongly recommended to use the Galil software “GalilTools” when communicating
to the RIO unit. Please see the GalilTools Manual for a complete description of how to install and connect to
Serial or Ethernet controllers.
http://www.galilmc.com/products/software/galiltools.html
Step 4. Establish Communications between RIO and the Host PC
Communicating to the RIO using Galil Software
RS-232:
To use serial communication, connect a 9pin straight-through RS-232 cable (CABLE-9-PIND) between the
serial port of the RIO and the computer or terminal communications port. The RIO serial port is configured
as DATASET.
Ethernet:
Connect the RIO Ethernet port to your computer via a crossover Ethernet cable, or to a network hub with a
straight through Ethernet cable.
RIO-471x0
Chapter 2 Getting Started ● 7
Using Non-Galil Communication Software
RS-232:
The RIO serial port is configured as DATASET. The computer or terminal must be configured as a for full
duplex, no parity, 8 data bits, one start bit and one stop bit. A standard Windows HyperTerminal session can
connect to the controller using a straight-through serial cable.
Check to insure that the baud rate jumpers have been set to the desired baud rate as described above. Also,
the hardware handshake lines (RTS/CTS) need to be connected. See Chapter 3 for more information on
‘Handshake Modes.’
Ethernet:
Connect the RIO Ethernet port to your computer via a crossover or null modem Ethernet cable, or to a
network hub by a straight through Ethernet cable. An IP address needs to be assigned via a DHCP server,
through Galil software, or via a serial cable using the IA command. See Chapter 3 for more information on
how to establish an IP address. Once an IP address is established, a standard Windows Telnet session can
connect to the controller.
Sending Test Commands to the Terminal after a successful Connection
After connecting to the computer or terminal, press <carriage return> or the <enter> key on the keyboard. In
response to carriage return {CR}, the controller responds with a colon, :
Now type
TZ {CR}
This command directs the RIO to return the current I/O status. The controller should respond with something
similar to the following:
:TZ
Block 0 (7-0) Inputs - value 255 (1111_1111)
Block 1 (15-8) Inputs - value 255 (1111_1111)
Block 0 (7-0) Outputs - value 0 (0000_0000)
Block 1 (15-8) Outputs - value 0 (0000_0000)
Analog Inputs(7-0)
0.0000,0.0000,0.0000,0.0000,0.0037,0.0012,0.0000,0.0000
Analog Outputs(7-0)
0.0000,0.0000,0.0000,0.0000,0.0000,0.0000,0.0000,0.0000
8 Chapter 2 Getting Started
RIO-471x0
RIO Web Server
The RIO has a built-in web server that can be accessed by typing the IP address of the controller into a
standard web browser. The controller comes from the factory without any IP address assigned so a user must
go through the steps outlined above to establish an IP address before the web-server is accessible. Here’s an
example screenshot of the web server:
RIO-471x0
Chapter 2 Getting Started ● 9
This page intentionally left blank
10 Chapter 2 Getting Started
RIO-471x0
Chapter 3 Communication
Introduction
The RIO has one RS-232 port and one Ethernet port. The RS-232 port is the data set, and it is a standard
serial link with a communication baud rate up to 115kbaud. The Ethernet port is jumper configurable for 10
or 100Base-T (default).
RS232 Port
The RIO board has a single RS232 connection for sending and receiving commands from a PC or other
terminal. The pin-outs for the RS232 connection are as follows.
RS232 - Port 1
1 N/C (No Connect)
6 N/C
2 TXD (Transmit Data)
7 RTS (Ready to Send)
3 RXD (Receive Data)
8 CTS (Clear to Send)
4 N/C
9 N/C (Can connect +5V if needed)
5 Ground
RS-232 Configuration
Configure the PC for 8 data bits, no parity, one stop bit, and hardware handshaking. The baud rate for the
RS232 communication defaults to 115k baud but can be set to 19.2k baud by placing a jumper on J5.
Handshaking Modes
The RS232 port is configured for hardware handshaking. In this mode, the RTS and CTS lines are used. The
CTS line will go high whenever the RIO is not ready to receive additional characters. The RTS line will
RIO-471x0
Chapter 3 Communication ● 11
inhibit the RIO board from sending additional characters. Note: The RTS line goes high for inhibit. This
handshake procedure is required and ensures proper communication especially at higher baud rates.
Ethernet Configuration
Communication Protocols
The Ethernet is a local area network through which information is transferred in units known as packets.
Communication protocols are necessary to dictate how these packets are sent and received. The RIO
supports two industry standard protocols, TCP/IP and UDP/IP. The board will automatically respond in the
format in which it is contacted.
TCP/IP is a "connection" protocol. The master must be connected to the slave in order to begin
communicating. Each packet sent is acknowledged when received. If no acknowledgement is received, the
information is assumed lost and is resent.
Unlike TCP/IP, UDP/IP does not require a "connection". This protocol is similar to communicating via
RS232. If a cable is unplugged, the device sending the packet does not know that the information was not
received on the other side. Because the protocol does not provide for lost information, the sender must resend the packet.
Galil recommends using TCP/IP for standard communication to insure that if a packet is lost or destroyed
while in transit, it will be resent. However UDP is recommended in certain situations such as launching Data
Record information to a host for graphing or data collection.
Each packet must be limited to 470 data bytes or less. This is not an issue when using Galil software as the
Galil Ethernet driver will take care of the low level communication requirements.
The IK command blocks the controller from receiving packets on Ethernet ports lower than 1000 except for
ports 0, 23, 25, 68, 80 and 502. To receive packets on all ports, set IK to 0.
NOTE: In order not to lose information in transit, Galil recommends that the user wait for an
acknowledgement of receipt of a packet before sending the next packet.
Jumper Configuration for 10BaseT
If 10BaseT communication is required, a jumper must be placed on the pins labeled OPT. The default is no
jumper which is 100BaseT Ethernet communication.
Addressing
There are three levels of addresses that define Ethernet devices. The first is the MAC or hardware address.
This is a unique and permanent 6 byte number. No other device will have the same MAC address. The RIO
MAC address is set by the factory and the last two bytes of the address are the serial number of the board.
To find the Ethernet MAC address for a RIO unit, use the TH command. A sample is shown here with a unit
that has a serial number of 3:
Sample MAC Ethernet Address: 00-50-4C-28-00-03
The second level of addressing is the IP address. This is a 32-bit (or 4 byte) number that usually looks like
this: 192.168.15.1. The IP address is constrained by each local network and must be assigned locally.
Assigning an IP address to the RIO board can be done in a number of ways.
The first method for setting the IP address is using a DHCP server. The DH command controls whether the
RIO board will get an IP address from the DHCP server. If the unit is set to DH1 (default) and there is a
12 Chapter 3 Communication
RIO-471x0
DHCP server on the network, the controller will be dynamically assigned an IP address from the server.
Setting the board to DH0 will prevent the controller from being assigned an IP address from the server.
The second method to assign an IP address is to use the BOOT-P utility via the Ethernet connection. The
BOOT-P functionality is only enabled when DH is set to 0. Either a BOOT-P server on the internal network
or the Galil software may be used. When opening the Galil Software, it will respond with a list of all RIO
boards and controllers on the network that do not currently have IP addresses. The user must select the board
and the software will assign the specified IP address to it. This address will be burned into the controller
(BN) internally to save the IP address to the non-volatile memory. Note: if multiple boards are on the
network – use the serial numbers to differentiate them.
CAUTION: Be sure that there is only one BOOT-P or DHCP server running. If your network has
DHCP or BOOT-P running, it may automatically assign an IP address to the RIO board upon linking
it to the network. In order to ensure that the IP address is correct, please contact your system
administrator before connecting the I/O board to the Ethernet network.
The third method for setting an IP address is to send the IA command through the RS-232 port. (Note: The
IA command is only valid if DH0 is set). The IP address may be entered as a 4 byte number delimited by
commas (industry standard uses periods) or a signed 32 bit number (e.g. IA 124,51,29,31 or IA 2083724575).
Type in BN to save the IP address to the RIO non-volatile memory.
NOTE: Galil strongly recommends that the IP address selected is not one that can be accessed across the
Gateway. The Gateway is an application that controls communication between an internal network and the
outside world.
The third level of Ethernet addressing is the UDP or TCP port number. The Galil board does not require a
specific port number. The port number is established by the client or master each time it connects to the RIO
board. Typical port numbers for applications are:
Port 23: Telnet
Port 502: Modbus
Port 80: HTTP
Email from the RIO
If the RIO is on a network with a SMTP Mail Server, the RIO is capable of sending an email message using
the MG command. There are three configuration commands necessary to send an email from the RIO unit –
MA, MS and MD. MA sets the smtp email server IP address. MS sets the email source or “from” address
and MD sets the destination or “to” address. There is a maximum character limit for the MS and MD
commands of 30 characters. An example of this is shown here:
MA 10,0,0,1;
MD [email protected];
MS [email protected];
MG "Testing Email"{M};
‘example SMTP Email Server IP address
‘sample destination email address
‘sample source address
‘Message to send via Email
Please contact your system administrator for information regarding email settings.
Note: it is strongly recommended that the email messaging frequency is limited so as not to overload the
email server.
RIO-471x0
Chapter 3 Communication ● 13
Communicating with Multiple Devices
The RIO is capable of supporting multiple masters or slaves. A typical scenario would be connecting a PC (a
master) and a motion controller (a 2nd master) that can both send commands to the RIO board over Ethernet
on different handles.
Note: The term “master” is equivalent to the Internet “client” and the term “slave” is equivalent to the
Internet “server”.
An Ethernet handle is a communication resource within a device. The RIO-47xx0 can have a maximum of 3
Ethernet handles open at any time. This number is increased to 5 Ethernet handles on the RIO-47xx2. If all
handles are in use and another device tries to connect, it will be sent a "reset packet" showing that the RIO
cannot establish any new connections.
NOTE: A reset will cause the Ethernet connection to be lost. There are a number of ways to reset the board.
Hardware resets (push reset button or power down RIO board) and software resets (through Ethernet or
RS232 by entering the RS command).
When the RIO acts as the master, the IH command is used to assign handles and connect to its slaves. The IP
address may be entered as a 4 byte number separated with commas (industry standard uses periods) or as a
signed 32 bit number. A port number may also be specified, but if it is not, it will default to 1000. The
protocol (TCP/IP or UDP/IP) to use must also be designated at this time. Otherwise, the board will not
connect to the slave. (Ex: IHB=151,25,255,9<179>2. This will open handle #2 and connect to the IP
address 151.25.255.9, port 179, using TCP/IP)
Once the IH command is used to connect to slaves, the user can communicate to these slaves by sending
commands to the master. The SA command is used for this purpose, and it has the following syntax.
SAh= "command string"
Here "command string" will be sent to handle h. For example, SAA=”XQ” command will send an XQ
command to the slave/server on handle A. A more flexible form of the command is
SAh= field1,field2,field3,field4 ... field8
where each field can be a string in quotes or a variable.
When the Master/client sends an SA command to a Slave/server, it is possible for the master to determine the
status of the command. The response _IHh4 will return the number 1 to 4. 1 indicates waiting for the
acknowledgement from the slave. 2 indicates a colon (command accepted) has been received. 3 indicates a
question mark (command rejected) has been received. 4 indicates the command timed out.
If a command generates multiple responses (such as the TE command), the values will be stored in _SAh0
thru _SAhn where n is the last field. If a field is unused, its _SA value will be -2^31.
See the Command Reference for more information on the SA command.
Which devices receive what information from the RIO depends on various things. If a device queries the
RIO, it will receive the response unless it explicitly tells the RIO to send it to another device. If the
command that generates a response is part of a downloaded program, the response will route to whichever
port is specified by the CF command (either a specific Ethernet handle or the RS232 port). If the user wants
to send the message to a port other than what is specified by the CF command, add an {Eh} or {P1} to the
end of the command (Ex. MG{EB}"Hello" will send the message "Hello" to handle #2 and MG{P1}”Hello”
will send it to the serial port).
Handling Communication Errors
A reserved automatic subroutine which is identified by the label #TCPERR can be used to catch
communication errors. If an RIO has an application program running and the TCP or UDP communication is
14 Chapter 3 Communication
RIO-471x0
lost, the #TCPERR routine will automatically execute. The #TCPERR routine should be ended with the RE
command.
Multicasting
A multicast may only be used in UDP/IP and is similar to a broadcast (where everyone on the network gets
the information) but specific to a group. In other words, all devices within a specified group will receive the
information that is sent in a multicast. There can be many multicast groups on a network and are
differentiated by their multicast IP address. To communicate with all the devices in a specific multicast
group, the information can be sent to the multicast IP address rather than to each individual device IP
address. All Galil devices belong to a default multicast address of 239.255.19.56. This multicast IP address
can be changed by using the IA>u command.
Unsolicited Message Handling
Unsolicited messages are any messages that are sent from the controller that are not directly requested by the
host PC. An example of this is a MG or TP command inside of a program running on the controller. Error
messages are also “unsolicited” because they can come out at any time. There are two software commands
that will configure how the controller handles these unsolicited messages: CW and CF.
The RIO has 3 Ethernet handles as well as 1 serial port where unsolicited messages may be sent. The CF
command is used to configure the controller to send these messages to specific ports. In addition, the Galil
software has various options for sending messages using the CF command. For more information, see the CF
command description in the Command Reference.
The CW command has two data fields that affect unsolicited messages. The first field configures the most
significant bit (MSB) of the message. A value of 1 will set the MSB of unsolicited messages, while a value
of 2 suppresses the MSB. Programs like HyperTerminal or Telnet need to use a setting of CW2 for the
unsolicited messages to be readable in standard ASCII format. However, the Galil software needs a value of
CW1 to be set so that it can differentiate between solicited and unsolicited messages. If you have difficulty
receiving characters from the controller, or receive garbage characters instead of messages, check the status
of the CW command.
The second field of the CW command controls whether the product should pause while waiting for the
hardware handshake to enable the transmission of characters over RS-232 (CW,0), or continue processing
commands and lose characters until the hardware handshake allows characters to be sent (CW,1).
Other Protocols Supported
Galil supports DHCP, ARP, BOOT-P, and Ping, which are utilities for establishing Ethernet connections.
ARP is an application that determines the Ethernet (hardware) address of a device at a specific IP address.
BOOT-P is an application that determines which devices on the network do not have an IP address and
assigns the IP address you have chosen to it. Ping is used to check the communication between the device at
a specific IP address and the host computer.
The RIO can communicate with a host computer through any application that can send TCP/IP or UDP/IP
packets. A good example of this is Telnet, a utility that comes standard with the Windows operating system.
When using DHCP and a DNS (Domain Name Server), the DNS will assign the name “RIO47100-n” to the
controller where n is the serial number of the unit.
RIO-471x0
Chapter 3 Communication ● 15
Modbus with the RIO
The RIO-47xxx supports Modbus/TCP, and requires an Ethernet connection between its master or slave
devices.
As a Modbus class 1 device, the RIO supports the following Modbus function codes:
Of the Modbus function codes the RIO supports, all are supported by the RIO when it operates as a master
(also known as a client) or when it operates as a slave (server).
Function Code
1
2
3
4
5
6
7
15
16
Modbus Description
Read Coil Status
Read Input Status
Read Holding Registers
Read Input Registers
Force Single Coil
Preset Single Register
Read Exception Status
Force Multiple Coils
Preset Multiple Registers
Galil Description
Read Digital Outputs
Read Digital Inputs
Read Analog Inputs
Read Analog Outputs
Write Digital Output
Write Digital Outputs
Read Digital Outputs
Write Digital Outputs
Write Analog Outputs
Note1: By default the RIO uses function code 3 for analog inputs and function code 4 for analog outputs. For
a majority of Modbus devices this functionality is inverted. Use the MV command to switch the
functionality. Please see the command reference for details.
Note2: The remainder of this document uses the '$' symbol to signify that numbers are in hexadecimal
notation.
Setup
Modbus/TCP requires an Ethernet connection between master and slave. Modbus/TCP also requires that all
slaves communicate with their masters over port 502. See the IH command to setup port communication for
the RIO. Note that the RIO by default
Sending Modbus Packets
The RIO programming language provides 3 ways of issuing Modbus packets as a master.
1) Issue the MB command of type Mbh = -1,len,array[]
This Galil command allows the user complete control over the creation of their Modbus
packet. len is the number of bytes to be included in the packet, and array[] is the name of the
array containing the Modbus packet. Each element of array[] may contain only one byte, and
array[] must contain the entire Modbus packet, including transaction identifiers, protocol identifiers,
length field, Modbus function code, and data specific to that function code.
2) Issue the MB command of type Mbh = addr, x, m, n, array[]
This Galil command allows the user to send a Modbus command easily by allowing the
user to select a few key parameters, and allowing the controller to do the rest. addr is the Unit
ID field, which if not set, Galil will automatically set to the value of the handle the
communication is over (Handle A=$01, B=$02, etc). Also, as a slave the RIO ignores the Unit
ID field. x is the function code of the Modbus command. m is the address at which to begin
reading or writing. n is either the number of coils or the number of registers to read/write.
array[] is the array in which data from a read gets stored or where data to write is stored. See
individual function code descriptions in the command reference for specifics of this command.
16 Chapter 3 Communication
RIO-471x0
3) Issue another Galil command that supports Modbus
The following Galil commands support Modbus, and are an easy way to use the Modbus protocol:
SB,CB,AO,OB,@IN[],@OUT[],@AN[],@AO[]. The I/O number (variable) to use with these commands
when using Modbus can be calculated as follows:
I/O Number = (HandleNum*1000) + (bitNum)
Modbus Exceptions
An RIO configured as a slave will return an exception response if it receives an invalid request (e.g. An
invalid function code, or a communication error). As a class 1 Modbus device the RIO-47xxx can respond
with exception codes $01 or $02. Exception code $01 is returned when a request referencing an Illegal
Function is received. Exception code $02 is returned when a request referencing an Illegal Data Address is
received.
When an Exception Response occurs, the function code of the response is $80 added to the original function
code (e.g. Improper use of function code $01 will result in the exception response $81)
An RIO-47xxx configured as a master can query the function code of the last response it received using the
_MW command (see command reference). The _MW command can be used to determine if an exception has
occurred. The _MW1 command (see the command reference) can be used to query the exception code.
RIO-471x0
Chapter 3 Communication ● 17
Function Code 1 ($01) - Read Coils
Description
Modbus function code $01 is a request to read coils. This will read digital outputs from an RIO configured as
a slave.
Operating as a master
The function code of the response can be queried with the _MW command. If an exception occurred, the
exception code of the response can be queried with _MW1.
Example:
Normal Response
_MW results in $01
Exception Response
_MW results in $81
_MW1 contains $01 or $02
When using the MB command with Modbus function code 1, response data will be stored in the array
referenced in the command line. When using @OUT[], @OUT[] contains the response data, which can either
be stored to a variable or transmitted via serial port or ethernet.
Ways to use function code $01 with Galil commands:
1.
2.
3.
MB command in raw packet mode
MB command with Modbus function code1
@OUT[] (see @OUT[] in the command reference)
Operating as a slave
The RIO will accept a read coils request with a starting address ranging from $0000-$000F, referencing
digital outputs 0-15. The RIO will accept a request for up to all 16 of its digital outputs, with the quantity of
coils ranging from $0001-$0010. The RIO will respond with function code $01 followed by a byte count of
either $01 or $02, which describes the number of bytes of digital outputs being returned (byte count =
quantity of outputs/8; if the remainder is not 0, byte count = quantity of outputs/8 +1). The RIO will respond
with a coil status of 1 or 2 bytes (equal to the byte count) ranging from $0001-$FFFF, with each bit
representing the state of a digital output (1 or 0). The LSB of the first coil status byte refers to the output
addressed by the request packet.
Coil Mapping
Coil
Addresses
Coil
Addresses
0
Digital Output 0
8
Digital Output 8
1
Digital Output 1
9
Digital Output 9
2
Digital Output 2
10
Digital Output 10
3
Digital Output 3
11
Digital Output 11
4
Digital Output 4
12
Digital Output 12
5
Digital Output 5
13
Digital Output 13
6
Digital Output 6
14
Digital Output 14
7
Digital Output 7
15
Digital Output 15
18 Chapter 3 Communication
RIO-471x0
Examples:
MBA= ,1,2,12,array[]
Request the status of coils 2-13 (result is stored in array[])
MG@OUT[1002]
Requests the status of coil 2 (result is transmitted via serial port or
ethernet)
Packets
The command MBA=,1,2,10,array[] results in the following packets being sent, when one RIO is the master,
and another RIO is the slave, communicating over handle A, port 502(Modbus). Assume digital outputs, in
descending order from 15-0 are: 0,1,1,1,0,0,1,1,0,0,1,1,0,1,1,1
Request
Response
Field Name
(hex)
Field Name
(hex)
Function
01
Function
01
Starting Address High
00
Byte Count
02
Starting Address Low
02
Outputs Status 9-2
CD
Quantity of Outputs High
00
Outputs Status 13-10
0C
Quantity of Outputs Low
0C
1st Byte of Response Word
bit
7
6
5
4
3
2
1
0
Coil #
9
8
7
6
5
4
3
2
Value
1
1
0
0
1
1
0
1
2nd Byte of Response Word
bit
15
14
13
12
11
10
9
8
Coil #
X
X
X
X
13
12
11
10
Value
0
0
0
0
1
1
0
0
Note: bits in the response marked 'X' are not valid coil response data, but are instead 0's that fill the
remainder of the byte
On the master RIO, array[0]=205 and array[1]=12 after the MBA= ,2,2,12,array[]command is issued
RIO-471x0
Chapter 3 Communication ● 19
Function Code 2 ($02) - Read Discrete Inputs
Description
Modbus function code $02 is a request to read discrete inputs. This will read digital inputs from an RIO
configured as a slave.
Operating as a master
The function code of the response can be queried with the _MW command. If an exception occurred, the
exception code of the response can be queried with _MW1.
Example:
Normal Response
_MW results in $02
Exception Response
_MW results in $82
_MW1 contains $01 or $02
When using the MB command with Modbus function code $02, response data will be stored in the array
referenced in the command line. When using @IN[], @IN[] contains the response data, which can either be
stored to a variable or transmitted via serial port or ethernet.
Ways to use function code 2 with Galil commands:
1.
2.
3.
MB command in raw packet mode
MB command with Modbus function code 2
@IN[] (see @IN[] in the command reference)
Operating as a slave
The RIO will accept a read discrete inputs request with a starting address ranging from $0000-$000F,
referencing digital inputs 0-15. The RIO will accept a request for up to all 16 of its digital inputs, with a
quantity of inputs range of $0001-$0010.
The RIO will respond with a byte count of either $01 or $02, which describes the number of bytes of digital
inputs being returned (byte count = quantity of inputs/8; if the remainder is not 0, byte count = quantity of
inputs/8 +1). The RIO will respond with a input status of 1 or 2 bytes (equal to the byte count) ranging from
$0001-$FFFF, with each bit representing the state of a digital input (1 or 0). The LSB of the first input status
byte refers to the input addressed by the request packet.
Coil Mapping
Coil
Addresses
Coil
Addresses
0
Digital Input 0
8
Digital Input 8
1
Digital Input 1
9
Digital Input 9
2
Digital Input 2
10
Digital Input 10
3
Digital Input 3
11
Digital Input 11
4
Digital Input 4
12
Digital Input 12
5
Digital Input 5
13
Digital Input 13
6
Digital Input 6
14
Digital Input 14
7
Digital Input 7
15
Digital Input 15
20 Chapter 3 Communication
RIO-471x0
Examples:
MBA= ,2,2,12,array[]
Request the status of discrete inputs 2-13 (result is stored in array[])
MG@IN[1002]
Requests the status of input 2 (result is transmitted via serial port or
ethernet)
Packets:
The command MBA=,2,2,12,array[] results in the following packets being sent, when one RIO is the master,
and another RIO is the slave, communicating over handle A, port 502(Modbus). Assume digital inputs, in
descending order from 15-0 are: 0,1,1,1,0,0,1,1,0,0,1,1,0,1,1,1.
Request
Response
Field Name
(hex)
Field Name
(hex)
Function
02
Function
02
Starting Address High
00
Byte Count
02
Starting Address Low
02
Inputs Status 9-2
CD
Quantity of Inputs High
00
Inputs Status 13-10
0C
Quantity of Inputs Low
0C
1st Byte of Response Word
bit
7
6
5
4
3
2
1
0
Input #
9
8
7
6
5
4
3
2
Value
1
1
0
0
1
1
0
1
2nd Byte of Response Word
bit
15
14
13
12
11
10
9
8
Input #
X
X
X
X
13
12
11
10
Value
0
0
0
0
1
1
0
1
Note: bits in the response marked 'X' are not valid input response data, but are instead 0's that fill the
remainder of the byte. Inputs report back a 0 when active and a 1 when inactive
On the master RIO, array[0]=205 and array[1]=12 after the MBA= ,2,2,12,array[] command is issued
RIO-471x0
Chapter 3 Communication ● 21
Function Code 3 ($03) - Read Holding Registers
Description
Modbus function code $03 is a request to read holding registers. In its default configuration the RIO-471x0
responds to this command with analog input register information. To configure the RIO to respond to a
function code 3 request with analog output information see the MV command in the command reference.
Operating as a master
The function code of the response can be queried with the _MW command. If an exception occurred, the
exception code of the response can be queried with _MW1.
Example:
Normal Response
_MW results in $03
Exception Response
_MW results in $83
_MW1 contains $01 or $02
When using the MB command with Modbus function code $03, response data will be stored in the array
referenced in the command line. When using @AN[], @AN[] contains the response data, which can either be
stored to a variable or transmitted via serial port or ethernet.
Ways to use function code 3 with Galil commands:
1.
2.
3.
MB command in raw packet mode
MB command with Modbus function code 3
@AN[] (see @AN[] in the command reference)
Operating as a slave
The RIO will accept different starting address ranges for a read holding registers request depending on the
state of the MI command. If MI is set to 0 (register data is volts in 32-bit floating point), the RIO will accept
a read holding registers request with an address range of $0000-$000E. If MI is set to 1 (register data is
counts in 16-bit decimal), The RIO will accept a read holding registers request with an address range of
$0000-$0007. The RIO will accept a request with a quantity of registers field up to $0008 if MI is set to 0,
and $00010 if MI is set to 1.
The RIO will respond with a byte count ranging from $0000 to $0020 if MI is 0, and from $0000 to $0010 if
MI is 1 (Byte Count = 2*NumberOfRegisters, where NumberOfRegisters is equal to the number of analog
inputs you are trying to read multiplied by 2 if MI is 0, or 1 if MI is 1). The RIO will respond with a byte
count field equal to the byte count field in the request packet. The RIO will respond with a register value
field consisting of either 2 bytes (counts) or 4 bytes (32-bit floating point) per analog input in ascending
order from the analog input referenced in the address.
22 Chapter 3 Communication
RIO-471x0
Galil Register Map
Register
Address
0
1
2
3
4
5
6
7
8
9
10
11
12
13
14
15
32-Bit Floating Point
Analog Input 0
Analog Input 1
Analog Input 2
Analog Input 3
Counts
Analog Input 0
Analog Input 1
Analog Input 2
Analog Input 3
Analog Input 4
Analog Input 5
Analog Input 6
Analog Input 7
Analog Input 4
Analog Input 5
Analog Input 6
Analog Input 7
Examples:
MBA= ,3,2,4,array[]
Request the status of holding registers 2-5 (AN1 and AN2 if MI0, or
AN2, AN3, AN4, AN5 if MI1). The response is stored in array[]
MG@AN[1002]
Requests the status of analog input 2 (result is transmitted via serial port
or ethernet).
RIO-471x0
Chapter 3 Communication ● 23
Packets:
The command MBA=,3,2,4,array[] results in the following packets being sent, when one RIO is the master,
and another RIO-47100 is the slave, communicating over handle A, port 502(Modbus). When MI is set to 0
the response is given as volts in 32-bit Floating Point. When MI is set to 1 the response is given as counts in
16-bit decimal notation. Assume analog inputs in ascending order from 0-7 are: .4822, .9753, 1.4673, 1.9629,
2.4622, 2.9675, 3.4583, 3.9600
Slave MI0
Request
Field Name
Function
Starting Address High
Starting Address Low
Quantity of Registers High
Quantity of Registers Low
(hex)
03
00
02
00
04
Response
32-bit Floating Point
Field Name
Function
Byte Count
RegVal2 High
RegVal2 Low
RegVal3 High
RegVal3 Low
Slave MI1
(hex)
03
08
3F
79
B0
00
3F
BB
D0
00
Response
Real Value 16-bit Integer
(volts)
Field Name
Function
Byte Count
0.9753
RegVal2 High
RegVal2 Low
RegVal3 High
RegVal3 Low
1.4673
RegVal4 High
RegVal4 Low
RegVal5 High
RegVal5 Low
(hex)
03
08
25
80
32
68
3F
20
4C
18
With the slave MI set to 0, the master RIO’s arrays will look like this:
array[0]=16249
array[1]=45056
array[2]=16315
array[3]=53248
With the slave MI set to 1, the master RIO’s arrays will look like this:
array[0]=9600
array[1]=12904
array[2]=16160
array[3]=19480
24 Chapter 3 Communication
RIO-471x0
Real Value
(counts)
9600
12904
16160
19480
Function Code 4 ($04) - Read Input Registers
Description
Modbus function code $04 is a request to read input registers. In its default configuration the RIO-471x0
responds to this command with analog output register information. To configure the RIO to respond to a
function code 4 request with analog input information see the MV command in the command reference.
Operating as a master
The function code of the response can be queried with the _MW command. If an exception occurred, the
exception code of the response can be queried with _MW1.
Example:
Normal Response
_MW results in $04
Exception Response
_MW results in $84
_MW1 contains $01 or $02
When using the MB command with Modbus function code $04, response data will be stored in the array
referenced in the command line. When using @AO[], @AO[] contains the response data, which can either be
stored to a variable or transmitted via serial port or ethernet.
Ways to use function code1 with Galil commands:
1.
2.
3.
MB command in raw packet mode
MB command with Modbus function code 4
@AO[] (see @AO[] in the command reference)
Operating as a slave
The RIO will accept different address ranges for a read input registers request depending on the state of the
MI command. If MI is set to 0 (register data is volts in 32-bit floating point), the RIO will accept a read input
registers request with an address range of $0000-$000E. If MI is set to 1 (register data is counts in 16-bit
decimal), The RIO will accept a read input registers request with an address range of $0000-$0007. The RIO
will accept a request with a quantity of registers field up to $0008 if MI is set to 0, and $00010 if MI is set to
1. The RIO will respond with a byte count ranging from $0000 to $0010 if MI is 1, and from $0000 to $0020
if MI is 0 ((byte count = 2*NumberOfRegisters, where NumberOfRegisters is equal to the number of analog
outputs you are trying to read multiplied by 2 if MI is 0, or 1 if MI is 1). The RIO will respond with an input
registers field consisting of either 2 bytes (counts) or 4 bytes (32-bit floating point) per analog output register
in ascending order from the analog output referenced in the address.
RIO-471x0
Chapter 3 Communication ● 25
Galil Register Map
Register
Address
0
1
2
3
4
5
6
7
8
9
10
11
12
13
14
15
32-Bit Floating Point
Analog Output 0
Analog Output 1
Analog Output 2
Analog Output 3
Counts
Analog Output 0
Analog Output 1
Analog Output 2
Analog Output 3
Analog Output 4
Analog Output 5
Analog Output 6
Analog Output 7
Analog Output 4
AnalogOutput 5
Analog Output 6
Analog Output 7
Examples:
MBA= ,4,2,4,array[]
Request the status of Registers 2-5 (AO1 and AO2 if MI0, and AO2,
AO3, AO4, AO5 if MI1). The response is stored in array[]
MG@AO[1002]
Requests the status of analog output 2 (result is transmitted via ethernet or
serial)
26 Chapter 3 Communication
RIO-471x0
Packets:
The command MBA=,4,2,4,array[] results in the following packets being sent, when one RIO is the master,
and another RIO-47100 is the slave, communicating over handle A, port 502(Modbus). When MI is set to 0
the response is given as volts in 32-bit Floating Point. When MI is set to 1 the response is given as counts in
16-bit decimal notation. Assume analog outputs in ascending order from 0-7 are: .5, 1, 1.5, 2, 2.5, 3, 3.5, 4
Slave MI0
Request
Field Name
Function
Starting Address High
Starting Address Low
Quantity of Registers High
Quantity of Registers Low
(hex)
04
00
02
00
04
Response
32-bit Floating Point
Field Name
Function
Byte Count
RegVal2 High
RegVal2 Low
RegVal3 High
RegVal3 Low
Slave MI1
(hex)
04
08
3F
80
00
00
3F
C0
00
00
Response
Real Value 16-bit decimal
(volts)
Field Name
Function
Byte Count
1.0000
RegVal2 High
RegVal2 Low
RegVal3 High
RegVal3 Low
1.5000
RegVal4 High
RegVal4 Low
RegVal5 High
RegVal5 Low
(hex)
04
08
4C
CD
66
66
80
00
99
99
With the slave MI set to 0, the master RIO’s arrays will look like this:
array[0]=16256
array[1]=0
array[2]=16320
array[3]=0
With the slave MI set to 1, the master RIO’s arrays will look like this:
array[0]=19661
array[1]=26214
array[2]=32768
array[3]=39321
RIO-471x0
Chapter 3 Communication ● 27
Real Value
(counts)
19661
26214
32768
39321
Function Code 5 ($05) - Write Single Coil
Description
Modbus function code $05 is a request to write a single coil. This will write a digital output of an RIO
configured as a slave.
Operating as a master
The function code of the response can be queried with the _MW command. If an exception occurred, the
exception code of the response can be queried with _MW1.
Example:
Normal Response
_MW results in $05
Exception Response
_MW results in $85
_MW1 contains $01 or $02
Ways to use Function Code 5 with Galil commands:
1.
2.
3.
4.
5.
MB command in raw packet mode
MB command with Modbus function code 5
SB
CB
OB
Operating as a slave
The RIO will accept a write single coil request with a starting address ranging from $0000-$000F,
referencing digital outputs 0-15.
The RIO will respond with a Modbus packet that is identical to the packet it received.
28 Chapter 3 Communication
RIO-471x0
Coil Mapping
Coil
Addresses
Coil
Addresses
0
Digital Output 0
8
Digital Output 8
1
Digital Output 1
9
Digital Output 9
2
Digital Output 2
10
Digital Output 10
3
Digital Output 3
11
Digital Output 11
4
Digital Output 4
12
Digital Output 12
5
Digital Output 5
13
Digital Output 13
6
Digital Output 6
14
Digital Output 14
7
Digital Output 7
15
Digital Output 15
Examples:
For the following example, array[] contains [0,0,0,0,0,6,1,5,0,7,$FF,$00]
MBA= -1,12,array[]
Request to set digital output 7 high
MBA=,5,7,1
Request to set digital output 7 high
SB1007
Request to set digital output 7 high
OB1007,@IN[1000]
Request to set digital output 7 high if digital output 0 is high
Packets:
The command MBA=,5,7,1 results in the following packets being sent, when one RIO is the master, and
another RIO is the slave, communicating over handle A, port 502(Modbus).
Request
Response
Field Name
(hex)
Field Name
(hex)
Function
05
Function
05
Starting Address High
00
Starting Address High
00
Starting Address Low
07
Starting Address Low
07
Output Value High
FF
Output Value High
FF
Output Value Low
00
Output Value Low
00
As a result of the MB command above, the slave RIO will have output 7 turned on.
RIO-471x0
Chapter 3 Communication ● 29
Function Code 6 ($06) - Preset Single Register
Description
Modbus function code $06 is a request to write to a single register. This will write all 16 digital outputs of an
RIO configured as a slave.
Operating as a master
The function code of the response can be queried with the _MW command. If an exception occurred, the
exception code of the response can be queried with _MW1.
Example:
Normal Response
_MW results in $06
Exception Response
_MW results in $86
_MW1 contains $01 or $02
Ways to use function code 6 with Galil commands:
1.
2.
MB command in raw packet mode
MB command with Modbus function code 6
Operating as a slave
The RIO will accept a preset single register request with a starting address of $0000. The register values can
range from 0x0000 to 0xFFFF and correspond to a binary representation of the 16 digital outputs. The RIO
will respond with a Modbus packet that is identical to the packet it received.
30 Chapter 3 Communication
RIO-471x0
Coil Mapping
Coil
Addresses
Coil
Addresses
0
Digital Output 0
8
Digital Output 8
1
Digital Output 1
9
Digital Output 9
2
Digital Output 2
10
Digital Output 10
3
Digital Output 3
11
Digital Output 11
4
Digital Output 4
12
Digital Output 12
5
Digital Output 5
13
Digital Output 13
6
Digital Output 6
14
Digital Output 14
7
Digital Output 7
15
Digital Output 15
Examples:
For the following example, array[] contains [0,0,0,0,0,6,1,6,0,0,$55,$AA]
MBA= -1,12,array[]
Request to write digital outputs 15-0 to $55AA
MBA= ,6,0,$55AA
Request to write digital outputs 15-0 to $55AA
Note: writing digital outputs 15-0 to $55AA results in digital outputs 15-0 in descending order, being
0,1,0,1,0,1,0,1,1,0,1,0,1,0,1,0.
Packets:
The command MBA= ,6,0,$55AA results in the following packets being sent, when one RIO is the master,
and another RIO is the slave, communicating over handle A, port 502(Modbus).
Request
Response
Field Name
(hex)
Field Name
(hex)
Function
06
Function
06
Starting Address High
00
Starting Address High
00
Starting Address Low
00
Starting Address Low
00
Register Value High
55
Register Value High
55
Register Value Low
AA
Register Value Low
AA
RIO-471x0
Chapter 3 Communication ● 31
Function Code 7 ($07) – Read Exception Status
Description
Modbus function code $07 is a request to read the 8 exception status outputs. This will read digital outputs 07 of an RIO configured as a slave.
Operating as a master
The function code of the response can be queried with the _MW command. If an exception occurred, the
exception code of the response can be queried with _MW1.
Example:
Normal Response
_MW results in $07
Exception Response
_MW results in $87
_MW1 contains $01 or $02
When using the MB command with Modbus function code $07, response data will be stored in the array
referenced in the command line.
Ways to use function code 7 with Galil commands:
1.
2.
MB command in raw packet mode
MB command with Modbus function code 7.
Operating as a slave
The RIO will accept a read exception status request. The RIO will respond with function code $07, and will
return 1 byte of output data ranging from $00 to $FF, with each bit representing the state of a digital output
(1 or 0). The LSB of the output data byte is digital output 0, and the MSB of the output data byte is digital
output 7.
32 Chapter 3 Communication
RIO-471x0
Coil Mapping
Coil
Addresses
0
Digital Output 0
1
Digital Output 1
2
Digital Output 2
3
Digital Output 3
4
Digital Output 4
5
Digital Output 5
6
Digital Output 6
7
Digital Output 7
Examples:
MBA= ,7,array[]
Request to read exception status
Packets:
The command MBA= ,7,array[] results in the following packets being sent, when one RIO is the master, and
another RIO is the slave, communicating over handle A, port 502(Modbus). Assume digital outputs, in
descending order from 15-0 are:0,1,0,1,0,1,0,1,1,0,1,0,1,0,1,0. ($55AA)
Request
Response
Field Name
(hex)
Field Name
(hex)
Function
07
Function
07
Output Data
AA
array[0] on the master RIO will equal 170 in this example.
RIO-471x0
Chapter 3 Communication ● 33
Function Code 15 ($0F) – Write Multiple Coils
Description
Modbus function code ($0F) is a request to write multiple coils. This will write multiple digital outputs to an
RIO configured as a slave.
Operating as a master
The function code of the response can be queried with the _MW command. If an exception occurred, the
exception code of the response can be queried with _MW1.
Example:
Normal Response
_MW results in $0F
Exception Response
_MW results in $8F
_MW1 contains $01 or $02
Ways to use function code 15 with Galil commands:
1.
2.
MB command in raw packet mode
MB command with Modbus function code 15
Operating as a slave
The RIO will accept a write multiple coils request with a starting address ranging from $0000-$000F,
referencing digital outputs 0-15. The RIO will accept a request for up to all 16 of its digital outputs, or
$0001-$0010.
The RIO will respond with function code $0F, a starting address field which matches the starting address
field of the request packet, and a quantity of outputs which matches the quantity of outputs field of the
request packet.
34 Chapter 3 Communication
RIO-471x0
Coil Mapping
Coil
Addresses
Coil
Addresses
0
Digital Output 0
8
Digital Output 8
1
Digital Output 1
9
Digital Output 9
2
Digital Output 2
10
Digital Output 10
3
Digital Output 3
11
Digital Output 11
4
Digital Output 4
12
Digital Output 12
5
Digital Output 5
13
Digital Output 13
6
Digital Output 6
14
Digital Output 14
7
Digital Output 7
15
Digital Output 15
Examples:
For the following example, array[] contains [0,0,0,0,0,9,1,15,0,0,0,16,2,$AA,$55]
MBA= -1,15,array[]
Request to write $AA55 to digital outputs 15-0
For the following example, array[] contains [$AA55]
MBA= ,15,0,16,array[]
Request to write $AA55 to digital outputs 15-0
Packets:
The command MBA= ,15,0,16,array[] (when array contains [$AA55]) results in the following packets being
sent, when one RIO is the master, and another RIO is the slave, communicating over handle A, port
502(Modbus). The slave RIO’s outputs 15-0 will be set to the following (1 is on 0 is off):
Output
15
14
13
12
11
10
9
8
7
6
5
4
3
2
1
0
Value
0
1
0
1
0
1
0
1
1
0
1
0
1
0
1
0
Request
Response
Field Name
(hex)
Field Name
(hex)
Function
15
Function
15
Starting Address High
00
Starting Address High
00
Starting Address Low
00
Starting Address Low
00
Quantity of Outputs High
00
Quantity of Outputs High
00
Quantity of Outputs Low
10
Quantity of Outputs Low
10
Byte Count
02
Outputs Value High
AA
Outputs Value Low
55
RIO-471x0
Chapter 3 Communication ● 35
Function Code 16 ($10) – Write Multiple Registers
Description
Modbus function code ($10) is a request to write multiple registers, also known as analog outputs
Operating as a master
The function code of the response can be queried with the _MW command. If an exception occurred, the
exception code of the response can be queried with _MW1.
Example:
Normal Response
_MW results in $10
Exception Response
_MW results in $90
_MW1 contains $01 or $02
Ways to use function code 16 with Galil commands:
1.
2.
3.
MB command in raw packet mode
MB command with Modbus function code 16
AO[x] See command reference for details
Note: The RIO acting as a master can write up to 123 registers at a time with function code 16 per the
Modbus specification.
The Modbus transaction results are available with the _MW and _MW1 commands.
Operating as a slave
The RIO will accept different starting address ranges for a write multiple registers request depending on the
state of the MI command. If MI is set to 0 (register data is volts in 32-bit floating point), the RIO will accept
an address range of $0001-$000E. If MI is set to 1 (register data is count in 16-bit decimal), the RIO will
accept a write multiple registers request with an address range of $0000-$0007. The RIO will respond with
function code 16, a 2 byte starting address field identical to the starting address field of the request packet,
and a 2 byte quantity of registers field identical to the quantity of registers field of the request packet.
36 Chapter 3 Communication
RIO-471x0
Galil Register Map
Register
Address
0
1
2
3
4
5
6
7
8
9
10
11
12
13
14
15
32-Bit Floating Point
Analog Output 0
Analog Output 1
Analog Output 2
Analog Output 3
Counts
Analog Output 0
Analog Output 1
Analog Output 2
Analog Output 3
Analog Output 4
Analog Output 5
Analog Output 6
Analog Output 7
Analog Output 4
Analog Output 5
Analog Output 6
Analog Output 7
Examples:
For the following example, array[] contains [0,0,0,0,0,15,1,16,0,2,0,4,8,64,160,0,0,64,64,0,0]
MBA= -1,21,array[]
Request to write 5V to analog output 1 and 3V to analog output 2
For the following example, array[] contains [$40A0, $0000, $4040, $0000] ($40A00000 is 32-bit Floating
Point for 5.0000 decimal and $40400000 is 32-bit Floating Point for 3V decimal)
MBA= ,16,2,4,array[]
Request to write 5V to analog output 1 and 3V to analog output 2
AO1001,5
Request to write 5V to analog output 1
RIO-471x0
Chapter 3 Communication ● 37
Packets:
The command MBA= ,16,2,4,array[] results in the following packets being sent, when one RIO is the master,
and another RIO is the slave, and array[] contains [$40A0,$0000,$4040,$0000], communicating over handle
A, port 502(Modbus). MI is set to 0 on the slave.
Request
32-Bit Floating Point
Field Name
Function
Starting Address Hi
Starting Address Lo
Quantity Outputs Hi
Quantity Outputs Lo
Byte Count
RegVal0 High
RegVal0 Low
RegVal1 High
RegVal1 Low
Response
(hex)
10
0
2
0
4
8
40
A0
0
0
40
40
0
0
Field Name
Function
Starting Address Hi
Starting Address Lo
Quantity of Registers Hi
Quantity of Registers Lo
(hex)
10
0
2
0
4
The slave RIO will have analog output 1 set to 5V and analog output 2 set to 3V
Example 2
The command MBA= ,16,2,2,array[] results in the following packets being sent, when one RIO is the master,
and another RIO-47100 is the slave, and array[] contains [$FFFF,$9999,$6666,$3333], communicating over
handle A, port 502(Modbus). MI is set to 1 on the slave.
Request
Counts
Field Name
Function
Starting Address Hi
Starting Address Lo
Quantity Outputs Hi
Quantity Outputs Lo
Byte Count
RegVal0 High
RegVal0 Low
RegVal1 High
RegVal1 Low
Response
(hex)
10
0
2
0
2
4
FF
FF
99
99
Field Name
Function
Starting Address Hi
Starting Address Lo
Quantity of Registers Hi
Quantity of Registers Lo
(hex)
10
0
2
0
2
The slave RIO will have analog output 2 set to 5V and analog output 3 set to 3V
38 Chapter 3 Communication
RIO-471x0
Analog IO Ranges
The analog inputs and outputs range from different values depending on the configuration of the
RIO-471x0. This information is specifically important when using the RIO to communicate as a modbus
slave and MI is set to 1.
RIO-47100
Analog Inputs
AQx,m(see command reference for details)
m
Analog Range
Counts Range(decimal)
Counts Range(hex)
0
0-5V
0-32572
0x0000 - 0x7FF0
1
+/-5V
0-32572
0x0000 - 0x7FF0
Analog Outputs
Analog Range
Counts Range(decimal)
Counts Range(hex)
0-5V
0-65520
0x0000 - 0xFFF0
RIO-47120 (12 or 16 bit version)
Analog Inputs
AQx,m(see command reference for details)
m
Analog Range
Counts Range(decimal)
Counts Range(hex)
1
+/5V
-32768 to 32767
0x8000 - 0x7FFF
2
+/-10V
-32768 to 32767
0x8000 - 0x7FFF
3
0-5V
0-65535
0x0000 - 0xFFFF
4
0-10V
0-65535
0x0000 - 0xFFFF
Analog Outputs
DQx,m(see command reference for details)
m
Analog Range
Counts Range(decimal)
Counts Range(hex)
1
0-5V
0-65535
0x0000 - 0xFFFF
2
0-10V
0-65535
0x0000 - 0xFFFF
3
+/-5V
0-65535
0x0000 - 0xFFFF
4
+/-10V
0-65535
0x0000 - 0xFFFF
RIO-471x0
Chapter 3 Communication ● 39
Data Record
QR and DR Commands
The RIO can provide a block of status information back to the host computer in a single Ethernet packet
using either the QR or DR commands. The QR command returns the Data Record as a single response. The
DR command causes the controller to send a periodic update of the Data Record out a dedicated UDP
Ethernet handle. The Data Record response packet contains binary data that is a snapshot of the controller’s
I/O status.
Since the Data Record response contains all information in binary format; the result of this command cannot
be displayed in a Galil terminal.
The QR and DR commands will return 4 bytes of header information, followed by an entire data record. A
data record map is provided below.
RIO Data Record
DATA TYPE
UB
UB
UB
UB
UW
UB
UB
UW
UW
UW
UW
UW
UW
UW
UW
UW
UW
UW
UW
UW
UW
UW
UW
UW
UW
UL
SL
SL
ITEM
1st byte of header
2nd byte of header
3rd byte of header
4th byte of header
Sample number
Error Code
General Status
Analog Out Channel 0 (counts)
Analog Out Channel 1 (counts)
Analog Out Channel 2 (counts)
Analog Out Channel 3 (counts)
Analog Out Channel 4 (counts)
Analog Out Channel 5 (counts)
Analog Out Channel 6 (counts)
Analog Out Channel 7 (counts)
Analog In Channel 0 (counts)
Analog In Channel 1 (counts)
Analog In Channel 2 (counts)
Analog In Channel 3 (counts)
Analog In Channel 4 (counts)
Analog In Channel 5 (counts)
Analog In Channel 6 (counts)
Analog In Channel 7 (counts)
Output State
Input State
Pulse Count
ZC data – user configurable variable
ZD data – user configurable variable
Note: UB=Unsigned Byte, UW=Unsigned Word (2 bytes), SL=Signed Long Word
This data can be broken up into sections. The Data Record Map includes the 4 bytes of header. The
General Data Block consists of the sample number, the error code, and the general status. The I/O Data
Block includes all the other items in the above table.
40 Chapter 3 Communication
RIO-471x0
Explanation of Status Information
Header Information –
Bytes 0, 1 of Header:
The first two bytes of the data record provide the header information.
BIT 15
1
BIT 14
N/A
BIT 7
N/A
BIT 13
N/A
BIT 6
N/A
BIT 5
N/A
BIT 12
N/A
BIT 4
N/A
BIT 11
BIT 3
N/A
N/A
BIT 10
N/A
BIT 9
N/A
BIT 2
N/A
BIT 1
N/A
BIT 8
N/A
BIT 0
N/A
Bytes 2, 3 of Header:
Bytes 2 and 3 make up a word, which represents the Number of bytes in the data record, including the
header. Byte 2 is the low byte, and byte 3 is the high byte.
Note: The header information of the data records is formatted in little endian.
General Status Information (1 Byte)
BIT 7
Program
Running
BIT 6
N/A
BIT 5
N/A
BIT 4
BIT 3
N/A
N/A
BIT 2
Waiting for
input from IN
command
BIT 1
BIT 0
Trace On
Echo On
ZC and ZD Commands
Another important feature of the data record is that it contains two variables that can be set by the user. The
ZC and ZD commands are responsible for these variables. Each variable can be a number, a mathematical
equation, or a string. See the Command Reference for more information on the ZC and ZD commands.
RIO-471x0
Chapter 3 Communication ● 41
Chapter 4 I/O
Introduction
The standard RIO controller has 16 digital inputs, 16 digital outputs, 8 analog inputs and 8 analog outputs.
The interrogation command, TZ, allows the user to get a quick view of the I/O configuration and bit status.
Specifications
Access to I/O points is made through the 44pin and 26pin High Density D-Sub connectors on the top of the
unit. Pin outs and I/O specifications are listed below.
44 pin D-Sub Connector (Digital I/O) – RIO-471xx
Pin
Label
Description
Pin
1
DI15
Digital Input 15
16
2
DI12
Digital Input 12
17
DI13
Digital Input 13
3
DI9
Digital Input 9
18
DI10
Digital Input 10
4
N/C
No Connect
19
INC1
Input Common DI[8-15]
34
5
DI6
Digital Input 6
20
DI7
Digital Input 7
35
DI5
Digital Input 5
6
DI3
Digital Input 3
21
DI4
Digital Input 4
36
DI2
Digital Input 2
7
DI0
Digital Input 0
22
DI1
Digital Input 1
37
INC0
Input Common DI[0-7]
8
OP1B²
+5-24V Output Power
Supply for DO[8-15]²
23
N/C
No Connect
38
DO15
Digital Output 15
9
DO13
Digital Output 13
24
DO14
Digital Output 14
39
DO12
Digital Output 12
10
DO10
Digital Output 10
25
DO11
Digital Output 11
40
DO9
Digital Output 9
OP1A³
Output Power Ground
for DO[8-15]³
26
DO8
Digital Output 8
41
N/C
No Connect
42
DO6
Digital Output 6
11
Label
Description
Pin
Label
Description
No Connect / INC1B¹
31
DI14
Digital Input 14
32
DI11
Digital Input 11
33
DI8
Output Power GROUND
for DO[0-7]
Digital Input 8
No Connect / INC0B¹
12
DO7
Digital Output 7
27
OP0B
13
DO4
Digital Output 4
28
DO5
Digital Output 5
43
DO3
Digital Output 3
14
DO1
Digital Output 1
29
DO2
Digital Output 2
44
DO0
Digital Output 0
OP0A
+12-24V Output Power
Supply for DO[0-7]
OP0A
+12-24V Output Power
Supply for DO[0-7]
15
30
¹ INC0B and INC1B are only valid when INC jumpers are used.
² When ordered with -08-15 SOURCE this pin will actually be Output Power Ground for DO[8-15]
³ When ordered with -08-15 SOURCE this pin will actually be +5-24V Output Power Supply for DO[8-15]
42 Chapter 4 I/O
RIO-471x0
26 pin D-Sub Connector (Analog I/O)
Pin
Label
Description
Pin
Label
Description
Pin
Label
Description
1
N/C
No Connect
10
N/C
No Connect
19
N/C
No Connect
2
N/C
No Connect
11
N/C
No Connect
20
N/C
No Connect
3
AI7
Analog Input 7
12
GND
Ground
21
AI6
Analog Input 6
4
AI4
Analog Input 4
13
AI5
Analog Input 5
22
AI3
Analog Input 3
5
AI1
Analog Input 1
14
AI2
Analog Input 2
23
AI0
Analog Input 0
6
GND
Ground
15
GND
Ground
24
AO7
Analog Output 7
7
AO5
Analog Output 5
16
AO6
Analog Output 6
25
AO4
Analog Output 4
8
AO2
Analog Output 2
17
AO3
Analog Output 3
26
AO1
Analog Output 1
9
GND
GND
18
AO0
Analog Output 0
Screw Terminals – RIO-472xx
On the RIO-472xx series the IO is accessible through screw terminals only. Below are the details
Label
Description
Label
Description
18-36
18-16VDC logic power input
DI10
Digital Input 10
RET
Return side of logic power input
DI11
Digital Input 11
AGND
Analog Ground
DI12
Digital Input 12
AGND
Analog Ground
DI13
Digital Input 13
AI0
Analog Input 0
DI14
Digital Input 14
AI1
Analog Input 1
DI15
Digital Input 15
AI2
Analog Input 2
OP0A
+12-24V Output Power Supply for DO[0-7]
AI3
Analog Input 3
OP0B
Output Power GROUND for DO[0-7]
AI4
Analog Input 4
DO0
Digital Output 0
AI5
Analog Input 5
DO1
Digital Output 1
AI6
Analog Input 6
DO2
Digital Output 2
AI7
Analog Input 7
DO3
Digital Output 3
INC0A
Input common DI[0-7]
DO4
Digital Output 4
INC0B
No connect for standard configuration
DO5
Digital Output 5
DI0
Digital Input 0
DO6
Digital Output 6
DI1
Digital Input 1
DO7
Digital Output 7
DI2
Digital Input 2
OP1A
+12-24V Output Power Supply for DO[8-15]
DI3
Digital Input 3
OP1B
Output Power GROUND for DO[8-15]
DI4
Digital Input 4
DO8
Digital Output 8
DI5
Digital Input 5
DO9
Digital Output 9
DI6
Digital Input 6
DO10
Digital Output 10
DI7
Digital Input 7
DO11
Digital Output 11
INC1A
Input common DI[8-15]
DO12
Digital Output 12
INC1B
No connect for standard configuration
DO13
Digital Output 13
DI8
Digital Input 8
DO14
Digital Output 14
DI9
Digital Input 9
DO15
Digital Output 15
RIO-471x0
Chapter 4 I/O ● 43
High Power Sourcing Outputs
On the RIO-471xx digital outputs 0-7 are opto-isolated sourcing power outputs. On the RIO-472xx all 16 of
the digital outputs are configured this way by default. 12-24VDC with 500mA of current capability per
output. The internal circuit diagram is shown here:
OP0A should be connected to the positive side of a 12-24VDC external power supply.
OP0B should be connected to Ground on the external power supply
OP0A and OP0B are the Output Power for Bank 0. The device that needs to be turned on/off (solenoid,
relay, etc…) should be connected with the positive side of the device connected to the digital output DO [7:0]
and the negative side connected to the Ground of the power supply. When the SBn (Set Bit n) command is
given, this will provide a positive voltage to the device on the output pin to turn it on (with up to 500mA of
current available). A CBn (Clear Bit n) will remove the voltage to turn it off. The bold connections in the
schematic above are external connections.
There are two internal 2Amp fuses for the high power outputs. One fuse for outputs 0-3 and another fuse for
outputs 4-7. These fuses are not field-replaceable.
Low Power Sinking Outputs
Digital Outputs 8-15 are opto-isolated sinking outputs on the RIO-471xx (by default none of the digital
outputs on the RIO-472xx are configured this way). If ordered with -08-15 SOURCE option please see the
section below. 5-24VDC with 25mA of current capability in a sinking configuration.
44 Chapter 4 I/O
RIO-471x0
OP1B should be connected to the positive side of a 5-24VDC external power supply.
OP1A should be connected to Ground on the external power supply.
OP1A and OP1B are the Output Power for Bank 1. The output can sink up to 25mA of current. The device
should be connected between the digital output DO[15:8] and the positive side of the power supply. When
current is not flowing through the opto-coupler (CB), the 10k resistor pulls-up the output pin to the voltage
supplied to OP1B. When current is flowing through the opto-coupler (SB), the digital output drops to
Ground (supplied by OP1A) and is able to sink up to 25mA of current. The bold connections in the
schematic above are external connections.
OUTC jumpers
The OUTC jumpers can be used when an external power supply is not desired for digital outputs 8-15. These
low power outputs can use the internal +5V from the RIO instead. To do this, place a jumper on the pins
labeled OUTC as shown here:
Note: These jumpers DO NOT supply power to high power digital outputs;, an external supply is required
for these outputs
INC
OUTC
Digital Inputs
Digital inputs 0-15 are opto-isolated inputs with a range of 5-24VDC. There is a 2.2k internal series resistor
to INC0 (Input Common Bank 0) for inputs 0-7 and INC1 (Input Common Bank 1) for inputs 8-15. The
series resistor limits the current through the PS2805 opto-coupler. The INC0 and INC1 can either be
connected to the positive side of a DC power supply or to the Ground side of a DC power supply. When a
device is connected to the digital input, current flowing through the opto-coupler will cause the input to turn
on. The logic of the input can be configured using the IQ command.
RIO-471x0
Chapter 4 I/O ● 45
+5V to 24V
or
GND
+5V to 24V or GND
(needs to be the opposite of
what goes into INC0 and INC1)
Toggle
Switch
INC jumpers
The INC jumpers can be used when an external power supply is not desired for digital inputs 0-15. These
inputs can use the internal +5V from the RIO instead. To do this, place a jumper on the pins labeled INC as
shown here:
INC
OUTC
When using the INC jumpers, the digital inputs must have a reference. This reference comes from the RIO
from pin34 (INC0B) for inputs 0-7 and from pin 16 (INC1B) for inputs 8-15.
Toggle
Switch
DI0-DI7
or
DI8-DI15
INC0B (pin 34)
or
INC1B (pin 16)
46 Chapter 4 I/O
RIO-471x0
Analog Outputs
RIO-4710x:
Analog Outputs 0-7 on the RIO-4710x are 12 bit analog outputs and have a voltage range of 0-5VDC. The
outputs can sink or source up to 4mA of current.
RIO-4712x:
Analog Outputs 0-7 on the RIO-4712x have a configurable voltage range that is set using the DQ command.
The default outputs have a 12bit DAC resolution (order RIO-4712x-16 for 16 bit resolution). The analog
outputs can sink or source up to 4mA of current. See the DQ command in the Command Reference for a
full explanation.
DQ
DQ 0,1
DQ 1,2
DQ 2,3
DQ 3,4
Analog Output Range
Sets AO0 to 0-5VDC
Sets AO1 to 0-10VDC
Sets AO2 to +/-5VDC
Sets AO3 to +/-10VDC
Analog Inputs
Each analog input goes through its own internal ADC (Analog to Digital Converter) but when differential
mode is chosen – the inputs are treated as “pairs”. The difference of two analog inputs is the value reported
by the controller. The same analog value is reported on both “pairs” of inputs. The table below shows how
the differential channels are grouped. For instance, if AN0 is at 1.5VDC and AN1 is at 0VDC, a value of
1.5V is reported on @AN[0] and @AN[1].
Here’s the equation used to get the analog value for a sample pair of inputs (0 and 1).
AI _ value = Input 0 − Input1
RIO-4710x:
Analog Inputs 0-7 have a voltage range of 0-5VDC. They have 12bit ADC (a resolution of approximately
1.22mV) with a 100k input impedance.
Depending on the hardware configuration, the AQ command behaves differently. (Check the ID command to
see what style of RIO hardware is installed.)
AQ
AQ 0,1
AQ 2,1
AQ 4,1
AQ 6,1
Differential Pairs
Input 0 & Input 1
Input 2 & Input 3
Input 4 & Input 5
Input 6 & Input 7
Table 1: Differential Analog Input Channels on RIO-4710x
RIO-4712x:
The default resolution for the RIO-4712x is 12bit with a 16bit option. The part number is RIO-4712x-16 for
the 16 bit version.
Input Impedance:
Single Ended:
Differential:
RIO-471x0
42k Ω
31k Ω
Chapter 4 I/O ● 47
Use the AQ command to specify the analog input range on the RIO-4712x.
AQ
AQ 0,1
AQ 1,2
AQ 2,3
AQ 3,4
Input Range
Set input 0 to have +/-5V input range
Set input 1 to have +/-10V input range
Set input 2 to have 0-5V input range
Set input 3 to have 0-10V input range
Table 2: Setting Input Ranges on RIO-4712x
On the RIO-4712x, the AQ command also allows the RIO to change the configuration from the default 8
single ended analog inputs to 4 differential analog inputs.
AQ
AQ 0,-1
AQ 2,-2
AQ 4,-3
AQ 6,-4
Differential Pairs
Input 0 & Input 1 and +/-5V input range
Input 2 & Input 3 and +/-10V input range
Input 4 & Input 5 and 0-5V input range
Input 6 & Input 7 and 0-10V input range
Table 3: Differential Analog Input Channels on RIO-4712x
RIO-472xx
The default resolution for the RIO-472xx is 12 bit with a 16 bit option. The part number is RIO-472xx-16 for
the 16 bit version.
Input Impedance (default 12 bit):
Single Ended:
100kΩ
Input Impedance (With +-10V option)
Single Ended:
Differential:
42k Ω
31k Ω
See the AQ command in the command reference for a full explanation.
48 Chapter 4 I/O
RIO-471x0
Analog Process Control Loop
A Process Control Loop allows closed loop control of a process or device. The RIO-471x0 has two
independent PID filters to provide process control of two devices simultaneously. The RIO-471x2 has a total
of 6 PID loops available and the RIO-472xx has 0 PID loops. The set of commands shown in the table below
are used to set the structure of the Process Control Loop.
Command
AF
AZ
KP
KD
KI
IL
DB
CL
PS
TE
AQ
DQ
Description
Analog Input for feedback
Analog Output for control
Proportional Gain
Derivative Gain
Integral Gain
Integrator Limit
Deadband
Control Loop Update Rate
Commanded Setpoint
Tell Error
Analog Input Range
Analog Output Range
To understand how a Process Control Loop works on the RIO, consider an example where it is desirable to
control the temperature of an oven. The key items needed to do this are a heater, a temperature sensor, the
oven itself, and a RIO unit to control the process. As shown in the diagram below, the heating element is
coupled to the “System” which in this case is the oven. The temperature sensor provides feedback to the RIO
in the form of an analog input. The RIO unit then compares the desired set-point (entered by the PS
command) with the temperature sensor. The difference between the two is called the error “E”. The error
goes through a PID digital filter and then through a Digital to Analog Converter (DAC) which outputs a
control voltage to the heater to close the loop.
RIO-47100
Temperature
Setpoint
(PS)
+
E
Σ
PID Digital
Filter
Kh
DAC
V
Heater
System
Τ
ADC
Ks
Feedback
(Volts)
RIO-471x0
Temperature
Sensor
Chapter 4 I/O ● 49
The example program below uses analog input 0 as the feedback from the temperature sensor and analog
output 0 as the control voltage to the heater. An update rate of 25msec was set using the CL command, but a
slower update rate could have been chosen due to the slow nature of temperature response. The PID values
entered were experimentally found to provide optimum results based on the system. The desired set-point
was chosen as 1V. A dead-band of 0.1V was added in order to prevent the system from responding to minor
disturbances of the sensor.
#PCL
CL 25; '25msec update rate
AF 0; 'analog input 0 as feedback
AZ 0; 'analog output 0 as control
KP 1; 'proportional gain to 1
KD 10; 'derivative gain to 10
KI 0.5; 'integral gain to 0.5
DB 0.1; 'deadband of 0.1V
PS 1.8; 'set-point at 1.8V
Note: When the Process Control Loop is enabled, the Analog output voltage is normalized to half of the total
voltage input. For instance, with a 0-5V analog input range such as the RIO-47100 – the voltage is
normalized to 2.5V. This allows the output to go below 2.5 to compensate for a negative error and above
2.5V to compensate for positive error.
The AQ and DQ must be set on the RIO-47120 to configure the Analog input and output ranges before the
process control loops are run and prior to setting AZ & AF. The range of the PS command is dependant on
the AQ command.
Pulse Counter Input
Digital input 3 (DI3) is a special purpose input that (when enabled) is used to count pulses coming in. To
enable the pulse counter, the PC command must be issued with the following syntax:
PCn
where
n=0 (default) input DI3 is a general purpose input
n=1 sets input DI3 to be a rising edge pulse counter (also clears the pulse counter)
n=-1 sets input DI3 to be a falling edge pulse counter (also clears the pulse counter)
n=? returns the status of the pulse counter (0 if disabled, 1 if enabled)
When the PC command is enabled, input DI3 will count high or low going edges. The operand _PC is used
to report back the number of pulses counted. The maximum frequency of the input is limited by the optocouplers to 1-2kHz. If a higher frequency is needed, please contact Galil.
Standard Options
-DIN
If ordered with the –DIN option the RIO has a DIN rail mount attached to the case. This option is valid for all
RIO-471xx controllers. It is not valid for the RIO-472xx family as the RIO-472xx comes in a DIN rail mount
by default.
50 Chapter 4 I/O
RIO-471x0
-NO DIN
This option is only valid with the RIO-472xx. This option removes the din rail clips. The unit will still be in a
plastic trey.
-08-15 SOURCE option
If a RIO-471xx is ordered with the -08-15 SOURCE option then outputs 8-15 are configured to source
current. They will be capable of 5-24VDC with 25mA of current in a sourcing configuration.
OP1A should be connected to the positive side of 5-24VDC external power supply.
OP1B should be connected to Ground on the external power supply.
OP1A and OP1B are the Output Power for Bank 1. The output can source up to 25mA of current. The device
should be connected between the digital output DO[15:8] and the return side of the power supply (OP1B).
When current is not flowing though the optocoupler (CB), the 10k resistor pulls-down the output pin to
OP1B. When current is flowing through the optocouple (SB), the digital output switches to the voltage
supplied by OP1A and is able to source 25mA of current, The bold connections in the schematic above are
external connections.
-16Bit
The -16 option specifies 16 bit resolution on the analog inputs and outputs. This option is valid on the RIO4712x only.
-422
This option allows the RIO to communicate via RS-422 instead of RS-232. It is only available on the RIO472xx as a standard option. If required on the RIO-471xx, please consult the factory.
Pin Number
Description
Pin Number
Description
1
RTS-
6
RTS+
2
TXD-
7
TXD+
3
RXD-
8
RXD+
4
CTS-
9
CTS+
5
GND
RIO-471x0
Chapter 4 I/O ● 51
52 Chapter 4 I/O
RIO-471x0
-0-7 or -8-15 SINK/SOURCE
These four options are only available on the RIO-472xx. By default the RIO-472xx has all 16 high power
outputs. These options allow either of the two banks of 8 outputs to be configured for low power sinking or
low power sourcing. For example, if output 0-7 need to be configured for low power sourcing the option
would be -0-7SOURCE. The circuits for low power sourcing and sinking will be the same as the circuits for
the low power outputs previously defined.
-HS
This option changes digital input 3 to a high speed digital input. It is only available on the RIO-472xx and
RIO-4712x as a standard option. With this option, the input becomes a TTL level input. It is activated by
connecting the input to the AGND terminal. The maximum frequency of pulses that can be captured is
increased to 3Mhz. If higher values are required, please consult factory.
-10V12-Bit
This option changes the analog inputs on the RIO-472xx to accept +-10V analog signals with 12 bit
resolution. The range of the analog inputs can be changed with the AQ command, similar to the RIO-4712x.
-10V16-Bit
This option changes the analog inputs on the RIO-472xx to accept +-10V analog signals with 16 bit
resolution. The range of the analog inputs can be changed with the AQ command, similar to the RIO-4712x.
RIO-471x0
Chapter 4 I/O ● 53
Chapter 5 Application Programming
Overview
The RIO provides a versatile programming language that allows users to customize the RIO board for their
particular application. Programs can be downloaded into the RIO memory, freeing up the host computer for
other tasks. However, the host computer can send commands to the RIO at any time, even while a program
is being executed.
In addition to commands that handle I/O, the RIO provides commands that allow it to make decisions. These
commands include conditional jumps, event triggers, and subroutines. For example, the command
JP#LOOP, n<10 causes a jump to the label #LOOP if the variable n is less than 10.
For greater programming flexibility, the RIO provides user-defined variables, arrays, and arithmetic
functions. The following sections in this chapter discuss all aspects of creating applications programs. The
RIO-47xx0 program memory size is 200 lines x 40 characters. The RIO 47xx2 increases the memory size to
a total of 400 lines x 40 characters.
Editing Programs
Use Galil software to enter programs in the Editor window. After downloading a program, use the XQ
command to execute the program. The RIO also has an internal editor that may be used to create and edit
programs in the RIOs memory. The internal editor is a rudimentary editor and is only recommended when
operating with Galil’s DOS utilities or through a simple RS-232 communication interface such as Windows
Hyperterminal. See the ED command in the Command Reference for more info.
Program Format
A RIO program consists of instructions combined to solve a programmable logic application. Action
instructions, such as setting and clearing I/O bits, are combined with Program Flow instructions to form the
complete program. Program Flow instructions evaluate real-time conditions, such as elapsed time or input
interrupts, and alter program flow accordingly.
A delimiter must separate each RIO instruction. Valid delimiters are the semicolon (;) or carriage return.
The semicolon is used to separate multiple instructions on a single program line where the maximum number
of characters on a line is 40 (including semicolons and spaces). A line continuation character ( ` ) (below the
~ on a standard keyboard) allows a command to be continued on the next line in the case that 40characters is
not enough for a single command (see example at the end of this section).
54 Chapter 5 Application Programming
RIO-471x0
Using Labels in Programs
All RIO programs must begin with a label and end with an End (EN) statement. Labels start with the number
(#) sign followed by a maximum of seven characters. The first character must be a letter; after that, numbers
are permitted. Spaces are not allowed.
The maximum number of labels that can be defined in the RIO-47xx0 is 62. The RIO-47xx2 increases this to
a total of 126 labels.
Valid labels:
#BASICIO
#SQUARE
#X1
#input1
Invalid labels:
#1Square
#123
#PROGRAMMING
(longer than 7 characters)
Special Labels
The RIO also has some special labels, which are used to define input interrupt subroutines and command
error subroutines. The following is a list of the automatic subroutines supported by the RIO. Sample
programs for these subroutines can be found in the section Automatic Subroutines for Monitoring Conditions.
#AUTO
#ININTn
#CMDERR
#TCPERR
Automatic Program Execution on power up
Label for Input Interrupt subroutine
Label for incorrect command subroutine
Ethernet communication error
#AUTO is a special label for automatic program execution. A program which has been saved into the
controller non-volatile memory using the BP (Burn Program) command can be automatically executed upon
power up or reset by beginning the program with the label #AUTO.
Commenting Programs
Using an Apostrophe to Comment
The RIO provides an apostrophe (‘) for commenting programs. This character allows the user to include up
to 39 characters on a single line after the apostrophe and can be used to include comments from the
programmer as in the following example:
#OUTPUT
‘ PROGRAM LABEL
SB1; CB2
‘Set Bit 1 and Clear Bit 2
EN; ‘END OF PROGRAM
Note: The NO command also works to comment programs. The inclusion of the apostrophe or NO
commands will require process time by the RIO board.
Using REM Statements with the Galil Terminal Software
When using Galil software to communicate with the RIO, REM, as in remark, statements may also be
included. ‘REM’ statements begin with the word ‘REM’ and may be followed by any comments that are on
RIO-471x0
Chapter 5 Application Programming ● 55
the same line. The Galil terminal software will remove these statements when the program is downloaded to
the RIO board. For example:
#OUTPUT
REM PROGRAM LABEL
SB1;CB2;
REM Set Bit 1 and Clear bit 2
EN
REM END OF PROGRAM
Since the REM statements will be removed when the program is downloaded to RIO, be sure to keep a copy
of the program with comments stored on the PC.
Program Lines Greater than 40 Characters
Line Continuation Character
A new character ( ` ) {ascii character 96} has been included to allow a command in an application program to
extend beyond the confines of the 40 character maximum line length.
#TEST
IF((var100=100)& (var101=50));MG"Condi`
tion satisfied”;ELSE;MG”Stop”;ENDIF
EN
This allows for
a)
more efficient command compressing
b) the continuation of message commands (MG) on multiple lines.
c)
Longer IF, JP, & JS conditional statements
(Note: the total length of a multi-line command can not exceed 80 characters)
Lock Program Access using Password
The RIO can lock out user access to the internal program using the PW and {cntrl}L{cntrl}K commands.
The PW sets the Password for the unit and the {cntrl}L{cntrl}K will lock the application program from being
viewed or edited . The commands ED, UL, LS and TR will give privilege error #106 when the RIO is in a
locked state. The program will still run when locked. The locked or unlocked state can be burned with the
BN command. Once the program is unlocked, it remains accessible until a lock command or a reset (with
the locked condition burned in) occurs. An example of how to lock the program is shown here:
:PW test, test
:^L^K test,1
1 locks, 0 unlocks
:LS
?
TC1
106 Privilege violation
56 Chapter 5 Application Programming
RIO-471x0
Executing Programs - Multitasking
The RIO can run up to 4 independent programs or threads simultaneously. They are numbered 0 thru 3,
where 0 is the main thread.
The main thread differs from the others in the following ways:
1. Only the main thread, thread 0, may use the input command, IN.
2. When interrupts are implemented for command errors, the subroutines are executed in thread 0. However
for the #ININTn subroutines, the RIO has the ability to execute multiple input interrupts (#ININTn) on
designated threads, not limited to the main thread. For more information, refer to the II command in the
Command Reference.
To begin execution of the various programs, use the following instruction:
XQ #A,n
Where A represents the label and n indicates the thread number. To halt the execution of any thread, use the
instruction
HX n
where n is the thread number.
Note that both the XQ and HX commands can be performed from within an executing program.
For example:
Instruction
#TASK1
AT0
CB1
#LOOP1
AT 10
SB1
AT -40
CB1
JP #LOOP1
#TASK2
XQ #TASK1,1
#LOOP2
WT20000
HX1
MG”DONE”
EN
Interpretation
Task1 label
Initialize reference time
Clear Output 1
Loop1 label
Wait 10 msec from reference time
Set Output 1
Wait 40 msec from reference time, then initialize reference
Clear Output 1
Repeat Loop1
Task2 label
Execute Task1
Loop2 label
Wait for 20 seconds
Stop thread 1
Print Message
End of Program
The program above is executed with the instruction XQ #TASK2,0 which designates TASK2 as the main
thread (i.e. Thread 0). #TASK1 is executed within TASK2.
RIO-471x0
Chapter 5 Application Programming ● 57
Debugging Programs
The RIO provides commands and operands that are useful in debugging application programs. These
commands include interrogation commands to monitor program execution, determine the state of the RIO
board and the contents of the program, array, and variable space. Operands also contain important status
information, which can help to debug a program.
Trace Commands
The trace command causes the RIO to send each line in a program to the host computer immediately prior to
execution. Tracing is enabled with the command, TR1. TR0 turns the trace function off. Note: When the
trace function is enabled, the line numbers as well as the command line will be displayed as each command
line is executed. The program lines come back as unsolicited messages.
Error Code Command
When a program error occurs, the RIO halts the program execution at the point of the error. To display the
last line number of program execution, issue the command, MG _ED.
The user can obtain information about the type of error condition that occurred by using the command TC1.
This command returns a number and text message, which describe the error condition. The command TC0
(or TC) will return the error code without the text message. For more information about the command TC,
see the Command Reference.
RAM Memory Interrogation Commands
For debugging the status of the program memory, array memory, or variable memory, the RIO has several
useful commands. The command DM ? will return the number of array elements currently available. The
command DA? will return the number of arrays that can be currently defined. For example, the RIO has a
maximum of 400 array elements in up to 6 arrays. If a single array of 100 elements is defined, the command
DM ? will return the value 250, and the command DA ? will return 5.
To list the contents of the variable space, use the interrogation command LV (List Variables). To list the
contents of array space, use the interrogation command LA (List Arrays). To list the contents of the program
space, use the interrogation command LS (List Program). To list the application program labels only, use the
interrogation command LL (List Labels).
Operands
In general, all operands provide information that may be useful in debugging an application program. Below
is a list of operands that are particularly valuable for program debugging. To display the value of an operand,
the message command may be used. For example, since the operand, _ED, contains the last line of program
execution, the command MG _ED will display this line number.
_ED contains the last line of program execution (useful to determine where program stopped)
_DL contains the number of available labels (62 max.)
_UL contains the number of available variables (126 max.)
_DA contains the number of available arrays (6 max.)
_DM contains the number of available array elements (400 max.)
58 Chapter 5 Application Programming
RIO-471x0
Debugging Example:
The following program has an error. It attempts to set bit 14 high, but “SD” is used as the command instead
of “SB”. When the program is executed, the RIO stops at line 001. The user can then query the RIO board
using the command, TC1. The RIO responds with the corresponding explanation:
Instruction
:LS
000 #A
001 SD14
002 SB15
003 MG”DONE”
004 EN
:XQ #A
?001 SD14
:TC1
130 Unrecognized Command
:MG_ED
1.00
Interpretation
List Program
Program Label
Set bit 14 high
Set bit 15 high
Print message
End
Execute #A
Error on Line 1
Tell Error Code
This command doesn’t
Print line number where problem occurred
The error occurred on line 1 of the program
Program Flow Commands
The RIO provides instructions to control program flow. The RIO program sequencer normally executes
program instructions sequentially. The program flow can be altered with the use of interrupts and conditional
jump statements.
Interrupts
To function independently from the host computer, the RIO can be programmed to make decisions based on
the occurrence of an input interrupt, causing the RIO board to wait for multiple inputs to change their logic
levels before jumping into a corresponding subroutine. Normally, in the case of a Galil controller, when an
interrupt occurs, the main thread will be halted. However, in the RIO, the user can indicate in which thread
(the thread must be already running when the interrupt occurs) the interrupt subroutine is to be run. When
the interrupt occurs, the specified thread’s main program will be paused to allow the interrupt subroutine to
be executed. Therefore, the user has the choice of interrupting a particular thread execution upon an input
interrupt (see II command). The input interrupt routines are specified using #ININTn where n can be 0-3. In
this way, the RIO can make decisions based on its own I/O status without intervention from a host computer.
The Return from Interrupt (RI) command is used to return from this subroutine to the place in the program
where the interrupt had occurred. If it is desired to return to somewhere else in the program after the
execution of the #ININTn subroutine, the Zero Stack (ZS) command is used, followed by unconditional jump
statements.
Note: When using multiple II commands in a program, each II command must point to a unique label and
must activate on an unused thread. Two or more II commands cannot be set to execute on the same thread,
nor can multiple II commands be pointed to the same #ININTn label. Please see the II command in the RIO47xxx command reference for more details.
RIO-471x0
Chapter 5 Application Programming ● 59
Examples:
Interrupt
Instruction
#A
XQ#B,1
II1,0,-1&3
II2,1,-5&10
AI 13&14
#LOOP;JP#LOOP
EN
#B
AI 7&-8
#LOOP2
SB10
WT500
CB10
WT500
JP#LOOP2
EN
#ININT1
MG”Loop stops”
RI0
#ININT2
MG”Blinker stops”
WT10000
RI1,1
Interpretation
Program Label
Execute #B in thread 1
#ININT1 in thread 0 when input 1 low and input 3 high
#ININT2 in thread 1 when input 5 low and input 10 high
Trippoint on inputs 13 and 14
Pseudo program – Loop indefinitely
End program
Program Label
Trippoint on inputs 7 and 8
Set bit 10 high
Wait for half a second
Set bit 10 low
Wait for 500msec
Create a ‘light-blinker’ effect
End program
Input interrupt program label
Print message, saying loop program in main thread halted
Return to main program without restoring trippoint, but keeping the
interrupt enabled
Print message, saying blinker effect in thread 1 halted, since #ININT2
runs in thread 1
Wait 10 seconds for user to reset inputs 5 and 10
Return to thread 1’s main program (blinker continues) while restoring
trippoint on inputs 5 and 10; interrupt disabled
Note: This multitasking program can be executed with the instruction XQ #A,0 designating A as the main
thread (i.e. Thread 0). #B is executed within A.
Event Trigger
This example waits for input 1 to go low and input 3 to go high, and then execute the TZ interrogation
command. Note: The AI command actually halts execution of the program until the input occurs. If you do
not want to halt the program sequences, use the Input Interrupt function (II) or a conditional jump on an
input, such as:
JP #GO,(@IN[1] = 0) | (@IN[3] = 1).
Instruction
#INPUT
AI-1&3
TZ
EN
Interpretation
Program Label
Wait for input 1 low and input 3 high
List the entire I/O status
End program
60 Chapter 5 Application Programming
RIO-471x0
Conditional Jumps
The RIO provides Conditional Jump (JP) and Conditional Jump to Subroutine (JS) instructions for branching
to a new program location based on a specified condition. The conditional jump determines if a condition is
satisfied and then branches to a new location or subroutine. Unlike event triggers such as the AI command,
the conditional jump instruction does not halt the program sequence. Conditional jumps are useful for testing
events in real-time. They allow the RIO to make decisions without a host computer.
Command Format - JP and JS
Format
Description
JS destination, logical condition
JP destination, logical condition
Jump to subroutine if logical condition is satisfied
Jump to location if logical condition is satisfied
The destination is a program line number or label where the program sequencer will jump if the specified
condition is satisfied. Note that the line number of the first line of program memory is 0. The comma
designates "IF". The logical condition tests two operands with logical operators.
RIO-471x0
Chapter 5 Application Programming ● 61
Logical operators:
Operator
Description
<
>
=
<=
>=
<>
less than
greater than
equal to
less than or equal to
greater than or equal to
not equal
Conditional Statements
The conditional statement is satisfied if it evaluates to any value other than zero. The conditional statement
can be any valid RIO numeric operand, including variables, array elements, numeric values, functions,
keywords, and arithmetic expressions. If no conditional statement is given, the jump will always occur.
Examples:
Number
Numeric Expression
Array Element
Variable
Internal Variable
I/O
V1=6
V1=V7*6
@ABS[V1]>10
V1<Count[2]
V1<V2
_TI1=255
_DM<100
V1>@IN[2]
@IN[1]=0
Multiple Conditional Statements
The RIO will accept multiple conditions in a single jump statement. The conditional statements are
combined in pairs using the operands “&” and “|”. The “&” operand between any two conditions, requires
that both statements be true for the combined statement to be true. The “|” operand between any two
conditions requires that only one statement be true for the combined statement to be true.
Note: Each condition must be placed in parentheses for proper evaluation by the RIO. In addition, the RIO
executes operations from left to right.
For example, using variables named V1, V2, V3 and V4:
JP #TEST, (V1<V2) & (V3<V4)
In this example, this statement will cause the program to jump to the label #TEST if V1 is less than V2 and
V3 is less than V4. To illustrate this further, consider this same example with an additional condition:
JP #TEST, ((V1<V2) & (V3<V4)) | (V5<V6)
This statement will cause the program to jump to the label #TEST under two conditions: 1) If V1 is less than
V2 AND V3 is less than V4. OR 2) If V5 is less than V6.
Using the JP Command:
If the condition for the JP command is satisfied, the RIO branches to the specified label or line number and
continues executing commands from this point. If the condition is not satisfied, the RIO board continues to
execute the next commands in sequence.
62 Chapter 5 Application Programming
RIO-471x0
Instruction
JP #Loop,COUNT<10
JS #MOVE2,@IN[1]=1
Interpretation
Jump to #Loop if the variable, COUNT, is less than 10
Jump to subroutine #MOVE2 if input 1 is logic level high. After
the subroutine MOVE2 is executed, the program sequencer returns
to the main program location where the subroutine was called.
Jump to #BLUE if the absolute value of variable, V2, is greater
than 2
Jump to #C if the value of V1 times V7 is less than or equal to the
value of V8*V2
Jump to #A
JP #BLUE,@ABS[V2]>2
JP #C,V1*V7<=V8*V2
JP#A
Using If, Else, and Endif Commands
The RIO provides a structured approach to conditional statements using IF, ELSE and ENDIF commands.
Using the IF and ENDIF Commands
An IF conditional statement is formed by the combination of an IF and ENDIF command. The IF command
has arguments of one or more conditional statements. If the conditional statement(s) evaluates true, the
command interpreter will continue executing commands which follow the IF command. If the conditional
statement evaluates false, the RIO will ignore commands until the associated ENDIF command is executed
OR an ELSE command occurs in the program (see discussion of ELSE command below).
Note: An ENDIF command must always be executed for every IF command that has been executed.
Using the ELSE Command
The ELSE command is an optional part of an IF conditional statement and allows for the execution of
commands only when the argument of the IF command evaluates False. The ELSE command must occur
after an IF command and has no arguments. If the argument of the IF command evaluates false, the RIO will
skip commands until the ELSE command. If the argument for the IF command evaluates true, the RIO board
will execute the commands between the IF and ELSE commands.
Nesting IF Conditional Statements
The RIO allows for IF conditional statements to be included within other IF conditional statements. This
technique is known as 'nesting' and the RIO allows up to 255 IF conditional statements to be nested. This is a
very powerful technique allowing the user to specify a variety of different cases for branching.
Command Format - IF, ELSE and ENDIF
Function
Condition
IF conditional statement(s)
Execute commands proceeding IF command (up to ELSE command)
if conditional statement(s) is true, otherwise continue executing at
ENDIF command or optional ELSE command.
Optional command. Allows for commands to be executed when
argument of IF command evaluates not true. Can only be used with
IF command.
Command to end IF conditional statement. Program must have an
ENDIF command for every IF command.
ELSE
ENDIF
Example using IF, ELSE and ENDIF:
Instruction
#TEST
RIO-471x0
Interpretation
Begin Main Program "TEST"
Chapter 5 Application Programming ● 63
#LOOP
TEMP=@IN[1]|@IN[2]
JS#COND, TEMP=1
JP#LOOP
EN
#COND
IF (@IN[1]=0)
IF (@IN[2]=0)
MG "INPUT 1 AND INPUT 2 ARE
INACTIVE"
ELSE
MG "ONLY INPUT 1 IS ACTIVE”
ENDIF
ELSE
MG"ONLY INPUT 2 IS ACTIVE"
ENDIF
#WAIT
JP#WAIT,(@IN[1]=0) & (@IN[2]=0)
EN
Begin loop inside main program
TEMP is equal to 1 if either Input 1 or Input 2 is high
Jump to subroutine if TEMP equals 1
Loop back if TEMP doesn’t equal 1
End of main program
Begin subroutine “COND”
IF conditional statement based on input 1
2nd IF conditional statement executed if 1st IF
conditional true
Message to be executed if 2nd IF conditional is true
ELSE command for 2nd IF conditional statement
Message to be executed if 2nd IF conditional is false
End of 2nd conditional statement
ELSE command for 1st IF conditional statement
Message to be executed if 1st IF conditional statement
End of 1st conditional statement
Label to be used for a loop
Loop until both input 1 and input 2 are not active
End of subroutine
Stack Manipulation
It is possible to manipulate the subroutine stack by using the ZS command. Every time a JS instruction,
interrupt or automatic routine (such as #ININTn or #CMDERR) is executed, the subroutine stack is
incremented by 1 (up to a maximum of 16). Normally the stack is restored with an EN instruction.
Occasionally it is desirable not to return back to the program line where the subroutine or interrupt was
called. The ZS1 command clears 1 level of the stack. This allows the program sequencer to continue to the
next line. The ZS0 command resets the stack to its initial value. For example, if an interrupt occurs and the
#ININT1 routine is executed, it may be desirable to restart the program sequence instead of returning to the
location where the interrupt occurred. To do this, give a ZS (ZS0) command at the end of the #ININT1
routine.
Auto-Start Routine
The RIO has a special label for automatic program execution. A program that has been saved into the RIO
non-volatile memory can be automatically executed upon power up or reset, simply by beginning the
program with the label #AUTO.
Note: The program must be saved into non-volatile memory using the command, BP.
Automatic Subroutines for Monitoring Conditions
Often it is desirable to monitor certain conditions continuously without tying up the host or RIO program
sequences. The RIO can monitor several important conditions in the background. These conditions include
checking for the occurrence of a defined input, position error, a command error, or an Ethernet
communication error. Automatic monitoring is enabled by inserting a special, predefined label in the
applications program. The pre-defined labels are:
SUBROUTINE
DESCRIPTION
#AUTO
#AUTOERR
#ININTn
Automatic Program Execution on power up
Automatic Program Execution on power up if error condition occurs
Input specified by II goes low (n from 0 to 3)
64 Chapter 5 Application Programming
RIO-471x0
#CMDERR
#TCPERR
#COMINT
Bad command given
Ethernet communication error
Communication Interrupt Routine
For example, the #ININT label could be used to designate an input interrupt subroutine. When the specified
input occurs, the program will be executed automatically.
NOTE: An application program must be running for automatic monitoring to function.
Example - Input Interrupt
Instruction
#A
II0,0,1
#LOOP;JP#LOOP;EN
#ININT0
MG “INPUT 1 IS HIGH”
RI0
Interpretation
Label
Input Interrupt on 1
Loop
Input Interrupt
Send Message to screen
Return from interrupt routine to Main Program and
do not re-enable trippoints
Example - Command Error
Instruction
#BEGIN
IN "ENTER THE OUTPUT (0-15)", OUT
SB OUT
JP #BEGIN
EN
#CMDERR
JP#DONE,_ED<>3
JP#DONE,_TC<>6
MG "VALUE OUT OF RANGE"
MG "TRY AGAIN"
ZS1
JP #BEGIN
#DONE
ZS0
EN
Interpretation
Begin main program
Prompt for output number
Set the specified bit
Repeat
End main program
Command error utility
Check if error on line 3
Check if out of range
Send message
Send message
Adjust stack
Return to main program
End program if other error
Zero stack
End program
The above program prompts the operator to enter the output port to set. If the operator enters a number out
of range (greater than 15), the #CMDERR routine will be executed prompting the operator to enter a new
number.
In multitasking applications, there is an alternate method for handling command errors from different
threads. Using the XQ command along with the special operands described below allows the controller to
either skip or retry invalid commands.
OPERAND
FUNCTION
_ED1
_ED2
_ED3
Returns the number of the thread that generated an error
Retry failed command (operand contains the location of the failed command)
Skip failed command (operand contains the location of the command after the
failed command)
RIO-471x0
Chapter 5 Application Programming ● 65
The operands are used with the XQ command in the following format:
XQ _ED2 (or _ED3),_ED1,1
Where the “,1” at the end of the command line indicates a restart; therefore, the existing program stack will
not be removed when the above format executes.
The following example shows an error correction routine that uses the operands.
Example - Command Error w/Multitasking
Instruction
#A
JP#A
EN
#B
N=17
SB N
TY
EN
#CMDERR
IF _TC=6
N=1
XQ _ED2,_ED1,1
ENDIF
IF _TC=1
XQ _ED3,_ED1,1
ENDIF
EN
Interpretation
Begin thread 0 (continuous loop)
End of thread 0
Begin thread 1
Create new variable
Set the 17th bit, an invalid value
Issue invalid command
End of thread 1
Begin command error subroutine
If error is out of range (SB 8)
Set N to a valid number
Retry SB N command
If error is invalid command (TY)
Skip invalid command
End of command error routine
Example – Ethernet Communication Error
This simple program executes in the RIO and indicates (via the serial port) when a communication handle
fails. By monitoring the serial port, the user can re-establish communication if needed.
Instruction
Interpretation
#LOOP
Simple program loop
JP#LOOP
EN
#TCPERR
Ethernet communication error auto routine
MG {P1}_IA4
Send message to serial port indicating which handle did not receive proper
acknowledgment.
RE
Return to main program
Note: The #TCPERR routine only detects the loss of TCP/IP Ethernet handles, not UDP.
66 Chapter 5 Application Programming
RIO-471x0
Mathematical and Functional Expressions
Mathematical Operators
For manipulation of data, the RIO provides the use of the following mathematical operators:
Operator
Function
+
*
/
&
|
()
%
Addition
Subtraction
Multiplication
Division
Logical And (Bit-wise)
Logical Or (On some computers, a solid vertical line appears as a broken line)
Parenthesis
Modulus
The numeric range for addition, subtraction and multiplication operations is +/-2,147,483,647.9999. The
precision for division is 1/65,000.
Mathematical operations are executed from left to right. Calculations within parentheses have precedence.
Examples:
SPEED=7.5*V1/2
COUNT=COUNT+2
RESULT=Val1 (@COS[45]*40)
K=@IN[1]&@IN[2]
The variable, SPEED, is equal to 7.5 multiplied by V1 and divided
by 2
The variable, COUNT, is equal to the current value plus 2.
Puts the value of Val1 - 28.28 in RESULT. 40 * cosine of 45° is
28.28
K is equal to 1 only if Input 1 and Input 2 are high
Note: Mathematical operations can be done in hexadecimal as well as decimal. Just precede hexadecimal
numbers with a $ sign so that the RIO recognizes them as such.
Bit-Wise Operators
The mathematical operators & and | are bit-wise operators. The operator, &, is a Logical And. The operator,
|, is a Logical Or. These operators allow for bit-wise operations on any valid RIO numeric operand,
including variables, array elements, numeric values, functions, keywords, and arithmetic expressions. The
bit-wise operators may also be used with strings. This is useful for separating characters from an input
string. When using the input command for string input, the input variable will hold up to 6 characters. These
characters are combined into a single value, which is represented as 32 bits of integer and 16 bits of fraction.
Each ASCII character is represented as one byte (8 bits), therefore the input variable can hold up to six
characters. The first character of the string will be placed in the top byte of the variable and the last character
will be placed in the lowest significant byte of the fraction. The characters can be individually separated, by
using bit-wise operations as illustrated in the following example:
Instruction
RIO-471x0
Interpretation
Chapter 5 Application Programming ● 67
#TEST
IN "ENTER",LEN{S6}
FLEN=@FRAC[LEN]
FLEN=$10000*FLEN
LEN1=(FLEN&$00FF)
LEN2=(FLEN&$FF00)/$100
LEN3=LEN&$000000FF
LEN4=(LEN&$0000FF00)/$100
LEN5=(LEN&$00FF0000)/$1000
0
LEN6=(LEN&$FF000000)/$1000
000
MG LEN6 {S4}
MG LEN5 {S4}
MG LEN4 {S4}
MG LEN3 {S4}
MG LEN2 {S4}
MG LEN1 {S4}
EN
Begin main program
Input character string of up to 6 characters into variable
‘LEN’
Define variable ‘FLEN’ as fractional part of variable
‘LEN’
Shift FLEN by 32 bits (IE - convert fraction, FLEN, to
integer)
Mask top byte of FLEN and set this value to variable
‘LEN1’
Let variable, ‘LEN2’ = top byte of FLEN
Let variable, ‘LEN3’ = bottom byte of LEN
Let variable, ‘LEN4’ = second byte of LEN
Let variable, ‘LEN5’ = third byte of LEN
Let variable, ‘LEN6’ = fourth byte of LEN
Display ‘LEN6’ as string message of up to 4 chars
Display ‘LEN5’ as string message of up to 4 chars
Display ‘LEN4’ as string message of up to 4 chars
Display ‘LEN3’ as string message of up to 4 chars
Display ‘LEN2’ as string message of up to 4 chars
Display ‘LEN1’ as string message of up to 4 chars
This program will accept a string input of up to 6 characters, parse each character, and then display each
character. Notice also that the values used for masking are represented in hexadecimal (as denoted by the
preceding ‘$’). For more information, see the section on Sending Messages (page 74).
To illustrate further, if the user types in the string “TESTME” at the input prompt, the RIO will respond with
the following:
T
E
S
T
M
E
Response from command MG LEN6 {S4}
Response from command MG LEN5 {S4}
Response from command MG LEN4 {S4}
Response from command MG LEN3 {S4}
Response from command MG LEN2 {S4}
Response from command MG LEN1 {S4}
Functions
Function
Description
@SIN[n]
@COS[n]
@TAN[n]
@ASIN*[n]
@ACOS* [n]
@ATAN* [n]
@COM[n]
@ABS[n]
@FRAC[n]
@INT[n]
@RND[n]
@SQR[n]
Sine of n (n in degrees, with range of -32768 to 32767 and 16-bit fractional resolution)
Cosine of n (n in degrees, with range of -32768 to 32767 and 16-bit fractional resolution)
Tangent of n (n in degrees, with range of -32768 to 32767 and 16-bit fractional resolution)
Arc Sine of n, between -90° and +90°. Angle resolution in 1/64000 degrees.
Arc Cosine of n, between 0 and 180°. Angle resolution in 1/64000 degrees.
Arc Tangent of n, between -90° and +90°. Angle resolution in 1/64000 degrees
1’s Complement of n
Absolute value of n
Fraction portion of n
Integer portion of n
Round of n (Rounds up if the fractional part of n is .5 or greater)
Square root of n (Accuracy is +/-.004)
68 Chapter 5 Application Programming
RIO-471x0
@IN[n]
@OUT[n]
@AN[n]
@AO[n]
Return digital input at general input n (where n starts at 0)
Return digital output at general output n (where n starts at 0)
Return analog input at general input n (where n starts at 0)
Return analog output at general output n (where n starts at 0)
*Note: These functions are multi-valued. An application program may be used to find the correct band.
Functions may be combined with mathematical expressions. The order of execution of mathematical
expressions is from left to right and can be over-ridden by using parentheses.
Examples:
V1=@ABS[V7]
V2=5*@SIN[POS]
V3=@IN[1]
The variable, V1, is equal to the absolute value of variable V7.
The variable, V2, is equal to five times the sine of the variable, POS.
The variable, V3, is equal to the digital value of input 1.
Variables
For applications that require a parameter that is variable, the RIO-47xx0 board provides 126 variables. The
RIO-47xx2 increases this to 254 total available variables. These variables can be numbers or strings. A
program can be written in which certain parameters, such as I/O status or particular I/O bit, are defined as
variables. The variables can later be assigned by the operator or determined by program calculations.
Example:
SB Red
input1=_@IN[1]
Uses variable “Red” in SB command
Assigns value of digital input 1 status to variable “input1”
Programmable Variables
The RIO allows the user to create up to 126 variables. Each variable is defined by a name, which can be up
to eight characters. The name must start with an alphabetic character, however, and numbers are permitted in
the rest of the name. Spaces are not permitted. Variable names should not be the same as RIO instructions.
For example, RS is not a good choice for a variable name.
Examples of valid and invalid variable names are:
Valid Variable Names
STATUS1
TEMP1
POINT
Invalid Variable Names
REALLONGNAME
; Cannot have more than 8 characters
123
; Cannot begin variable name with a number
STAT Z
; Cannot have spaces in the name
RIO-471x0
Chapter 5 Application Programming ● 69
Assigning Values to Variables:
Assigned values can be numbers, internal variables and keywords, functions, RIO board parameters and
strings; the range for numeric variable values is 4 bytes of integer (231) followed by two bytes of fraction (+/2,147,483,647.9999).
Numeric values can be assigned to programmable variables using the equal sign.
Any valid RIO functions can be used to assign a value to a variable. For example, s1=@ABS[V2] or
s2=@IN[1]. Arithmetic operations are also permitted.
To assign a string value, the string must be in quotations. String variables can contain up to six characters
that must be in quotation.
Examples:
INTWO=_TI2
INPUT=@IN[1]
V2=V1+V3*V4
Var="CAT"
Assigns returned value from TI2 command to variable INTWO.
Assigns logical value of input 1 to variable INPUT
Assigns the value of V1 plus V3 times V4 to the variable V2.
Assign the string CAT to variable Var
Displaying the value of variables at the terminal
Variables may be sent to the screen using the format, variable=. For example, V1= , returns the value of the
variable V1. V1=? or MG V1 are also valid ways of displaying a variable.
Operands
Operands allow status parameters of the RIO to be incorporated into programmable variables and
expressions. Most RIO commands have an equivalent operand - which are designated by adding an
underscore (_) prior to the command (see command reference).
Examples of Internal Variables:
IN1=@IN[1]
JP #LOOP,@AN[0]<2
JP #ERROR,_TC=1
Assigns value of input 1 to the variable IN1.
Jump to #LOOP if analog input 0 is less than 2
Jump to #ERROR if the error code equals 1.
Operands can be used in an expression and assigned to a programmable variable, but they cannot be assigned
a value. For example: _TI0=1 is invalid.
Special Operands (Keywords)
The RIO provides a few additional operands that give access to internal variables that are not accessible by
standard RIO commands.
Operand
Function
_BN
_DA
_DL
*Returns serial # of the board.
*Returns the number of arrays available
*Returns the number of available labels for programming
70 Chapter 5 Application Programming
RIO-471x0
_DM
_UL
TIME
*Returns the available array memory
*Returns the number of available variables
Free-Running Real Time Clock (Resets with power-on).
Note: TIME does not use an underscore character (_) as other keywords.
*Note: All these keywords have corresponding commands except for TIME.
Examples of Keywords:
V1=_DA
V3=TIME
Assign V1 the number of available array names
Assign V3 the current value of the time clock
Arrays
For storing and collecting numerical data, the RIO-47xx0 provides array space for 400 elements. This
number is increased to 1000 array elements on the RIO-47xx2. The arrays are one-dimensional, and up to 6
different arrays may be defined. Each array element has a numeric range of 4 bytes of integer (231) followed
by two bytes of fraction (+/-2,147,483,647.9999). Arrays can be used to capture real-time data, such as the
bit status of a particular I/O bank.
Defining Arrays
An array is defined with the command DM. The user must specify a name and the number of entries to be
held in the array. An array name can contain up to eight characters, starting with an uppercase alphabetic
character. The number of entries in the defined array is enclosed in [ ].
Example:
DM IOSTAT[100]
DA *[]
Defines an array names IOSTAT with 100 entries
Frees array space using Deallocate command
Assignment of Array Entries
Like variables, each array element can be assigned a value. Assigned values can be numbers or returned
values from instructions, functions and keywords.
Array elements are addressed starting at count 0. For example, the first element in the OUTPUT array
(defined with the DM command, DM OUTPUT[7]) would be specified as OUTPUT[0].
Values are assigned to array entries using the equal sign. Assignments are made one element at a time by
specifying the element number with the associated array name.
NOTE: Arrays must be defined using the command, DM, before assigning entry values.
Examples:
DM OUTPUT[10]
OUTPUT[1]=3
OUTPUT[1]=
OUTPUT[9]=_TI0
data [2]=@COS[POS]*2
RIO-471x0
Dimension Output Array
Assigns the second element of the array, OUTPUT, the value of
3.
Returns array element value
Assigns the 10th element of the array, OUTPUT, the value for
bank 0 digital inputs
Assigns the third element of the array “data” the cosine of the
variable POS multiplied by 2.
Chapter 5 Application Programming ● 71
TIMER[1]=TIME
Assigns the second element of the array timer the returned value
of the TIME keyword.
Using a Variable to Address Array Elements
An array element number can also be a variable. This allows array entries to be assigned sequentially using a
counter.
For example:
Instruction
#A
COUNT=0;DM POS[10]
#LOOP
WT 10
INPUT[COUNT]=_TI0
INPUT[COUNT]=
COUNT=COUNT+1
JP #LOOP,COUNT<10
EN
Interpretation
Begin Program
Initialize counter and define array
Begin loop
Wait 10 msec
Record bank 0’s input bit value into array element
Report input bit value
Increment counter
Loop until 10 elements have been stored
End Program
The above example records 10 input bit values for bank 0 at a rate of one value per 10 msec. The values are
stored in an array named INPUT. The variable, COUNT, is used to increment the array element counter.
The above example can also be executed with the automatic data capture feature described below.
Uploading and Downloading Arrays to On Board Memory
Arrays may be uploaded and downloaded using the QU and QD commands.
QU array[],start,end,delim
QD array[],start,end
where array is an array name such as A[].
Start is the first element of array (default=0)
End is the last element of array (default=last element)
Delim specifies whether the array data is separated by a comma (delim=1) or a carriage return (delim=0).
The file is terminated using <control>Z, <control>Q, <control>D or \.
Automatic Data Capture into Arrays
The RIO provides a special feature for automatic capture of data such as inputs or outputs. Up to four types
of data can be captured and stored in four arrays. The capture rate or time interval may be specified.
Recording can be done as a one-time event or as a circular continuous recording.
Command Summary - Automatic Data Capture
Command
Description
RA n[],m[],o[],p[]
Selects up to four arrays for data capture. The arrays must be defined
with the DM command.
72 Chapter 5 Application Programming
RIO-471x0
RD
type1,type2,type3,type4
RC n,m
RC?
Selects the type of data to be recorded, where type1, type2, type3, and
type 4 represent the various types of data (see table below). The order of
data type is important and corresponds with the order of n,m,o,p arrays
in the RA command.
The RC command begins data collection. Sets data capture time interval
where n is an integer between 1 and 8 and designates 2n msec between
data. m is optional and specifies the number of elements to be captured.
If m is not defined, the number of elements defaults to the smallest array
defined by DM. When m is a negative number, the recording is done
continuously in a circular manner. _RD is the recording pointer and
indicates the address of the next array element. n=0 stops recording.
Returns a 0 or 1 where, 0 denotes not recording, 1 specifies recording in
progress
Data Types for Recording:
Data type
Description
_TIn
_OPn
_AFn
_AOn
Inputs at bank n (0 or 1)
Output bank n status (0 or 1)
Analog input status (0-7)
Analog output status (0-7)
Operand Summary - Automatic Data Capture
_RC
_RD
Returns a 0 or 1 where, 0 denotes not recording, 1 specifies recording in
progress
Returns address of next array element.
Deallocating Array Space
Array space may be deallocated using the DA command followed by the array name. DA*[0] deallocates all
the arrays.
RIO-471x0
Chapter 5 Application Programming ● 73
Input of Data (Numeric and String)
Input of Data
The command, IN, is used to prompt the user to input numeric or string data. Using the IN command, the
user may specify a message prompt by placing a message in quotations. When the RIO executes an IN
command, it will wait for the input of data. The input data is assigned to the specified variable or array
element.
Note: The IN command is only valid when communicating through RS232. This command will not work
through the Ethernet.
An Example for Inputting Numeric Data
#A
IN "Enter output number", OUT
EN
In this example, the message “Enter output number” is displayed on the computer screen. The RIO board
waits for the operator to enter a value. The operator enters the numeric value that is then assigned to the
variable, OUT.
Inputting String Variables
String variables with up to six characters may input using the specifier, {Sn} where n represents the number
of string characters to be input. If n is not specified, six characters will be accepted. For example, IN "Enter
X,Y or Z", V{S} specifies a string variable of up to six characters to be input.
Output of Data (Numeric and String)
Numerical and string data can be output from the RIO board using several methods. The message command,
MG, can output string and numerical data. Also, the RIO can be commanded to return the values of variables
and arrays, as well as other information using the interrogation commands, such as V1=? and TZ.
Sending Messages
Messages may be sent using the message command, MG. This command sends specified text and numerical
or string data from variables or arrays to the screen.
Text strings are specified in quotes and variable or array data is designated by the name of the variable or
array. For example:
MG "The Final Value is", RESULT
In addition to variables, functions and commands, responses can be used in the message command. For
example:
MG "The input is", @IN[1]
Formatting Messages
String variables can be formatted using the specifier, {Sn} where n is the number of characters, 1 thru 6. For
example:
MG STR {S3}
74 Chapter 5 Application Programming
RIO-471x0
This statement returns 3 characters of the string variable named STR.
Numeric data may be formatted using the {Fn.m} expression following the completed MG statement.
{$n.m} formats data in HEX instead of decimal. The actual numerical value will be formatted with n
characters to the left of the decimal and m characters to the right of the decimal. Leading zeros will be used
to display specified format.
For example:
MG "The Final Value is", RESULT {F5.2}
If the value of the variable RESULT is equal to 4.1, this statement returns the following:
The Final Value is 00004.10
If the value of the variable RESULT is equal to 999999.999, the above message statement returns the
following:
The Final Value is 99999.99
The message command normally sends a carriage return and line feed following the statement. The carriage
return and the line feed may be suppressed by sending {N} at the end of the statement. This is useful when a
text string needs to surround a numeric value.
Example:
#A
FNAME=“John”
LNAME=“Smith”
MG “The name is ”, FNAME{S3} {N}
MG “ ”,LNAME{S6}
EN
When #A is executed, the above example will appear on the screen as:
The name is John Smith
Using the MG Command to Configure Terminals
The MG command can be used to configure a terminal. Any ASCII character can be sent by using the format
{^n} where n is any integer between 1 and 255.
Example:
MG {^07} {^255}
sends the ASCII characters represented by 7 and 255 to the bus.
Summary of Message Functions:
Function
Description
""
{Fn.m}
Surrounds text string
Formats numeric values in decimal n digits to the right of the decimal
point and m digits to the left
Formats numeric values in hexadecimal
Sends ASCII character specified by integer n
Suppresses carriage return/line feed
Sends the first n characters of a string variable, where n is 1 thru 6.
{$n.m}
{^n}
{N}
{Sn}
RIO-471x0
Chapter 5 Application Programming ● 75
{Zn.m}
{En}
{P1}
{M}
Formats values like {Fn.m} except leading zeroes are removed
Outputs message to Ethernet handle n where n is A,B or C
Outputs message to Serial port
Sends Email message (see MA, MD, MS commands)
Displaying Variables and Arrays
Variables and arrays may be sent to the screen using the format, variable= or array[x]=. For example, V1=
, returns the value of V1.
Removing Leading Zeros from Response
The leading zeros on data returned as a response to interrogation commands or variables and arrays can be
removed by the use of the command, LZ. The default value for LZ is 1, meaning that the leading zeroes do
not get printed out unless LZ0 command is entered.
Example - Using the LZ command
LZ0
MG@IN[0]
0000000001.0000
Disables the LZ function
Print input status of bank 1
Response from Interrogation Command
(With Leading Zeros)
LZ1
MG@IN[0]
1.0000
Enables the LZ function
Print input status of bank 1
Response from Interrogation Command
(Without Leading Zeros)
Formatting Variables and Array Elements
The Variable Format (VF) command is used to format variables and array elements. The VF command is
specified by:
VF m.n
where m is the number of digits to the left of the decimal point (0 thru 10), and n is the number of digits to
the right of the decimal point (0 thru 4).
A negative sign for m specifies hexadecimal format. The default format for VF is VF 10.4
Hex values are returned preceded by a $ and in 2's complement.
:V1=10
:V1=
0000000010.0000
:VF2.2
:V1=
10.00
:VF-2.2
:V1=
$0A.00
:VF1
:V1=
9
Assign V1
Return V1
Default format
Change format
Return V1
New format
Specify hex format
Return V1
Hex value
Change format
Return V1
Overflow
76 Chapter 5 Application Programming
RIO-471x0
Local Formatting of Variables
VF command is a global format command that affects the format of all relevant returned values and
variables. Variables may also be formatted locally. To format locally, use the command, {Fn.m} or {$n.m}
following the variable name and the ‘=’ symbol. F specifies decimal and $ specifies hexadecimal. n is the
number of digits to the left of the decimal, and m is the number of digits to the right of the decimal. For
example:
Examples:
:V1=10
:V1=
0000000010.0000
:V1={F4.2}
0010.00
:V1={$4.2}
$000A.00
:V1="ALPHA"
:V1={S4}
ALPH
Assign V1
Return V1
Default Format
Specify local format
New format
Specify hex format
Hex value
Assign string "ALPHA" to V1
Specify string format first 4 characters
The local format is also used with the MG command (see page 75).
Programmable I/O
As described earlier, the RIO has 16 digital inputs, 16 digital outputs, 8 analog inputs and 8 analog outputs.
The paragraphs below describe the commands that are used for I/O manipulation and interrogation.
Digital Outputs
The most common method of changing the state of digital outputs is by using the set bit ‘SB’ and clear bit
‘CB’ commands. The following table shows an example of the SB and CB commands.
Instruction
SB2
CB1
Interpretation
Sets bit 2
Clears bit 1
The Output Bit (OB) instruction is useful for setting or clearing outputs depending on the value of a variable,
array, input or expression. Any non-zero value results in a set bit.
Instruction
OB1,POS
OB2,@IN [1]
OB3,@IN [1]&@IN [2]
OB2,COUNT [1]
Interpretation
Set Output 1 if the variable POS is non-zero. Clear Output 1 if
POS equals 0.
Set Output 2 if Input 1 is high. If Input 1 is low, clear Output 2.
Set Output 3 only if Input 1 and Input 2 are high.
Set Output 2 if element 1 in array COUNT is non-zero.
The output port can be set by specifying the OP (Output Port) command. This instruction allows a single
command to define the state of the entire output bank, where 20 is bit 0, 21 is bit 1 and so on. A 1 designates
that the output is on.
RIO-471x0
Chapter 5 Application Programming ● 77
For example:
Instruction
OP6
OP0,0
OP0,7
Interpretation
Sets bits 1 and 2 of bank 0 high. All other bits on bank 0 are 0. (21 + 22 = 6)
Clears all bits of bank 0 and 1
Sets output bits 0, 1 and 2 to one (20 + 21 + 22 ) on bank 1. Clears all bits on
bank 0.
The state of the digital outputs can be accessed with the @OUT[n] where n is the output number (Ex:
MG@OUT[1] displays the state of output number 1).
Digital Inputs
The digital inputs are accessed by using the @IN[n] function or the TI n command. The @IN[n] function
returns the logic level of a specified input, n, where ‘n’ is the input bit number. The IQ command determines
the active level of each input. The TI n command gives the input status of an entire bank, where ‘n’ is the
bank number, 0 or 1. The AI command is a trip-point that pauses program execution until the specified
combination of inputs is high or low.
Example – Using Inputs to control program flow
Instruction
JP #A,@IN[1]=0
MG@IN[2]
AI 7&-6
Instruction
Jump to A if input 1 is low
Display the state of input 2
Wait until input 7 is high and input 6 is low
Analog Inputs
Analog inputs are accessed with the @AN[n] function where n is the number assigned to the analog input
channel. The returned value will be a voltage reading with 12 bit resolution (16bit optional on RIO-47120).
The standard voltage range is 0 to +5VDC on the RIO-47100. The voltage input range is configurable on the
RIO-47120 using the AQ command.
Note: When analog input values are accessed from the Data Record or from the Record Array function, the
returned value will be an integer number that represents the analog voltage. For a RIO-47100, the equation
used to determine the decimal equivalent of the analog voltage is as follows:
N= (((V-Vlo)*4095)/(Vhi-Vlo))*8
Where N is the integer equivalent of the analog voltage, V is the expected analog voltage, Vlo is the lowest
voltage in the total range (0V for the standard analog input module) and Vhi is the highest voltage in the total
range (5V for the standard module). The data range for N is 0-32760.
These integer values will also be returned when accessing the analog inputs by the API calls in C/C++ or
Visual Basic.
The AQ command also configures the analog inputs to be either 8 single ended (default) or 4 differential
inputs.
The AA command is a trippoint that halts program execution until the specified voltage on an analog input is
reached. The third field of the AA command controls whether the trippoint will be satisfied when going
higher or lower than the voltage. With a command such as AA 1,4.5,0 - if the specified voltage is exceeded
prior to arrival at the AA command, the program will continue to execute without a pause. Analog inputs are
useful for reading special sensors such as temperature, tension or pressure. The range of AA is dependant on
the AQ setting. Here are some examples of using the Analog inputs:
Instruction
Instruction
78 Chapter 5 Application Programming
RIO-471x0
JP #C,@AN[1]>2
MG@AN[2]
AA 1,4.5,0
AA 1,3.2,1
Jump to A if analog input number 1 is greater than 2 volts
Display the analog voltage reading on input 2
Wait until the voltage on input 1 goes above 4.5V
Wait until the voltage on input 1 goes below 3.2V
Analog Outputs
Analog output voltage is set with the AO command. The AO command has the format AO m,n where m is
the output pin and n is the voltage assigned to it. The analog output voltage is accessed with the @AO[n]
function where n is the analog output channel. Analog output modules come with a resolution of 12 bits
(16bit optional). The standard voltage range is 0 to +5VDC for the RIO-47100. The Analog Output voltage
range is configurable using the DQ command when using the RIO-47120. Use the ID command to see the
model number of the RIO.
Note: When analog output values are accessed from the Data Record or from the Record Array function, the
returned value will be an integer number that represents the analog voltage. For a RIO-47100, the equation
used to determine the decimal equivalent of the analog voltage is as follows:
N= ((V-Vlo)*4095)/(Vhi-Vlo)
Where N is the integer equivalent of the analog voltage, V is the expected analog voltage, Vlo is the lowest
voltage in the total range (0V for the standard analog input module) and Vhi is the highest voltage in the total
range (5V for the standard module).
These integer values will also be returned when accessing the analog inputs by the API calls in C/C++ or
Visual Basic.
The AO command can also be used to set the analog voltage on ModBus devices over Ethernet
Instruction
AO 7,1.5
MG@AO[2]
RIO-471x0
Instruction
Set the output voltage on output 7 to 1.5V
Display the analog voltage reading on output 2
Chapter 5 Application Programming ● 79
Appendix
Electrical Specifications
Input/Output
Digital I/O
See Chapter 4.
DAC Output Current
4mA max output per channel
47120: +/-12V out
10mA max output
Power Requirements
18-36 VDC
Typical: 2.5 Watts
Max: 4 Watts
Performance Specifications
RIO-47xx0
Variable Range:
Variable Resolution:
Variable Size
Array Size:
Max Program Labels:
Program Size:
+/-2 billion
1 ⋅ 10-4
126 variables
400 elements, 6 array names
62
200 lines x 40 characters
Variable Range:
Variable Resolution:
Variable Size
Array Size:
Max Program Labels:
Program Size:
+/-2 billion
1 ⋅ 10-4
256 variables
1000 elements, 6 array names
126
400 lines x 40 characters
RIO-47xx2
80 Appendix
RIO-471x0
Certifications
The RIO-471xx is certified for the following when the product or package is marked.
ETL
CE
CE marked EMC Directive 2004/108/EC
ROHS
ROHS Compliant
Connectors on the RIO
44 pin D-Sub Connector – RIO-471xx
Pin
Label
Description
Pin
1
DI15
Digital Input 15
16
2
DI12
Digital Input 12
17
DI13
3
DI9
Digital Input 9
18
DI10
Digital Input 10
33
DI8
Digital Input 8
4
N/C
No Connect
19
INC1
Input Common DI[8-15]
34
N/C
No Connect / INC0B ¹
5
DI6
Digital Input 6
20
DI7
Digital Input 7
35
DI5
Digital Input 5
6
DI3
Digital Input 3
21
DI4
Digital Input 4
36
DI2
Digital Input 2
7
DI0
Digital Input 0
22
DI1
Digital Input 1
37
INC0
Input Common DI[0-7]
8
OP1B²
+5-24V Output Power
Supply for DO[8-15]²
23
N/C
No Connect
38
DO15
Digital Output 15
9
DO13
Digital Output 13
24
DO14
Digital Output 14
39
DO12
Digital Output 12
10
DO10
Digital Output 10
25
DO11
Digital Output 11
40
DO9
Digital Output 9
11
OP1A³
Output Power Ground
for DO[8-15]³
26
DO8
Digital Output 8
41
N/C
No Connect
12
DO7
Digital Output 7
27
OP0B
13
DO4
Digital Output 4
28
DO5
14
DO1
Digital Output 1
29
OP0A
+12-24V Output Power
Supply for DO[0-7]
15
30
Label
Description
Pin
Label
Description
No Connect / INC1B ¹
31
DI14
Digital Input 14
Digital Input 13
32
DI11
Digital Input 11
Output Power GROUND
for DO[0-7]
42
DO6
Digital Output 6
Digital Output 5
43
DO3
Digital Output 3
DO2
Digital Output 2
44
DO0
Digital Output 0
OP0A
+12-24V Output Power
Supply for DO[0-7]
¹Note: INC0B and INC1B are only valid when INC jumpers are used.
² When ordered with -08-15 SOURCE this pin will actually be Output Power Ground for DO[8-15]
³ When ordered with -08-15 SOURCE this pin will actually be +5-24V Output Power Supply for DO[8-15]
RIO-471x0
Appendix ● 81
26 pin D-Sub Connector – RIO-471xx
Pin
Label
Description
Pin
Label
Description
Pin
Label
1
Description
N/C
No Connect
10
N/C
No Connect
19
N/C
No Connect
2
N/C
+12V
47100: No Connect
47120: +12V out (10mA)
11
N/C
No Connect
20
N/C
-12V
47100: No Connect
47120: -12V out (10mA)
3
AI7
Analog Input 7
12
GND
Ground
21
AI6
Analog Input 6
4
AI4
Analog Input 4
13
AI5
Analog Input 5
22
AI3
Analog Input 3
5
AI1
Analog Input 1
14
AI2
Analog Input 2
23
AI0
Analog Input 0
6
GND
Ground
15
GND
Ground
24
AO7
Analog Output 7
7
AO5
Analog Output 5
16
AO6
Analog Output 6
25
AO4
Analog Output 4
8
AO2
Analog Output 2
17
AO3
Analog Output 3
26
AO1
Analog Output 1
9
GND
GND
18
AO0
Analog Output 0
Screw Terminals – RIO-472xx
Label
Description
Label
Description
18-36
18-16VDC logic power input
DI10
Digital Input 10
RET
Return side of logic power input
DI11
Digital Input 11
AGND
Analog Ground
DI12
Digital Input 12
AGND
Analog Ground
DI13
Digital Input 13
AI0
Analog Input 0
DI14
Digital Input 14
AI1
Analog Input 1
DI15
Digital Input 15
AI2
Analog Input 2
OP0A
+12-24V Output Power Supply for DO[0-7]
AI3
Analog Input 3
OP0B
Output Power GROUND for DO[0-7]
AI4
Analog Input 4
DO0
Digital Output 0
AI5
Analog Input 5
DO1
Digital Output 1
AI6
Analog Input 6
DO2
Digital Output 2
AI7
Analog Input 7
DO3
Digital Output 3
INC0A
Input common DI[0-7]
DO4
Digital Output 4
INC0B
No connect for standard configuration
DO5
Digital Output 5
DI0
Digital Input 0
DO6
Digital Output 6
DI1
Digital Input 1
DO7
Digital Output 7
DI2
Digital Input 2
OP1A
+12-24V Output Power Supply for DO[8-15]
DI3
Digital Input 3
OP1B
Output Power GROUND for DO[8-15]
DI4
Digital Input 4
DO8
Digital Output 8
DI5
Digital Input 5
DO9
Digital Output 9
DI6
Digital Input 6
DO10
Digital Output 10
DI7
Digital Input 7
DO11
Digital Output 11
INC1A
Input common DI[8-15]
DO12
Digital Output 12
INC1B
No connect for standard configuration
DO13
Digital Output 13
DI8
Digital Input 8
DO14
Digital Output 14
DI9
Digital Input 9
DO15
Digital Output 15
82 Appendix
RIO-471x0
¹J2 RS-232 Port: DB-9 Pin Male
Standard connector and cable, 9Pin.
Pin
Signal
1
2
3
4
5
6
7
8
9
No Connect
TXD
RXD
No Connect
Ground
No Connect
CTS
RTS
No Connect
Note: A straight-thru serial cable should be used to connect the RIO to a standard PC serial port
(pin1 to pin1, pin2 to pin 2, etc…)
J1 Ethernet Port: 10/100 Base-T (RJ-45)
Pin
Signal
1
2
3
4
5
6
7
8
TXP
TXN
RXP
PoE+
PoE+
RXN
PoEPoE-
J5 Power: 2 pin Molex for 18-36VDC (if not using Power over Ethernet)
Note: The part number listed below is the connector that is found on the controller. For more information see
the Molex website. http://www.molex.com/
RIO-471x0
Pin
Signal
1
2
GND (Ground)
18-36VDC
Molex Part Number
Pin Part Number (x2)
Type
39-31-0020
44476-3112
2 Position
Appendix ● 83
Jumper Description for RIO
Jumper
Label
Function (If jumpered)
JP5
MRST
Master Reset enable. Returns RIO to factory default settings
and erases EEPROM. Requires power-on or RESET to be
activated.
Used to upgrade controller firmware when resident firmware is
corrupt.
Set baud Rate to 19.2k (default without jumper is 115k)
10BaseT Ethernet Communication
UPGD
19.2
OPT
Jumper
Label
Function (If jumpered)
JP6
AUX
(4 jumpers)
PoE
(4 jumpers)
Power for board comes from 2pin Molex Connector (18-36V DC)
JP7
Power for board comes from Power over Ethernet (No power cable
is necessary – Ethernet cable with PoE Switch is required)
Jumper
Label
Function (If jumpered)
JP102
JP102
INC
OUTC
Connects INC0 & INC1 to +5V and INC0B & INC1B to GND
Connects OP1A to GND and OP1B to +5V
84 Appendix
RIO-471x0
RIO Dimensions
RIO-471xx
RIO-471x0
Appendix ● 85
RIO-472xx
86 Appendix
RIO-471x0
Accessories and Options
Product
Description
RIO-47100
Remote I/O controller with 0-5V analog I/O; 12bit
RIO-47120
Remote I/O controller with ±10V analog I/O; 12bit
RIO-47120-16
Remote I/O controller with ±10V analog I/O; 16bit
ICS-48026-M
26-pin D high-density male to screw terminals.
Use 1 for each RIO-471x0 to break out analog signals
ICS-48044-M
44-pin D high-density male to screw terminals.
Use 1 for each RIO-471x0 to break out analog signals
CABLE-44M-1M
CABLE-26M-1M
RIO-471x0
44-pin D high-density male cable to discrete wires.
Use 1 for each RIO-471x0 to break out analog signals
-1M = 1 meter length. Order -2M for 2 meter length
26-pin D high-density male cable to discrete wires.
Use 1 for each RIO-471x0 to break out analog signals
Appendix ● 87
List of Other Publications
"Step by Step Design of Motion Control Systems"
by Dr. Jacob Tal
"Motion Control Applications"
by Dr. Jacob Tal
"Motion Control by Microprocessors"
by Dr. Jacob Tal
Contacting Us
Galil Motion Control
270 Technology Way
Rocklin, CA 95765
Phone: 916-626-0101
Fax: 916-626-0102
E-Mail Address: [email protected]
URL: www.galilmc.com
88 Appendix
RIO-471x0
Training Seminars
Galil, a leader in motion control with over 500,000 controllers working worldwide, has a
proud reputation for anticipating and setting the trends in motion control. Galil
understands your need to keep abreast with these trends in order to remain resourceful and
competitive. Through a series of seminars and workshops held over the past 15 years,
Galil has actively shared their market insights in a no-nonsense way for a world of
engineers on the move. In fact, over 10,000 engineers have attended Galil seminars. The
tradition continues with three different seminar, each designed for your particular skill set-from beginner to the most advanced.
MOTION CONTROL MADE EASY
WHO SHOULD ATTEND
Those who need a basic introduction or refresher on how to successfully implement servo
motion control systems.
TIME: 4 hours (8:30 am-12:30 pm)
ADVANCED MOTION CONTROL
WHO SHOULD ATTEND
Those who consider themselves a "servo specialist" and require an in-depth knowledge of
motion control systems to ensure outstanding controller performance. Also, prior
completion of "Motion Control Made Easy" or equivalent is required. Analysis and design
tools as well as several design examples will be provided.
TIME: 8 hours (8:00 am-5:00 pm)
PRODUCT WORKSHOP
WHO SHOULD ATTEND
Current users of Galil motion controllers. Conducted at Galil's headquarters in Rocklin,
CA, students will gain detailed understanding about connecting systems elements, system
tuning and motion programming. This is a "hands-on" seminar and students can test their
application on actual hardware and review it with Galil specialists.
TIME: Two days (8:30 am-5:00 pm)
RIO-471x0
Appendix ● 89
WARRANTY
All products manufactured by Galil Motion Control are warranted against defects in
materials and workmanship. The warranty period for all products is 18 months except for
motors and power supplies which have a 1 year warranty.
In the event of any defects in materials or workmanship, Galil Motion Control will, at its
sole option, repair or replace the defective product covered by this warranty without
charge. To obtain warranty service, the defective product must be returned within 30 days
of the expiration of the applicable warranty period to Galil Motion Control, properly
packaged and with transportation and insurance prepaid. We will reship at our expense
only to destinations in the United States.
Any defect in materials or workmanship determined by Galil Motion Control to be
attributable to customer alteration, modification, negligence or misuse is not covered by
this warranty.
EXCEPT AS SET FORTH ABOVE, GALIL MOTION CONTROL WILL MAKE NO
WARRANTIES EITHER EXPRESSED OR IMPLIED, WITH RESPECT TO SUCH
PRODUCTS, AND SHALL NOT BE LIABLE OR RESPONSIBLE FOR ANY
INCIDENTAL OR CONSEQUENTIAL DAMAGES.
COPYRIGHT (2008)
The software code contained in this Galil product is protected by copyright and must not be
reproduced or disassembled in any form without prior written consent of Galil Motion
Control, Inc.
90 Appendix
RIO-471x0
Index
Absolute Value ............................................56, 62
Address ..............................................................80
Arithmetic Functions .......................47, 55, 60, 63
Array ................................2, 47, 51, 55, 60, 70, 73
Automatic Subroutine ........................................57
Baud Rate.........................................................6, 9
Bit-Wise.............................................................60
Circular Record Array........................................65
Code...................................................................63
Command Summary ....................................64, 65
Communication
Baud Rate....................................................6, 9
Handshake.......................................................9
Serial Ports ..................................................5, 6
Conditional jump ...................................47, 52, 71
Cosine ................................................................64
Cycle Time
Clock .............................................................64
Debugging..........................................................51
Digital Input.................................................62, 71
Digital Output ..............................................62, 70
Download.....................................................47, 65
Edit Mode ..........................................................52
Error Code .........................................................63
Formatting..........................................................67
Function .................................................47, 53, 55
Functions
Arithmetic ...................................47, 55, 60, 63
Hardware............................................................70
Output of Data...............................................67
I/O
Digital Input ............................................62, 71
Digital Output .........................................62, 70
Output of Data...............................................67
Input Interrupt ....................................................53
Input of Data ......................................................67
Internal Variable ..........................................55, 63
Interrogation.......................................................67
Interrupt .......................................................48, 53
Jumpers ................................................................9
Keyword ................................................55, 60, 63
Label
RIO-471x0
Special Label ................................................48
Logical Operator................................................54
Masking
Bit-Wise........................................................60
Math Function
Absolute Value ....................................... 56, 62
Bit-Wise........................................................60
Cosine ...........................................................64
Logical Operator ...........................................54
Sine ...............................................................62
Mathematical Expression ............................ 60, 62
Memory ..................................... 47, 51, 54, 64, 65
Array........................... 2, 47, 51, 55, 60, 70, 73
Download................................................ 47, 65
Message ....................................................... 51, 61
Modbus . 11, 14, 15, 16, 17, 18, 19, 20, 22, 23, 25,
26, 27, 28, 29, 30, 31, 32, 33, 34, 36
Multitasking.......................................................50
Operand
Internal Variable ..................................... 55, 63
Operators
Bit-Wise........................................................60
Output of Data ...................................................67
Program Flow .............................................. 47, 52
Interrupt ........................................................53
Stack .............................................................71
Programmable....................................................70
Serial Port ........................................................ 5, 6
Sine....................................................................62
Special Label .....................................................48
Stack ..................................................................71
Zero Stack.....................................................71
Status .................................................................63
Interrogation .................................................67
Stop Code ..........................................................63
Subroutine..........................................................48
Automatic Subroutine ...................................57
Terminal ...................................................... 63, 68
Time
Clock.............................................................64
Time Interval .....................................................65
Trigger ...............................................................47
Index ● 91
Variable
Internal ....................................................55, 63
92 Index
Zero Stack..........................................................71
RIO-471x0