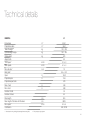
1
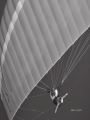
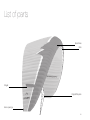
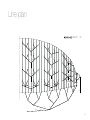
BIBETA 5
User manual
Edition 1 / 05_2012
Contents
Thank you for flying ADVANCE ....................................................... 4
About ADVANCE .............................................................................. 5
The BIBETA 5.................................................................................... 6
Share your passion....................................................................... 6
More important details.................................................................. 7
Pilot requirements............................................................................. 9
Using the paraglider for the first time............................................ 10
Delivery....................................................................................... 10
Basic set-up................................................................................ 10
Adjusting the brake lines............................................................. 10
Speed system/Trimmer............................................................... 10
Big Ears System.......................................................................... 12
Fitting the Spreaders................................................................... 12
Suitable harnesses...................................................................... 13
Weight range............................................................................... 13
Flight characteristics...................................................................... 14
Takeoff......................................................................................... 14
Normal flight ............................................................................... 15
Turns ........................................................................................... 15
Accelerated flight........................................................................ 15..
Collapses .................................................................................... 16..
Rapid descents............................................................................17
Stall.............................................................................................. 19
Landing....................................................................................... 20..
Flying with a wet paraglider ....................................................... 20
Winching...................................................................................... 21
Acrobatics................................................................................... 21
Maintenance, repairs and care ...................................................... 22
Packing ....................................................................................... 22
Care and maintenance ............................................................... 22..
What to do if the leading edge gets damaged? ........................ 22
Check ......................................................................................... 23
Repairs........................................................................................ 23
Disposal....................................................................................... 23
Technical details............................................................................. 24
Materials used............................................................................. 25
Certification................................................................................. 26
Service............................................................................................ 27
ADVANCE Service Center.......................................................... 27
The ADVANCE website............................................................... 27
Warranty...................................................................................... 27
List of parts..................................................................................... 30
Line plan ......................................................................................... 31
Risers ............................................................................................. 32
Bowline knots................................................................................. 37
3
Thank you for flying ADVANCE
Congratulations on your choice of a BIBETA 5 - a quality product
from ADVANCE. We are sure that you will spend many rewarding
hours in the air with it.
This user manual is an important part of the glider. Here you will find
instructions and important information about safety, care of the glider
and maintenance, and that’s why we recommend that you read this
document carefully before your first flight.
The latest version of this manual, as well as further updated information, can be found at www.advance.ch. Any new safety-related information will also be published on the website. If you have any further
questions or problems please contact your dealer or get in touch
directly with ADVANCE. We wish you a lot of enjoyment with your
BIBETA 5 and always «happy landings».
Team ADVANCE
4
About ADVANCE
ADVANCE, based in Switzerland, is one of the world’s leading paraglider manufacturers. Since it was founded in 1988, the company has
consistently pursued its own directions and concepts, both in development and production. The results are quality products with distinctive characteristics.
At the heart of the ADVANCE brand is a team of specialists who
share the passion of the customers who place their trust in the company’s products. With their thorough understanding of flying they
contribute their valuable personal experience and dedication to the
working processes.
Total control of the production process and supervision of the working practices at the ADVANCE factory in Vietnam ensure a high
standard of workmanship. Long term relationships with fabric and
line manufacturers means that ADVANCE knowledge and expertise
also finds its way directly into the development of new materials.
ADVANCE attaches great importance to after-sales customer support, and has built up a worldwide service network for this purpose.
An on-going interaction with its customers brings in a steady flow of
new knowledge that finds its way into ADVANCE products, thus completing the «Circle of Service».
5
The BIBETA 5
BIBETA 5 – Share your passion
Resistant
You want to take off effortlessly with your passenger for a stress-free
flying experience? The BIBETA 5 can fully satisfy this requirement. Its
excellent takeoff behaviour as well as efficient turning flight and landing identify the BIBETA 5 as an absolutely reliable partner.
The BIBETA 5 is a reliable and hard-wearing partner. The optimised
internal structure combined with a careful choice of materials make
the BIBETA 5 a light but robust and long-lived wing that will, even after frequent use, remain hard-wearing, retaining its takeoff qualities
and canopy stability.
Outstanding characteristics
Stress-free
Just a brief impulse and already the canopy is climbing evenly above
you and your guest – the BIBETA 5’s easy inflating and rising mean
that you and your passenger leave the ground in a relaxed frame of
mind, ready to enjoy the flight. Even in difficult takeoff conditions the
BIBETA 5 is a partner which you can fully rely on.
Efficient
The BIBETA 5’s internal conformation has been further improved by
means of detailed analysis and calculation: the weight-efficient structure and the use of Nylon wires make the wing lighter. Equipped with
performance-enhancing trimmers and the established Vary-Grip big
ears system the BIBETA 5 stands for efficiency and precision.
6
More important details
Effective Trimmers
STRESS-FREE
The BIBETA 5 has an accelerate system that uses trimmers. These
trimmers, with very long travel, expand the operating envelope, and
achieve a speed increase of approx. 5km/h. They provide a higher
safety margin in strong winds, and increase the glider’s usefulness
with lighter passengers. And, not least, the use of trim together with
big ears (Vary-Grip-System) is also, for the passenger, a very comfortable and considerate way of descending.
Spreaders adjustable for height
EFFICIENT
The BIBETA 5 is delivered with hard, soft or soft adjustable spreaders. The adjustable soft supports are infinitely variable to accommodate different passenger sizes. Clever design means that these can
be adjusted in flight.
ADVANCE Innovations & Quality
RESISTANT
ADVANCE pay a lot of attention to small details. Sewn-in tension
bands improve canopy stability, distinctive winglets reduce induced
drag (vortex-effect). Velcros at the wingtips make it easy to remove
7
sand and snow etc from the wing. Like all ADVANCE models the
BIBETA 5 comes with swivels and magnetic clips on the brake handles as standard. All these small but important details finish off the
product.
Pilot requirements
Flying a paraglider calls for appropriate training and a sound knowledge of the subject, and of course the requisite insurance cover and
licences. A tandem pilot must be able to correctly assess the meteorological conditions before taking off. His or her capabilities must
match the responsibilities of tandem flying.
The wearing of an adequate helmet, suitable shoes and clothing of
pilot and passenger as well as carrying an emergency reserve parachute are indispensable. All components of the equipment must be
checked for damage and airworthiness before every flight. A thorough
pre-flight check should also be carried out.
Each pilot bears sole responsibility when making a tandem flight.
Neither the manufacturer nor the seller of a paraglider can guarantee,
or be held responsible for, the safety of pilot and passenger.
9
Using the paraglider for the first time
Delivery
Adjustment of the brake lines
Each ADVANCE paraglider must be flown by the dealer and checked
for correct basic setting and trim. After doing this the dealer enters
the date of the first flight on the manufacturer’s label fixed to the rib in
the centre of the canopy. This entry, together with the return of a correctly completed warranty card to ADVANCE, will ensure that defects
in the product attributable to a manufacturing fault are covered by the
ADVANCE warranty (see Warranty in the «Service» section).
The brake line length is set at the factory so that the trailing edge is
unbraked (crease-free) in fully accelerated flight with brakes fully released. Fundamentally this setting should be kept.
BIBETA 5 delivery includes a backpack, an inner bag, a compression
strap, hard or soft spreaders (the soft spreaders are continuously adjustable for height), a repair kit, a mini windsock in the colours of the
wing and a “Getting-started” booklet.
Basic set-up
The basic set-up of the BIBETA 5 at delivery is that which has been
found to be ideal by the ADVANCE test team; it is in this condition
that the glider was awarded its certification. Any unapproved changes
or modifications, such as changes to the line lengths or the attachment of other risers or quick links by the owner, will result in the paraglider losing its certification (see the «Certification» section).
If the brake lines have to be reset there must be approx. 10 – 12cm
free line movement (at the pulleys) between brakes fully released and
that brake position that first affects the trailing edge in unaccelerated
flight. We recommend that the brake handles are secured using a
bowline knot (see illustration in the appendix page 39).
Speed system/Trimmer
The BIBETA 5 has an accelerate system in the form of trim. It is very
effective and easy to use. It provides for a significant increase in
speed of ca. 5 km/h.
The BIBETA 5 accelerate system is not only intended to provide a
better performance reserve for dealing with strong winds (e.g. slope
soaring, strong valley winds), but it also increases the glider’s general
user-friendliness, mainly when carrying light passengers. In addition,
when used with big ears (Vary-Grip-System), the trim improves the
10
1
most agreeable way of getting down if passenger well-being requires
it (see also section «Fast Descent»).
2
In accelerated flight the rear risers are lengthened and this reduces
the angle of attack of the wing. The accelerate system on the
BIBETA 5 is so designed that the wing profile remains the same in
accelerated flight (reduced angle of attack). This keeps the best wing
shape at higher speeds.
The trimmers do not require adjustment. Just make sure that they are
closed before takeoff (neutral position i.e. unaccelerated). To open
them in the air press both spring clips on the back of the risers at the
same time (see point 2 ); you can set any trim position as you wish
using these clips. They will not slip even under extreme load. To close
the trimmers pull the lower tapes down as far as possible using the
blue loops.
Caution: Keep the trimmer settings symmetrical.
Caution: When the trimmers are open the brake handles will be in a noticeably higher position than in unaccelerated (normal) flight.
11
Big Ears System
The BIBETA 5 has split A-risers, which make the application of big
ears easy. A cleat (Vary-Grip-System) makes it possible to fix the outer A-lines so that they can be held in for an extended period. (see
point 1 ). The lines can be pulled down and reset in the clamps.
With big ears applied the glider can be steered normally using the
brakes.
1
Fitting the Spreaders
The BIBETA 5 comes with hard, soft or soft adjustable spreaders.
The hard spreaders hold a spread distance of 27 cm. The passenger
can be suspended from two different positions. The reserve bridle
runs above the pilot’s own spreader arm and is fixed in the middle of
the support, next to the main glider suspension point.
The soft spreaders have a length of 70 cm. There are three possible positions to which to connect the paraglider riser. The reserve bridle runs underneath the pilot’s spreader arm and is fixed on the loop
provided.
12
The soft adjustable spreaders have a length of 70 cm. There are two
different positions to which to connect the paraglider riser. There is a
spring-loaded cleat (see point 9 Riser Illustration page 33) on the pilot’s spreader arm, which allow him to adjust the support height to
suit the passenger size. The reserve bridle runs underneath the pilot’s spreader arm and is fixed on the loop provided.
Tip: The soft adjustable spreaders can be adjusted to any position to suit the passenger height. If you have trouble shortening them in flight you can pull the straps down with the loops bit by bit, alternating left and right, and weight-shifting to the opposite sides, thus reducing the force required.
includes the pilot’s and passenger’s body weights, clothes, and the
weight of all equipment (paraglider, harnesses, instruments etc.) – in
fact everything that’s going on the flight.
The BIBETA 5 is certified for a takeoff weights between 120 kg to 225
kg. The best weight range lies between 150 kg and 190 kg. Flight at
the lower and upper weight limits can affect speed and glider flying
behaviour; without, however, influencing the safety of pilot and passenger.
Suitable harnesses
The BIBETA 5 is certified for use with harnesses without rigid crossbracing (see section “Certification”). The main support points of the
selected harness should (ideally) be set at a distance of approx. 45
cm and a height of 40 to 45 cm.
Weight range
The BIBETA 5 weight range is shown in the «Technical Data» section.
The figures given there represent total in-flight weight. This, of course,
13
Flight characteristics
We recommend that you make your first flights with the new glider
in quiet conditions at a familiar flying site, so that you can gain confidence in your BIBETA 5 from the outset.
Tip: To get the BIBETA 5 in just the right curved shape for takeoff stand abeam the centre of each wing after you have sorted the lines; take the brake line and pull it in until all the brake junctions are tensioned.
Takeoff
Light Wind Takeoff (Forwards)
Before every takeoff carry out the following pre-takeoff checks:
1. Harnesses and helmets done up, reserve OK?
2. Pilot-glider-passenger connections OK?
3. Lines free?
4. Canopy open?
5. Wind direction and strength assessed?
6. Airspace and view clear?
7. Passenger ready?
BIBETA 5 takeoff behaviour is very smooth and straightforward for
both forward and backward launches. Nylon wires and light weight
ensure that the canopy fills quickly and climbs evenly, without hanging or shooting ahead.
The BIBETA 5 is pulled up using both the inner, wide A-risers. This
takes less effort, and the wing will come up very straight. The canopy
should always be laid out in a slightly curved shape, so that all A-lines
are equally loaded during the pull up.
The BIBETA 5 only needs a modest tug in a light wind. It is not necessary to step back and then ‘run’ into the lines. Lead the glider up
with committed and forward-leaning body weight, but without too
much pull on the inner A-risers, until the canopy is nicely above you.
Any directional correcting during the pull-up phase should be done
by going under the glider, without use of brake. After the correction
phase and a look at the glider a few brisk steps with determined
leaning forward is enough to get you airborne, even in little wind. The
takeoff run can be shortened by an appropriate touch of brake.
Strong Wind Takeoff (Forwards or Backwards)
A backward pull up is recommended for stronger wind. Like a forward
takeoff the pull up should be made using the inner A-risers. During
the pull up walk towards the BIBETA 5 as necessary to control the
rising rate, and correct the direction by walking under the wing. Turning round and lifting off are straightforward.
14
Caution: The BIBETA 5’s very good takeoff qualities mean that you should remember that only a modest initial pull up impulse is needed.
Normal flight
In calm air the BIBETA 5 best glide ratio is achieved with completely
released brakes. Light brake will result in the minimum sink configuration. In headwind and descending air the glide performance over
the ground can be improved by appropriate use of the accelerate
system.
Make sure that you do not get below the minimum flying speed.
Turns
The BIBETA 5 turns with precision. It responds directly and progressively to increasing steering input, once the brake line free play has
been taken up. The agreeable and compact character of the wing
means that weight shift is not necessary to assist turning.
When thermaling set your angle of bank (and turn radius) with inside
brake and allow the paraglider to turn evenly in this attitude. Use outside brake to both steady the outer wingtip and, in particular, keep a
constant rate of turn going. Excessive use of outside brake will try to
stop the turn, and therefore lose the glider’s good climbing qualities.
Caution: To keep good manoeuvrability in thermals it is im-
portant to always keep enough flying speed. Do not hold too much outside brake, and avoid overcontroling.
Tip: If a brake line were to break the BIBETA 5 can be steered with the rear risers (D-risers) if necessary.
Accelerated flight
The BIBETA 5 also remains exceptionally stable in accelerated flight.
Because of the higher forces associated with higher speeds, however, a collapse could turn out to be somewhat vigorous, in that paragliders fly at a lower angle of attack at their upper speeds, thus becoming generally less stable. (see also chapter «Collapses»).
Info:
• You can fly through light turbulence while accelerated thanks to the BIBETA 5’s high canopy stability.
• With open trimmers you can also control and stabilise the BIBETA 5 with the brakes in turbulence.
15
• At the higher speed obtained with open trimmers the wing pressure is higher, thus raising the brake force.
Caution: With open trimmers the steering/braking hand posi-
tion is significantly displaced upwards, and brake force in-
creases due to the higher airspeed.
Tip: We recommend that you circle in thermals with closed trimmers. You will then be flying closer to best stability and minimum sink configurations.
Collapses
Asymmetric collapse of the wing
The BIBETA 5 is notable for its very solid and stiff canopy. With an
active flying technique in normal conditions collapses should be more
or less completely avoidable.
If, however, the glider should suffer a greater-than-50% asymmetric
collapse at trim speed the reaction will only be a slight turning tendency, and track can be maintained without problem by means of
light braking. Under normal conditions the wing will open by itself.
An asymmetric collapse in accelerated flight will produce a slightly
more impulsive reaction due to the higher aerodynamic forces involved at the higher speed. The turning away behaviour at a collapse
at fully accelerated speed is a little more dynamic, but is well manageable. After an asymmetric collapse direction should be maintained by careful opposite braking, and wing pressure raised on the
collapsed side by brake pumping. This will quicken canopy reopening. Only use just enough brake on the open side so as not to stall
this wing.
Poorly flown wingovers can make the wing tips fold in and cause a
cravat. Because of the high drag that they produce at the wingtip
cravats can cause a strong rotation moment (=spiralling). Oppose
this desire to rotate with careful use of opposite brake. Then clear the
cravat by means of the orange stabilo line. Opening a cravat can also
be speeded up by pumping. To do this the relevant brake should be
pulled down to up to 75% brake travel within two seconds (no longer),
then immediately released.
Front Collapse
After a spontaneous or A-riser-generated front collapse normal airflow will break down. Reopening occurs quickly and by itself.
16
Rapid descent
For a fast and efficient descent the ADVANCE Test Team recommend
that you use either big ears (with open or closed trimmers) or the spiral dive, depending on the circumstances.
Tip: Rapid descents should be rehearsed from time to time in quiet conditions – then they won’t become an emergency when needed.
Collapsing the Wingtips (Big Ears)
Pull both outer, narrow A-risers down, together and decisively. This
will collapse the wingtips, and this configuration can easily be held,
either by hand or by fixing the outer A lines in the cleats (Vary-GripSystem). You can pull the lines further through the cleats to increase
the folded areas, and resecure them. To reopen the big ears either let
go of the outer A-risers, or free the lines by releasing them from the
cleats with a light pull. The wingtips will open by themselves, thanks
to the BIBETA 5’s high internal wing pressure. While in big ears the
paraglider can be steered with the brakes, without problem. (See also chapter ‘Big Ears System’.)
Caution: Don’t fly spiral dives with big ears applied. The in-
creased wing loading supported by fewer lines can cause damage to the wing.
Caution: Be aware that flying with big ears puts you closer to a stall. Don’t rely on the use of big ears with a wet glider – there’s more information on this in the chapter ‘Flying with a wet paraglider’.
Tip: If you need to come down fast for passenger reasons, or
to fly away from a danger zone, we recommend the following
method: Apply big ears and pull the lines in to the marks on the Vary-Grip-System. Then accelerate the glider using the trimmers, as far as conditions will allow. In this configura-
tion the BIBETA 5 comes down quietly, almost like being on rails.
Info: In the fully accelerated state the big ears do not open by themselves, because of the high airspeed and raised stagnation point pressure. Help the opening with a brief but determined pump: i.e. pull the brakes down within two sec-
onds to full arm’s length and release.
17
Spiral dive
Enter the spiral with a progressive increase of brake application.
Head and vision should be directed in the direction of turn. As the
bank increases so does the rotation rate and the centrifugal force.
Basically the behaviour of the glider can be divided into two phases:
in the first the glider increases its angle of bank and turns in ever decreasing circles. At the second phase the glider bites into the spiral:
this means that the wing dives forward relative to the pilot and appears to be aligned with the horizon – the airspeed, g and rate of rotation increase markedly. During the spiral try to maintain the neutral
sitting position and don’t fight the centrifugal force – your body will be
pulled outwards.
Recovery requires a progressive releasing of the brake on the inside
of the turn. From a spiral dive with high sink and rotation rates it is essential to carefully apply some inside brake again while recovery is
taking place, in order to slow down the natural recovery behaviour
and subsequent high energy climb. This is the only way to avoid an
excessive pitch up attitude and consequent surge. Make sure you recover with enough height above the ground. Generally one should
expect the recovery to take the same amount of time as the entry,
but the rate of descent during recovery will be higher!
The BIBETA 5 comes out of the spiral by itself if a neutral sitting position is maintained. Active weight shift to the inside of the turn can
lead to greater acceleration and a delayed natural recovery.
Caution: do not fly spiral dives with big ears; the raised wing loading on a reduced wing area together with the reduction of effective lines can seriously overstress and damage your glider.
Caution: To avoid a collapse enter the spiral carefully when in accelerated flight, because the angle of attack is reduced.
Caution: Remember that you, the pilot, may be familiar with the high g-loading in a spiral dive, but it might upset your passenger a lot. If a descent is required for passenger well-
being we recommend the Vary-Grip big ears configuration together with a speed increase using the trim system.
B-Stall / C-Stall
The B-stall and the C-stall put extreme stresses on the entire glider
as well as threatening its profile shape. This kind of fast descent is
not particularly effective either. We recommend that you do not do Band C-stalls with your BIBETA 5 and so give no instructions here.
18
Because of the wing’s high structural stiffness the B- or C-stall is just
about impossible to achieve.
Full stall
The BIBETA 5 responds early to brake inputs, but the brake travel is
also very long. This implies a large safety margin for the pilot, and it is
difficult to encourage the BIBETA 5 to fullstall.
Stall
One-sided stall (spin)
In a tight turn the BIBETA 5 gives early and clear warning of the risk
of stalling by strongly rising brake loading. If the wing should stall,
however, the BIBETA 5 will react dynamically. Depending on the situation from which you let the glider recover a vigorous response
can result (surging forward with an increased risk of collapse). While
shooting forward the wing can be slowed down by appropriate brake.
If this is done normal flight can be resumed without further collapse.
Tip: We recommend that the simulation of spins and spin entries are not carried out in safety training. The high wing loading means that some reactions could turn out to be very dynamic.
Tip: Fundamentally, you should respond to all out-of-control behaviour, especially the start of spin rotation, by completely releasing both brakes (both hands up).
Should the glider be stalled, however, and depending on the situation
from which you let the glider recover, a vigorous response can result
(surging forward with an increased risk of collapse). While shooting
forward the wing can be slowed down by appropriate brake. If this is
done normal flight can be resumed without further collapse.
Tip: We recommend that the simulating of the fullstall is avoided in safety training. The high wing loading means that some reactions could turn out to be very dynamic.
Tip: Fundamentally, you should respond to all out-of-control behaviour by completely releasing both brakes (both hands up).
Deep stall
The BIBETA 5 cannot go into stable parachutal stall by itself. The
wing can be brought to the point of parachutal stall, however, by
19
means of the brakes, and can stay there (see chapter Flying with a
Wet Glider).
Caution: Be aware that your glider is much less manoeuvra-
ble when fully braked.
Caution: Never let your glider fall forward on to its leading edge. The internal pressure surge so caused can tear the cell walls and damage the leading edge.
Caution: If you are flying tight, slow airspeed circles in signif-
icant turbulence you may stall unexpectedly. If this happens let both brakes go immediately.
Landing
Flying with a wet paraglider
Thanks to the precise handling and long brake travel the BIBETA 5 is
very easy to land.
Flying with a wet glider creates a risk of deep stall. Deep stall is often
the result of a combination of factors. The weight of the wet canopy
goes up, and this increased weight increases the angle of attack,
which always puts the glider nearer the deep stall limit. Added to this,
water drops on the top surface have a detrimental effect on the laminar flow of the boundary layer near the leading edge, which distinctly
reduces the maximum lift coefficient. If the wet glider is also being
flown at its lower weight limit there is a further small effect of an increased angle of attack, as well as flight at lower airspeed because of
the reduced wing loading.
Always fly a proper landing circuit with a defined final approach, without rolling and pitching. From full speed apply the BIBETA 5 brakes
continuously, finally going through to full brake. By making this kind of
‘fully flared’ landing the speed can be brought to a minimum, and the
passenger set down softly.
Caution: Don’t fly steep turn reversals near the ground. These
are dangerous and could lead to strong swinging.
Caution: Never get below minimum speed when top landing, or on final approach.
To avoid the risk of deep stall with a wet glider you should brake as
little as possible and never use big ears. A further preventative measure is to fly with trimmers open.
20
These tactics have a small effect on the angle of attack. If the wet
glider were still to go into deep stall opening the trimmers is your only
recourse. See section “Deep stall”.
Winching
The BIBETA 5 is suitable for winch launching. When taking off in
windless conditions, ensure that the paraglider is laid out in an
arched or even wedge shape (to avoid risk of the glider rosetting):
Winch launch is only permitted if:
• the pilot has completed a tow training course (only Germany/DHV);
• the winch system is certified for use with paragliders;
• the winch operator has been fully trained in how to winch
paragliders.
Acro flying
The BIBETA 5 is not suitable for acro flying.
21
Maintenance, repairs and care
Packing
Pack your glider nose wire on nose wire, so that the plastic rods in
the ribs at the leading edge lie as flat as possible on one another, all
at the same height. This will prolong your glider’s life and keep its fast
and excellent filling qualities at takeoff. You should randomly offset
your packing centreline so that the final chordwise fold is not always
along same cell. Only pack and store a dry paraglider, and avoid unnecessary compressing and tight packing.
Care and maintenance
Ultraviolet light, heat, humidity, sea water, aggressive cleaning
agents, unsuitable storing and physical abuse (dragging across the
ground) speed up the ageing process. The life of a paraglider can be
extended significantly by observing the following advice:
• Let a wet or damp glider dry by leaving it completely unpacked at room temperature, or outside in the shade.
• If the glider gets wet with salt (sea) water rinse it thoroughly with
fresh water.
• Clean the glider only with fresh water, and a little neutral soap if
necessary. Do not use solvents under any circumstances.
• If the glider has been subjected to increased stress (such as a tree
landing) have it examined by an expert.
• Regularly remove sand, leaves, stones and snow from the cells.
Openings with Velcro closures are provided at the wing tips for this
purpose.
• Do not leave the glider out in the sun unnecessarily before and after
flight (UV light).
• Do not subject the packed glider to excessive temperature fluctua tions, and do ensure adequate air circulation to prevent condensa tion forming.
• Do not drag the glider across the ground.
• When landing, make sure that the canopy does not fall on its lead ing edge.
What to do if the leading edge gets damaged?
If a plastic rod breaks or its seam rips the glider must be taken to an
ADVANCE checking facility where the rod can be replaced or sewn
back in. To guarantee a long lifespan it is important that the wing is
not allowed to fall on its leading edge after landing, otherwise the fabric can be damaged by abrasion. But mainly there is a risk, as in all
paragliders, that the crossports could tear.
22
Check
Disposal
A new ADVANCE paraglider must be given a check every 24 months
(2 years). With intensive use (> 150 flying hours per year, or excessively demanding use) an annual check is needed, after the first
check. When a check is carried out the condition of all materials is
assessed in accordance with strict guidelines, and tested with great
care. Finally the overall condition of the glider is rated and recorded in
a test report. You can find additional information about the check in
this manual in the section «Service», or at www.advance.ch.
Environmental protection plays an important role in the selection of
materials and the manufacture of an ADVANCE product. We use only
non-toxic materials that are subjected to continuous quality and environmental impact assessments. When your paraglider reaches the
end of its useful life in a number of years’ time, please remove all metal parts and dispose of the lines, canopy and risers in a waste incineration plant.
Repairs
As a general rule you should not attempt to repair a paraglider yourself. The various seams and lines are made with great precision, and,
for this reason, only the manufacturer or an authorised service centre
may fit identical replacement parts or replace entire cells. Exceptions
to this rule are the replacement of lines and the repair of small tears
(up to 5 cm) or holes in the fabric that may be glued with the self-adhesive ripstop included in the repair kit. After a repair, or the replacement of a line, the glider must always be opened out and checked on
the ground before the next flight.
23
Technical details
BIBETA 5
Flat surface
Projected surface
Take off weight 2
Optimal weight range 2
Glider weight
Aspect ratio
Trim speed 1
Max. speed 1
Min. sink rate 1
Best glide 1
Span
Projected span
Projected aspect ratio
Max. chord
Min. chord
Number of cells
Number of risers
Riser length
Max. length of the lines with the risers
Min. speed 1
Certification
1 Values depend on wing loading (pilot/passenger/harnesses and glider)
41
m
m2
kg
kg
kg
2
km/h
km/h
m/s
m
m
m
m
cm
cm
km/h
40.81
34.47
120 - 225
150 - 190
8.15
5.2
41 +/- 3
47 +/- 3
1.2
8.5 +/- 0.2
14.42
11.43
3.79
3.49
0.90
52
4+1
33.5
887.6
24 +/-3
EN / LTF B
2 Pilot, passenger, wing, equipment
24
Materials used
We routinely inspect and test our materials many times over. Like all
ADVANCE products the BIBETA 5 is designed and produced as a result of the latest developments and knowledge. We have chosen all
the materials very carefully, under conditions of the strictest quality
control.
Lower surface leading edge borders:
Polyamid 16 mm
Upper surface:
New Skytex 6.6, 9017 E77A, 40 g/m2
Lines:
• Edelrid Technora (Aramid) 6843, 240/200/160, covered, 2.1 mm / 1.9 mm / 1.5 mm (base lines)
• Edelrid Technora (Aramid), 6843, 120, covered, 1.4 mm (middle gallery)
• Liros Dynema, DSL 70, covered, 0.95 mm (upper gallery)
• Liros Dynema, DSL 70 / DFL 115, covered, 0.95 / 1.3 mm (brake lines)
• Liros Dynema, DFL 115, covered, 1.3 mm (upper brake lines)
DFLP 200, Dyneema/Polyester, covered 1,9 mm (lower brake lines)
Lower surface:
DOMENICO DOKDO-20DMF, 36 g/m2
Risers:
Polyester 25 mm, 1400 kg / 22 mm, 1200 kg / Technora 13 mm, 850 kg
Ribs:
New Skytex 6.6, 9017 E29, 40 g/m2
Quick links:
Maillon Rapide, Inox, 3.5 mm, 750 kg / 4 mm, 1000 kg
Leading edge:
New Skytex 6.6, 9017 E32, 40 g/m2
Leading and trailing edge borders:
Polyester laminated 20 mm
25
Certification
The BIBETA 5 has EN and LTF certification. It is certified for harnesses without rigid cross bracing. The test reports can be downloaded
from www.advance.ch.
Certification ratings can only provide limited information about a paraglider’s flying behaviour in thermally active and turbulent air. The
certification grading is based primarily on provoked extreme flight
manoeuvres in calm air.
During the development of an ADVANCE paraglider, the emphasis
is first and foremost on flying behaviour and handling, and not exclusively on the certification test. The result is a well-rounded product with the familiar ADVANCE handling. Nevertheless, the certification rating occupies a significant proportion of the specifications that
have to be met.
26
Service
ADVANCE Service Centres
ADVANCE operates two company-owned service centres that carry
out checks and repairs of all types. The workshops based in Switzerland and France are official maintenance operations, certified by the
German Hanggliding and Paragliding Federation (DHV), which has
many years’ experience and in-depth product-specific expertise. The
ADVANCE worldwide service network includes other authorised service centres that provide the same services. All service facilities use
original ADVANCE materials exclusively. You can find all information
on checks and repairs and the relevant addresses at www.advance.ch.
The ADVANCE website
At www.advance.ch you will find detailed information about ADVANCE
and its products, as well as useful addresses which you can contact
if you have any questions.
Among the things you will be able to do on the website are:
• complete the warranty card online up to 10 days after purchasing
the glider, enabling you to enjoy the full benefits of the ADVANCE warranty.
• find out about new safety-related knowledge and advice concern-
ing ADVANCE products.
• download an application form in PDF format which you can use when sending your glider in for a check at ADVANCE.
• find an answer to a burning question among the FAQs (Frequently Asked Questions).
• subscribe to the ADVANCE Newsletter so that you will be regularly informed by e-mail about news and products.
It is well worth visiting the ADVANCE website regularly because the
range of services offered is continuously being expanded.
Warranty
In order to enjoy the full benefits of the ADVANCE warranty, you are
requested to complete the relevant form on the website in the «Warranty» section within 10 days of purchase.
As part of the ADVANCE warranty, we undertake to rectify any defects in our products that are attributable to manufacturing faults. In
order for a warranty claim to be made, ADVANCE must be notified
immediately on discovery of a defect and the defective product sent
in for inspection. The manufacturer will then decide how a possible
manufacturing fault is to be rectified (repair, replacement of parts or
replacement of the product). This warranty is valid for three years
from the date of purchase of the product.
27
The ADVANCE warranty does not cover any claim other than those
listed above. Claims in respect of damage resulting from careless or
incorrect use of the product (e.g. inadequate maintenance, unsuitable
storage, overloading, exposure to extreme temperatures, etc.) are expressly excluded. The same applies to damage attributable to an accident or normal wear and tear.
28
List of parts
Nylon Wires
Cells
Winglet
Ring-Raff-System
Velcro openings
30
Line plan
40
B I B E TA 5
40
B I B E TA 5
A1
A3
A2
A1
A4
A5
A2
A3
A4
A6
2A1
A5
A6
A7
2A2
2A1
2A2
2A3
A7
A8
2A3
2A4
B1
B3
B2
B1
3A1
2B1
B4
B3
B5
B2
B6
3A1
2B2
2B1
B4
B5
3A2
B6
B7
B8
2B2
2B3
A8
A9
2A4
A9
A10
3A2
A10
B7
2A5
B9
2B3
2B4
2B4
2A6
C2
3B1
2C1
C1
C3
C2
C4
2C1
2C2
D4
D3
3C1
E1
E2
2C2
3C1
E2
2DE1
2DE2
2DE2
D6
1
2
3
2
4
C5
C4
C7
C8
D4
3C2
E6
E7
2DE3
3
D6
3C2
E8
C10
3B3
2C5
2D5
D7
E7
2DE3
5
7
C11
C9
C10
3B3
2C5
B13
D11
11
St A 2D5
St B
A12
2D6
2StBCD
D13
8
A13
B13
C12
2C6
3CD3
12
B12
C11
D10
C13
D12
E8
2DE4
107
2StAB
D9
D8
2D6
B11
2B6
C12
2C6
3CD3
96
8
A11
2B5
B12
C8
A13
3DE2
4
3A3
A12
B11
2B6
D10
E6
2DE4
6
2C4
D9
D8
E5
2A6
B10
C7
C9
D5
D7
2A5
B9
2B5
3B2
2C3
3DE2
5
C6
2C4
E4
3DE1
1
3DE1
3B2
E3
E5
E4
C6
2C3
D3
D5
E1
E3
2DE1
C3
D2
D1
D2
D1
3B1
C5
B8
B10
3A3
C1
A11
C13
D11
D12
D13
13
10
12
11
C St
F6
F3
F2
F4
F3
F1
F2
VR1
SL low
VR2
VR1
SL low
VR2
SL up
F5
F4
2StB
St C
St C
9
F5
F1
2S
St A
St B
F6
VR3
VR3
SL up
31
13
Tragegurte Risers Elévateurs
•
•
Mit weicher verstellbarer Spreize
With soft adjustable spreader
1a.
1b.
2a.
2b.
3.
4.
5.
6.
7.
8.
9.
10.
Big Ears System:
1a. Split A-risers
1b. Vary-Grip-System
Speed system/Trim closed, unaccelerated position:
2a. Spring-loaded cleat to open the trims
2b. Strap to close the trim
3. Swivel
4. Magnet clips
5. Suspension for reserve
6. Suspension for passenger
7. Suspension for pilot
8. Suspension for paraglider (two positions)
9. Spring-loaded cleat for height adjustment
10. Straps for height adjustment
Ohrenanlegesystem:
Getrennte A-Tragegurte
Vary-Grip-System
Speedsystem/Trimmer geschlossen, unbeschleunigt:
Federklemme zum Öffnen der Trimmer
Band zum Schliessen der Trimmer
Wirbel
Magnetclips
Notschirmaufhängung
Passagieraufhängung
Pilotenaufhängung
Hauptschirmaufhängung (zwei Positionen)
Federklemme zur Höhenverstellung
Band zur Höhenverstellung
32
1a
1b
3
Avec écarteur souple réglable
2a
Kit oreilles :
1a. Elévateurs A dédoublés
1b. Vary-Grip-System
Système d’accélération/Trims fermés, non accélérée :
2a. Boucles à griffes pour ouvrir les trims
2b. Sangle inférieure pour fermer les trims
3. Emerillon
4. Fixations magnétiques
5. Fixation pour parachute de secours
6. Fixation pour passager
7. Fixation pour pilote
8. Fixation pour l’aile (deux positions)
9. Boucles à griffes pour régler la hauteur
10. Sangle inférieure pour régler la hauteur
4
2b
8
9
5
11
7
6
33
Mit weicher Spreize
With soft spreader
Ohrenanlegesystem:
1a. Getrennte A-Tragegurte
1b. Vary-Grip-System
Speedsystem/Trimmer geschlossen, unbeschleunigt:
2a. Federklemme zum Öffnen der Trimmer
2b. Band zum Schliessen der Trimmer
3. Wirbel
4. Magnetclips
5. Notschirmaufhängung
6. Passagieraufhängung
7. Pilotenaufhängung
8. Hauptschirmaufhängung (drei Positionen)
Big Ears System:
1a. Split A-risers
1b. Vary-Grip-System
Speed system/Trim closed, unaccelerated position:
2a. Spring-loaded cleat to open the trims
2b. Strap to close the trim
3. Swivel
4. Magnet clips
5. Suspension for reserve
6. Suspension for passenger
7. Suspension for pilot
8. Suspension for paraglider (three positions)
34
1a
1b
3
Avec écarteur souple
2a
4
2b
8
5
Kit oreilles :
1a. Elévateurs A dédoublés
1b. Vary-Grip-System
Système d’accélération/Trims fermés, non accélérée :
2a. Boucles à griffes pour ouvrir les trims
2b. Sangle inférieure pour fermer les trims
3. Emerillon
4. Fixations magnétiques
5. Fixation pour parachute de secours
6. Fixation pour passager
7. Fixation pour pilote
8. Fixation pour l’aile (trois positions)
7
6
35
Mit harter Spreize
With hard spreader
Ohrenanlegesystem:
1a. Getrennte A-Tragegurte
1b. Vary-Grip-System
Speedsystem/Trimmer geschlossen, unbeschleunigt:
2a. Federklemme zum Öffnen der Trimmer
2b. Band zum Schliessen der Trimmer
3. Wirbel
4. Magnetclips
5. Notschirmaufhängung
6. Passagieraufhängung (zwei Positionen)
7. Pilotenaufhängung
8. Hauptschirmaufhängung
Big Ears System:
1a. Split A-risers
1b. Vary-Grip-System
Speed system/Trim closed, unaccelerated position:
2a. Spring-loaded cleat to open the trims
2b. Strap to close the trim
3. Swivel
4. Magnet clips
5. Suspension for reserve
6. Suspension for passenger (two positions)
7. Suspension for pilot
8. Suspension for paraglider
36
1a
1b
3
Avec écarteur rigid
2a
4
2b
8
5
7
Kit oreilles :
1a. Elévateurs A dédoublés
1b. Vary-Grip-System
Système d’accélération/Trims fermés, non accélérée :
2a. Boucles à griffes pour ouvrir les trims
2b. Sangle inférieure pour fermer les trims
3. Emerillon
4. Fixations magnétiques
5. Fixation pour parachute de secours
6. Fixation pour passager (deux positions)
7. Fixation pour pilote
8. Fixation pour l’aile
6
37
Bowline knots
Step 1
Step 2
Step 3
Step 4
Step 5
39
advance thun ag
u t t i g e n g s t r a s s e 87
ch 3600 thun
f o n + 41 3 3 225 70 10
f a x + 41 3 3 225 70 11
w w w. a d v a n c e.c h
i n f o @ a d v a n c e.c h