1
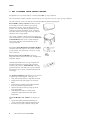
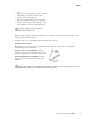
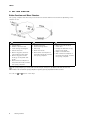
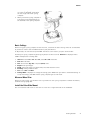
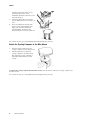
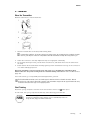
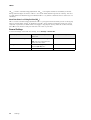
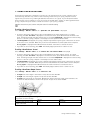
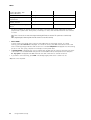
ENGLISH
Polar CS500+
User manual
ENGLISH
CONTENTS
1. GET TO KNOW YOUR POLAR CS500+ .......................................................................................... 4
2. GETTING STARTED ................................................................................................................
Button Functions and Menu Structure .........................................................................................
Basic Settings .....................................................................................................................
Measure Wheel Size .............................................................................................................
Install the Polar Bike Mount ....................................................................................................
Attach the Cycling Computer to the Bike Mount .............................................................................
6
6
7
7
7
8
3. TRAINING........................................................................................................................... 9
Wear the Transmitter............................................................................................................. 9
Start Training...................................................................................................................... 9
Training Information ............................................................................................................. 11
Take a Lap ......................................................................................................................... 12
Functions in Pause Mode ....................................................................................................... 12
Stop Training ...................................................................................................................... 13
Training with OwnZone .......................................................................................................... 13
Determining Your OwnZone ................................................................................................. 14
4. AFTER TRAINING .................................................................................................................. 15
Training File ....................................................................................................................... 15
Deleting Training Files........................................................................................................... 16
Totals ............................................................................................................................... 17
5. DATA TRANSFER .................................................................................................................. 18
6. SETTINGS .......................................................................................................................... 19
Cycling Settings .................................................................................................................. 19
Timer Settings..................................................................................................................... 19
Heart Rate Limit Settings ........................................................................................................ 19
Bike Settings ...................................................................................................................... 20
AutoStart ........................................................................................................................ 20
Wheel ............................................................................................................................ 20
Speed ........................................................................................................................... 21
Cadence ........................................................................................................................ 21
Power ............................................................................................................................ 21
Altitude Settings .................................................................................................................. 22
Watch Settings .................................................................................................................... 22
User Settings ...................................................................................................................... 23
Maximum Heart Rate (HRmax) ............................................................................................ 24
Heart Rate Value in a Sitting Position (HRsit) ......................................................................... 24
General Settings .................................................................................................................. 24
7. USING A NEW ACCESSORY ...................................................................................................... 25
Teaching a New Speed Sensor ............................................................................................. 25
Teaching a New Cadence Sensor* ........................................................................................ 25
Teaching a New Power Output Sensor*.................................................................................. 25
8. USING A NEW TRANSMITTER ................................................................................................... 27
Teaching a New Transmitter................................................................................................ 27
9. IMPORTANT INFORMATION ...................................................................................................... 28
Care and Maintenance........................................................................................................... 28
Caring of Your Product ....................................................................................................... 28
Service ........................................................................................................................... 28
Changing Batteries............................................................................................................ 28
ENGLISH
Changing Cycling Computer Battery ...................................................................................... 29
Precautions ........................................................................................................................ 30
Interference During Exercise .............................................................................................. 30
Minimizing Risks When Exercising........................................................................................ 30
Technical Specifications ........................................................................................................ 31
Frequently Asked Questions..................................................................................................... 32
Limited Polar International Guarantee ........................................................................................ 34
Disclaimer ......................................................................................................................... 35
INDEX ............................................................................................................................... 36
ENGLISH
1. GET TO KNOW YOUR POLAR CS500+
Congratulations on your purchase of a new Polar CS500+ cycling computer!
This user manual includes complete instructions for you to get the most out of your cycling computer.
The latest version of this user manual can be downloaded at www.polar.fi/support.
Polar CS500+ cycling computer provides you with
all the data you need to enhance your cycling
performance and also saves the data for later
analysis. The new large display guarantees clear
visibility of training information in all conditions.
Innovative button technology allows easy and safe
operation even in high speeds.
The cycling computer can be easily attached to the
stem or handlebars of your bike with new Polar Dual
Lock Bike Mount. Bike mount’s newly designed
metal parts guarantee firm attachment for the
cycling computer.
Comfortable Polar WearLink ®+ transmitter W.I.N.D.
sends the heart rate signal to the cycling computer
ecg-accurately. The transmitter consists of a strap
and a connector.
Polar CS speed sensor™ W.I.N.D. wirelessly
measures distance and your real-time, average and
maximum speeds.
Transfer data between the cycling computer and
polarpersonaltrainer.com with Polar's new data
communication device, Polar DataLink. Just plug
your DataLink into the USB port of your computer,
and it detects your cycling computer with W.I.N.D.
technology.
The polarpersonaltrainer.com web service is tailored
to support your training goals. There you can:
• store your training files for a long-term follow-up
• analyze and follow your progress to the finest
detail
• analyze training intensity and needed recovery
time using the training load feature
• optimize the way you train by using the Polar
training programs
• challenge your friends to a virtual sports
competition and interact with other sports
enthusiasts
With Polar WebSync 2.4 Software (or newer), you
can:
• synchronize and transfer data between your
cycling computer and polarpersonaltrainer.com
• fine-tune your cycling computer settings and
4
Get to Know Your Polar CS500+
ENGLISH
•
•
•
personalize the display for example with your own
logo
set training sounds, automatic lap and a reminder
that reminds you to drink, eat or take other
important actions during training
select the equipment (bike) you use in the sport
and set the available sensors for the equipment
customize your cycling computer display to show
the information you want to see during training
The WebSync software can be downloaded at
www.polarpersonaltrainer.com.
Register your Polar product at http://register.polar.fi/ to ensure we can keep improving our products and
services to better meet your needs.
For video tutorials, go to http://www.polar.fi/en/support/video_tutorials.
Available Polar Accessories
With the help of Polar accessories, you can enhance the experience and achieve a more complete
understanding of your performance.
Polar CS cadence sensor™ W.I.N.D. wirelessly
measures your real-time and average cadence, also
known as pedaling rate, as revolutions per minute.
Polar Power Output Sensor™ W.I.N.D. wirelessly
measures power output expressed in watts and
cadence.
Data from all compatible sensors and WearLink transmitter is sent wirelessly to the cycling computer over Polar's
2.4GHz W.I.N.D. technology. This eliminates interference during training.
Get to Know Your Polar CS500+
5
ENGLISH
2. GETTING STARTED
Button Functions and Menu Structure
The cycling computer has three easy-to-use buttons that have different functionalities depending on the
situation of use.
1.
•
•
•
•
•
•
•
BACK / STOP
Exit the menu
Return to previous level
Leave settings unchanged
Cancel selections
With a long press, return to
time mode from any mode
With a long press in time
mode, go to the power save
mode
With a three-second press in
the power save mode, activate
the cycling computer.
2.
OK / START / LAP / RESET
3.
•
•
•
•
•
Confirm selections
Start a training session
Take a lap
Reset total values
With a three-second press in
the power save mode, activate
the cycling computer.
•
•
•
•
NEXT / SET
Move to the next mode or
menu level
Change the bike with a long
press in time mode
Adjust a selected value
With a three-second press in
the power save mode, activate
the cycling computer.
The cycling computer goes to the power save mode if you do not press any button in the time mode for five
minutes. You can turn the cycling computer on again by pressing any button for three seconds.
You can use
6
and
buttons in two ways:
Getting Started
ENGLISH
1.
When the cycling computer is mounted
on a stem or handlebar, gently press
the left or right side of the cycling
computer.
2.
When you hold the cycling computer in
your hand, use the trigger buttons on
the backside of the cycling computer.
Basic Settings
Before using your cycling computer for the first time, customize the basic settings. Enter as accurate data
as possible to ensure correct feedback based on your performance.
To adjust data, use SET and accept with OK. The values scroll faster if you press and hold SET.
Activate your cycling computer by pressing any button for three seconds. Basic SET is displayed. Press
START and adjust the following data:
1.
2.
3.
4.
5.
6.
7.
8.
Time set: Select 12h or 24h. With 12h, select AM or PM. Enter time.
Date set: Enter date.
Unit: Select metric (kg/cm) or imperial (lb/ft) units.
Weight: Enter your weight.
Height: Enter your height. In LB/FT format, first enter feet then inches.
Birthday: Enter your date of birth.
Sex: Select Male or Female.
Settings DONE is displayed. To change the settings, press BACK until you return to the desired setting. To
accept the settings, press OK and the cycling computer goes to time mode.
Measure Wheel Size
Before you start cycling, set the wheel size of your bike into the cycling computer. For further information,
see Bike Settings (page 20).
Install the Polar Bike Mount
You can install the bike mount on the stem or on the left- or right-hand side of the handlebar.
Getting Started
7
ENGLISH
1.
Thread two cable ties through the
passages of the bike mount. If you
install the bike mount on the
handlebar, thread the cable ties to the
opposite direction.
2.
Insert the rubber part into the bike
mount. Make sure that it is firmly in its
nest.
3.
Place the rubber part and the bike
mount on the stem/handlebar and
adjust the cable ties around the
stem/handlebar. Secure the bike
mount firmly. Cut off excess cable ties.
For a video tutorial, go to http://www.polar.fi/en/support/video_tutorials.
Attach the Cycling Computer to the Bike Mount
1.
Push the button and position the
cycling computer onto the bike mount.
2.
Release the button to fasten the
cycling computer to the bike mount.
Check that the cycling computer is
fastened properly before you start
cycling.
To detach the cycling computer from the bike mount, push the button and lift the cycling computer off
the bike mount.
For a video tutorial, go to http://www.polar.fi/en/support/video_tutorials.
8
Getting Started
ENGLISH
3. TRAINING
Wear the Transmitter
Wear the transmitter to measure heart rate.
1.
Wet the electrode areas of the strap under running water.
In demanding conditions, for instance during long-lasting events, we recommend using conductive electrode
lotion or gel to improve contact. It is important to wash the transmitter carefully after using lotion or gel.
2.
Attach the connector to the strap. Adjust the strap to fit tightly but comfortably.
3.
Tie the strap around your chest, just below the chest muscles, and attach the hook to the other end of
the strap.
4.
Check that the wet electrode areas are firmly against your skin and that the Polar logo of the connector is
in a central and upright position.
Detach the transmitter connector from the strap after every use, to maximize the transmitter battery
lifetime. Rinse the strap under running water. See detailed washing instructions in Care and Maintenance
(page 28).
For a video tutorial, go to http://www.polar.fi/en/support/video_tutorials.
The Polar WearLink transmitter can be used with apparels that have built-in soft textile electrodes. Wet the
electrode areas of the apparel. Attach the connector of the transmitter straight onto the apparel without the strap
so that the connector’s Polar logo is in an upright position.
Start Training
Attach the cycling computer to the bike mount and activate it with a long
button press.
In time mode, the cycling computer automatically starts detecting your heart rate.
The number on the upper left-hand corner indicates the bike that is in use. The bike
you have used during the previous training session is automatically selected. To
change the bike, long-press NEXT in time mode.
Training
9
ENGLISH
If you have activated the AutoStart function, the cycling computer automatically
starts recording the training session when you start cycling. For further information
on AutoStart, see Bike Settings (page 20).
If you have not activated the Autostart function, press START to start the recording.
You can view three lines of training information simultaneously. Press NEXT to view the following displays:
See Training
Information (page 11) for more detailed descriptions of displayed information.
Distance alternating with lap distance (when you have taken at least one lap).
Speed
Heart rate and Cadence
Average speed
Speed
Average heart rate and Cadence
Speed
Stopwatch
Heart rate and Cadence
Arrival time
Time of day
Heart rate and Cadence
Heart rate limits
Time in target zone
Heart rate and Cadence
Calories
Calorie expenditure per hour
Heart rate and Cadence
Altitude
Inclinometer
Temperature and Cadence
Trip distance
Speed / Power
Heart rate and Cadence
Set the cycling computer to scroll the views automatically by pressing and holding NEXT. Turn scrolling off by
pressing NEXT.
10
Training
ENGLISH
Training Information
Information on the display
Description
Altitude
Current altitude in meters / feet
Arrival time
By setting the distance you are going to ride, the cycling computer
estimates your arrival time to the destination according to your riding
speed. For further information, see Cycling Settings (page 19).
If the riding distance function is off, the speed is displayed instead of
arrival time.
Average heart rate
Your average heart rate of the training session is displayed with an
indicator which tells you whether your heart rate is rising or dropping.
Average speed
Your average riding speed of the training session is displayed with an
indicator which tells you whether the speed is rising or dropping (Polar
CS speed sensor W.I.N.D. required).
Cadence
Your pedaling rate in revolutions per minute (Optional Polar CS cadence
sensor W.I.N.D. required)
Calories
The expended calories so far. The cumulation of calories starts when your
heart rate is displayed.
Calorie expenditure per hour
Rate of calorie expenditure per hour
Distance
Distance covered so far (Polar CS speed sensor W.I.N.D. required)
Heart rate
Your current heart rate
Heart rate limits
Lower and upper heart rate limit. The heart symbol moves left or right
according to your heart rate. If the symbol is not visible, your heart rate is
outside the limits. The alarm helps you to stay within the set limits.
You can set the alarm off by setting the sound off in General
Settings. For more information, see General Settings
(page ? )
Inclinometer
Uphill / Downhill steepness in percentages and grades. An estimation in
numerical form how steep uphill or downhill you are cycling, helping you
to adjust cycling effort accordingly.
Training
11
ENGLISH
Information on the display
Description
Lap distance
Lap distance (Polar CS speed sensor W.I.N.D. required)
Power
Power output expressed in watts (Optional Polar Power Output Sensor
W.I.N.D. required)
Speed
Current speed (Polar CS speed sensor W.I.N.D. required)
Stopwatch
Total duration of the training session so far
Temperature
Current temperature
Time in zone
Time you have trained within the heart rate limits
Time of day
Time of day
Trip distance
Distance between points A and B. Use this function for measuring
distance between two points on the route (Polar CS speed sensor™
W.I.N.D. required). Trip distance can be reset in pause mode.
Take a Lap
Take a lap by pressing LAP. The following information is displayed:
Lap time indicates elapsed time for one lap.
Heart rate / Lap number
Split time is elapsed time from the beginning of the training session until storing
the latest lap time.
Average heart rate (calculated from the beginning of the lap)
If you have activated the automatic lap function, your cycling computer automatically records laps when
you reach the set distance. For further information, see Cycling Settings (page 19).
Functions in Pause Mode
To pause the training session, press STOP.
In pause mode, you can select:
12
Training
ENGLISH
•
Continue to continue training recording.
•
Exit to stop recording completely.
•
Summary for a summary of training information. The following information is displayed:
•
Exe. Time: Duration of the recorded training session and average heart rate
•
Limits: Heart rate limits used during the training session (if limits are set)
•
In zone: Time spent in the target heart rate zone
•
Kcal/ %Fat: Calories burned during the training session and fat percentage
•
Speed: Average speed
•
Cadence: Average cadence
•
Distance: Ridden distance
•
Ride Time: Ridden time. For instance, if you stop cycling but do not stop recording the training session,
the time counting will automatically stop, but the duration of the training session will continue to
accumulate.
If the AutoStart function is active, the training and cycling time are the same, as the cycling computer
automatically starts and stops recording as you start and stop cycling.
•
Power : Average Power
•
Ascent: Ascended meters / feet
•
Altitude: Average altitude
•
Sound to set sounds Off, Soft, Loud or Very loud .
•
Reset TRIP to reset a distance. Confirm with OK.
•
Auto SCROLL to set the computer to scroll the views automatically.
•
Sensor SEARCH to search for WearLink, Speed, Cadence* and Power* data, if the signal disappears during
the training session due to interference.
Stop Training
Press STOP to pause the training session. Continue is displayed.
Press STOP again.
Care for your transmitter after training. Detach the transmitter connector from the strap and rinse the
strap under running water after every use. Wash the strap regularly in a washing machine at 40ºC/104ºF at
least after every fifth use.
For complete care and maintenance instructions, see Care and Maintenance (page 28).
Training with OwnZone
Your cycling computer automatically determines your individual, optimum and safe training intensity zone;
your OwnZone. The unique Polar OwnZone defines your personal training zone for aerobic training. The
function guides you through a warm up, taking your present physical and mental state into account. For
most adults, OwnZone corresponds to about 65-85% of maximum heart rate.
Listening to and interpreting the signals your body sends during physical exertion is an important part of
getting fit. Since warm-up routines differ for different types of training, and since your physical and
mental state may also vary from day to day (due to stress or illness), using the OwnZone function for every
session guarantees the most effective heart rate target zone for that particular type of training and day.
OwnZone can be determined in 1-5 minutes during a warm-up period. The idea is to start training slowly
at a light intensity and to gradually increase intensity and heart rate. OwnZone is developed for healthy
people. Some health conditions may cause heart rate variability-based OwnZone determination to fail.
These conditions include high blood pressure, cardiac arrhythmias, and certain medications.
Before you start determining your OwnZone, make sure that:
• Your user settings are correct.
• The OwnZone function is activated. See Heart Rate Limit Settings (page 19) for more information. The
cycling computer automatically determines your OwnZone every time you start training if the OwnZone
Training
13
ENGLISH
function is on.
Determining Your OwnZone
Your OwnZone is determined in five stages. If the sounds are on, a beep will indicate the end of each
stage.
1.
2.
3.
4.
5.
6.
Wear the transmitter as instructed. Start from time mode and press START .
OZ > is displayed and OwnZone determination begins. Cycle or walk at a slow pace for 1 min. Keep your
heart rate below 100 bpm/ 50 % HRmax during this first stage.
OZ >> Cycle or walk at a normal pace for 1 min. Slowly increase your heart rate by appr. 10 bpm/ 5%
HRmax.
OZ >>> Cycle or walk at a brisk pace for 1 min. Slowly increase your heart rate by appr. 10 bpm/ 5%
HRmax.
OZ >>>> Cycle at a brisk pace or jog at a slow pace for 1 min. Slowly increase your heart rate by appr.
10bpm/ 5% HRmax.
OZ >>>>> Cycle or jog at a brisk pace or run for 1 min. Increase your heart rate by appr. 10bpm/ 5%
HRmax.
When you hear two consecutive beeps, your OwnZone has been determined.
OwnZone Updated and the heart rate zone are displayed. The zone is displayed in beats per minute (bpm)
or as a percentage of maximum heart rate (HR%), depending on your settings.
If OwnZone determination was not successful, your previously determined OwnZone will be used and
OwnZone appears with limits on the display. If OwnZone has not previously been determined, age-based
limits are automatically used.
You can now continue with your training session. Try to keep inside the given heart rate zone to maximize
training benefits. The elapsed time used for OwnZone determination is included in your recorded training
time.
Alternatively, to skip OwnZone determination and to use the previously determined OwnZone, press STOP
at any phase of the process.
Redetermine your OwnZone:
• When changing training environment or training mode.
• When training for the first time after a week’s break.
• If you have not recovered from the previous training session or if you are not feeling well or are stressed.
• After changing user settings.
14
Training
ENGLISH
4. AFTER TRAINING
Training File
View detailed information on your training session in FILES.
1.
In time mode, press NEXT. FILES is displayed.
2.
Press START to view the following information:
•
Date and time when the training session started.
•
Number of the training file (the bigger the file number, the more recent the file is).
3.
To browse the files, use NEXT .
4.
To view information recorded in a certain file, press OK.
5.
Use NEXT to browse through the following information:
Text on the display
Displayed information
Exe. Time
Duration of the training session.
Average heart rate and maximum heart rate alternate on the display.
Limits
Upper and lower heart rate limit used during the training session (if
limits are set).
In Zone
Time spent In Zone and Above and Below heart rate zone alternate on
the display.
Kcal/ % Fat
Expended calories during the session and fat percentage.
Distance
Ridden distance.
Speed
Maximum and average speed.
Cadence
Maximum and average cadence.
Power
Maximum and average power.
Ride Time
Ridden time: for instance, if you stop cycling but do not stop recording
the training session, the cycling time counting will automatically stop,
but the duration of the training session will continue to accumulate.
If the AutoStart function is active, the training and cycling time are the
same, as the cycling computer automatically starts and stops recording
as you start and stop cycling.
Alt./Temp
Maximum altitude
Temperature
To display additional information calculated from the altimeter data,
press OK.
•
•
•
•
•
Incline (Maximum inclination shown in degrees and in
percentage)
Decline (Maximum declination shown in degrees and in
percentage)
Altitude (Minimum altitude)
Ascent (Ascended meters / feet)
Descent (Descended meters / feet)
After Training
15
ENGLISH
Text on the display
Displayed information
LAPS
Number of saved laps
A. LAPS
1.
To view Best lap, press START . The fastest lap time and
lap number are displayed.
2.
To view Avg. lap, press OK. The average lap time is
displayed. Press OK.
3.
Browse the laps with NEXT. You can see the lap number in
the bottom right-hand corner. To view detailed information
on a certain lap, press OK. The following lap information is
displayed:
• Speed
• Cadence
• Distance
• Power
• Alt./Temp.
• Ascent
• Descent
• Incline
• Decline
Number of saved laps
1.
To view Best lap, press START . The fastest lap time and
lap number are displayed.
2.
To view Avg. lap, press OK. The average lap time is
displayed. Press OK.
3.
Browse the laps with NEXT. You can see the lap number in
the bottom right-hand corner. To view detailed information
on a certain lap, press OK. The following lap information is
displayed:
• Speed
• Cadence
• Distance
• Power
• Alt./Temp.
• Ascent
• Descent
• Incline
• Decline
Deleting Training Files
The training file memory becomes full once either the maximum recording time or the maximum number
of files is reached. For more information on the limit values, see Technical Specifications (page 31).
When the training file memory becomes full, the oldest training file is overwritten by the most recent one.
To save the training file for a longer period of time, transfer it to Polar web service at
www.polarpersonaltrainer.com. For more information, see Data Transfer (page 18).
1.
To delete a training file, go to FILES. Press NEXT until Delete FILE is displayed. Press OK.
2.
The date and time when the training session started and the number of the training file are displayed.
3.
To browse the files, use NEXT. To select a file to be deleted, press OK.
4.
Are You SURE? is displayed. To delete the file, press OK. To cancel file deletion, press BACK until the
16
After Training
ENGLISH
cycling computer returns to time mode.
Totals
TOTALS include cumulative information recorded during training sessions since the last reset. Use total
values as a seasonal or monthly counter of training data. The values are updated automatically when
recording of a training session is stopped.
In time mode, press NEXT until TOTALS is displayed. Press START . Use NEXT to browse through the
following information:
•
Trip: Cumulative trip distance and the date when cumulation started.
•
Distance 1: Cumulative distance with bike 1 and the date when the cumulation started.
•
Distance 2: Cumulative distance with bike 2 and the date when the cumulation started.
•
Distance 3: Cumulative distance with bike 3 and the date when the cumulation started.
•
Distance: Cumulative distance of all three bikes and the date when the cumulation started.
•
Odometer : Cumulative distance and the date when the cumulation started (cannot be reset).
•
Ride Time: Total cumulative ridden duration and the date when the cumulation started.
•
Total Time: Total duration and the date when the cumulation started.
•
Total Kcal: Total calories and the date when the cumulation started.
•
Ascent: Cumulative ascent and the date when the cumulation started.
•
Descent: Cumulative descent and the date when the cumulation started.
•
Reset ALL?: To reset all total values, press START . Reset? ALL is displayed. Press OK. Are You SURE? is
displayed. To confirm resetting, press OK. To cancel resetting, press STOP.
To reset a total value, select the value you want to reset by pressing START . Reset? is displayed. Press
OK. Are You SURE? is displayed. To confirm resetting, press OK. To cancel resetting, press STOP.
After Training
17
ENGLISH
5. DATA TRANSFER
For a long-term follow-up, store all your training files at polarpersonaltrainer.com web service. There you
can view detailed information of your training data and get a better understanding of your training. With
Polar DataLink* it is easy to transfer training files to the web service.
How to transfer data:
1.
Register at polarpersonaltrainer.com.
2.
Download and install the Polar WebSync software on your computer from Downloads -section of
polarpersonaltrainer.com.
3.
WebSync software is automatically activated when the box "Launch the Polar WebSync" is ticked at the
end of the installation.
4.
Plug in your DataLink to the USB port of the computer and activate your cycling computer with a long
button press.
5.
Follow the data transfer process and the instructions for downloading the data with the WebSync
Software on your computer screen. For further instructions on data transfer, see WebSync help.
When you transfer data in the future, follow steps 4 and 5 above.
Remove the transmitter from your chest before data transfer.
* Optional Polar DataLink required.
18
Data Transfer
ENGLISH
6. SETTINGS
Cycling Settings
In cycling settings you can activate or disactivate the following functions:
Reminder : This setting is shown only if you have activated the reminder function in
polarpersonaltrainer.com via WebSync. You can use the reminder to indicate when you should drink or eat
so that you can carry on your training.
Target dist. (Target distance): Set a distance you are going to ride and the cycling computer will estimate
your arrival time to the destination according to your cycling speed.
A. Lap (Automatic Lap): Set a distance for the automatic lap and the cycling computer will record the lap
information every time you reach this distance. For example, if you set 1km/mi, the cycling computer will
record lap information every kilometer or mile.
To view and change cycling settings, select Settings > Cycling SET.
The display reads:
To adjust the flashing value,
press SET
To accept the value, press OK
Reminder
Set the reminder ON/OFF.
OK
Target dist.
1.
Set the target distance
function ON/OFF.
OK
2.
Set the distance.
1.
Set the automatic lap
function ON/OFF.
2.
Set the distance.
A. Lap
OK
Timer Settings
Your cycling computer is equipped with two alternating timers. The timers work during training recording.
Use the timers for example as a training tool in interval training to tell you when to switch from a harder to
a lighter period and vice versa.
To view and change timer settings, select Settings > Timer SET .
The display reads:
To adjust the flashing value,
press SET
To accept the value, press OK
Timer 1
1.
Set the Timer 1 ON /OFF.
OK
2.
If you set the timer on, set
the minutes and the seconds.
1.
Set the Timer 2 ON /OFF.
2.
If you set the timer on, set
the minutes and the seconds.
Timer 2
OK
Heart Rate Limit Settings
Select the heart rate limit type in heart rate limit settings:
• Manual limits: Create a target heart rate zone by setting the upper and the lower heart rate limits
manually.
• OwnZone: The cycling computer automatically determines an individual and safe training intensity zone for
you. For more information on OwnZone, see Training with OwnZone (page 13).
• Off: You can also deactivate heart rate limits. In this case, no heart rate limits are used during a training
session and no target heart rate zone values are calculated in the Summary or Files.
Settings
19
ENGLISH
To view and change heart rate limit settings, select Settings > Limits SET.
The display reads:
To adjust the flashing
value, press SET
To accept the value, press OK
HR / HR% MODE
Select heart rate
displayed as beats per
minute (HR) or as % of
your maximum heart
rate (HR%)
OK
TYPE
Select Manual, OwnZone
or Off.
Press OK (If you turned the
function off or activated
OwnZone, the cycling computer
returns to Limits SET view).
If you selected Manual limits, set the heart rate limits:
HighLimit
Set the upper heart rate
limit.
OK
LowLimit
Set the lower heart rate
limit.
OK
Bike Settings
You can set three bike preferences for the cycling computer.
To view and change bike settings, select Settings > Bike SET. Select Bike 1/ 2 / 3.
Prepare the following settings for the bike. Before you start training, long-press NEXT in time mode to
select bike 1, 2 or 3.
AutoStart
In AutoStart SET you can set the AutoStart function ON/OFF.
The AutoStart function starts or stops the training recording automatically when you start or stop cycling.
The AutoStart function requires wheel size setting and Polar Speed Sensor W.I.N.D.
Wheel
In Wheel SET you can set the wheel size (mm) of your bike. Wheel size settings are a prerequisite for
accurate cycling information.
There are two ways to determine the wheel size of your bike:
Method 1
Measure the wheel manually for the most accurate result.
Use the valve to mark the point where the wheel touches the ground. Draw a line on the ground to mark
the point. Move your bike forward on a flat surface for one complete rotation. The tire should be
perpendicular to the ground. Draw another line on the ground when the valve is at the starting point to
mark a full rotation. Measure the distance between the two lines.
Subtract 4 mm from the distance to account for your weight on the bike to get your wheel circumference.
Enter this value in the cycling computer.
Method 2
Look for the diameter in inches or in ETRTO printed on the wheel. Match it to the wheel size in
millimeters in the right column of the chart.
You can also check the wheel size from the manufacturer.
20
Settings
ENGLISH
ETRTO
Wheel size diameter (inches)
Wheel size setting (mm)
25-559
26 x 1.0
1884
23-571
650 x 23C
1909
35-559
26 x 1.50
1947
37-622
700 x 35C
1958
47-559
26 x 1.95
2022
20-622
700 x 20C
2051
52-559
26 x 2.0
2054
23-622
700 x 23C
2070
25-622
700 x 25C
2080
28-622
700 x 28
2101
32-622
700 x 32C
2126
42-622
700 x 40C
2189
47-622
700 x 47C
2220
Wheel sizes on the chart are advisory as wheel size depends on the wheel type and air pressure. Due to te variation
of the measurements, Polar cannot be held responsible for their validity.
Speed
Set the Polar speed sensor ON/OFF in Speed SET.
If you set the speed sensor ON, Speed TEACH? is displayed.
If your sensor is already taught, select STOP.
If your sensor has not been taught, see Using a New Accessory (page 25) for more information on teaching.
Cadence
Set the Polar cadence sensor ON/OFF in Cadence SET.
If you set the cadence sensor ON, Cadence TEACH? is displayed.
If your sensor is already taught, select STOP.
If your sensor has not been taught, see Using a New Accessory (page 25) for more information on teaching.
Power
Set the Polar Power Output Sensor ON/OFF in Power SET .
If you set the power sensor ON, the following settings are displayed:
1.
C. weight: Set chain weight in grams. Accept the set value with OK.
2.
C. length: Set chain length in millimeters. Accept the set value with OK.
3. S. length: Set span length in millimeters. Accept the set value with OK.
Examples of chain weights and lengths (Due to the variation of the measurements, Polar cannot be held
responsible for their validity):
Weight
Length
Settings
21
ENGLISH
Shimano Dura-Ace CN-7700
Super narrow HG
280 g
1473 mm
Shimano Dura-Ace CN-7701
Ultegra CN-HG92, 105
HG72,105 HG73
280 g
1473 mm
Shimano Sora CN-HG50
335 g
1473 mm
Campagnolo Record 2000, 10
Speed Chain
260 g
1473 mm
Campagnolo 10 Speed Chains
Chorus, Centaur
274 g
1473 mm
Campagnolo Veloce, Mirage, and
Xenon
277g
1473 mm
For precise readings, all settings must be as accurate as possible. Chain length and weight are directly
proportionate to power value. If there is 1% error, the power value will also have 1% error.
There is no need to re-enter chain length and weight if links are removed. The system uses chain density
(weight/length). Removing links from the chain does not affect density.
4.
Power TEACH? :
If your sensor is already taught, select STOP.
If your sensor has not been taught, see Using a New Accessory (page 25) for more information on
teaching.
Altitude Settings
Calibrate the altimeter to ensure accurate measurement.
Manual calibration: Set the reference altitude whenever a reliable reference, such as a peak or a
topographic map, is available or you are at the sea level.
Automatic calibration: By using the automatic altitude calibration, you can adjust the starting elevation to
be always the same in the beginning of the training session. Calibrate the elevation manually and turn the
automatic calibration on. From now on, this elevation will be always used as the base elevation in the
beginning of the training session if automatic altitude calibration is in use. Also, if the automatic
calibration is turned on and you calibrate the cycling computer manually, the new value will be used as a
new starting elevation for automatic calibration.
Select automatic calibration if you always train in the same environment to ensure correct altitude values.
To view and change altitude settings, select Settings > Altitude SET.
The display reads:
To adjust the flashing value,
press SET
To accept the value, press OK
Altitude
Set the altitude of the current
location.
OK
Auto calibr.
Set the automatic calibration
ON/OFF.
OK
Watch Settings
To view and change the time and date settings, select Settings > Watch SET.
22
Settings
ENGLISH
The display reads:
To adjust the flashing value,
press SET
To accept the value, press OK
Time
1.
OK
2.
3.
4.
Date
24h/12h: Set 24h or 12h
time mode.
AM/PM: Set AM or PM if you
use 12h format.
Set hours.
Set minutes.
Set date.
OK
The order of date settings
depends on which time format
you have chosen (24h: day month - year / 12h: month - day
- year).
User Settings
Enter accurate user information in the cycling computer to receive the correct feedback on your
performance.
To view and change user settings, select Settings > User SET .
The display reads:
To adjust the flashing value,
press SET
To accept the value, press OK
WEIGHT kg/ lb
Set your weight in kilograms or
pounds.
OK
Height cm/ ft
Set your height in cm or ft.
OK
Set inches (if you have chosen
lb/ft)
Birthday
Set your date of birth.
OK
The order of date settings
depends on which time format
you have chosen (24h: day month - year / 12h: month - day
- year).
HR Max
Set your maximum heart rate if
you know your laboratory
measured current maximum
heart rate value. Your
age-predicted maximum heart
rate value (220-age) is displayed
as default when you set this
value for the first time.
OK
For more information, see
Maximum Heart Rate (HRmax)
HR Sit
Set your heart rate value in a
sitting position. For more
information, see Heart Rate
Value in a Sitting Position
(HRsit)
OK
Sex
Set male or female.
OK
Male / Female
Settings
23
ENGLISH
Maximum Heart Rate (HRmax)
HRmax is used to estimate energy expenditure. HRmax is the highest number of heartbeats per minute
during maximum physical exertion. HRmax is also useful when determining exercise intensity. The most
accurate method for determining your individual HRmax is to perform a maximal exercise stress test in a
laboratory.
Heart Rate Value in a Sitting Position (HR sit)
HRsit is used to estimate energy expenditure. HRsit is your typical heart rate when you are not doing any
physical activity (while sitting). To determine your HR sit easily, wear the transmitter, hold your cycling
computer in your hand, sit down and do not engage in any physical activity. After two or three minutes,
press OK in time mode to view your heart rate. This value is your HRsit.
General Settings
To view and change sound and unit settings, select Settings > General SET .
The display reads:
To adjust the flashing value,
press SET
To accept the value, press OK
SOUND Off/Soft/Loud/Very loud
Select Off*/Soft/Loud/Very loud .
OK
*Off selection inactivates the
heart rate limit alarm.
Unit kg/cm / lb/ft
Select metric (kg/cm) or
imperial (lb/ft) units.
OK
Watch face
Select LOGO or DATE.
OK
24
Settings
ENGLISH
7. USING A NEW ACCESSORY
A new sensor purchased as a separate accessory has to be introduced to the cycling computer. This is
called teaching and takes only a few seconds. Teaching ensures that your cycling computer receives
signals from your sensor only, enabling disturbance-free exercise in a group. If you have purchased the
sensor and the cycling computer as a set, the sensor has already been “taught” to work together with the
cycling computer. You just need to activate the sensor in your cycling computer.
You can teach one speed, cadence and power sensor for each bike setting.
Teaching a New Speed Sensor
Select Settings > Bike SET > Bike1/ 2 / 3 > Speed SET > ON. Speed TEACH? is displayed
•
To teach a new sensor, make sure you are not near (40 m/131 ft) other speed sensors. To confirm
teaching, press OK. Test drive is displayed. To activate the sensor, press OK and rotate the wheel a few
times. A flashing red light indicates that the sensor is activated. Completed! is displayed once the teaching
process is over. The cycling computer is now ready to receive speed and distance data.
•
If Teaching FAILED is displayed, the cycling computer may be detecting the signal of more than one sensor
or the sensor is not activated. Make sure you are not near (40 m/131 ft) other speed sensors and press
OK. Try again? is displayed. Press OK and rotate the wheel a few times to activate the sensor.
•
If you want to cancel teaching, press STOP. The already taught speed sensor is taken into use.
Teaching a New Cadence Sensor*
Select Settings > Bike SET > Bike 1/ 2 / 3 > Cadence SET > ON. Cadence TEACH? is displayed
•
To teach a new sensor, make sure you are not near (40 m/131 ft) other cadence sensors. To confirm
teaching, press OK. Test drive is displayed. To activate the sensor, press OK and rotate the crank a few
times. A flashing red light indicates that the sensor is activated. Completed! is displayed once the teaching
process is over. The cycling computer is now ready to receive cadence data.
•
If Teaching FAILED is displayed, the cycling computer may be detecting the signal of more than one sensor
or the sensor is not activated. Make sure you are not near (40 m/131 ft) other cadence sensors and press
OK. Try again? is displayed. Press OK and rotate the crank a few times to activate the sensor.
•
If you want to cancel teaching, press STOP. The already taught cadence sensor is taken into use.
Teaching a New Power Output Sensor*
Select Settings > Bike SET > Bike 1/ 2 / 3 > Power SET > ON.
•
C. length: Set chain length in millimeters. Accept the set value with OK.
•
C. weight: Set chain weight in grams. Accept the set value with OK.
•
S. length: Set span length in millimeters. Measure the distance from the centre of the rear hub to the
centre of the bottom bracket as shown in the picture. Accept the set value with OK.
Examples of chain weights and lengths (Due to the variation of the measurements, Polar cannot be held
responsible for their validity):
Shimano Dura-Ace CN-7700
Super narrow HG
Weight
Length
280 g
1473 mm
Using a New Accessory
25
ENGLISH
Shimano Dura-Ace CN-7701
Ultegra CN-HG92, 105
HG72,105 HG73
280 g
1473 mm
Shimano Sora CN-HG50
335 g
1473 mm
Campagnolo Record 2000, 10
Speed Chain
260 g
1473 mm
Campagnolo 10 Speed Chains
Chorus, Centaur
274 g
1473 mm
Campagnolo Veloce, Mirage, and
Xenon
277g
1473 mm
For precise readings, all settings must be as accurate as possible. Chain length and weight are directly
proportionate to power value. If they have, for example, 1% error, then the Power Value will also have this
1% error.
There is no need to re-enter chain length and weight if links are removed. The system uses chain density
(weight/length). Removing links from the chain does not affect density.
•
Power TEACH? :
To teach a new sensor, make sure you are not near (40 m/131 ft) other power sensors. To confirm
teaching, press OK. Test drive is displayed. To activate the sensor, press OK and rotate the crank a few
times. A flashing red light indicates that the sensor is activated. Completed! is displayed once the teaching
process is over. The cycling computer is now ready to receive power data.
•
If Teaching FAILED is displayed, the cycling computer may be detecting the signal of more than one sensor
or the sensor is not activated. Make sure you are not near (40 m/131 ft) other power sensors and press
OK. Try again? is displayed. Press OK and rotate the crank a few times to activate the sensor.
•
If you want to cancel teaching, press STOP. The already taught power sensor is taken into use.
*Optional sensor required.
26
Using a New Accessory
ENGLISH
8. USING A NEW TRANSMITTER
A new Polar WearLink W.I.N.D. transmitter purchased as a separate accessory has to be introduced to the
cycling computer. This is called teaching and takes only a few seconds. Teaching ensures that your
cycling computer receives signals from your transmitter, enabling disturbance-free training in a group. If
you have purchased the transmitter and the cycling computer as a set, the transmitter has already been
taught to work together with the cycling computer.
Teaching a New Transmitter
Wear the transmitter and make sure that you are not near (40 m/131 ft) other Polar WearLink W.I.N.D.
transmitters.
Activate your cycling computer with a three-second
button press.
Once the cycling computer identifies a new transmitter, WearLink FOUND , WearLink TEACH? is displayed.
• Press OK to confirm. Once the teaching process is over, Completed! is displayed.
• Press STOP to cancel teaching.
Using a New Transmitter
27
ENGLISH
9. IMPORTANT INFORMATION
Care and Maintenance
Like any electronic device, the Polar cycling computer should be treated with care. The suggestions below
will help you fulfill guarantee obligations and enjoy this product for many years to come.
Caring of Your Product
Detach the transmitter connector from the strap and rinse the strap under running water after every use.
Dry the connector with a soft towel. Never use alcohol or any abrasive material (steel wool or cleaning
chemicals).
Wash the strap regularly in a washing machine at 40ºC/104ºF or at least after every fifth use. This ensures
reliable measurement and maximizes the life span of the transmitter. Use a washing pouch. Do not soak,
spin-dry, iron, dry clean or bleach the strap. Do not use detergent with bleach or fabric softener. Never put
the transmitter connector in the washing machine or drier!
Dry and store the strap and connector separately, to maximize the transmitter battery lifetime. Wash the
strap in a washing machine before long-term storage and always after use in pool water with high chlorine
content.
Keep your cycling computer, transmitter and sensors in a cool and dry place. Do not keep them in a damp
environment, in non-breathable material (a plastic bag or a sports bag) nor with conductive material (a wet
towel). The cycling computer, transmitter and sensors are water resistant, and can be used in rainy
weather. To maintain the water resistance, do not wash the cycling computer or the sensors with a
pressure washer or sink them under water. Do not expose to direct sunlight for extended periods such as
by leaving it in a car or mounted on the bike mount.
Keep your cycling computer clean. Clean the cycling computer and sensors with a mild soap and water
solution and rinse them with clean water. Do not immerse them in water. Dry them carefully with a soft
towel. Never use alcohol or any abrasive material such as steel wool or cleaning chemicals.
Avoid hard hits to the cycling computer, speed and cadence sensors, as these may damage the sensor
units.
Service
During the two-year guarantee/warranty period we recommend that you have service, other than battery
replacement, done by an authorized Polar Service Center only. The warranty does not cover damage or
consequential damage caused by service not authorized by Polar Electro.
For contact information and all Polar Service Center addresses, visit www.polar.fi/support and
country-specific websites.
Register your Polar product at http://register.polar.fi/ to ensure we can keep improving our products and
services to better meet your needs.
The username for your Polar Account is always your email address. The same username and password are valid for
Polar product registration, polarpersonaltrainer.com, Polar discussion forum and Newsletter registration.
Changing Batteries
The CS500+ cycling computer and the WearLink transmitter W.I.N.D. both have a user changeable
battery. To change the battery yourself, please follow the instructions carefully as instructed in chapter
Changing Cycling Computer Battery.
The batteries for the speed and cadence sensors cannot be replaced. Polar has designed speed and
cadence sensors to be sealed in order to maximize mechanical longevity and reliability. The sensors have
long-life batteries inside. To purchase a new sensor contact your authorized Polar Service Center or
retailer.
For instructions on how to change the battery for the Power Output Sensor W.I.N.D., consult the Power
28
Important Information
ENGLISH
Output Sensor user manual.
Changing Cycling Computer Battery
To change the batteries of the cycling computer and transmitter yourself, carefully follow the instructions
below:
When changing the battery, make sure the sealing ring is not damaged, in which case you should replace
it with a new one. Battery kits with sealing rings are available at well-equipped Polar retailers and
authorized Polar Service Centers. In the USA and Canada, the additional sealing rings are available at
authorized Polar Service Centers. In USA the sealing ring/battery kits are also available at
www.shoppolar.com.
1.
Open the battery cover by turning it counter
clockwise 45 degrees (picture 1).
2.
Remove the battery cover by lifting it carefully.
The battery is attached to the cover. Remove the
battery. Be careful not to damage the threads of
the back cover and metal spring inside the
battery cover.
3.
Place a new battery with the positive (+) side
against the cover and negative (-) side toward the
cycling computer (picture 2).
4.
The sealing D -ring of the battery cover is
attached to the back cover. Replace the sealing
D -ring if it is damaged. Before closing the
battery cover, make sure that the sealing ring is
undamaged and is placed correctly in its groove.
Ensure that the flat surface of the sealing D –ring
is against the back cover. Otherwise sealing D
–ring might damage when you close the battery
cover.
5.
Put the battery cover in its place and close it by
turning the cover clockwise (picture 3). Make
sure that the cover is closed properly!
Transmitter connector
To change the battery yourself, follow below
instructions.
1.
2.
3.
4.
Using a coin, open the battery cover by turning it
counterclockwise to OPEN.
Insert the battery (CR2025) inside the cover with
the positive (+) side against the cover. Make sure
the sealing ring is in the groove to ensure water
resistance.
Press the cover back into the connector.
Use the coin to turn the cover clockwise to
CLOSE.
Open the cover only when changing the battery to
ensure a long life, and make sure the sealing ring is
not damaged, in which case you should replace it
with a new one.
Battery kits with sealing rings are available at Polar
retailers and authorized Polar Service Centers. In
the USA and Canada, sealing rings are available at
Important Information
29
ENGLISH
authorized Polar Service Centers only.
Keep batteries away from children. If swallowed, contact a doctor immediately. Batteries should be disposed of in
compliance with local regulations.
Danger of explosion if the battery is replaced with wrong type.
Precautions
The Polar cycling computer displays your performance indicators. It indicates the level of physiological
strain and intensity during exercise. It also measures speed and distance when cycling with a Polar CS
speed sensor W.I.N.D. The Polar CS cadence sensor W.I.N.D. is designed to measure cadence when
cycling. The Polar Power Output Sensor is designed to measure power output when cycling. No other use
is intended or implied.
The Polar cycling computer should not be used for obtaining environmental measurements that require
professional or industrial precision. Furthermore, the device should not be used to obtain measurements
when engaged in airborne or underwater activities.
Interference During Exercise
Disturbance may occur near microwave ovens and computers. Also WLAN base stations may cause
interference when exercising with CS500+. To avoid erratic reading or misbehaviors, move away from
possible sources of disturbance.
Minimizing Risks When Exercising
Exercise may include some risk. Before beginning a regular exercise program, it is recommended that you
answer the following questions concerning your health status. If you answer yes to any of these questions,
we recommend that you consult a doctor before starting any training program.
• Have you been physically inactive for the past 5 years?
• Do you have high blood pressure or high blood cholesterol?
• Do you have symptoms of any disease?
• Are you taking any blood pressure or heart medication?
• Do you have a history of breathing problems?
• Are you recovering from a serious illness or medical treatment?
• Do you use a pacemaker or other implanted electronic device?
• Do you smoke?
• Are you pregnant?
Note that in addition to exercise intensity, medications for heart conditions, blood pressure, psychological
conditions, asthma, breathing, etc., as well as some energy drinks, alcohol, and nicotine may also affect
heart rate.
It is important to be sensitive to your body’s responses during exercise. If you feel unexpected pain or
excessive fatigue when exercising, it is recommended that you stop the exercise or continue at a lighter
intensity.
Note! If you are using a pacemaker, you can use Polar training computers. In theory interference to
pacemaker caused by Polar products should not be possible. In practice no reports exist to suggest anyone
ever having experienced interference. We cannot however issue an official guarantee on our products'
suitability with all pacemakers or other implanted devices due to the variety of devices available. If you
have any doubts, or if you experience any unusual sensations while using Polar products, please consult
your physician or contact the implanted electronic device manufacturer to determine safety in your case.
30
Important Information
ENGLISH
If you are allergic to any substance that comes into contact with your skin or if you suspect an allergic
reaction due to using the product, check the listed materials in Technical Specifications. To avoid any
skin reaction to the transmitter, wear it over a shirt, but moisten the shirt well under the electrodes to
ensure flawless operation.
The combined impact of moisture and intense abrasion may cause a black color to come off the transmitter’s
surface, possibly staining light-colored clothes. If you use insect repellent on your skin, you must ensure that it
does not come into contact with the transmitter.
Technical Specifications
Cycling computer
Battery life:
Battery type:
Battery sealing ring:
Operating temperature:
Cycling Computer Materials:
Watch accuracy:
Accuracy of heart rate monitor:
Heart rate measuring range:
Current speed display range:
Altitude display range:
Ascent resolution:
Average 3 years (if you train on avg. 1h/day, 7 days/week)
CR 2354
Silicone D-ring 28.0 x 0.8mm (no need to change during battery
replacement if sealing ring is not damaged)
-10 °C to +50 °C / 14 °F to 122 °F
PMMA lens with hard coating in top surface, cycling computer body
ABS+GF/PA+GF, metal parts stainless steel (nickel free)
Better than ± 0.5 seconds / day at 25 °C / 77 °F temperature.
± 1% or 1 bpm, whichever larger. Definition applies to stable conditions.
15-240
0-127 km/h or 0-75 mph
-550 m … +9000 m / -1800 ft … +29500 ft
5 m / 20 ft
Cycling computer limit values
30
Maximum number of files:
Maximum recording time:
Heart rate
144 h 20 min*
Heart rate + speed
78 h 03 min*
Heart rate + speed +
67 h 09 min*
cadence
Heart rate + cadence
111 h 01 min*
Heart rate + speed +
15 h 12 min**
power
Heart rate + cadence + 19 h 55 min**
power
Heart rate + speed +
13 h 25 min**
cadence + power
Heart rate + power
24 h 04 min**
*The cycling computer stores the data in 5 second intervals.
**The cycling computer stores the data in 1 second intervals when the power sensor is in use.
Maximum number of laps:
99
Total distance:
999 999 km / 621370 mi
Total duration:
9999h 59min 59s
Total calories:
999 999 kcal
Total exercise count:
9999
Total ascent:
304795 m / 999980 ft
Dual Lock Bike Mount
Materials:
Rubber Part TPE, Bike Mount body PA+GF, metal parts stainless steel
(nickel free)
Transmitter
Battery life of WearLink transmitter W.I.N.D.:
Battery type:
Battery sealing ring:
2000 hours of use
CR2025
O-ring 20.0 x 1.0, material silicone
Important Information
31
ENGLISH
Operating temperature:
Connector material:
Strap material:
-10 °C to +40 °C / 14 °F to 104 °F
Polyamide
Polyurethane/ Polyamide/ Polyester/ Elastane/ Nylon
The Polar CS500+ cycling computer applies the following patented technologies, among others:
•
OwnZone® assessment for determining personal target heart rate limits for the day
•
Wearlink® technology for heart rate measurement
Polar DataLink and Polar WebSync 2.1 Software (or newer)
System Requirements:
PC MS Windows (2000/XP/Vista/7), 32 bit, Microsoft .NET Framework
Version 2.0
Intel Mac OS X 10.5 or newer
Water resistance of Polar products is tested according to International IEC 60529 IPx7 (1m, 30min,
20ºC). Products are divided into four different categories according to water resistance. Check the back of
your Polar product for the water resistance category and compare it to the chart below. Please note that
these definitions do not necessarily apply to products of other manufacturers.
Marking on case back
Water resistant characteristics
Water proof IPX7
Not suitable for bathing or swimming. Protected
against wash splashes and raindrops. Do not wash
with a pressure washer.
Water resistant*
Not suitable for swimming. Protected against wash
splashes, sweat, raindrops etc. Do not wash with a
pressure washer.
Water resistant 30 m/50 m
Suitable for bathing and swimming
Water resistant 100 m
Suitable for swimming and snorkeling (without air
tanks)
*These characteristics also apply to Polar WearLink transmitter W.I.N.D. , CS speed and cadence sensors
W.I.N.D. and Power Output Sensor W.I.N.D. marked water resistant.
Frequently Asked Questions
What should I do if...
...the battery symbol and WearLink /Speed/Cadence/Power is displayed?
...The battery of your WearLink or Speed/Cadence/Power sensor is expiring. For more information, see Care
and Maintenance (page 28).
...I do not know where I am in the menu?
Press and hold BACK until the time of day is displayed.
...the cycling computer does not measure the calories?
Burnt calories are calculated only when you are wearing the transmitter and all the user settings are set
correctly. For more information see User Settings (page 23).
...the heart rate reading becomes erratic, extremely high or shows nil (00)?
• Make sure the cycling computer is no further than 40 m/131 ft from the transmitter.
• Make sure the transmitter belt has not loosened during exercise.
• Make sure the textile electrodes in the sports apparel fit snugly.
• Make sure that the electrodes of the transmitter / sports apparel are moistened.
• Make sure the transmitter / sports apparel is clean.
• Make sure that there is no other heart rate transmitter within 40 m/131 ft.
• Strong electromagnetic signals can cause erratic readings. For further information, see Precautions
32
Important Information
ENGLISH
•
•
30).
If the erratic heart rate reading continues despite moving away from the source of disturbance, slow down
your speed and check your pulse manually. If you feel it corresponds to the high reading on the display,
you may be experiencing cardiac arrhythmia. Most cases of arrhythmia are not serious, but consult your
doctor nevertheless.
A cardiac event may have altered your ECG waveform. In this case, consult your physician.
…exclamation mark and WearLink is displayed and your cycling computer cannot find your heart rate
signal?
• Make sure the cycling computer is no further than 40 m/131 ft from the transmitter.
• Make sure the transmitter belt has not loosened during exercise.
• Make sure the textile electrodes in sports apparel fit snugly.
• Make sure that the electrodes of the transmitter / sports apparel are moistened.
• Make sure the transmitter / electrodes in the sports apparel are clean and undamaged.
• If the heart rate measurement does not work with the sports apparel, try using a WearLink strap. If your
heart rate is detected with the strap, the problem is most probably in the apparel. Please contact the
apparel retailer / manufacturer.
• If you have done all of the above-mentioned actions, and the message still appears and heart rate
measurement does not work, the battery of your transmitter may be empty. For further information, consult
the WearLink Transmitter W.I.N.D. user manual.
…WearLink FOUND and WearLink TEACH? is displayed?
If you have purchased a new transmitter as an accessory, it has to be introduced to the cycling computer.
For further information, see Using a New Transmitter (page 27).
If the transmitter you are using is included in the product set, and the text appears on the display, the
cycling computer may be detecting the signal of another transmitter. In that case, make sure you are
wearing your own transmitter, that the electrodes are moistened, and that the transmitter strap has not
loosened.
...exclamation mark and Speed is displayed?
Make sure your speed sensor is positioned correctly. Rotate the wheel a few times to activate the sensor.
The flashing red light indicates that the sensor is activated.
…exclamation mark and Cadence is displayed?
Make sure your cadence sensor is positioned correctly. Rotate the crank a few times to activate the sensor.
The flashing red light indicates that the sensor is activated.
…exclamation mark and Power is displayed?
Make sure your power sensor is positioned correctly. For further information, see Power Output Sensor
user manual.
...the altitude keeps changing even if I am not moving?
The cycling computer converts measured air pressure into an altitude reading. This is why changes in the
weather may cause changes in altitude readings.
…the altitude readings are inaccurate?
Your altimeter may show faulty altitude if it is exposed to external interference like strong wind or air
conditioning. In this case, try to calibrate the altimeter. If the readings are constantly inaccurate, dirt may
be blocking the air pressure channels. In this case, send the cycling computer to a Polar Service Center.
...Memory full is displayed?
The message appears during training if no memory space is left for the training session. In that case, the
cycling computer will overwrite the oldest training file. To save the training file for a longer period of time,
Important Information
33
ENGLISH
transfer it to Polar web service at www.polarpersonaltrainer.com. Then delete the file from the cycling
computer. For more information, see Deleting Training Files (page 16).
Limited Polar International Guarantee
•
This guarantee does not affect the consumer’s statutory rights under applicable national or state laws in
force, or the consumer’s rights against the dealer arising from their sales/purchase contract.
•
This limited Polar international guarantee is issued by Polar Electro Inc. for consumers who have
purchased this product in the USA or Canada. This limited Polar international guarantee is issued by Polar
Electro Oy for consumers who have purchased this product in other countries.
•
Polar Electro Oy/Polar Electro Inc. guarantees the original consumer/purchaser of this device that the
product will be free from defects in material or workmanship for two (2) years from the date of purchase.
•
The receipt of the original purchase is your proof of purchase!
•
The guarantee does not cover the battery, normal wear and tear, damage due to misuse, abuse, accidents
or non-compliance with the precautions; improper maintenance, commercial use, cracked, broken or
scratched cases/displays, elastic strap and Polar apparel.
•
The guarantee does not cover any damage/s, losses, costs or expenses, direct, indirect or incidental,
consequential or special, arising out of, or related to the product.
•
Items purchased second hand are not covered by the two (2) year warranty, unless otherwise stipulated by
local law.
•
During the guarantee period, the product will be either repaired or replaced at any of the authorized Polar
Service Centers regardless of the country of purchase.
Guarantee with respect to any product will be limited to countries where the product has been initially
marketed.
Polar Electro Oy is a ISO 9001:2008 certified company.
Copyright © 2011 Polar Electro Oy, FI-90440 KEMPELE, Finland.
All rights reserved. No part of this manual may be used or reproduced in any form or by any means without
prior written permission of Polar Electro Oy. The names and logos marked with a ™ symbol in this user
manual or in the package of this product are trademarks of Polar Electro Oy. The names and logos marked
with a ® symbol in this user manual or in the package of this product are registered trademarks of Polar
Electro Oy, except Windows which is a registered trademark of Microsoft Corporation.
This product is compliant with Directives 93/42/EEC and 1999/5/EC. The relevant Declaration of
Conformity is available at www.support.polar.fi/declaration_of_conformity.html.
FCC regulatory information
This device complies with part 15 of the FCC rules. Operation is subject to the following two conditions:
(1) This device may not cause harmful interference, and (2) This device must accept any interference
received, including interference that may cause undesired operation.
Note: This equipment has been tested and found to comply with the limits for a Class B digital device,
pursuant to part 15 of the FCC Rules. These limits are designed to provide reasonable protection against
harmful interference in a residential installation. This equipment generates, uses and can radiate radio
frequency energy and, if not installed and used in accordance with the instructions, may cause harmful
interference to radio communications. However, there is no guarantee that interference will not occur in a
particular installation. If this equipment does cause harmful interference to radio or television reception,
which can be determined by turning the equipment off and on, the user is encouraged to try to correct the
interference by one or more of the following measures:
1.
2.
3.
34
Reorient or relocate the receiving antenna.
Increase the separation between the equipment and receiver.
Connect the equipment into an outlet on a circuit different from that to which the receiver is connected.
Important Information
ENGLISH
4.
Consult the dealer or an experienced radio/TV technician for help.
Caution! Changes or modifications not expressly approved by the party responsible for compliance could
void the user’s authority to operate the equipment.
FCC Radiation Exposure Statement
This product emits radio frequency energy, but the radiated output power of this device is far below the
FCC and IC radio frequency exposure limits. Nevertheless, the device should be used in such a manner
that the potential for human contact with the antenna during normal operation is minimized.
This crossed out wheeled bin marking shows that Polar products are electronic devices and are in the
scope of Directive 2002/96/EC of the European Parliament and of the Council on waste electrical and
electronic equipment (WEEE) and batteries and accumulators used in products are in the scope of
Directive 2006/66/EC of the European Parliament and of the Council of 6 September 2006 on batteries
and accumulators and waste batteries and accumulators. These products and batteries/accumulators
inside Polar products should thus be disposed of separately in EU countries. Polar encourages you to
minimize possible effects of waste on the environment and human health also outside the European Union
by following local waste disposal regulations and, where possible, utilize separate collection of electronic
devices for products, and battery and accumulator collection for batteries and accumulators.
This marking shows that product is protected against electric shocks.
Disclaimer
•
•
•
The material in this manual is for informational purposes only. The products it describes are subject to
change without prior notice, due to the manufacturer’s continuous development program.
Polar Electro Inc./Polar Electro Oy makes no representations or warranties with respect to this manual or
with respect to the products described herein.
Polar Electro Inc./Polar Electro Oy shall not be liable for any damages, losses, costs or expenses, direct,
indirect or incidental, consequential or special, arising out of, or related to the use of this material or the
products described herein.
This product is covered by the following patent documents:
FI 110303 B, EP 0748185, JP3831410, US6104947, DE 69532803.4-08, FI 6815, EP 1245184, US 7076291,
HK10484, US6199021, US6356838, EP0909940, FI110915, US7324841, EP1361819, FI23471, US D492999SS,
EU0046107-002, EU0046107-003.
Manufactured by:
Polar Electro Oy
Professorintie 5
FIN-90440 KEMPELE
Tel +358 8 5202 100
Fax +358 8 5202 300
www.polar.fi [http://www.polar.fi]
17942967.01 ENG B
10/2011
Important Information
35
ENGLISH
INDEX
Altitude settings . . . . . . . . . . . . . . . . . . . . . . . . . . . . . . . . . . . . . . . . . . . . . . . . 22
Arrival time . . . . . . . . . . . . . . . . . . . . . . . . . . . . . . . . . . . . . . . . . . . . . . . . . . . . . 19
Attaching cycling computer to the bike mount . . . . . . . . . . . . . . . . . . 8
Automatic calibration . . . . . . . . . . . . . . . . . . . . . . . . . . . . . . . . . . . . . . . . . . 22
Automatic lap . . . . . . . . . . . . . . . . . . . . . . . . . . . . . . . . . . . . . . . . . . . . . . . . . . 19
AutoStart . . . . . . . . . . . . . . . . . . . . . . . . . . . . . . . . . . . . . . . . . . . . . . . . . . . . . . . 20
Basic settings . . . . . . . . . . . . . . . . . . . . . . . . . . . . . . . . . . . . . . . . . . . . . . . . . . . 7
Battery replacement . . . . . . . . . . . . . . . . . . . . . . . . . . . . . . . . . . . . . . . . . . . . 28
Bike settings . . . . . . . . . . . . . . . . . . . . . . . . . . . . . . . . . . . . . . . . . . . . . . . . . . . 20
Button functions . . . . . . . . . . . . . . . . . . . . . . . . . . . . . . . . . . . . . . . . . . . . . . . . 6
Cadence sensor settings . . . . . . . . . . . . . . . . . . . . . . . . . . . . . . . . . . . . . . . 21
Care instructions . . . . . . . . . . . . . . . . . . . . . . . . . . . . . . . . . . . . . . . . . . . . . . . 28
Chain length . . . . . . . . . . . . . . . . . . . . . . . . . . . . . . . . . . . . . . . . . . . . . . . . . . . 21
Chain weight . . . . . . . . . . . . . . . . . . . . . . . . . . . . . . . . . . . . . . . . . . . . . . . . . . . 21
Cycling settings . . . . . . . . . . . . . . . . . . . . . . . . . . . . . . . . . . . . . . . . . . . . . . . . 19
Date . . . . . . . . . . . . . . . . . . . . . . . . . . . . . . . . . . . . . . . . . . . . . . . . . . . . . . . . . . . . 23
Deleting training files . . . . . . . . . . . . . . . . . . . . . . . . . . . . . . . . . . . . . . . . . . 16
Frequently Asked Questions . . . . . . . . . . . . . . . . . . . . . . . . . . . . . . . . . . . . 32
General settings . . . . . . . . . . . . . . . . . . . . . . . . . . . . . . . . . . . . . . . . . . . . . . . . 24
Guarantee . . . . . . . . . . . . . . . . . . . . . . . . . . . . . . . . . . . . . . . . . . . . . . . . . . . . . . 34
Heart rate limit settings . . . . . . . . . . . . . . . . . . . . . . . . . . . . . . . . . . . . . . . . 19
HRmax . . . . . . . . . . . . . . . . . . . . . . . . . . . . . . . . . . . . . . . . . . . . . . . . . . . . . . . . . . . 24
HRsit . . . . . . . . . . . . . . . . . . . . . . . . . . . . . . . . . . . . . . . . . . . . . . . . . . . . . . . . . . . . 24
Installing bike mount . . . . . . . . . . . . . . . . . . . . . . . . . . . . . . . . . . . . . . . . . . . . 7
Lap storing . . . . . . . . . . . . . . . . . . . . . . . . . . . . . . . . . . . . . . . . . . . . . . . . . . . . . 12
Manual calibration . . . . . . . . . . . . . . . . . . . . . . . . . . . . . . . . . . . . . . . . . . . . . 22
Manual limits . . . . . . . . . . . . . . . . . . . . . . . . . . . . . . . . . . . . . . . . . . . . . . . . . . 19
OwnZone . . . . . . . . . . . . . . . . . . . . . . . . . . . . . . . . . . . . . . . . . . . . . . . . . . . . . . . 19
Pause a training session . . . . . . . . . . . . . . . . . . . . . . . . . . . . . . . . . . . . . . . 12
Power save mode . . . . . . . . . . . . . . . . . . . . . . . . . . . . . . . . . . . . . . . . . . . . . . . . 6
Power sensor settings . . . . . . . . . . . . . . . . . . . . . . . . . . . . . . . . . . . . . . . . . . 21
Precautions . . . . . . . . . . . . . . . . . . . . . . . . . . . . . . . . . . . . . . . . . . . . . . . . . . . . . 30
Reminder . . . . . . . . . . . . . . . . . . . . . . . . . . . . . . . . . . . . . . . . . . . . . . . . . . . . . . . 19
Reset total files . . . . . . . . . . . . . . . . . . . . . . . . . . . . . . . . . . . . . . . . . . . . . . . . 17
Service . . . . . . . . . . . . . . . . . . . . . . . . . . . . . . . . . . . . . . . . . . . . . . . . . . . . . . . . . 28
Sound . . . . . . . . . . . . . . . . . . . . . . . . . . . . . . . . . . . . . . . . . . . . . . . . . . . . . . . . . . 24
Span length . . . . . . . . . . . . . . . . . . . . . . . . . . . . . . . . . . . . . . . . . . . . . . . . . . . . 21
Speed sensor settings . . . . . . . . . . . . . . . . . . . . . . . . . . . . . . . . . . . . . . . . . . 21
Start measuring heart rate . . . . . . . . . . . . . . . . . . . . . . . . . . . . . . . . . . . . . . 9
Start recording a training session . . . . . . . . . . . . . . . . . . . . . . . . . . . . . . . 9
Stop recording a training session . . . . . . . . . . . . . . . . . . . . . . . . . . . . . . 13
Target distance . . . . . . . . . . . . . . . . . . . . . . . . . . . . . . . . . . . . . . . . . . . . . . . . . 19
Teaching a new cadence sensor . . . . . . . . . . . . . . . . . . . . . . . . . . . . . . . . 25
Teaching a new power sensor . . . . . . . . . . . . . . . . . . . . . . . . . . . . . . . . . . 25
Teaching a new speed sensor . . . . . . . . . . . . . . . . . . . . . . . . . . . . . . . . . . 25
Teaching a new transmitter . . . . . . . . . . . . . . . . . . . . . . . . . . . . . . . . . . . . 27
Technical specifications . . . . . . . . . . . . . . . . . . . . . . . . . . . . . . . . . . . . . . . . 31
Time . . . . . . . . . . . . . . . . . . . . . . . . . . . . . . . . . . . . . . . . . . . . . . . . . . . . . . . . . . . . 23
Timer settings . . . . . . . . . . . . . . . . . . . . . . . . . . . . . . . . . . . . . . . . . . . . . . . . . . 19
Totals . . . . . . . . . . . . . . . . . . . . . . . . . . . . . . . . . . . . . . . . . . . . . . . . . . . . . . . . . . . 17
Training files . . . . . . . . . . . . . . . . . . . . . . . . . . . . . . . . . . . . . . . . . . . . . . . . . . . 15
Training information . . . . . . . . . . . . . . . . . . . . . . . . . . . . . . . . . . . . . . . . . . . 10
Training summary . . . . . . . . . . . . . . . . . . . . . . . . . . . . . . . . . . . . . . . . . . . . . . 12
Training with OwnZone . . . . . . . . . . . . . . . . . . . . . . . . . . . . . . . . . . . . . . . . . 13
Transmitter . . . . . . . . . . . . . . . . . . . . . . . . . . . . . . . . . . . . . . . . . . . . . . . . . . . . . . 9
Units . . . . . . . . . . . . . . . . . . . . . . . . . . . . . . . . . . . . . . . . . . . . . . . . . . . . . . . . . . . 24
36
Index
User settings . . . . . . . . . . . . . . . . . . . . . . . . . . . . . . . . . . . . . . . . . . . . . . . . . . . 23
Watch face . . . . . . . . . . . . . . . . . . . . . . . . . . . . . . . . . . . . . . . . . . . . . . . . . . . . . 24
Watch settings . . . . . . . . . . . . . . . . . . . . . . . . . . . . . . . . . . . . . . . . . . . . . . . . . 22
Water resistance . . . . . . . . . . . . . . . . . . . . . . . . . . . . . . . . . . . . . . . . . . . . . . . 32
Wheel size . . . . . . . . . . . . . . . . . . . . . . . . . . . . . . . . . . . . . . . . . . . . . . . . . . . . . . 20