1
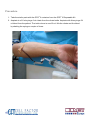
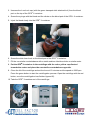
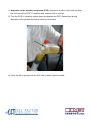
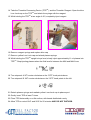
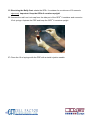
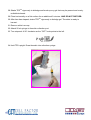
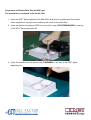
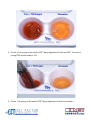
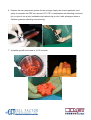
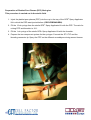
USER MANUAL Description The GPS II System separates the blood components, present in blood, on the basis of density, through application of the GPS -Thermo International Equipment Company (IEC)-Centrifuge. The GPS II System offers the possibility to produce in a short time a platelet concentrate, from a small amount of blood, taken from the patient just prior to surgery. Used materials All materials used in syringes, tubes, connectors and devices for the separation of platelets, supplied with the GPS II System, like polymers, elastomers and stainless steel, are for medical applications. The GPS II System contains no Latex. Warnings and precautions 1. Aspiration of blood should take place “lege artis” under sterile conditions. 2. Guidelines for the use of the centrifuge should be followed. Use only the GPS-IECCentrifuge. The results when using other centrifuges are not known. 3. Don’t use the sterile components of this set when the package is opened or damaged. 4. For single use only – Do not reuse. 5. Prior to using the GPS II System, the surgeon should familiarize him/herself with the system. 6. The patient should be informed about the general risks of the treatment and possible adverse events. 7. Use the platelet concentrate within 6 hours, after the blood is taken from the patient. User Manual (using GPS® II Single Kit) For the aspiration of blood, the following is needed: • Disinfectant • Tourniquet • 1 “Butterfly” needle or 1 vein-puncture needle (minimum 16 gauge) • ACD-A citrate solution as anti-coagulant for the aspiration of blood (included in GPS II disposable kit) • A sterile 60 ml syringe from the GPS II Disposable Kit to aspirate blood • Sterile injection needle for the 60 ml syringe to aspirate ACD-A citrate solution (included in GPS II disposable kit) • Gloves • Sterile gauzes to cover the vein-puncture site • Plaster To separate the platelets, the following is needed: Description • GPS Centrifuge, including buckets Article number 7427 and one of the GPS II Disposable Kits: • GPS II Disposable Double Kit 800-0621A or • GPS II Disposable Single Kit 800-0721A, and • GPS Non-Sterile Counterbalance 800-0508 or • Mini-GPS II Disposable Kit 800-0503A, and • GPS Mini Non-Sterile Counterbalance 800-0505 along with • sterile injection needles (18 gauge) To produce autologous thrombin, the following is needed: Description Article number • Thrombin Processing Device (TPDTM) TPD100T (10-pk) • Thrombin Reagent TPDRS100T (10-pk) To prepare and apply the platelet gel/fibrin glue, the following is needed: Description • GPS Spray Applicator Kit Article number 800-0600 And one or more of the following applicator tips: • Spray Tip ST-3 TIP (used in combination with the blending connector tip) • GPS Blending Connector Tip Single Cannula 800-0204 • GPS Malleable Dual Cannula Tip 20 Gauge x 4 inch 800-0202 • GPS Malleable Dual Cannula Tip 20 Gauge x 7 inch 800-0203 • GPS Malleable Dual Cannula Tip 20 Gauge x 10 inch 800-0206 • GPS Malleable Dual Lumen Endoscopic Tip 5mm x 12 inch 800-0207 Procedure 1. Take the sterile pack with the GPS II container from the GPS II Disposable Kit. 2. Aspirate in a 60 ml syringe 6 ml citrate from the citrate bottle. Aspirate with this syringe 54 ml blood from the patient. The total volume is now 60 ml. Mix the citrate and the blood by shaking the syringe a couple of times. 3. Unscrew the Luer-Lock cap (with the green transport stick attached to it) from the blood port on the top of the GPS II container. 4. Screw the syringe with the blood and the citrate on the blood port of the GPS II container. 5. Inject the blood slowly into the GPS II container. 6. Screw the white Luer-Lock on the blood port of the GPS II container. 7. Fill the non-sterile counterbalance with a sterile sodium chloride solution or sterile water. 8. Put the GPS II container in the centrifuge with the red or yellow cap directed towards the center and place the non-sterile counterbalance opposite. 9. Close the lid of the centrifuge and set the time at 15 minutes and the speed at 3200 rpm. Press the green button to start the centrifugation process. Open the centrifuge with the red button, once the centrifugation has finished (speed 0!). 10. Take the GPS II container out of the centrifuge. 11. Aspiration of the platelet poor plasma (PPP): Unscrew the yellow Luer-Lock cap from the side port of the GPS II container and connect a 30 ml syringe. 12. Turn the GPS II container upside down and aspirate the PPP. Beware that during aspiration of the plasma the blue air valve is not blocked. 13. Close the 30 ml syringe with the PPP with a sterile injection needle. 14. Take the Thrombin Processing Device (TPDTM ) and the Thrombin Reagent. Open the blue Luer-Lock cap on the TPDTM and attach the syringe with the reagent. 15. While holding the TPDTM at an angle of 45°, completely inject reagent 16. Remove reagent syringe and replace blue cap 17. Remove yellow Luer-Lock cap and attach plasma syringe 18. While holding the TPDTM upright at eye level, slowly inject approximately 11 ml plasma into TPDTM. Stop injecting plasma when the fluid level is between the MIN and MAX lines. 19. Turn stopcock A 900 counter clockwise so the "OFF" knob points down. 20. Turn stopcock B 1800 counter clockwise so the "OFF" knob points to the left. 21. Detach plasma syringe and reattach yellow Luer-Lock cap to plasma port 22. Gently invert TPD at least 7 times. 23. Place TPD horizontally on a flat surface, with beads distributed evenly 24. Allow TPD to rest at 18°C and 26°C for 20 minutes AND DO NOT DISTURB. 25. Dissolving the Buffy-Coat: shake the GPS II container for a minimum of 30 seconds vigorously. Important: Keep the GPS II container upright! 26. Unscrew the red Luer-Lock cap from the side port of the GPS II container and connect a 10 ml syringe. Aspirate the PRP and keep the GPS II container upright. 27. Close the 10 ml syringe with the PRP with a sterile injection needle. 28. Shake TPDTM vigorously to dislodge and break up any gel that may be present and evenly redistribute beads. 29. Place horizontally on a flat surface for an additional 5 minutes. AND DO NOT DISTURB. 30. After time has elapsed, shake TPDTM vigorously to dislodge gel. Thrombin is ready to harvest. 31. Remove white luer cap. 32. Attach 20 ml syringe to thrombin collection port. 33. Turn stopcock A 90° clockwise so the "OFF" knob points to the left. 34. Hold TPD upright. Draw thrombin into collection syringe. Preparation of Platelet-Rich Plasma (PRP) gel. The procedure is continued in the sterile field 1. Open the GPS Spray Applicator Kit (800-0600) and hand it, together with the needed sterile applicators, syringes and needles to the nurse in the sterile field. 2. Inject the platelet rich plasma (PRP) into one of the cups (CRYO/FIBRINOGEN) in the tray of the GPS Spray Applicator Kit. 3. Inject the thrombin into the second cup (THROMBIN) in the tray of the GPS Spray Applicator Kit. 4. Fill the 12 ml syringe of the sterile GPS Spray Applicator Kit with the PRP. The ratio of mixing PRP and thrombin is 10:1 5. Fill the 1 ml syringe of the sterile GPS Spray Applicator Kit with the thrombin. 6. Prepare the two-component system for the syringes. Apply the correct applicator, and spray for example the PRP on a wound (ST-3 TIP in combination with blending connector tip), or inject it into a joint (malleable dual cannula tip) or mix it with autologous bone or Calcibon granules (blending connector tip). 7. A platelet gel will be formed in 10-15 seconds. Preparation of Platelet-Poor Plasma (PPP) fibrin glue. This procedure is carried out in the sterile field. 1. Inject the platelet poor plasma (PPP) into the cup in the tray of the GPS Spray Applicator Kit in which the PRP was injected before (CRYO/FIBRINOGEN). 2. Fill the 12 ml syringe from the sterile GPS Spray Applicator Kit with the PPP. The ratio for mixing PPP and thrombin is 10:1. 3. Fill the 1 ml syringe of the sterile GPS Spray Applicator Kit with the thrombin. 4. Prepare the two-component system for the syringes. Connect the ST-3 TIP and the blending connector tip. Spray the PPP on the different woundlayers during wound closure.