1
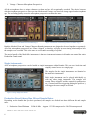
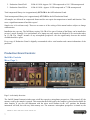
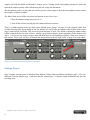
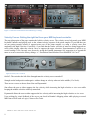
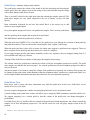
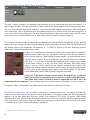
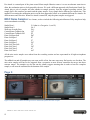
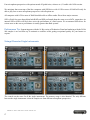
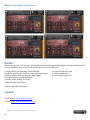
User Manual Production Grand version 1.1 User Manual Description: Production Grand is an exceptionally high-quality piano sample library for NI Kontakt 4.2 and above, consisting of eight microphone perspectives and over 120,000 samples of a Yamaha C7 grand piano recorded in a worldclass recording studio. The library is 437.5 GB* in size! Production Grand is ideal for Studio Production, Stage Production, Film Score Production, Performance and more! Instrument Features: • 12 velocities pedal up samples • 12 velocities pedal down samples • 12 velocities release samples • Authentic Pedalling: adds sympathetic resonance and realistic pedal control. • Authentic hammer mechanism noises (labeled: Pre-Attack) • User controllable recording noise for added studio realism • Recorded with world-Class microphones: Coles, AKG 414, Classic U87s, B&K, Crown etc. • Best possible A/D converters used: Burl Mothership • Best possible microphone preamps used: API and Neve Version 1.1 Features: Soft pedalling scripted. Sostenuto pedalling scripted. Authentic Pedalling adjusted to respond to all playing styles more evenly. Keyup mechanical noises volumes adjusted resulting in more authentic sound. Pre-Attack now buffered to respond correctly, but is no longer playable live. (180 ms Latency) C#4 mechanical noise user fixable with on/off button. Velocity mapping curves updated and respond correctly. (Inversed in version 1.0) PRODUCTION GRAND USER MANUAL 2 “Double Triggered” notes A5, A#5 and B5 have been fixed for the offending two velocities. Known Issues: Pedal Down low velocities from F5 and above have an increase in mechanical noise that is most prominent on the Pencil Hammer microphone perspective. Using another perspective further away from the piano hammers can reduce this issue. Additions considered for future release: Catch-pedalling Half-pedalling * 437.5 GB represents the complete library in three versions (24 bit 96 kHz, 24 bit 44.1 kHz and 16 bit 44.1 kHz) before using Kontakt’s lossless compression. The library is reduced from 437.5 GB to 210 GB using Kontakt’s lossless compression format and delivered on USB 3.0 hard drive. All specifications subject to change. PRODUCTION GRAND USER MANUAL 3 Microphone Perspectives: 1. Player’s Perspective: The Player’s Perspective is near binaural. When you put on your headphones with this perspective, it will sound like you are seated playing the piano! The player’s perspective was recorded with a Crown SASS-P MKII. 2. Hammer Microphones: The hammer microphones give plenty of attack for a more aggressive sound. The hammer microphone perspective also captures plenty of hammer mechanism sound as well. These samples are excellent for cutting through a busy mix or getting heard or a live band. 3. & 4. Inside Microphones: This is the sound most people associate with piano recordings. We decided on two sets of inside piano microphones: vintage Neumann U87s (they say West Germany on them) and the modern Rode NT2As. This gives the player the ability to get that classic piano sound or the modern wider-range sound or both! 5. Outside Microphones: Just outside the piano we used expensive Neumann M149 modern tube microphones. The engineer called these the “Golden Sound” microphones. This microphone pair has a classy sound and a more balanced tone than the inside and hammer microphones. 6. & 7. Room Microphones: In an attempt to give you modern and classic choices, we used Coles ribbon microphones and AKG C414s on the rooms. The ribbons sound like… ribbons… smooth and velvety. Ribbons take EQ well; another reason to include them. The AKGs sound true to the piano’s tone in the room. The ribbon room microphones are an exceptional pleasure to play, particularly for jazz and solo work. 8. Under Piano Microphone: Underneath the middle of the piano a PZM (pressure zone) microphone was used to give a clear centre image to the sound. This mono sound works well with the inside and outside microphones to add more center image and stability to the sound when mixed in tastefully. Microphone Summary: Hammer Mics: B&K Inside Mics: vintage Neumann U87, modern Rode NT2A Outside Piano: Neumann M149 Room Microphones: Coles Ribbon, AKG 414 Piano Bottom: PZM Player’s Perspective: Crown SASS-P MKII for near binaural experience when played! PRODUCTION GRAND USER MANUAL 4 ***Note: Production Grand was recorded at Phase One in Toronto Ontario Canada, an elite studio with professional high-end studio equipment resulting in an unsurpassed sample quality. Production Grand is capable of rivaling live studio recordings. We used the Burl Mothership A/D converters over all the microphone perspectives. Source files were recorded at 24 bit 96 kHz. *** System Requirements: Minimum System: Kontakt 4.2 or Kontakt 5 and above. 4 GB RAM 80 GB of available hard drive space (210 GB for full library). Computer that meets the minimum requirements of Kontakt 4.2 and above. Intel Duo Core (Intel i3, i5, i7 or better recommended) Regular User Recommended System: (Performer using one or two microphone persectives at the same time) 8 GB RAM Fast hard drive: 7200 rpm. 120 GB of available hard drive space (210 GB for full library) on a non-system drive (drive that is not running the computer OS). Intel i5 processor or better. Power User Recommended System: (Film scoring, Album production etc.) 16 GB RAM or more. Fast hard drive: RAID drive or Solid State Drive. Solid State highly recommended. 210 GB of available hard drive space on a non-system drive (drive that is not running the computer OS). Fastest possible processor. See performance later in the manual for system performance tips. Production Grand Kontakt Instrument Types: There are two types of presets for Production Grand: 1. Multi-Mic Instruments 2. Single Microphone instruments Multi-Mic Instruments: Kontakt has a maximum instrument sample limit of 32,768. Production Grand contains over 42,000 samples for each bit and sample rate option and uses plenty of polyphony/voices. So it was best to divide the 8 microphone perspectives into two instrments: 1. Modern / Clean Microphone Perspectives PRODUCTION GRAND USER MANUAL 5 2. Vintage / Character Microphone Perspectives All the microphones have a unique character to them and are all exceptionally recorded. The choice between which microphone perspectives where put into Modern and Vintage was based on vintage appeal and microphone age. The recording quality across the microphone perspectives remains the same. Figure 1 Production Grand Modern/Clean Edition Page 1 Figure 2 Production Grand Vintage/Character Edition Page 1 Both the Modern/Clean and Vintage/Character Kontakt instruments are designed to be used together or separately. All of the microphone perspectives are “Phase Aligned” so that they will play in exact timing relationship to how the samples were recorded. This is the same as a real studio recording of a piano! The major benefit of the Multi-Mic instruments is that two instrument instances in Kontakt can control the entire Production Grand sound. Single Instruments: All 8 microphone perspectives can be loaded as single instruments within Kontakt. This can save load time and simplify control access to a single page. The samples for the single instruments are identical to the multi-mic instruments. Each single instrument can be played individually or with any other single instrument. The samples will remain “Phase Aligned” and the controls for pedal noises etc., if turned on before triggering (hitting the pedal etc.), will trigger the same sample set in both. Figure 3 Vintage Singles instrument Production Grand Library Size, Bit and Sample Rates: Depending on the bundle that you have purchased, the samples are divided into three different bit and sample rates: 1. Production Grand Platinum 24 Bit 96 kHz PRODUCTION GRAND USER MANUAL 6 Approx. 123 GB compressed or 246 GB uncompressed 2. Production Grand Gold 3. Production Grand Silver 24 Bit 44.1 kHz Approx. 58.5 GB compressed or 114.5 GB uncompressed 16 Bit 44.1 kHz Approx. 26 GB compressed or 77 GB uncompressed Total compressed library size is approximately 207.5 GB for the full Production Grand. Total uncompressed library size is approximately 437.5 GB for the full Production Grand. All samples are delivered in compressed format and do not require decompression to install and function. This saves a significant amount of hard drive space! Sample size is for reference only. These are accurate as of the writing of this manual and are subject to change without notice. Installation size can vary. The full library requires 210 GB of free space. Portions of the library can be installed as per user’s needs. Example: Live performance off a laptop may only require the Modern 16 bit version that takes up 13 GB. The “Single” instance of any microphone perspective can also significantly decrease the needed available hard drive space. Every copy of Production Grand is digitally watermarked with a serial number and contact information of the purchaser. Production Grand Controls: Multi-Mic Controls Mixer, Page 1: Figure 4 Page 1 Modern/Clean Mixer Figure 5 Page 1 Vintage/Character Mixer Page 1 is obviously the mixer. The On/Off channel buttons/switches turn on/off the respective microphone perspectives. When turned off, the memory used by the samples is purged. This means that the RAM used by the samples is cleared and available for other samples. If you save the instrument with the mixer on/off buttons in the “off” position, the Kontakt instrument will load, but with very little memory use. The moment a microphone perspective is turned on, the PRODUCTION GRAND USER MANUAL 7 samples will load into RAM and Kontakt’s memory server. Turning on/off a microphone perspective loads and unloads the samples quickly while still allowing the user to play the instrument. The microphone pictures on the right side, besides given a relative shape to the actual microphones used to record the samples, are purely aesthetic. The faders when moved all the way down can function in one of two ways: 1. Mute the channel saving cpu resources, or, 2. Turn off the volume, but still plays the channel and uses resources. There is a hidden button in the top right corner labeled “mute_groups” on page 4 of the scripting editor that switches between fader group muting or not. By default, it is set to mute the samples when a fader on the mixer page is turned all the way down. This will work for the majority of users. The default of muting the channel when a fader is turned all the way down will save valuable cpu resources and give greater polyphony to the channels still active. A few users may want to trigger notes and then blend in a microphone perspective from zero volume to full volume. These users will have to turn off the group button in the top right corner of page 4 on script editor. Figure 6 Page 4 Hidden Controls showing Mute Groups Option Settings, Page 2: Page 2 settings work the same for Modern/Clean Edition, Vintage Character Edition and Singles page 1. The only difference between Singles page 1 and the multi-mic edition page 2 is that the single instrument only has one recording noise. PRODUCTION GRAND USER MANUAL 8 Figure 7 Production Grand Modern/Clean Edition Page 2 Settings Velocity Curves: Getting the right feel from your MIDI keyboard controller. The top right portion of the page contains the built-in velocity curves. The velocity curves help match your MIDI keyboard controller and playing style to the volume/velocity response of the piano samples. If you find that you are not getting enough volume or aggressiveness out of the piano samples, try using a velocity curve that emphasizes the high velocities. Conversely, if you find that the louder velocities or notes are being triggered too easily while playing, adjust the velocity curve to suppress the upper velocities. Experimentation is quick so try several settings. Users can only save presets by saving the Kontakt instrument. Our suggestion is to append the name as to not overwrite the factory settings. i.e. “Production Grand Modern/Clean Edition Hi Vel Curve”. Figure 8 Velocity Curve Controls On/Off - The switch to the left of the Strength turns the velocity curves on and off. Strength works both positive and negative with no change to velocity when set in the middle (12 o’clock). There are two curves to choose from: Sine and Exponential. Sine allows the user to either suppress the low velocity while increasing the high velocities or vise versa while keeping the middle velocities relatively untouched. Exponential allows the user to either suppress the low velocity while increasing the high velocities or vise versa. Users wishing for visual feedback of the curves can check in Kontakt’s Mapping editor while playing or record MIDI into a DAW such as Logic, Cubase or Pro Tools. PRODUCTION GRAND USER MANUAL 9 Pedal Noise: Authentic damper pedal samples. The pedal noise controls the volume of the sound of the foot depressing and releasing the sustain pedal. Here the dampers activate the strings in the piano and then stop the strings with a subtle thump sound when released. There is an on/off switch for the pedal noise that also unloads the samples when off. The pedal noise samples are very small compared to the rest of library, so they will load quickly. Most workstation keyboards do not have this sound! But it is the easiest way to add realism to your sampled piano. Every microphone perspective has its own pedal noise samples. There are nine pedal down Figure 9 Pedal Noise and nine pedal up noise samples that are played in round robin. The Mod-Wheel controls the pedal noises as follows: When the mod wheel (MIDI CC#1) is less than 63, the pedal noises cycle through six variations of both pedal up and pedal down noises. These are the modest casual samples from “regular” pedal usage. When the mod wheel has a value of 64 or greater, the louder more aggressive pedal noises are triggered. There are three variations for the pedal up and down noises (for a total of 6 samples). If you want to trigger specific pedal noises manually, such as in a sequencer, they are mapped starting from C-2 (lowest MIDI note) and go up 18 notes. Turning off the Pedal Noises with the switch purges the samples from memory. The volume control for pedal noises controls the volume of all four microphone perspectives equally. The pedal noise samples are linked to the mixer on page 1. So, only the pedal noises for the microphone perspectives that are active will sound. Advanced control: If you want to control the volume of the pedal noises separately, the volumes of the groups can be changed in the group editor within Kontakt within the instrument editor. Another less complicated option is to use the single Kontakt instruments and adjust the pedal noise for each instrument separately. Pedal Noise Tips: Busy mixes, such as songs with many instruments, may mask the pedal noise. In this case, Pedal Noise can be turned off to save voice count. On solo or sparse arrangements, consider increasing the pedal noise to give an intimate sound. Control clicking on the pedal noise volume will allow you to assign any MIDI continuous controller number to it. We suggest assigning it to a control pedal so that the volume of the pedal noise can change throughout a performance! For Pedal Noise, Key Up and Key Release controls of the multi-mic Kontakt instruments, the volume controls the samples for all four microphone perspectives. The On/Off switch for each will purge samples when in the off position. PRODUCTION GRAND USER MANUAL 10 Key Up: Key Up controls the volume of the keyboard action sound as a key is released (the hammer returning). It is only triggered when the pedal is down and a key is released. This is a subtle sound that is barely heard even at the maximum volume, but it adds that extra touch of realism. You might be asking: “Why only when the pedal is down and when a key is released? Why not when the pedal is off as well?” These are good questions! The Key Up sample is a natural part of the Key Release samples. In a busy production or song, the Key Ups may not be heard. There is a button to turn the Key Ups off and to unload them from RAM. When turned back on, the samples will automatically be loaded again. Key Up does tend to use plenty of CPU and polyphony! Figure 9 Key Up Controls Key Release: Key Release is the volume control for samples triggered when a key is released or when the pedal is let up when a note was sustaining from the pedal, but no key is held. This is the sound of the dampers stopping the piano string from ringing. The key releases give a realistic sound to the stopping of a note that just isn’t achievable with ADSR release envelopes. Users vary in how loud they like the key release samples. The key releases, like the rest of the instrument, have been professionally scripted (programmed in Kontakt) to sound as realistic as possible. The longer you sustain a note in isolation, the more likely it is that you will hear the key release when a key is released. Figure 9 Key Release Controls All of the mechanical noises can add up to create an authentic piano sound that just isn’t available in most current keyboard workstations, digital pianos or other piano sample libraries for that matter. ***NOTE*** The Production Grand Piano was professional scripted to have a smart release for the pedal samples. Release samples are only played on the notes that are not sustained. When a note is struck, the pedal is depressed and the note is released, it will still sustain. But… when the pedal is released, a proper release sample is played. Recording Noise: Authentic signal path noise from the recording session. Why would you want to add noise back in? If you want the most authentic sounding studio grand piano sample as if you recorded a piano in a studio, you need the signal path noise. This is a combination of the room noise, microphone self noise, console and microphone preamp noise. Noise isn’t always a bad thing. It is bad in the actual piano samples (that’s why we used the best algorithm available to remove the noise without affecting the sound). But to get that classic ribbon microphone sound on a piano, it needs to have the recording noise. Every microphone perspective has its own noise print. We keep them rather long at about one minute and 53 seconds of noise and Figure 10 Vintage/Character Recording Noise PRODUCTION GRAND USER MANUAL 11 then it loops. The recording noise gets turned off the moment Kontakt loads or unloads samples. This is unavoidable based on Kontakt’s design. Just turn it back on from the button. An alternative is to trigger the sample from a sequencer by playing C8. Authentic Pedalling: Sympathetic resonance and more. Turning Authentic Pedalling on makes Production Grand respond to the sustain (damper) pedal the same way a grand piano would beyond basic sample switching. Without Authentic Pedalling, a sustain sample or a non-sustain piano sample is played depending on the position of the sustain pedal. There are two components to how Authentic Pedalling works: 1. Notes triggered without sustain and sustain added in. 2. Notes triggered with sustain and held with the sustain pedal released. Figure 10 Authentic Pedalling and Pre-Attack On/Off With Authentic Pedalling on, anytime a note is played, held and then the sustain pedal is pressed, there is a gradually increase to the sympathetic resonance caused by the blending of samples just like on a grand piano. When the note continues to sustain, but the pedal is released, the sample plays the correct no-pedal sample. The switching is dynamic and can occur multiple times with multiple pedal up and downs on a held note. Notes triggered with the sustain pedal down and held when the sustain pedal is released will behave similarly, except the algorithm for determining the speeds of crossfades and relative volumes have been changed to act more like a grand piano would when starting from a sustained note. The Authentic Pedalling was perhaps the most labour intensive part of the scripting for the Production Grand. This is an advanced form of the Authentic Pedalling first developed for Production Voices’ Estate Grand. Hidden Controls: All the relative speeds and volumes of the Authentic Pedalling are accessible (but hidden on the main instrument panel) by editing the fourth scripting page. This is really only for the advanced user! Figure 11 Hidden Authentic Pedalling Controls on Script Editor Page 4.These are unsupported settings for ADVANCED USERS Only. Csharp_fix The Csharp_fix button on Page 4 of the Script Editor fixes a mechanical noise for a single C# note of Production Grand. It is recommended to leave this on, but for those that like the imperfect authentic sound of the sampled piano, the fix can be turned off . PRODUCTION GRAND USER MANUAL 12 Group Handling: Authentic Pedal Controls: The following is technical and can get confusing to anyone not familiar with how the backend of the instrument is designed. We provide this information for those users that wish to maximize their results with Authentic Pedalling. Our suggestion for others is to leave these alone :) With Authentic Pedalling on, the groups with (AS) are activated. When a Ped Up group is triggered, a corresponding Ped Down (AS) group is triggered and faded in and out according to the pedal position as a note is held. The (AS) groups were necessary as they needed separate ADSR times than the regular Ped Up and Ped Down groups. Basically, each microphone perspective has a Ped Down group and a corresponding Ped Up (AS) group and a Ped Up group and a corresponding Ped Down (AS) group. The Ped Up or Ped Down group is always triggered first before the (AS) group is faded in and out. ` pu_pu = Ped Up (AS) maximum volume (when pedal is in up position) pu_pd = Ped Down (AS) minimum volume (when pedal is in up position) pd_pu = Ped Up (AS) minimum volume (when pedal is in down position) pd_pd = Ped Down (AS) maximum volume (when pedal is in down position) 1st fade_down = Ped Up (AS) time it takes for group to fade down - triggered by Ped Dwn samples 1st fade_up = Ped Up (AS) time it takes for group to fade up - triggered by Ped Dwn samples 2nd fade_down = Ped Down (AS) time it takes for group to fade UP! - triggered by Ped Up samples 2nd fade_up = Ped Down (AS) time it takes for group to fade DWN! - triggered by Ped Up samples Speed times of up and down also interact with max and min volumes! pu_pd2 = Ped Down group minimum volume (when pedal is up) pd_pd2 = Ped Down group maximum volume (when pedal is down) fade_down2 = Time it takes for Ped Down group to increase in volume when pedal is down fade_up2 = Time it takes for Ped Down group to reduce in volume when pedal is up Authentic Pedalling is an elaborate crossfading matrix that determines the volume and crossfade times based on the pedal position. The controls are for the groups within the Kontakt instrument. PRODUCTION GRAND USER MANUAL 13 Voice Handling Script Editor Page 5 settings: Figure 12 Voice Handling Controls The page 5 script is a simple voice handling script that keeps the voice count down when notes are repeated. If a player triggers middle C ten times consecutively, there is no need for all ten samples of the same note to play back. We have determined the appropriate amount of voices that maintains authentic performance while keeping the voice count down. This is important as four microphone perspectives on with ten of the same notes triggered is a voice count of 40 for that single note! The only control on this page is the speed at which extra voices are faded out. It's best to leave it at the default value of 100ms unless there is a specific reason to change it. Pre-Attack: Pre-Attack is the mechanical key mechanism noise from striking the key (playing the key) from the moment the finger touches the piano to the moment the piano string begins to sound. This can add an ultra-real and intimate sound to the instrument. The drawback is… LATENCY. Latency is the time difference between when a note is triggered and when a note sounds. Imagine for the moment the softest note possible on the piano (which is included in the Production Grand by the way). The speed at which you strike the key would have to be so precise and slow. While editing the piano samples, we noticed that the lowest velocities where around 120 ms of mechanical noise and the fastest loud velocities were from 6 – 18 ms long. This means that turning on the Pre-Attack using Version 1.0 will cause a latency of at the very least 6 ms to the piano. This makes perfect sense, as a lower velocity would have the hammer mechanism travel slower. The problem with modern keyboard controllers is that samples are triggered at the bottom of the key bed, not the moment a player touches a key like on a piano. So, the latency is unavoidable until a better MIDI keyboard controller is invented. Version 1.1 of Production Grand and later makes Pre-Attack have a consistent 180ms latency/delay to compensate for fast and slow velocity timing differences. This 180ms delay with Pre-Attack on makes it unplayable live and it has to be compensated for in a sequencer! Users wishing to play live with Pre-Attack on can still use Version 1.0 presets. Figure 13 Pre-Attack Pre-Attack Volume will naturally seem louder than the piano sample on the lower velocities. Pre-Attack Production Tip: Pre-Attack works best on sequenced piano parts. Live playing with the PreAttack on can be frustrating to some players because of the latency. We suggest turning it off for live playing and turning it on for solo piano parts that have already been sequenced. In Version 1.0 presets, slight timing differences may occur because of the different Pre-Attack times. The lower velocities will have longer pre-attack times. Lower notes will also have longer pre-attack times as naturally occurs on a piano. This is fixed with Version 1.1 and later presets, but a 180ms latency/delay is introduced. PRODUCTION GRAND USER MANUAL 14 Pre-Attack is a natural part of the piano sound. Most sample libraries remove it or use an alternate start time to allow the mechanism noise to be bypassed by the user. We took a different approach with Production Grand. PreAttack plays a pair of samples one after another at sample accuracy from the original recording session. The sample pair is the seamless pre-attack and the piano sample. Every sample had a different Pre-Attack time. This method of recreating the mechanism noise was the best approach to allow us to maintain different Pre-Attacks for different notes and velocities. When Pre-Attack is turned off, only the piano samples are triggered. MISC Noise Samples: As a bonus, we have include the following miscellaneous Foley samples to help create an authentic recording: Studio Door 1 Studio Door 2 Walk out of studio floor Control Room Talkback On Control Room Talkback Off Piano Lid Open Soft Piano Lid Open 1 Piano Lid Open 2 Piano Lid Open 3 Piano Lid Close Soft Piano Lid Close 1 Piano Lid Close 2 Piano Lid Close 3 G-1 (that is a G negative 1, not G1) G#-1 F#-1 C#7 D7 D#7 E7 F7 F#7 G7 G#7 A7 A#7 All the misc noise samples were taken from the recording session and are represented in all eight microphone perspectives. The talkback on and off samples may not seem useful at first, but some users may find creative use for them. The misc noise samples will have to be triggered from a sequencer as most 88 note controllers do not go into these extreme ranges. The samples are also not one hit (drum) triggers meaning that in order to hear the complete sample, a note must be sustained for the duration of the sample. Page 3: Figure 14 Modern/Clean Edition and Vintage/Character Edition Microphone Placement Graphics PRODUCTION GRAND USER MANUAL 15 Page 3’s only purpose is to show where the microphones were placed for the recording session. This is useful for audio engineers and some performers. The single white round dots are the actual placement in relation to the piano. The placement is different for the Modern/Clean and Vintage/Character editions. Performance note: Since the microphone perspectives are all time aligned to be phase accurate to the original recording, there is a very small delay between the sound of say the hammer microphones and the room microphones. Users just playing the room microphone perspective instruments will experience a slight latency that most will have no issues adjusting to. Users looking for the shortest latency when playing Production Grand should use Pencil, the hammer microphone perspective. Performance Expectations on Different Systems Production Grand is one of the largest single instrument sample libraries ever produced. It can really test the limits of a computer system if many microphone perspectives are active. Test Systems: We purposely tested on relatively modest systems to give real world performance results. Test System 1: Early 2010 MacBook Pro i7 2.66 GHz Mac OSX 10.6.8 8 GB RAM Samples played off of 750 GB 7200 rpm non-system drive. Performance results: One microphone perspective with all options on: Excellent performance with all three digital versions (24 Bit 96k, 24 Bit 44.1k, 16 Bit 44.1k) Two microphone perspectives with all options on: Very useable, occasional dropouts. Three microphone perspectives with all options on: Not reliable. Not recommended. Three microphone perspectives with options turned off (pedal noise, releases etc.): Useable with 16 Bit version. Test System 2: 2011 Mac Mini i5 2.5 GHz Mac OSX 10.7.3 16 GB RAM Samples tested playing off of RAID 0 (Iomega UltraMAX 2TB) and RAID 5 (Lacie 4Big 12TB) eSATA external drives. Samples tested playing off SSD drive: OCZ Agility 4 256GB connected by eSATA. Performance results: Overall performance results: Excellent. Performs better than MacBook Pro in Test System 1. RAID drive performance is exceptional and equals SSD performance when both are connected by eSATA. One microphone perspective with all options on: Excellent performance with all three digital versions (24 Bit 96k, 24 Bit 44.1k, 16 Bit 44.1k) Two microphone perspectives with all options on: Excellent. Three microphone perspectives with all options on: Very useable, occasional dropouts. PRODUCTION GRAND USER MANUAL 16 Four microphone perspectives with options turned off (pedal noise, releases etc.): Useable with 16 Bit version. We anticipate that recent top-of-the-line computers with SSD drives with 16 GB or more of RAM will easily be able to play four or more microphone perspectives with all options on. All computers with 8 GB or more of RAM should be able to offline render files with no major concerns. SSD vs Raid: Our tests showed that both RAID and SSD performed about the same on an eSATA connection. An internal SSD at 6GB/s will likely have twice the performance of a Raid system. We recommend SSD drives for serious users as the cost to performance is usually greater than Raid systems. Performance Tip: Sequencing parts with the 16 Bit version of Production Grand and rendering with the 24 Bit 96k samples is an excellent way to maintain a workflow while getting exceptional quality for your bounce or exports. Vintage/Character Single Instruments: The controls are the same for all the single instruments. The memory usage is also identical. The only different between the single instruments is that the samples are from different microphone perspectives. PRODUCTION GRAND USER MANUAL 17 Modern/Clean Single Instruments: Credits: This massive project could not have been completed without the support and dedication of many talented people! I am very fortunate to have worked with such an excellent team. Thanks again! Concept, Editing, Programming: Jason Chapman Graphic Design, logo and Interface controls: Shannon Penner Kontakt Scripting and Programming: Adam Hanley Recording Engineer: Dajaun Martineau Assistant, Audio Editing: Eric Ferns Addition Editing: Paul Mack Thanks to the many beta testers! Contact: Email: [email protected] Website: http://www.productionvoices.com PRODUCTION GRAND USER MANUAL 18 www.productionvoices.com www.plunkandboom.ca www.icebreaker-audio.com