1
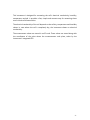
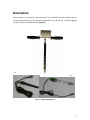
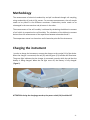
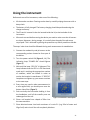
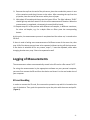
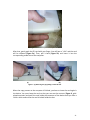
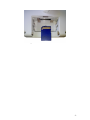
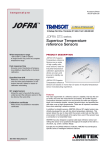
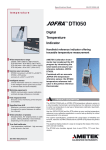
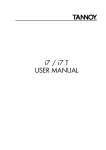
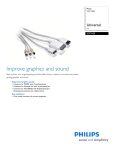
Field Equipment for Measuring Electrical Conductivity, Humidity and pH of Soil User Manual This instrument is designed for measuring the soil’s electrical conductivity, humidity, temperature and pH. It provides a fast, simple and accurate way for measuring those most critical soil characteristics. The electrical conductivity of the soil depends on the salinity, temperature and humidity values. In case where the soil is completely dry, the instrument shows no electrical conductivity. The measurement values are stored in an SD card. These values are stored along with the coordinates of the point where the measurements took place, taken by the instrument’s integrated GPS. -1- Description The instrument is consisted of the sensor parts (1 to 8) which the user should dig into the soil, external sensors for electrical conductivity (a) and pH (b), the data logging system (10) and the handle bars (9) (Figure 1). (a) (b) Figure 1. Field equipment parts -2- Methodology The measurement of electrical conductivity and pH is achieved through soil sampling, using conductivity (a) and pH (b) sensors. For accurate measurements, the soil sample needs to be placed in two different containers. Conductivity sensor needs to be submerged in the one container and pH sensor in the other. The measurement of the soil humidity is achieved by calculating the dielectric constant of soil which is proportional to soil humidity. The calculation of the dielectric constant derives from the measurement of the capacitance between electrodes 4 and 5. The temperature sensor is a thermistor and is located at point 8 of the instrument. Charging the instrument In order to charge the instrument, connect the charger to the receipt (11) of the device. When the charger is connected, the red (12) and the green (13) indicator will illuminate. The green light indicates that the charger is connected correctly while the red that the battery is being charged. When the red light turns off, the battery is fully charged. (Figure 2). Figure 2. Instrument's charging components ATTENTION: during the charging procedure, the power switch (14) should be OFF -3- Using the instrument Before each use of the instrument, make sure of the following: All electrodes are clean. Cleaning can be done by carefully wiping the sensor with a damp cloth. The battery is fully charged. The battery charging should be performed using the charger accessory. The SD card is inserted in the slot located inside the lid, at the backside of the instrument. After each use and before storing the device you need to make sure that all sensors are clean. Moreover, during storage, it is crucially that the end of the pH sensor stays liquid. This is achieved by placing the protective cap 3Μ of potassium chloride. The steps’ order that should be followed during each measurement is stated below: 1. Connect the conductivity and pH sensors at the corresponding sockets located at front part of the device. 2. Turn the power switch ON (Figure 2, 14). The indicating lamp “POWER ON” should lighten (Figure 3). 3. Wait until the lamp “GPS FIX” is lightened. This lamp indicates that the GPS is in full functional mode and is tracking the appropriate number of satellites, which are locked in order to receive the location’s coordinates. If “GPS FIX” lamp does not lighten up, you cannot continue to the next steps. 4. Every time you need to take measurements in a new region-field, you should press once the button «New Site» (Figure 3). 5. Push vertically the instrument holding it from the handlebars, until all the metallic parts are submerged into the soil. Figure 3. Instrument's control panel 6. Place a soil sample from a depth of 20cm into the two containers. 7. Place deionized water into both containers of a ratio 5:1 (e.g. 50ml of water and 10g of soil) and stir until the soil completely dissolves. -4- 8. Remove the cap from the end of the pH sensor, place the conductivity sensor in one of the containers and the pH sensor to the other. After removing the cap from the pH probe, clean the end of the sensor with a piece of paper. 9. Wait about 30 seconds and then press the button 20cm. The light indicator “BUSY” should light up and shall remain lit for the all the measurement duration. When the measurement is completed, a characteristic sound shall be heard. 10. Repeat steps 6-9 of the process with different soil samples, in different containers, for other soil depths, e.g. for a depth 40cm or 60cm press the corresponding button. At this point, the measurement process is completed and the values set, is stored to the SD Card. If there is need of taking more measurements of different areas of the same site, then step 4-10 of the above process have to be repeated, without turning off the instrument. If the device is switched off for any reason, steps 1, 2 must be repeated, while when changing location area, step 3 has to be repeated as well. Logging of Measurements The measurement values are automatically stored in the SD card at a file named “LiFE”. For using the measurements by the appropriate software on your personal computer, you must first remove the SD card from the device and insert it in the card reader slot of your computer. SD card handling In order to remove the SD card, first remove the protective cap which is located at the rear of the device. Then, push the protective cap to the point with the arrow and pull it. (Figure 4). -5- Figure 4. Instrument's protective cap removal After that, gently push the SD card with your finger. You will hear a "click" and the card will be released (Figure 5a). Then, pull it back (Figure 5b) and insert it into the corresponding reader slot of the computer. (a) (b) Figure 5. (a) Releasing and, (b) pulling out the SD card. When the copy process on the computer is finished, you have to insert the card again in the device. You must keep the card so that you can see the contacts (Figure 6, goldplated terminals) and push the card inside the connector of the device until you hear a «click» which means that the card is locked inside the slot. -6- Figure 6. SD card insertion back to the instrument -7-