1
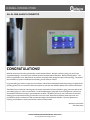
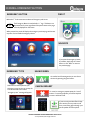
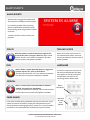
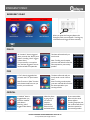
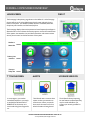
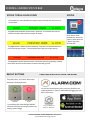
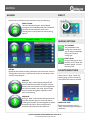
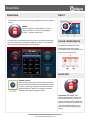
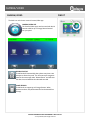
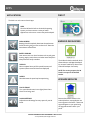
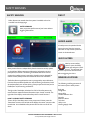
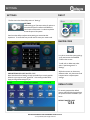
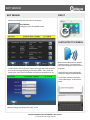
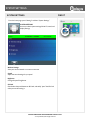
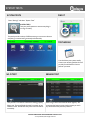
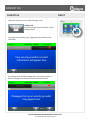
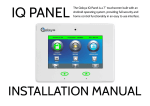
USER MANUAL
ABOUT THIS DOCUMENT
CERTIFICATION
This document describes the User Interfaces and controls for the Qolsys home
control and automation system. The Home Control system is a centralized smart
LCD control panel (IQPanel) that enables and simplifies home security, home control,
energy management, home healthcare, and other services. The smart Control Panel
uses wireless technology to communicate with a broad set of wireless peripherals
and sensors. The panel can also communicate with a centralized Service Provider
system, smart phone or a remote system via cellular wireless or broadband
technologies. The panel is accessible via an easy to use touch screen interface as well
as from any web browser or smart phone. The control panel platform uses an ARM
processor and Android operating system.
Qolsys Inc. proprietary.
Reproduction without permission is not permitted.
Document#: IQPANEL-UM-06-14
Revision Date: 6/3/14
Qolsys Part #: QS-9004-VRZ
Software Version: 1.3.4
Conforms to UL Std. 1023, 985 & 1635
Certified to ULC Std. C1023 & S545
IQ PANEL- INTRODUCTION
ALL-IN-ONE, ALWAYS CONNECTED
CONGRATULATIONS!
We’d like to thank you for making the decision to purchase the IQ Panel. We hope you’ll enjoy using it as much as we
enjoyed developing it. Our name name is Qolsys, (pronounced kwal-siss) and stands for “Quality Of Life Systems.” We
built our organization on the belief that we can improve the quality of life through innovation and technology. This panel is
the culmination of 3 years of development and testing, and we think you’ll love it.
It’s got everything you need in a single, easy to use device, and because we developed the software using a Google Android
operating system, we can continue to refine your experience over time with software updates and innovative new devices.
The IQ Panel is more than just a security panel, its a home automation and control platform, giving you access and control
over what is going on in your home at all times. To take full advantage of the power of this amazing device you’ll want to
download the free Alarm.com app to your smartphone or tablet. This will be your link to your home when you are away,
keeping you connected and ensuring you have the control you need. We’ve tried to make the panel easy to use, and
provide this manual as a reference to help you take advantage of all the features available. If you have questions on
anything, don’t hesitate to contact your security or home control provider.
Welcome to the future!
-The Qolsys team
QOLSYS CONFIDENTIAL AND PROPRIETARY PAGE 2 OF 30
© Last updated 6/3/14 All rights reserved
IQ PANEL- HARDWARE OVERVIEW
HARDWARE OVERVIEW
FRONT
Panel Camera
Header/
Status Bar
Primary User Interface
Footer/Help bar
Emergency
Button
Home Button
Microphone
BACK
Mounting holes
Cooling Vents
Mounting plate
SD Card Slot
Two-Way Voice
Speaker
Panel Sounds Speaker
Rear access
Siren
QOLSYS CONFIDENTIAL AND PROPRIETARY PAGE 3 OF 30
© Last updated 6/3/14 All rights reserved
IQ PANEL- EMERGENCY BUTTON
EMERGENCY BUTTON
FIND IT
Below the 7” Touchscreen are two buttons: Emergency and Home.
+
The Emergency Button is marked with a “+” sign. This button can
be pressed at any time, regardless of the panel’s status or the page
currently displayed on the screen.
When pressed, the panel will display the emergency services page, with access
to police, fire, and medical emergency alarms.
WHOOPS!
If you press the emergency button
by mistake, simply tap the “Home”
button or click “Back” to return to
the previous page.
EMERGENCY TYPE
SILENCE SIREN
On medical and fire emergencies you can silence
the siren by pressing the green button.
Select the icon that represents your
emergency type. As soon as you tap the
icon the siren will sound and an
“emergency sent” message will appear.
CANCEL REQUEST
To cancel an emergency request press the “cancel”
button. For security purposes, you will be required
to enter a valid user code.
If your security provider offers 2-Way
voice service you may receive a call
from a monitoring agent through your
panel’s speaker and microphone.
QOLSYS CONFIDENTIAL AND PROPRIETARY PAGE 4 OF 30
© Last updated 6/3/14 All rights reserved
ALARM EVENTS
ALARM EVENTS
When the alarm is triggered the IQ Panel will
sound the siren and display a red alarm screen.
If your security provider offers monitoring
service, the panel will automatically contact
the monitoring center using the built in cellular
connection.
To disarm, touch the screen and enter your
passcode.
POLICE
TWO-WAY VOICE
When the system is armed and the alarm is tripped or the
you touch the “Police” emergency button the alarm sounds
with the “Intrusion” siren and then activates the Two-Way
Voice microphone and speaker, if available.
FIRE
Note that Two-Way Voice services are
only activated after an alarm event and
may not be available in all areas or with all
security providers.
HARDWARE
When a Smoke or Carbon Monoxide detector is triggered or
someone taps the “Fire” panic on the IQ Panel:
•The alarm sounds with the “Fire” siren and then activates the
Two-Way Voice microphone and speaker, if available.
The built in microphone on the front of
the panel and the dedicated Two-Way
Voice speaker on the side of the panel
activate after a connection to the
monitoring station has been made.
MEDICAL
When a customer presses their IQ Pendant or indicates a
“Medical” emergency from the IQ Panel:
•The alarm sounds with the “Medical” siren and then activates
the Two-Way Voice microphone and speaker, if available.
FALSE ALARM
In the event of a false alarm, press disarm and enter your user code. If your
system is monitored, be ready to provide your verbal password to your
security provider’s monitoring agent if they contact you. If you are unable to
provide the correct verbal passcode, the authorities may be contacted.
Built in
Microphone
Dedicated
Two-Way
Voice
Speaker
QOLSYS CONFIDENTIAL AND PROPRIETARY PAGE 5 OF 30
© Last updated 6/3/14 All rights reserved
EMERGENCY PANIC
EMERGENCY PANIC
When you press the Emergency Button the
Emergency Panic screen appears. Touching any
of the buttons will trigger an alarm manually.
POLICE
An “Intrusion” alarm is triggered
when you touch the “Police” panic
button. (touching “silent” triggers
a silent alarm.)
For your security, once a police
siren has been triggered it cannot
be silenced without a passcode.
The alarm will sound until you
touch cancel.
A “Fire” alarm is triggered when
you touch the “Fire” panic button.
The alarm will sound until you
touch cancel or touch “silence
siren”
Note: Touching cancel requires
your user code and will cancel the
fire alarm reported to your
security provider.
Note: Touching cancel requires
your user code and will cancel the
alarm reported to your security
provider.
FIRE
Note: There is no “Silent” function
on the button itself, but once you
touch it you can silence it.
MEDICAL
A “Medical” alarm is
triggered when you
touch the “Medical”
panic button.
(touching “silent”
triggers a silent alarm.)
When the alarm
is going off you
can cancel it
(requires
passcode) or
silence it until
authorities arrive
QOLSYS CONFIDENTIAL AND PROPRIETARY PAGE 6 OF 30
© Last updated 6/3/14 All rights reserved
If you create a silent
alarm only the cancel
button appears.
Touching it requires your
user code and will cancel
the alarm reported to
your security provider.
IQ PANEL- HOME SCREEN OVERVIEW
HOME SCREEN
FIND IT
The home page is the primary page shown on the IQ Panel. It is the first page
the user will see, and it is the default page when the user pushes the home
button on the panel. It is divided into three sections: The header/status bar,
the primary user interface, and the footer/help bar.
The home page displays the most important and most frequently used Apps. It
allows the user to arm or disarm the security system; monitor the overall status
of the system; view weather, time, and date information; and execute various
security, home control, and other functions of the system.
Header or
Status Bar
Primary User
Interface
Footer or
“Help” Bar
7” TOUCHSCREEN
ALERTS
In an emergency you need an
immediate response to your touch,
so we built the IQ Panel with a 7”
RESISTIVE TOUCH screen so it
even works with gloves, fingernails,
etc.
The IQ Panel uses a common alerts
system to draw your attention to
various items. When you see the
alert, touch the screen to find out
what information is being shared.
UPGRADE SERVICES
The IQ Panel is always improving.
As new features are developed they
may be made available to you.
Contact your security provider for
details.
QOLSYS CONFIDENTIAL AND PROPRIETARY PAGE 7 OF 30
© Last updated 6/3/14 All rights reserved
IQ PANEL- HEADER/STATUS BAR
STATUS TYPES & COLOR CODES
STATUS
The header bar is color coded based on system status, and shows the date, time, and
current status.
The green header is labeled “System Ready – Disarmed” and indicates that all of the
sensors are closed and the system is ready to be armed.
If you want to know
whether your sensors are
open or closed, touch the
“Status” app on the
Home Screen
The yellow header is labeled “System Not Ready – Disarmed” and indicates that one or
more of the sensors are open. Touch this yellow bar to see a list of open sensors.
Feb 26, 2013
SYSTEM ARMED- AWAY MODE
Tue - 03:12 PM
The red header is labeled “System Armed” and indicates the arming type (Stay or Away)
Note: When armed, the home button and panic button will glow red.
BACKLIT BUTTONS
CHECKING STATUS OUTSIDE THE HOME
The panel’s “Panic” and “Home” buttons also
illuminate to show panel status.
You can also see the status of your home from your Alarm.com
mobile application, or from any web browser by logging into your
Alarm.com account.
Green LED when
Disarmed
Red LED when
Armed
To save battery life, these LED lights will NOT
illuminate if the panel is running on battery only
(during a power outage)
Go to your device and
search for “Alarm.com”
QOLSYS CONFIDENTIAL AND PROPRIETARY PAGE 8 OF 30
© Last updated 6/3/14 All rights reserved
ARMING
ARMING
FIND IT
The first icon on the home screen is used for arming and disarming.
PRESS TO ARM
This coincides with the green “System Ready”
message in the Header/Status Bar and indicates the
system is currently disarmed, ready to arm.
Touching this icon will produce the various arming
options.
ARMING OPTIONS
EXIT SOUNDS
The panel beeps as the
arming timer counts down.
You can silence these beeps
before you choose an
arming type.
ENTRY DELAY
The panel will give you time
to disarm once a “delay door”
has been opened. Turn this
off with a touch.
BYPASS
Bypass sensors easily by checking the buttons next to the sensor name on
the right side of the screen. The panel even shows you the status of each
device for easy reference.
ARM STAY
Arming in “Stay” mode indicates that people will
remain inside the home while the system is armed.
Devices such as the IQ Motion and the Image Sensor
may not be activated in this mode. We encourage
users to activate this regularly, especially as they
retire for the evening.
ARM AWAY
Arming in “Away” mode indicates that the home will
be vacant while the system is armed. All devices,
including the IQ Motion and the Image Sensor will be
activated in this mode. We encourage users to
activate this whenever they leave the home.
COUNTDOWN TIMER
When you arm “Away” a timer will
appear, giving you time to leave the
home before the system is activated.
NEED MORE TIME?
Extend your countdown timer for
“Away” mode arming by touching the
+60 button.
QOLSYS CONFIDENTIAL AND PROPRIETARY PAGE 9 OF 30
© Last updated 6/3/14 All rights reserved
DISARMING
DISARMING
FIND IT
The first icon on the home screen changes appearance when the system is
armed.
ARMED
When the system is armed, whether in “Stay” or
“Away” mode, the icon turns red and appears
“locked.” To disarm, tap this icon.
If a “delay” door is opened the panel will go into a countdown, allowing the
user time to enter their code without triggering the alarm. The camera will
take a picture and save the image in the camera app.
COLOR CODED STATUS
The IQ Panel is designed to make
knowing panel status easy. When
armed, the buttons, arming button, and
header bar will all appear red.
QUICK EXIT
DISARM PHOTOS
When you disarm the system from the panel, the built-in
IQ Camera will automatically take a photograph and store
it in your Camera App, along with the date and time the
panel was disarmed. (Note: If an invalid user code was
attempted, the system will log this as well)
QUICK EXIT (STAY MODE ONLY)
Need to grab the paper? Let the dog
out? Head to work early and don’t
want to wake those asleep? When the
system is armed, press “Quick Exit” for
a 120 second period where you can
open doors without deactivating the
system.
QOLSYS CONFIDENTIAL AND PROPRIETARY PAGE 10 OF 30
© Last updated 6/3/14 All rights reserved
WEATHER
WEATHER
FIND IT
The second icon on the home screen is for weather
78
45
TODAY’S FORECAST
Today’s forecast is displayed on the weather icon
with a graphical representation of expected
precipitation, as well as the High and Low
temperatures for the day.
PRECIPITATION
The forecasted precipitation will be depicted visually on the panel, and will
change based on the day’s outlook.
SUNNY
FOG
PARTLY SUNNY
CLOUDY
LOCATION
MOSTLY SUNNY MOSTLY CLOUDY
RAIN
STORMY
Your weather reporting is based on
your location, which is set by your
dealer. When the IQ Panel is installed
your dealer indicates your zip code in
your Alarm.com account.
FORECAST
SNOW
SLEET
ICE
DUST/HAZE
4
DAY FORECAST
If you touch the weather icon, you will
get a four day weather forecast.
QOLSYS CONFIDENTIAL AND PROPRIETARY PAGE 11 OF 30
© Last updated 6/3/14 All rights reserved
CAMERA/VIDEO
CAMERA/VIDEO
FIND IT
The third icon on the home screen is Camera/Video app.
CAMERA/VIDEO APP
The Camera/Video app is used to access both the IQ
Camera as well as up to 5 Image Sensors learned
into your panel.
DISARM PHOTOS
The IQ Panel will automatically take a photo every time a user
attempts to disarm the panel. The 20 most recent images are
saved in the camera app under “Disarm Photos” and also store
the date, time, and whether the code used was valid.
IMAGE SENSOR
The IQ Panel can support up to 5 Image Sensors. When
pictures are taken, they will be saved and can be viewed from
this app.
QOLSYS CONFIDENTIAL AND PROPRIETARY PAGE 12 OF 30
© Last updated 6/3/14 All rights reserved
STATUS
STATUS
FIND IT
The first icon on the second row is Status.
STATUS APP
The Status app is divided into four sections: Current
Status, Alerts, Alarms and History.
ALERTS
If the IQ Panel is reporting a new issue,
it will display a bubble above the app
showing the number of new items that
may require your attention.
CURRENT STATUS
The individual security sensors are listed by zone/area. The status and
settings for each of the sensors are shown in a list. If more than one page is
required for the whole list, use the “Page Up” and “Page Down” buttons to
see the entire list. To see the history for a specific sensor, click “View.”
ALERTS
Alerts are messages about tampered sensors, low batteries, and failed
communications. The total number of unacknowledged Alerts messages
appears in the red bubble counter on this tab. The user may acknowledge
each message separately, which will then eliminate the message from the
list.
ALARMS
Alarms lists all unacknowledged messages about alarm events.
HISTORY
The last tab displays a history for all sensor activity connected to the IQ
Panel . The system will store up to 100 events in the history listing.
ACKNOWLEDGE
Acknowledge a single alert by tapping
the check box to the left. Acknowledge
all the alerts by tapping the check box
at the top of the table.
FILTER
QOLSYS CONFIDENTIAL AND PROPRIETARY PAGE 13 OF 30
© Last updated 6/3/14 All rights reserved
You can view specific
results by touching
the “Filter” button
HOME CONTROL
HOME CONTROL
FIND IT
The second icon on the second row is Home Control.
HOME CONTROL
Control your home automation devices from the panel’s
interface.
Z-Wave Status
Z-Wave Status
See the status of all your
Z-Wave sensors
Door Locks
See the current status of
each lock, send “lock” or
“unlock” commands
Thermostat
See the current temperature,
adjust target temps as
desired, switch from heat to
cool, auto or off
Lights
Control light modules
from the IQ Panel, turns
lights on or off as needed
Smart Socket
Control each side of the
smart socket, see current
energy usage
Other Z-Wave Devices
Pair other Z-Wave
devices with the panel
and operate their
functions from this
section
Lock All Doors
Sends a “lock” command
to all doors.
Unlock All Doors
Sends an “unlock”
command to all doors.
QOLSYS CONFIDENTIAL AND PROPRIETARY PAGE 14 OF 30
© Last updated 6/3/14 All rights reserved
Thermostat
Smart Socket
Door Locks
APPS
APPLICATIONS
FIND IT
The third icon on the second row is Apps.
APPS
Since the IQ Panel is built on the Android operating
system, you have access to a variety of useful
applications, and more to come as they are developed.
CLEAN SCREEN
Pressing this will completely deactivate the touchscreen
for 30 seconds, giving you time to clean it off. Press the
home button to deactivate.
SAFETY SENSORS
Learn sensors into non-alarm locations such as pool gates,
cleaning supply, interior doors, and other items that pose a
safety hazard to family members.
HISTORY
See a complete history of all the panel’s sensors and
systems. (Most recent 100 items are displayed)
ALERTS
See what issues the panel may be experiencing.
ANDROID DEVELOPERS
The IQ Panel is built on Android, which
allows Qolsys to add Apps developed
by our team as well as by others in the
Android Developer Community.
NOTE: For security purposes, the IQ
Panel is not open to the Android
Market.
UPGRADE SERVICES
PHOTO FRAME
Turn your IQ Panel screen into a digital photo frame
when it’s not being used.
SOUND SETTINGS
Adjust the sound settings for every aspect of your IQ
Panel.
Because the IQ Panel is built on the
Android platform, new application are
sure to appear in the future. These new
apps will appear on your panel using
the upgrade services inside in your
panel.
QOLSYS CONFIDENTIAL AND PROPRIETARY PAGE 15 OF 30
© Last updated 6/3/14 All rights reserved
SAFETY SENSORS
SAFETY SENSORS
FIND IT
Safety Sensors are created when the system is installed, and can be
accessed from the Apps page.
SAFTEY SENSORS
A way to protect specific areas of your home without
triggering false alarms.
ARMED ALARM
If a safety sensor is opened while the
system is armed, then the intrusion
alarm will not trip and the system will
remain in the Armed state.
QUICK ACCESS
Safety sensors function independently from the intrusion security system
on the IQ Panel. Safety sensors provide warning information via voice
prompts and/or chimes. The warning notifications will be announced
anytime that a safety sensor is opened or closed (or motion detected for
motion sensors). Safety sensors are defined at the time of installation.
The Safety Sensor app allows the user to manage safety sensor behaviors.
Functions are provided to Disable (turn off) the warning notifications, Quick
Access (temporarily turn off the warning voice prompts and chimes), and to
Enable (turn on) the warning notifications.
The right side of the display includes a list of all of the safety sensors by
name and their respective status information (open, closed, or active). The
right side of the display contains the safety sensor control functions.
HOW TO DISABLE SAFETY SENSORS
To turn off all of the safety sensor voice prompts and chimes, press the
“Deactivate” button on the left side of the display, then enter your user code
to authorize. Once disabled, safety sensors will not chime or set off the
alarm.
Need to access a safety
sensor? Open the Safety
Sensor app and press “Quick
Access.” You will have 300
seconds to open and close the sensor
without triggering the chime.
SENSOR LOCATIONS
The following could be great areas of
the home to place a safety sensor:
Pool gate
Garage door
Home office
Toddler bedroom door
Gun safe
Medicine cabinet
Tool shed
Utility room
Cleaning supply closet
QOLSYS CONFIDENTIAL AND PROPRIETARY PAGE 16 OF 30
© Last updated 6/3/14 All rights reserved
PHOTO FRAME
PHOTO FRAME
FIND IT
Press “Apps” and then select “Photo Frame.”
PHOTO FRAME SCREENSAVER
You can turn your IQ Panel into a digital photo frame
with pre-loaded images or your own pictures. This not
only disguises it in your home but adds to your decor.
When you open the Photo Frame app, you will see thumbnails of the
images saved in the panel, as well as buttons to play slideshow now, edit
your settings, and load new images.
PREVIEW
To preview a photo, touch the picture
from the photo frame app. It will
expand to full screen. To exit, touch
the screen again.
Tapping the “Settings” icon will allow you to access settings to customize
your photo frame experience with preferences like duration and effects.
QOLSYS CONFIDENTIAL AND PROPRIETARY PAGE 17 OF 30
© Last updated 6/3/14 All rights reserved
PHOTO FRAME
ADDING YOUR OWN PHOTOS TO PHOTO FRAME
STEP 1
STEP 2
FIND IT
Insert an SD Card* into your computer *We recommend using
a “class 4” or higher SDHC card with 4gb – 16gb storage space
Copy the images you want on your panel onto the SD Card.
Please note the requirements for your photos:
-No larger than
800x480 pixels
Less than
1MB each
Saved in a
folder called
“Photos”
REMOVING THE SD CARD
STEP 3
Safely eject the SD Card from your computer.
Once you are done with the SD Card
you need to safely remove it.
STEP 4
Insert the SD Card into the slot on the left side of the IQ Panel
From the home screen,
touch “Settings”
*Do not insert SD Card into panel if power is off
Enter your user code
Touch “System Settings”
Touch “SD Card”
STEP 5
Touch “Apps”
STEP 6
Touch “Photo Frame”
STEP 7
Touch “Load from SD Card”
STEP 8
Choose one of the following options:
Touch “Unmount SD Card”
“Replace” deletes the existing photos and saves the new ones in their place
“Add” adds your new photos to the ones already on the panel
STEP 9
Once the photos are loaded they will appear in the preview
pane. Press “Start Photo Frame” to test.
Remove the SD Card from the back of
the panel
QOLSYS CONFIDENTIAL AND PROPRIETARY PAGE 18 OF 30
© Last updated 6/3/14 All rights reserved
SOUND SETTINGS
SOUND SETTINGS
FIND IT
The sound settings are located within Apps or inside panel settings.
SOUND
Change the way the panel makes noise.
The IQ Panel’s sound settings are completely customizable. To edit your
sound preferences, tap the “Sound” icon located in “Settings” or inside the
“Apps” folder on the home screen.
The following can be toggled on or off individually for sensors, the panel, or
safety sensors:
-Panel voices (verbal commands and announcements)
-Panel chimes (beeps, tones, etc)
SPEAKER
The panel sounds will emit from the
speaker on the left side of the screen.
Dedicated
panel
sounds
speaker
MASTER VOLUME
Selecting “Volume” allows you to
control the panel’s master volume. To
adjust, touch the bar on the slider and
move it from left to right.
QOLSYS CONFIDENTIAL AND PROPRIETARY PAGE 19 OF 30
© Last updated 6/3/14 All rights reserved
SETTINGS
SETTINGS
FIND IT
The first icon in the footer/help section is “Settings.”
SETTINGS
Inside settings you’ll access a variety of options to
customize the panel’s interface and abilities to
your location and situation. A code is required to
access this part of the system.
Users have the ability to adjust various settings to customize their
experience. To access this area you will need to enter your master code.
MASTER CODE
In order to access the system settings
you’ll need to enter the MASTER
CODE on the account.
To add, edit, or delete user codes,
select “User Management” in
Settings”
USER SETTINGS (REQUIRES MASTER CODE)
Note: Some features and settings are only accessible if your security provider
allows it, so you may see some “greyed out”. Your security provider will be
happy to change these settings for you.
While the account can have many
different codes, only the master code
has permission to adjust system
settings.
DEFAULT CODE
For security purposes the default
master code should be changed when
the system has been installed in your
home:
DEFAULT MASTER CODE:
1234
QOLSYS CONFIDENTIAL AND PROPRIETARY PAGE 20 OF 30
© Last updated 6/3/14 All rights reserved
EDIT SENSOR
EDIT SENSOR
FIND IT
Edit the name and behavior of a sensor in the system.
EDIT SENSOR
Change the name of individual sensors
CUSTOM TEXT TO SPEECH
To edit a sensor, click on the “edit” button on the right side of the sensor list
and you will see a page displaying all the sensor details. This includes the
sensor name, chime type, and whether voice prompts should be on or off.
Because the IQ Panel uses an Android
operating system, it can read almost
any name and speak it when the sensor
is opened.
Customize your system with specific
names like “Megan’s Upstairs Window”
To customize a sensor name, select
“Custom Description” under “Sensor
Name”
Make any changes you like and click “save” to exit.
QOLSYS CONFIDENTIAL AND PROPRIETARY PAGE 21 OF 30
© Last updated 6/3/14 All rights reserved
SYSTEM SETTINGS
SYSTEM SETTINGS
FIND IT
From the home page, press “Settings” and then “System Settings.”
SYSTEM SETTINGS
Access your basic system settings like Wi-Fi, sound, and
display settings.
Wireless Settings
View your current network or connect to new ones
Sound
Adjust the sound settings for your panel
Brightness
Change the panel’s brightness
SD Card
See whether the panel detects an SD Card, and safely “eject” that SD Card
when you are done using it.
QOLSYS CONFIDENTIAL AND PROPRIETARY PAGE 22 OF 30
© Last updated 6/3/14 All rights reserved
SYSTEM TESTS
SYSTEM TESTS
FIND IT
Press “Settings” and select “System Tests”
SYSTEM TESTS
Test your panel’s systems to ensure everything is
running accurately.
The panel provides a variety of different tests you can use to make sure
everything is communicating accurately and effectively.
TEST WEEKLY
You should test your system weekly.
Contact your security provider who will
provide you with details on how to
perform your tests.
WI-FI TEST
SENSOR TEST
Test your Wi-Fi connection to ensure it’s working properly.
Please note: The test will check the panel’s connection to your
network or router, but will NOT verify if the router has internet
connectivity
Performing a sensor test should be done regularly. We
recommend at least once per week to ensure you catch
any issues before they become problems.
QOLSYS CONFIDENTIAL AND PROPRIETARY PAGE 23 OF 30
© Last updated 6/3/14 All rights reserved
WIRELESS SETTINGS
WIRELESS SETTINGS
FIND IT
Wi-Fi settings are found inside “Settings” under “System Settings.”
WIRELESS SETTINGS
Connecting to a local Wi-Fi network will allow a wide
variety of features and benefits.
To connect to your Wi-Fi, follow the steps below:
Press “Settings”
Enter your master code
Select “System Settings”
Select “Wireless Settings”
Select “Wi-Fi Settings” and choose your
network from the list
Enter your network password (if required)
QOLSYS CONFIDENTIAL AND PROPRIETARY PAGE 24 OF 30
© Last updated 6/3/14 All rights reserved
USERS
USERS
FIND IT
Access “User Management” in the “Settings”.
USERS
Add, delete, or edit the names, access level and
individual pass codes for those who access your system.
AUTO-UPDATE
When you make a change to a user, it
will automatically update the
information on your Alarm.com
account.
The IQ Panel allows different users to operate the system. Each user has a
unique user code so that the IQ Panel can track who logs into and out of the
system. To access User Management, press the "Settings" button and enter
your master code. Then tap "User Management.” Users have the option to
add, edit, or delete users by pushing the corresponding buttons on the
screen. Make the desired changes and tap “Save” to exit.
If you make a change to a user on your
Alarm.com portal, it will automatically
update the information on your IQ
Panel.
CODE TYPES
You can create users in the following
categories:
Master:
Access panel functions as well as
system settings.
User:
Access panel functions, but NOT
system settings
Guest:
Used to give access to those users
who will only use the panel on a
temporary basis.
QOLSYS CONFIDENTIAL AND PROPRIETARY PAGE 25 OF 30
© Last updated 6/3/14 All rights reserved
HELP
HELP
FIND IT
The second icon in the footer is “Help”
HELP APP
The “Help” app is divided into four sections:
Video tutorials, FAQs, Contact Us, and
Documentation.
VIDEO TUTORIALS
To watch a video, select the Video Tutorials tab and press “View”
The built in library of video tutorials
includes video instructions on common
questions like “User Codes” and
“Connecting Wi-Fi”
FAQs
The panel also has a tab with frequently
asked questions that allow a user to find
an answer the most common
questions.
The IQ Panel displays a long list of common questions and their answers.
To access these questions, tap the
“Help” icon and select “FAQs”. The
questions appear in a list and can be
expanded by touching the arrow o the
left.
QOLSYS CONFIDENTIAL AND PROPRIETARY PAGE 26 OF 30
© Last updated 6/3/14 All rights reserved
CONTACT US
CONTACT US
FIND IT
Select the “Contact Us” icon in the bottom right corner.
CONTACT US
An easy way to get contact information for your
security provider
Touching this icon will bring you to a page with your provider’s contact
information.
Your security provider’s contact
information will appear here
The message center tab holds messages from your security provider. To
dismiss a message, touch the box to the left of the date and time.
Messages from your security provider
may appear here
QOLSYS CONFIDENTIAL AND PROPRIETARY PAGE 27 OF 30
© Last updated 6/3/14 All rights reserved
LEGAL
LEGAL
This document is subject to change without notice. Quality of Life Systems (“Qolsys”) assumes no responsibility for errors or omissions and disclaims any
liabilities and losses experienced as a result of using this document. For the most recent documentation, contact your local vendor or visit us online at
www.qolsys.com.
This document may contain images or information used in normal operations of the IQPanel (the “Product”). These may include fictitious names of people and
companies. Any similarity to actual names and addresses of businesses or persons is coincidental.
A. Trademarks and patents
Qolsys, the IQPanel name, and the Qolsys logo are trademarks of Qolsys, Inc.
You agree that all of Qolsys’s trademarks, trade names, service marks and other Qolsys logos and brand features, and product and service names are trademarks
and the property of Qolsys, Inc. (the "Qolsys Marks"). Without Qolsys's prior permission, you agree not to display or use in any manner the Qolsys Marks. Trade
names used herein may be trademarks or registered trademarks of the manufacturers or sellers of the respective products.This Product and the use of this
Product may be covered by one or more patents.
B. Software license Agreement Important: This software license agreement (“Agreement”) is a legal agreement between Qolsys and You. Read the following
terms and conditions before installing or using the software installed on the Product (the “Software”). This agreement provides a license from Qolsys to use the
Software on the Product. It also contains warranty information, disclaimers, and liability limitations. Installing and/or using the Software confirms Your
agreement to be bound by these terms and conditions. If You do not agree with these terms and conditions, do not install or use the Software or, if already
installed, immediately cease all use of the Software..
C. License. Qolsys grants You a personal, non-transferable and non-exclusive right and license to use the object code of its Software on the single Product on
which it was provided; provided that you do not (and do not allow any third party to) copy, modify, create a derivative work from, reverse engineer, reverse
assemble or otherwise attempt to discover any source code, sell, assign, sublicense, grant a security interest in or otherwise transfer any right in the Software.
You agree not to modify the Software in any manner or form, nor to use modified versions of the Software.
D. Term. This Agreement is effective until terminated. You may terminate this Agreement by ceasing use of the Software. Qolsys may terminate this
Agreement if You breach any of these terms and conditions. Upon termination of this Agreement for any reason, You agree to cease use of the Software. All
provisions of this Agreement relating to (i) disclaimer of warranties; (ii) limitations on liability, remedies, and damages; and (iii) Qolsys proprietary rights, shall
survive termination of this agreement.
E. Limited warranty. Please refer to our website, www.qolsys.com, for the latest Warranty and Return Policy applicable to this product.
F. Limitation of liability. Qolsys’s sole obligation or liability under this agreement is the repair or replacement of nonconforming Products and/or Software
according to the limited warranty referenced above. In no event will Qolsys be liable for damages, whether consequential, incidental, or indirect, nor for loss of
data, loss of profits, or lost savings, arising from use or inability to use the Product or Software or documentation even if Qolsys has been advised of the
possibility of such damages, nor for any claim by any third party.
G. General. Any materials provided to You by Qolsys shall not be exported or reexported in violation of any export provisions of the USA or any other applicable
jurisdiction. Any attempt to sublicense, assign, or transfer any of the rights, duties, or obligations hereunder shall be void. This Agreement shall be governed by
and interpreted under the laws of the State of California, United States of America, without regard to conflicts of law provisions. You hereby consent to the
exclusive jurisdiction of the state and federal courts located in Santa Clara County, California, to resolve any disputes arising under or in connection with this
Agreement, with venue in Santa Clara County, California.
H. Acknowledgment. You acknowledge that You have read and understand this agreement and agree to be bound by its terms. You further agree that this
agreement is the complete and exclusive statement of the agreement between You and Qolsys, and supersedes any proposal or prior agreement, oral or written,
and any other communication relating to the subject matter of this agreement.
I. Intended use
Use the Product for its intended use only; refer to the data sheet and user documentation. Any use other than the Product’s intended use will void any applicable
warranties. For the latest Product information, contact your local vendor or visit us online at www.qolsys.com.
J. FCC compliance
Changes or modifications not expressly approved by Qolsys can void the user’s authority to operate the Product. This Product has been tested and found to
comply with FCC Rules.
This Product generates, uses, and can radiate radio frequency energy and, if not installed and used in accordance with the instructions, may cause harmful
interference to radio communications. However, there is no guarantee that interference will not occur in a particular installation.
If this Product does cause harmful interference to radio or television reception, which can be determined by turning the equipment off and on, the user is
encouraged to try to correct the interference by one or more of the following measures:
Reorient or relocate the receiving antenna.
Increase the separation between the Product and receiver.
Connect the affected equipment and the Product to separate outlets, on different branch circuits.
Consult the dealer or an experienced radio/TV technician for help.
K. WARNINGS
Warning: Do not connect the Product to an AC receptacle that is controlled by a switch.
Warning: Do not connect the Product to a High Power AC receptacle.
QOLSYS CONFIDENTIAL AND PROPRIETARY PAGE 28 OF 30
© Last updated 6/3/14 All rights reserved
LEGAL
LEGAL (Cont.)
Warning: This Product should be installed in accordance with the National Fire Alarm Code, ANSI/NFPA 72, (National Fire Protection Association, Batterymarch
Park, Quincy, MA 02269). Printed information describing proper installation, operation, testing, maintenance, evacuation planning, and repair service is to be
provided with this Product.
Warning: Owner’s instruction notice: The Product is not to be removed by anyone except occupant or certified dealer representative.
Warning: This Product and all sensors associated with it (collectively, the “System”) should be tested once a week.
Warning: This System must be checked by a qualified technician at least once every three (3) years.
Warning: Users are advised to create their own Fire and Emergency Evacuation plan. Information to create a plan can be found at the following website,
National Fire Protection Association (http://www.nfpa.org/categoryList.asp?categoryID=1979), United States Fire Administration (https://apps.usfa.fema.gov/
publications/) or via other equivalent agencies.
Warning: This System cannot call the local police station directly … all Police Panic Alarms and Intrusion Alarms will be sent to the dealer authorized central
monitoring station who will then handle calling the local police as necessary. The Product cannot be configured to call the local police station.
Warning: This System cannot call the local fire station directly … all Fire Panic Alarms and Fire Detection Alarms will be sent to the dealer authorized central
monitoring station who will then handle calling the local Fire Department as necessary. The Product cannot be configured to call the local Fire Department.
Warning: This System cannot call the local medical emergency personnel directly … all Medical Panic Alarms will be sent to the dealer authorized central
monitoring station who will then handle calling the local medical emergency personnel (often 911 personnel) as necessary. The Product cannot be configured to
call the local medical emergency personnel (nor local 911 services).
Warning: The terminal block that is mounted inside the Product has 8 connectors for wires. Only the DC power input connections are currently in use (labeled
DCIN + and DCIN -). The other connectors are for future usage. There are two additional connectors for the first external sensor (labeled EXT1 + and EXT1 -), two
additional connectors for the second external sensor (labeled EXT2 + and EXT2 -), and finally, two additional connectors for an external siren (labeled BUZZER +
and BUZZER -).
L. BATTERY INFORMATION & WARNINGS
Main AC-DC Supply Converter
Voltage
Input 100-240V (AC-DC converter)
frequency,
50/60hz
max. input current
0.68A Max
Voltage
output 12V, 2A
Panel Battery
Battery Type
Lithium Ion Polymer battery
Lifetime Power Cycles
300+ Power Cycles ( fully charged to fully discharged state )
DC voltage
8.4V max
battery model number
Springpower 704077
max. charging current
400mA
trickle charge current
50mA max
battery capacity in ampere-hours
2500maH
Warning: Battery Capacity Detection: The battery will be automatically monitored for low battery capacity. Warning messages will be sent to the Product and
to the Alarm.com Backend informing the customer of the low battery condition (this occurs whenever the current battery capacity falls below 30% of the fully
charged capacity). The Product will also provide optional trouble beep warnings for the low battery conditions. The Product warning messages can be viewed on
the Security Status / Alerts Tab.
Warning: Battery Unplugged Detection: The battery will be automatically monitored to detect occurrences of the battery being unplugged. Warning messages
will be sent to the Product and to the ADC Backend informing the customer of the unplugged battery. The Product will also provide optional trouble beep
warnings for the unplugged battery condition. The Product warning messages can be viewed on the Security Status / Alerts Tab.
Warning: Battery Life: Greater than 5 years with use of the Product according to specifications. Change the battery after 5 years of service. .
Warning: Battery Handling: To maximize the life of the battery and for safety reasons the following precautions should be taken:
•
•
•
The aluminum foil encasing the battery is delicate and should not be exposed to sharp objects such as knives, pins or sharp finger nails
The battery should not be exposed to water
Do not leave near a heat source. This will reduce the working life of the battery
QOLSYS CONFIDENTIAL AND PROPRIETARY PAGE 29 OF 30
© Last updated 6/3/14 All rights reserved
LEGAL
LEGAL (Cont.)
•
Do not short circuit the battery by connecting the positive terminal to the negative terminal. High currents can be generated resulting in high
temperatures and risking fire and personal injury
M. FALSE ALARM WARNINGS
The following warnings cover the likely potential situations that may cause False Alarms Reports (FAR) to be generated.
Cause of FAR: User fails to enter proper pass code or enters the wrong pass code while trying to disarm system.
Prevention: Carefully enter your passcode. Remember your passcode and/or write it down in a safe place that is easily accessible.
Cause of FAR: User fails to exit premise before exit delay timer expires while trying to arm system in Away Mode.
Prevention: Listen to exit beeps and last 10 second voice countdown … if running out of time, then either press the Extend button to extend the exit delay or
press cancel … and then start the rearming process again once you are ready to leave the premises.
Cause of FAR: User opens a door, but fails to close the door before the exit delay timer expires while trying to arm system in Away Mode, thus causing an exit
fault and alarm condition.
Prevention: Be careful to close the door tightly upon exit during the arming process. If an exit fault / alarm does occur, then quickly reenter the home and
disarm the alarm.
Cause of FAR: Erroneous fire detection alarm from sensor.
Prevention: During installation, system can be set to require two fire sensor detections prior to generating central monitoring station fire alarm … note a local fire
alarm will still sound to alert the homeowner.
Cause of FAR: Erroneous Carbon Monoxide detection alarm from sensor.
Prevention: During installation, system can be set to require two Carbon Monoxide sensor detections prior to generating central monitoring station gas leak
alarm … note a local fire alarm will still sound to alert the homeowner.
Cause of FAR: Erroneous user fire, medical or police panic alarm generated.
Prevention: Do not press the Emergency button unless there is a real emergency. If the emergency alarm is accidentally activated, then quickly enter the disarm
pass code which will then cancel the alarm.
This equipment has been tested and found to comply with the limits for a Class B digital device, pursuant to part 15 of the FCC Rules. These limits are designed to
provide reasonable protection against harmful interference in a residential installation. This equipment generates, uses and can radiate radio frequency energy
and, if not installed and used in accordance with the instructions, may cause harmful interference to radio communications. However, there is no guarantee that
interference will not occur in a particular installation. If this equipment does cause harmful interference to radio or television reception, which can be determined
by turning the equipment off and on, the user is encouraged to try to correct the interference by one or more of the following measures:
—Reorient or relocate the receiving antenna.
—Increase the separation between the equipment and receiver.
—Connect the equipment into an outlet on a circuit different from that to which the receiver is connected.
—Consult the dealer or an experienced radio/TV technician for help.
This Class [B] digital apparatus meets all requirements of the Canadian Interference-Causing Equipment Regulations.
Cet appareil numérique de la classe [B] respecte toutes les exigences du Réglement sur le matériel brouilleur du Canada.
IMPORTANT! Changes or modifications not expressly approved by Qolsys Inc. could void the user’s authority to operate the equipment.
This device complies with Industry Canada license-exempt RSS standard(s). Operation is subject to the following two conditions: (1) this device may not cause
interference, and (2) this device must accept any interference, including interference that may cause undesired operation of the device
CAUTION! This equipment complies with radiation exposure limits set forth for uncontrolled environment. The antenna(s) used for this transmitters must be installed to
provide a separation distance of at least 20 cm from all persons and must not be collocated or operating in conjunction with any other antenna or transmitter.
Cet appareil est conforme avec Industrie Canada RSS exemptes de licence standard (s). Son fonctionnement est soumis aux deux conditions suivantes: (1) ce
dispositif ne doit pas causer d'interférences, et (2) cet appareil doit accepter toute interférence, y compris celles pouvant causer un mauvais fonctionnement de
l'appareil
ATTENTION! Cet équipement est conforme aux limites d'exposition aux rayonnements définies pour environnement non contrôlé. L'antenne (s) utilisé pour
cette émetteurs doit être installé pour fournir une distance de séparation d'au moins 20 cm de toute personne et ne doit pas être installé à proximité ou utilisé
en conjonction avec une autre antenne ou émetteur.
This device complies with Part 15 of the FCC Rules. Operation is subject to the following two conditions: (1) this device may not cause harmful interference, and
(2) this device must accept any interference received, including interference that may cause undesired operation.
QOLSYS CONFIDENTIAL AND PROPRIETARY PAGE 30 OF 30
© Last updated 6/3/14 All rights reserved