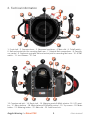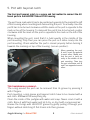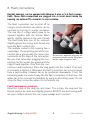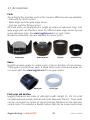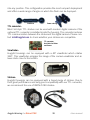
1
Hugyfot camera housings Nikon D700 User manual Picture: Jordi Chias Hugyfot Housing for Nikon D700 1 User manual Dear Dive buddy, Regardless which model of Hugyfot you hold in your hand, you can be sure that it is not only the best housing on the market but also the best looking one. Hugyfot builds underwater housings for cameras as well as lighting systems since 1953. The story began at a time when the first regulators were build and all the diving equipment still had to be designed. During the last decade, Hugyfot has invested a lot in new technologies. Together with the emphasising of the ergonomical design, this investment has changed the market of underwater housings. Recognition and a very high quality standard have made the Hugyfot brand known throughout the world. Underwater photography is our life. Happy Diving! Hugyfot nv - Industrielaan 30 Zuid III - 9320 Erembodegem - Belgium All rights are reserved for HUGYFOT. Also on all copies. Hugyfot Housing for Nikon D700 2 User manual Contents 1. 2. 3. 4. 5. 6. 7. 8. 9. 10. 11. Preface ..................................................................................................................................................................... 4 Techical information ................................................................................................................................. 5 Hugyfot for Nikon D700 ........................................................................................................................ 6 Opening and closing the housing .............................................................................................. 7 Port with bayonet catch ........................................................................................................................ 8 Flash connections ........................................................................................................................................ 9 Mounting the camera .......................................................................................................................... 11 Operation of the HugyCheck system .................................................................................. 12 Maintenance and service ................................................................................................................ 21 Photo practice .............................................................................................................................................. 23 Accessories ..................................................................................................................................................... 25 WARRANTY HUGYFOT NV guarantees for the actual status of techniques an impeccable usage for 2 years. In order to be able to claim this warranty, this user manual is to be followed unconditionally and the housing is to be used in a professional way. Faults and imperfections will be fixed by HUGYFOT during this period of warranty. All resulting damages are NOT INCLUDED in this claim. Damages due to transportation can not be claimed from HUGYFOT and remain under full responsability of the owner. The owner has to forward his claim to the transport company itself in order to avoid the loss of his right of claim. Hugyfot Housing for Nikon D700 3 User manual 1. Preface A camera in an underwater housing offers a lot of advantages to the professional and amateur underwater photographer: impeccable exposure due to the use of the most modern exposure techniques of the camera; direct view on the subject, very short reaction time and swift image processing; exact and swift focusing due to the autofocus objective; parallax faults no longer exist because one looks through the objective (all settings are displayed on the LCD-screen);as the camera can also be used on land, a second camera is not needed. As housings and flashes have a long lifetime and are quite expensive, some time should be invested in looking around to find the right equipment. Doing this in cooperation with a professional salesman is probably the best solution. Different criteria determine the final choice of the camera: recording technique (viewfinder, controls, …); functionality and comfort (design of the housing, control switches and their ergonomical position, …); price. Also: some elements that determine ones choice when buying a safari camera are not important at all when purchasing a camera for “underwater” use. Cameras are always designed for “on land” use. Therefore HUGYFOT always designs its housings from the divers’ ergonomical point of view and translates this through the controls. First dive is a checkdive without the camera in the housing. Check all buttons under water. Hugyfot Housing for Nikon D700 4 User manual 6 2. Techical information 7 5 4 8 9 10 3 2 11 1 12 1. Front shell - 2. Exposure lever - 3. Neoprene handstrap - 4. Main dial - 5. On/off switch 6. Ball-and-socket joint for mounting flash arm - 7. External flash connections - 8. Zoom/focus control - 9. Ergonomic grip with ball-and-socket joint for mounting flash arm - 10. AF/MF switch - 11. Lens release - 12. Port 20 18 19 21 22 13 23 13 14 17 16 15 13. Countersunk bolt - 14. Back shell - 15. Metering mode & Multi selector- 16. LCD monitor - 17. Menu buttons - 18. White balance/ISO/Quality control - 19. Top screen - 20. Mode button - 21. Metering button - 22. Main dial - 23. Auto focus lock. Hugyfot Housing for Nikon D700 5 User manual 3. Hugyfot for Nikon D700 It is a trend in underwater photography to use a digital camera that can be used by the amateur as well as by the professional. Nothing is as simple as taking pictures with the automatic settings of the Nikon D700. One can choose to take control himself and set each parameter to his preference. The sensitive exposure lever is integrated in the front shell which is a part of the patented Hugyfot-grip. This enables one-hand photography. With this sensitive lever the exposure lever of the camera can be slightly squeezed so the camera is activated. All the settings then become visible on the LCD-screen. One-hand photography, taking pictures during a drift dive or point-shooting with the flash in the other hand are “child’s play” thanks to the HUGYFOT design. Just as easy is the manipulation of the zoom on the left side, the diaphragm and the shutter speed. All parameters can be changed through the menu driven system, this can be operated through the buttons on the back of the housing. The big LCDscreen of the camera is entirely visible through the integrated window on the back of the housing. Any flash can be connected through the standard Nikonos contact. The sensitive exposure lever is integrated in the front shell which is a part of the patented HUGYFOT-grip. This enables one-hand photography. Hugyfot Housing for Nikon D700 6 User manual 4. Opening and closing the housing The HUGYFOT Nikon D700 housing is opened and closed by means of 2 builtin countersunk bolts. This guarantees the safest way of closing. Only with the right key you can open and close the housing. A curious buddy cannot open the housing by accident. Herewith we exclude the unwanted opening of the housing. To seal the housing, the socket screw key is inserted into the countersunk bolt and then turned until the shells are squeezed to one another. Stop turning the key when resistance increases significantly. Further turning the screws hasn’t got any sense and can only damage the thread. At a depth of 6 meters the hydrostatic pressure takes over and keeps all the o-rings under pressure. Always check the tension on the bolts before diving if the housing wasn’t opened in between two dives. First maintenance command: The screws, and more specific the tread, must be kept very clean at all times. The main o-ring merely lies in the o-ring groove. It can be removed by blowing it out with compressed air, by using a credit card or by rubbing two pieces of paper towards each other against the o-ring so the o-ring pops out of his groove. Never use a metal object or any other hard material: by doing this you can DAMAGE the O-ring and the groove. Second maintenance command: Whenever the o-ring is dirty or misted up, it must be removed from its groove (see first command) and cleaned up with soap (do not use corrosive or chemical degreasers). Afterwards clean it with clear water. O-rings have to be dried up with a clean cloth (do not squeeze) or by air. Grease the O-rings by using HUGYFOT grease. Pull the o-ring gently through your fingers without stretching it! O-ring grooves, housing and shell edges have to be cleaned with a clean cloth. Hugyfot Housing for Nikon D700 7 User manual 5. Port with bayonet catch The front port bayonet catch is a secure and fast method to connect the different ports to the HUGYFOT Nikon D700 housing. The port has a mark which has to be positioned opposite to the mark at the left of the housing when mounting and demounting the port. To actually close the port it has to be turned clockwise until the mark on the port is opposite to the mark on top of the housing. To demount the port it has to be turned counter clockwise until the mark on the port is opposite to the mark on the left of the housing. When mounting the port, mind that it is held exactly in the middle of the port mounting. Only then you can press the port so it slides nicely into the port mounting. Check whether the port is closed properly before turning it towards the marking on top of the housing. (secure position). When mounting the port, A and C must be opposite to each other. Make sure that the port is held exactly in the middle of the port mounting. Then turn the port clockwise until B and C are opposite to each other. A B C Third maintenance command: The o-ring around the port can be removed from its groove by pressing it with 2 fingers. Port mounting, o-ring groove and bayonet catch have to be cleaned with a wet cloth. Afterwards let everything dry. Clean the inside of the portglas with water and soap. Never scrub it with a cloth. Rinse it with fresh water and let it dry, or dry it with compressed air. Grease the O-rings with HUGYFOT grease by gently pulling it through your fingers without stretching it! Put it back into their grooves. Hugyfot Housing for Nikon D700 8 User manual 6. Flash connections Hugyfot housings can be equiped with Nikonos 5-pins or S-6 flash connections. These flash connections are plugged into a circuit board inside the housing. An optional TTL-converter is also available. The flash connection can be shut off by using a small protection cap which can be removed by turning it counter clockwise. The cap has 2 o-rings which have to be cleaned together with the thread. Afterwards, slightly grease o-ring and thread. The flash plug also has to be serviced. Slightly grease the o-rings and thread and keep the flash contacts dry. The multiple socket in the housing has a small ridge. The projecting part of the connection has a groove with the same meaBe sure that, whenever plugging the surements as the ridge of the connection. connection into the socket, the groove Be sure that, whenever plugging the con- and the ridge fit together well. nection into the socket, the groove and the ridge fit well together. Only then the connection is well positioned. Press the plug gently into the contact. Then turn it clockwise to tighten it. Whenever the flash connection has to be removed from a wet housing it always has to be positioned downwards. If not, the remaining water can work its way into the flash connection. In that case, the water has to be removed immediately by using an absorbing paper. Do not close the flash connection when it is not entirely dry. Fourth maintenance command: Keep the inside of the plug dry and clean. The o-rings, the plug and the thread need to be clean and slightly greased. DO NOT use the housing with an open multiple socket: this can cause leakage and corrosion! Hugyfot Housing for Nikon D700 9 User manual 7. Mounting the camera Prepare yourself at ease and try to avoid stress! Obligations when using underwater housings for cameras: Mount zoom (or focus) control gear (if applicable). Slide the zoom gear over the objective. Position the gear so that the gearwheel of the zoom control gear matches the gearwheel of the zoom control inside the housing. Remove the protection cap from the objective (if a port is mounted). Turn the ON/OFF switch onto position ON (camera and housing). Turn the AF/MF switch (optional) onto the ‘M’ position (camera and housing). Synchronize metering mode selector on camera and housing. Insert the tripod screw in the base of the camera body. Gently slide the camera onto the camera support until it reclines. The objective should be centered in the port mounting. If the zoom control gear does not function properly slightly turn it until the teeth fit. Never use force while mounting the camera. Be sure the flash connection is free and not jammed. Next, fix the tripod screw handfirm. Check whether the camera is mounted in a stable way without tension. Slide the flash adapter onto the flash connection of the camera (red connector facing back of camera). Turn on the camera. Check whether all control switches can be operated and function over the complete range. If not, this has to be checked and fixed before continuing. Set the parameters of the camera as much as possible according to the settings which will be used under water. If applicable, connect the external flash and test the camera and flash. If function fails, check the connections for their position and clean them. Closing of the housing: Check the main o-ring and the opposite sealing surface for dirt. If Hugyfot Housing for Nikon D700 10 User manual necessary, clean with a wet cloth. After appr. 5 dives, remove the main o-ring with a clean cloth by pressing it out of his groove. Clean the o-ring, the groove and the sealing surface. Then close the housing. Turn the countersunk bolds in without using any pressure so that the two shells are nicely put together. This point is reached when the tightening suddenly generates resistance. Check all operational switches in the back shell of the camera. It is possible that some pressure has to be used to operate the buttons. Due to the water pressure all buttons are squeezed, so this is the normal situation of operation. Mount accessories such as flash arm, handle, protection cap, etc… We strongly recommend doing this first mounting on a table. When one is forced to work on a floor (ship deck, tent, cabin, …) a clean towel should be used as a clean surface to avoid all kinds of dirt. Especially the first time, you should give yourself all the time needed to practise all these steps. Afterwards you will notice that it only takes a couple of minutes to mount your camera. Opening the housing: Before the housing should be opened, see to it that the housing is properly rinsed with fresh water. Make sure that the housing is dry so there is no more water left that can work its way inside when it is opened. Put the housing down with the port facing down. Loosen the bolds. Remove the back shell gently from the front shell. When resistance occurs while opening see to it that the cause of this resistance is put right before continuing. If not, damage to the housing or the camera may occur. Hugyfot Housing for Nikon D700 11 User manual 8. Operation of HugyCheck system The HugyCheck system is a pre-dive check system that allows the underwater photographer to check prior to the dive whether the housing has been closed properly and whether the o-rings are in good condition. An electrical vacuum pump will create a slight under pressure inside the housing which can be monitored by means of an LED pressure indicator on the camera hot shoe. Components: circuit board hot shoe with LED pressure indicator electrical vacuum pump - one way valve moisture sensor 1 7 2 3 4 5 6 Hugyfot Housing for Nikon D700 1. 2. 3. 4. J2 connecter J1 connecter SW1 switchboard J3 connecter (strobe socket 1) 5. J4 connecter (strobe socket 2) 6. J8 Power socket (3 Volt only) 7. Buzzer 8. J5 connecter (TTL converter) 9. J6 connecter (TTL converter) 10. Connecter for leakage alarm. 12 8 9 10 User manual Battery The HugyCheck system runs on a single CR123A 3V battery. Please make sure to install this battery correctly as a reversed polarity will damage the circuitry. Do not use batteries with a voltage higher than 3 Volt as this will damage the electronics. Strobe switchboard The HugyCheck system is developed to allow all possible combinations between camera and external strobes. Given the amount of possible combinations and settings, we advise you to read this section carefully. J1 J2 SW1 J3 J4 The camera hot shoe cable can be connected to either J1 (direct) or J2 (converter) on the circuit board. The J2 connecter is only to be used when the optional TTL converter is installed. When no TTL converter is installed inside the housing and the camera hot shoe is connected to J2, the strobes won’t fire. The J1 connecter is used when strobes are used in manual mode or when strobes are used that are fully iTTL or eTTL compatible (e.g. Nikon SB 800, Canon 580 EX, Subtronic dttl, …) Next to J1 is a switchboard SW1 which contains 6 switches (3 for each strobe) which control the Q, the SP and the Ready signal on both external strobe connections. By using these switches one can individually control the Q, the SP and the Ready signal on each strobe connection. The X and the Ground signal (as well as the 6th Canon line in case of Canon housings) are permanently wired through and cannot be switched off. Hugyfot Housing for Nikon D700 13 User manual Hugyfot Housing for Nikon D700 14 User manual Hugyfot Housing for Nikon D700 15 User manual SW1 Switchboard SW1 Switchboard: 1 = Q signal on J4 connecter 2 = Q signal on J3 connecter 3 = SP signal on J4 connecter 4 = SP signal on J3 connecter 5 = RDY signal on J4 connecter 6 = RDY signal on J3 connecter J1 connecter - Manual mode When the camera hot shoe is connected to J1 and when strobes are used in manual mode we strongly recommend that all the switches on SW1 are turned off. In this case only X and ground will be used as the digital data of modern cameras is incompatible with conventional TTL strobes and as ‘old style’ strobes might use a tension that is too high for modern cameras and might damage the camera circuitry. J1 connecter - iTTL or eTTL mode When the camera hot shoe is connected to J1 and when fully iTTL or eTTL compatible strobes are used (e.g. Nikon SB 800, Canon 580 EX, Subtronic dttl, …) all the switches on SW1 have to be switched on as the strobes will need all the data on all the lines. Please note that in this case only one strobe can be connected to the housing as most of these strobe systems require a master and slave strobe. The master strobe will be connected to the housing while the slave strobe will be connected to the master strobe. In case Canon eTTL strobes are used, all 6 lines are required and a 6-pin strobe connection needs to be installed on the housing. J1 connecter - iTTL or eTTL mode + Manual mode When the camera hot shoe is connected to J1 and when 1 fully iTTL or eTTL compatible strobe is used in combination with 1 non iTTL or eTTL compatible strobe, then all the connectors of the fully iTTL or eTTL compatible strobe on SW1 have to switched on while all the connectors of the non iTTL or eTTL compatible strobe have to switched off. Hugyfot Housing for Nikon D700 16 User manual J2 connecter - iTTL or eTTL mode through optional TTL converter When the camera hot shoe is connected to J2 and when conventional TTL strobes are used in combination with the optional TTL converter, only the Q lines of both strobes have to be switched on. J2 connecter - iTTL or eTTL mode through optional TTL converter + Manual mode When the camera hot shoe is connected to J2 and when 1 conventional TTL strobe is used in combination with the optional TTL converter in combination with 1 conventional strobe that is used in manual mode, only the Q line of the TTL strobe has to be switched on. Vacuum system When the battery is installed, the HugyCheck system is in ‘stand-by’ mode and the red LED on the camera hot shoe will blink every 5 seconds. To start the vacuum procedure, please make sure that the system is in ‘stand-by’ mode. Start the vacuum procedure at least 30 min prior to the dive. Check the main O-ring and port O-ring and close the housing. Make sure the port is installed properly. Install the one-way valve into the 3rd bulkhead and remove the sealing cap. Insert the plug on the electrical vacuum pump into the one-way valve and press the button on the pump. One way valve installed in 3rd bulkhead (only on new models). Hugyfot Housing for Nikon D700 One way valve installed in manifold (old models which only have 2 bulkheads). 17 User manual Install the one-way valve into the 3rd bulkhead and remove the sealing cap. Insert the plug on the electrical vacuum pump into the one-way valve and press the button on the pump. When the standard viewfinder is installed the red and green LED’s on the hot shoe are visible right above the viewfinder, through the back window of the housing. In case a 45° viewfinder or a straight viewfinder is installed, the red and green LED’s on the hot shoe are visible through the gap right above the viewfinder. With the standard viewfinder installed, the LED’s on the hotshoe are visible through the back window. - With the 45° or straight viewfinder installed, the LED’s on the hotshoe are visible through the gap above the viewfinder. As soon as the HugyCheck system detects a pressure between 950 and 850 hPa, the red LED will blink once each second. When the HugyCheck system detects a pressure between 850 and 750 hPa, the red LED will blink 3 times each second. When a pressure of 750 hPa (or less) is registered the red LED will stop blinking and the green LED will take over. In case the housing hasn’t been closed properly or in case an O-ring should be faulty, the pressure of 750 hPa will not be reached or will not be kept. In this case a loss of under pressure will be registered by the system and the red LED will be reactivated while the green LED will stop blinking. We strongly recommend to start the vacuum procedure at least 30 minutes prior to the dive. When opening the housing after a dive, the under pressure first has to be released by unscrewing the one way valve from the bulkhead. Hugyfot Housing for Nikon D700 18 User manual Calibration When using the housing at altitude, the ambient pressure can be a lot lower than 1.015 hPa (factory settings). In this case the unit has to be calibrated in order to have a minimum of 250 hPa pressure difference before the green LED is activated. To calibrate the unit, the HugyCheck calibration jumper is required. The HugyCheck calibration jumper has a ‘bridge’ between pin 6 and pin 7. There are two different ways of calibrating the unit: 1. Calibrating at altitude (< 1.015 hPa) 2. Calibrating at sea level (1.015 hPa) 1. Calibrating at altitude (< 1.015 hPa) When this unit is used at altitide, the reference pressure of 1.015 hPa (factory settings) has to be changed to the ambient pressure at altitude. To calibrate the unit at altitude: - first remove the battery from the camera support; - remove the hot shoe cable from the Hugycheck system (J1 or J2); - install the HugyCheck calibration jumper on J2 (convert); - install the battery in the camera support; To calibrate at altitude, the HugyCheck calibration jumper is to be installed on J2 (convert). The red LED will burn, indicating that the reference pressure has been set to ambient pressure (< 1.015 hPa). - remove the battery from the camera support; - remove the HugyCheck calibration jumper on J2 (convert); - install the hot shoe cable on the Hugycheck system (J1 or J2); - install the battery in the camera support. The system in now ready to be used at altitude. Hugyfot Housing for Nikon D700 19 User manual 2. Calibrating at sea level (1.015 hPa) When this unit is used at sea level, the reference pressure has to be set to 1.015 hPa (factory settings). To calibrate the unit at sea level: - first remove the battery from the camera support; - remove the hot shoe cable from the Hugycheck system (J1 or J2); - install the HugyCheck calibration jumper on J1 (direct); - install the battery in the camera support; To calibrate at sea level, the HugyCheck calibration jumper is to be installed on J1 (direct). The yellow LED will burn, indicating that the reference pressure has been set to 1.015 hPa (factory settings). - remove the battery from the camera support; - remove the HugyCheck calibration jumper on J1 (direct); - install the hot shoe cable on the Hugycheck system (J1 or J2); - install the battery in the camera support. The system in now ready to be used at sea level. Warning When the unit is used at altitude (< 850 hPa) while calibrated at sea level, the red LED may already be blinking rapidly even with no under pressure inside the housing as the system will register a pressure below 850 hPa. When the unit is used at sea level while calibrated at altitude, the reference pressure (< 1.015 hPa) may be so low that the pump will not reach the required underpressure in the housing to acivate the green LED. In this case the red LED will keep on blinking rapidly. Hugyfot Housing for Nikon D700 20 User manual 9. Maintenance and service The Hugyfot o-rings are of a very high quality. Their lifetime may be estimated at 5 years. Nevertheless it is advised to have a spare of the main and the port o-ring. When the housing isn’t used for a longer period, it should be thoroughly cleaned and stored away with closed shells in a dry and dark storage (NO PRESSURE on the main o-ring). The camera should not be stored inside the housing and the port should not be mounted.While transporting (airplane, Transport Company, post …) never leave the camera inside the housing. Due to vibrations the camera as well as the shells can be damaged. Either pack the shells separately or bolted together. Never put the housing in the sun. Aside from the mentioned maintenance commands, the HUGYFOT Nikon D700 housing is fairly simple to maintain. Some issues however should be kept in mind: - - When finishing a dive one has to rinse the closed housing with a closed flash connection (plug or protection cap) under the shower or in a rinsing tub. Never leave the housing to dry up after use in salt water. If it is not possible to rinse it in fresh water, keep it wet with salt water. Before opening the housing it has to be completely dry. See to it that when opening the housing no water can work it’s way inside. Be carefull with wet hair, diving gloves or wetsuits. When finishing your diving holiday, soak your housing for 12 hours or longer. Then wash it and clean it. Certainly at all buttons and in all corners. (Bolds, buttons, bullets, …). Clean the bolds with a wet cloth. Remove all salt with maintenance oil. Remove the battery from the HugyCheck system. Hugyfot Housing for Nikon D700 21 User manual A service of all passages is necessary once a year. If you can do this yourself, the following procedure is to be followed: - Unscrew and unmount all the control switches in the housing with the small socket screw key (gears, exposure lever shaft, wedge caps, selector switch shaft, …). Remove the o-ring out of its groove. Use the control shaft or a non metalic tool. Wash axe and o-ring with soap (do not use degreasers), rinse with fresh water and dry thoroughly or let it dry for a while. Slightly grease with Hugyfot-grease. Position the greased o-ring in its groove, gently slide the axe back in and mount the control switch back to its proper position. When the control switches are mounted you may mount the camera into the housing. Now check all the controls on their proper functioning. Always perform a pressure test after removing/installing control switches or perform a testdive without camera inside the housing. Hugyfot Housing for Nikon D700 22 User manual 10. Photo practice With a Nikon D700 camera in a HUGYFOT housing one can take pictures almost completely automated. To use the camera with all its possibilities one has to beware of some basic principles. These basic principles are explained in the following chapter. The “Auto Focus system” (AF) lets the camera focus in most cases, supposing that the subject is positioned in the centre of the viewer. If not one has to focus on the subject and keep the shutter release button squeezed. This way the focus is locked. One can now adjust the composition and shoot. When taking macro images the depth of field is more narrow and therefore the AF-system can be defective by particles in suspension. In that case, focus on the subject and lock this position according to the technique mentioned above. Next, approach or move away from the subject until it is focussed and press the exposure lever. Due to diffusion and absorption of light under water, photography under water is limited to a distance of about 1,5 meters. Nevertheless, shots from a distance of over 1,5 meters are possible but the quality of color, sharpness and glow will be considerably less. Therefore the golden rule in underwater photography states: “The closer the subject is photographed, the more attractive the colours and the more sharpen the shots willl be.” When adjusting the “diaphragm”, one has to consider a decreasing depth of field when increasing values of the diaphragm are selected. This depth of field decreases when close up shots are made. With a longer “shutter speed”, more light can be catched and the brightness of the shots can be increased. The shutter speed is always to be considered in combination with the diaphragm. The built-in light sensor informs the photographer about the effects of the combination he wishes to apply. Always consider that shutter speeds slower than 1/60 second could result in motion blur. Hugyfot Housing for Nikon D700 23 User manual When taking shots at depths deeper than 3 meters, the use of a “flash” is necessary to regain the natural colours. The Nikon D700 can be combined with a flash in 3 modes: Manual flashes: using this mode, the power of the flash can be adjusted. The camera will direct and synchronise the flash by means of the X-contact. The result obtained can be observed on the LCD-screen. In case of an overor underexposure, the power of the flash or the distance to the subject has to be adjusted and a new shot has to be made. Autonomous flashes: some flashes have a light sensor which registers the light reflected on the subject. When this sensor registers enough light, it will automatically shut down the flash. Only by means of the diaphragm, the flash light can be limited. To obtain a correct simulation, the diaphragm used on the camera has to be adjusted on the flash. In case of an under- or overexposure, a higher or lower value of the diaphragm has to be adjusted on the flash. TTL flashes: using this mode, camera and flash communicate and set the right values of diaphragm and shutter speed to obtain the correct amount of light needed for the shot. This mode can only be obtained by using a Nikon D700 compatible flash or by installing the optional TTL converter. Hugyfot Housing for Nikon D700 24 User manual 11. Accessories Ports: According to the objective used on the camera, different ports are available. - Flat ports for macro lenses - Wide angle ports for wide angle lenses - Fish eye ports for fisheye lenses All these ports can be adjusted in length by means of extension rings. One wide angle port can therefore serve for different wide angle lenses by only using extension rings. See www.hugyfot.com for our port charts. Neoprene protection caps are available for all our ports. Fisheye port Wide angle port Flat port Extension ring Gears: Hugyfot provides gears to control zoom or focus function of most lenses. These gears consist of two parts, a black delrin outer shell and a white silicon inner part. See www.hugyfot.com for our gear charts. Delrin gear Silicon gear Flash arms and handles: Hugyfot flasharms are made of ultra light shafts (length 11, 23, 31 or 50 cm) with ball-and-socket joints at both ends (diameter 25mm). These arms can be connected by means of clamps that are tightened on the ball-andsocket joints. This provides a flexible system that can be moved and locked Hugyfot Housing for Nikon D700 25 User manual into any position. This configuration provides the most compact deployment and offers a wide range of angles in which the flash can be deployed. Flash arm Power closing TTL converter: Most ‘old style’ TTL strobes can be used with modern digital cameras if the optional TTL converter is installed inside the housing. The converter restores TTL communication between the strobe and the digital camera. Please contact [email protected] to check whether your strobes are compatible. TTL converter Available for Nikon and Canon Viewfinder: Hugyfot housings can be equipped with a 45° viewfinder which rotates 360°. This viewfinder enlarges the image of the camera viewfinder and allows shots close to the bottom. Strobes: Hugyfot housings can be equipped with a broad range of strobes. Due to their great performance and very good compatibility with our TTL converter, we recommend the use of INON Z-240 strobes. Hugyfot Housing for Nikon D700 26 User manual