1
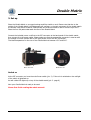
Double Matrix Double sided© record cleaning machine User manual Made in Germany Hi-Fi Components clearaudio© electronic GmbH Spardorfer Str. 150 ● D-91054 Erlangen ● Tel. +49(0) 1805/059595 ● FAX +49(0) 09131/51683 www.clearaudio.de ● www.analogshop.de ● [email protected] / copyright clearaudio 2009 Version 1.4_02.26.09_English Double Matrix User manual Dear clearaudio customer, Congratulations to your new clearaudio Double Matrix record cleaner, an extraordinary product made by clearaudio. The cleaning of dirty or used records does improve the overall sound quality. This appears as well for new vinyl records as there are often residues left over, which stay in the grooves during the pressing process. Please read this user manual with great care, to avoid mistakes in use, mistreatments or void of warranty. Why Double Matrix ? In the past, many analog and music lovers as well commercial and professional organisations did approach us with numerous questions. How it is possible to clean vinyl records even better and faster. Why it cannot be avoided that the clean side of the record needs to be turned and be placed on a possible dusty underground. It is obvious, during cleaning hundreds of records, especially under commercial circumstances, time is money. A semiautomatic record cleaning machine, without costly accessories for a perfect cleaning of LP’s and EP’s - as well as the total elimination of electrostatic charges and that the record needs not to be flipped over again after one side is cleaned and which is able to finish the whole cleaning process within a minute - was the target for us. This means, a revolutionary and worldwide outstanding product needs to be developed. The additional goals are an efficient and easy use, combined with a longlife ability. What seemed to be far away from realisation, had been after more than 2 years of research and development successfully achieved - the clearaudio Double Matrix. Ingredients and craftsmanship The clearaudio Double Matrix is made out of the highest grade of materials and components, which are almost undestroyable. For instance, the platter is made out of solid 10mm thick aluminium which is sitting on the bearing, shafted twice to achieve highest stability. The housing is made out of 12 mm thick polymer material, for a robust case. The corner poles, feets, the fluid tank where the fluid is stored after cleaning are made out of stainless steel. This results in an attractive total weight of approx. 23 kg. If there should occur a slight problem, which is unregular and not to be awaited at all, the components and spare parts are secured to its availability for the next century. Thank you very much for your confidence! How to operate and why you made the right choice, you will read on the following pages. We wish you a lot of enjoyment with your new cleraudio Double Matrix. Page 2 clearaudio electronic GmbH 2009 Double Matrix User manual Directory 1. Package content 4 2. Features overview 5 3. Set up 7 4. Functions 9 5. Cleaning with the Double Matrix 14 6. Maintenance 16 7. Technical data 19 Warranty information 20 Important note! Page 3 clearaudio electronic GmbH 2009 Double Matrix User manual 1. Package content The clearaudio Double Matrix is delivered in a special and optimised packing material. Please take the Double Matrix out of the packing and place it on a safe place (underground). Please check if the Double Matrix suffered any damages in transit. Right after that take off gently the blue secure tape. Any residues from the tape can be easily rubbed off by hand. Please keep the original packing, to avoid any unnecessary damages in case the machine needs to be transported. Setup – see page 7 Please check the package contens of your Double Matrix: 1. Complete pre-installed Double Matrix machine 2. Seal - Clamp 3. Filling funnel and feet- felt pads (4pcs.) 4. Power cord 5. 4pcs. microfabric spare stripes 6. 250 ml pure groove cleaning fluid 7. Seal for fluid container (already installed) 8. Fluid release knob (already mounted on the rubber tube) 9. Single Adapter 10. Warranty card * * see on page 20 warranty registration. In case that the content is not complete, please contact your clearaudio dealer, where you purchased the Double Matrix. Page 4 clearaudio electronic GmbH 2009 Double Matrix User manual 2. Features - overview Version: February 2009 Both sides cleaned at once Due to the sophisticated design of the wash and vacuum arm tubes, it is now possible to clean both sides of your precious vinyl at once. This results in a even higher comfort during the use. For a constant brush pressure a approved magnet mechanics are used. Left-right turn switch It is substantive for a perfect cleaning process that the platter is turning in both directions. Automatic speed regulation If the vacuum is switched on, the rotation speed is automatically reduced. Our research and long experience showed clearly that an additional deeper cleaning is achieved through this process. Cleaning of LPs, EPs and Singles The Double Matrix is able to clean all these formats without any additional accessories. You even do not need to change the cleaning vacuum arms for the different formats. Excellent cleaning Through the cleaning process with the double matrix, the general sonic improvements have been raised to a new level which regular cleaning machines do not reach. This is proven by our laboratories. No platter The vinyl records do not have to be placed on a possible dusty underground anymore, they are just sitting on a platform in the size of the label. Through the integrated cleaning vacuum brush, the vinyl is stabilised automatically. Cleaning in half of the time Both sides of any record are cleaned at once. This reduces the time of the cleaning process at least of 50%. Especially in commercial areas, this is an unbeatable advantage. Optical control through an integrated mirror You even have the possibility to watch or control the bottom side of the record during the cleaning process. This is possible through the integrated mirror, which covers the same surface as the object being cleaned. Integrated filter To avoid any dust or other particles, there is a micro filter integrated, to ensure a long life for the cleaning brushes and your vinyl. Page 5 clearaudio electronic GmbH 2009 Double Matrix User manual Perfect cleaning fluid control Only the fluid which is needed or desired, will be transferred. This is possible through two electronic controlled magnet valves which secure that no unwanted fluid is being transferred while vacuuming. You will find other machines on the market where this is not the case. Antistatic brush Through a high efficiency antistatic brush, a complete discharge is reached even if you do not want or need to clean your record. The sonic benefits are obvious. Dry labels The labels of your records are completely covered through our well known seal clamp, which is used in the Double Matrix as a sandwich. Perfect temperature controle A special air channel system ensures no overheating in the housing. Even while cleaning hundreds of records without interruption, no components get overheated. In usage without the silent pad, we guarantee an inner temperature lower than 35°C. Big tank The 0,75 litre fluid tank is easy capeable to be used for at least 100 cleaning processes, as it is needed in professional equipment. Big waste tank On the opposite, where the fluid is stored after vacuuming, the tank lasts for even more fluid than 0,75 liters. Self cleaning procedure If both cleaning arms are placed in function, but just without a record, you have the possibility to dry the cleaning arms or even to clean them with fluid. Noise reduction The Double Matrix is already equipped with acoustic damping material, for a reduced noise level during use. As an additional feature there is a silent pad on the bottom of the housing. (For normal use, about 20 records per hour) Ease of use After a very short period you will be able to clean up to 50 records per hour with the Double Matrix. Page 6 clearaudio electronic GmbH 2009 Double Matrix User manual 3. Set up Place the Double Matrix on a rugged underground like a table or rack. Please note that due to the weight of the Double Matrix it could damage soft surfaces, or through movement of the double matrix the surface could suffer scratches. Please make sure that the surface is able to retrieve up to 60°C. Place the four felt pads underneath the feet of the Double Matrix. Connect the included power cord first to the IEC connector at the back panel of the double matrix, then connect it to the power outlet. Please make sure that the appropriate connector is used as well the voltage is correct. Please refer to the type sticker next to the IEC connection. The ideal temperature for the use of the Double Matrix is between 15°C and 30°C. Pic. 1: Back view Pic 2: Back view Switch on At the IEC connector you have the main Power switch (pic. 2). If the unit is switched on the red light of the switch is lightened up. As well a blue LED lights up on top of the double matrix (pic. 3. page 8) Now your Double Matrix is ready to be used. Please first finish reading the whole manual! Page 7 clearaudio electronic GmbH 2009 Double Matrix User manual Top view of Double Matrix: service knob antistatic brush holder control mirror antistatic brush Seal clamp seal of fluid container washing unit lower washing unit power indication lower washing unit rubber tube fluid pump switch top wash arm vacuum switch fluid regulation funktion panel screw Pic. 3: Top view Please make yourself familiar with the functions. On the next pages you will find more information on the various functions. They will be illustrated with additional pictures as well. Page 8 clearaudio electronic GmbH 2009 Double Matrix User manual 4. Functions 4.1 clearaudio “Seal” record clamp The clearaudio “Seal record clamp” (pic.4) has been developed to cover and seal the record label and to hold the records thight on any platter devices. On the outer aluminium ring you will find two small deflation holes, so that there will be no vacuum while putting the seal clamp on records. This make it easier to release the clamp after the cleaning process. open close resonance body locking device control mark rubber seal holes for the air Pic. 4: “Seal” record clamp Important! Please place the “Seal record clamp” with some pressure on the record in order to avoid any unwanted sliding of the record! 4.2 Antistatic brush unit The antistatic brush (pic. 5+6, page 10) is used to discharge any electrical charges, which can occur while cleaning. After vacuuming the record and only when the surface is dry, place the antistatic brush in position while twisting it to the left (towards the record). Leave it in place for one turn (use the blue helping spot). This Function can be used as well if you do not clean a record. If the hairs of the carbon fibre brush are not building enough connection to the surface of the record, use a comp to place the carbon hairs back in position. Page 9 clearaudio electronic GmbH 2009 Double Matrix User manual working position resting position record carbon fibre brush Pic. 5: Working position Pic. 6: carbon fibre hairs and record 4.3 Cleaning arms - function Top and lower cleaning arms The top and the lower cleaning arms include the cleaning and the vacuum as well as the fluid dispension at once. If the top cleaning arm is in working position (pic. 8), there is always a constant pressure on the record. In the resting position (pic. 7) the top and the lower cleaning arms are automatically in a distance to the record. The top cleaning arm (pic. 10) can be twisted 90° degree, to be placed parallel to the lower cleaning arm. The lower cleaning arm can not be moved, as it is automatically moving horizontal due to the inserted magnets. At the end of the cleaning arms, you will find several air holes (pic. 9, page 11). They are needed to transport the fluid with the airflow direction. The drier the surface of the record is, the lower is the pressure. At the lower cleaning arm (pic. 10) on each side you see the fluid drains. These protection is built in to avoid fluid dripping if too much fluid is used while cleaning. This fluid will be automatically run through the blue tube (pic 8) back into the tank. Even during vacuum the blue tube is of help. top arm neodym magnet lower arm blue overflow release tube Pic. 7: Resting position Page 10 Pic. 8:Working position clearaudio electronic GmbH 2009 Double Matrix User manual upper arm 90° movable lower arm – can not be mooved fluid drains fluid dispensing rubber tube Bild 9 Vergrößerung Luftlöcher positioning screws Pic. 9: Enlarged air - holes Releasing the upper cleaning arm Sometimes it is necessary to take off the upper cleaning arm tube, e.g. if you would like to change the control mirror of the micro fibre stripes. First take the rubber tubes of the upper cleaning arm (pic. 10, no.1). Now release the positioning screws, by turning them counter clock wise, till they stand off 6 - 8mm further out of the housing. It is no problem if you release the screws completely (pic. 10, no.2). Now you can take off one or both cleaning arms. (pic. 10, no. 3) To prevent any scratches, place them on a soft underground. Replacing the cleaning arm tubes to slide the arm tubes back, please operate vis-à-vis as you released them. Installation of the lower cleaning arm unit Use the opposite way as described above. take off - cleaning unit If one or both cleaning arm tubes are taken off, never switch the vacuum on. Fluid can be get into the vacuum engine. Damage can occure! release the lock – positioning screws take off the rubber tube Pic. 10: Washing unit Page 11 clearaudio electronic GmbH 2009 Double Matrix User manual 4.4 Control mirror Control mirror Through the mirror you are able at any time to control or just to enjoy the cleaning process from the bottom side of the record. Additionally, you are able to make sure that the surface is completely dry after the vacuum process. Mirror change The mirror can be exchanged in case of scratches or dullness. First take off the small platter, while loosening the 3 lock screws. To bring the mirror to the right position, we recommend you to uninstall the cleaning arms (see page 11). A little dent on the upper plate is provided for an easier lifting of the mirror (pic. 11), which is fixed with 6 adhesive tapes. Please remove any waste of glue or dust with alcohol. Mirror replacing control mark You will find on the bottom side of the mirror already 6 pre mounted self-adhesive pads, from which you first take off the protection foil. Now place the mirror into the cut out and press it gently down onto the surface. Now you can place the cleaning units back. Pic. 11: Dent for mirror change Only after finishing the exchange of the mirror, take off the protection foil. White residue of the manufacturing process can appear on the surface, which can easily be wiped off with a wet cloth. use a wet cloth for cleaning Pic. 12 : Mirror incl. protection foil Page 12 clearaudio electronic GmbH 2009 Double Matrix User manual 4.5 Operation panel Main power at the back panel At the back panel you have the main power switch (page 7). The power socket is equipped with a 10 ampere fuse (10 AF). Blue LED The blue LED lights up when the unit is switched on and ready fur usage. If the unit is not used for a longer period, please disconnect it always from the main power. Switch, left and right With this switch you can control (pic. 13, no.1) the movement direction of the platter. If the switch position is on “zero” (0), the platter does not turn. Fluid pump switch By pushing the liquid button (pic. 13, no.2), the cleaning fluid will be transferred to the record. You can regulate the quantitiy of fluid, depending how long you hold (push) the liquid button. It will take some time and training until you know the perfect amount of the cleaning fluid. Pic. 13: Switch board TIPP Switch for vacuum function Use the switch “Vacuum” (pic. 13, no. 3) to control the suction. If you switch to „II turbo“ you activate the complete throughput of the vacuum pump. In position „I normal“ the suction is reduced about 50%; The cleaning of singles and EPs records requires this function. Page 13 clearaudio electronic GmbH 2009 Double Matrix User manual 5. Cleaning with the double matrix 5.1 Fluid tank re-fill We recommend you to use only the clearaudio “Pure Groove” cleaning fluid for a perfect result and for the safety of your records (www.analogshop.de). Attention: Foaming fluid can damage the machine and void the warranty! The fluid tank has a maximum capacity of 0,75 liter. Open the fluid tank by removing the round top cap. Fill the fluid with the supplied filling funnel into the tank. There is no necessity to worry if you filled too much fluid into tank; just wipe the spilled fluid off with a cloth. 5.2 Record cleaning, vacuum drying, electrostatic discharging For the initial record cleaning process, we recommend you to use a defective or unused record to get familiar wit the machine. 1. Take off the record clamp by twisting the lock (pic. 4, page 9) cap to the left. Place the record over the spindle and put the record clamp back. Tighten it firmly, so that the record can not slip while vacuuming. 2. Place the top upper arm over the record, while swinging it towards the spindle. With light pressure on the top of the cleaning arm, the upper and lower cleaning arms will be pushed together due to the inserted magnets. 3. By pushing the button „Liquid“ the rubber tubes will fill up with the cleaning fluid. Wait until the fluid comes out of the cleaning arms onto the surface of the record. The micro fibre brushes should be wet before switching them onto the platter. 4. To let the platter turn, push the button „Motor“. Now be aware that the fluid should build a closed surface by pushing the “Liquid” button quickly, maybe several times. Through the mirror you can control the fluid dispersion of the bottom side of the record. 5. The platter should turn in each direction 3 to 5 times, depending on the dirt level of the record. You can count the turns easily by watching the “Blue control spot”, provided on the record clamp. Caution: Please take care that there is enough fluid on the record surface. For a very intense cleaning, you can stop the platter during the cleaning process. Just wait 30 to 60 seconds for the fluid to sink in. Page 14 clearaudio electronic GmbH 2009 Double Matrix User manual 5.3 Vacuum drying 6. To achieve a perfect result, proper vacuuming is necessary. You have the choice between “Vacuum normal” (lower noise level) and “Turbo”. As it dries faster, we recommend you to use the “Turbo” function. 7. When the record is dry you always should switch off the vacuum at first, then put the upper cleaning arm up and swing it back to the left in it’s resting position. Now you can stop the platter. Important! The cleaning arm should always be placed back while the platter is turning. After vacuum drying, never change the platter direction. 8. Place the antistatic brush over the record, while lifting the brush up and swing it towards the record. Let the platter turn now at least one time. You should do this procedure after every cleaning process. Use the “Blue control point” on the record clamp. After the antistatic procedure, place the brush back in its resting position and switch off the platter. Never use the antistatic brush when the record is wet! Now you can take off the record and enjoy music. Page 15 clearaudio electronic GmbH 2009 Double Matrix User manual 6. Maintainance 6.1 Changing the micro fibre stripes This procedure will be easier if you take off the upper cleaning arm (page 11). Before taking off the old micro fibre stripes, please remember the previous position of them. The adhesive surface must be clean and dry. After you have taken off the protection foil ,place the new micro fabric stripes on the previous place and press the stripes gently onto the cleaning arms. Attention! Do not place the stripes over the small fluid dispensing holes. 6.2 Self cleaning procedure After cleaning several records, depending on the dirt level of the records, you should clean your cleaning arms, as dust and dirt may influence the perfect cleaning procedure. Please place the upper cleaning arm in working position over the lower one. Attention! Please never place a record onto the machine while the self cleaning process. TIPP Turn the “Turbo” switch on for 20 seconds. The waste dust on the outer banks of the micro fibre stripes can be wiped off easily with your fingers. 6.3 Vacuum fluid tank The tank for the vacuumed fluid has a tankage of one litre, which is normally reached after 200 cleaned records. Of course it depends on the amount of fluid used for each cleaning. If you clean more than 20 records a day, you should release the fluid at the rubber tube at the back of the machine. The rubber tube should only be opened for fluid release! If you clean less than 20 records per day, releasing the fluid should not be necessary, as it mostly evaporates. Page 16 clearaudio electronic GmbH 2009 Double Matrix User manual 6.4 Draining and cleaning of the collecting and holding tank Draining the collecting tank Place an adequate container on the floor for the disposal fluid. Take off the secure cap of the rubber tube and place it into the disposal container. Tilt the machine towards the back (about 45°), until the fluid drains out of the tube. Attention! When finished, always place secure cap back on the tube ! Do not reuse the drained fluid! Cleaning the collecting tank Take off the upper cleaning arm and fill the cleaning fluid into the stainless steel tube. Water and vinegar (2 spoons) are appropriate enough. Attention! During the cleaning process, never switch on the vacuum! Before releasing the rubber tube, let the fluid rest in the tank for about 20 minutes. Pic. 15 Rubber tube seal / lock Draining the holding tank If your double matrix ever needs to be transported, please make sure that there is no fluid left at all. Therefore we recommend you to empty the collecting and the holding tank. Take off the two rubber tubes from the cleaning arms and place them into a fluid container. Push the button “Liquid” and let the fluid drain completely into the container, until there is no fluid left. Place back the rubber tubes onto the cleaning arms. If you do not use the machine for a longer period, we recommend to drain the collecting and the holding tank! Page 17 clearaudio electronic GmbH 2009 Double Matrix User manual 7. Warranty - information The warranty time for the Double Matrix is two (2) years. You can achieve the extended warranty time of three (3) years, if you fill out the warranty card and send it in within 2 weeks after purchase, to the following address : clearaudio electronic GmbH Spardorfer Str. 150 91054 Erlangen Germany Please note, never use foaming or acid fluids! Use always special clearaudio “Pure Groove” fluid. Otherwise no warranty will be avoid The Double Matrix should only be repaired by clearaudio or approved institutions or persons, otherwise the warranty will be void. A frequent optical control of the mains cables is requested, for your own safety. If any damage should occur, the repair or exchange should be done immediately through an approved electrician or institution ! A service of clearaudio products should be done only by certified clearaudio dealers. If damage of the machine for any reason should occur, and a repair of the machine is necessary, than it should be sent to the selected dealer, distributor or directly to : clearaudio electronic GmbH Spardorfer Str 150 91054 Erlangen Germany Tel/Phone: +49-(0)9131 / 57702 www.clearaudio.de www.analogshop.de [email protected] The repair will be free of charge, during the warranty period. If you transport or ship the Double Matrix, the use of original packaging is required! Please pack the machine like it has been packed originally from clearaudio. Only in the original packaging a secure transport is possible. Legal disclaimer : Clearaudio refuse to cover any claims or damage to records or any other damage, that have been caused by misuse or mishandling of the Double Matrix. Page 18 clearaudio electronic GmbH 2009 Double Matrix User manual 8. Technical Data Construction: The Double Matrix is a fully automatic record cleaning machine, turning the platter left and right , including vacuum suction. Weight: approx. 23 kg Dimensions: w = 470 mm x l = 370 mm x h = 345 mm Warranty: 3 years, if the warranty card is filled out correctly and send back to clearaudio Power consumption: Platter Motor: Vacuum motor: Fluid pump: Total Power consumption: 500 Watts Noise Level: Normal: 68 db Turbo: 72 db 20 Watt max. 460 Watt max. 20 Watt max. Attention: This unit is for indoor use only! Never place flammable goods near or onto the machine! This unit / machine was built to be used in heated or climatic controlled surroundings. Never touch the power cord with wet hands or other wet body parts ! Never put or use any equipment with open flames, like candles on top of this equipment! CE- MARKIERUNG The clearaudio Double Matrix is approved according to the regulations of the CE certification and other international standards and approvals. clearaudio electronic is not responsible for typographical errors in descriptions. Technical specifications subject to change or improvement without prior notice. Availability as long as stock lasts. Copies and imprints- also only in extracts – require written conformation through clearaudio electronic GmbH; Germany clearaudio electronic GmbH 2009 Version: February 2009 Page 19 clearaudio electronic GmbH 2009 Double Matrix User manual To achieve the full clearaudio warranty, it is necessary that you fill out and send the corresponding part of the warranty registration certificate /card back to clearaudio, within two weeks after purchase. Only if the product is returned in it’s original packing clearaudio can provide the warranty of 3 years. Otherwise clearaudio provides the legal warranty of 2 years. ENGLISH WARRANTY For warranty information, contact your local clearaudio distributor. RETAIN YOUR PURCHASE RECEIPT Your purchase receipt is your permanent record of a valuable purchase. It should be kept in a safe place to be referred to as necessary for insurance purposes or when corresponding with clearaudio. IMPORTANT When seeking warranty service, it is the responsibility of the consumer to establish proof and date of purchase. Your purchase receipt or invoice is adequate for such proof. FOR U.K. ONLY This undertaking is in addition to a consumer's statutory rights and does not affect those rights in any way. FRANÇAIS GARANTIE Pour des informations sur la garantie, contacter le distributeur local clearaudio. CONSERVER L'ATTESTATION D'ACHAT L'attestation d'achat est la preuve permanente d'un achat de valeur. La conserver en lieu sur pour s'y reporter aux fins d'obtention d'une couverture d'assurance ou dans le cadre de correspondances avec clearaudio. IMPORTANT Pour l'obtention d'un service couvert par la garantie, il incombe au client d'établir la preuve de l'achat et d'en corroborer la date. Le reçu ou la facture constituent des preuves suffisantes. DEUTSCH GARANTIE Bei Garantiefragen wenden Sie sich bitte zunächst an Ihren clearaudio-Händler. Heben Sie Ihren Kaufbeleg gut auf. WICHTIG! Die Angaben auf Ihrer Quittung erlauben uns die Identifizierung Ihres Gerätes und belegen mit dem Kaufdatum die Dauer Ihrer Garantie-Ansprüche. Für Serviceleistungen benötigen wir stets die Gerätenummer. Diese finden Sie auf dem Typenschild auf der Rückseite des Gerätes oder auch in der beigefügten Garantie-Registrierkarte. NEDERLANDS GARANTIE Voor inlichtingen omtrent garantie dient u zich tot uw plaatselijke clearaudio. UW KWITANTIE, KASSABON E.D. BEWAREN Uw kwitantie, kassabon e.d. vormen uw bewijs van aankoop van een waardevol artikel en dienen op een veilige plaats bewaard te worden voor evt, verwijzing bijv, in verbend met verzekering of bij correspondentie met clearaudio. BELANGRIJK Bij een evt, beroep op de garantie is het de verantwoordelijkheid van de consument een gedateerd bewijs van aankoop te tonen. Uw kassabon of factuurzijn voldoende bewijs. ITALIANO GARANZIA L’apparecchio è coperto da una garanzia di buon funzionamento della durata di un anno, o del periodo previsto dalla legge, a partire dalla data di acquisto comprovata da un documento attestante il nominativo del Rivenditore e la data di vendita. La garanzia sarà prestata con la sostituzione o la riparazione gratuita delle parti difettose. Non sono coperti da garanzia difetti derivanti da uso improprio, errata installazione, manutenzione effettuata da personale non autorizzato o, comunque, da circostanze che non possano riferirsi a difetti di funzionamento dell’apparecchio. Sono inoltre esclusi dalla garanzia gli interventi inerenti l’installazione e l’allacciamento agli impianti di alimentazione. Gli apparecchi verranno riparati presso i nostri Centri di Assistenza Autorizzati. Le spese ed i rischi di trasporto sono a carico del cliente. La casa costruttrice declina ogni responsabilità per danni diretti o indiretti provocati dalla inosservanza delle prescrizioni di installazione, uso e manutenzione dettagliate nel presente manuale o per guasti dovuti ad uso continuato a fini professionali. ESPAÑOL GARANTIA Para obtener información acerca de la garantia póngase en contacto con su distribuidor clearaudio. GUARDE SU RECIBO DE COMPRA Su recibo de compra es su prueba permanente de haber adquirido un aparato de valor, Este recibo deberá guardarlo en un lugar seguro y utilizarlo como referencia cuando tenga que hacer uso del seguro o se ponga en contacto con clearaudio. IMPORTANTE Cuando solicite el servicio otorgado por la garantia el usuario tiene la responsabilidad de demonstrar cuándo efectuó la compra. En este caso, su recibo de compra será la prueba apropiada. Page 20 clearaudio electronic GmbH 2009