1
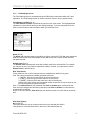
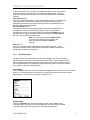
TRACER Version1.3
Portable Technology Solutions, LLC
Telephone: 1-877-640-4152
Fax: 1-501-421-5085
http://www.ptshome.com
[email protected]
This document and the software described by this document are copyright 2001-2004 by Portable
Technology Solutions LLC. All rights reserved. Use of the software described herein may only be done in
accordance with the License Agreement provided with the software. This document may not be reproduced
in full or partial form except for the purpose of using the software described herein in accordance with the
License Agreement provided with the software. Information in this document is subject to change without
notice.
Windows is the registered trademark of Microsoft Corporation. All other trademarks are the
property of their respective owners
PORTABLE TECHNOLOGY SOLUTIONS LLC WILL NOT BE LIABLE FOR (A) ANY BUG,
ERROR, OMISSION, DEFECT, DEFICIENCY, OR NONCONFORMITY IN TRACER OR THIS
DOCUMENTATION; (B) IMPLIED MERCHANTIBILITY OF FITNESS FOR A PARTICULAR
PURPOSE; (C) IMPLIED WARRANTY RELATING TO COURSE OF DEALING, OR USAGE
OF TRADE OR ANY OTHER IMPLIED WARRANTY WHATSOEVER; (D) CLAIM OF
INFRINGEMENT; (E) CLAIM IN TORT, WHETHER OR NOT ARISING IN WHOLE OR PART
FROM PORTABLE TECHNOLOGY SOLUTIONS CORPORATION'S FAULT, NEGLIGENCE,
STRICT LIABILITY, OR PRODUCT LIABILITY, OR (F) CLAIM FOR ANY DIRECT, INDIRECT,
INCIDENTAL, SPECIAL, OR CONSEQUENTIAL DAMAGES, OR LOSS OF DATA, REVENUE,
LICENSEES GOODWILL, OR USE. IN NO CASE SHALL PORTABLE TECHNOLOGY SOLUTIONS
LLC LIABILITY EXCEED THE PRICE THAT LICENSEE PAID FOR TRACER.
TracerM-0001.002
1
Version 1.3 User Manual
Chapter 1: Introduction ......................................................................................3
1.1
Introduction.............................................................................................3
Chapter 2: Installation ........................................................................................4
2.1
Automatic Installation .............................................................................4
2.2
Removing Tracer ....................................................................................4
Chapter 3: System Operation.............................................................................5
3.1
PDA Operation .......................................................................................5
3.1.3
Main Screen .............................................................................................. 5
3.1.2
Field Settings Screen . ........................................................................... 6
3.1.3
Data Entry Screen.................................................................................... 7
3.1.4
About Screen ............................................................................................ 8
3.2
HotSync to PC Operation .......................................................................8
Chapter 4: Registering Tracer..........................................................................10
4.1
Registering Tracer ................................................................................10
4.2
Entering your registration code.............................................................10
4.3
Tracer Support......................................................................................10
TracerM-0001.002
2
Chapter 1: Introduction
Chapter 1: Introduction
1.1
Introduction
PTS is proud to introduce Tracer v1.3. Tracer v1.3 offers unmatched flexibility and speed
in capturing and analyzing data for most inventory control and asset management tasks.
Tracer was designed for use in both standard Palm OS devices and Symbol bar code
enabled terminals including Symbol's SPT series, and the Visor compatible CSM-150
module. Take control of your inventory, your assets or just about any other piece of
remote information you need now with Tracer.
Tracer is an application written to provide the user complete flexibility in both setting up
and capturing data. Through the use of customizable field names to user defined flow of
data capture, Tracer is the ideal solution for almost any data capture situation. Typical
scenarios for Tracer include asset tracking, physical inventory, order fulfillment, etc.
There is almost no limit to the number of applications that can be customized to meet
your needs in minutes. Tracer features custom field settings giving you the power to
arrange the data entry screen into a format that works best for your particular application.
Tracer's flexibility makes it the perfect solution for most data acquisition tasks, which
easily can be transferred to your current database.
TracerM-0001.002
3
Chapter 2: Installation
Chapter 2: Installation
This chapter details the steps for installing Tracer. For most installations, the automatic install is
sufficient. In certain scenarios, the automatic installation may not work and a manual installation
is necessary.
2.1
Automatic Installation
1. Download Tracer.exe from www.ptshome.com or another authorized reseller.
2. Double click Tracer.exe to run the installation.
3. Follow the steps as directed.
4. Once completed, you will be prompted to run PTS PDA Installer. This is the final step in the
installation process and is normally required.
5. The PTS PDA Installer application installs both the PDA Application as well as the PC conduit
used for the data transfer. Follow the remaining steps and the software installation is
complete.
6. Perform a HotSync with your Palm Pilot. At this point, you should see the Tracer application
installed on your Palm Pilot.
2.2
Removing Tracer
In the unlikely event that you would like to remove Tracer from your PDA, follow these simple
instructions.
Run the PDA Installer application from StartÆProgramsÆPTSÆTracer 1.3ÆPDA Installer.
Select Remove Tracer 1.3. Once this process is completed, finish the uninstallation by clicking
the Remove button for PTS Tracer 1.3from StartÆSettingsÆControl PanelÆAdd/Remove
Programs. This process removes the conduit from the HotSync process but the Tracer
application must be manually removed from the PDA
TracerM-0001.002
4
Chapter 3: System Operation
Chapter 3: System Operation
Chapter 3 details the operation of the Tracer System. Both the PDA operation and the PC
operation of the system are discussed here. Since Tracer is a flexible data capture
system, to utilize all of the features of Tracer it is strongly recommended you read
and understand this chapter.
3.1
PDA Operation
Following is a screen-by-screen description of Tracer operation on the PDA. Each screen
and their associated elements are discussed in detail.
3.1.3
Main Screen
The Main Screen presents the user with a grid containing the data currently stored in the
database. This grid contains four columns. The headers of these columns contain the field names
that you chose in the Field Settings Menu Option. Refer to Setting Field Options later in this
chapter for a discussion of that topic. The four columns of this grid are resizable to fit every user's
needs. For example, if the data contained in the first field is very long, you may choose to make
that column wider while decreasing the size of another column.
Column resizing is accomplished by touching the pen to the screen in the column header area
and dragging to the left or right. This either decreases or increases the size of the grid column
respectively.
Delete Button
The Delete button allows the user to delete the currently
selected record in the grid. After confirmation, the selected
record is permanently deleted from the PDA database.
Edit Button
The Edit button allows the user to edit the currently selected
record. The user is taken to the Entry Screen where the data
may be changed. Once the data has been changed, the user is
returned to the Main Screen.
New Button
The New button allows the user to begin entering new records.
Once clicked, the user is taken to the Entry Screen.
Find
The Find feature searches field 1 for records with matching data
in field 1.
The Total Records
This Total Records display shows the total quantity of records
stored in the Tracer database at that moment.
TracerM-0001.002
5
Chapter 3: System Operation
3.1.2
Field Settings Screen
The Field Settings screen is accessed through the PDA's Menu button while within the Tracer
application. The Field Settings screen is used to customize Tracer to fit your specific needs.
Field Selector List Box (Ref. A)
The Field Selector List Box is located at the top left corner of the screen. The highlighted field
indicates the current field for which you are changing settings. To set the properties of the four
fields, use this list box to select the field to which you would like to set.
Name (Ref. B)
The Name field represents what you would like to call the current field. This field name represents
what the user will see when entering data for that field as well as the column header name for
that particular field.
Default Value (Ref. C)
The Default Value represents the value that is initially used for the selected field. For example,
you may set up one of your fields to represent a quantity. Likewise, you might want to set the
Default Value for that field to be 1.
Real Time Default
Tracer allows the user to utilize standard real time variables as a default for any given
field. There are three permitted variables permitted at this time.
1. [*DATE*] - Enter the current date at the time of record entry
2. [*TIME*] - Enter the current time at the time of record entry.
3. [*USER*] - Enter the PDA User name at the time of record entry.
Special note: These values must be entered exactly as specified. It may be easier to use
the virtual keyboard as opposed to graffiti.
Note 1: The Default Value is only used when the Clear on Submit option is selected for this
field. If the user changes this value during data entry and Clear on Submit is not checked, the
changed value is retained.
Note 2: If the user clicks the Clear All button from the Entry screen, this value will be cleared as
well.
After Scan Options
Go To (Ref. D)
This option allows the user to control the tab order for the selected field. After a
user performs a successful scan while in the focus of the selected field, the
TracerM-0001.002
6
Chapter 3: System Operation
system will set the focus to whatever you selected in this area. The user typically
uses this feature to control the 'flow' of the data entry. Alternatively, the Down
arrow key represents an 'After Scan' event for those PDAs that are not barcode
enabled.
Auto Submit (Ref. E)
This option represents whether or not to automatically submit this record after an
'After Scan' event. If this option is chosen for the selected field, the system
automatically submits the record and sets the focus to the field selected in the
Go To prompt for the selected field.
Clear On Submit (Ref. F)
This option is used to tell the system whether to clear the selected field after
submitting the current record in the Entry screen. If the current record is
submitted as a result of a successful scan or by clicking the Submit button, all
the fields with this option selected are cleared. If the field has a Default Value,
that value is used instead of a blank entry
Note 1: If the user has selected a Default Value
for the field, the default value is placed in the
particular field when Clear on Submit is
selected
Done (Ref. G)
Once you have set up all the fields and their associated properties, you are
returned to the Main Screen. Note that the grid column headers now reflect the
changes you made to the field names.
3.1.3
Data Entry Screen
The Entry Screen is the area where the user does his data entry. The four fields are
presented to the user with the customized field names shown. The user enters data for
each record presented. When the data is being scanned, the system controls the flow to
the next field based on the Field Settings entries previously setup. This screen contains
three buttons. These are discussed below.
Done Button
Click the Done button when you have finished entering data and would like to return to the Main
Screen. You will be prompted as to whether you would like to save the last record. Answer
appropriately. You will now be returned to the Main Screen.
Submit Button
Clicking the Submit button submits the current record to the database. After
clicking this button, the focus is set to the field that is next in the tab order based
on the field that had the focus just prior to clicking the Submit button.
TracerM-0001.002
7
Chapter 3: System Operation
Clear All Button
Clicking the Clear All button clears all the data from all of the fields for this
record. Notice that the focus does not change after clicking this button. Also
notice that any Default Values selected in the Field Settings are not
recognized.
3.1.4 About Screen
The About Screen provides information about the application. Current Version number
information is stored. PTS sales and Support contact information is also supplied on this screen.
3.2
HotSync to PC Operation
Data captured from the PDA is transmitted to the PC upon every HotSync. This data
contains all the information captured for the four fields on the PDA application. The data
is transferred and is located in the Tracer subdirectory of the particular Palm User
performing the HotSync. For example, if your PDA name is set to John Smith, Tracer
data would be located in a folder called c:\palm\smithj\Tracer. The filename is Tracer.txt.
Tracer has two methods to remove data from the PDA.
1. The user can select Delete All from the Options menu.
2. The user can choose to Delete Records after HotSync. This option is accessible form
the Admin -->HotSync Settings menu.
Note: Only five records are transferred in an unregistered version of Tracer. Once
the application is registered, all records are transferred.
TracerM-0001.002
8
Chapter 3: System Operation
3.3 Passwords
The Passwords setting screen is accessed through the Admin menu. When a Password is set a
user is required to enter this Password to access Field Settings and Hot Sync Settings.
TracerM-0001.002
9
Chapter 4: Registering Tracer
Chapter 4: Registering Tracer
4.1
Registering Tracer
Tracer is an application that requires registration for full functionality. The trial version of Tracer
limits the number of records entered on the PDA and transferred to the PC to five and the number
of sessions to three. The full version does not contain this limitation.
PTS encourages all users who benefit from Tracer to register their copy. To register Tracer, we
only require your Palm User ID and an Email address. We generate a unique serial number to
your Palm User ID so it is important that you send the ID Exactly as it appears on the Tracer
Splash Screen.
This user ID can be found in the HotSync application of your Palm Pilot in the upper right-hand
corner of the screen. It can also be found in the Tracer Splash Screen.
1. Open the Registration info link included with your installation. This is located at
StartÆProgramsÆPTSÆTracer 1.3ÆRegistration Info.
2. Enter the information for your order including your PDA Device Name.
3. Click on the Submit button.
4. Once you submit this information, your registration code will be emailed to the provided
address.
4.2
Entering your registration code
1. Run the Tracer application on your PDA.
2. Press the Register button in the Tracer Splash Screen..
3. Enter your Registration Code at the Reg Code prompt.
4. If the Registration is valid, you will receive a Thank you for Purchasing Tracer message.
4.3
Tracer Support
As a registered Tracer user you are entitled to free email support for three months from date of
purchase. PTS will be available to answer Tracer questions as well as general bar coding
questions. Our goal is to provide Tracer users the tools to capitalize on the efficiencies of bar
code data acquisition. To contact PTS support email [email protected]. Please allow us
24 hours to respond although it is often much faster.
TracerM-0001.002
10