1
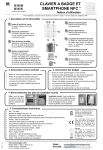
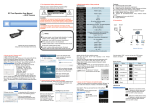
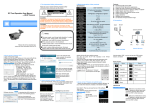
Specifications
Model
4CH
Main Processor
ARM Cortex A9 @Max. 660MHz
Operating system
Embedded LINUX
Compression
H.264
Video Input
4CH(1920×1080, 1280×960, 1280×720 etc.)
Video Output
1x HDMI, 1xVGA. Max resolution:1920x1080P/60Hz
Preview Resolution
1920x1080, 1280x1024, 1280x720, 1024x768(Coincidence with
IPC resolution, main stream for full screen, sub-stream for split
screen )
Record Resolution
1080P(1920x1080)/720P(1280x720)/D1(704x576/704x480)
Playback
1CH (Local/IE playback)
Display Split
1/4
OSD
Camera title, Time, Video loss, Motion detection, Recording
Frame Rate
PAL: 25 frames / sec; NTSC: 30 frames / sec.
Motion Detection
MD Zones: 396 ( 22 x 18 )
Ethernet
1 RJ-45 port(10/100Mbps)
Network Function
HTTP, TCP/IP, IPv4, RTSP, SMTP, NTP, DHCP, DNS, DDNS, IP
Search, P2P
Smart Phone
iPhone, iPad, Android
Browser
IE8.0-11, Firefox, Google Chrome (under windows system)
Onvif Version
ONVIF2.4
Backup Mode
USB Device/Network/E-SATA
HDD
1 SATA port, up to 4TB
USB
2 ports (2 Rear), USB2.0
P2P
Support FREEIP ( www.freeip.com )
Dual-Stream
Yes
Power Supply
DC5V/2A
Working Environment
-10℃~+55℃/10%~90%RH
Network Video Recorder
Quick Installation Guide
Thank you for using our product, please read this manual
carefully before using this equipment.
For more please refer to the user manual in the CD packaged along with the NVR.
Instructions
Power Consumption
≤ 10W (Without HDD)
Dimension (W x D x H)
110*114*38mm
Weight
137g
◆ Please install the device in a well ventilated place, do not block
the vents of the equipment.
◆ Please keep equipment installed horizontally, or install equipment in a stable place, avoid the equipment falling down.
Item List
◆ Please keep it dry in case a short-circuit may cause fire or other
hazard. This equipment is not weather proof.
Item
Name
Quantity
1
Mouse
1
2
CD
1
4
Power Adapter
1
5
Quick Installation Guide
1
6
Network Video Recorder
1
◆ Please use the HDD as requested, buy through the regular
channels, make sure the HDD quality.
◆ Please do not place heavy objects on it or pile up.
1. Product Appearance Introduction
Note:The appearance of products, including buttons, interfaces and
layout are for reference only, technical parameters are subjected to the
real objects.
2. Hard Disk Installation
Note: This equipment, no need screws to fix the covers.
Support 2.5” HDD, up to 4TB.
① Open covers: Two fingers at the
covers card slot, reversely apart the
upper and the bottom cover.
NVR Top Cover
4.Web Access
② Place the 2.5” HDD, pay attention to
the direction .
1. Open IE, enable all ActiveX controls and plug-ins. Setting Path: Tools
—>Internet Options—>Security —>Custom Level—>ActiveX controls
and plug-ins.
2. Input IP address http://192.168.1.88 and search.
3. Install OCX controls (skip this if you already install it).
4. When login interface pop up, input user name and passwords to log in
NVR.(Default user: admin password: 12345 ).
Power switch
③ Fix the HDD with screws on
bottom cover .
④ Close covers aiming to the card slot.
NVR Rear Panel
5. Add IP cameras
Notice: Make sure the NVR and IPC are in the same LAN,
but different IP address.
Interface Name
Interface Function
VGA
VGA output
HDMI
HDMI output
WAN
RJ45 Ethernet
USB 2.0
For USB Backup and Mouse
HDD
HDD Indicator. Light blink means HDD working.
PWR
Power indicator. Light blink means power is connected.
3.Local Access
1 Right-click in the main interface.
1. Boot up NVR, right click mouse for login interface.
2. Input user name and passwords to log in NVR.(Default user: admin
E-SATA
External Serial ATA
DC-5V
Power Input, only use DC5V power supply.
password: 12345 )
3 ↑Select search to the camera
2↑
4↑
5→