1
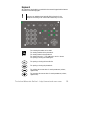
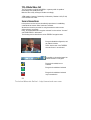
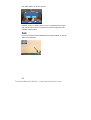
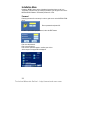
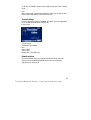
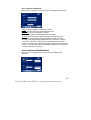
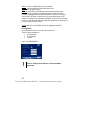
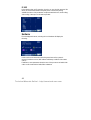
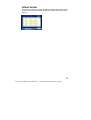
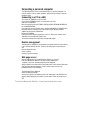
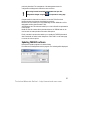
Aethra
Theseus
User’s and installation
manual
MS, Microsoft and NetMeeting are registered trade marks of Microsoft Corporation. Windows is a trade mark of Microsoft Corporation.
The information contained in this document is the property of Aethra Telecomunicazioni s.r.l., it is subject to change without notice and
it shall in no way be binding for Aethra Telecomunicazioni SpA
© Copyright Aethra Telecomunicazioni SpA 2004.
All rights reserved.
Aprile 2004 Cod. 074111014GB V02_04_04Rev1
Technical Manuals Online! - http://www.tech-man.com
Welcome
Thank you for having chosen an AETHRA® product.
This manual contains all the information necessary for using the product.
The information contained in this manual may be changed without notice by
Aethra® Ltd.
Technical Manuals Online! - http://www.tech-man.com
1
SAFETY RULES .......................................................................... 6
WARNINGS ................................................................................ 7
EN 55022 CLASS A COMPLIANCE.............................................. 8
FCC 15 CLASS A COMPLIANCE.................................................. 8
CUSTOMER INFORMATION ........................................................ 9
FCC ............................................................................................ 9
EQUIPMENT FUNCTIONALITY .................................................. 11
THESEUS SYSTEM COMPONENTS ........................................... 12
Video Camera .......................................................................... 12
Display ..................................................................................... 12
Keyboard.................................................................................. 13
THESEUS POSITIONING AND INSTALLATION........................... 15
Handset Installation ................................................................. 15
Installation of the Handset (optional)....................................... 18
THESEUS INSTALLATION ......................................................... 19
OPERATION AND USE .............................................................. 20
2 Manuals Online! - http://www.tech-man.com
Technical
First time equipment is switched on ........................................ 20
How to make a call .................................................................. 20
Phonebook Call ........................................................................ 21
Audio-video calls ..................................................................... 22
ISDN calls. ............................................................................ 22
IP calls.................................................................................. 23
Redialling a call (Incoming/Outgoing)..................................... 23
TCS-4 Mode Video Call ............................................................ 24
Secure Connections ................................................................. 24
Audio call ................................................................................. 25
How to receive a call ............................................................... 25
TOOLS...................................................................................... 26
USING THE PHONEBOOK.......................................................... 27
How to enter names in the phonebook ..................................... 27
How to modify phonebook entries ............................................ 28
SETTINGS MENU...................................................................... 29
User settings............................................................................ 29
Control panel......................................................................... 29
Ways of making calls and answering ..................................... 30
VIDEO QUALITY........................................................................ 31
Controlling the video camera from a remote terminal.............. 31
Disable still picture ................................................................ 31
Technical Manuals Online! - http://www.tech-man.com
3
Volume ................................................................................. 31
Audio – video – data ................................................................ 31
Audio.................................................................................... 32
Video .................................................................................... 33
Data channels ....................................................................... 33
Synchronising audio-video .................................................... 33
Installation Menu ..................................................................... 34
Password ............................................................................. 34
Licences ............................................................................... 35
Encryption ............................................................................ 35
Terminal settings................................................................... 37
Network interface .................................................................. 37
Localization........................................................................... 43
Load default settings ............................................................. 44
THESEUS DIAGNOSTICS .......................................................... 45
Test terminal............................................................................ 45
Interfaces................................................................................. 45
Audio........................................................................................ 46
Video........................................................................................ 46
Connection Status .................................................................... 47
ISDN H320............................................................................ 47
IP H323 ................................................................................ 48
Hardware ................................................................................. 48
Software Versions.................................................................... 49
CONNECTING A PERSONAL COMPUTER .................................. 50
4 Manuals Online! - http://www.tech-man.com
Technical
Connecting to a PC in a LAN .................................................... 50
Remote management............................................................... 50
Web page access..................................................................... 50
Updating THESEUS software.................................................... 51
DATA CONFERENCE WITH MICROSOFT NETMEETING 3.XX..... 52
Managing the DataConference software .................................. 53
TROUBLESHOOTING PROBLEMS ............................................. 55
TECHNICAL SPECIFICATIONS .................................................. 57
SUPPORTED STANDARDS........................................................ 57
USE AND STORAGE CONDITIONS............................................. 60
REFERENCE REGULATIONS (CE MARK AND RELIABILITY TESTS)
................................................................................................. 60
Technical Manuals Online! - http://www.tech-man.com
5
SAFETY RULES
To guarantee continuous protection for operator safety, only use the
mains adapter supplied with the device.
WARNING: for power supply connection use an easily accessible
outlet located near the device.
Never remove the mains plug for permanent connection.
Connect the ISDN port to a network termination only (NT1). It is
absolutely forbidden to connect the system to an outdoor
telecommunication line.
Connect the LAN port to an internal LAN circuit only. It is absolutely
forbidden to connect the system to an outdoor telecommunication
line.
The batteries of this equipment must be recycled by a company in
charge of this activity, a company qualified for the disposal of
dangerous materials or by using containers provided for the
separate collection of worn out batteries.
CAUTION: risk of explosion if batteries are replaced by an incorrect
type. Dispose of used batteries according to the instructions.
The change from cold to hot environments can cause the formation
of condensate inside the device. To avoid malfunctioning, wait at
least 1 hour before connecting the device to the supply mains.
In case of fire, absolutely avoid using water to extinguish it.
WARNING: RISK OF ELECTRIC SHOCK
The power supply used by this device involves lethal voltage levels.
Do not access internal parts of the device (and/or of the power
supply unit).
If objects or liquids penetrate inside the device, immediately
disconnect the power supply cable. Before using the device again,
have it checked by specialized staff.
Refer to qualified staff for service.
6 Manuals Online! - http://www.tech-man.com
Technical
In case of intervention, always check that the power supply has
been completely and successfully disconnected.
CAUTION: small metallic objects may be picked up by the handset.
WARNINGS
CAUTION: many of the components used in this device are sensitive
to electrostatic charge.
In case of manipulation of the connection cables, disconnect the
power supply and avoid direct contacts with the connector
terminals.
When handling electronic components, to eliminate any static
electricity touch a grounded surface. If possible, wear a grounding
arm band.
Failure to comply with these warnings could cause permanent
damage to this device.
To clean the device use a soft cloth either dry or moistened with a
little detergent. Never use any type of solvents, such as alcohol or
gasoline, to avoid damaging the finish.
Technical Manuals Online! - http://www.tech-man.com
7
EN 55022 Class A COMPLIANCE
This is a Class A product. In a domestic environment this product
may cause radio interference in which case the user may be
required to take adequate measures.
FCC 15 Class A COMPLIANCE
This equipment has been tested and found to comply with the limits
for a Class A digital device, pursuant to part 15 of the FCC Rules.
These limits are designed to provide reasonable protection against
harmful interference when the equipment is operated in a
commercial environment. This equipment generates, uses and can
radiate radio frequency energy and, if not installed and used in
accordance with the instruction manual, may cause harmful
interference to radio communications. Operation of this equipment in
a residential area might cause harmful interference in which case the
user will be required to correct the interference at his own expense.
8 Manuals Online! - http://www.tech-man.com
Technical
Customer information
!
For U.S. Customers only.
FCC
This equipment complies with Part 68 of the FCC rules and the requirements
adopted by the ACTA. On the exterior of the cabinet of this equipment is a label
that contains, among other information, a product identifier in the format
US: OAUXDNAN008 If requested, this number must be provided to the telephone
company.
ACTA Registration Number:
Ringer Equivalence Number (AC REN):
Facility Interface Code (FIC):
Service Order Code (SOC):
USOC Jack Type:
US: OAUXDNAN008
N/A
02IS5-ISN
6.0N
RJ48C.
A FCC compliant telephone cord and modular plug is provided with this
equipment. This equipment is designed to be connected to the telephone
network or premises wiring using a compatible modular jack that is Part 68
compliant. See Installation Instructions for details.
The REN is used to determine the quantity of devices that may be connected to
the telephone line. Excessive RENs on the telephone line may result in the
devices not ringing in response to an incoming call. Typically, the sum of RENs
should not exceed five (5.0). To be certain of the number of devices that may be
connected to a line (as determined by the total RENs) contact the local telephone
company.
If this equipment THESEUS causes harm to the telephone network, the telephone
company will notify you in advance that temporary discontinuance of service
may be required. But if advance notice isn't practical, the telephone company
will notify the customer as soon as possible. Also, you will be advised of your
right to file a complaint with the FCC if you believe it is necessary.
The telephone company may make changes to its facilities, equipment,
operations or procedures that could affect the operation of your equipment. If
Technical Manuals Online! - http://www.tech-man.com
9
this happens the telephone company will provide advance notice so you can
make the necessary modifications to maintain uninterrupted service.
If trouble is experienced with this equipment THESEUS, for repair or warranty
information, please contact Aethra Inc, 701 Bricknell Avenue, Miami, FL 33131,
USA Tel: +1 305 375 0010. If the equipment is causing harm to the telephone
network, the telephone company may request that you disconnect the equipment
until the problem is resolved.
Connection to party line service is subject to state tariffs. (Contact the state
public utility commission, public service commission or corporation
commission for information.)
10 Manuals Online! - http://www.tech-man.com
Technical
Equipment functionality
Elegant. Ultra modern design, rounded profile.
Compact. Easily fits into any home or office environment.
Affordable. Offers both IP and ISDN connection capabilities.
Is an attractive, compactly designed videophone that affordably provides ISDN
and IP-based videoconferencing to home offices and small businesses. With its
rounded profile and cool modern design, the THESEUS videophone has all the
features and benefits you need in a reliable, all-in-one system.
MULTIPLE NETWORK CONNECTIVITY
Supports both ISDN and IP-based communications standards, fully conforming
to the H.320 and H.323 international standards (with transmission rates up to
384 kbps over IP).
HIGH-QUALITY VIDEO
Features a high-resolution (960 x 234 pixels) rounded, 5” LCD video display for
private conversations with top-quality images from any viewing angle. A TV
screen connection is also provided for applications requiring larger presentation.
For video input, a built-in camera, with manual focus and automatic white
balance, uses a 1/4” CCD sensor to capture business-quality, 15 fps video.
EXCELLENT SOUND REPRODUCTION
Provides large bandwidth and full-duplex hands-free audio with omnidirectional
microphone, echo cancellation and Automatic Noise Suppression.
EASY TO INSTALL AND USE
On-screen contextual help and intuitive, user-friendly graphical user interface
ensure easy installation and use. The simple keypad and handset, plus address
book dialling, make it easy to master right away, even for the most novice user.
All remote diagnostics and management functions are accessible from web
browsers.
Technical Manuals Online! - http://www.tech-man.com
11
THESEUS system components
The principle components of the THESEUS Videophone are:
1
4
2
5
6
3
7
1.
2.
3.
4.
5.
6.
7.
Video Camera
5” Active-Matrix LCD Display
Keyboard
Tilt Video Camera
Micro Telephone
Loudspeaker
Hands-Free Microphone
Video Camera
The colour video camera has automatic control integrated for various conditions
of illumination. There are, however, menus available for manually controlling
brightness, colour and contrast. The video camera is also provided with an
inclined support allowing vertical adjustments.
Display
The THESEUS display is a full-screen resolution 5-inch colour LCD type (Liquid
Crystal Display).
It may be tilted manually in order to optimise the vertical viewing angle and the
contrast.
12 Manuals Online! - http://www.tech-man.com
Technical
Keyboard
All videophone functionality is controlled via the numeric keypad and the buttons
illustrated in the following figure.
!
Some keys are multifunctional and will differ in function for the
videophone according to the context within which they are used.
For selecting the number to be called.
For entering numbers in the phonebook.
For entering names in the phonebook.
For entering the point “.” in IP addresses, use the * button.
For opening or closing the redialling list.
For opening or closing the last calls list.
For opening or closing the phonebook.
For reducing the current value of certain parameters (volume,
digital zoom).
For increasing the current value of certain parameters (volume,
digital zoom).
Technical Manuals Online! - http://www.tech-man.com
13
For viewing the local video camera image.
For disabling the micro-telephone and activating the handsfree
function.
For viewing your own image on the display.
For suppressing audio transmission during a connection.
To enable or disable the sending of video of yourself.
For selecting from different choices in menus.
For selecting from different choices in menus.
For selecting from different choices in menus.
For selecting from different choices in menus.
For selecting from different choices in menus.
For entering or exiting the main configuration and management
menu.
For confirming the last selection.
For opening the Help menu.
For closing the Help menu.
14 Manuals Online! - http://www.tech-man.com
Technical
THESEUS positioning and installation
Handset Installation
The THESEUS guarantees optimum reproduction and transmission of sound in
handsfree mode. The telephone receiver is intended for users who require
private communications.
The system is designed for handsfree operation. The handset is for
users who desire private conversation.
Step 1: Lock the FIXING BRACKET B to the HANDSET SUPPORT A, by sliding
the BRACKET in the direction of the arrows.
Steps 2-3: Lock the group (BRACKET B + HANDSET A) to the BASE C.
Technical Manuals Online! - http://www.tech-man.com
15
Step 4: Connect the CABLE plug D to the BASE C
and fix the cable as in the figure.
Step 5: Thread the CABLE D through the hole in the BRACKET B:
16 Manuals Online! - http://www.tech-man.com
Technical
Step 6: Connect the CABLE D to Jack 1.
Step7: Connect one of the two SPIRAL CABLE plugs E to Jack 2.
Step 8: Connect the other SPIRAL CABLE E plug to the handset Jack.
Technical Manuals Online! - http://www.tech-man.com
17
Step 9: Assembled view.
Installation of the Handset (optional)
Step 1: Disconnect the HANDSET cable from the BASE C.
Step 2: Dismantle the HANDSET SUPPORT and the FIXING BRACKET.
Step 3: Plug the HEADSET connector cable in the BASE C.
Step 4: Activate use of the headset via the Audio Out settings.
Refer to the section “Audio-Video-Data” in this manual.
18 Manuals Online! - http://www.tech-man.com
Technical
THESEUS INSTALLATION
In order to set up and put the THESEUS into operation only a few steps and
observations are necessary:
!
All operations must be carried out without connection to the mains
power supply.
Connect to the mains power supply only after having verified that all
connections are correct.
!
The sockets marked Video In/Out and Audio In/Out may be used for
connecting external audio and video peripherals.
Connect the LAN input to the local network.
Connect the ISDN input to the ISDN network terminations.
!
Connect the ISDN input (connector ISDN or network interface) only to
a network termination (NT1). It is expressly forbidden to connect the
equipment to an external telecommunications line.
Connect the power supply adapter to the THEEUS and then connect it to the
mains supply.
Select the ON position of the power switch.
Technical Manuals Online! - http://www.tech-man.com
19
Operation and use
First time equipment is switched on
When the equipment is switched on for the first time, the following menu will
appear:
This enables the user to select the desired language.
How to make a call
Once the THESEUS is switched on, the video will display the main user interface.
From the main user interface, you can make a call in three different ways:
• Phonebook Call
• Video Call
• Audio Call
20
Technical Manuals Online! - http://www.tech-man.com
Phonebook Call
In order to select quickly a number to call, a phonebook is
available where entries referring to the most frequently called terminals can be
stored. In order to make a call using a phonebook entry, you only have to select
a name from a list.
Example:
From the main interface, press the button “PHONEBOOK” and the following will
be displayed:
Scroll the index of the phonebook to the desired initial letter.
Using the arrow buttons, move down to the chosen name and press OK to
select.
To make the call:
Move to the icon CALL and press OK.
Lift the handset.
Press the Handsfree button.
In order to end the call:
In “HANDSFREE” mode, press the corresponding button (the system will ask
you to confirm disconnection), or else replace the handset.
21
Technical Manuals Online! - http://www.tech-man.com
Audio-video calls
Select the call type (ISDN or IP) using the arrow buttons and press OK.
Select the call rate using the OK button.
ISDN calls.
1.
From the main interface, lift the handset or press the “HANDSFREE”
button.
2. To initiate the call, dial the number to call using the numeric buttons on
the keypad.
Move to the corresponding icon CALL (in “HANDSFREE” mode) and
press OK, or lift the handset.
3. In order to end the call in “HANDSFREE” mode, press the
corresponding button, (the system will ask you to confirm
disconnection).
22
Technical Manuals Online! - http://www.tech-man.com
IP calls.
From the main interface, lift the handset or press the “HANDSFREE” button.
Enter the IP address of the terminal to be called using the videophone’s numeric
keypad.
You can also make a call using an “alias”.
Move to the corresponding icon CALL (in “HANDSFREE” mode) and press OK,
or lift the handset.
In order to end the call in HANDSFREE mode, press the corresponding button,
(the system will ask you to confirm disconnection).
IP Calls using an “Alias”.
From the main interface, lift the handset or press the “HANDSFREE” button.
Select the icon “DIRECT CALL” and confirm with keypad button OK.
Press the OK button to display the virtual keypad.
Compose the “Alias” by selecting the desired letters using the arrows. Confirm
each letter using OK.
Select ESC and press OK to close the virtual keypad.
Move to the icon CALL to initiate the call (in “HANDSFREE” mode) and press OK
or lift the telephone receiver.
In order to end the call in “HANDSFREE” mode, press the corresponding button,
(the system will ask you to confirm disconnection).
Redialling a call (Incoming/Outgoing)
Using the “RP” button or the “HANDSFREE” button, you can redial a number
previously called or received.
23
Technical Manuals Online! - http://www.tech-man.com
TCS-4 Mode Video Call
The TCS-4 mode is an H.320 call (ISDN) to a gateway which is capable of
transcoding H.320 (ISDN)/H.323 (IP).
Make the video call by entering the number accordingly:
“ISDN number of gateway” followed by # followed by “Number H.323 (E.164)
of the terminal to be called ”.
Secure Connections
In the previous sections we have described the procedures for establishing
communications between Video Conference Terminals.
We shall now show the procedure for using the terminal to make a secure
videoconference (encrypted).
Firstly, the terminal must have encryption activated. See the sections “Licenses”
and “ENCRYPTION” in this manual.
The following sections describe the various THESEUS encryption states.
Encryption disabled configuration, and
the padlock is hidden.
This is also the state of the THESEUS
when the licence is not activated.
The padlock on the terminal status bar
indicates the state of encryption.
Encryption is enabled, but not
activated.
Encryption is enabled and activated.
Encryption is enabled and activated
only in transmission.
24
Technical Manuals Online! - http://www.tech-man.com
Note:
In ISDN, also for videoconferences in progress, it is possible to activate
encryption by selecting the yellow padlock and pressing OK.
Audio call
You can make an audio call using the THESEUS like a normal telephone.
From the main interface, move to the icon “Telephone” on the status bar, thus
selecting the mode “Audio Only” and press OK.
Follow the same procedure as described in the section, “Audio-video calls”.
How to receive a call
In the situation where you are at the main page,
and you receive a call, notification will be displayed in a window showing the
caller’s number.
Moreover, if the automatic answer function is not enabled (described later), the
25
Technical Manuals Online! - http://www.tech-man.com
user will be asked to accept the call or not.
If instead, you are in a situation where you are at a page other than the main
page, the user will be asked to accept the call or reject it irrespective of the
automatic answer function.
Tools
Once the connection has been established with a remote terminal, an icon will
appear on the status bar.
26
Technical Manuals Online! - http://www.tech-man.com
Using the arrow, move to the icon and press OK, a new window will appear.
Remote video camera control: allows you to control the remote video camera (if
enabled).
Snapshot: allows you to send a still image, or view a received image.
Using the phonebook
How to enter names in the phonebook
From the keypad press ”PHONEBOOK”.
Using the arrow buttons, move to the icon “NEW” and press OK.
27
Technical Manuals Online! - http://www.tech-man.com
At this point enter new data for the new user by filling out the fields available
using the keypad.
Enter NAME and COMPANY.
Choose the call configuration in order to record the connection details for this
user.
Type of call: ISDN or IP.
Transfer rate (Rate).
Enter the Code and Number of the telephone.
Using the arrows, move to the icon SAVE to save the new entry or CANCEL to
exit and press OK.
How to modify phonebook entries
In order to modify the data belonging to an entry in the phonebook:
1.
2.
Select the desired user and press OK.
Move to the icon MODIFY and press OK again.
To erase a name in the phonebook:
1.
2.
Select the desired user and press OK.
Move to the icon CANCEL, press OK; the system will ask for
confirmation.
28
Technical Manuals Online! - http://www.tech-man.com
Settings Menu
User settings
From the SETTINGS menu, select the icon USER SETTINGS and press OK.
Control panel
Date and Time: from this menu you can access the date and time settings
Status Bar and Transparency Display: allow you to change the functionality of
the status bar and of the transparency.
Display Status Bar and Transparency with reference to the items displayed on
the Menu Status Bar by default, deselect those items that you do not want
displayed.
The Transparency, if activated, allows you to see interactive menu information
concerning settings or diagnostic tools superimposed on live video. There are
different value settings for the Transparency.
Local Information: if activated, shows local information on the monitor (ISDN
number, IP address).
PIP: enables or disables the PIP function (displaying local and remote images)
and allows you to choose display position.
29
Technical Manuals Online! - http://www.tech-man.com
Automatic Screen Saver: This functions after 5 minutes of monitor inactivity
(default).
Ways of making calls and answering
From the USER SETTINGS menu, select the icon CALL-ANSWER MODE and
press OK.
This section treats how options are chosen relative to:
Audio Number = Video Number: in an ISDN call, the audio number may be
different to the video number and if such a field is not selected, the THESEUS
will ask for the video number after the first call has been made.
Advanced
Only numeric keyboard: if the text box on the call page is selected, you can only
enter numbers with the keyboard.
Enable Tone: enable ringing tone when a call is attempted.
Mute: enable or disable per default transmitted audio.
Confirm disconnection: enable or disable the disconnection confirmation
request.
Automatic Reply: enable or disable automatic reply and allow setting the number
of times to ring.
Mode: 64K/56K – this option allows you to set the rate in multiples 64K or 56K.
Additional calls: Automatic or Manual.
Broadcast: enable or disable broadcast mode – the two terminals must have the
same audio configuration, video and rate.
!
Warning.
We remind you that if the settings explained above are selected, they
will be permanently active after saving and whenever the videophone
is switched on.
30
Technical Manuals Online! - http://www.tech-man.com
Video Quality
Video Speed-Quality: move the cursor towards VIDEO SPEED in order to obtain
an improvement in the reproduction of moving pictures or towards QUALITY for
an improvement in picture definition.
Aethra Error Strategies: "Aethra Error Strategy" allows a choice in the number of
line errors before video is frozen: “Min Fluidity” means stop video on the first
error, “Max Fluidity” means never stop video and allows errors through.
Controlling the video camera from a remote terminal
This allows you to control a local video camera from a remote terminal when
enabled.
Disable still picture
When activated, this does not allow still images to be transmitted.
Volume
Volume: audio and ringing.
From the pop-up “Volume”, select RINGING or AUDIO. Move the slider with the
aid of the arrow buttons and choose the desired value, always using the arrow
buttons.
Audio – video – data
From the SETTINGS menu select the option AUDIO VIDEO DATA and press OK.
31
Technical Manuals Online! - http://www.tech-man.com
Audio
The Audio menu includes management of integrated audio both peripheral and
external. Understanding Audio Inputs, Echo Canceller, Audio Outputs.
Inputs
In this menu you can enable or disable the THESEUS integrated microphone, the
echo cancellation and its gain adjustment.
You can enable or disable the Input Line of the THESUS, its echo canceller and
its gain adjustment.
Echo canceller
In this menu you can enable or disable the functions of the Echo Canceller, AGC
and Noise Reduction.
Audio outputs
In this menu you can choose between the audio outputs: THESEUS
loudspeakers (MONITOR) or audio output present on the rear panel (Line Out). It
is also possible to enable or disable peripheral audio connected to the input Line
In.
If you choose the audio output (Line Out), you can listen to the audio using an
external peripheral (e.g. Audio Mixer or VCR).
It is also possible to select the audio between reception and transmission Line
In, to be sent to the output Line Out.
Note:
In this case, the factory defaults include enabling audio reception and audio
transmission, which is advisable for the eventual use of a VCR.
A menu is also present allowing you to select the use of the handset or
alternatively, a headset/microphone (optional).
See the section “INSTALLATION OF HEADSET” in this manual.
32
Technical Manuals Online! - http://www.tech-man.com
Video
From the AUDIO VIDEO DATA menu, select the icon VIDEO and press OK.
The values for contrast, brightness and colour can be adjusted in order to obtain
a better video picture.
Data channels
From the AUDIO – VIDEO - DATI menu select the icon DATA CHANNELS and
press OK.
In this window you can:
Enable or disable data transmissions.
Select the transfer rate.
Choose the transmission protocol.
Synchronising audio-video
Within this section you can synchronise audio delay with respect to video. The
audio delay represents the value in milliseconds by which received audio is
delayed. In order to have perfect synchronisation between audio and video, it is
necessary to adjust these parameters according to the connection type. By
pressing the “Automatic” button, this operation is performed automatically by
the system. Alternatively you can make manual adjustments by moving the
slider along the bar-display until you obtain the best compromise.
33
Technical Manuals Online! - http://www.tech-man.com
Installation Menu
Press the “MENU” button on the videophone keypad and move to the icon
“SETTINGS” and press OK. By entering a password, you will gain access to the
INSTALLATION submenu. The default password is 1234.
Password
Entering a password is necessary in order to gain access to the INSTALLATION
menu.
Enter a password and press OK.
In order to personalise your password, select the EDIT button.
Enter the old password.
Enter a new password.
Enter the new password again to confirm your choice.
At this stage a new page will be displayed:
34
Technical Manuals Online! - http://www.tech-man.com
Licences
This page is dedicated to the activation of some supplementary functions such
as encryption.
In order to obtain information on the activation of this functionality, contact the
system supplier to request the enable code.
Once you have the code:
Select “LICENSES” and press OK in order to obtain the following display:
Enter the enable code and press “ENABLE.”
Encryption
The use of encryption is allowed only after activation of the user licence.
It can only be used for point-to-point video call connections.
From the SETTINGS menu, select “INSTALLATION” and “ENCRYPTION” in this
order.
Once in the Encryption menu, you can set the following parameters:
Use Encryption:
Encryption is activated on the THESEUS either in H.323 or H.320.
Encryption active from start (ISDN):
35
Technical Manuals Online! - http://www.tech-man.com
This option, as described by its name, is only valid for ISDN calls.
In particular, if such an option is selected, the THESEUS starts the encryption
procedure from the start of the ISDN connection. If the option is not selected, the
ISDN connection starts in unencrypted mode, however, you can activate
encryption at a later stage (during the connection, select the padlock
and
press OK).
Unprotected calls
From this drop down menu, you can choose how the THESEUS will behave if the
terminal with which a videoconference session is being negotiated is not
capable of supporting encrypted calls.
In detail:
Disconnect – The THESEUS does not allow connection with a remote terminal
that does not use encryption and therefore automatically disconnects.
Request Confirmation – During the session negotiation phase, the THESEUS
asks the user to confirm if they want to make an unprotected call.
Inform – The THESUS informs you that you are about to make an unprotected
connection by displaying a message on video.
State – The THESUS notifies you that you are about to make an unprotected call,
and when the connection is made, an opened padlock symbol will be displayed
on the status bar.
Key Length AES (only ISDN)
From this dropdown menu you can choose for ISDN connections only, from
three AES key lengths: 128 bits, 192 bits, and 256 bits.
Moreover, the “auto” option allows optimisation of the choice according to the
characteristics of the terminal in question.
Regarding an IP connection, the key length is always 128 bits.
DH Prime Number Key Length (ISDN only)
The protocol used requires the contemporaneous exchange of a prime number
and an AES private key between terminals.
For ISDN calls you can choose between two prime numbers:
High Security length 1024 bits.
Very High Security length 1536 bits.
36
Technical Manuals Online! - http://www.tech-man.com
For IP calls, the THESEUS always uses the High Security option with a 1024-bit
length.
Note:
Most common video communication terminals normally use the High Security
prime number length and the 128-bit AES private key.
Terminal settings
In order to access the submenu TERMINAL SETTINGS, choose the appropriate
icon in the INSTALLATION menu and press OK.
In this section:
you can change:
The Network Type ISDN/IP
Rate
Audio Coding
Video Coding
Bonding YES or NO (ISDN only)
Network interface
From the SETTINGS menu, select INSTALLATION after having entered the
password. Go to the NETWORK INTERFACES section by selecting the
appropriate icon and press OK.
37
Technical Manuals Online! - http://www.tech-man.com
ISDN Configuration
In order to access the interface configuration menu, move to the icon ISDN and
press OK.
In this section you can:
Select the protocol “Euro” or “National”
Activate or deactivate the CLIR and COLR functions.
(These functions enable you to avoid having your own number displayed on the
remote system).
!
If the function CLIR (S) is active, the caller’s number will not be
displayed on the remote system called. If the function COLR (S) is
active, the number of the user connected is not displayed on the
remote calling system.
Activate or deactivate the “Downspeed” function that is called when one or more
lines are dropped during a connected session.
Activate the “FALLBACK” function in order to make a phone call when the
remote system consists of a basic telephone.
Activate or deactivate the “Bonding Recovery” function in order to cope with a
situation where network errors occur during a Bonding connection.
Activate or deactivate the 5ESS protocol (only for National ISDN).
Select the mode (64K or 56K).
Activate or deactivate the 1TR6 function (allows you to change the protocol level
3 from ETS1 to 1TR6 only for Euro ISDN).
38
Technical Manuals Online! - http://www.tech-man.com
Access Configuration (ISDN BRI Euro)
Move to the icon Configure Access, press OK, the following will be displayed:
Enable: if selected, enables the ISDN access function.
Number: enter the number associated with ISDN access.
Subaddress: specify the subaddress if existing.
Multinumber: if selected, enables multinumber functionality.
TEI Fixed: select TEI Fixed according the functional characteristics of the
network. The TEI constitutes an identifying number that allows the ISDN
exchange to distinguish between different terminals connected to a common
access point. If TEI Fixed is selected, then you must manually enter the TEI
number. Conversely by not selecting, the parameter will be set as TEI Automatic.
In this case, the TEI number will be automatically assigned by the exchange and
no further operations are necessary.
Access configuration (ISDN BRI National)
Move to the icon Configure Access and press OK; the following will be
displayed:
39
Technical Manuals Online! - http://www.tech-man.com
Enable: if selected, enables ISDN access functionality.
Number: enter the number associated with ISDN access.
Spid: specify the SPID if existing.
TEI Fixed: select TEI Fixed according the functional characteristics of the
network. The TEI constitutes an identifying number that allows the ISDN
exchange to distinguish between different terminals connected to a common
access point. If TEI Fixed is selected, then you must manually enter the TEI
number. Conversely by not selecting, the parameter will be set as TEI Automatic.
In this case, the TEI number will be automatically assigned by the exchange and
no further operations are necessary.
Spid2: enable any eventual SPID2 and enter the appropriate numbers.
IP Configuration
From the Network Interface menu select IP and press OK.
The three options available are:
• IP Configuration
• H.323 settings
• Services
Select “IP CONFIGURATION”.
!
In order to configure these addresses, contact the network
administrator.
40
Technical Manuals Online! - http://www.tech-man.com
For “H.323 SETTINGS” move to the corresponding icon and press OK.
This section contains the configuration options necessary for using the system
with the H.323 protocol.
Name H.323: (H.323 ID) name used at the terminal for registering with the
gatekeeper.
Number H.323: (E.164) identifying number used at the terminal for registering
with the gatekeeper.
Use Gatekeeper: if selected, allows the use of a gatekeeper and its address.
Use NetMeeting: If a T.120 connection is available, a data conference using
NetMeeting can be started by entering the IP address of the application host
server.
!
For Advanced H.323 settings, contact the network administrator.
41
Technical Manuals Online! - http://www.tech-man.com
Services Configuration
Services menu
The THESUS allows the configuration of some parameters connected with
management of the equipment via web and SNMP protocol.
In this section in particular, you can decide:
To use the THESEUS via the Web or not.
To make the phonebook available.
To allow use with a single IP address or use with all those available in the
network.
To modify the access password via the Web or Telnet, (default 1234).
Web-Telnet management
42
Technical Manuals Online! - http://www.tech-man.com
SNMP Management
!
To configure these parameters, contact the network administrator.
Localization
From the INSTALLATION menu, move to the icon LOCALIZATION and press OK.
This section is dedicated to entering data for the purpose of localizing the
terminal:
Terminal Name: enter a name for the terminal.
Country Code: enter the country code.
PBX: enter the PBX access number for an outgoing call.
Language: select the desired language.
Audio Coding: select the type of coding required in “Transmission”.
Video Standard: select the type of “Video Standard” relative to the type of
peripheral connected to the Video Out.
Selection Tone: select the desired tone.
43
Technical Manuals Online! - http://www.tech-man.com
Load default settings
From the INSTALLATION menu, you can load the default settings.
You can choose between two options:
“Factory Defaults” (*)
“User settings only”
After having selected the option desired, move to the icon “LOAD DEFAULT
VALUES” and press OK.
!
Read the monitor instructions carefully.
Note: (*)
As a safety measure for the case where the option “FACTORY SETTINGS” is
chosen, you will be asked for confirmation. An affirmative answer will result in
the factory settings being recalled and all user settings will be lost (last numbers,
phonebook, IP address.).
44
Technical Manuals Online! - http://www.tech-man.com
THESEUS Diagnostics
In order to check that the system installation is correct, the THESEUS is
equipped with a diagnostics menu. Press the “MENU” button on the videophone
keypad, select “SETTINGS”, “DIAGNOSTICS” and press OK.
The following will be displayed:
In this section you can access various diagnostics menus that concern the
connection state, the interfaces used, audio, video and various system hardware
components.
Test terminal
This option includes an internal test of the system and if selected, the THESEUS
should create a correct audio video loop.
Press any button to stop the test.
Interfaces
Selection of the option Interfaces will display the following picture that divides
the tests according to:
Audio
Video
Network
45
Technical Manuals Online! - http://www.tech-man.com
Audio
Select the icon “AUDIO” and press OK.
In this section, tests are grouped together concerning the audio components of
the system.
The following data can be viewed: microphone and external microphone - peak
values, noise and state.
Moreover, you can see the transmission and reception streams, and the audio
outputs: main and auxiliary.
Finally, it is possible to generate a tone (Tone Loc.) that allows you to test the
loudspeaker volume.
Selecting Tx Tone during a connection will generate a tone at the remote system.
Video
From the interfaces menu, select the icon “VIDEO” and press OK.
In this section, tests are grouped together concerning the video components of
the system.
You can view information on the type of video camera, the video-standard and
the active video input type (Room/Doc1).
The test Loop Loc. shows local video continuously.
46
Technical Manuals Online! - http://www.tech-man.com
Network
In this section the interfaces (ISDN/IP) found are displayed. For BRI access, a
coloured LED is present having the following meanings:
Red – errors present in the network
Yellow – access enabled, but no network present
Green – access enabled, network present
Connection Status
From the diagnostics menu, select the icon “CONNECTION STATE”. This section
contains information on the state of the call showing some parameters
concerning the audio and video of the current connection.
ISDN H320
In an active ISDN connection, you can check the actual characteristics and
quality of the connection, having at your disposition the values of the parameters
RATE of reception and transmission, audio coding, video coding, frames per
second, and data channel status.
Entering the ACCESS menu, you can obtain more detailed information
concerning the status of the ISDN B1 and B2 channels used by THESEUS.
47
Technical Manuals Online! - http://www.tech-man.com
IP H323
In the situation when an IP connection is active, you can check by means of this
menu, the actual characteristics and quality of the connection by having
available the values of the parameters reception/transmission rate, audio coding,
video coding, frames per second and lost packets.
Hardware
From the diagnostics menu, selecting the icon Hardware will display the
following:
In this section some information about the general state of the system is
reported: (hardware revision, MAC address and battery condition of the remote
control).
Furthermore, some parameters about the state of the processor and audio/video
codec can be checked in the Audio/Video submenus.
48
Technical Manuals Online! - http://www.tech-man.com
Software Versions
Selecting the icon Software Version will show the following image which reports
a series of items about the modules installed in the system, the versions, build
dates, etc.
49
Technical Manuals Online! - http://www.tech-man.com
Connecting a personal computer
The THESEUS system can be connected directly to a personal computer or a
network (LAN) in order to update software, change remote settings or perform
diagnostic tests.
Connecting to a PC in a LAN
To connect the THESEUS to a PC in a LAN:
Check that the THESEUS and PC are connected to the LAN.
Switch on the THESEUS.
Move through the sections SETTINGS, INSTALLATION, NETWORK INTERFACE,
IP, IP CONFIGURATION.
If the LAN does not use a DHCP server, deselect AUTOMATIC IP ADDRESS and
manually enter the IP address, the subnet mask and the gateway address
supplied by the network administrator.
Restart the THESEUS.
Launch the Internet Explorer application on the PC. Enter the IP address of the
THESEUS in the web browser address bar.
The browser-based web configuration manager will appear.
Remote management
The Videophone THESEUS is provided with an integrated web server that allows
you to remotely manage the unit. Thanks to the web pages incorporated you
can:
Execute diagnostic tests.
Check a system.
Change a system’s settings
Web page access
Start the web browser (for example Internet Explorer on your PC).
Enter the THESEUS IP address in the web browser address bar.
A request to enter the network password will be displayed.
Always enter the word Aethra in the User Name field, in the Password field enter
your password (default password: 1234) in order to gain access to the
installation menu for the THESEUS.
The Web page will be displayed.
Select the desired language.
At this point a picture very similar to that of the initial page of the THESUS user
interface will be displayed from which you can make a call in the same way as
50
Technical Manuals Online! - http://www.tech-man.com
previously described. The arrangement of the management menus for
configuration and diagnostics remain the same as before.
!
When using browser-based web management save your last
configuration changes using the
icon present on every page.
Compared with the classical user interface, the section TOOLS has been
introduced where the following downloads are proposed:
Dataconf.exe This enables you to use NetMeeting 3.xx with ISDN calls or IP for
multimedia activities (data channels T120).
AePPTManager.exe This software enables you to load a PowerPoint presentation
in the system.
NoteB.dat This file contains all the phonebook data of the THESUS and can be
used to enter the same phonebook in another Videophone.
Finally, a module is present that enables you to update the THESUS phonebook
data created with an earlier Aethra Videophone. Click TOOLS on the home page
to access the various options.
Updating THESEUS software
Download the update program in the desired folder.
From Resources Management start the program. The following will be displayed:
51
Technical Manuals Online! - http://www.tech-man.com
Enter the IP address in the field “Host IP Address” of the system to be updated.
Press Start to start downloading.
!
!
!
Attention.
During this procedure follow the instructions that are presented on
the THESEUS monitor.
Attention.
The download process requires a few minutes.
Attention.
At the end of the download, the system automatically restarts.
Data Conference with Microsoft NetMeeting 3.xx
The Data Conference software that has been introduced and is compatible with
version 3.xx of Microsoft NetMeeting, allows you to connect via a LAN the
THESEUS to a PC hosting NetMeeting.
This enables a user on a local network to exploit the THESEUS in order to
manage ISDN and LAN videoconference T.120 data traffic. You can download
Data Conferences connecting the relevant PC to the available THESEUS LANport by entering the THESEUS web page and selecting the icon TOOLS
Selecting the file of interest will automatically activate a link to the AETHRA.NET
service and instructions for downloading files.
Execute the DataConf.exe software download and launch the program. When
functioning correctly, the file will be unpacked in a folder on the PC containing
the DataConf.exe and DataConf.ini files.
Launch the DataConf.exe program.
!
Downloading of DataConf.ini must be performed. This enables
automatic configuration of the previous program and must be
installed in the same folder where the DataConf.exe file was saved.
52
Technical Manuals Online! - http://www.tech-man.com
1 - Go to the section SETTINGS, AUDIO-VIDEO-DATA. Configure the section
THESEUS “Data Channels” software as illustrated in the figure.
Data Channels: Yes
Modem Function: No
MLP: T.120
Speed: 115200
2 - Go to the section SETTINGS, INSTALLATION, NETWORK INTERFACES, IP.
Configure the section “H.323 Settings” of the THESEUS software as illustrated in
the figure (only for IP calls).
Enable by checking the “Use NetMeeting”
function. Enter the IP address of
NetMeeting.
Managing the DataConference software
Data Conference is typically used at a time when two LAN or ISDN connected
users decide to start a conference using T.120 communication.
Start the DataConf.exe program.
53
Technical Manuals Online! - http://www.tech-man.com
The program creates a connection between the THESEUS and the PC completely
automatically. At this point several items of information concerning the
connection are displayed:
The THESEUS IP address.
The network interface used for video calls (ISDN or LAN).
The type of call: incoming or outgoing.
The T.120 data channel active.
The status of NetMeeting between the two users.
Once the connection has been established, NetMeeting 3.xx is displayed in the
foreground and you can perform all data conference management operations.
If you want to change the IP address of the THESEUS, all you need do is:
Terminate the connection.
Press the “Configure” button.
Enter the new IP address to be used.
54
Technical Manuals Online! - http://www.tech-man.com
Troubleshooting Problems
PROBLEM
Nothing displayed on monitor.
I see no video camera signal in Self
View and the picture is dark.
No audio transmitted.
The LAN lamp (LED) is flashing, but
I cannot successfully PING the
system.
I cannot establish a data connection
between the two systems.
I cannot connect the DataConf to
the codec.
In ISDN, the system only connects
at 64K.
I cannot make an IP connection and
SOLUTION
Check that the THESEUS’ power switch is
in the “ON” position. See figure
“Positioning and Installation of the
THESEUS”. If the problem persists,
contact the Aethra Help Desk.
Check that the integrated video camera
has no objects obscuring the optics.
Select the video camera named Room
using the remote control or via Web. If the
problem persists, contact the Aethra Help
Desk.
Check that there are no objects close to
the microphone. Use the integrated
diagnostics. If the problem persists,
contact the Aethra Help Desk.
Check that the system IP address is not
duplicated in the network. If the problem
persists, contact the Aethra Help Desk.
Check that the IP of the DataConf is the
same as that of the codec to be
connected. If the connection is IP, make
sure that the check-box “Use NetMeeting”
and the PC IP- address to be connected
are correct (see relevant section in this
manual). If the problem persists, contact
the Aethra Help Desk.
Check that there are no conflicts with your
system caused by another PC with
DataConf. If the problem persists, contact
the Aethra Help Desk.
Check that the system is connected with
128Kbps-combined channels. Perform the
same checks on the called system. If the
problem persists, contact the Aethra Help
Desk.
Check that the system is switched on.
55
Technical Manuals Online! - http://www.tech-man.com
my IP address is correct.
The Self View picture is black and
white and is rolling from bottom to
top.
The picture transmitted from my
equipment is too dark.
Audio received is unclear and you
only hear the audio in bursts.
Attempting to call some places in
the USA results in no connection.
Check that the system can be reached
using PING. Check that the Gatekeeper for
both systems is enabled/disabled. If the
problem persists, contact the Aethra Help
Desk.
Check that the Video Standard used (NTSC
or PAL) is correctly selected in the menu
INSTALLATION > LOCALIZATION
Ensure that the video camera is not
pointing at a light source (neon light,
window etc.).
Place the integrated microphone further
away from any external loudspeakers (TV,
system loudspeakers etc.). Ensure that the
volume is not too high and that the echo
cancellation is activated.
Set the equipment to make calls at 56K
(restricted network), this setting can be
made from the Installation menu.
56
Technical Manuals Online! - http://www.tech-man.com
TECHNICAL SPECIFICATIONS
SUPPORTED STANDARDS
• ITU-T H.320
• ITU-T H.323
• Video
• Audio
• Data
• MCU compatibility
TRANSMISSION
• Bit rate
ISDN
IP networks
H.261, H.263+
G.711, G.722, G.728, G723.1
T.120
H.243
56 ÷ 128 kbps over ISDN
64 ÷ 384 kbps over IP
VIDEO
• Frame rate 15 frames per second
• Video resolution FCIF 352 x 288 pixels
QCIF 176 x 144 pixels
4CIF 704 x 576 pixels
for still images (Annex D or H.263)
• Remote camera control H.281 (H.320), H.282/H.283 (H.323)
AUDIO
Audio
Band
Bit rate
G.711
300 ÷ 3400 Hz
56 kbps
G.722
50 ÷ 7000 Hz
48/56 kbps
G.723.
1 300 ÷ 3400 Hz
5.3 / 6.3 kbps
G.728
50 ÷ 3400 Hz
16 kbps
• Echo cancellation Full-duplex
• Echo Return Loss Enhancement (ERLE)
• Automatic Gain Control (AGC)
• Automatic Noise Suppression
BUILT-IN CAMERA
• Sensor 1/4” CCD
• Format Video composite
• Picture elements 542 x 586 pixels
• Resolution 380 TV line
• Lens f=3.7 mm
• Iris F=2.0
• Focus Manual
• White balance Automatic
• Minimum illumination 0.5 lux
57
Technical Manuals Online! - http://www.tech-man.com
• S/N 52 dB
BUILT-IN DISPLAY
• Type Color TFT-LCD
• Size 5”
• Resolution 960 x 234
NETWORK INTERFACES
• ISDN
1 BRI 1 RJ-45
• Ethernet
10/100BASE-T full-duplex 1 RJ-45
AUDIO/VIDEO INTERFACES
Video
• Video input CVBS PAL/NTSC (RCA)
• Video output CVBS PAL/NTSC (RCA)
Audio
• Audio input Line (RCA)
• Audio output Line (RCA)
AUXILIARY INTERFACES
• Serial port RS232 (DB9)
USER INTERFACE
• Multilingual on-screen graphic user interface
• User selectable languages:
Italian, English, French, Spanish, German,
Portuguese, Norwegian, Swedish, Chinese
• Contextual help
• Diagnostics and management functions
• Call progress monitoring
BUILT-IN HANDS FREE
• Omnidirectional microphone
• Speaker 8 ohm 1 Watt
ENCRYPTION
AES encryption standard (option)
WEB MANAGEMENT
All configuration, call diagnostics and
management functions are accessible
using the following web browsers:
Microsoft® Internet ExplorerTM, Netscape
NavigatorTM
58
Technical Manuals Online! - http://www.tech-man.com
REMOTE DIAGNOSTIC AND MANAGEMENT
Local Web Browser
Self test
Yes
Yes
Diagnostics
Yes
Yes
Configuration
Yes
Yes
Call
Yes
Yes
Error tracking
Yes
Yes
SNMP
Yes
Yes
Yes
Yes
POWER SUPPLY
•100-240 Vac 50-60 Hz 0.45 A Max
DIMENSIONS THESEUS
Width 26 cm (10.23”)
Height 10 cm (3.3”) closed
23 cm (9’’) open
Depth 19 cm (7.8”)
59
Technical Manuals Online! - http://www.tech-man.com
USE AND STORAGE CONDITIONS
OPERATING TEMPERATURE
RELATIVE OPERATING HUMIDITY
STORAGE TEMPERATURE
+5°C ÷ +45 °C
10% ÷ 93 % (without condensation)
-40 ÷ +70 °C
REFERENCE REGULATIONS (CE MARK AND
RELIABILITY TESTS)
STORAGE
TRANSPORTATION
OPERATING CONDITIONS
EMC
SAFETY
CONNECTION TO
TELECOMMUNICATION NETWORK
EN 60068-2-1 Test Ab (IEC 60068-2-1)
EN 60068-2-2 Test Bb (IEC 60068-2-2)
IEC 60068-2-32 Test Ed - Method 1
IEC 60068-2-64 Test Fdb (CEI 50-6/9)
CEI 50-3
EN 60068-2-1 Test Ab (IEC 60068-2-1)
EN 60068-2-2 Test Bb (IEC 60068-2-2)
IEC 60068-2-14 Test Nb
IEC 60068-2-56 Test Cb
IEC 60068-2-6 Test Fc
IEC 60068-2-31 Test Ec
IEC 60068-2-32 Test Ed - Method 1
IEC 60068-2-64 Test Fdb (CEI 50-6/9)
EN 55022
EN 55024
EN 61000-3-2
EN 61000-3-3
FCC15 *
EN 60950 (IEC 60950)
FCC 68 *
* Equipment for USA market only
This device complies with essential requirements and other
relevant notes of R&TTE Directive 1999/5/EC.
60
Technical Manuals Online! - http://www.tech-man.com