1
BaseSpace® Onsite v2.0
System Guide
For Research Use Only. Not for use in diagnostic procedures. Introduction
How Do I Start
BaseSpace Onsite User Interface
How To Use BaseSpace Onsite
Admin Tasks
Technical Assistance
ILLUMINA PROPRIETARY
Part # 15049148 Rev. E
May 2015
7
10
14
25
76
This document and its contents are proprietary to Illumina, Inc. and its affiliates ("Illumina"), and are intended solely for the
contractual use of its customer in connection with the use of the product(s) described herein and for no other purpose. This
document and its contents shall not be used or distributed for any other purpose and/or otherwise communicated, disclosed,
or reproduced in any way whatsoever without the prior written consent of Illumina. Illumina does not convey any license
under its patent, trademark, copyright, or common-law rights nor similar rights of any third parties by this document.
The instructions in this document must be strictly and explicitly followed by qualified and properly trained personnel in order
to ensure the proper and safe use of the product(s) described herein. All of the contents of this document must be fully read
and understood prior to using such product(s).
FAILURE TO COMPLETELY READ AND EXPLICITLY FOLLOW ALL OF THE INSTRUCTIONS CONTAINED HEREIN
MAY RESULT IN DAMAGE TO THE PRODUCT(S), INJURY TO PERSONS, INCLUDING TO USERS OR OTHERS, AND
DAMAGE TO OTHER PROPERTY.
ILLUMINA DOES NOT ASSUME ANY LIABILITY ARISING OUT OF THE IMPROPER USE OF THE PRODUCT(S)
DESCRIBED HEREIN (INCLUDING PARTS THEREOF OR SOFTWARE).
© 2015 Illumina, Inc. All rights reserved.
Illumina, 24sure, BaseSpace, BeadArray, BlueFish, BlueFuse, BlueGnome, cBot, CSPro, CytoChip, DesignStudio,
Epicentre, GAIIx, Genetic Energy, Genome Analyzer, GenomeStudio, GoldenGate, HiScan, HiSeq, HiSeq X, Infinium,
iScan, iSelect, MiSeq, NeoPrep, Nextera, NextBio, NextSeq, Powered by Illumina, SeqMonitor, SureMDA,
TruGenome, TruSeq, TruSight, Understand Your Genome, UYG, VeraCode, verifi, VeriSeq, the pumpkin orange color,
and the streaming bases design are trademarks of Illumina, Inc. and/or its affiliate(s) in the U.S. and/or other countries. All
other names, logos, and other trademarks are the property of their respective owners.
Read Before Using this Product
This Product, and its use and disposition, is subject to the following terms and conditions. If Purchaser does not agree to these
terms and conditions then Purchaser is not authorized by Illumina to use this Product and Purchaser must not use this Product.
1
Definitions. "Application Specific IP" means Illumina owned or controlled intellectual property rights that pertain to
this Product (and use thereof) only with regard to specific field(s) or specific application(s). Application Specific IP
excludes all Illumina owned or controlled intellectual property that cover aspects or features of this Product (or use
thereof) that are common to this Product in all possible applications and all possible fields of use (the "Core IP").
Application Specific IP and Core IP are separate, non-overlapping, subsets of all Illumina owned or controlled intellectual
property. By way of non-limiting example, Illumina intellectual property rights for specific diagnostic methods, for
specific forensic methods, or for specific nucleic acid biomarkers, sequences, or combinations of biomarkers or
sequences are examples of Application Specific IP. "Consumable(s)" means Illumina branded reagents and consumable
items that are intended by Illumina for use with, and are to be consumed through the use of, Hardware.
"Documentation" means Illumina's user manual for this Product, including without limitation, package inserts, and any
other documentation that accompany this Product or that are referenced by the Product or in the packaging for the Product
in effect on the date of shipment from Illumina. Documentation includes this document. "Hardware" means Illumina
branded instruments, accessories or peripherals. "Illumina" means Illumina, Inc. or an Illumina affiliate, as applicable.
"Product" means the product that this document accompanies (e.g., Hardware, Consumables, or Software). "Purchaser"
is the person or entity that rightfully and legally acquires this Product from Illumina or an Illumina authorized dealer.
"Software" means Illumina branded software (e.g., Hardware operating software, data analysis software). All Software is
licensed and not sold and may be subject to additional terms found in the Software's end user license agreement.
"Specifications" means Illumina's written specifications for this Product in effect on the date that the Product ships from
Illumina.
2
Research Use Only Rights. Subject to these terms and conditions and unless otherwise agreed upon in writing by an
officer of Illumina, Purchaser is granted only a non-exclusive, non-transferable, personal, non-sublicensable right under
Illumina's Core IP, in existence on the date that this Product ships from Illumina, solely to use this Product in Purchaser's
facility for Purchaser's internal research purposes (which includes research services provided to third parties) and solely
in accordance with this Product's Documentation, but specifically excluding any use that (a) would require rights or a
license from Illumina to Application Specific IP, (b) is a re-use of a previously used Consumable, (c) is the disassembling,
reverse-engineering, reverse-compiling, or reverse-assembling of this Product, (d) is the separation, extraction, or
isolation of components of this Product or other unauthorized analysis of this Product, (e) gains access to or determines
the methods of operation of this Product, (f) is the use of non-Illumina reagent/consumables with Illumina's Hardware
(does not apply if the Specifications or Documentation state otherwise), or (g) is the transfer to a third-party of, or sublicensing of, Software or any third-party software. All Software, whether provided separately, installed on, or embedded
in a Product, is licensed to Purchaser and not sold. Except as expressly stated in this Section, no right or license under
any of Illumina's intellectual property rights is or are granted expressly, by implication, or by estoppel.
Purchaser is solely responsible for determining whether Purchaser has all intellectual property rights that are
necessary for Purchaser's intended uses of this Product, including without limitation, any rights from third
parties or rights to Application Specific IP. Illumina makes no guarantee or warranty that purchaser's specific
intended uses will not infringe the intellectual property rights of a third party or Application Specific IP.
3
Regulatory. This Product has not been approved, cleared, or licensed by the United States Food and Drug
Administration or any other regulatory entity whether foreign or domestic for any specific intended use, whether
research, commercial, diagnostic, or otherwise. This Product is labeled For Research Use Only. Purchaser must ensure it
has any regulatory approvals that are necessary for Purchaser's intended uses of this Product.
4
Unauthorized Uses. Purchaser agrees: (a) to use each Consumable only one time, and (b) to use only Illumina
consumables/reagents with Illumina Hardware. The limitations in (a)-(b) do not apply if the Documentation or
Specifications for this Product state otherwise. Purchaser agrees not to, nor authorize any third party to, engage in any of
the following activities: (i) disassemble, reverse-engineer, reverse-compile, or reverse-assemble the Product, (ii) separate,
extract, or isolate components of this Product or subject this Product or components thereof to any analysis not expressly
authorized in this Product's Documentation, (iii) gain access to or attempt to determine the methods of operation of this
Product, or (iv) transfer to a third-party, or grant a sublicense, to any Software or any third-party software. Purchaser
further agrees that the contents of and methods of operation of this Product are proprietary to Illumina and this Product
contains or embodies trade secrets of Illumina. The conditions and restrictions found in these terms and conditions are
bargained for conditions of sale and therefore control the sale of and use of this Product by Purchaser.
5
Limited Liability. TO THE EXTENT PERMITTED BY LAW, IN NO EVENT SHALL ILLUMINA OR ITS
SUPPLIERS BE LIABLE TO PURCHASER OR ANY THIRD PARTY FOR COSTS OF PROCUREMENT OF
SUBSTITUTE PRODUCTS OR SERVICES, LOST PROFITS, DATA OR BUSINESS, OR FOR ANY INDIRECT,
SPECIAL, INCIDENTAL, EXEMPLARY, CONSEQUENTIAL, OR PUNITIVE DAMAGES OF ANY KIND ARISING
OUT OF OR IN CONNECTION WITH, WITHOUT LIMITATION, THE SALE OF THIS PRODUCT, ITS USE,
ILLUMINA'S PERFORMANCE HEREUNDER OR ANY OF THESE TERMS AND CONDITIONS, HOWEVER
ARISING OR CAUSED AND ON ANY THEORY OF LIABILITY (WHETHER IN CONTRACT, TORT
(INCLUDING NEGLIGENCE), STRICT LIABILITY OR OTHERWISE).
6
ILLUMINA'S TOTAL AND CUMULATIVE LIABILITY TO PURCHASER OR ANY THIRD PARTY ARISING OUT
OF OR IN CONNECTION WITH THESE TERMS AND CONDITIONS, INCLUDING WITHOUT LIMITATION,
THIS PRODUCT (INCLUDING USE THEREOF) AND ILLUMINA'S PERFORMANCE HEREUNDER, WHETHER
IN CONTRACT, TORT (INCLUDING NEGLIGENCE), STRICT LIABILITY OR OTHERWISE, SHALL IN NO
EVENT EXCEED THE AMOUNT PAID TO ILLUMINA FOR THIS PRODUCT.
7
Limitations on Illumina Provided Warranties. TO THE EXTENT PERMITTED BY LAW AND SUBJECT TO THE
EXPRESS PRODUCT WARRANTY MADE HEREIN ILLUMINA MAKES NO (AND EXPRESSLY DISCLAIMS
ALL) WARRANTIES, EXPRESS, IMPLIED OR STATUTORY, WITH RESPECT TO THIS PRODUCT,
INCLUDING WITHOUT LIMITATION, ANY IMPLIED WARRANTY OF MERCHANTABILITY, FITNESS FOR A
PARTICULAR PURPOSE, NONINFRINGEMENT, OR ARISING FROM COURSE OF PERFORMANCE,
DEALING, USAGE OR TRADE. WITHOUT LIMITING THE GENERALITY OF THE FOREGOING, ILLUMINA
MAKES NO CLAIM, REPRESENTATION, OR WARRANTY OF ANY KIND AS TO THE UTILITY OF THIS
PRODUCT FOR PURCHASER'S INTENDED USES.
8
Product Warranty. All warranties are personal to the Purchaser and may not be transferred or assigned to a third-party,
including an affiliate of Purchaser. All warranties are facility specific and do not transfer if the Product is moved to
another facility of Purchaser, unless Illumina conducts such move.
a
Warranty for Consumables. Illumina warrants that Consumables, other than custom Consumables, will conform to
their Specifications until the later of (i) 3 months from the date of shipment from Illumina, and (ii) any expiration
date or the end of the shelf-life pre-printed on such Consumable by Illumina, but in no event later than 12 months
from the date of shipment. With respect to custom Consumables (i.e., Consumables made to specifications or
designs made by Purchaser or provided to Illumina by, or on behalf of, Purchaser), Illumina only warrants that the
custom Consumables will be made and tested in accordance with Illumina's standard manufacturing and quality
control processes. Illumina makes no warranty that custom Consumables will work as intended by Purchaser or for
b
c
d
e
f
9
Purchaser's intended uses.
Warranty for Hardware. Illumina warrants that Hardware, other than Upgraded Components, will conform to its
Specifications for a period of 12 months after its shipment date from Illumina unless the Hardware includes Illumina
provided installation in which case the warranty period begins on the date of installation or 30 days after the date it
was delivered, whichever occurs first ("Base Hardware Warranty"). "Upgraded Components" means Illumina
provided components, modifications, or enhancements to Hardware that was previously acquired by Purchaser.
Illumina warrants that Upgraded Components will conform to their Specifications for a period of 90 days from the
date the Upgraded Components are installed. Upgraded Components do not extend the warranty for the Hardware
unless the upgrade was conducted by Illumina at Illumina's facilities in which case the upgraded Hardware shipped
to Purchaser comes with a Base Hardware Warranty.
Exclusions from Warranty Coverage. The foregoing warranties do not apply to the extent a non-conformance is
due to (i) abuse, misuse, neglect, negligence, accident, improper storage, or use contrary to the Documentation or
Specifications, (ii) improper handling, installation, maintenance, or repair (other than if performed by Illumina's
personnel), (iii) unauthorized alterations, (iv) Force Majeure events, or (v) use with a third party's good not provided
by Illumina (unless the Product's Documentation or Specifications expressly state such third party's good is for use
with the Product).
Procedure for Warranty Coverage. In order to be eligible for repair or replacement under this warranty Purchaser
must (i) promptly contact Illumina's support department to report the non-conformance, (ii) cooperate with Illumina
in confirming or diagnosing the non-conformance, and (iii) return this Product, transportation charges prepaid to
Illumina following Illumina's instructions or, if agreed by Illumina and Purchaser, grant Illumina's authorized repair
personnel access to this Product in order to confirm the non-conformance and make repairs.
Sole Remedy under Warranty. Illumina will, at its option, repair or replace non-conforming Product that it
confirms is covered by this warranty. Repaired or replaced Consumables come with a 30-day warranty. Hardware
may be repaired or replaced with functionally equivalent, reconditioned, or new Hardware or components (if only a
component of Hardware is non-conforming). If the Hardware is replaced in its entirety, the warranty period for the
replacement is 90 days from the date of shipment or the remaining period on the original Hardware warranty,
whichever is shorter. If only a component is being repaired or replaced, the warranty period for such component is
90 days from the date of shipment or the remaining period on the original Hardware warranty, whichever ends later.
The preceding states Purchaser's sole remedy and Illumina's sole obligations under the warranty provided
hereunder.
Third-Party Goods and Warranty. Illumina has no warranty obligations with respect to any goods originating
from a third party and supplied to Purchaser hereunder. Third-party goods are those that are labeled or branded
with a third-party's name. The warranty for third-party goods, if any, is provided by the original manufacturer.
Upon written request Illumina will attempt to pass through any such warranty to Purchaser.
Indemnification.
a
Infringement Indemnification by Illumina. Subject to these terms and conditions, including without limitation,
the Exclusions to Illumina's Indemnification Obligations (Section 9(b) below), the Conditions to Indemnification
Obligations (Section 9(d) below), Illumina shall (i) defend, indemnify and hold harmless Purchaser against any
third-party claim or action alleging that this Product when used for research use purposes, in accordance with these
terms and conditions, and in accordance with this Product's Documentation and Specifications infringes the valid
and enforceable intellectual property rights of a third party, and (ii) pay all settlements entered into, and all final
judgments and costs (including reasonable attorneys' fees) awarded against Purchaser in connection with such
infringement claim. If this Product or any part thereof, becomes, or in Illumina's opinion may become, the subject of
an infringement claim, Illumina shall have the right, at its option, to (A) procure for Purchaser the right to continue
using this Product, (B) modify or replace this Product with a substantially equivalent non-infringing substitute, or
(C) require the return of this Product and terminate the rights, license, and any other permissions provided to
Purchaser with respect this Product and refund to Purchaser the depreciated value (as shown in Purchaser's official
records) of the returned Product at the time of such return; provided that, no refund will be given for used-up or
expired Consumables. This Section states the entire liability of Illumina for any infringement of third party
intellectual property rights.
b
Exclusions to Illumina Indemnification Obligations. Illumina has no obligation to defend, indemnify or hold
harmless Purchaser for any Illumina Infringement Claim to the extent such infringement arises from: (i) the use of
this Product in any manner or for any purpose outside the scope of research use purposes, (ii) the use of this Product
in any manner not in accordance with its Specifications, its Documentation, the rights expressly granted to Purchaser
hereunder, or any breach by Purchaser of these terms and conditions, (iii) the use of this Product in combination
with any other products, materials, or services not supplied by Illumina, (iv) the use of this Product to perform any
c
d
e
assay or other process not supplied by Illumina, or (v) Illumina's compliance with specifications or instructions for
this Product furnished by, or on behalf of, Purchaser (each of (i) – (v), is referred to as an "Excluded Claim").
Indemnification by Purchaser. Purchaser shall defend, indemnify and hold harmless Illumina, its affiliates, their
non-affiliate collaborators and development partners that contributed to the development of this Product, and their
respective officers, directors, representatives and employees against any claims, liabilities, damages, fines, penalties,
causes of action, and losses of any and every kind, including without limitation, personal injury or death claims, and
infringement of a third party's intellectual property rights, resulting from, relating to, or arising out of (i) Purchaser's
breach of any of these terms and conditions, (ii) Purchaser's use of this Product outside of the scope of research use
purposes, (iii) any use of this Product not in accordance with this Product's Specifications or Documentation, or (iv)
any Excluded Claim.
Conditions to Indemnification Obligations. The parties' indemnification obligations are conditioned upon the
party seeking indemnification (i) promptly notifying the other party in writing of such claim or action, (ii) giving the
other party exclusive control and authority over the defense and settlement of such claim or action, (iii) not admitting
infringement of any intellectual property right without prior written consent of the other party, (iv) not entering into
any settlement or compromise of any such claim or action without the other party's prior written consent, and (v)
providing reasonable assistance to the other party in the defense of the claim or action; provided that, the party
reimburses the indemnified party for its reasonable out-of-pocket expenses incurred in providing such assistance.
Third-Party Goods and Indemnification. Illumina has no indemnification obligations with respect to any goods
originating from a third party and supplied to Purchaser. Third-party goods are those that are labeled or branded
with a third-party's name. Purchaser's indemnification rights, if any, with respect to third party goods shall be
pursuant to the original manufacturer's or licensor's indemnity. Upon written request Illumina will attempt to pass
through such indemnity, if any, to Purchaser.
Part #
Revision
Date
15049148
E
May 2015
15049148
D
April 2015
15049148
C
August
2014
15049148
B
June 2014
15049148
A
March
2014
Description of Change
Minor changes for final launch.
Supporting BaseSpace Onsite v2.0 using BaseSpace version
3.14.
Added log package descriptions.
Added descriptions for the following features:
• Prep tab library import
• Upload VCF file
• Custom library
• VariantStudio app
Initial Release
The BaseSpace Onsite System is a genomics analysis platform that is a directly
integrated end-to-end solution for the HiSeq 2500 sequencing system (with HCS version
2.2.68 or later) and the NextSeq. BaseSpace Onsite has the following features:
} You can prepare a NextSeq run on the BaseSpace Onsite Prep Tab, and then start
that run from your instrument.
} The instrument seamlessly pushes the base call (*.bcl) files and associated files to
BaseSpace Onsite for automatic analysis and storage. There is no need for a manual
and time-consuming data-transfer step: the data are already in the BaseSpace Onsite.
} The BaseSpace Onsite System provides a mechanism to share data with others and
easily scale storage and computing needs.
} The BaseSpace Onsite System runs locally; no need to connect to the cloud.
For more information about BaseSpace Onsite, see the BaseSpace Onsite System Data
Sheet.
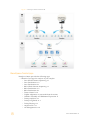
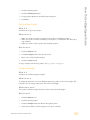
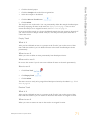
Workflow Model
Processing a flow cell on a sequencing instrument produces various files, collectively
referred to as a run. A run contains log files, instrument health data, run metrics, sample
sheet, and base call information (*.bcl files). The base call information is demultiplexed
in BaseSpace Onsite to create the samples used in secondary analysis.
Samples are analyzed by launching BaseSpace Onsite apps. BaseSpace Onsite apps are
processing software and routines that interact with BaseSpace Onsite data through the
API.
The result files from an app session are stored in an analysis. Analyses are created to
record every time an app is launched. For example, when a resequencing app executes
alignment and variant calling, an analysis is created that contains the app results for
each sample. App results generally contain BAM and VCF files, but they can also
contain other file types. App results can also be used as inputs to apps.
Finally, projects are simple containers that store samples and analyses.
BaseSpace Onsite v2.0 System Guide
7
Introduction
Introduction
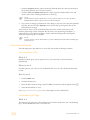
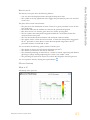
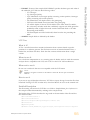
Figure 1 BaseSpace Onsite Data Model
BaseSpace Onsite Apps
BaseSpace Onsite provides the following apps:
} Illumina Core Apps for analysis of your samples:
• Isaac Whole-Genome Sequencing v2
• Isaac Enrichment v1.0
• Isaac Enrichment v2.1
• BWA Whole-Genome Sequencing v1
• BWA Enrichment v1.0
• BWA Enrichment v2.1
• Tumor Normal v1.0
• TopHat Alignment v1 (non-multi-launch version)
• Cufflinks Assembly and Differential Expression v1
• TruSeq Amplicon v1.1
• TruSeq Long Reads v1.1
• TruSeq Phasing v1.1
• Amplicon DS v1.1
• 16S Metagenomics v1.0
8
Part # 15049148 Rev. E
BaseSpace Onsite v2.0 System Guide
9
Introduction
For documentation, see support.illumina.com/sequencing/sequencing_
software/basespace/documentation.ilmn.
} VariantStudio. Illumina VariantStudio enables you to view annotation information
for variants and transcripts and filter to the variants of interest in one easy to use
application. See Run the VariantStudio App on page 47 for instructions on launching
this app, and the BaseSpace VariantStudio User Guide for instructions for using the
software application.
} IGV. Illumina has generated an app with the Integrative Genomics Viewer (IGV) of
the Broad Institute for visualizing your sequence data in great detail. See Launch the
IGV App on page 46 for instructions for using this app.
} Third-party Apps. Currently, BaseSpace Onsite provides SPAdes Genome Assembler
3.0 and Novoalign Generic DNA pipeline. For more information, see the SPAdes or
Novoalign App page on the Apps tab.
How Do I Start
Make sure to have a compatible desktop computer. BaseSpace Onsite v2.0 is compatible
with IE (9 or higher), Chrome (39 or higher), Firefox (35 or higher), and Safari (10.9 or
higher). Hardware requirements for these browsers can be found on the developer’s
website. A PC running Windows 7 or greater is required to access the BaseSpace Onsite.
See the following topics to get started with BaseSpace Onsite.
Using BaseSpace Onsite with NextSeq on page 10.
Using BaseSpace Onsite with HiSeq on page 11.
Getting Shared Data on page 13.
Using BaseSpace Onsite with NextSeq
BaseSpace Onsite is the Illumina analysis local environment. BaseSpace Onsite facilitates
your experiments on the NextSeq system in 2 different ways:
} BaseSpace Onsite helps to organize your samples and experiments, and preps runs
for NextSeq.
} BaseSpace Onsite stores and analyzes your run data, providing the following
benefits:
• Enables browser-based data management and analysis
• Provides tools for institute-wide collaboration and sharing
• Eliminates the need to manage your own storage and computing solutions
BaseSpace Onsite has limited storage capacity, and checks the free space available before
uploading a run. If there is not enough available space, you see an error message; see
Storage Check on page 79 for more information.
10
Part # 15049148 Rev. E
How Do I Start
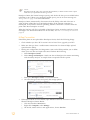
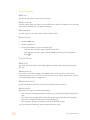
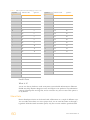
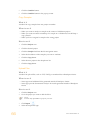
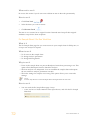
Figure 2 BaseSpace Onsite Log On
If your NextSeq sequencing system and BaseSpace do not connect properly, check the
following:
} Make sure that you have a stable connection of at least 10 Mbps upload speed from
the NextSeq.
} From the Manage Instrument screen, select System Configuration to access a series
of screens that configure the connection to BaseSpace Onsite.
} Log in to BaseSpace Onsite when setting up the run on the NextSeq sequencing
system.
NOTE
When you bookmark the BaseSpace Onsite location in your browser, make sure to
bookmark the Dashboard page after logging on. Do not bookmark the Login page.
Using BaseSpace Onsite with HiSeq
BaseSpace Onsite Connectivity—The HiSeq features an option to send instrument
health and sequencing data to BaseSpace Onsite in real time to streamline both
instrument quality control and analysis. Real-time monitoring of runs enables fast
troubleshooting. Free alignment and variant calling provide many easy to use workflows
that tailor analysis for diverse biological applications.
When you set up the run on the HiSeq, select the option to log in to BaseSpace Onsite. If
you have a problem with the data upload between HiSeq and BaseSpace Onsite, see
HiSeq Connection on page 12.
BaseSpace Onsite v2.0 System Guide
11
NOTE
Raw data from the run is also stored on the instrument, or in the location of the output
folder that you specified in the Storage screen.
BaseSpace Onsite has limited storage capacity, and checks the free space available before
uploading a run. If there is not enough available space, you see an error message; see
Storage Check on page 79 for more information.
BaseSpace Onsite automatically disconnects from the HiSeq at the end of the run or
when all base calling files have finished uploading. If the internet connection is
interrupted, analysis files continue uploading after the connection is restored from the
point when the interruption occurred.
When the last base call file is uploaded to BaseSpace Onsite, secondary analysis of your
data begins. For information about how to run tasks, see How To Use BaseSpace Onsite on
page 25
HiSeq Connection
If the HiSeq data are not uploaded to BaseSpace Onsite, check the following things.
1
Check whether you have HCS version 2.2.68 or later. If not, upgrade your HCS.
2
Make sure that you have a stable internet connection of at least 10 Mbps upload
speed from the HiSeq.
3
During run configuration, the Integration screen on the HiSeq enables you to define
where your run data are output and stored. Perform the following:
a Select BaseSpace Onsite.
b Select Storage and Analysis—Sends run data to BaseSpace for remote monitoring
and secondary analysis. A sample sheet is required with this option.
c
d
4
12
Enter your BaseSpace Onsite account information.
Go to the Storage screen and specify the storage options.
If BaseSpace Onsite is not available, open Windows Services and start or restart
Illumina BaseSpace Onsite Broker:
e Click the Windows Start button.
f Right-click Computer, select Manage.
g On the left, under Services and Applications, choose Services.
Part # 15049148 Rev. E
j
How Do I Start
h
i
Scroll down the list to find Illumina BaseSpace Broker.
Right-click Illumina BaseSpace Broker and do one of the following:
— Click Start if this option is not grayed out
— If the Start option is grayed out, click Restart
The service starts, or closes then restarts.
Close the Computer Management window.
NOTE
To use BaseSpace Onsite, you have to load a sample sheet at the start of your run.
For more information, see the HiSeq User Guide
When you begin your sequencing run on the HiSeq, the BaseSpace Onsite icon changes
to indicate that the HiSeq is connected to BaseSpace Onsite and data files are being
transferred.
Getting Shared Data
If you receive a link to shared data in BaseSpace Onsite, click the link.
Use your BaseSpace Onsite account to log on; the first time you visit you are asked to
accept the BaseSpace Onsite agreement. After that, you are ready to run BaseSpace
Onsite. For a new account, ask your local administrator to set one up.
If someone shared data with you, you see a notification stating so.
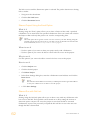
Figure 3 BaseSpace OnsiteNotification Window
The shared data show up in your project list. Now you can use the BaseSpace Onsite
tools to look at and download the data. For information about how to run tasks, see How
To Use BaseSpace Onsite on page 25
NOTE
The owner of the data can disable the sharing feature at any time.
NOTE
When you bookmark the BaseSpace Onsite location in your browser, make sure to
bookmark the Dashboard page after logging on. Do not bookmark the Login page.
BaseSpace Onsite v2.0 System Guide
13
BaseSpace Onsite User Interface
The BaseSpace Onsite user interface (UI) has 4 tabs that allow you to access and use your
data. In addition, there are several common interface elements that enable general tasks.
This section describes the various aspects of the BaseSpace Onsite UI.
Common Elements on page 14
Dashboard Tab on page 15
Runs Tab on page 20
Projects Tab on page 22
Apps Tab on page 24
Common Elements
There are several common UI elements that are shared between all BaseSpace Onsite
pages, and which enable general tasks:
} Toolbar
} Contact us button
} Bottom links
Toolbar
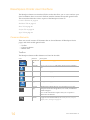
The BaseSpace Onsite toolbar elements are listed in the table.
Icon
Element
Description
Dashboard See Dashboard Tab on page 15
Tab
Prep Tab
See Prep Tab on page 17. This tab is used to set up a NextSeq
run.
Runs Tab
See Runs Tab on page 20.
Projects
Tab
See Projects Tab on page 22.
Apps Tab
See Apps Tab on page 24.
Support
Page
The BaseSpace Onsite Support page provides access to the
BaseSpace Onsite Knowledge Base, User Guide, and Illumina
Technical Support.
Search
14
Access to this information requires that your computer is
connected to the internet.
The Search box allows you to find runs, projects, samples, files,
or apps. For more information, see Search for Runs, Projects,
Samples, Files, and Apps on page 75.
Part # 15049148 Rev. E
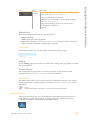
Element
Account
Description
The Account drop-down list provides access to:
• MyAccount. See MyAccount on page 15.
• Terms: leads to the User Agreement.
• Admin Panel: only available if you have admin privileges.
See Admin Panel on page 15.
• Blog: leads to the blog. Check out for the latest news,
developments, and updates.
• Sign out.
Bottom Links
The bottom links provide access to more information:
} Help: online help.
} Terms: leads to the User Agreement.
} Blog: leads to the blog (blog.basespace.illumina.com). Check out for the latest news,
updates, and developments, and subscribe to updates.
MyAccount
MyAccount provides access to the Settings and Transfer History pages.
Settings
On the Settings page you can edit your notifications settings, edit your profile, or update
your profile picture.
Transfer History
The Transfer History page allows you to review projects or runs that have been
transferred. See Transfer Owner on page 67 for more information.
Admin Panel
The Admin Panel allows you to manage analysis, notifications, storage, users, system
health, planned runs, software updates, and alarms. See Admin Tasks on page 76 for a
description.
NOTE
You need administrator privileges to see and work in the admin panel.
Dashboard Tab
After login, the first tab you see is the dashboard. The dashboard provides access to
notifications, your latest runs, projects, and app results. The dashboard is always
accessible in BaseSpace Onsite from the top ribbon selector.
BaseSpace Onsite v2.0 System Guide
15
BaseSpace Onsite User Interface
Icon
NOTE
If a run or project is not showing on BaseSpace Onsite, it is possible your data
has not been sent to BaseSpace Onsite. Set the BaseSpace Onsite option on
your sequencing instrument; see the instrument user guide.
Notifications
Shows notifications, most recent first. There are multiple types of notifications:
} Runs
• Run in progress
• Run completed
• Run error
} Collaborators
• Collaborator joined a project/run of which you are a member
• Collaborator invited you to a project/run
• (optionally) collaborator has included a personal message
• Collaborator recommended an App
• Collaborator accepted your offer to transfer ownership
• Collaborator offered to transfer ownership to you.
} Analyses by you
• Analysis in progress
• Analysis completed
• Analysis error
} Analyses by collaborators
• Analysis in progress
• Analysis completed
• Analysis error
} Uploads, additions, or deletions to/from a project of which you are a member
• By you
• By a collaborator
NOTE
If you did not configure SMTP during install, all notifications show up on the dashboard.
No notifications are sent through email.
Runs Pane
The bottom left pane of the BaseSpace Onsite dashboard shows the 3 most recent runs,
and is updated automatically.
Clicking the Runs pane opens the Runs tab. Clicking a run opens the Runs tab with the
run loaded. For more information, see Runs Tab on page 20.
Projects Pane
The bottom middle pane of the BaseSpace Onsite dashboard shows the 3 most recent
projects. The folder icon indicates the sharing status of the project: if it shows several
people
, the project is shared.
Clicking the Projects pane opens the Projects tab. Clicking a project opens the Projects tab
with the project loaded. For more information, see Projects Tab on page 22.
16
Part # 15049148 Rev. E
The right bottom pane of the BaseSpace Onsite dashboard shows the most recent app
results. Clicking an app result provides charts relevant for the app used in the Projects
tab. For more information, see Analyses Page on page 23.
Prep Tab
The Prep tab enables you to set up a sequencing run on the NextSeq sequencing system.
This tab is only available for NextSeq sequencing systems. Other sequencing instruments
use a sample sheet to provide sample information to BaseSpace.
The Prep Tab sets up a run in 4 steps:
} Biological Samples: Contains information about the samples that are going to be
sequenced. See Biological Samples on page 17.
} Libraries: Consists of biological samples that are prepped and contain adapters.
Each library usually derives from a single biological sample, though biological
samples can be used in multiple libraries. See Libraries on page 18.
} Pools: Consists of groups of libraries that share analysis parameters. Pools can
consist of one or multiple libraries. See Pools on page 19.
} Planned Runs: Contains pools that run with the same analysis parameters, on the
same machine, at the same time. Planned runs can consist of one or multiple pools.
See Planned Runs on page 19.
Biological Samples
When you click the Biological Samples tab you see the Biological Samples list, which
shows all available samples you have created on your account.
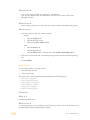
Figure 4 Biological Samples List
If you want information about the samples, you can perform the following:
} Sort the list by clicking the column headers.
} Click a sample to go to the sample page.
This page provides the following actions to prepare your analysis:
BaseSpace Onsite v2.0 System Guide
17
BaseSpace Onsite User Interface
App Results Pane
}
}
}
}
Create a sample.
Import new samples.
Select a sample and edit its properties.
Select one or more samples and continue with Prep Libraries.
NOTE
You can select multiple samples by using one of the following methods:
• Select multiple checkboxes.
• Click anywhere on a sample row while holding Ctrl button to add to a selection.
• Click anywhere on a sample row while holding Shift button to select all samples in
between.
• Click the checkbox next to Plate/Tube ID to select all samples on the current page.
The box next to the Biological Samples header tracks the total number of samples, and
how many are selected. Click X next to the selection count to clear the current selection.
For more information about these actions, see Create New Biological Samples on page 26,
Import Biological Samples on page 26, and Use Existing Biological Samples on page 27.
Libraries
When you click the Libraries tab you see the Libraries list, which shows all available
plates or tubes with libraries you have created on your account. You can sort the list by
clicking the column headers, or click a plate to see its properties and associated libraries.
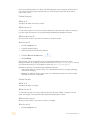
Figure 5 Libraries List
This page provides the following actions to prepare your analysis:
} Click a plate, then click the Edit button to edit its properties or libraries.
} Select one or more plates or tubes and move to Pool Libraries.
} Import libraries and associate them to new biological samples at the same time.
When going through the Import workflow, you can also download a template import
CSV file. See Import Samples and Libraries on page 31 for more information.
NOTE
If you want to select multiple libraries:
• Select multiple checkboxes.
• Click anywhere on a library row while holding Ctrl button to add to a selection.
• Click anywhere on a library row while holding Shift button to select all libraries in
between.
• Click the checkbox next to Plate/Tube ID to select all samples on the current page.
• Use the import function.
The box next to the Libraries header tracks the total number of libraries, and how many
are selected. Click X next to the selection count to clear the current selection.
For more information about these actions, see Prep Libraries on page 27When prepping a
library, you can also create a custom library kit; see Set Up Custom Library Prep Kit on
page 29.
18
Part # 15049148 Rev. E
When you click the Pools tab you see the Pools list, which shows all available pools of
libraries you have created on your account. You can sort the list by clicking the column
headers, or click a pool to see its properties and associated libraries.
Figure 6 Pools List
This page provides the following actions to prepare your analysis:
} Click a pool, then click the Edit button to edit the notes.
} Select a pool and move to Plan Run.
NOTE
You can also merge pools the following way:
• Click the Save & Continue Later, which takes you to the Pools list, with the recently
created plate at the top of the list.
• Select the checkboxes in the Pools list.
• Click the Merge Pools button in the top navigation bar.
The box next to the Pools header tracks the total number of pools, and how many are
selected.
For more information about these actions, see Pool Libraries on page 31.
Planned Runs
When you click the Planned Runs tab you see the Planned Runs list, which shows all
planned runs you have created on your account.
Figure 7 Planned Runs List
You can sort the list by clicking the column headers, or click a run to see or edit its
properties. For more information about these actions, see Plan Runs on page 32.
The runs can have the following states:
} Ready to Sequence: the run can be started from the NextSeq sequencing system.
} Planning, the run does not show up on the NextSeq sequencing system, because it is
still in the planning stage.
BaseSpace Onsite v2.0 System Guide
19
BaseSpace Onsite User Interface
Pools
NOTE
If you want to select multiple runs:
• Select multiple checkboxes.
• Click anywhere on a planned run row while holding Ctrl button to add to a selection.
• Click anywhere on a planned run row while holding Shift button to select all runs in
between.
• Click the checkbox next Experiment Name to select all planned runs on the current
page.
The box next to the Planned Runs header tracks the total number of runs, and how many
are selected. Click X next to the selection count to clear the current selection.
When sequencing on a run starts, the run is removed automatically from the Planned
Runs list.
Runs Tab
The Runs button leads to the runs list, which allows you to sort your runs based on
experiment name, state, workflow, created date, machine, and owner.
The following run states are possible (blue boxes indicate final states.):
If you want to look at a run in detail, click the name to view metrics in more detail. For
more information, see Run Overview Page on page 21.
You manage the runs by using the buttons above the list:
} Share: Manage sharing a run with a particular collaborator. See also Share a Run
Using the Email Option on page 63.
} Get Link: Forward the sharing link to any number of collaborators. See also Share a
Run with Get Link on page 62.
} Download Run: Download files from this run. See also Download Run File Package on
page 49.
20
Part # 15049148 Rev. E
NOTE
Runs and projects have separate permissions. If you share a project, you do
not share the runs contained within the project.
Run Overview Page
The Run Overview page provides 5 panes:
} The Run Details pane gives a summary of the run with links to view files and
download and share options. For more information, see Share Data on page 60, View
Files and Results on page 34, or Download Files on page 48
} The Samples pane gives a list of all the app results in the run, the associated
projects, and the number of samples in that analysis. This pane provides access to
the following pages:
}
}
}
}
Samples list, see Run Samples List on page 21
Sample Details page, see Sample Overview Page on page 23
App Results page, see Analyses Page on page 23
Project Overview page, see Project Overview Page on page 22
} The Charts pane shows an intensity by cycle chart. Clicking the header takes you to
the Charts page, which contains 5 charts with run metrics.
} The Run Summary pane shows tables with basic data quality metrics. Clicking the
header takes you to the Run Summary page.
} The Indexing QC pane lists count information for indexes used in the run. Clicking
the header takes you to the Indexing QC page.
In addition, there is a Side Navigation ribbon, which provides easy navigation in the
Run Details area.
It contains links to the Overview, Run Samples List, Charts, Run Summary, Indexing QC,
Run Settings, and Files pages.
Run Samples List
The samples list allows you to sort the samples in your run based on sample ID, app,
date created, and project. If you want to look at a sample, app result, or project in detail,
click the links to get to the following pages:
BaseSpace Onsite v2.0 System Guide
21
BaseSpace Onsite User Interface
} Transfer Owner: Hand control of data over to a collaborator or customer. This button
is visible if a run is selected. See also Transfer Owner on page 67.
} Move to Trash: Delete a project. This button is visible if a run is selected. See also
Delete Project on page 69.
} View Trash: view the deleted items in the trash, so you can restore them or empty the
trash. See also Delete Items on page 68.
} Sample Overview Page on page 23.
} Analyses Page on page 23.
} Project Overview Page on page 22.
In addition, there is a Side Navigation ribbon, which provides easy navigation in the
Run Details area.
It contains links to the Overview, Run Samples List, Charts, Run Summary, Indexing QC,
Run Settings, and Files pages.
Projects Tab
The Projects button opens a list of your projects. You can sort the list by name, last
update, or owner. Clicking a project provides access to the app results and samples
within that project.
You manage the projects by using the buttons above the list:
} New Project: Generate a new project. See also Set Up a New Project on page 65.
} Edit project: Edit the name and description of the project. See also Edit Project Details
on page 64.
} Share Project: Manage sharing a project with a particular collaborator. See also Share
a Project Using the Email Option on page 62.
} Get Link: Forward the sharing link to any number of collaborators. See also Share a
Project with Get Link on page 61.
} Transfer Owner: Hand control of data over to a collaborator or customer. See also
Transfer Owner on page 67.
} Move to Trash: Delete a project. This button is visible if a project is selected. See also
Delete Project on page 69.
} View Trash: view the deleted items in the trash, so you can restore them or empty the
trash. See also Delete Items on page 68.
NOTE
Runs and projects have separate permissions. If you share a project, you do
not share the runs contained within the project.
Project Overview Page
The Project Overview page provides access to 3 panes with information about the
project:
} The About tab gives you summary information about the project: owner, shared
status, date created, and collaborators.
} The Analyses tab gives a list of all the App Sessions in the project. This tab can be
sorted based on analysis name, last modified date created, status, or application
22
Part # 15049148 Rev. E
NOTE
You can access these panes through the left navigation bar.
Project Toolbar
The Project Toolbar provides the following actions:
} Launch app: run apps on your sample. Clicking the app name leads to a page with
more information about launching that app, including access permissions. See also
Analyze Samples Further on page 45.
} Download Project: download all files in a project.
} Share project: manage sharing a project with a particular collaborator. See also Share
a Project Using the Email Option on page 62
} Get link: forward the sharing link to any number of collaborators. See also Share a
Project with Get Link on page 61
} Edit project: edit the name and description of the project. See also Edit Project Details
on page 64
} Transfer Owner: hand control of data over to a collaborator or customer. See also
Transfer Owner on page 67
Options that are not available for the particular analysis or sample are grayed out.
If you have selected samples in the Samples pane, you can perform additional actions:
} Copy to...: copy samples from this project to another. See also Copy Samples on page
66
} Combine: combine samples. See also Combine Samples on page 65
NOTE
The app session states are defined as follows:
State
Running
Complete
Aborted
Needs
Attention
Description
The app is processing or uploading data.
Processing and file upload has finished and the data are now available
to use
This AppResult or Sample has been aborted and cannot be resumed.
Cannot continue without user intervention
Analyses Page
The Analyses page provides access to the results for that app session. There is a general
information pane to the left, and several graphs, depending on the app run.
Sample Overview Page
The Sample Overview page provides 2 panes:
BaseSpace Onsite v2.0 System Guide
23
BaseSpace Onsite User Interface
used to generate the analysis. Clicking the analysis links to the app results for that
sample, see Analyses Page on page 23 for more information.
} The Samples tab gives a list of all the samples in the project. Clicking a sample links
to the page for that sample, see Sample Overview Page on page 23 for more
information. Selecting the samples allows you to launch it in an app, copy to a
different project, or combine with another result.
} The Sample Details pane gives a summary of the run with a links to launch a
custom BaseSpace Onsite app on your sample. Clicking the app name leads to a
page with more information about that app, including access permissions.
Running apps can incur a charge.
} The Files pane gives a list of files associated with that sample. You can either look at
all FASTQ files, or look at files specific for an app session.
See also View Files and Results on page 34. You can also download selected files; see
Download Multiple FASTQ Files on page 49.
Apps Tab
The Apps button leads to the Apps page, which provides an overview of the custom
BaseSpace Onsite apps that you can run.
} Clicking the app name leads to a page with more information about that app,
including a link to the developer and their app support contact details.
} Clicking the Launch button
leads you through the launch pages, which
allow you to set up the app session. Specify parameters like the project, sample, or
output folder used by the app, depending on the app, and accept access permissions.
} You can search for apps using Search
24
.
Part # 15049148 Rev. E
The following topics describe how to run different functions in BaseSpace Onsite.
View Files and Results on page 34
Analyze Samples Further on page 45
Download Files on page 48
Project and Sample Management on page 64
Search for Runs, Projects, Samples, Files, and Apps on page 75
Prepare a NextSeq Run
What is it
You can prepare NextSeq runs through the BaseSpace Onsite Prep tab, which organizes
samples, libraries, pools, and run in a single environment. You do not prepare HiSeq
runs though BaseSpace Onsite.
When to use it
Use this option if you want to prepare a sequencing run on a NextSeq instrument, and
have the data stream seamlessly to BaseSpace Onsite.
Do not use it to prepare sequencing runs for other instruments. If you do have a NextSeq
sequencing system but do not want to use BaseSpace Onsite, you can also start a run
straight on the instrument.
Why to use it
Preparing a run in the Prep tab moves the data and analysis seamlessly to BaseSpace
Onsite. Using the Prep tab means BaseSpace Onsite is your single-stop solution for
sequencing management, storage and analysis.
How to use it
1
Log in to BaseSpace Onsite. If it is your first time logging in, accept the user
agreement.
2
Click the Prep icon
3
Set up a NextSeq run on the Prep Tab in 4 consecutive steps:
a Biological Samples: Contains information about the samples that are going to be
sequenced. You can create samples, import samples, or use existing samples; for
instructions, see one of the following topics:
— Create New Biological Samples on page 26
— Import Biological Samples on page 26
— Use Existing Biological Samples on page 27
b Libraries: Consists of biological samples that are prepped and contain adapters.
Each library usually derives from a single biological sample, though biological
samples can be used in multiple libraries. See Libraries on page 18.
You can also import biological samples and libraries in one step; see Import
Samples and Libraries on page 31.
BaseSpace Onsite v2.0 System Guide
.
25
How To Use BaseSpace Onsite
How To Use BaseSpace Onsite
c
d
Pools: Consists of groups of libraries that share analysis parameters. Pools can
consist of one or multiple libraries. See Pools on page 19.
Planned Runs: Contains pools that run with the same analysis parameters, on
the same machine, at the same time. Planned runs can consist of one or multiple
pools. See Planned Runs on page 19.
Create New Biological Samples
If you want to create a new biological sample, do the following:
NOTE
Use the import function to create several new samples, see Import Biological Samples on
page 26.
1
Click the Prep icon
.
2
Click Biological Samples.
3
Click the + Create button.
4
Fill out the required fields Sample ID, Name, and Nucleic Acid type.
NOTE
Sample ID and sample name can only exist of alphanumeric characters, dash, or
underscore. Sample ID has to be unique and short; sample name can be more descriptive
to provide a human-readable identifier.
5
[Optional] Fill out the Organism (species) field.
6
[Optional] Fill out the Project fields. You can also generate a new project. A project is
optional here, but required later, because the output data gets stored to the project.
7
When finished, do one of the following:
• If you only want to select the newly created sample, click the Next: Prep
Libraries button. Continue with Prep Libraries on page 27.
• If you want to select multiple samples, click the Save & Continue Later. This
selection takes you back to the Biological Samples list, with the recently created
sample at the top of the list. Continue with Use Existing Biological Samples on
page 27.
Import Biological Samples
If you want to import new biological samples, do the following:
26
1
Click the Prep icon
.
2
Click Biological Samples.
3
Click the Import button.
4
If you have not generated an import file yet, click the template link, fill out the
samples, and be aware of the following when filling out the template:
• User Sample ID and sample name can only exist of alphanumeric characters,
dash, or underscore. Sample ID has to be unique and short; sample name can be
more descriptive to provide a human-readable identifier.
• The Organism (species) field is optional.
• The Project field is optional, but a project is required later, because the output
data gets stored to the project.
• Fill out the Nucleic Acid column with DNA or RNA.
Part # 15049148 Rev. E
5
Click the Choose File button.
6
Browse to the import file and click Open.
7
Click Import.
8
When finished, do one of the following:
• If you only want to select the newly created samples, click the Next: Prep
Libraries button. Continue with Prep Libraries on page 27.
• If you want to select multiple samples, click the Save & Continue Later. This
selection takes you back to the Biological Samples list, with the recently created
sample at the top of the list. Continue with Use Existing Biological Samples on
page 27.
Use Existing Biological Samples
The Biological Samples list shows all available samples that you have created on your
account.
1
2
To select existing samples, do one of the following in the Biological Samples list:
} Select the checkboxes.
} Click the sample. If you want to select multiple samples, hold the Ctrl button.
} Select all samples by selecting the checkbox next to the SampleID header.
Click the Prep Libraries button in the top navigation bar.
Prep Libraries
On the Prep Libraries page, you assign indexes to biological samples, based on the
indexes available in the library preparation chosen. Every used well or tube contains a
separate library. Best practice is to set up the libraries in BaseSpace Onsite first. then you
export a file of your library settings, and use that to pipet the biological samples into the
proper wells or tubes.
BaseSpace Onsite v2.0 System Guide
27
How To Use BaseSpace Onsite
Figure 8 Import Sample Template
NOTE
If you do not want to use indexed sequencing, you still have to assign your biological
sample to an index. Only when you set up your sequencing run, you specify that you do
not sequence the index.
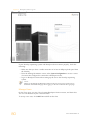
1
Select the library prep type. BaseSpace Onsite now automatically assigns indexes to
wells or tubes, depending on the format of the library prep type.
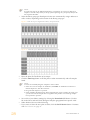
Figure 9 Tube Set Up for Single Index Library Preparation Kit
Figure 10 Plate Set Up for Dual Index Library Preparation Kit
2
Enter the plate ID. The ID has to be unique.
3
Click the Auto Prep button to fill the plate or tubes automatically with all samples
listed.
NOTE
You can also manually drag the samples to wells or tubes:
1. Select one or more samples. To multiselect, hold Shift. To multiselect on Firefox or
Internet Explorer 9, click the well twice.
2. Drag selected samples to a position.
3. Check whether the indexes have been assigned to the proper samples. Hovering over
a position reveals the sample that is assigned to that position. You can drag samples
from position to position.
28
4
Save a file of your library settings by clicking the Download CSV button. Use this
file in the lab to indicate which biological samples get pipetted into specific wells.
5
When finished, do one of the following:
} If you want to select the new plate or tubes, click the Pool Libraries button. Continue
with Pool Libraries on page 31.
Part # 15049148 Rev. E
NOTE
If one of your samples is not assigned to a project, you cannot continue. Select the
sample, click the Set Project button, and assign it to a project. You can also
generate a new project.
Set Up Custom Library Prep Kit
When you have selected your biological samples, you can set up a custom library prep
kit the following way:
1
When prepping a library, select + Custom Library Prep Kit in the Library Prep Kit
dropdown menu.
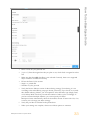
The Custom Library Prep Kit Definition page opens.
2
Fill
•
•
•
out the name of the custom prep. It has the following requirements:
Unique for your account.
Characters: only alphanumeric, hyphen, underscores, and spaces accepted.
Less than or equal to 50 characters.
3
Select at least 1 of the supported read types.
4
Select at least 1 of the indexing strategies. Only selecting None is not allowed.
5
Fill out the default number of cycles.
BaseSpace Onsite v2.0 System Guide
29
How To Use BaseSpace Onsite
} If you want to select multiple library preps or plates, do the following:
a Click the Save & Continue Later. This selection takes you to the Libraries list,
with the recently created set-up at the top of the list.
b Select the checkboxes in the Libraries list.
c Click the Pool Libraries button in the top navigation bar.
6
Click template to download the index definition file template.
7
Fill out the Settings section the following way:
• For single read only: no adapter (blank), or 1 adapter sequence for Read 1.
• For paired-end: no adapter (blank), or 2 adapter sequences, 1 for Read 1 and 1 for
Read 2.
• Each adapter sequence meets the following criteria:
— Sequence of A, T, C, or G character
— Length from 1 to 20 characters.
8
Fill out the Index1Sequences and [Index2Sequences] sections the following way:
• For Single Index, with or without None:
— 1 to 100 Index 1 names
— For each Index 1 name an associated Index 1 sequence
• For Dual Index, with or without None and Single Index:
— 1 to 100 Index 1 names
— For each Index 1 name an associated Index 1 sequence
— 1 to 100 Index 2 names
— For each Index 2 name an associated Index 2 sequence
• Each index name meets the following criteria:
— Unique within the file
— Length from 1 to 8 characters alphanumeric, hyphen, or underscore
characters.
• Each index sequence meets the following criteria
— Sequence of A, T, C, or G characters
— Length from 1 to 20 characters
— All index sequence lengths (Read 1 and Read 2) are equal
— Index 1 sequences are unique within the file set of Index 1 sequences
— Index 2 sequences are unique within the file set of Index 2 sequences
9
If the supported indexing strategy specifies Single Index, you can set up Default
Layout By Well the following way:
• Each well unique from A01 to H12
• For each well, an associated index name exists in the specified Index1Sequences
section
10 If the supported indexing strategy specifies Single Index or Dual Index, you can set
up Default Layout By Column the following way:
• Each column number unique from 1 to 12
• For each column, an associated index name exists in the specified
Index1Sequences section
11 If the supported indexing strategy specifies Dual Index, you can set up Default
Layout By Row the following way:
• Each row letter unique from A to H
• For each row, an associated index name exists in the specified Index2Sequences
section
12 Click the Choose.csv File button to select and upload your custom index file.
13 Click Create New Kit to complete the process.
Your custom library prep has been added to the library kit drop-down.
30
Part # 15049148 Rev. E
You can import libraries and associate them to new biological samples at the same time
the following way:
1
Click the Prep icon
.
2
Click Libraries.
3
Click the Import button.
4
If you have not generated an import file yet, click the template link, fill out the
samples, and be aware of the following when filling out the template:
• User Sample ID and sample name can only exist of alphanumeric characters,
dash, or underscore. Sample ID has to be unique and short; sample name can be
more descriptive to provide a human-readable identifier.
• The Species field is optional.
• The Project field is optional, but if you do not specify it here, set it later, because
the output data gets stored to the project.
• Fill out the Nucleic Acid column with DNA or RNA.
Figure 11 Import Sample Template
5
Click the Choose File button.
6
Browse to the import file and click Open.
7
Click Import.
8
When finished, do one of the following:
• If you only want to select the newly created samples, click the Pool Libraries
button. Continue with Pool Libraries on page 31.
• If you want to select other libraries, click the Save & Continue Later. This
selection takes you back to the Libraries list, with the recently created sample at
the top of the list.
Pool Libraries
The Pool Libraries page allows you to pool samples and sequence them in the same run,
using the same analysis parameters.
1
Fill out the first pool ID. Pool ID has to be unique.
2
If needed, you can create additional pools on the right by clicking the + Add Pool
button and filling out the pool IDs.
BaseSpace Onsite v2.0 System Guide
31
How To Use BaseSpace Onsite
Import Samples and Libraries
• Colors of the wells correspond to the colors of the pools.
• You can hover over the wells to see the library IDs.
3
Drag and drop individual samples from their well on the plate to a pool.
You can multiselect by holding Shift. To multiselect on Firefox or Internet Explorer 9,
click the well twice.
4
If you want to pool libraries from multiple plates, use the Plate drop-down menu to
specify the plate.
NOTE
You can also merge pools the following way:
• Click the Save & Continue Later. This selection takes you to the Pools list, with the
recently created plate at the top of the list.
• Select the checkboxes in the Pools list.
• Click the Merge Pools button in the top navigation bar.
5
Click the Plan Run button.
Plan Runs
On the Planned Runs page, you can set up the parameters for the sequencing run on
your NextSeq instrument.
32
Part # 15049148 Rev. E
How To Use BaseSpace Onsite
1
Enter a name for your planned run.
2
[Optional] Enter the reagent barcode you plan to use, which links a reagent kit to this
run.
3
Make sure that the rehyb checkbox is not selected. Currently, there is no supported
rehyb workflow available for NextSeq.
4
Fill out the Enter Cycles section:
} Single- vs. paired-end
} Number of cycles per read
5
Verify the Review Indexes section for the indexing strategy. For indexing, it is set
according to the index/library prep type chosen previously. If you choose to override
this default indexing scheme, you are required to select the Index type (Single, Dual,
or No Index). Make sure that you enter the number of index cycles accordingly. If
you have selected multiple libraries, you cannot specify No Index.
BaseSpace Onsite automatically checks if the indexes chosen all start with 2 Gs; if so,
it warns you to change your index strategy.
6
Verify the pool that is included in the planned run.
7
When your settings are complete, choose one of these options to continue:
BaseSpace Onsite v2.0 System Guide
33
} Click the Sequence button, which opens the Planned Runs list, and sets the state of
the recently planned run to Ready to Sequence.
} Click the Save & Continue Later button, which opens the Planned Runs list, and
sets the state of the recently planned run to Planning.
NOTE
A planned run must be in the Ready to Sequence state in order for it to show up in the
Planned Runs list in the control software on the instrument.
8
If you want to change a planned run to the Ready to Sequence state, select the planned
run from the list. Click the Sequence arrow link in the top navigation bar on the
Planned Runs list page.
Your run now shows up in the Planned Runs list in the control software on your
NextSeq sequencing system. Complete the run from your sequencing instrument. A
sample sheet is not required. BaseSpace Onsite automatically generates FASTQ files
when the sequencing run is complete.
NOTE
You can connect as many instruments as you have BaseSpace Onsite nodes installed, up to
a maximum of 6.
View Files and Results
The following topics describe how to view files and results in BaseSpace Onsite.
View Files from a Run
What is it
BaseSpace Onsite gives you an option to view your run files or download them
individually.
When to use it
Use this option if you want to view individual files. You can also download these files
locally.
How to use it
1
Click the Runs icon.
2
Click the desired run.
3
From the Run Overview Page, select the Files icon from the left navigation menu.
4
Select the desired file to view.
See BaseSpace Onsite Files on page 50 for a description of the available files.
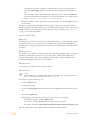
View Indexing QC Page
What is it
The Indexing QC page lists count information for indexes used in the run. The Indexing
QC is only available if the run is an index run.
34
Part # 15049148 Rev. E
Use this option when you want to access indexing QC results.
Why to use it
You can see unexpected results for a sample with a particular index, and have to
troubleshoot what happened. You can also use it to confirm that all indexed samples
were represented properly.
How to use it
1
Click the Runs icon.
2
Click the desired run.
3
There are 2 methods to go to the Indexing QC page:
• From the Run Overview page, click the Indexing QC link.
• From the Run Overview page, click the Indexing QC icon from the left
navigation menu.
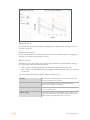
You can select the displayed lane through the drop-down list.
The first table provides an overall summary of the indexing performance for that lane,
including:
Total Reads
The total number of reads for this lane.
PF Reads
The total number of passing filter reads for this lane.
% Reads Identified (PF)
The total fraction of passing filter reads assigned to an index.
CV
The coefficient of variation for the number of counts across
all indexes.
Min
The lowest representation for any index.
Max
The highest representation for any index.
Further information is provided regarding the frequency of individual indexes in both
table and graph form. The table contains several columns, including
Index Number
A unique number assigned to each index by BaseSpace
Onsite for display purposes.
Sample ID
The sample ID assigned to an index in the sample sheet.
Project
The project assigned to an index in the sample sheet.
Index 1 (I7)
The sequence for the first Index Read.
Index 2 (I5)
The sequence for the second Index Read.
% Reads Identified (PF)
The number of reads (only includes Passing Filter reads)
mapped to this index.
This information is also displayed in graphical form. In the graphical display, indexes
are ordered according to the unique Index Number assigned by BaseSpace Onsite.
BaseSpace Onsite v2.0 System Guide
35
How To Use BaseSpace Onsite
When to use it
View Run Charts
What is it
The Charts page shows charts with run metrics.
When to use it
Use this option when you want to view charts such as Flow Cell, Data By Cycle, Data By
Lane, QScore Distribution, and QScore Heatmap.
Why to use it
Use this option if you want access to these various charts.
How to use it
1
Click the Runs icon.
2
Click the desired run.
3
There are 2 methods to go to the Charts page:
• From the Run Overview page, click the Charts link.
• From the Run Overview page, click the Charts icon from the left navigation
menu.
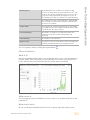
Flow Cell Chart
What is it?
The Flow Cell Chart shows color-coded graphical quality metrics per tile for the entire
flow cell.
When to use it.
Use the Flow Cell Chart to judge local differences per cycle, per lane, or per read in
sequencing metrics on a flow cell. It is also an easy way to see the %Q30 metric, which is
an excellent single metric to judge a run.
When not to use it.
Do not use the Flow Cell Chart to look at downstream analysis metrics.
How to use it.
The Flow Cell Chart has the following features:
} You can select the displayed metric, surface, cycle, and base through the drop-down
lists.
} The color bar to the right of the chart indicates the values that the colors represent.
} The chart is displayed with tailored scaling by default.
} Tiles that have not been measured or are not monitored are gray.
You can monitor the following quality metrics with this chart:
36
Part # 15049148 Rev. E
This chart shows the intensity by color and cycle of the 90%
percentile of the data for each tile.
FWHM
The average full width of clusters at half maximum (in
pixels). Used to display focus quality.
% Base
The percentage of clusters for which the selected base (A, C,
T, or G) has been called.
%Q>20, %Q>30
The percentage of bases with a quality score of > 20 or > 30,
th
respectively. These charts are generated after the 25 cycle,
and the values represent the current scored cycle.
Median Q-Score
The median Q-Score for each tile over all bases for the
th
current cycle. These charts are generated after the 25 cycle.
This plot is best used to examine the Q-scores of your run as
it progresses. Bear in mind that the %Q30 plot can give an
over simplified view due to its reliance on a single threshold.
Density
The density of clusters for each tile (in thousands per mm ).
Density PF
The density of clusters passing filter for each tile (in
2
thousands per mm ).
Clusters
The number of clusters for each tile (in millions).
Clusters PF
The number of clusters passing filter for each tile (in
millions).
Error Rate
The calculated error rate, as determined by a spiked in PhiX
control sample. If no PhiX control sample is run in the lane,
this chart is not available.
% Phasing, % Prephasing.
The estimated percentage of molecules in a cluster for which
sequencing falls behind (phasing) or jumps ahead
(prephasing) the current cycle within a read.
% Aligned
The percentage of reads from clusters in each tile that aligned
to the PhiX genome.
Perfect Reads
2
The percentage of reads that align perfectly, as determined
by a spiked in PhiX control sample. If no PhiX control sample
is run in the lane, this chart is all gray.
Corrected Intensity
The intensity corrected for cross talk between the color
channels by the matrix estimation and phasing and
prephasing.
Called Intensity
The intensity for the called base.
Signal to Noise
The signal to noise ratio is calculated as mean called intensity
divided by standard deviation of noncalled intensities.
Note the variable scales used on these different parameters.
Data By Cycle Plot
What is it?
The Data by Cycle plot shows the progression of quality metrics during a run as a line
graph.
BaseSpace Onsite v2.0 System Guide
37
How To Use BaseSpace Onsite
Intensity
When to use it.
Use the Data By Cycle Plot to judge the progression of quality metrics during a run on a
cycle by cycle basis.
When not to use it.
Do not use the Data By Cycle Plot to look at downstream analysis metrics, or aggregate
analysis for a whole lane regardless of cycle.
How to use it.
The Data by Cycle plots allow you to follow the progression of quality metrics during a
run. These plots have the following features:
} You can select the displayed metric and base through the drop-down lists.
} The symbol in the top right-hand corner toggles the plot between pane view and full
screen view.
You can monitor the following quality metrics with this plot:
38
Intensity
This chart shows the intensity by color and cycle of the 90%
percentile of the data for each tile.
FWHM
The average full width of clusters at half maximum (in
pixels). Used to display focus quality.
% Base
The percentage of clusters for which the selected base (A, C,
T, or G) has been called.
%Q>20, %Q>30
The percentage of bases with a quality score of > 20 or > 30,
th
respectively. These charts are generated after the 25 cycle,
and the values represent the current scored cycle.
Part # 15049148 Rev. E
The median Q-Score for each tile over all bases for the
th
current cycle. These charts are generated after the 25 cycle.
This plot is best used to examine the Q-scores of your run as
it progresses. Bear in mind that the %Q30 plot can give an
over simplified view due to its reliance on a single threshold.
Error Rate
The calculated error rate, as determined by a spiked in PhiX
control sample. If no PhiX control sample is run in the lane,
this chart is not available.
Perfect Reads
The percentage of reads that align perfectly, as determined
by a spiked in PhiX control sample. If no PhiX control sample
is run in the lane, this chart is all gray.
Corrected Intensity
The intensity corrected for cross talk between the color
channels by the matrix estimation and phasing and
prephasing.
Called Intensity
The intensity for the called base.
Signal to Noise
The signal to noise ratio is calculated as mean called intensity
divided by standard deviation of noncalled intensities.
You can expand a chart by clicking the expand button.
QScore Distribution
What is it?
The QScore Distribution Plot shows a bar graph that allows you to view the number of
bases by quality score. The quality score is cumulative for current cycle and previous
cycles, and only bases from reads that pass the quality filter are included.
When to use it.
Use it to judge the QScore distribution for a run, which is an excellent indicator for run
performance.
When not to use it.
Do not use the QScore Distribution Plot to look at metrics other than quality scores.
BaseSpace Onsite v2.0 System Guide
39
How To Use BaseSpace Onsite
Median Q-Score
How to use it.
The QScore Distribution pane shows plots that allow you to view the number of reads by
quality score. The quality score is cumulative for current cycle and previous cycles, and
only reads that pass the quality filter are included.
These plots have the following features:
} You can select the displayed read, and cycle through the drop-down lists.
} The symbol in the top right-hand corner toggles the plot between pane view and full
screen view.
The QScore is based on the Phred scale. The following list shows Q-scores and the
corresponding chance that the base call is wrong:
}
}
}
}
Q10: 10% chance of wrong base call
Q20: 1% chance of wrong base call
Q30: 0.1% chance of wrong base call
Q40: 0.01% chance of wrong base call
You can slide the threshold (set at >=Q30 by default) to examine the proportion of bases
at or above any particular Q-score. When using Q-score binning, this plot reflects the
subset of Q-scores used.
Data by Lane Plot
What is it?
The Data by Lane plots allow you to view quality metrics per lane.
When to use it.
Use the Data By Lane Plot to judge the difference in quality metrics between lanes.
When not to use it.
Do not use the Data By Lane Plot to look at alignment or variant calling analysis metrics.
40
Part # 15049148 Rev. E
The Data by Lane plots have the following features:
} You can select the displayed metric through the drop-down lists.
} The symbol in the top right-hand corner toggles the plot between pane view and full
screen view.
The plots share several characteristics:
} The plots show the distribution of mean values for a given parameter across all tiles
in a given lane.
} The red line indicates the median tile value for the parameter displayed.
} Blue boxes are for raw clusters, green boxes for clusters passing filter.
} The box outlines the interquartile range (the middle 50% of the data) for the tiles
analyzed for the data point.
} The error bars delineate the minimum and maximum without outliers.
} The outliers are the values that are more than 1.5 times the interquartile range below
the 25th percentile, or more than 1.5 times the interquartile range above the 75th
percentile. Outliers are indicated as dots.
You can monitor the following quality metrics with this plot:
} The density of clusters for each tile (in thousands per mm2).
} The number of clusters for each tile (in millions).
} The estimated percentage of molecules in a cluster for which sequencing falls behind
(phasing) or jumps ahead (prephasing) the current cycle within a read.
} The percentage of reads from clusters in each tile that aligned to the PhiX genome.
You can expand a chart by clicking the expand button.
QScore Heatmap
What is it?
A heatmap of the Q-scores.
BaseSpace Onsite v2.0 System Guide
41
How To Use BaseSpace Onsite
How to use it.
When to use it.
For a quick overview of the Q-scores over the cycles.
When not to use it.
Do not use the QScore Heatmap to look at metrics other than quality scores.
How to use it.
The QScore Heatmap shows plots that allow you to view the QScore by cycle. These
plots have the following features:
} The color bars to the right of each chart indicate the values that the colors represent.
The charts are displayed with tailored scaling; the scale is always 0% to 100% of
maximum value.
} The symbol in the top right-hand corner toggles the plot between pane view and full
screen view.
You can expand a chart by clicking the expand button.
View Run Samples List
What is it
The Run Samples List contains a list of all the samples in the run.
When to use it
} Use this option when you want to see a list of all the samples in the run
} Use this option when you want to navigate to details regarding a specific sample.
Why to use it
Use this option if you want a quick way to view all the samples in a Run.
Use this option when you want to see more detail regarding your samples such as
genome name, sample, or FASTQ files.
How to use it
1
Click the Runs icon.
2
Click the desired run.
3
There are 2 methods to go to the Run Samples List:
• From the Runs Overview page, click the Samples link.
• From the Runs Overview page, click the Samples icon from the left navigation
menu.
You can now click a sample to see the sample overview; for more information, see
Sample Overview Page on page 23.
42
Part # 15049148 Rev. E
What is it
The Run Summary page has the overall statistics about the run.
When to use it
Use this option when you want to view information about the run such as percent
alignment, cycles, and densities.
Why to use it
Use this option if you want a quick breakdown of the statistics for a particular run.
How to use it
1
Click the Runs icon.
2
Click the desired run.
3
There are 2 methods to go to the Run Summary:
• From the Run Overview Page, select Run Summary button.
• From the Run Overview Page, select the Run Summary icon from the left
navigation menu.
The following metrics are displayed in the top table, split out by read and total:
Level
The sequencing read level.
Yield Total
The number of bases sequenced, which is updated as the run
progresses.
Projected Total Yield
The projected number of bases expected to be sequenced at
the end of the run.
Aligned
The percentage of the sample that aligned to the PhiX
genome, which is determined for each level or read
independently.
Error Rate
The calculated error rate of the reads that aligned to PhiX.
Intensity Cycle 1
The average of the A channel intensity measured at the first
cycle averaged over filtered clusters. For the NextSeq 500
System, the red channel is used.
%Q>=30
The percentage of bases with a quality score of 30 or higher,
th
respectively. This chart is generated after the 25 cycle, and
the values represent the current cycle.
The following metrics are available in the Read tables, split out by lane:
Tiles
The number of tiles per lane.
Density
The density of clusters (in thousands per mm ) detected by
image analysis, +/- 1 standard deviation.
BaseSpace Onsite v2.0 System Guide
2
43
How To Use BaseSpace Onsite
View Run Summary
Clusters PF
The percentage of clusters passing filtering, +/- 1 standard
deviation.
Phas./Prephas.
The value used by RTA for the percentage of molecules in a
cluster for which sequencing falls behind (phasing) or jumps
ahead (prephasing) the current cycle within a read.
For MiSeq and NextSeq, RTA generates phasing and
prephasing estimates empirically for every cycle. The value
displayed here is therefore not used in the actual
phasing/prephasing calculations, but is an aggregate value
determined from the first 25 cycles. For most applications,
the value reported is very close to the value that is applied.
For low diversity samples or samples with unbalanced base
composition, the reported value can diverge from the values
being applied because the value changes from cycle to cycle.
Reads
The number of clusters (in millions).
Reads PF
The number of clusters (in millions) passing filtering.
%Q>=30
The percentage of bases with a quality score of 30 or higher,
th
respectively. This chart is generated after the 25 cycle, and
the values represent the current cycle.
Yield
The number of bases sequenced which passed filter.
Cycles Err Rated
The number of cycles that have been error-rated using PhiX,
starting at cycle 1.
Aligned
The percentage that aligned to the PhiX genome.
Error Rate
The calculated error rate, as determined by the PhiX
alignment. Subsequent columns display the error rate for
cycles 1–35, 1–75, and 1–100.
Intensity Cycle 1
The average of the A channel intensity measured at the first
cycle averaged over filtered clusters.
%Intensity Cycle 20
The corresponding intensity statistic at cycle 20 as a
percentage of that value at the first cycle. 100%x(Intensity at
cycle 20)/(Intensity at cycle 1).
View the Project Sample List
What is it
The Project Sample List contains the list of samples in a project.
When to use it
} Use this option when you want to see a list of all the samples in the project
} Use this option when you want to navigate to details regarding a specific sample.
Why to use it
This option is an easy way to get to the details page of a sample.
44
Part # 15049148 Rev. E
1
Click the Projects icon.
2
Click the desired project.
3
Click the Samples link from the left navigation menu.
You can now click a sample to see the sample overview; for more information, see
Sample Overview Page on page 23.
View the Analyses List
What is it
The Analyses List contains a list of app sessions in a project.
When to use it
Use this option when you want to navigate to details regarding a specific app session.
Why to use it
This option is an easy way to get to the details of a particular app session.
How to use it
1
Click the Projects icon.
2
Click the desired project.
You can now click an Analysis to see the results; for more information, see Analyses Page
on page 23.
Analyze Samples Further
The following topics describe how to analyze samples further in BaseSpace Onsite.
} Launch Apps on page 45
• Launch the IGV App on page 46
• Run the VariantStudio App on page 47
Launch Apps
What is it
You can launch apps that perform additional analysis, visualization, or annotation of
data.
When to use it
When you want to run an Illumina-provided app on your samples.
How to use it
1
There are 2 ways to start an app:
BaseSpace Onsite v2.0 System Guide
45
How To Use BaseSpace Onsite
How to use it
• Navigate to the project, sample, or analysis that you want to run the app on,
click the Launch Apps button, and select the desired app from the drop-down
list.
• Go to the Apps button, select the desired app from the list and click Launch. If
you are running BWA Enrichment v2.1 or Isaac Enrichment v2.1, make sure to
read Enrichment v2.1 Apps Adapter Trimming on page 48.
2
Read the End-User License Agreement and permissions, and click Accept if you are
ok with them.
The app now guides you through the start-up process. BaseSpace Onsite has limited
storage capacity, and checks the free space available before starting an app. If there is not
enough available space, BaseSpace Onsite displays an error message; see Storage Check
on page 79 for more information.
Launch the IGV App
What is it
The Integrative Genomics Viewer (IGV) of the Broad Institute is a fully featured genome
browser that allows you to visualize your sequence data in great detail. Illumina has
modified IGV to display alignment and variant data from BaseSpace Onsite (BAM and
VCF files).
When to use it
IGV enables you to perform variant analysis after launching Resequencing or Amplicon
workflows in BaseSpace Onsite. IGV is run on a project, which is the highest level
directory and contains one or more AppResults. IGV retains all its native functions,
including loading data from your local computer.
Why to use it
To visualize your sequence data in greater detail.
How to use it
NOTE
Make sure that the Java Runtime Environment is installed on the computer in order for
IGV to work properly. Download Java here: java.com/en/.
Run the IGV App the following way:
1
Click the Projects icon.
2
Click desired project.
3
Click the Launch Apps button and select the IGV application from the drop-down
list.
4
Select the Accept button.
5
Depending on your browser, it asks you to open or save the *.jnlp file.
• For Internet Explorer, click the Open button.
• For Chrome, click the Keep button and then click file to open.
• For Firefox, select the Open with Java(TM) Web Start Launcher (default) option.
The IGV App opens on your desktop with the requested project loaded.
46
Part # 15049148 Rev. E
The BaseSpace Onsite file browser shows data in BaseSpace Onsite that is available for
viewing in IGV. The directory structure shown is according to how data are organized in
BaseSpace Onsite.
A project is the highest level directory and it contains one or more AppResults. If an
AppResult was the result of analyzing a single sample, then the sample name is
appended to the AppResult name. Each AppResult contains zero or more files.
The file browser shows alignment (BAM) and variant (VCF) files, and, if produced, BED,
GTF, and BEDGRAPH files. Double-click a file to load it as an IGV track. First load VCF
files before BAM files because read tracks can take up an entire IGV screen, which
requires scrolling to see variants.
Additional Reference Genomes
IGV contains several installed reference genomes:
}
}
}
}
Homo sapiens: Human hg19
Mus musculus: Mouse mm9
Saccharomyces cerevisiae: S. cerevisiae (sacCer2)
Arabidopsis thaliana: A. thaliana (TAIR10)
Run the VariantStudio App
What is it
The Illumina VariantStudio data analysis software application enables researchers to
identify and classify disease-relevant variants quickly, and then communicate significant
findings in concise and actionable reports.
This application provides an intuitive framework for nonexpert users. It offers:
} Flexible filtering options
} Streamlined variant classification
} Rapid and rich annotations
} Customizable reporting
When to use it
Use VariantStudio if you want to:
} Explore and isolate key variants
} Categorize variants and determine biological impact
How to use it
Launch the VariantStudio app the following way:
1
Click the Apps button
2
Select the VariantStudio app
3
Select the project you want to run the app on. You can only select projects you own.
4
Click Continue.
BaseSpace Onsite v2.0 System Guide
.
from the list and click Launch.
47
How To Use BaseSpace Onsite
BaseSpace Onsite Data in IGV
5
If you use the app for the first time, install VariantStudio:
a Click the Install VariantStudio button.
b Run the setup.exe file. Your web browser can ask you to save the file first. After
the download has completed, double-click the setup file.
c If you are prompted with a security warning, click Install.
6
Click the Launch VariantStudio.
The VariantStudio application opens on your desktop with the requested project loaded.
For instructions on how to run VariantStudio, see the VariantStudio User Guide.
Enrichment v2.1 Apps Adapter Trimming
BWA Enrichment v2.1 and Isaac Enrichment v2.1 Apps do not support adapter
trimming in this BaseSpace Onsite release. Here are some notes on the use of these apps:
} NextSeq: You do not need to use adapter trimming for NextSeq data in any of the
secondary analysis apps. Adapter trimming is performed automatically in FASTQ
generation based on the library prep kit type selected during run setup in the Prep
Tab workflow.
} HiSeq: You can go back to the uploaded run and requeue FASTQ generation by
fixing the sample sheet:
a Add adapter sequences to the Settings subsection in the sample sheet.
b Requeue the analysis.
For more information, see Fix Sample Sheet / Re-Run Workflow on page 72.
} MiSeq: you can only upload MiSeq FASTQ files through BaseSpace Onsite Import.
Trim the adapters from the FASTQ files before import.
Download Files
The following topics describe how to download files in BaseSpace Onsite.
Download Individual Files
What is it
BaseSpace Onsite allows you to download data as a package, individually, or as a group
of FASTQ files. This topic describes how to download individual files with the file
browser.
When to use it
Use this option when you want to download individual files, and do not need all files
for a run, sample, project, or analysis.
Why to use it
If you only want to download individual files, it saves you time, because you are not
downloading all the other files.
How to use it
1
48
Click the Runs icon or Projects icon.
Part # 15049148 Rev. E
Navigate to the file you want to download
3
Click the file.
4
Click the Download button.
BaseSpace Onsite now downloads the files to the desired location.
Download Multiple FASTQ Files
What is it
BaseSpace Onsite allows you to download data as a package, individually, or as a group
of FASTQ files. This topic describes how to download a group of FASTQ files with the
downloader.
When to use it
Use this option when you want to download FASTQ files per sample.
Why to use it
If you only want to download several FASTQ files for a sample, it saves you time,
because you are not downloading all the other files.
How to use it
1
Click the Runs icon or Projects icon.
2
Click the desired run or project.
3
Click the desired sample in the Samples pane.
4
In the Files pane, select the checkboxes for the desired FASTQ files.
5
Click the Download Selected button.
6
The BaseSpace Onsite Downloader is not signed, which leads to the following
warnings:
• A Windows popup appears when trying to install the setup.exe. Choose Run
anyway to install the BaseSpace Onsite Downloader.
• Antivirus software can flag the file; make sure that you allow this file to be
installed.
The BaseSpace Onsite Downloader guides you through the download process, and starts
the download of the files to the desired location.
Download Run File Package
What is it
BaseSpace Onsite allows you to download data as a package, individually, or as a group
of FASTQ files. This topic describes how to download a package of files in a run.
BaseSpace Onsite v2.0 System Guide
49
How To Use BaseSpace Onsite
2
The packages available depend on your workflow; packages that are grayed out are not
available for download. There are 4 types of data packages:
}
}
}
}
Variant Data, containing VCF files with variant calls.
Aligned Data, containing BAM files with aligned reads.
Unaligned Data, containing FASTQ files with unaligned reads.
SAV Data, containing files describing the set-up of the run and InterOp files.
For more information about file types, see BaseSpace Onsite Files on page 50.
When to use it
} Use this option when you want to download a packaged (zipped) file for Variant,
Aligned, Unaligned, or SAV data.
} Do not use if you only want individual files.
Why to use it
If you want to download for Variant, Aligned, Unaligned, or SAV data in a neatly
packaged file versus downloading the files one-by-one.
How to use it
1
Click the Runs icon.
2
Click the desired run.
3
Click the Download Run button.
4
Select the desired data option.
BaseSpace Onsite Files
BaseSpace Onsite uses and produces various files. See the topics in this section for
details.
BAM Files
What is it?
The Sequence Alignment/Map (SAM) format is a generic alignment format for storing
read alignments against reference sequences, supporting short and long reads (up to 128
Mb) produced by different sequencing platforms. SAM is a text format file that is humanreadable. The Binary Alignment/Map (BAM) keeps the same information as SAM, but in
a compressed, binary format that is only machine readable.
When to use it.
Allows you to see alignments. Use it for direct interpretation or as a starting point for
further analysis with downstream analysis tools that are compatible with BAM. BAM
files are suitable for viewing with an external viewer such as IGV or the UCSC Genome
Browser.
50
Part # 15049148 Rev. E
Do not use it with tools that are not compatible with the BAM format. Do not use with
applications that cannot handle large files, as BAM files can get large, depending on the
application and data.
How to use it
If you use an app in BaseSpace that uses BAM files as input, the app locates the file
when launched. If using BAM files in other tools, download the file to use it in the
external tool.
Detailed Description
Go to samtools.sourceforge.net/SAM1.pdf to see the exact SAM specification.
gVCF Files
What is it?
This application also produces the Genome Variant Call Format file (gVCF). gVCF was
developed to store sequencing information for both variant and nonvariant positions,
which is required for human clinical applications. gVCF is a set of conventions applied
to the standard variant call format (VCF) 4.1 as documented by the 1000 Genomes
Project. These conventions allow representation of genotype, annotation, and other
information across all sites in the genome in a compact format. Typical human wholegenome sequencing results expressed in gVCF with annotation are less than 1 Gbyte, or
about 1/100 the size of the BAM file used for variant calling. If you are performing
targeted sequencing, gVCF is also an appropriate choice to represent and compress the
results.
gVCF is a text file format, stored as a gzip compressed file (*.genome.vcf.gz).
Compression is further achieved by joining contiguous nonvariant regions with similar
properties into single ‘block’ VCF records. To maximize the utility of gVCF, especially for
high stringency applications, the properties of the compressed blocks are conservative.
Block properties like depth and genotype quality reflect the minimum of any site in the
block. The gVCF file can be indexed (creating a *.tbi file) and used with existing VCF
tools such as tabix and IGV, making it convenient both for direct interpretation and as a
starting point for further analysis.
For more information, see sites.google.com/site/gvcftools/home/about-gvcf.
When to use it.
Use it for direct interpretation or as a starting point for further analysis with downstream
analysis that is compatible with gVCF, such as tabix and IGV.
When not to use it.
Do not use it with tools that are not compatible with the gVCF format.
How to use it
Apps that use gVCF files find it when kicked off and directed to the sample. If using
gVCF files in other tools, download the file to use it in the outside tool.
BaseSpace Onsite v2.0 System Guide
51
How To Use BaseSpace Onsite
When not to use it.
Detailed Description
The following conventions are used in the variant caller gVCF files.
Samples per File
There is only one sample per gVCF file.
Nonvariant Blocks Using END Key
Contiguous nonvariant segments of the genome can be represented as single records in
gVCF. These records use the standard 'END' INFO key to indicate the extent of the
record. Even though the record can span multiple bases, only the first base is provided
in the REF field to reduce file size.
The following is a simplified segment of a gVCF file, describing a segment of nonvariant
calls (starting with an A) on chromosome 1 from position 51845 to 51862.
##INFO=<ID=END,Number=1,Type=Integer,Description="End position
of the variant described in this record">#CHROM POS ID REF
ALT QUAL FILTER INFO FORMAT NA19238chr1 51845 . A . . PASS
END=51862
Any field provided for a block of sites, such as read depth (using the DP key), shows the
minimum value that is observed among all sites encompassed by the block. Each
sample value shown for the block, such as the depth (DP), is restricted to a range where
the maximum value is within 30% or 3 of the minimum. For example, for sample value
range [x,y], y <= x+max(3,x*0.3). This range restriction applies to each of the sample
values printed in the final block record.
Indel Regions
Sites that are "filled in" inside deletions have additional changes:
All deletions:
} Sites inside any deletion are marked with the deletion filters, in addition to any
filters that have already been applied to the site.
} Sites inside deletions cannot have a genotype or alternate allele quality score higher
than the corresponding value from the enclosing indel.
Heterozygous deletions:
} Sites inside heterozygous deletions are altered to have haploid genotype entries (e.g.
"0" instead of "0/0", "1" instead of "1/1").
} Heterozygous SNV calls inside heterozygous deletions are marked with the
"SiteConflict" filter and their genotype is unchanged.
Homozygous deletions:
} Homozygous reference and no-call sites inside homozygous deletions have genotype
"."
} Sites inside homozygous deletions that have a non-reference genotype are marked
with a “SiteConflict” filter, and their genotype is unchanged.
} Site and genotype quality are set to "."
The described modifications reflect the notion that the site confidence is bound within
the enclosing indel confidence.
52
Part # 15049148 Rev. E
Genotype Quality for Variant and Nonvariant Sites
The gVCF file uses an adapted version of genotype quality for variant and nonvariant
site filtration. This value is associated with the key GQX. The GQX value is intended to
represent the minimum of {Phred genotype quality assuming the site is variant, Phred
genotype quality assuming the site is nonvariant}. The reason for using this value is to
allow a single value to be used as the primary quality filter for both variant and
nonvariant sites. Filtering on this value corresponds to a conservative assumption
appropriate for applications where reference genotype calls must be determined at the
same stringency as variant genotypes, ie:
} An assertion that a site is homozygous reference at GQX >= 30 is made assuming the
site is variant.
} An assertion that a site is a non-reference genotype at GQX >= 30 is made assuming
the site is nonvariant.
Section Descriptions
The gVCF file contains the following sections:
} Meta-information lines start with ## and contain metadata, config information, and
define the values that the INFO, FILTER, and FORMAT fields can have.
} The header line starts with # and names the fields that the data lines use. These
fields are #CHROM, POS, ID, REF, ALT, QUAL, FILTER, INFO, FORMAT, followed
by one or more sample columns.
} Data lines that contain information about one or more positions in the genome.
If you extract the variant lines from a gVCF file, you produce a conventional variant VCF
file.
Field Descriptions
The fixed fields #CHROM, POS, ID, REF, ALT, QUAL are defined in the VCF 4.1
standard provided by the 1000 Genomes Project. The fields ID, INFO, FORMAT, and
sample are described in the meta-information.
} CHROM: Chromosome: an identifier from the reference genome or an anglebracketed ID String ("<ID>") pointing to a contig.
} POS: Position: The reference position, with the first base having position 1. Positions
are sorted numerically, in increasing order, within each reference sequence CHROM.
There can be multiple records with the same POS. Telomeres are indicated by using
positions 0 or N+1, where N is the length of the corresponding chromosome or
contig.
} ID: Semi-colon separated list of unique identifiers where available. If this ID is a
dbSNP variant, it is encouraged to use the rs number. No identifier is present in
more than one data record. If there is no identifier available, then the missing value
is used.
} REF: Reference bases: A,C,G,T,N; there can be multiple bases. The value in the POS
field refers to the position of the first base in the string. For simple insertions and
deletions in which either the REF or one of the ALT alleles would otherwise be
null/empty, the REF and ALT strings include the base before the event. This
modification is reflected in the POS field. The exception is when the event occurs at
position 1 on the contig, in which case they include the base after the event. If any of
BaseSpace Onsite v2.0 System Guide
53
How To Use BaseSpace Onsite
On occasion, the variant caller produces multiple overlapping indel calls that cannot be
resolved into 2 haplotypes. If this case, all indels and sites in the region of the overlap
are marked with the IndelConflict filter.
the ALT alleles is a symbolic allele (an angle-bracketed ID String "<ID>"), the
padding base is required. In that case, POS denotes the coordinate of the base
preceding the polymorphism.
} ALT: Comma-separated list of alternate non-reference alleles called on at least one of
the samples. Options are:
} Base strings made up of the bases A,C,G,T,N
} Angle-bracketed ID String (”<ID>”)
} Break-end replacement string as described in the section on break-ends.
If there are no alternative alleles, then the missing value is used.
} QUAL: Phred-scaled quality score for the assertion made in ALT. ie -10log_10
probability (call in ALT is wrong). If ALT is ”.” (no variant), this score is -10log_10 p
(variant). If ALT is not ”.”, this score is -10log_10 p(no variant). High QUAL scores
indicate high confidence calls. Although traditionally people use integer Phred
scores, this field is permitted to be a floating point to enable higher resolution for low
confidence calls if desired. If unknown, the missing value is specified. (Numeric)
} FILTER: PASS if this position has passed all filters, ie a call is made at this position.
Otherwise, if the site has not passed all filters, a semicolon-separated list of codes for
filters that fail. gVCF files use the following values:
• PASS: position has passed all filters.
• IndelConflict: Locus is in region with conflicting indel calls.
• SiteConflict: Site genotype conflicts with proximal indel call, which is
typically a heterozygous SNV call made inside a heterozygous deletion.
• LowGQX: Locus GQX (minimum of {Genotype quality assuming variant
position,Genotype quality assuming nonvariant position}) is less than 30 or
not present.
• HighDPFRatio: The fraction of base calls filtered out at a site is greater than
0.3.
• HighSNVSB: SNV strand bias value (SNVSB) exceeds 10. High strand bias
indicates a potential high false-positive rate for SNVs.
• HighSNVHPOL: SNV contextual homopolymer length (SNVHPOL) exceeds 6.
• HighREFREP: Indel contains an allele that occurs in a homopolymer or
dinucleotide track with a reference repeat greater than 8.
• HighDepth: Locus depth is greater than 3x the mean chromosome depth.
} INFO: Additional information. INFO fields are encoded as a semicolon-separated
series of short keys with optional values in the format: <key>=<data>[,data]. gVCF
files use the following values:
• END: End position of the region described in this record.
• BLOCKAVG_min30p3a: nonvariant site block. All sites in a block are
constrained to be nonvariant, have the same filter value, and have all
sample values in range [x,y], y <= max(x+3,(x*1.3)). All printed site block
sample values are the minimum observed in the region spanned by the
block.
• SNVSB: SNV site strand bias.
• SNVHPOL: SNV contextual homopolymer length.
• CIGAR: CIGAR alignment for each alternate indel allele.
• RU: Smallest repeating sequence unit extended or contracted in the indel
allele relative to the reference. If longer than 20 bases, RUs are not reported.
• REFREP: Number of times RU is repeated in reference.
• IDREP: Number of times RU is repeated in indel allele.
54
Part # 15049148 Rev. E
VCF Files
What is it?
VCF is a text file format that contains information about variants found at specific
positions in a reference genome. The file format consists of meta-information lines, a
header line, and then data lines. Each data line contains information about a single
variant.
When to use it.
Use it for direct interpretation or as a starting point for further analysis with downstream
analysis that is compatible with VCF, such as IGV or the UCSC Genome Browser.
When not to use it.
Do not use it with tools that are not compatible with the VCF format.
NOTE
Windows recognizes VCF files as an Outlook contact file. Do not open VCF files in
Outlook.
How to use it
If you use an app in BaseSpace that uses VCF files as input, the app locates the file when
launched. If using VCF files in other tools, download the file to use it in the external tool.
Detailed Description
The file naming convention for VCF files is as follows: SampleName_S#.vcf (where # is
the sample number determined by ordering in the sample sheet).
The header of the VCF file describes the tags used in the remainder of the file and has
the column header:
##fileformat=VCFv4.1
##fileDate=20120317
##source=SequenceAnalysisReport.vshost.exe
##reference=
##phasing=none
##INFO=<ID=DP,Number=1,Type=Integer,Description="Total Depth">
BaseSpace Onsite v2.0 System Guide
55
How To Use BaseSpace Onsite
} FORMAT: Format of the sample field. FORMAT specifies the data types and order of
the subfields. gVCF files use the following values:
• GT: Genotype.
• GQ: Genotype Quality.
• GQX: Minimum of {Genotype quality assuming variant position, Genotype
quality assuming nonvariant position}.
• DP: Filtered base call depth used for site genotyping.
• DPF: Base calls filtered from input before site genotyping.
• AD: Allelic depths for the ref and alt alleles in the order listed. For indels,
this value only includes reads that confidently support each allele (posterior
probability 0.999 or higher that read contains indicated allele vs all other
intersecting indel alleles).
• DPI: Read depth associated with indel, taken from the site preceding the
indel.
} SAMPLE: Sample fields as defined by the header.
##INFO=<ID=TI,Number=.,Type=String,Description="Transcript ID">
##INFO=<ID=GI,Number=.,Type=String,Description="Gene ID">
##INFO=<ID=CD,Number=0,Type=Flag,Description="Coding Region">
##FILTER=<ID=q20,Description="Quality below 20">
##FORMAT=<ID=GT,Number=1,Type=String,Description="Genotype">
##FORMAT=<ID=GQ,Number=1,Type=Integer,Description="Genotype
Quality">
#CHROM POS ID REF ALT QUAL FILTER INFO FORMAT SAMPLE
A sample line of the VCF file, with the data that is used to populate each column
described:
chr22 16285888 rs76548004 T C 17 d15;q20 DP=11;TI=NM_
001136213;GI=POTEH;CD GT:GQ 1/0:17
56
Setting
Description
ALT
The alleles that differ from the reference read. For example, an insertion of a
single T could show reference A and alternate AT.
CHROM
The chromosome of the reference genome. Chromosomes appear in the same
order as the reference FASTA file (generally karyotype order)
FILTER
If all filters are passed, the' PASS' is written. The possible filters are as follows:
• q20 – The variant score is less than 20. (Configurable using the
VariantFilterQualityCutoff setting in the config file)
• r8 – For an Indel, the number of repeats in the reference (of a 1- or 2-base
repeat) is greater than 8. (Configurable using the IndelRepeatFilterCutoff
setting in the config file)
FORMAT
The format column lists fields (separated by colons), for example, "GT:GQ". The
list of fields provided depends on the variant caller used. The available fields are
as follow:
AD – Entry of the form X,Y where X is the number of reference calls, Y the
number of alternate calls
GQ – Genotype quality
GT – Genotype. 0 corresponds to the reference base, 1 corresponds to the first
entry in the ALT column, 2 corresponds to the second entry in the ALT column,
etc. The '/' indicates that there is no phasing information.
NL – Noise level; an estimate of base calling noise at this position
SB – Strand bias at this position. Larger negative values indicate more bias;
values near zero indicate little strand bias.
VF – Variant frequency. The percentage of reads supporting the alternate allele.
ID
The rs number for the SNP obtained from dbSNP. If there are multiple rs
numbers at this location, the list is semi-colon delimited. If no dbSNP entry exists
at this position, the missing value ('.') is used.
Part # 15049148 Rev. E
Description
INFO
The possible entries in the INFO column:
• AD – Entry of the form X,Y where X is the number of reference calls, Y the
number of alternate calls.
• CD – A flag indicating that the SNP occurs within the coding region of at least
one RefGene entry
• DP – The depth (number of base calls aligned to this position)
• GI – A comma-separated list of gene IDs read from RefGene
• NL – Noise level; an estimate of base calling noise at this position.
• TI – A comma-separated list of transcript IDs read from RefGene
• SB – Strand bias at this position.
• VF – Variant frequency. The number of reads supporting the alternate allele.
POS
The 1-based position of this variant in the reference chromosome. The
convention for VCF files is that, for SNPs, this base is the reference base with the
variant. For indels or deletions, this base is the reference base immediately
before the variant. Variants are in order of position.
QUAL
A Phred-scaled quality score assigned by the variant caller. Higher scores
indicate higher confidence in the variant (and lower probability of errors). For a
quality score of Q, the estimated probability of an error is 10-(Q/10). For
example, the set of Q30 calls has a 0.1% error rate. Many variant callers assign
quality scores (based on their statistical models) which are high relative to the
error rate observed in practice.
REF
The reference genotype. For example, a deletion of a single T can read reference
TT and alternate T.
SAMPLE
The sample column gives the values specified in the FORMAT column. One
MAXGT sample column is provided for the normal genotyping (assuming the
reference). For reference, a second column is provided for genotyping assuming
the site is polymorphic. See the Starling documentation for more details.
NOTE
Variant files for Isaac also contain off-target variant calls, with filter.
FASTQ Files
What is it?
BaseSpace Onsite converts *.bcl files into FASTQ files, which contain base call and
quality information for all reads passing filtering.
When to use it.
FASTQ files can be used as sequence input for alignment and other secondary analysis
software.
When not to use it.
Do not use it with tools that are not compatible with the FASTQ format.
How to use it
BaseSpace Onsite automatically generates FASTQ files in sample sheet-driven workflow
apps. Other apps that perform alignment and variant calling also automatically use
FASTQ files.
BaseSpace Onsite v2.0 System Guide
57
How To Use BaseSpace Onsite
Setting
Naming
FASTQ files are named with the sample name and the sample number, which is a
numeric assignment based on the order that the sample is listed in the sample sheet.
Example:
Data\Intensities\BaseCalls\SampleName_S1_L001_R1_001.fastq.gz
• SampleName—The sample name provided in the sample sheet. If a sample
name is not provided, the file name includes the sample ID, which is a required
field in the sample sheet and must be unique.
• S1—The sample number based on the order that samples are listed in the
sample sheet starting with 1. In this example, S1 indicates that this sample is the
first sample listed in the sample sheet.
NOTE
Reads that cannot be assigned to any sample are written to a FASTQ file for sample
number 0, and excluded from downstream analysis.
• L001—The lane number.
• R1—The read. In this example, R1 means Read 1. For a paired-end run, there is
at least one file with R2 in the file name for Read 2. When generated, index reads
are I1 or I2.
• 001—The last segment is always 001.
Compression
FASTQ files are saved compressed in the GNU zip format (an open source file
compression program), indicated by the .gz file extension.
Format
Each entry in a FASTQ file consists of four lines:
} Sequence identifier
} Sequence
} Quality score identifier line (consisting only of a +)
} Quality score
@<instrument>:<run number>:<flowcell ID>:<lane>:<tile>:<xpos>:<y-pos> <read>:<is filtered>:<control number>:<index>
The following table describes the elements:
Element
Requirements
@
@
<instrument> Characters allowed:
a–z, A–Z, 0–9 and
underscore
<run number> Numerical
<flowcell
Characters allowed:
ID>
a–z, A–Z, 0–9
<lane>
Numerical
<tile>
Numerical
<x_pos>
Numerical
<y_pos>
Numerical
<read>
Numerical
58
Description
Each sequence identifier line starts with @
Instrument ID
Run number on instrument
Lane number
Tile number
X coordinate of cluster
Y coordinate of cluster
Read number. 1 can be single read or Read 2 of
paired-end
Part # 15049148 Rev. E
Requirements
Y or N
Description
Y if the read is filtered (did not pass), N otherwise
Numerical
0 when none of the control bits are on, otherwise
it is an even number.
Index of the read
Restricted characters:
A/T/G/C/N
An example of a valid entry is as follows; note the space preceding the read number
element:
@SIM:1:FCX:1:15:6329:1045 1:N:0:ATCCGA
TCGCACTCAACGCCCTGCATATGACAAGACAGAATC
+
<>;##=><9=AAAAAAAAAA9#:<#<;<<<????#=
Quality Scores
A quality score (or Q-score) expresses an error probability. In particular, it serves as a
convenient and compact way to communicate very small error probabilities.
Given an assertion, A, the quality score, Q(A), expresses the probability that A is not true,
P(~A), according to the relationship:
Q(A) =-10 log10(P(~A))
where P(~A) is the estimated probability of an assertion A being wrong.
The relationship between the quality score and error probability is demonstrated with the
following table:
Quality score, Q
(A)
10
20
30
Error probability, P
(~A)
0.1
0.01
0.001
NOTE
On the systems we currently support, Q-scores are automatically binned. The specific
binning applied depends on the current Q-table. See the white paper Reducing Whole
Genome Data Storage Footprint for more information, available from www.illumina.com.
Quality Scores Encoding
In FASTQ files, quality scores are encoded into a compact form, which uses only 1 byte
per quality value. In this encoding, the quality score is represented as the character with
an ASCII code equal to its value + 33. The following table demonstrates the relationship
between the encoding character, its ASCII code, and the quality score represented.
BaseSpace Onsite v2.0 System Guide
59
How To Use BaseSpace Onsite
Element
<is
filtered>
<control
number>
<index>
Table 1 ASCII Characters Encoding Q-scores 0–40
Symbol
ASCII Code
Q-Score
Symbol
ASCII Code
Q-Score
!
33
0
6
54
21
"
34
1
7
55
22
#
35
2
8
56
23
$
36
3
9
57
24
%
37
4
:
58
25
&
38
5
;
59
26
'
39
6
<
60
27
(
40
7
=
61
28
)
41
8
>
62
29
*
42
9
?
63
30
+
43
10
@
64
31
,
44
11
A
65
32
-
45
12
B
66
33
.
46
13
C
67
34
/
47
14
D
68
35
0
48
15
E
69
36
1
49
16
F
70
37
2
50
17
G
71
38
3
51
18
H
72
39
4
52
19
I
73
40
5
53
20
Health Runs
What is it?
A user can choose whether to send anonymous system health information to Illumina.
Health runs help Illumina diagnose issues and improve our products. The information
consists of InterOp files and log files, and is not tied to any user account. This option is
on by default.
Share Data
Data in BaseSpace Onsite can be shared with collaborators in a couple of different ways.
You can either share data at a run or project level, via an email invitation or through a
hyperlink. With the email invitation option, only the accounts with the specified email
60
Part # 15049148 Rev. E
You can only share data to collaborators who have an account on the same BaseSpace
Onsite.
Sharing is for read-only access. If you want a collaborator to have write access, see
Transfer Owner on page 67.
NOTE
Runs and projects have separate permissions. If you share a run, the project
associated with that run is not shared automatically, meaning samples and
app results are not accessible to collaborators of the run.
The following topics describe how to share.
Share a Project with Get Link
What is it
Sharing using the Get Link option allows you to share a project or a run with any
collaborator who is in your company, and has an account on the BaseSpace Onsite
system. The hyperlink can be turned on or off by setting the activate or deactivate option.
Anyone who previously accepted the link still has access to the run even though the link
is deactivated.
NOTE
If you want more control, use the email share option where you can specify who can view
the project (Share a Project Using the Email Option on page 62).
When to use it
} Use this option when you do not want to assign the project to a specific person.
} This share link can be forwarded to many other collaborators while the link is still
active.
} Do not use this option if you want to confine the list of who has access to this
project.
Why to use it
If you want an easy way to share a link without the hassle of adding specific people by
email and setting permissions.
How to use it
1
Click the Projects icon.
2
Click the desired project.
3
Click the Get Link button.
4
Click the Activate button.
5
Copy the URL to share with collaborators.
BaseSpace Onsite v2.0 System Guide
61
How To Use BaseSpace Onsite
can view shared data. Sharing via a hyperlink option allows anyone with access to the
hyperlink to be able to view the shared data, as long as the hyperlink is still active.
The link is active until the Deactivate option is selected. The path to deactivate a sharing
link is similar:
1
Navigate to the shared item.
2
Click the Get Link button.
3
Click the Deactivate button.
Share a Project Using the Email Option
What is it
Sharing using the "Share" option allows you to share a Project or Run with a specified
collaborator via an email link. The specified collaborators receive an email with a link to
the Project or Run and only that person can view the corresponding data.
NOTE
The email option allows greater control over who can view your data. Sharing using the
Get Link options gives anyone access to your data, as long as the link is left activated. For
more information, see Share a Project with Get Link on page 61
When to use it
} Use this option of you want to share your project easily with collaborators.
} Use this option if you want to be able to control who has access to the projects.
Why to use it
Use this option if you want to be able to control who has access to the project.
How to use it
1
Click the Projects icon.
2
Click the desired project.
3
Click Share Project.
4
In the Share Settings dialog box, enter the collaborators email address and click the
Invite button.
NOTE
The invitation email address must match your BaseSpace Onsite login email address
or else your collaborator is not able to view the project.
5
4. Click Save Settings.
Share a Run with Get Link
What is it
Sharing using the Get Link option allows you to share a run with any collaborator who
has access to the link. The hyperlink can be turned on or off by setting the activate or
deactivate option. Anyone can access the project or run when the link is activated.
Furthermore, anyone who previously accepted the link still has access to the run even
though the link is deactivated.
62
Part # 15049148 Rev. E
NOTE
If you want more control, use the email share option where you can specify who can view
the project (Share a Run Using the Email Option on page 63).
When to use it
} Use this option when you do not want to assign the run to a specific person.
} This share link can be forwarded to many other collaborators while the link is still
active.
} Do not use this option if you want to confine the list of who has access to this run.
Why to use it
This option is an easy way to share a link without having to specify email and setting
permissions.
How to use it
1
Click the Runs icon.
2
Click the desired run.
3
Click the More button and select the Get Link option.
4
Click the Activate button.
5
Copy the URL to share with collaborators.
The link is active until the Deactivate option is selected. The path to deactivate a sharing
link is similar:
1
Navigate to the run
2
Click the Get Link button.
3
Click the Deactivate button.
NOTE
Runs and projects have separate permissions. If you share a run, the project
associated with that run is not shared automatically, meaning samples and
app results are not accessible to collaborators of the run.
Share a Run Using the Email Option
What is it
Sharing using the Share option allows you to share a project or run with a specified
collaborator via an email link. Specified collaborators receive an email with a link to the
project or run and only that person can view the corresponding data.
NOTE
The email option allows greater control over who can view your data. The Get Link
options gives anyone access to your data, as long as the link is left activated. See Share a
Run with Get Link on page 62 for more information.
BaseSpace Onsite v2.0 System Guide
63
How To Use BaseSpace Onsite
Sharing runs with the Get Link option is similar to sharing projects with the Get Link
option.
When to use it
} Use this option of you want to share your run easily with collaborators.
} Use this option if you want to be able to control who has access to the run.
Why to use it
Use this option if you want to be able to control who has access to the run.
How to use it
1
Click the Runs icon.
2
Click the desired run.
3
Click the Share button.
4
In the Share Settings dialog box, enter the collaborators email address and click the
Invite button.
NOTE
The invitation email address must match your BaseSpace Onsite login email address
or else your collaborator is not able to view the project.
5
4. Click the Save Settings button.
NOTE
Runs and projects have separate permissions. If you share a run, the project
associated with that run is not shared automatically, meaning samples and
app results are not accessible to collaborators of the run.
Project and Sample Management
The following topics describe how to manage projects and samples in BaseSpace Onsite.
Edit Project Details
What is it
The way to edit project details.
When to use it
Use this option when you want to change details regarding the project such as the
description or project name.
Why to use it
Use this option if you have to edit the project name or description
How to use it
1
64
Click the Projects icon.
Part # 15049148 Rev. E
Click the desired project.
3
Click the Edit Project button.
4
Change project details in the Edit Project dialog box
5
Click Save.
Set Up a New Project
What is it
A method to set up a new project.
When to use it
} When you want to analyze a sample in the context of 2 different projects
} When you want to transfer ownership of samples to a collaborator, but still keep a
copy yourself
} When you want to split a project into multiple projects
How to use it
1
Click the Projects icon.
2
Click New Project link in the top left corner.
3
Enter a new name and description.
4
Click the Create button.
To copy samples into the new project, seeCopy Samples on page 66.
Combine Samples
What is it
A method to combine (merge) samples.
When to use it
To merge the data from 2 or more different sequencing runs on the same sample. The
samples can only merge if they have the same read lengths.
When not to use it
You cannot combine samples that do not have the same read lengths.
How to use it
1
Click the Projects icon.
2
Click the desired project.
3
Click the Samples link from the left navigation menu.
4
Select the checkboxes of the samples you want to combine.
BaseSpace Onsite v2.0 System Guide
65
How To Use BaseSpace Onsite
2
5
Click the Combine button.
6
Click the Combine button in the pop-up screen.
Copy Samples
What is it
A method to copy samples from one project to another.
When to use it
} When you want to analyze a sample in the context of 2 different projects
} When you want to transfer ownership of a sample to a collaborator, but still keep a
copy yourself
} When you have assigned a sample to the wrong project
How to use it
1
Click the Projects icon.
2
Click the desired project.
3
Click the Samples link from the left navigation menu.
4
Select the checkboxes of the samples you want to combine.
5
Click the Copy button.
6
Select the new project in the drop-down list.
7
Click the Copy button.
Upload Files
What is it
A method to upload files, such as VCF, FASTQ, or manifest files to BaseSpace Onsite.
When to use it
} Some apps need additional files generated outside of BaseSpace Onsite.
} Some apps provide downstream analysis for results generated outside of BaseSpace
Onsite.
How to use it
1
Click the Projects icon.
2
Go to the project you want to add the file to.
NOTE
You can only upload files to projects you own.
66
3
Click Import.
4
Select the import file type.
Part # 15049148 Rev. E
Select the file to upload in one of 2 ways:
• Drag and drop the file in the Drag and Drop box
• Browse to the file through the select file link and click Open
6
BaseSpace Onsite now uploads the file to your project.
7
Type in the analysis name in the Name of analysis box.
8
[Optional]: Associate the file you are importing with the samples used as inputs. By
making this association, the analysis is listed on the sample detail page. You can
also locate these uploaded files later by navigating to one of the samples.
9
Click Complete Import.
FASTQ File Upload Requirements
The FASTQ file is a text format file used to represent sequences. Each record has 4 lines.
The 4 lines of data are an identifier (read descriptor), the sequence, +, and the quality
scores. For a detailed description of the FASTQ format, see FASTQ Files on page 57.
Make sure the FASTQ file adheres to the following upload requirements:
} The uploader only supports gzipped FASTQ files generated on Illumina instruments
} The name of the FASTQ files conforms to the following convention:
SampleName_SampleNumber_Lane_Read_FlowCellIndex.fastq.gz
For example,
SampleName_S1_L001_R1_001.fastq.gz
SampleName_S1_L001_R2_001.fastq.gz)
} The read descriptor in the FASTQ files conforms to the following convention:
@Instrument:RunID:FlowCellID:Lane:Tile:X:Y
ReadNum:FilterFlag:0:SampleNumber:
For example, a Read 1 descriptor could look like this line:
@M00900:62:000000000-A2CYG:1:1101:18016:2491 1:N:0:13
And the corresponding Read 2 would have a 2 in the ReadNum field:
@M00900:62:000000000-A2CYG:1:1101:18016:2491 2:N:0:13
Quality considerations:
} The number of base calls for each read equals the number of quality scores.
} The number of entries for Read 1 equals the number of entries for Read 2.
} The uploader determines whether files are paired-end based on matching file names
in which the only difference is the ReadNum.
} For paired-end reads, the descriptor must match for every entry for both reads 1 and
2.
} Each read has passed filter.
The uploader rejects any upload session containing files that do not meet the
requirements. If a file is rejected, a message is provided. This message states why the
upload failed and what to do to remedy the problem.
Transfer Owner
What is it
A method to hand control of data over to a collaborator or customer.
BaseSpace Onsite v2.0 System Guide
67
How To Use BaseSpace Onsite
5
When to use it
} If you want to give control of your data to a collaborator.
} You can only transfer data to collaborators who have an account on the same
BaseSpace Onsite.
}
When to use it
} If items from a project are in the trash, you cannot transfer ownership of the project.
How to use it
1
Select the project or run you want to transfer:
• Project:
a
Click the Projects icon.
b
Click the desired project.
c
Click the Transfer Owner button.
• Run:
2
a
Click the Runs icon.
b
Click the desired run.
c
Click the More button, and then select the Transfer Ownership option.
Enter new owner email and an optional message in the Transfer Ownership dialog
box.
3
Click Continue.
Delete Items
You can delete items in a 2-step process:
1
Move the item to trash.
2
Clean up the trash.
The actions that can be performed are described in the following topics:
} Delete Run on page 68
} Delete Project on page 69
} Delete Analysis on page 70
} Delete Sample on page 70
} Empty Trash on page 71
} Restore Trash on page 71
Delete Run
What is it
A method to delete runs.
When to use it
To move the project out of your Runs list into the trash. When a run is in the trash, it can
be permanently deleted from BaseSpace Onsite.
68
Part # 15049148 Rev. E
Do no use this action if you want to archive a run.
How to use it
1
Click the Runs icon.
2
Click the desired run.
3
Click the Move to Trash button.
4
If there are analyses or samples associated with this run, BaseSpace Onsite asks if
you want to delete those analyses and samples too. Select checkbox if you want to
delete the associated items.
5
Click Confirm.
If you are the owner of the run, the run now appears in the trash. You can permanently
delete the run from trash by emptying all items in the trash; see Empty Trash on page 71
You can also restore the run to its original location; see Restore Trash on page 71.
Deleting a run has the following additional features:
} If you received the run as a share, the deleted run does not appear in the trash. If you
want to restore a run shared with you, click the previously sent share link or contact
the owner.
} Runs cannot be removed if they are in a nonterminal state, for example running,
uploading, or analyzing.
Delete Project
What is it
A method to delete a project.
When to use it
To move the project out of your Projects list into the trash. When a project is in the trash,
it can be permanently deleted from BaseSpace Onsite.
When not to use it
Do no use this action if you want to archive a project.
How to use it
1
Click the Projects icon.
2
Click the desired project.
3
Click the Move to Trash button.
4
Click Confirm.
If you are the owner of the project, the project now appears in the trash. You can
permanently delete it from trash by emptying all items in the trash; see Empty Trash on
page 71 You can also restore the project to its original location; see Restore Trash on page
71.
BaseSpace Onsite v2.0 System Guide
69
How To Use BaseSpace Onsite
When not to use it
If you received the project as a share, the deleted project does not appear in the trash. If
you want to restore a project shared with you, click the previously sent share link or
contact the owner.
Delete Analysis
What is it
A method to delete an analysis result.
When to use it
To move the analysis out of your Analysis Results list into the trash. When an analysis
is in the trash, the analysis can be permanently deleted from BaseSpace Onsite.
When not to use it
Do no use this action if you want to archive an analysis result.
How to use it
1
Click the Projects icon.
2
Click the desired project.
3
Select the analysis results to be deleted.
4
Click the Move to Trash button.
5
Click Confirm.
The analysis is now in the trash. You can permanently delete the analysis from
BaseSpace Onsite by emptying all items in the trash; see Empty Trash on page 71 You can
also restore the analysis to its original location; see Restore Trash on page 71.
Deleting an analysis has the following additional features:
} You cannot delete an analysis that is in a nonterminal state, for example, pending
execution or running.
} Deleting an analysis from a project that is in ownership transfer can cause a delay
until the transfer has completed.
Delete Sample
What is it
A method to delete a sample.
When to use it
To move the sample out of your Samples list into the trash. When a sample is in the
trash, the sample can be permanently deleted from BaseSpace Onsite.
When not to use it
Do no use this action if you want to archive a sample.
How to use it
1
70
Click the Projects icon.
Part # 15049148 Rev. E
Click the desired project.
3
Click the Samples tab on the left navigation bar.
4
Select the samples to be deleted.
5
Click the Move to Trash button.
6
Click Confirm.
The sample is now in the trash. You can permanently delete the sample from BaseSpace
Onsite by emptying all items in the trash; see Empty Trash on page 71 You can also
restore the analysis to its original location; see Restore Trash on page 71.
If you received the sample as a share, the deleted sample does not appear in the trash. If
you want to restore a sample shared with you, click the previously sent share link or
contact the owner.
Empty Trash
What is it
After you have deleted an item, it is present in the Trash if you are the owner of that
item. With this method, you can delete all items in the trash from BaseSpace Onsite
permanently.
When to use it
When you want to delete an item permanently from BaseSpace Onsite.
When not to use it
Do no use this action if you do not want to delete all items in the trash permanently.
How to use it
1
Click View Trash.
2
Click Empty Trash.
3
Click Confirm.
The items are now ready to be purged from BaseSpace Onsite by the adminPurge Deleted
Items on page 79.
Restore Trash
What is it
After you have deleted an item, it is present in the Trash if you are the owner of that
item. With this method, you can restore an item from the trash to its original location.
When to use it
When you want to restore an item in the trash to its original location.
BaseSpace Onsite v2.0 System Guide
71
How To Use BaseSpace Onsite
2
When not to use it
Do no use this action if you do not want to delete an item in the trash permanently.
How to use it
1
Click View Trash.
2
Select the items you want to restore.
3
Click Restore Trash.
The item is now restored to its original location. Restored items keep all their original
attributes except for the share recipients.
Fix Sample Sheet / Re-Run Workflow
What is it
The Fix Sample Sheet page lets you correct errors in your sample sheet for HiSeq runs, or
set up a new analysis to requeue.
When to use it
} To fix errors in the sample sheet.
} To change analysis parameters.
} To change indexing details.
Why to use it
} Errors in the sample sheet can prevent BaseSpace Onsite from processing a run. This
option allows BaseSpace Onsite to finish the analysis.
} The first analysis was suboptimal. You can resubmit the sample sheet and requeue
the run with new analysis parameters one time.
} The index settings for samples were wrong. This option allows you to correct the
settings.
NOTE
You can only submit a corrected sample sheet and requeue the run one time.
How to use it
1
You can reach the Fix Sample Sheet page 2 ways:
• A run can have a Needs Attention state. Open the run, and click the Fix Sample
Sheet link.
72
Part # 15049148 Rev. E
The Fix Sample Sheet page opens. If BaseSpace Onsite has detected an error, it shows
the issue above the black sample sheet editor.
2
Depending on the complexity of the change, you have 2 options:
• Easy fix: edit the sample sheet in the sample sheet editor. BaseSpace Onsite
keeps validating the sample sheet as you edit; any remaining issues are
displayed above the sample sheet editor.
• More complex change: use Illumina Experiment Manager (IEM).
a
If you have not installed IEM yet, click the Illumina Experiment Manager
(IEM) link, and install IEM.
b
Open IEM.
c
Import the original sample sheet from your system in IEM and edit it, or
generate a new sample sheet. See the Illumina Experiment Manager User
Guide for instructions.
d
Copy and paste the sample sheet into the Sample Sheet Editor in BaseSpace
Onsite.
BaseSpace Onsite validates the sample sheet; any issues are displayed above
the sample sheet editor.
3
When you are done editing and the sample sheet is valid, click the Queue Analysis
button, and BaseSpace Onsite starts analyzing the run using the new sample sheet.
You can only resubmit a sample sheet and requeue the run one time.
NOTE
If your edits result in an invalid sample sheet, the Queue Analysis button is not available.
You can return to the original using the Load Original button.
BaseSpace Onsite v2.0 System Guide
73
How To Use BaseSpace Onsite
• Go to a run, select the More drop-down list, and then select Fix Sample Sheet.
Common Sample Sheet Fixes
If a sample sheet is invalid, it could be because the genome path is not set up correctly.
This situation is indicated through the Genome Path Unknown Genome warning (as in the
example). The paths of the standard BaseSpace Onsite genomes have to conform to the
following relative paths:
Arabidopsis_thaliana\NCBI\build9.1\Sequence\WholeGenomeFASTA
Bos_taurus\Ensembl\UMD3.1\Sequence\WholeGenomeFASTA
Escherichia_coli_K_12_DH10B\NCBI\2008-0317\Sequence\WholeGenomeFASTA
Homo_sapiens\UCSC\hg19\Sequence\WholeGenomeFASTA
Mus_musculus\UCSC\mm9\Sequence\WholeGenomeFASTA
PhiX\Illumina\RTA\Sequence\WholeGenomeFASTA
Rattus_norvegicus\UCSC\rn4\Sequence\WholeGenomeFASTA
Saccharomyces_cerevisiae\UCSC\sacCer2\Sequence\WholeGenomeFASTA
Staphylococcus_aureus_NCTC_8325\NCBI\2006-0213\Sequence\WholeGenomeFASTA
Fix indexes In the Prep Tab
What is it
You can correct errors in your indexes through the Prep tab and regenerate the FASTQ
files.
When to use it
} To change indexes and regenerate FASTQ files for samples that have already been
sequenced.
When not to use it
} For runs that are not set up with the Prep tab.
} For runs where the wrong library prep kit was selected in the Prep tab.
How to use it
1
Go to the run with the wrong indexes.
2
Click the Run Settings button
3
Go to the bottom of the page, and click the pool.
4
Click the Plate ID of the plate.
5
Click Edit.
6
Correct the index in the dropdown menu.
7
Go to the affected run.
8
In the More dropdown menu, select Generate FASTQ Files.
in the navigation task pane.
BaseSpace Onsite now starts regenerating the FASTQ files with the corrected indexes. The
new FASTQ files get added to the sample list and you can identify the new files by date.
74
Part # 15049148 Rev. E
Search for Runs, Projects, Samples, Files, and Apps
What is it
The Search function allows you to find runs, projects, samples, files, and apps
When to use it
When you want to do a quick search for something
Why to use it
Use if there are a many runs and you want a quick way to search.
How to use it
1
Click the search icon
2
Type in the run, project, or sample name in the search field and hit enter.
3
Select the desired run, project, sample, file, or app in the search results. You can also
filter the search results by these categories using the drop-down list at the right of the
results page.
BaseSpace Onsite v2.0 System Guide
75
How To Use BaseSpace Onsite
TIP
If you do not want to identify the samples by date, you can also rename the sample_ID, or
assign the new FASTQ files to a new project in the Prep tab.
Admin Tasks
The admin of BaseSpace Onsite has the following tasks:
} Manage analysis, notifications, storage, users, system health, planned runs, software
updates, and alarms using the Admin Panel. See Manage BaseSpace Onsite on page 76
for instructions.
} Replace hard drive or power supply. See Replacement Procedures on page 82.
In addition, BaseSpace Onsite sends an email alert if there is an issue with your system.
Error Codes on page 84 provides a list of possible codes and descriptions to help you
troubleshoot.
Manage BaseSpace Onsite
The Account drop-down list provides access to the Admin Panel.
The Admin Panel allows you to manage analysis, notifications, storage, users, system
health, planned runs, software updates, and alarms.
NOTE
You need admin privileges to see and work in the admin panel.
You can reach these options through the side navigation panel.
Manage Analysis
On the Analysis page, you see the analyses that are currently running, and the analyses
that are queued. You can sort the analyses by the column headers. You can manage the
analyses the following way:
} Select an active analysis and click Stop to stop the analysis.
76
Part # 15049148 Rev. E
Manage Storage
The Storage page contains 3 tabs:
} The Active Storage tab provides an overview of the total amount of active storage
used and free, and the storage by user. Active samples, runs, and analyses are stored
on the BaseSpace Onsite system, and can be used for analysis. At the bottom, you see
the list of active samples, runs, and analyses stored; you can sort this list by clicking
the column headers. Any changes that add or remove data usually take 3–5 minutes
to be reflected in the pie chart. Active samples, runs and analyses are stored on the
BaseSpace Onsite system, and can be used for analysis.
NOTE
If there are many merged samples and copied samples on the system, the usage per-user
values are overestimated in the Storage Use By Owners pie chart. The Total Active Storage
is not affected.
} The Archive Storage tab provides an overview of the archived analyses. Archived
samples, runs, and analyses are stored on the archive system, and cannot be used
for analysis on BaseSpace Onsite without restoring. At the bottom, you see the list of
archived samples, runs, and analyses; you can sort this list by clicking the column
headers.
} The Deleted Items tab provides an overview of the items that have been deleted. At
the bottom, you see the list of deleted samples, runs, and analyses; you can sort this
list by clicking the column headers. You can restore these items to active storage, or
purge them from BaseSpace Onsite, which deletes them permanently.
NOTE
Illumina highly recommends that you set up an archive location.
BaseSpace Onsite v2.0 System Guide
77
Admin Tasks
} Select a queued analysis and click Remove to remove the analysis from the queue.
} Click Settings to set the administrator notifications you get through email.
Archive or Backup Analysis
To archive or backup an analysis, perform the following:
1
Under Storage, go to the Archive Storage tab.
2
Select the analysis
3
Click Archive.
4
A dialog box appears, asking you if you want to keep the data in active storage;
• If you keep the data in active storage, you can keep working with the analysis,
while making a backup in the archive.
• If you do not keep the analysis in active storage, the data are archived, and you
cannot work with the analysis in BaseSpace Onsite. You can always move it
back to active storage as described in Restore Analysis From Archive on page 78.
Maximum speed for archiving is 25 Mb/s, so it does not interfere with other
BaseSpace Onsite tasks.
Restore Analysis From Archive
To restore an analysis from archive to active status, perform the following:
1
Under Storage, go to the Archive Storage tab.
2
Select the analysis.
3
Click Unarchive.
If there is sufficient free space, BaseSpace Onsite restores the analysis. If there is not
enough space, BaseSpace Onsite displays an error message.
NOTE
You cannot restore an archived item that has been deleted and purged fromBaseSpace
Onsite.
Set Up Archive Location
To set up an archive location, perform the following:
78
Part # 15049148 Rev. E
Under Storage, go to the Archive Storage tab.
2
Click Mount
3
Fill out the form.
Admin Tasks
1
You can set up 1 archive location per BaseSpace Onsite system.
Restore Deleted Item
To restore a deleted item to active status, perform the following:
1
Under Storage, go to the Deleted Items tab.
2
Select the analysis.
3
Click Unarchive.
If there is sufficient free space, BaseSpace Onsite restores the item. If there is not enough
space, BaseSpace Onsite displays an error message.
Purge Deleted Items
To purge deleted items from BaseSpace Onsite permanently, perform the following:
1
Under Storage, go to the Deleted Items tab.
2
Click Purge.
This action removes all items in the trash from BaseSpace Onsite permanently.
Storage Check
BaseSpace Onsite has limited storage capacity, and checks the free space available before
uploading a run or starting an app. The necessary space is then reserved until the
process completes.
If there is not enough space, you see an error message and the run or app does not start.
If the space check fails before starting FASTQ generation, the run gets into Needs
Attention state. To manage available space, see Archive or Backup Analysis on page 78
BaseSpace Onsite v2.0 System Guide
79
Figure 12 BaseSpace Onsite Log On
If your NextSeq sequencing system and BaseSpace do not connect properly, check the
following:
} Make sure that you have a stable connection of at least 10 Mbps upload speed from
the NextSeq.
} From the Manage Instrument screen, select System Configuration to access a series
of screens that configure the connection to BaseSpace Onsite.
} Log in to BaseSpace Onsite when setting up the run on the NextSeq sequencing
system.
NOTE
When you bookmark the BaseSpace Onsite location in your browser, make sure to
bookmark the Dashboard page after logging on. Do not bookmark the Login page.
Manage Users
On the Users page, you see a list of current BaseSpace Onsite accounts, and their roles.
You can sort the users by the column headers.
To set up a new user, click Add User and fill out the form.
80
Part # 15049148 Rev. E
Admin Tasks
The new user gets an email with a link to set up a new password. If the user does not get
an email, the user can go to the BaseSpace Onsite logon page and click Forgot Password
to resend the email.
If you did not configure SMTP during install, be aware of the following points:
} You enter the password for the new user.
} BaseSpace Onsite does not enforce usernames to be in the form of an email, which
can cause a problem with HiSeq integration. Make sure to enforce that all users
create a username in the format of an email.
} If you enable the SMTP support after using BaseSpace Onsite without SMTP support,
all users that are logged in have to log out and then log back in. If not, they do not
receive notifications by email or on the dashboard.
Monitor System Health
On the System Health page, you see the BaseSpace Onsite system health alerts. You can
sort the alerts by the column headers.
Many sensors are monitored for health in the BaseSpace Onsite server. If a sensor
indicates a failure, BaseSpace Onsite sends an alert to the administrator. When you
receive an alert, contact Illumina Support to diagnose the error and, if necessary, arrange
a site visit to correct the problem.
Some of these errors, such as a failure of a disk drive or one of the power supplies, you
can resolve. See Replacement Procedures on page 82 for instructions. Illumina Support can
also guide you through the process of replacing the faulty component.
If you want to remove an alert, select the alert and click Dismiss.
Unlock Planned Runs
On the Planned Runs page, you see the runs that are currently planned. You can sort the
runs by the column headers.
The sequencing system locks planned runs when they are selected. In rare instances, the
sequencing system leaves the run in locked state without starting the run. These runs
must be manually unlocked to access again. Unlocking runs allows the users to edit the
run in the Prep tab, and makes the run available for selection on other sequencing
systems. Unlocking also frees up the reserved run storage space on the BaseSpace Onsite
system.
BaseSpace Onsite v2.0 System Guide
81
To unlock a run, select the planned run and click Unlock.
Updates
In general, to update the server software, perform the following:
1
Plug the external USB drive with the software update into the BaseSpace Onsite head
node server.
2
Go to the Updates page.
3
Click Detect Drive.
The Updates wizard now leads you through the update.
System Logs
The System Logs page provides a download of the log files. You can download all log
files, or packages that contain the system state log files, active analysis log files, or delete
log files.
If an issue arises with your BaseSpace Onsite, Illumina support uses these files to
troubleshoot your system. To speed up troubleshooting, download the appropriate
package before calling Illumina support.
About Page / Licenses
The About page provides a download containing the licenses for third-party software
components.
Manage Alarms on the Settings Page
If there are problems with the hard drive, BaseSpace Onsite sounds a loud alarm. The
Disable Alarm button on the Settings page allows you to turn off a current alarm.
See Replace Hard Drive on page 83 to continue.
CAUTION
Do not disable the alarm and ignore the warning. Failure could lead to irretrievable data
loss.
Replacement Procedures
You have received a spare hard drive and power supply module with the instrument. If
needed, you can perform the replacement without calling Illumina, using the instructions
in this section.
To order more, use the following part numbers:
Part
Nomenclature
Part Number
Power Supply PSU 750W 1U CRPS 80PLUS PLATINUM 10535S
Hard drive
Hard Drive, 2 TB SATA, 6GB/S
15049450S
82
Part # 15049148 Rev. E
Admin Tasks
Replace Power Supply Module
1
Remove the power cord from the power supply.
2
Press the green and black tab and slide the power supply out.
Figure 13 Slide Power Supply Out
3
Push the new power supply into the slot and make sure that it is seated properly.
Figure 14 Reseat Power Supply
4
Attach the power cord to the power supply.
Replace Hard Drive
1
Lift the green tab on hard drive tray, and then pull out the drive.
Figure 15 Lift Tab
BaseSpace Onsite v2.0 System Guide
83
Figure 16 Pull Drive Out
2
Remove the 3 screws on each side of the carrier, then remove the old drive from the
carrier.
Figure 17 Remove Drive From Carrier
3
Attach the new drive to the carrier.
4
Insert the new drive into the bay and make sure the tray latches closed.
The new drive is automatically rebuilt.
5
Go to the Settings page in the Admin Panel, and click Enable Alarm.
Error Codes
If there is an issue with your system, BaseSpace Onsite sends an email alert. The possible
codes and descriptions are listed in this topic to help you troubleshoot.
Error Code/
Item ID
Item Name
Message
Status
Pwr_Unit_
Status
Power Unit Status
The power unit has detected a shutdown
Error
Pwr_Unit_
Status
Power Unit Status
The power unit has detected that the system has been
turned on
OK
Pwr_Unit_
Status
Power Unit Status
The power unit has detected a loss of AC power
Error
Pwr_Unit_
Status
Power Unit Status
The power unit has detected that the AC power has been
restored
OK
Pwr_Unit_
Status
Power Unit Status
The power unit has detected a soft-power failure
Error
Pwr_Unit_
Status
Power Unit Status
The power unit has recovered from a soft-power failure
OK
84
Part # 15049148 Rev. E
Item Name
Message
Status
Pwr_Unit_
Status
Power Unit Status
The power unit has detected an unexpected failure
Error
Pwr_Unit_
Status
Power Unit Status
The power unit has recovered from an unexpected failure
OK
PU_$C
Power supply unit
number $C
The power supply is no longer redundant due to power
unit number $C failing
Error
PU_$C
Power supply unit
number $C
The power supply is no longer redundant due to power
unit number $C failing
Error
PU_$C
Power supply unit
number $C
The power supply is no longer redundant due to power
unit number $C failing
Error
PU_$C
Power supply unit
number $C
The power supply is no longer redundant due to power
unit number $C failing
Error
PU_$C
Power supply unit
number $C
The power supply is no longer redundant due to power
unit number $C failing
Error
PU_$C
Power supply unit
number $C
The power supply is no longer redundant due to power
unit number $C failing
Error
PU_$C
Power supply unit
number $C
The power supply is no longer redundant due to power
unit number $C failing
Error
PU_$C
Power supply unit
number $C
The power supply is redundant again
OK
IPMI
IPMI Watchdog
The hardware monitor has detected an expired timer
Error
IPMI
IPMI Watchdog
The hardware monitor has detected hard reset of the
system
Error
IPMI
IPMI Watchdog
The hardware monitor has detected that the system is
shutting down
Error
IPMI
IPMI Watchdog
The hardware monitor has detected that the system is
restarting
Error
IPMI
IPMI Watchdog
The hardware monitor has detected a timer interrupt
Error
Phy_Sec
Physical Security
The system cover has been opened
Error
Phy_Sec
Physical Security
The system cover has been closed
OK
Phy_Sec
Physical Security
The system has been unplugged from the network
Error
Phy_Sec
Physical Security
The system network connection has been restored
OK
FPB
Front Panel Board
The front panel board has detected a critical interrupt error
Error
SMI
System Board Timeout
The system board has detected a timeout
Error
SMI
System Board Timeout
The system board has recovered from a timeout
OK
SE
System Event
There was a PEF Action detected
Error
BaseSpace Onsite v2.0 System Guide
85
Admin Tasks
Error Code/
Item ID
Error Code/
Item ID
Item Name
Message
Status
SB
System Board
The system board has detected that the power button has
been pressed
OK
SB
System Board
The system board has detected that the reset button has
been pressed
OK
VR
Voltage Watchdog
The voltage sensor has detected that the voltage is not
within normal range
Error
VR
Voltage Watchdog
The voltage sensor has detected that the voltage is back
within normal range
OK
F_$C
Fan number $C
The fans are no longer redundant due to fan number $C
failing
Error
F_$C
Fan number $C
The fans are no longer redundant due to fan number $C
failing
Error
F_$C
Fan number $C
The fans are no longer redundant due to fan number $C
failing
Error
F_$C
Fan number $C
The fans are no longer redundant due to fan number $C
failing
Error
F_$C
Fan number $C
The fans are no longer redundant due to fan number $C
failing
Error
F_$C
Fan number $C
The fans are no longer redundant due to fan number $C
failing
Error
F_$C
Fan number $C
The fans are no longer redundant due to fan number $C
failing
Error
F_$C
Fan number $C
The fans are redundant again
OK
TEMP
System Board
Temperature
The system board temperature has exceeded the normal
range
Error
TEMP
System Board
Temperature
The system board temperature is back within normal
range
OK
BMC_FW
BMC Firmware Health
The BMC board has detected a sensor failure
Error
F1
Fan 1
Fan number 1 is not functioning
Error
F1
Fan 1
Fan number 1 is functioning
OK
F2
Fan 2
Fan number 2 is not functioning
Error
F2
Fan 2
Fan number 2 is functioning
OK
F3
Fan 3
Fan number 3 is not functioning
Error
F3
Fan 3
Fan number 3 is functioning
OK
F4
Fan 4
Fan number 4 is not functioning
Error
F4
Fan 4
Fan number 4 is functioning
OK
F5
Fan 5
Fan number 5 is not functioning
Error
86
Part # 15049148 Rev. E
Item Name
Message
Status
F5
Fan 5
Fan number 5 is functioning
OK
PS_$C
Power supply number
$C
The number $C AC power supply is no longer available
Error
PS_$C
Power supply number
$C
The number $C AC power supply has just been connected
OK
PS_$C
Power supply number
$C
The number $C AC power supply has recovered from
failure
OK
PS_$C
Power supply number
$C
The number $C AC power supply has detected a failure
Error
PS_$C
Power supply number
$C
The number $C AC power supply has recovered from a
predictive failure
OK
PS_$C
Power supply number
$C
The number $C AC power supply has detected a predictive
failure
Error
PS_$C
Power supply number
$C
The number $C AC power supply has been lost
Error
PS_$C
Power supply number
$C
The number $C AC power supply has been restored
OK
PS_$C
Power supply number
$C
The number $C AC power supply has resolved the
configuration error for a vendor mismatch
OK
PS_$C
Power supply number
$C
The number $C AC power supply has detected a
configuration error for a vendor mismatch
Error
PS_$C
Power supply number
$C
The number $C AC power supply has resolved the
configuration error for a revision mismatch
OK
PS_$C
Power supply number
$C
The number $C AC power supply has detected a
configuration error for a revision mismatch
Error
PS_$C
Power supply number
$C
The number $C AC power supply has resolved the
configuration error for a missing processor
OK
PS_$C
Power supply number
$C
The number $C AC power supply has detected a
configuration error for a missing processor
Error
PS_$C
Power supply number
$C
The number $C AC power supply has resolved an
unexpected configuration error
OK
PS_$C
Power supply number
$C
The number $C AC power supply has detected an
unexpected configuration error
Error
CBPB
Chassis Back Panel
Board
The panel board in the back of the chassis has changed to
being offline
Error
CBPB
Chassis Back Panel
Board
The panel board in the back of the chassis is back online
OK
P_$C
Processor number $C
The processor number $C has exceeded the normal range
Error
P_$C
Processor number $C
The processor number $C is back within the normal range
OK
BaseSpace Onsite v2.0 System Guide
87
Admin Tasks
Error Code/
Item ID
Error Code/
Item ID
Item Name
Message
Status
P_$C
Processor number $C
The processor number $C has been detected
OK
P_$C
Processor number $C
The processor number $C is not being detected
OK
P_ERR_$C
Processor number $C
digital state error
The processor number $C has detected a digital state error
Error
P_ERR_$C
Processor number $C
digital state error
The processor number $C has recovered from a digital
state error
OK
P_TEMP_$C
System temperature
The system temperature has exceeded its threshold
Error
P_TEMP_$C
System temperature
The system temperature is back within normal operating
range
OK
PS_FAN_$C
Power Supply Fan $C
The power supply fan number $C has failed
Error
PS_FAN_$C
Power Supply Fan $C
The power supply fan number $C has been restored
OK
M_$C
Memory Sensor
number $C
The thermal sensor at memory location $C has exceeded its
threshold
Error
M_$C
Memory Sensor
number $C
The thermal sensor at memory location $C is back within
normal range
OK
HD_$C
Disk in slot $C
Disk rebuild in progress at slot $C
Error
HD_$C
Disk in slot $C
Disk rebuild at slot $C has completed
OK
HD_$C
Disk in slot $C
Disk at slot $C is no longer online
Error
HD_$C
Disk in slot $C
Disk at slot $C is back online
OK
HD_$C
Disk in slot $C
Disk at slot $C is no longer working
HD_$C
Disk in slot $C
Disk at slot $C is no functioning correctly again
LV_$B
Logical volume $B with
capacity $C $D
The logical volume at $B size $C $D is not currently active
88
Error
Part # 15049148 Rev. E
For technical assistance, contact Illumina Technical Support.
Table 2 Illumina General Contact Information
Website
Email
www.illumina.com
[email protected]
Table 3 Illumina Customer Support Telephone Numbers
Region
Contact Number
Region
North America
1.800.809.4566
Italy
Australia
1.800.775.688
Netherlands
Austria
0800.296575
New Zealand
Belgium
0800.81102
Norway
Denmark
80882346
Spain
Finland
0800.918363
Sweden
France
0800.911850
Switzerland
Germany
0800.180.8994
United Kingdom
Ireland
1.800.812949
Other countries
Contact Number
800.874909
0800.0223859
0800.451.650
800.16836
900.812168
020790181
0800.563118
0800.917.0041
+44.1799.534000
Safety Data Sheets
Safety data sheets (SDSs) are available on the Illumina website at
support.illumina.com/sds.html.
Product Documentation
Product documentation in PDF is available for download from the Illumina website. Go
to support.illumina.com, select a product, then click Documentation & Literature.
BaseSpace Onsite v2.0 System Guide
Technical Assistance
Technical Assistance
15049148
Part # 15049148 Rev. E
Illumina
San Diego, California 92122 U.S.A.
+1.800.809.ILMN (4566)
+1.858.202.4566 (outside North America)
[email protected]
www.illumina.com