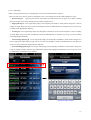
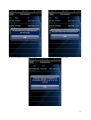
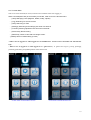
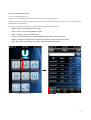
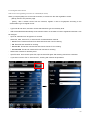
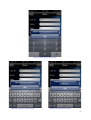
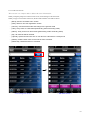
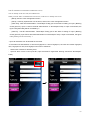
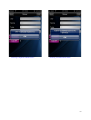
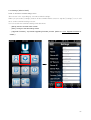
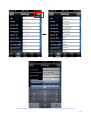
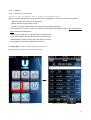
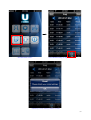
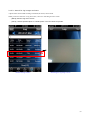
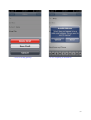
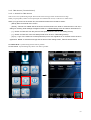
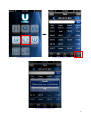
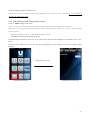
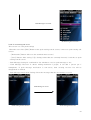
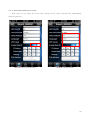
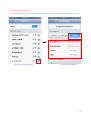
1
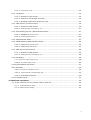
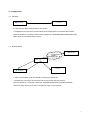
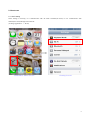
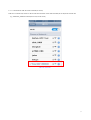
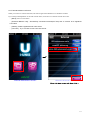
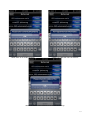
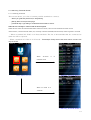
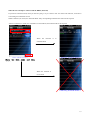
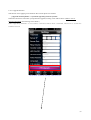
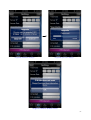
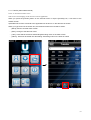
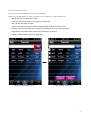
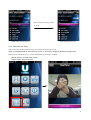
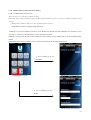
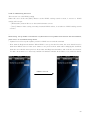
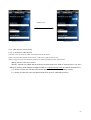
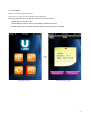
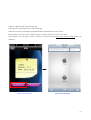
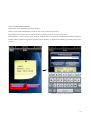
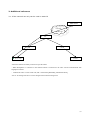
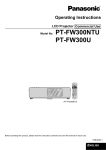
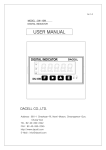
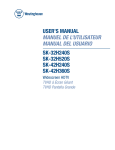
< i-UNIS User Manual > 1. Configuration ............................................................................................................ 3 1.1. AP Mode .......................................................................................................... 3 1.2. Network Mode .................................................................................................... 3 2. How to use ................................................................................................................ 4 2-1. Wi-Fi Setting ....................................................................................................... 4 2-1-1. Communicate with AP mode Terminal(AC-F100) ........................................................ 5 2-1-2. Communicate with terminal(AC-F100) through inner network ........................................... 6 2-4. Email setting ....................................................................................................... 7 2-3. Downloading i-UNIS and installation ........................................................................... 9 2-4. Running the program ........................................................................................... 10 2-5. Intro Menu ....................................................................................................... 11 2-6. External Network List Screen ................................................................................. 12 2-7. Searching Terminals Screen .................................................................................. 14 2-7-1. Searching Terminals ....................................................................................... 14 2-7-2. Login Dialog ............................................................................................... 16 2-8. Terminal Menu .................................................................................................. 18 2-9. User (Administrator Mode)..................................................................................... 19 2-9-1. User management screen .................................................................................. 19 2-9-2. Register Users Screen ..................................................................................... 20 2-9-3. Edit Users Screen .......................................................................................... 22 2-9-4. Detailed User Search Screen .............................................................................. 23 2-9-5. Detailed user information modification screen) ....................................................... 25 2-10. Settings (Admin Mode) ..................................................................................... 27 2-10-1. Search for Terminal settings screen .................................................................. 27 2-10-2. Edit terminal settings screen .......................................................................... 28 2-10-3. Upgrade firmware ........................................................................................ 30 2-11. Transfer (Administrator Mode) .............................................................................. 32 2-11-1. Search for transfer screen ............................................................................. 32 1 2-11-2. Edit transfer screen .................................................................................... 33 2-12. Log Screen .................................................................................................... 34 2-12-1. Search for logs screen .......................................................................... 34 2-12.2. Search for log images and save .............................................................. 36 2-12-3. Sending emails and temporary save........................................................ 37 2-13. T&A Screen (Terminal Menu) .......................................................................... 39 2-13-1. Search for T&A Screen .......................................................................... 39 2-13-2. Sending emails and temporary save .................................................................. 41 2-14. Push Setting Screen (Administrator Mode)) ...................................................... 41 2-14-1. DDNSSetting search screen .......................................................................... 41 2-14-2. Push Setting Edit Screen .............................................................................. 42 2-15. Administrator Mode ....................................................................................... 43 2-16. DDNS Setting (Administrator Mode) ................................................................ 44 2-16-1. DDNS Setting Search Screen ......................................................................... 44 2-16-2. DDNS Setting Edit Screen ............................................................................ 45 2-17. T&A Screen (Intro Menu) ............................................................................... 46 2-17-1. Search for T&A Screen .......................................................................... 46 2-17-2. Sending emails and temporary save .................................................................. 48 2-18. T&A Setting .................................................................................................... 48 2-18-1. Search for T&A setting screen .......................................................................... 48 2-18-2. Edit T&A setting screen............................................................................... 49 2-19. Synchronization Info Screen ................................................................................. 51 2-20. Information ..................................................................................................... 52 2-20-1. Search for information screen......................................................................... 52 2-20-2. App Download or Downloading App ................................................................ 53 2-20-3. Download Firmware .............................................................................. 55 2-21. Automatic Logout .............................................................................................. 57 3. Additional reference? ........................................................................................... 59 3.1. If the network net only can be used in static IP ................................................... 59 3-1-1. Terminal Static IP setting ............................................................................... 60 3-1-2. IPhone Static IP Setting ................................................................................. 61 2 1. Configuration 1.1. AP Mode ● AC-‐F100 i-UNIS - In case of terminal(AC-F100) performs AP function - A smartphone can connect to the terminal AP and communicate on the same WiFi network. - Name of default AP: smartiAp_serial number, password: 1234567890 [WEP128/Shared Mode] - Basic setup when released from a factory. 1.2. Network Mode Internet UNIS Server WAN/LAN AP i-UNIS ● AC-‐F100 - In case of terminal(AC-F100) has already connected to specific AP - A smartphone connects to the same AP and communicates with the terminal - Name of default AP: unisSvrAP, password: 1234567890 [WPAPSK_AES/Shared Mode] - Server AP setup above can modify in the settings menu on the terminal. 3 2. How to use 2-1. Wi-Fi Setting Wi-Fi setting is necessary, if it communicates with AP mode Terminal(AC-F100) or if it communicates with terminal(AC-F100) through inner network. ( Settings Application → Wi-Fi) <SmartPhone Menu Screen> <Setting Screen> 4 2-1-1. Communicate with AP mode Terminal(AC-F100) If Wi-Fi is switched off, switch on Wi-Fi and select network of AP mode terminal(AC-F100) from network list. (e.g. SmartiAP_9900032 terminal(AC-F100) of AP mode) <Wi-Fi Screen> 5 2-1-2. Communicate with terminal(AC-F100) through inner network If Wi-Fi is switched off, switch on Wi-Fi and select inner network from network list. (e.g. Inner network : unisSvrAP) If password is set, type password and tap [join]. <Wi-Fi Screen> < Typing Password Screen > 6 2-4. Email setting Email account is needed to send log info or T&A info of i-Unis. (Setting Application → Mail, Contacts, Calendar → Add Account) <Smart phone menu screen > <Setting Screen> 7 < Mail, Contacts, Calendar Screen> <New Account Screen> <Add Account… Screen> <IMAP Screen> 8 2-3. Downloading i-UNIS and installation Connect to http://www.virditech.com/iunis in the iPhone browser. Tap the iPhone App icon on the top and download the application. When warning message box appears, tap [install] and install. <Download web page> < Installing Screen> 9 2-4. Running the program Tap i-UNIS icon and run the program. Initial screen is shown, and it moves to intro menu automatically within 2-3 seconds. <iUnis Icon> <Initial Screen> 10 2-5. Intro Menu This screen displays available featured menus and internal/external connection divergent menus before log in to the terminal - [Inner Network] : A case of terminal(AC-F100) and iUnis application existing on the same network. - [External Network] : A case of iUnis application connecting to terminal(AC-F100) of a remote place - [T&A]: T&A Menu - [About]: Application Information <Intro Menu Screen> 11 2-6. External Network List Screen When you connect to external network, host names registered in DDNS server should be enrolled. If you click [terminal] button on external network menu, it will move to external network list screen. - [Back] : Move to intro menu - [Extermal Network List] : Successfully connected terminal(AC-F100) tries to connect as a registered host name - [Delete] : Delete registered host name server - [Connect} : Try to connect to new host name server Click <External Network Menu Screen> <External Network List> Enter the host name and then click→ 12 <When there is no content entered> <When non-valid host name is entered> <When the status of the network is not smooth or working> 13 2-7. Searching Terminals Screen 2-7-1. Searching Terminals This screen shows you a list of current possible terminals to connect. - When you grab and pull the list, it will [refresh]. - [Back]: Move to the previous page - [termanal list]: Login dialog of a selected terminal will be shown. When the user attempts to connect with an internal option. When the user clicks the internal manu button at the intro menu, it moves to the terminal list search screen. At the bottom, a current network status (3G, currently connected AP SSID, Disconnected) will be exposed or revealed. - When a terminal (AC-F100) is in Network Mode: The list of all terminals that are connected to same net will be exposed. - When a terminal AC-F100 is in AP mode : Terminal(AC-F100) which have been tried to connect can only be shown. When AC-F100 is in Network mode < Searching Terminals Screen > <Intro Menu Screen> When AC-F100 is in AP mode < Searching Terminals Screen > 14 When the user attempts to connect with the DDNS (External) If you select external network, when you choose a [list], or try to connect a new one on the host name list, it will move to searching for terminal list screen. When a terminal (AC-F100) is in Network Mode: Only corresponding terminal to the name will be exposed. - When a terminal (AC-F100) is in AP Mode: In a terminal list, the terminal will not be exposed Click When the terminal is in Network Mode < Searching Terminals Screen > <Intro Menu Screen> Enter the host name and then click↘ When the terminal is in AP mode < Searching Terminals Screen > 15 2-7-2. Login Dialog When you click [Terminal List], a login dialogue of the selected terminal will be exposed - There are many ways such as password, fingerprint, card, card or fingerprint, and card and fingerprint to log in. └ Password log in : Type your password on login dialog and click [OK]. You can log in as an admin. (Default password is 9999, and it can be changed in the terminal settings menu.) └ Fingerprint log in : Leave login dialog empty and click [OK]. Terminal(AC-F100) will be changed as a state of waiting for input. When you put your FP on Terminal(AC-F100) for authentication, it will allow you to log in as user or admin mode depending on authority. └ Card log in : Leave login dialog empty and click [OK]. Terminal(AC-F100) will be changed as a state of waiting for input. When you put a card on Terminal(AC-F100) for authentication, it will allow you to log in as user or admin mode depending on authority. └ Card or Fingerprint log in : Leave login dialog empty and click [OK]. Terminal(AC-F100) will be changed as a state of waiting for input. When you put your FP or a card on Terminal(AC-F100) for authentication, it will allow you to log in as user or admin mode depending on authority. └ Card and Fingerprint log in: Leave login dialog empty and click [OK]. Terminal(AC-F100) will be changed as a state of waiting for input. After the card authorization followed by fingerprint identification, one can log in as a user or administrator according to one’s authority. Click < Searching Terminals Screen > < Terminal Login Screen > 16 <Warning of duplicate administrators request> <Warning of authentication fail> <When DDNS is set to a non-active.> 17 2-8. Terminal Menu This screen shows terminal(AC-F100) connection and available menus after logging in. When a terminal(AC-F100) is successfully connected, it will move to the terminal menu. - [User]: Managing users (Register, delete, modify, upload) - [Log]: Searching for access records - [T&A]: Searching for T&A - [Settings]: Searching and modifying set value of a terminal - [Transfer]: Sending uploaded users from other terminals - [Disconnect]: Disconnecting - [RealTime] : Move to view real time image screen. - [DDNS]: Move to DDNS setting (screen) - When a user is logged in or when logged in as an administrator: All menu will be activated with administrator login. - When a user is logged in or when logged in as a general user) : It general user logs in, [Users], [Settings], [Transfer], [RealTime], and [DDNS] button will be deactivated. <Admin Mode Terminal Menu Screen> <User Mode Terminal Menu Screen> 18 2-9. User (Administrator Mode) 2-9-1. User management screen This screen is for managing users information (enroll, delete, modify and import). When you press [Users] button on terminal menu or select [users] tab, it will move to list of users who are registered on a terminal(AC-F100) as below. If you type a word in the search box, you will get all the results that have the word. - [Back] : Move to the terminals menu screen - [Add] : Move to new users registration screen - [Edit] : Change to the user list edit mode - [UID] : Users will be sorted into descending/ascending order on the basis of UID - [Name] : Users will be sorted into descending /ascending order on the basis of names - [User list] : Move to searching for a chosen user and modification screen <Terminal Menu Screen> <User management screen> 19 2-9-2. Register Users Screen This screen is for registering a new user on a terminal(AC-F100). When you tap the [add] icon on the user list screen, it will move to the user registration screen. - [Back] : Move to the previous page. - [Save] : After a buzzer sound from the terminal, register a card or fingerprints according to the authentication type to register a user. - Type user ID and name, and then choose authentication type and authority level. - UID will be selected automatically as the lowest number on the basis of current registered users but it can be changed. - Up to 20 characters can be typed in for a name. - Select FP, Card, Card or FP, or Card and FP for authentication method. └ Card: Enroll a card that issued for a terminal and use the card for clocking. └ FP: Enroll FP and used FP for clocking. └ Card or FP : Enroll both card and FP and choose card or FP for clocking. └ Card and FP : Enroll both card and FP and use both for clocking. - Select user or admin for authority level. - Input FP twice. Once a user inputs FP, input the same FP again after buzzing sound from a terminal. - If you select “Card or FP” or “Card and FP”, clocking with card will be prioritized. <User management screen> < User Registration Screen > 20 <Warning of not typing UID or name> <Warning of duplicate authentication> <Warning of authentication failed> 21 2-9-3. Edit Users Screen This screen is to import and to delete the user information. When you tap the [edit] icon on the user list screen, it will change to edit user mode. When you type a word in the search box, all the results with the word will be shown. - [Back] : Move to terminals menu screen. - [Add] : Move to new user registration screen. - [Cancel] : Cancel the edit mode and change to the general mode - [UID] : Array users on a UID basis (Descending order/ Ascending order) - [Name] : Array users on a name basis ((Descending order/ Ascending order) - [all] : All users list will be checked. - [Upload] : Upload chosen user info on user list from a terminal to a smart phone - [Delete] : Delete chose users on the user list from a terminal. - [Delete All] : Delete all users on a terminal. <User Management Screen> < Edit User Screen > 22 2-9-4. Detailed User Search Screen You can search for registered user info, and add FP/Card. When you choose each user on the [user list] screen, it will move to the search user screen. - [Back] : Move to the previous page - [Edit] : Change to the modifying user info mode - [Add card] : Add card authentication. Terminal(AC-F100) gets to the state of waiting for input. (Buzzing sound goes off.) Input a card for terminal authentication on terminal(AC-F100). If input is successful, the figure next [Add Card] will be increased by 1. - [Add FP] : Add FP authentication. Terminal(AC-F100) gets to the state of waiting for input. (Buzzing sound goes off.) Input FP for terminal authentication on terminal(AC-F100). If input is successful, the figure next [Add FP] will be increased by 1. - Input FP twice. Once a user inputs FP, input the same FP again after buzzing sound from terminal(ACF100). Click <User Management Screen> < User Modification Screen > 23 <Warning of duplicate authentication> <Warning of authentication failed> 24 2-9-5. Detailed user information modification screen) You can modify saved users info, and add FP/Card. When you click “Edit” on detailed users info screen, it will move to modify user screen. - [Back] : Move to user management screen. - [Save] : Currently inputted user info is saved, and move to user management screen. - [Add card] : Add card authentication. Terminal(AC-F100) gets to the state of waiting for input. (Buzzing sound goes off.) Input a card for terminal authentication on terminal(AC-F100). If input is successful, the figure next [Add Card] will be increased by 1. - [Add FP] : Add FP authentication. Terminal(AC-F100) gets to the state of waiting for input. (Buzzing sound goes off.) Input FP for terminal authentication on terminal(AC-F100). If input is successful, the figure next [Add FP] will be increased by 1. - Up to 20 characters can be entered for the name. - If the method of authorization is ‘card and fingerprint’ or ‘card or fingerprint’, the user can choose fingerprint, card, ‘fingerprint or card, and ‘fingerprint and card’ to authorize. - Select user or admin for authority level. - Input FP twice. Once a user inputs FP, input the same FP again after buzzing sound from terminal(AC- F100). <Detailed user search screen> <Modify user screen> 25 <Warning of duplicate authentication> <Warning of authentication failed> 26 2-10. Settings (Admin Mode) 2-10-1. Search for Terminal settings screen This screen is for searching for current terminal settings. When you press the [settings] button on the terminal menu screen or tap the [settings] icon, it will move to the terminal settings screen. You can search for terminal settings and edit them. - [Back] : Move to terminal menu screen. - [Edit] : Change to the edit settings mode. - [Upgrade Firmware] : It proceeds upgrading firmware process. (Refer to 2-12-3. Upgrade firmware for details.) <Terminal Menu Screen> <Searching for terminal settings screen> 27 2-10-2. Edit terminal settings screen This screen is for editing terminal settings. When you tap [Edit] on search for terminal settings screen, it will move to edit terminal settings screen. - [Back] : Move to terminal menu screen. - [Save] : Save changed settings and change to general mode. - [Upgrade Firmware] : It proceeds upgrading firmware process. (Refer to 2-12-3. Upgrade firmware for details.) - Terminal ID: ID that identifies a terminal - Terminal Name : Name of a terminal - Server AP : SID of AP Network Mode - Password : Password of AP Network Mode - AP Security : Security Type of AP Network Mode - Server IP : Unis Server IP (It is valid only when Unis server is installed) - Server Port : Unis Server Port (It is valid only when Unis server is installed) - Ring volume: The volume of warning sound - Access Code: Password to log in a terminal. - LED On/Off: Decide to use LED or not └ On: Blue LED stays on └ Off: LED maintains flickering status or lights - T&A voice On/Off : Decide to use T&A Voice function or not - Voice volume : The volume for the voice function - Language : Setting a language for the voice function on a terminal - LFD Level: Sets up the fake finger detection feature - Static IP address confirmation for use: Sets up whether to use a static IP or not. - Firmware : Terminal firmware version 28 < Search for terminal settings screen> <Edit terminal settings screen> <It appears when you press “Save” with leaving some section empty on settings.> 29 2-10-3. Upgrade firmware This function is for applying saved firmware file on smart phone to a terminal. - [Upgrade firmware] Button : It proceeds upgrading firmware process. If firmware file doesn’t exist when you tap firmware upgrade, warning screen will be shown. (Refer to 2-21-2. Firmware Download when warning screen shown.) When upgrading firmware is successful, it will disconnect from a terminal, and move to search for terminal screen. <Search for terminal settings / Edit screen> 30 <Upgrade firmware dialog> <Upgrade process dialog> < It appears if firmware file doesn’t exist > 31 2-11. Transfer (Administrator Mode) 2-11-1. Search for transfer screen This screen is for managing saved user info on iUnis application. When you press the [transfer] button on the terminal menu or tap the [transfer] icon, it will move to the transfer screen. Uploaded user list from a terminal to the application will be shown on the edit user list screen. When you type a word in the search box, all names that have the word will be shown. - [Back] : Move to terminal menu screen. - [Edit] : Change to the edit user mode - [UID] : Users will be sorted into descending/ascending order on the basis of UID - [Name] : Users will be sorted into descending /ascending order on the basis of names <Terminal Menu Screen> < Search Transfer list Screen > 32 2-11-2. Edit transfer screen This screen is for editing saved user info on iUnis application. When you press [Edit] button on search for transfer screen, it will move to edit transfer screen. - [Back] : Move to terminal menu screen. - [Cancel] : Cancel edit mode and change to general mode - [all] : All user list will be checked. - [UID] : Users will be sorted into descending/ascending order on the basis of UID - [Name] : Users will be sorted into descending /ascending order on the basis of names - [Download] : Download chosen users from application to a terminal - [Delete] : Delete chosen users from application < Search Transfer list Screen > <Edit Transfer list Screen> 33 2-12. Log Screen 2-12-1. Search for logs screen This screen is for searching for logs of clocking on terminal(AC-F100). When you press the [log] button on the terminal menu or tap [log] icon, it will move to search logs screen. - When you grab and pull the list, it will refresh. - [Back] : Move to terminal menu screen.. - [Email] : Log list of a related date is saved as csv file and send it to email. If email account is not set, a dialog for checking email settings will appear. Refer to 2.4 Email settings menu and add an email account. - Starting time setting: Set up a specific time to start searching - Ending time setting: Set up a specific time to end searching) - [Search] Button: Search for logs within the range of set date - [Log List] Click: Move to log image search screen.) On Admin Mode : Allows searching for all logs of all the users On User Mode : Allows searching for all personal logs <Terminal Menu Screen> <Admin Mode Searching for logs Screen> 34 <Terminal Menu Screen> <User Mode Searching for logs Screen> <Warning of not setting email account> 35 2-12.2. Search for log images and save A photo of the moment that clocking on terminal(AC-F100) can be found. When you choose each user on log list screen, it moves to searching for users screen - [Back] : Move to log menu screen - [Save] : Save a specified photo in a smart phone. You can check it in photos. 클릭 <Search for logs screen> <Searching for log image screen> 36 2-12-3. Sending emails and temporary save This screen is for sending data of a specific date to email. When you tap [email], it will move to sending email screen. - [Cancel]: Move to previous screen. └ [Delete temporary save] : It doesn’t save a file and moves to previous screen. └ [Temporary Save] : A file is saved in drafts (actual email) of an email account which has been set on settings application.. └ [Cancel] : When you tap cancel, it will cancel. - [Send] : Send email - Recipient : When an email account is set on T&A Settings (Intro Menu), an email account for recipient will be inputted automatically. - log corresponding date.csv: It is an excel log data file or It is a log data file for Excel - log corresponding date.dat: It is a data file for merging the log file of a Remote Manager <Search for logs screen> <Sending Email Screen> 37 <A case of clicking [Delete]> <A case of inputting invalid address> 38 2-13. T&A Screen (Terminal Menu) 2-13-1. Search for T&A Screen This screen is for synchronizing simple T&A search and access logs, based on terminal access logs. When you press [T&A} button or select [T&A] tab on terminal menu screen, it will move to T&A screen. When you type a word in the search box, all names that have the word will be shown.. - [Back]: Move to terminal menu screen. - [Email] : T&A list of a related date is saved as csv file and send it to email. If email account is not set, a dialog for checking email settings will appear. Refer to 2.4 Email settings menu and add an email account. - [<] : Search for T&A info from the previous date (Period which is set on T&A setting screen). - [>] : Search for T&A info of the next date (Period which is set on T&A setting screen). - [Sync] : Logs of the latest two months(maximum) which are registered on a terminal will be saved in application. Based on saved access logs and set time on T&A setting screen, T&A info will be shown. On Admin Mode : Synchronizing all users data is possible. On User Mode : Synchronizing only his/her own data is possible. <Terminal Menu Screen> < Admin Mode T&A Screen > 39 <Terminal Menu Screen> < User Mode T&A Screen > <If email account doesn’t exist> 40 2-13-2. Sending emails and temporary save It works the same as Sending emails and temporary save of Log Screen. Refer to 2-14-3. Sending emails and temporary save) 2-14. Push Setting Screen (Administrator Mode)) 2-14-1. DDNS Setting search screen This screen is to search for push settings (Some models may not support this feature.) When the user presses the [Push] button at the terminal menu screen, it moves to push setting search screen. - Backwards Button: Move to the terminal menu screen - Edit] Button: Switch to push setting edit screen. If push message notification is non-active: if set “push” for the first time after installation of a terminal or set to ‘nonactive’ If push message notification is active: the message corresponding “receive settings” is sent to a recipient of push messages Push message is not on <Terminal Menu Screen> <Push Setting Search Screen> 41 Push Message is on mode <Push Setting Search Screen> 2-14-2. Push Setting Edit Screen This screen is to edit push settings When the user clicks [Edit] Button at the push setting search screen, it moves to push setting edit screen. - [Backwards] Button: Moves to the terminal menu screen.) - [Save] Button: After saving 수신? Setting values that are currently inserted, it switches to push setting search screen. - Push Message Setting for confirmation: Set whether to receive push message or not. - Push Message Receiver: It allows adding maximum 3 people. It can add 1 person per 1 Smartphone. If push message notification is non-active, then existing receiver list will be disappeared or deleted - Push Message Notification Setting: Select the message that the user wants to receive Push Message is not set <Push Setting Search Screen > <Push Setting Edit Screen> 42 When the push message setting is set up <Push Setting Search Screen > <Push Setting Edit Screen> 2-15. Administrator Mode This screen is for checking real time image on terminal and opening door locks. When you tap [RealTime] on terminal menu screen, it will move to displaying RealTime image screen. Real time gets refreshed every 1 to 3 seconds depending on network’s condition. - [Back] : Move to terminal menu screen. - [Doors Open] : Open door locks <Terminal Menu Screen> <Search for real time image screen> 43 2-16. DDNS Setting (Administrator Mode) 2-16-1. DDNS Setting Search Screen This screen is to search for DDNS setting When the user clicks [DDNS] button at the terminal menu screen, it moves to DDNS setting search screen - [Backwards] Button: Moves to the terminal menu screen - [Edit] Button: Switches to DDNS setting edit screen. If DDNS is not in use or DDNS is non-active: if set “DDNS” for the first time after installation of a terminal or set to “non-active”. In this case, the terminal can not be connected to External. If DDNS is set up for the first time after installation of the terminal, the user should refer to AC-F100 DDNS setting manual. When DDNS is not in use or DDNS is active: it allows connecting to the terminal with External. A case of setting up to not use DDNS <Terminal Menu Screen> <DDNS Setting Search Screen> A case of setting up to use DDNS <DDNS Setting Search Screen> 44 2-16-2. DDNS Setting Edit Screen This screen is to edit DDNS setting When the user clicks the [Edit] Button at the DDNS setting search screen, it moves to DDNS setting edit screen. - [Backwards] button: Moves to the terminal menu screen. - [Save] Button: After saving currently inserted DDNS values, it switches to DDNS setting search screen.) DDNS setting : Set up whether to use DDNS or not) (When the user set up DDNS for the first time after the installation, please refer to AC-F100 DDNS setting manual. - Update Period: Set up the update period for DDNS server and the terminal - Host name & Registered number: When DDNS is set up for the first time, the user should receive them from DDNS server. If the user wants to use previous host name after changing the terminal, then the user should insert previous host name and Registered number, and click the save button. To add a host name is to insert any random 12 numbers and the host name to use, and save them. DDNS is set to off <DDNS Search> <DDNS Edit> 45 DDNS set On <DDNS Search > <DDNS Edit> 2-17. T&A Screen (Intro Menu) 2-17-1. Search for T&A Screen The same screen as search for T&A of terminal menu will be shown. When you press [T&A] button on intro menu, it will move to [T&A] menu screen. When you type a word on the searching window, all names including the word will be shown. - [Back] : Move to intro menu screen. - [Email] : T&A list of a related date is saved as csv file and send it to email. If email account is not set, a dialog for checking email settings will appear. Refer to 2.4 Email settings menu and add an email account. - [<] : Search for T&A info from the previous date (Period which is set on T&A setting screen). - [>] : Search for T&A info of the next date (Period which is set on T&A setting screen). 46 <Intro Menu Screen> < T&A Screen > <If email account doesn’t exist> 47 2-17-2. Sending emails and temporary save It works the same as Sending emails and temporary save of Log Screen. Refer to 2-14-3. Sending emails and temporary save. 2-18. T&A Setting 2-18-1. Search for T&A setting screen This is the set T&A search screen currently. When you select [settings] tab on T&A menu, it will move to search for T&A setting screen. - [Back] : Move to intro menu screen. - [Edit] : Change to setting edit mode 48 <Search for T&A setting screen> 2-18-2. Edit T&A setting screen This is the edit screen for modifying T&A info. When you click [Edit] on search for T&A setting screen, it will move to edit T&A setting screen. - - [Back]: Move to intro menu screen. - [Save]: Save data and move to the intro menu screen. Standard time : Set a standard time that can divide a day. E.g. If 04:00 is set, from 04:00 on that day to 04:00 on the next day will be set as a day. - Start work : Set a standard time of being late. E.g. When 09:00 is set, if the first clocking occurs after 09:00, it will be processed as being late. - End work : Set a standard time of leaving early / over time. E.g. When 18:00 is set, if the last clocking occurs before 18:00, it will be processed as leaving work early. If the last clocking occurs after 18:00, it will be processed as over time. - Lunch : Set lunch time which is not included in working hours. E.g. If from 12:00 to 13:00 is set, this hour won’t be included in working hours, - Dinner : Set dinner time which is not included in working hours. E.g. If from18:30 to 19:30 is set, this hour won’t be included in working hours. - Term : Set a period to be shown on T&A list - Email : Email address that would receive T&A(log) file. When you press [email] button on T&A (log) list, set email address is inputted automatically as recipient. 49 <Searching for T&A Setting Screen> <Edit T&A Setting Screen> <A case of inputting invalid email address> 50 2-19. Synchronization Info Screen This screen is to search for recent synchronization info with terminal(AC-F100). When you tap the Sync Info icon on the T&A menu, it will move to the T&A sync info screen. It will show the latest sync info list from each terminal. - [Back] : Move to the intro menu <Recent Terminal Sync Info list Screen> 51 2-20. Information 2-20-1. Search for information screen This screen is to search for info of installed iUNIS application. Please tap the [About] icon on the intro menu to move to the screen. - [Back]: Move to the intro menu - [Downloading firmware] : Move to downloading firmware file screen. - [Firmware Download]: Firmware download dialogue will be exposed or revealed <Intro Menu Screen> <Search for info Screen> 52 2-20-2. App Download or Downloading App This feature is to download the latest version of the app It will start to work? by clicking the app download button at the information search screen. If the firmware is the latest version: dialogue will be occurred to notify the version is at the latest. If the firmware is not the latest version: it will move to the web browser((http://www.virditech.com/iunis) that can download <Search for info Screen> <Download web page> 53 <A case of the latest version of app> 54 2-20-3. Download Firmware This function is for downloading the latest firmware. When you press [F/W Download] on search for info screen, it will start processing. If the firmware is the latest version: dialogue will be occurred to notify the version is at the latest If the firmware is not the latest version: firmware dialogue will be occurred The character that should be inputted in firmware dialog is firmware type. Basic firmware type is firmware, so download as firmware type unless specific notice is given. <Search for info Screen> <Dialog of firmware file download> 55 <A case of the latest firmware version> <A case of inputting invalid firmware name> 56 2-21. Automatic Logout After terminal login (entering terminal menu), if it doesn’t communicate with a terminal longer than 4 min, it will be disconnected from the terminal and logout automatically. After logout, a title shows in red as below. When you press a button that requires connection to a terminal, a dialog of selecting logout will appear. Tab shifting will be available after logging out. Latest data of transfer and T&A info can be searched. Only the latest data that has been searched before logging out can be searched for user, logs and setting info. - Logout dialog [OK] button: Move to intro menu screen. <A case of disconnection to terminal(AC-F100)> 57 <Running after log out from terminal(AC-F100)> < Features that need to be connected > 58 3. Additional reference 3.1. If the network net only can be used in static IP UNIS Server Internet WAN/LAN AP HUB HUB ● AC-F100 i-Unis - When the terminal is already connected to specific HUB - While Smartphone is connected to the terminal which is connected to the same AP and communicated with fingerprint terminal - Default AP Name or Title: unisSvrAP, PW: 1234567890 [WPAPSK_AES/Shared Mode] - Server AP setting at the above can be changed at the terminal setting menu. 59 3-1-1. AC-F100Terminal Static IP setting) - After select to use static IP at the iUnis setting screen, insert allocated IPs, SubnetMask, Gateway and save <Static IP is not in use or not active> <Static IP is in use or active> 60 3-1-2. IPhone Static IP Setting) - IPhone Setting App -> Insert IP, SubnetMask, GateWay, and DNS that are allocated from Wi-Fi Screen and save <IPhone Wi-Fi detailed setting> <IPhone Static IP Setting> 61