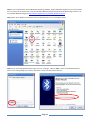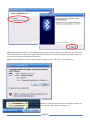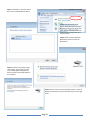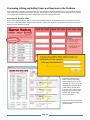
1
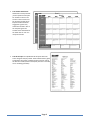
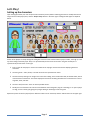
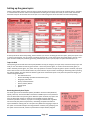
Quiz Show
User Manual
Tricalico Interactive
3933 W. Columbine Dr.
Phoenix, AZ 85029
www.tricalico.com
Copyright 2010, Tricalico Interactive
1.05
Table of Contents
About Quiz Show ........................................................................................................................................ 3
System Requirements ..................................................................................................................... 3
Quiz Show Features .................................................................................................................................... 4
Customizable Game Play features ......................................................................................................... 4
Customizable Topics and Questions features ....................................................................................... 6
Let’s Play ..................................................................................................................................................... 9
Setting up the Characters ...................................................................................................................... 9
Setting up the Game Topics................................................................................................................. 10
Randomly Generating Topics ......................................................................................................... 11
Specifying Topics ............................................................................................................................ 11
Retrieving a Saved Game ............................................................................................................... 12
Saving a Game ................................................................................................................................ 13
Printing Emcee Notes ..................................................................................................................... 13
Printing Student Worksheet (Just the Topics) ............................................................................... 13
Printing a list of Topics ................................................................................................................... 14
Playing a Game .................................................................................................................................... 15
About the Game Board .................................................................................................................. 15
Answering Questions ..................................................................................................................... 15
Questions containing Graphics and Audio ..................................................................................... 17
The Confidence Wager ................................................................................................................... 18
Playing the Final Exam (Bonus Round) ........................................................................................... 19
The Winner Congratulated ............................................................................................................. 20
Enabling/Disabling the Emcee Mode ............................................................................................. 20
Response Evaluation in the Emcee Mode ...................................................................................... 21
Other Controls in the Game Options dialog................................................................................... 21
Using the Wii Remotes (Wiimotes) and Nunchuks ............................................................................. 22
Previewing, Editing and Adding Topics and Questions to the Database ............................................... 28
Accessing the Question Editor ............................................................................................................. 28
Sorting and Filtering the Topics ........................................................................................................... 29
Previewing the Questions of a Topic ................................................................................................... 29
Understanding the Evaluation Criteria ................................................................................................ 30
Editing Topics, Questions, Answers, and Evaluation Criteria .............................................................. 31
Deleting Topics .................................................................................................................................... 31
Adding New Topics .............................................................................................................................. 31
Exporting / Importing Topics ............................................................................................................... 32
Return to the Game (Exiting the Question Editor) .............................................................................. 32
Best Practices / Suggestions / Tips .......................................................................................................... 33
Installing Quiz Show ................................................................................................................................. 34
Page 2
Quiz Show
About Quiz Show
Quiz Show is a highly interactive game from
Tricalico Interactive for two to four players
in competing to answer questions within
given topics using a television game show
format. The game will operate on Windows
PC or Macintosh. The game features
animated avatars, flexible game play, fully
customizable topics and questions, and can
use the Wii remotes (“Wiimotes”) from a
Nintendo Wii gaming system to provide a
unique buzzer system for player response as
an alternative to the default keyboard
response system. Quiz Show’s flexibility
makes the game suitable for any grade level.
It is great for family game play or
home/office/church gatherings as well.
System Requirements
Quiz Show is an Adobe Air 2.0 application and thus requires the same system requirements for the Adobe Air 2.0 framework,
whether running on a Windows computer, an Apple Macintosh, or a Linux-based workstation.
Windows
Minimum Processor: Intel® Pentium® III 1GHz or faster processor; Recommended: Pentium 4 2GHZ or faster
Operating System: Windows 7; Windows Vista® Home Premium, Business, Ultimate, or Enterprise including 64 bit editions,
Windows Vista SP1; Windows XP Tablet PC Edition SP2 and SP3, Windows XP SP2 and SP3, Windows 2003/2008
Server
Memory: 512 MB minimum (1 GB or more recommended)
Macintosh
Minimum Processor: Intel Core™ Duo 1.83GHz or faster processor (Sorry, the mac PowerPC is not supported)
Operating System: Mac OS 10.4, 10.5 or Mac OS 10.6
Memory: 512 MB minimum (1 GB or more recommended)
Linux (We don’t currently support Linux, but the program should run on the following)
Minimum Processor: Intel® Pentium® III 1GHz or faster processor; Recommended: Pentium 4 2GHZ or faster
Operating System: Fedora Core 12, Ubuntu 9.10, openSUSE 11.2
Memory: 512 MB minimum (1 GB or more recommended)
The following applies to all platforms:
Flash Player 10.0.15.3 or later is needed for installation from the Internet. (available at www.adobe.com)
To utilize the Wii remotes with Quiz Show, your computer will need compatible Bluetooth capabilities, two wiimotes with
nunchuks (or four wiimotes) and the free WiiFlash Server installed (see page 22 for details.)
FOR INSTRUCTIONS ON DOWNLOADING AND INSTALLING QUIZ SHOW, SEE PAGE 34.
Page 3
Quiz Show Features
Customizable Game Play
•
Support for up to four players/teams.
•
Two unique response systems (“buzzers”) including Wiimote support: The
default keyboard response system assigns a keyboard key to each player. The
optional response system uses Wiimotes/Nunchuks from a Nintendo Wii gaming
system. The Wiimote system eliminates the need for players to be gathered
around a keyboard, and frees the keyboard for use by a host or emcee. Both
response systems remove the guesswork and argument over who ‘buzzed’ in
first. (Wiimotes/Nunchuks not included. Bluetooth connectivity required to use
the Wiimotes – see below for additional information)
•
Over 800 animated avatars: Choose from 76 animated avatars to represent
each player’s (or team’s) on-screen persona. Each avatar has clothing in eleven
colors providing over 800 unique combinations. There are thirty male heads, thirty female heads and sixteen animal
mascots (well-suited for team play). Avatars are animated, hitting their on-screen podium buzzer when a player
presses his/her keyboard key or Wiimote button.
•
Edit player names: Provide
on-screen player/team names
for each avatar.
•
Scores are updated and
displayed: Player scores are
automatically incremented or
decremented in response to
correct and incorrect answers
and displayed in real time.
•
Customizable Game Setup:
Game topics may be selected,
assigned randomly, or a
combination of the two. In
assigning topics randomly,
categories can be specified or
topics can be pulled from any
category.
•
Ability to restrict re-use of
recently used topics: Recently
used topics are marked so they are not used again within the next ten games. This feature may be turned off.
Page 4
•
Create games of varying
length: Games may consist of
one, two or three rounds.
Round One presents five
topics each with five questions
generally increasing in
difficulty and valued at 100,
200, 300, 400, and 500 points.
The optional Round Two is like
Round One, but the point
values are doubled to
200,400,600,800, and 1000
points. The optional Round
Three (the Final Exam bonus
round) may be used to
conclude a game by
presenting one question in
which players wager any
portion of their score on their
confidence to answer a
question from a revealed
topic. All players write their answer to the same question in the Final Exam bonus round. Games may be setup to
consist of:
o Round One, Round Two, and the Final Exam bonus round
o Round One only
o Round One with the Final Exam bonus round
o Round One and Round Two (without the Final Exam bonus round)
•
Ability to complete a game within a specific time limit: Game play can proceed to Round Two and/or the Bonus
Round before completing previous rounds. This provides flexibility for classroom time management.
Page 5
•
Specify the time limit for
players to answer a question:
On-screen clock presents the
countdown time remaining for
responding to a question. The
default time of five seconds
can be modified.
•
Host/teacher may alter scores:
If it is determined that a
player’s answer was not
correctly judged, score may be
easily corrected.
•
Red/green virtual lights
display show when players
may “buzz in” to answer a
question.
•
Updates to the software are
automatically deployed via an
internet connection. Internet
connectivity is not required for
game play.
Customizable Topics and Questions
•
Quiz Show includes over 250 prebuilt topics: Topics for game play may be selected from a database of over 250
topics that ship with the game, each containing five questions of increasing difficulty. Topics are grouped in seven
categories:
o Arts & Entertainment
o General Knowledge
o Geography and Culture
o History & Social Studies
o Science / Math / Nature
o Special Topics
o Sports
•
Questions may include graphics or
audio. Supported image formats
include JPG, GIF and PNG. Any MP3
audio file may be incorporated.
•
Add your own topics and
questions: Additional topics are
easily added to the question
database and may include graphic
or audio files, allowing teachers to
customize to their class content.
•
Specific games can be set up
beforehand, saved and retrieved:
This allows teachers to create specific games of class content during lesson preparation and save those games for
use and re-use in multiple classes or subsequent semesters and years.
•
Export/import topics and questions: Select topics to export to a file that can be imported on another computer with
Quiz Show. Share topics and questions with other teachers.
•
Unique evaluation algorithm allows
for multiple correct answers, and
leniency/strictness in spelling: In the
default mode of play, a player’s
answer response is entered into a
dialog box. Answer evaluation can be
set up to provide up to three correct
answers, and spelling can be
specified to be lenient in containing
two groups of matching letters or can
be very strict to require exact
spelling. Thus a player who would
spell “Marie Curie” as “Currie” could
still be given credit in one scenario,
but in a spelling question with a
correct answer of ‘aardvark’ would
be marked incorrect if they provided
‘ardvark’. This allows teacher to
create games and questions that best
match their course objectives and
outcomes.
Page 6
•
Alternative Emcee Mode allows the teacher/host to evaluate the answer. In the Emcee mode of play, answers are
not entered into a dialog box, but instead are evaluated by the instructor or emcee as being correct or incorrect and
duly noted by clicking one of two buttons. This can speed up game play, presents an experience more similar to a
television game show, and places the teacher in direct control of the game. Answers to the questions of a game can
be printed beforehand to use as a guide.
•
Topic names, questions, answers, and evaluation criteria may be modified for any question in the database. In
addition to adding your own content, any existing topics, questions, or answer criteria of the topics in the database
can be edited. This would include any content added form other instructors, etc.
•
Password protected access to the questions: Access to the database to review, edit or add questions is restricted by
password access, keeping students from altering or previewing questions.
•
•
Topics may be alphabetically sorted, viewed by category, sorted by last used, and searched.
Choose from three different formats to present a question containing an image:
o A text question/statement is followed by an image displayed at up to 840x480 pixel resolution. Larger
images are auto-scaled to the correct size.
o A text question/statement is presented on the left with a portrait-oriented image on the right displayed
simultaneously.
o A text question/statement is presented at the top with a landscape –oriented image displayed on the
bottom simultaneously.
•
Questions and answers for a game
can be printed: Questions and
answers for all three rounds may be
printed before game play. This allows
the teacher or host to have a guide in
responding to questions, as well as to
preview a game and modify the
questions if desired.
Page 7
•
Print student worksheets:
Worksheets can be printed of
just the questions with space
for students to write in the
answers. These can be used
for classroom review and to
keep the student audience
engaged in a game. They
could even be used in lieu of
the computer game as a
student review worksheet for
the whole class or even as a
unique test format.
•
Print list of topics: An alphabetical list of topics within the
seven categories may be printed. These could be used in game
setup where each player is allowed to pick a topic for each of
the first two rounds (and the emcee/host picks one or the fifth
one is randomly generated).
Page 8
Let’s Play!
Setting up the characters
Upon starting Quiz Show, four male and/or female characters (avatars) will be randomly generated. To modify these and to
assign names to each player/team, click the ‘Players Setup’ button in the lower right. A dialog box will appear as depicted
below.
All four of the players are setup through this dialog box and their avatars created. Select a player number, 1 through 4, at the
top of the dialog to edit that player. Player 1 is represented by the first avatar on the left in the game and Player 4 is
represented by the last avatar on the right.
1. Enter a name for the player or team in the textbox at the top right. Names are limited to displaying about ten
characters.
2. Choose a gender – male, female, or animal mascot for the representative avatar.
3. Choose a head by clicking on an image in the center of the dialog. There are30 male heads, 30 female heads, and 16
mascot heads to choose from. The avatar displayed at the left of the dialog will reflect the current decision in terms
of gender, head, and color.
4. Choose a shirt/dress color. There are eleven possible choices.
5. Modify the score if desired. This can be used to facilitate continued games, long-term standings, or to ‘spot’ a player
an edge, such as in family play giving the youngest sibling an advantage to start the game.
Repeat the process for all four players/teams. With the avatars are set as desired, click the ‘Hide X’ button in the upper right.
Page 9
Setting up the game topics
Click the ‘Game Setup’ button in the lower right to setup the topics for the game. Topics may be randomly chosen, specified,
or a combination of the two. Games can be specified as consisting of one round, two rounds, or three rounds. Games that
have been setup can be saved for later use and/or re-use and saved games can be retrieved in the Game Setup Dialog.
At the top left of the Game Setup dialog, choose whether you want to randomly generate the topics, specify the topics to use
or retrieve a saved game. You can choose to randomly generate all or some of the topics then specify others, retrieve a save
game and then modify it by randomly generating selected topics spots or specify topics to replace selected topics, etc.
Topic List Grid
The topic list grid on the left shows the topic # (database record), the category, the topic name, and how recently a topic was
used (0 = not used within the last ten games and 10 = used in the previous game, 9 = used in the second to last game, 8 =
used in the third previous game, etc.) If the “Use only questions not used in the past 10 games” option is checked, only topics
with a value of 0 for Last Used will be shown. Any of the columns may be sorted in ascending or descending order by clicking
the column heading. The drop down list above the grid can be used to filter topics so only those of a particular category are
viewed. Categories include:
o Arts & Entertainment
o General Knowledge (includes miscellaneous topics)
o Geography and Culture
o History and Social Studies
o Science / Math / Nature
o Special Topics
o Sports
Restricting Recently Used Topics
On the far right are three checkbox options (available in all three modes (Random/
Specify / Retrieve). The first checkbox restricts the available topics to only those that
have not been used in the past ten games. With this option checked, only topics that
have not been used recently are shown and are available for being randomly
selected or specified. However, any topics in a saved game will be used, regardless
of how recently they were used previously. Unchecking the option will make all
topics available for viewing and use. The option only affects the assigning of topics. If
the option is turned off and topics are assigned either randomly or by specifying and
the option is then turned off, it does not preclude those topics already assigned.
Page 10
Setting up the Game’s Rounds
The remaining two checkbox options allow for Round Two and the Final Exam (Bonus Round) to be toggled on or off. Thus a
game may be setup to include both Rounds One and Two and the Final Exam bonus round. This is the default game setup.
Round One consists of five topics each with five questions ranging in value from 1000 to 500 points. Round Two contains the
same number of topics and questions but with the point values doubled, ranging from 200 to 1000 points. Round One and
Round Two each contain a hidden “Confidence Wager” in which the player who chooses the question is allowed to wager up
to 1000 (or 2000 points in Round Two) on their confidence in answering the 300, 400, or 500 point level question for the
given topic. The Final Exam bonus round (aka Round Three) consists of one question on a presented topic. All players make a
wager on their confidence to answer a question on the given topic prior to seeing the question. All players answer the same
question, recording their wager and their answer on paper (or 3x5 cards). Both their wager and their answers are the
revealed to conclude the game, with both entered into the game via dialogs, resulting in the scores being updated and the
winner announced. Using these checkbox options, one can setup a game to consist of:
Include
Round Two
Checked
Checked
Unchecked
Unchecked
Include Final
Exam Round
Checked
Unchecked
Checked
Unchecked
Game Setup
Round One, Round Two, and the Final Exam bonus round
Round One and Round Two (without the Final Exam bonus round)
Round One with the Final Exam bonus round
Round One only
Randomly Generating Topics
Click the ‘Random’ title at the top left of the Game Setup dialog. Each of the topics
shown in the selected rounds has a checkbox and a drop box of categories. Use the
checkboxes to select which slots to randomly generate topics for. There are buttons
in the lower right to ‘Check All’ or ‘Uncheck All” as well. Unchecked topics slots will
not be generated. Use the drop down for each topic to select a desired category for
that slot, including selecting from ‘Any topic’. Once topic slots have been enabled
(checked) or disabled (unchecked) and any category choices have been made for the
enabled slots, click the ‘Generate Random’ button to have Quiz Show select the
topics for the enabled slots. You may click the ‘Generate Random’ button multiple
times to generate new selections.
Diversify
The ‘Diversify’ button in the lower right can be used to randomly generate topics that are spread out in various categories. No
two categories will appear in the same round (assuming that all topics are first checked). This provides a quick way to
randomly generate a diverse offering of topics. We recommend using the “Diversify” feature over the “Generate Random” as
a more balanced approach, especially for entertainment uses (home and office gatherings, etc.)
Specifying Topics
Click the ‘Specify’ title at the top left of the Game Setup dialog. Each of the topics shown in the selected rounds has a radio
button above it. Choose a topic slot by clicking its radio button. In the Topic grid, select a topic to include in the game. Click
the ‘Place Topic’ button in the lower right to assign the highlighted topic to the chosen slot. Repeat the process for any other
specified topics. Unassigned topics may be randomly generated using the method discussed above. (see illustration at the top
of the next page.) NOTE: The radio button selection will automatically proceed to the next slot once a topic has been
assigned.
Searching for topics
In the ‘Specify’ mode of the Game Setup dialog, topics may be searched from within the database by entering a word or
phrase in the textbox above the topic list grid and then clicking the ‘Go’ button.
Page 11
Retrieving a Saved Game
Click the ‘Retrieve’ title at the top left of the Game Setup dialog to open a saved game. Click the ‘Retrieve Game’ button in
the lower right to open the ‘RETRIEVE QUIZSHOW GAME’ dialog. Saved games have a .qzg extension. Select a saved game in
the dialog and click the ‘Open’ button. The topics clots will be filled with the saved topics. NOTE: The saved topics do not take
into account whether topics have been recently used or not. They will be played regardless, unless modified using the
Random or Specify modes to reassign topics. There is a “saved games” folder inside the My Documents > QuizShow Data
folder, although games may be saved to any location and subsequently retrieved from any location.
.
Page 12
Saving a Game
Once a game has been properly set up, i.e. there are topics assigned to each slot for the selected rounds, the game may be
saved to disk for later retrieval and play. Click the “Save to Disk” button to save the game. A standard Save File dialog box is
presented allowing for a location and filename to be provided. Files are saved with an extension of .qzg. The extension does
not need to be specified when entering the filename. Saved games may be transferred from one computer to another,
allowing for teachers to build communities for sharing topic and games (customized topics may also be exported/imported to
the Quiz Show database – see page 32 for more information.)
Printing the Emcee Game Notes
Click the “Print Emcee Game Notes” button on the right side of the ‘Game Setup’ dialog to print the topics, questions and
answers to the games. These are particularly useful for playing the game in the Emcee mode where the teacher/host/emcee
responds to the correctness of a player’s answer rather than entering the response into a dialog for evaluation.
Printing Student Worksheet (Just the Questions)
In the same manner, just the topics and questions can be printed without the answers. These could be used a student
worksheets with or without playing the game. An instructor might use these as a way for the class audience to take notes
during the game or even as a unique quiz format or a review game for all students to participate in instead of the game. Click
the “Print Q” button to generate these sheets.
Page 13
Printing a List of Topics
Clicking the “Print Topic List” button will generate a printout of the topics in the database listed alphabetically within the
seven categories. This serves as an inventory of existing topics when contemplating adding in new topics. It might also be
used in an entertainment setting for players to each choose a topic, with the emcee/hose choosing the fifth topic for each
round and the final exam topic (or generating those randomly). A sample printout of those topics that ship with Quiz Show
has been included at the back of this document.
Playing a Game
When a game has been retrieved or setup, the game can be played. Click the ‘Play Now’ button in the bottom right. The
button will only appear once a game has been retrieved or properly set up. This will load the topics into the game boards and
close the “Game Setup” dialog. A “Let’s Play” button will then appear in the bottom right of the Quiz Show game window.
Click ‘Let’s Play” to begin the game. The Quiz Show sign
rises and the curtains part to reveal the game board with
the topics selected for Round One. Audio of the studio
audience clapping is heard and the four player avatars
join in the clapping. One of the four players is randomly
selected to be “in control” of the board to start the game
and they get to choose any topic and value. Click the ‘OK”
button to dismiss the dialog, and then click the desired
topic/value space on the board to reveal its question.
Page 14
About the Game Board
The three red/green ‘lights’ in the upper left of the game board simply serve as a visual of the
Rounds that are part of this particular game. THE left most light represents Round One and is
always green for every game contains the first round. The middle light represents Round
Two. If the game contains a Round Two setting it will be green; if not, the light will be red. The right light represents the Final
Exam (Bonus) Round. Likewise it will be green if the current game includes a Final Round and red if it does not.
In the upper right of the game board is another green/red light and to its right is the
countdown clock. This light will turn green when players are eligible to “buzz in’ to answer a
question and red when they are excluded from doing so. The countdown clock reveals the
seconds remaining for players to buzz in. The default is five seconds once the question has
been fully revealed, though this time limit may be modified via the ‘Game Options’ dialog
discussed later.
Answering Questions
Questions are revealed one word at a time. Players may buzz in while the question is being revealed, but in doing so, the
revelation of the question is halted until the player provides his or her response. Using the default keyboard response system,
players buzz in by pressing their assigned key on the keyboard (A, V, M, or P). When using the optional Wiimote response
system, players buzz in by pressing the “A” button on the Wii remote or the “C” (*or “Z”) button on the front of the Wii
nunchuk.
Page 15
The first player to buzz in is given the opportunity to answer the question. In the normal game mode (as opposed to the
emcee mode), that player is presented with the opportunity to provide an answer via a dialog box where their answer is
entered into a text field. Click the ‘Submit Answer’ button. Quiz Show evaluates the response against the answer criteria
specified for the question. If the criteria are matched, the player’s score is incremented by the question’s value, a green
feedback dialog is presented showing they were correct and that player now has control of the board (meaning they get to
choose the next topic and value of the
next question to be revealed). Players
may buzz in before a question is fully
revealed, but the full revelation of the
question’s text remains veiled. If the
player’s response is incorrect (i.e. it
did not meet any of the specified
criteria) a red feedback dialog box is
shown with the fact that that their
answer was incorrect and the player’s
score is decremented by the
question’s value amount. Once the
“OK” button is clicked on that dialog,
the question will continue to be
revealed (if it wasn’t already fully
visible any player may buzz in as long
as time remains on the countdown
clock in the upper right corner.
If no player is able to answer the
question correctly within the time
limit, or no player buzzes in for
the opportunity, the correct
answer is revealed. In that case
the player who had control of the
board retains the control and
selects the next question.
Play continues in this manner
until all questions of the round
have been revealed.
The game may progress
prematurely to the next round or
be stopped via the Game Options
dialog (discussed on pages 20-21).
If no player is able to answer the
question correctly within the time
limit, or no player buzzes in for
the opportunity, the correct
answer is revealed. In that case
the player who had control of the
board retains the control and
selects the next question.
Page 16
Questions containing Graphics and Audio
Questions may contain audio (MP3 format) or images
(JPG, GIF, or PNG formats). For questions containing
audio, any textual portion of the question is presented
first along with a button to play the audio. Players may
buzz in while the audio is playing, but the countdown
timer begins only after the audio has finished. If a
player buzzes in before the audio is completed, it is
paused until the player has responded and resumes if
the player’s response is incorrect.
Questions with related images may be presented in
one of three ways. Image mode 1 presents an image
up to 840x480 pixels in the same way that audio
questions are presented. Text is presented first with a
button to then display the image. The countdown
timer does not start until image is displayed. Images
larger than 840 pixels wide or 480 pixel in height are
automatically scaled to fit the question frame.
Image mode 2 presents the textual question on the
left half along with a smaller portrait-oriented image
on the right simultaneously. The countdown timer starts once the text has been fully revealed. Image mode 3 presents the
textual question at the top along with a landscaped image simultaneously at the bottom. As with Image mode 2, the
countdown timer starts once the text has been fully revealed.
Page 17
The Confidence Wager
In Round One and Round Two, a question is
randomly selected as the Confidence Wager
question. When the player in control of the
board chooses the question’s topic and value,
that player is presented with the Confidence
Wager dialog and is afforded the exclusive
right to answer the question. Other players
may not buzz in on the Confidence Wager
question.
In Round One, the controlling player may
wager between 0 and 1000 points in
increments of 100. In Round Two, the points
are doubled and the active player may wager
between 0 and 2000 points.
The wager is placed by dragging the slider
underneath the wager area to set the desired
point level. Once the wager is set, click the
“Let’s Go” button in the lower right of the
Confidence Wager dialog.
The question is displayed and the player
will have five seconds to think about
their answer. They do not need to buzz
in. At the end of the five seconds, they
will automatically be asked for their
response. If the player provides a correct
response, their score is increased by the
amount of their bid. If they answer
incorrectly, their score is decremented
by the wager amount and the correct
answer is revealed. Regardless, of his or
her answer, the player retains control of
the board and chooses the next topic
and value.
Page 18
Playing the Final Exam (Bonus) Round
The Final Exam Round (a.k.a. Bonus Round)
plays much differently from Rounds One
and Two. In the Final Exam Round, a topic is
presented and all four players are given an
opportunity to answer the same question. If
used, this round concludes the game and
potentially gives all four players an
opportunity to win the game depending on
their scores and how they each bid on this
last question. The player in the lead
however does have the advantage and if he
or she has a significant lead can largely
insure their victory if they wager
conservatively.
The Wager
After the topic has been revealed (but
before the question is shown), each player
writes their name and secret wager (up to
the amount of their score) and provides the
bid to the emcee / host / teacher or places
their bid face down in front of them. (A 3x5
card works great for this).
Answering the
Final Exam Question
Once all players have submitted their
wager, the “OK’ button is clicked and
the question is revealed. The
countdown clock is set to 20 seconds
and the Quiz Show contemplation
music is played during the twenty
seconds. Player must write their
response to the question during these
20 seconds. At the end of the twenty
seconds, a dialog box appears asking for
each player’s response to be entered
along with their bid. The order of input
starts with the player with the lowest
score, the player in third place, then the
player in second place and concludes
with the player in the lead.
Page 19
The Winner Congratulated
At the conclusion of the game, whether it
consists of one, two or three rounds, the
winner is congratulated!
Enabling/Disabling the Emcee Mode
To enable the Emcee Mode, click the
“Game Options” button in the lower
right and check the “Emcee Mode On”
checkbox of the Game Options dialog.
Click the “Hide” button of the dialog to
hide it. In like manner the Emcee mode
can be turned off to return to the
Normal mode of game play by
unchecking the same checkbox in the
Game Options dialog.
Page 20
Response evaluation in the Emcee Mode of game play
In the Emcee Mode of game play, the response
dialog does not include a textbox for entering the
answer. Instead the player announces his answer
and the emcee, host or teacher, uses the
computer’s mouse to click either the green
(correct) or red (incorrect) button on the dialog.
This requires the emcee or teacher to know the
correct answers (or to have printed the answer
sheet beforehand– see page 13).
Other Controls in the Game Options dialog
In the Game Options dialog (accessed by clicking the ‘Game Options’
button it the lower right of the game window), the time limit for players
to buzz in after a question has been revealed may be changed. The
default is 5 seconds. The countdown timer may be changed to any
integer value between 3 and 10 seconds by clicking the up and down
arrows to the selection’s right.
The ‘Reset’ button is useful if an error is encountered (such as if an
image can’t be found or loaded for a graphic question). Click the
‘Reset’ button to close the question and return to the game board.
If it is determined that a player’s answers were not correctly evaluated, the
score may be adjusted by opening the Character Setup dialog. In that case, it
may also be necessary to change which player has control of the board. The
‘Reset Player in control’ option of the Game Options dialog can be sued to do
just that. Where this is important is if the “Confidence Wager” question has not
yet been encountered in this round, for in that situation, the player considered
in control gets an exclusive opportunity to answer the question.
The sound effects (such as the ticking of the countdown clock) can be turned off
by unchecking the ‘Sound On’ checkbox (or turned on by checking it).
Buttons at the lower left of the Game Options dialog allow the game to be
closed and returned to the opening screen (curtains closed) to begin a new
game or to exit the application. (You can also exit by pressing the Esc key on the
keyboard).
The buttons in the lower right of the Game Options dialog allow play to proceed
from Round One to Round Two; or from Round One or Round Two to the Final
Exam round. These might be used in a timed game play format (such as
according to house rules) or in managing class time.
Page 21
Using the Wii Remotes (Wiimotes) and nunchuks
One of the unique features of this software is the use of
Wiimotes and Nunchuks from the Nintendo Wii game system
to be used as wireless player buzzers instead of the keyboard.
This makes for a better classroom setup. But the
wiimotes/nunchuks must be setup to work with the program.
You’ll need two wiimotes with nunchuks (or four wiimotes
without nunchuks) to handle four players.
What you need:
1.) Two wiimotes with nunchuks (or four wiimotes) to handle
four players.
2.) Bluetooth networking connectivity: Most newer
computers have Bluetooth built in, but a Bluetooth dongle
can be added via your USB port. You'll find them for $25 or
less at your local computer store or at Amazon. I use the
Inland Mini Bluetooth Dongle purchased for $9. Wiibrew.org
maintains a list of compatible Bluetooth dongles at
http://wiibrew.org/wiki/List_of_Working_Bluetooth_Devices
3.) WiiFlash Server software (Available for free download at
http://wiiflash.bytearray.org). Note WiiFlash requires
Microsoft .NET Framework 3 or higher. If you’re running
Windows Vista or Windows 7, you should be good; Windows
XP users may need to download from Microsoft.) On the
Macintosh platform, it uses Java server.
Setting up the WiiMotes/Nunchuks
The following instructions were written for
Microsoft Windows XP. For Windows 7
instructions, see page 27. If using Windows
Vista, or a Macintosh, the steps may vary a
bit. Consult your OS manual on using
Bluetooth.
Step 1: Download and install the WiiFlash
Server software ((Available for free
download at http://wiiflash.bytearray.org).
Note WiiFlash requires Microsoft .NET
framework 3 or higher. If you’re running
Windows Vista or Windows 7, you should
be good; Windows XP users may need to
download from Microsoft.) Be sure to
install the Wii Flash Server software after
downloading. I prefer to put an icon for the
installed program on the desktop for easy
reference.
Page 22
Step 2: If your computer does not have Bluetooth networking capability, obtain a Bluetooth dongle from your local computer
store or online (such as amazon.com). I use the Inland Mini Bluetooth Dongle purchased for $9. Wiibrew.org maintains a list
of compatible Bluetooth dongles at http://wiibrew.org/wiki/List_of_Working_Bluetooth_Devices
Step 3: Open up the Windows Control Panel. Click the “Bluetooth Devices” icon (see figure below).
Step 4: If you have a Wii gamebox within range, turn it off. / unplug it. Click the “Add…” button in the Bluetooth Devices
panel. In the resulting dialog box, check the “My device is setup and ready to be found” box.
Page 23
Step 5: Power up the first Wiimote. You should
see all four blue lights flashing on the Wiimote.
If the lights stop flashing before the device is
found in this step, press the 1 & 2 buttons on the
Wiimote simultaneously.
Click the Next button in the dialog (see image at
the right). Windows will search for your devices,
and once found will display it in the dialog (see
next page).
Step 6: Select the “New device” in the above dialog and click “Next” (below left illustration).
In the following dialog box, select the “Don’t use a passkey” and click “Next” (below right illustration).
Step 7: You will see another dialog indicating that your device is being installed (left image below).
Then will be presented with the message shown on the right below. Click the "Finish" button.
Page 24
Step 8: Repeat Steps 4 through 7 for each additional wiimote. (Note: Nunchuks plug into the wiimotes and do not need to be
setup as bluetooth devices.The four blue lights should remain flashing on each Wiimote throughout this process, if they stop,
press the 1 & 2 buttons on the Wiimote simultaneously.
Step 9: Run the WiiFlash Server program downloaded and installed in step 1. Click “Run” in the dialog warning.
WiiFlash should locate your Wiimotes and display the number of remotes found in the Windows status bar. The
Wiimotes will rumble and the lights on them will indicate which is Wiimote 1, Wiimote 2, etc.
Page 25
Step 10: You will also see the WiiFlash application on your desktop showing the remotes found as well. The icons will depict
the wiimotes and nunchecks found. If you connect/disconnect the nunchuk, the icons will update. DO NOT CLOSE THE
WIIFLASH APPLICATION – you can minimize it if you like.
You can close the Bluetooth Devices panel at this point by
clicking the “OK” button on the Bluetooth Devices panel.
Step 11: In Quiz Show, click the “Wiimote Status” button in
the lower right. Click the “Update” button - you should see
that the Wiimotes are connected and the battery level of
each. Check the box that says "Use wiimotes" before closing
the dialog. Click the “A” and “C” or “Z” buttons on the
Wiimotes and/or Nunchuks to verify they are working
properly (you should see the corresponding avatar press
their podium buzzer.)
Setting up the WiiMotes with Windows
7
Page 26
Step 1: In Windows 7, open the Control
then choose “Add a Bluetooth device”.
Panel. Click the Hardware and Sound;
Step 2: Press both the 1 and 2
buttons simultaneously on the first
Wiimote. (If they go out, press them
again, or keep them depressed until
the Bluetooth manager finds them
and pairs them).
Step 3: Select the found Nintendo
Bluetooth input device. Click the
Next button.
Step 4: Click the “Pair without using a
code” option. Once paired, you will
receive a dialog box stating that the
device has been successfully added to
the computer.
Step 5: Click the “Close” button and repeat steps 1-4. Once all
Wiimotes have been paired, proceed with steps 9-11 on pages
25-26
Page 27
Previewing, Editing and Adding Topics and Questions to the Database
Please note that the database is unique for each user. Thus changes made to the database by one user will not be reflected
when another user is logged in to the same computer. Added topics may be exported by one user and imported by another
user. Another option would be to create a shared login account for accessing Quiz Show.
Accessing the Question Editor
Access to the Question Editor is done via the Game Setup dialog. Click the “Game Setup” button at the bottom right of the
main screen. In the Game Setup dialog, click the “Retrieve” option in the upper left. On the Retrieve mode screen, there is a
button to access the Question Editor.
Clicking the “Open Question
Editor” reveals a login dialog
(above) requiring a user ID and
password. This is the user ID and
password that you chose when
initially setting up Quiz Show.
Enter the user Id and password
(both are case sensitive), then
click the “OK” button to gain
access to the editor.
If the correct ID and password is
supplied, the Question Editor will
be opened (left).
Page 28
Sorting and Filtering the Topics
A list of topics is presented on the left side of the editor. The topics may
be filtered by category by choosing a category from the drop down list of
the combo box in the upper left. Categories include:
o Arts & Entertainment
o General Knowledge
o Geography and Culture
o History & Social Studies
o Science / Math / Nature
o Special Topics
o Sports
Topic names may also be searched by entering a desired word, phrase or
part of a word in the Search textbox and then clicking the “Go” button.
The topic list on the left side may be sorted numerically by topic number (this is the database record number for the topic),
alphabetically by category or alphabetically by topic name. Click the column heading you wish to sort by. Sots may be either
ascending or descending, done by clicking the column heading a second time.
Previewing the Questions of a Topic
To view the details of any topic,
simply click the topic name in
the list. The questions, answers,
and evaluation criteria will be
shown on the right.
Questions containing an audio
link will begin with: [AUDIO
audioFilename.mp3] where
audioFilename.mp3 is the
name of the audio file in MP3
format. Audio files must be
located in the Audio folder of
the QuizShowData folder
insides the user’s Documents
directory.
Likewise, questions that contain
an image link will begin with
[IMAGE imageFile.jpg],
[IMAGE2 imageFile.jpg] or
[IMAGE3 imageFile.jpg] where
imageFile.jpg is the image’s
filename. Images may be in
JPG, PNG, or BMP format and
are located in the Images folder of the QuizShowData folder insides the user’s Documents directory. [IMAGE…] displays the
image within the full question area. [IMAGE2…] simultaneously displays the image on the right with the question at the left
and [IMAGE3…] simultaneously displays the image at the bottom with the question above it.
All topics contain 100, 200, 300, 400, and 500 point questions. When the topic is used in Round Two, the values are doubled
to 200, 400, 600, 800, and 1000 points. When the topic is used for a Final Exam question, Quiz Show will randomly choose to
use the 300, 400, or 500 point question.
Page 29
Understanding the Evaluation Criteria
Each question may have up to three answers and/or up to three sets of evaluation criteria. Each criterion offers a matching
string (or two matching strings) that must be present in a provided answer for the answer to be considered correct. The
criteria can be written to allow for flexibility in spelling. Consider the following:
There are two criteria provided. The first requires the user’s response to contain the letters “col” and “rado”. The second
requires the user to provide “col” as well as “rodo” in their response for it to be marked correct. Thus any of the following
responses would be judged as a correct answer:
o Colorado River
o Collorado River
o Colorrado River
o Colorado
o Collorado
o The Colorado River
o Colarodo River
o COLORADO RIVER
Of course, “Verrado Dog Collar” or “Radon College” would also be considered correct, but chances are the player’s not going
to suggest those in response to this question!
A space before a criterion will require the answer to contain a word beginning with the letters and a space after a criteria
would require an answer to contain a word ending with those letters. For an exact answer, such as a spelling word, only one
criterion would be offered and it would contain a space both before and after the word. The criteria (and a player’s response)
are NOT case sensitive.
The criterion also allow for a “But Not” specification. Consider the following . . .
The correct answer is Theodore Roosevelt, and if the player suggests any of the following it would be judged as a correct
response:
o Roosevelt
o Rosevelt
o Rooseveldt
o T. Roosevelt
o Teddy Roosevelt
o Theodore Roosevelt
o President Teddy Roosevelt
But if the player responded “Franklin Roosevelt” the answer would be considered incorrect.
Page 30
Editing Topics, Questions, Answers and Evaluation Criteria
Any topic (including those that
came with Quiz Show) may be
edited. The category to which a
topic is assigned may also be
modified. To make any changes to a
topic, select the topic in the topic
list at the left, then click the “Edit
Topic” button at the bottom of the
list. The editor will be displayed on
the right with all the topics data. To
modify the category, make a
selection from the combo box
above the Topic field.
Make any changes desired, then
click “Save” in the upper right.
Note: if links to any images or audio
files are added, those files must be
copied or moved to the appropriate
Images or Audio folder of the
QuizShowData folder in the user’s
Documents directory.
Deleting Topics
To permanently remove a topif from the data, select the topic and click the “Delete the Topic” button belwo the topic list. A
dialog box will confirm that you really do want to remove the topic. If so, click the the “Yes, remove it” button of the dialog,
otherwise choose “Cancel”.
Adding New Topics
To add a new topic to the database,
click the “Add a New Topic” button
below the topic list.
Choose a category and enter the
topic name. You may add sorting
and searching information to a
topic’s name by including it in
square brackes such as:
th
“Geography [5 Grade – Lesson 4]”
The information in the brackets will
not be seen on the game board. To
group topics together place a
common word or phrase in square
brackets before the topic name,
such as “[Bible] Genesis”.
Enter the five quesitons and
anwers. We suggest that 100 point
questions should be easier thatn
200 point questions, etc. For each
question, you must specify at least
one criteria (see the information on
evaluation criteria the previous page).
Page 31
Exporting / Importing Topics
It’s relatively easy to share topics with other users and transfer topics from one computer to another. Thus a teacher might
create topcis during preparation on their home computer, export those topics to a USB drive and then import them on his or
her classroom computer. Topic files could also be shared with other teacher via email attachments or uploaded/downloaded
via a server or internet forum.
To export topics, Select a topic
and then click the “Export Topic”
button below the topic list. This
results in the “Export Topics”
dialog beign displayed on the
right hand side. You amy add
additonal topics to the list to be
export, by simply clicking each
topci in the topic list on the left.
Selected topics will appear in
the topci list on the right.
The quesitons and answers for
any topic in the Export list may
be viewed by selecting the topic
on the right. This alllows you to
verify topics to be included. If
you wish to remove a topic from
the export list, select it in the
export list and click the
“Remove from List” button.
When all desired topics have
bene addd to the export list,
click the “Export Now” button. A standard “Save As” dialog box allows you to choose a location and ente a filename. Click the
“Save” button. The saved file is a text file and may be saved with an extension of .txt if you like or you can assign a unique
extension, such as your initials. Please note: any linked audio or image files are not included and must be manually copied.
To import topics from a saved file,
click the “Import Topics” button.
Click the “Import from File” button
in the Import File dialog, and
choose a file from Open File dialog.
The topics contained in the fiel will
be displayed in the topci list on the
right. You may review the
questions and answers of the
topcis by clicking a topic in the list.
You may remove any undesired
topics by selecting the topic and
clicking the “Remove from List”
button.
To import the topics to your Quiz
Show database, click the “Save to
DB” button.
Return to the Game
Click the “Return to Game” to
continue in Quiz Show.
Page 32
Best Practices / Suggestions / Tips
Add a wireless keyboard and mouse. If using the keyboard response system, the addition of a wireless keyboard with a
wired keyboard provides some setup flexibility. The four players can be divided between the two keyboards (two on each); or
the host/emcee/teacher can use one keyboard and the player can use the wireless keyboard. Dividing the players between
the two keyboards works best when using the Emcee Mode of game play. The teacher or emcee simply needs the mouse to
control the game and respond to player’s answers.
For home use, connect to your HDTV. The game is intended for use with a classroom computer and a data projector. The
ideal setup for home or small group use is to connect a laptop to the HDMI port of your HDTV. Use a wireless mouse and
keyboard for the host or emcee and the Wiimotes/Nunchuks for the players.
Use a shared login: In a shared classroom/lab setting, consider setting up a user account for playing the game and modifying
the database. Thus all users would have the same access to all the questions. The potential downside of this is that the list of
used topics will carry over from user to user.
Use spaces for stricter evaluation: In setting up questions where the answer must be exact or perfectly spelled, remember
to place a space before and after the criterion word. For example, one might record audio for spelling words, “The word is
‘AMBULANCE’ as in ‘She was taken to the hospital by ambulance.”. The criterion should be “_ambulance_” where the
underscores represent spaces (don’t type in the underscores – replace them with spaces!).
Test your questions: Before playing with others, set up a game with your questions and play a game to insure that answers
are correctly evaluated and any audio or image files are located and used. It’s easy to make a simple typographical mistake.
Use a Word Processor: Speaking of typographical mistakes, you might want to first enter you questions and answers using
word processing software such as Microsoft Word to take advantage of its spellchecker, then copy and paste into the various
fields of the Add Topic dialog. Sorry, there’s no spell checker in Quiz Show.
Page 33
Installing Quiz Show
Quiz show can be purchased online at www.tricalico.com and downloaded immediately.
Upon receipt of payment via our website, you will receive an email with instructions and your personal password to be used
in accessing the online installer. The password must be used with the email address you provided during purchase.
Enter your first name, last name, email address (must be the same address you provided during purchase) and the unique
personal passcode provided to you via email. Click the “Submit Information” button. Note that you can return to this screen
to view the Adobe Acrobat (PDF) online version of this manual, and/or access the website to download the Wii Flash software
if you plan to use the Wiimotes/Nunchuks with Quiz Show.
MULTIPLE DOWNLOADS: The license you purchased allows you to download and install
on two computers provided they are both owned and operated by the same individual
(such as a desktop and laptop computer) and that Quiz Show is not ran simultaneously
on both computers. A teacher or school employee may install on one school-provided
classroom computer, as well as his/her home computer for lesson preparation.
After submitting a valid email address and download passcode, you will be taken to the
Quiz Show installer. The installer will download and install Adobe Air if Air does not
already exist on your computer and will then install the Quiz Show application. Click the
Install Now button to begin installation.
Page 34
You will be asked to verify installation of the Quiz
Show application. Click the “Install” button to
proceed.
Choose a location for the application files and
whether you wish to add shortcuts to the desktop
or not.
The first time you run the application, you will be
asked to agree to the license agreement. Click the
“I agree…” button to proceed.
The data files will be saved to your documents area
and you will be asked to setup up an administrative
id and password for modifying the database. This is intended to keep students from unauthorized viewing or modification of
the questions and answers available in Quiz Show. You will need this ID and password to add, edit, delete, export, or import
topics.
Contact Info
More information about Quiz Show can be
found online at www.tricalico.com
Please direct email questions and inquiries to
[email protected].
Page 35
Page 36
Page 37
TRICALICO INTERACTIVE
END USER LICENSE AGREEMENT
THE FOLLOWING TERMS AND CONDITIONS SHOULD BE READ CAREFULLY
BEFORE INSTALLING OR USING THIS SOFTWARE. AMONG OTHER
THINGS, THIS AGREEMENT LICENSES THE ENCLOSED SOFTWARE TO YOU
AND CONTAINS WARRANTY AND LIABILITY DISCLAIMERS. BY OPENING
THIS ENVELOPE OR USING THE DISC(S) AND/OR INSTALLING THE
SOFTWARE, YOU ARE ACCEPTING AND AGREEING TO THE TERMS AND
CONDITIONS OF THIS AGREEMENT. IF YOU DO NOT AGREE TO THE
TERMS OF THIS AGREEMENT, DO NOT OPEN THIS PACKAGE PROMPTLY
RETURN THE PACKAGE UNOPENED.
The enclosed disc containing one or more Tricalico Interactive
applications or applications downloaded from Tricalico Interactive or its
agents (hereinafter the “Software”) is provided to you (hereinafter the
“Licensee”) under license. No sale has occurred. This license agreement
defines the ways in which you may use the Software. The term
“Software” shall include any upgrades, modified versions, updates,
additions, and copies of the Software licensed to you by Tricalico
Interactive, its successors or assigns.
1.COPYRIGHT
The Software and any related materials including documentation are
copyrighted by Tricalico Interactive and/or Stephen F. Hustedde and
their licensors. Rights of all parties are reserved.
2.LICENSE
Tricalico Interactive provides this software to Licensee and grants to
Licensee a non-exclusive, non-transferable license in accordance with
the terms of this license to:
a. install the Software in a single location on a hard disk or other storage
device;
b. install the Software on a second computer owned and operated by
the individual licenses (thus the licensee can install on a desktop and
laptop under their private use and ownership), provided that the
software is not used simultaneously on both computers. Professional
educators (employed at a K-12 or higher education institution) may
install the software locally on a school-owned individual classroom
computer and on a single home desktop or laptop computer.
c. make one copy of the Software in a machine readable form solely for
back-up and archival purposes;
d. use the Software for demonstration purposes only at an educational
conference or in-service teacher training as outlined under the
Demonstration Purposes section set forth below.
3.RESTRICTIONS
The following restrictions apply to the installation and use of the
Software as identified in section 2a above:
a. The Software may not be loaded on a network server, intranet, or
internet in such a way as to make it available to other users either to use
or install.
b. Installation is to occur by running the setup program contained on
the disc so that all necessary files are copied to the local hard drives
and/or a server hard drive (provided the restriction in section 3a is met);
Licensee may not duplicate the disc(s) except as identified in section 2b
above.
4.DEMONSTRATION PURPOSES
The Software may be temporarily installed and used on a second
computer for demonstration purposes only as specified under article 2
above, provided the following conditions are met:
a. Tricalico Interactive is clearly identified at the demonstration as the
developer and distributor of the Software, including displaying or
publishing Tricalico Interactive’s address (Tricalico Interactive; P. O. Box
84185; Phoenix, Arizona 85071-4185) and Internet website address
(www.tricalico.com) and email address ([email protected]);
b. The Software is removed from the computer promptly following the
Copyright 2010, Tricalico Interactive
demonstration. It may not be housed on the presentation computer for
more than 24 hours.
c. The Software may not be installed or used in such a way that others
may access it, copy it, or use it. It may not be installed on a network
server in any way.
5.COPYING THE SOFTWARE
Licensee may not copy or reproduce any part of the Software or related
materials except as permitted by the Copyright Act of the United States,
Title 17, United States Code. Licensee may, however, make one copy of
the disc for archival or back-up purposes only as identified in section 2b.
Licensee may not lend, lease, rent, de-compile, reverse-engineer,
disassemble, alter, or create derivative works of the Software in any way
or remove or alter the copyright notices or remove or alter the “About
Tricalico Interactive” notices. The Software is owned by Tricalico
Interactive or its suppliers and is protected by United States copyright
laws and international treaty provisions. Licensee must treat the
Software like any other copyrighted material.
6.TERM
This license is effective until terminated. Licensee may terminate it at
any time by destroying the Software or returning the Software to
Tricalico Interactive together with all copies in any form. This license will
also terminate if Licensee fails to comply with any term or condition of
this agreement or upon any conditions set forth elsewhere in this
agreement. Licensee agrees that upon such termination Licensee will
destroy (or return to Tricalico Interactive) the Software together with
any copies in any form.
This license may not be transferred, sublicensed, or assigned to another
party without the express, written consent of Tricalico Interactive, its
sucessors or assigns.
7.LIMITED WARRANTY
Tricalico Interactive warrants the disc on which the Software is furnished
to be free from defects in materials and workmanship under normal use
for a period of sixty (60) days from the date of purchase as evidenced by
a copy of your receipt or invoice. If a physical defect occurs within that
period, return the disc to Tricalico Interactive for a free replacement.
You assume full responsibility for the selection of the Software to
achieve your intended purposes, for the proper installation and use of
the Software and for verifying the results obtained from use of the
Software. Tricalico Interactive makes no representation, warranty or
other term that the functions contained in the Software will meet your
requirements, or that the Software will be free of interruptions or errors.
8.DISCLAIMER AND LIMITATIONS OF REMEDIES
The Software is provided ‘as is’ and Tricalico Interactive specifically
disclaims all warranties of any kind, either express or implied, including,
but not limited to, the implied warranty of merchantability, fitness for a
particular purpose, and non-infringement, with respect to the Software
and related materials. Tricalico Interactive does not warrant, guarantee,
or make any representations regarding the use or the results of the use
of the Software in terms of its correctness, accuracy, currentness,
reliability, or otherwise. The entire risk as to the results and performance
of the Software is assumed by the Licensee. Tricalico Interactive, its
management, dealers, agents, licensors and suppliers will not be held
liable to the Licensee or to anyone else for consequential, incidental,
indirect, or special damages arising out of the use of the Software, even
if Tricalico Interactive has been advised of the possibility of such
damages, or for any claim by any third party. In no event will Tricalico
Interactive’s liability for damages ever exceed the price the Licensee has
paid for the Software, regardless of the nature of the claim. Certain
states and jurisdictions do not permit certain of these exclusions and
limitations. If any part of this agreement is held to be unenforceable as
written, it shall be enforced to the maximum extent allowed by
applicable law.
Revised 10/2010
1.05