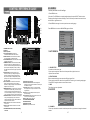
1
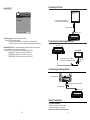
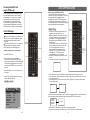
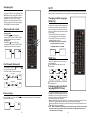
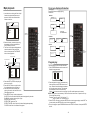
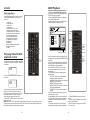
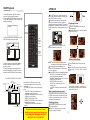
7" Digital LCD TV with DVD Player and
USB/SD/MMC Inputs
MODEL NO.:NTD-7561
For Sales Information Please Contact
RoadTrucker Inc (www.RoadTrucker.com
8312 Sidbury Rd. Wilmington, NC 28411
(800) 507-0482 / (910) 686-4281
INSTRUCTION MANUAL
BEFORE USING THIS PRODUCT, READ, UNDERSTAND,
AND FOLLOW THESE INSTRUCTIONS.
Save this booklet for future reference.
TROUBLESHOOTING (CONTINUED)
Sym ptom [DVD]
Rem edy
Play does no t start even
when title is selected.
Audio sound track and/o r subtitle
language is not the initia l settings.
No subtitles.
Alternative audio sound track
(or subtitle) languages f ail to be
selected.
Confirm t he region code setting is right.
If the aud io soundtrac k and/or sub title language does not
exist on t he disc, the l anguage selected at the i nitial settings
will not be seen/heard .
Su btitles appe ar only with d iscs which c ontain them.
Su btitles are cl eared from t he TV monito r, Perform th e
ste ps display th e subtitles.
An alt ernative language is not se lected wit h discs w hich
do not contain more tha n one language.
In the case of s ome discs, the alternative language can
not be selected by operating the AUDIO or SUBTITLE
button. Try selecting it from the D VD menu if one is available.
This function is dependent on softwa re availabilit y. Even if a
disc has a number of ang les recorded , these angl es may be
recorded fo r specific sce nes only.
Angle canno t be change d.
The password for rating level
has been fo rgotten.
Please contact you r local sales dealer.
Symptom [Vid eo CD]
No menu pla y.
Re medy
This function works only for Video CD s with playback control.
Symptom [TV]
Remedy
A djust antenn a or use an external ante nna
R elocate the unit near a w indow (if ins ide a building)
U se an extern al antenna
M ove unit aw ay from equi pment that causes interference
E nsure anten na/cable con nection is se cure
A uto Scan for channels ag ain
Try another c hannel
No or poor p icture
No sound or poor sound q uality
Noise or other interferenc e
C heck the sp eaker setting s. Turn up the volume.
P ress MUTE on the remot e control to c ancel the mute function
U nplug the he adphones
E lectronic equipment near the unit is c ausing interf erence.
R elocate the unit or move the equipment.
REGION CODE SETTING
Region codin g: All DVD d iscs are code d by t he sal es terr itory. P lease note t he pla yer
is set to reg ion 1 c oding by th e fact ory wh ich ca nnot be cha nged . This is in c ompli ance
with the DVD patent requirements.
The regio n num ber for this DVD player is
1
33
SPECIFICATIONS
SAFETY INFORMATION
(2) Co mpac t disc (VIDEO CD)
12 cm disc
8 cm d isc
CAUTION:
AC adaptor ( norma l: DC1 2V)
Power consumption: ≤1 8 W
Resolution: 480 (RG B)*23 4
Video output level: 1 V
Audio output level : 1 .2V
Earphone output level:
DVD/V IDEO CD/CD PLAY ER IS A CLASS 1 LASER PRO DUCT. HOW EVER THIS DVD/
VIDEO ,CD/CD PLAYER USES A VISI BLE L ASER BEAM WHI CH CO ULD C AUSE
HAZARDOUS RAD IATIO N EXP O SURE IF DIRECTED. BE SURE TO OPERATE THE
DVD/V IDEO CD/CD PLAY ER CORRE CTLY AS INSTRUCTED.
Dots Distance : 0.107 x0.37 0mm
Visible Range: 154.0 8x86.58mm
Discs played:
(1KHz , 0dB , 1.25m W )
Pickup: Wave le ngth: 655nm
L aser p ower: CLASS -1
WHEN THIS DVD/VIDEO CD/C D PLAYER IS PLUGGED TO THE WALL OU TLET, DO
NOT P LACE YOUR EYES CLOSE TO THE O PENI NG OF THE DISC T RAY AND
O THER OPE NINGS TO L OOK I NTO T HE IN SIDE OF TH IS PLAYER.
Power requirements:
AC 100 -240V~ 50/60Hz
Power source:
p- p
Operating Temperature Range:
(1) DVD-V IDEO disc
12 cm si ngle-s ided,s ingle-l ayer
12 cm si ngle-s ided,d ual-lay er
12 cm do uble-s ided,s ingle-layer
8 cm sin le-sid ed,sin gle-lay er
8 cm sin gle-si ded,du al-lay er
8 cm do uble-s ided,s ingle-l ayer
-5°C to 45°C
Operating Humidity Range: 0% to 80%
Measurement: 248 x 168 x 45 mm
Weight: Approx . 1017. 6g
Specifications are subject to change without notice.
TROUBLESHOOTING
Before requesting service for this player, check the chart below for a poss ible cause of the
problem you are experiencing. Som e simple checks or an adj ustme nt on your part may
eliminatethe prob lem and restore proper operation.
S ympto m(Co mmon )
No power.
Remed y
I nsert the AC adaptor secu rely into the power outle t.
Play fai ls to start even whe n
PLAY is pressed.
Play sta rts but then stops
immedi ately.
C ondensati on has form ed: wait a bout 1 to 2 hours
to allow the player to d ry out.
T his player cannot play a disc oth er than DV D, VCD an d CD.
T he disc ma y be dirty a nd may require clean ing.
E nsure that the disc is installed w ith the labe l side up.
No picture.
Ensur e that the equ ipment is co nnected properly.
No sound.
Distor ted sound.
Picture is dis torted during rapid
advance or r apid reverse .
N o rapid adva nce or rapid
re verse play
No operations can be performed
with the remote control unit.
No key operation (by the main
unit and/or the remote control
unit) is effective.
USE O F CONTROLS OR ADJU STME NTS O R PER FORMANCE OF P ROCE DURE S
O THERTHAN THO SE SP ECIFI ED HE REIN MAY RESULT IN HAZARDOUS
RADIATION EXPO SURE .
DO NO T OPE N CO VERS AND R EPAI R YOU RSEL F. REFER SERVIC ING T O QUALIFIE D
PERSO NNEL
T HIS D EVICE IS INTENDED FO R CONTINU OUS O PERATION!
TO R EDUC E THE RISK OF FI RE OR ELEC TRIC SHOC K, AND ANN OYIN G
INTE RFER ENCE , USE THE RECOM MEND ED ACCESSORIE S ON LY.
WARNING:
-TO PREVENT FIRE O R SHOCK H AZAR D. DO NOT USE T HIS PLUG W ITH AN
EXTENSION C ORD. RECE PTACLE OR OTHER OUTLET UNLE SS THE BLA DES CAN
BE FUL LY INS ERTE D TO PREVENT BLADE EXPO SURE .
-TO PREVENT FIRE O R SHOCK H AZAR D. DO NOT EXPO SE TH IS APPLIANCE TO RAIN
O R MOI STURE.
CAUTION - LAS ER RADIAT ION W HEN O PEN, DO NOT STARE I NTO B EAM.
VENT ILATION WA RN ING - THE N ORMA L VE NTILATION OF THE PRO DUCT SHAL L
N OT BE IMPEDED FOR IN TENDED U SE.
Ensure that the equipment is connected prope rly.
Ensure that the input setting for the TV and st ereo system
are corr ect.
The picture will b e somewhat distorted at times: this is
norm al.
Some discs may h ave sections which prohi bit rapid
advan ce (or rapid reverse.)
Check the batteries are installed with the correct polarities.
The batteries are exhausted: replace them with new ones.
Point remote control at the remote contr ol sensor and operate.
Operate the remote control unit at a dist ance of not more than
6 m from the remote control sensor.
Remove the obstacles between the remote control and remote
control sensor.
Press POWER to set th e player to the standby mode and then
back to ON. Alternative ly, press POWER to set the player to
the standby mode, disc onnect the power adaptor and then
reconnect it. (The play er may not be operating properly due t o
lightning, static electric ity or some other external factor.)
32
C A U T I O N
RISK OF ELECTRIC SHOCK
DO NOT OPEN
The lightning flash and
arrow head within the
triangle is a warning
sign alerting you of
“dangerous voltage”
inside the product.
CAUTION: TO REDUCE THE RISK
OF ELECTRIC SHOCK. DO NOT
REMOVE COVER (OR BACK).
NO USER SERVICEABLE PARTS
INSIDE. REFER SERVICING TO
QUALIFIED SERVICE
PERSONNEL.
The exclamation
point within the
triangle is a warning
sign alerting you of
important instructions
accompanying the
product.
Always fo llow b asic s afety preca utions when using elect rical p roducts, es pecia lly
whe n chil dren a re pre sent.
WARNING : To a void th e risk of elec trical s hock, make sure t he pro duct is unplu gged f rom
the e lectric al out let bef ore rel ocatin g, serv icing, or cleaning i t.
1
Read all instructions before using
Do n ot use t his produ ct near water.
Do n ot ceilin g- or wa ll-mount the prod uct.
Inst all the pr oduct in accorda nce with the ope rating in struction s.
Do n ot set th e produ ct near h eat sour ces, suc h as rad iators, he at regis ters, sto ves, or o ther
app aratus (i ncluding amplifie rs) that produce heat.
Pro tect the p ower co rd from b eing wa lked on or pinche d, partic ularly at plugs, c onvenie nce
rece ptacles , and the point wh ere they exit the product .
Do n ot use a ttachme nts not r ecomme nded or sold by t he produ ct manu facturer as a risk of fire,
elec trical sh ock, or s erious p ersonal injury ma y result .
Unp lug the p roduct d uring lig htning s torms or when un used for long pe riods of t ime.
Do n ot expo se the pr oduct to dripping or splas hing wa ter. Do n ot place objects filled wit h liquid
(e.g ., vases ) on the p roduct.
Do n ot place in or ex pose the product to direc t sunligh t, extrem e heat, h umid or dusty lo cations.
Nev er opera te this p roduct if it has a d amaged power c ord or p lug, is no t workin g proper ly, has
bee n droppe d, dama ged, or e xposed to moist ure, wat er, or oth er liquid s. Do no t attemp t to
exa mine or r epair th is produc t yourse lf; take t he produ ct to a s ervice ce ntre for inspecti on and
repa ir.
Keep magnetic objects such as speakers,at a distanc e from the player.
DEFINITION OF TERMS
DVD
Th is refe rs to a high-density optic al disc on wh ich high-qua lity pictures and so und have be en
ob tained by means of digita l signals. Incorporation a new v ideo c ompre ssion techno logy
(M PEG I I) and high-d ensity record ing te ch-nol ogy, DVD en ables aestheticall y pleasing
ful l-motion vide o to b e reco rded o ver long peri ods of time ( for ins tance, a who le mov ie can
be recorded). DVD ha s a structure cons isting o f two 0.6 mm thin discs which a re adhered
to each other. Since t he thinner th e disc , the hi gher t he den sity at which the in formation ca n
be recorded, a DVD disc ha s a greater c apacit y than a sing le 1.2 mm thi ck dis c. Sinc e the
tw o thin discs are adhered t o each other, there is the poten tial to achiev e double-sid ed pla y
so metim e in th e futur e for e ven lo nger d uration play.
Video CD
Th is con tains r ecordi ngs of pictur es and sound whose qual ity is o n a pa r with that of video
tape. Thi s play er also supports Vi deo CDs with playb ack control (version 2.0) .
Mp3
LASER SAFETY
This set employs an optical la ser be am system in the CD mechanism desi gned
with built-in safeguards. Do not attempt to disass emble. Expo sure to this
invisible la ser light beam may be harmful to the human eye. This is a Class -1
laser produ ct. Use of controls , adjustments or procedures other tha n thos e
specified herein may result in hazardous laser lig ht bea m exposure. This
compact disc player should not be a djusted or re paired by anyone except
qualified service personnel. The laser mechanism in th e set corresponds to the
stylus (needle) of a record player. Although this product uses a lase r pick-up
lens, it is completely safe when operated according to directions.
NOTE: The manufacturer is not r esponsi ble for a ny radio or TV int erferenc e caused by una uthorize d
modifications. S uch mod ification s could v oid the user's au thority to operate the equ ipment.
1) Operate turni ng controls and s witches as instru cted in the manu al.
2) Befor e turning on the power for the firs t time,make sure that the power cord is pro perly
installed.
3) Store your dis cs in a cool area to avoid damage from he at.
Battery Handling and Usage
NOTE: This s tyle p layer c ontain s rech argea ble Lit hium b attery . Ther e is a CR 2025
battery for re mote c ontro l.
1). Never thr ow bat teries into a fire. Do not e xpose batte ries to fire or other heat s ources .
2). Bat tery Disposa l: Spe nt or d ischar ged ba tterie s must be pro perly dispos ed of a nd
rec ycled in complianc e with all app licabl e laws . For d etailed infor mation , cont act you r
loc al soli d wast e authority.
DISC HANDLING AND MAINTENANCE
Th ese contain record ings o f musi c whic h are c ompressed, allowi ng a si gnificantly larger
am ount o f mus ic to be store d on a CD.
Angle
Recorde d onto some DVD discs a re sce nes which have bee n sim ultane ously shot fr om
a numbe r of different angles (the same s cene is shot from t he front, from the left side , from
the right side, etc.). With su ch dis cs, the ANGLE butt on can be us ed to view th e scene from
dif ferent angles .
Subtitles
Th is is the appearance of the dialo gue a t the b ottom of the screen which are p rerecorded o n
so me DVD discs.
Title number
Th ese nu mbers are recorded on DVD di scs. W hen a disc contains two o r more movies, the se
mo vies are numbered as tit le 1, tit le 2, e tc.
Chapter number
Th ese nu mbers are recorded on DVD di scs. A title is sub- d ivided into m any sections, each
of which is numbered , and specifi c parts of vid eo pre sentat ions c an be search ed qui ckly
us ing these nu mbers .
Time number
Th is indi cates the pla y time which has e lapsed from the sta rt of a disc o r a title . It can be
us ed to f ind a s pecific scene quickly.(It may not work with s ome d iscs.)
Playback control (PBC)
Th is is recorde d on a Video CD (ve rsion 2.0). The scenes o r infor mation to be viewe d
(or listen ed to) can be selected interacti vely w ith the TV monitor by looking at the me nu
sh own on the T V mon itor.
Track number
Handling precautions
Hold the disc by the edges so the su rface will no t be so iled with fing erprin ts. Fin gerpri nts,
dirt and sc ratche s can cause skippi ng and disto rtion.
Do n ot wri te on th e labe l side with a ball-p oint pe n or other writing u tensil s.
2
Th ese nu mbers are a ssigned to the trac ks whi ch are re- co rded o n Vide o CDs and CDs. They
en able s pecific tracks to be located quic kly.
31
Do not u se rec ord cle aning spray s, benz ine, th inner, static electr icity p revent ion liq uids.
Be caref ul not to drop or be nd the disc.
Do not in stall m ore th an 1 d isc on the dis c com partm ent.
Do not try to cl ose the disc cover w hen t he dis c is no t insta lled properly.
Be sure to stor e the d isc in its exc lusive case when n ot in u se.
6 SYSTEM SETUP
System Setup
Factory Reset
Time Setup
OSD Language
Audio Language
Screen
Format
:U p/Down
English
English
4:3
Normal
:Se lect MENU:Go Back
If the surface is soiled
Wipe g ently with a soft, d amp (water o nly) cl oth.
When wiping discs , alway s mov e the c loth fr om the centr e hole towar d the o utside , whic h
will no t caus e disto rtion. (If you wipe t he dis cs usin g a cir cular motion , circu lar scr atches are
likely t o occu r, whic h will cause distor tion.)
If the disc is brought from a cold to a warm environment
moisture may form on the disc
6.1 FACTORY RESET
-It is used to reset to factory settings.
-Press up/do wn button to select this item, then press right button to enter.
Wi pe this moisture off with a soft, dry, lin t-free cloth b efore using the dis c.
6.2 TIME SETUP
6.2.1 Clock
-The Clock displays the c urrent time f rom pr ogram s.(this optio n is not user adjust able)
6.2.2 Time Zone
-To set the ti me zone: Ea stern, Samoa, Hawaii, Alaska, P acific, Moun tain, Centra l, Atlan tic
and Newfoundland.
6.2.3 Daylig ht Saving
-it is used to set daylight saving time.
-Press up/do wn button to select it,then press left/r ight to set it ON/OF F.
You ca n dam age di scs if y ou sto re the m in th e follo wing p laces :
Area s exp osed t o direc t sunli ght
Hum id or d usty a reas
Area s dire ctly ex posed to a h eat ou tlet or heatin g appl iance
6.3 OS D LANGUAGE
-Press up/do wn button to select this item,th en pre ss left/right b utton to change the OSD
language.
-Option:English or other langua ges.It depen ds on the software.
6.4 AUDIO LANGUAGE
-It is used to set the audio langu age.
-Press up/do wn button to select it, the n pres s left/right b utton t o select the language as desired.
6.5 SCR EEN
-It is use d to se lect sc reen d isplay mode .
-P ress u p/down butto n to se lect th is item ,and p ress l eft/rig ht butt on to c hange the m ode.
-O ption:4 :3/16 :9
6.6 FOR MAT
-It is use d to se lect th e form at mod e.
-O ption:N orma l
Improper disc storage
Maintenance
Be su re to p ress POWE R to set the player to the standby mode and discon nect t he
AC a daptor befor e main taining the player.
Wipe the pl ayer with a d ry, soft cloth .
If the surfac es are extre mely dirty ,wipe clean with a cloth wh ich has been dippe d
in a weak s oap-an d-water solution and wrung ou t thoroughly, and then wipe aga in
with a dry c loth.
Never use alcohol, benzine, thinner, clean ing flu id or o ther ch emicals. And do not use
compresse d air to remo ve dust
ACCESSORIES
R emot e control
w ith battery
. ......... ......... ...1
AC a dapto r
....... ......... 1
Ante nna
conv ertor
....... ......1
30
Car cord
.............1
Instruction
manual
................1
Audio/Video
cable ... ....1
R od an tenna
. ......... ......1
Stand holder
.... ......... ...1
Extended
tel escopic
antenna
.... ......... .1
A ll the p icture s in th e instr uction manua l are j ust for your r eferen ce, sp ecifica tion s hould refer
to actua l acce ssorie s.
3
5.PROGRAM CONTROL SETUP
TABLE OF CONTENTS
Inpu t Passw ord
Please enter the password by 0-9
Getting Started:
S afety i nform ation. . . . . . .. . . . . . . . . . . . . . .. . . . . . . .. . . . . . .. . . . . . . .. . . . . . . .. . . . . . .. . . . . . . . 1 - 2
D ISC ha ndling and m ainte nance. . . . . . . . . . . . . . . . . . . . . . . . . . . . . . . . . . . . . . . . . . . . . . . . 2 - 3
A ccess ories . .. . ... . . .. . .. . . . . .. .. . . . . ... . . .. . . .. . . .. . . ... . . .. . ... . . . ... . . . . . ... . . . . . . .. . . .. 3
F eature s
.. ... ... .. . ... ... . ... ... .. . ... ... . .. ...... . ... ... . .. ...... ... .... . .. ... ... ... ..... . ..5
C ontrol refere nce gu ide
. . . .. .. . . . . .. . . . . . .. . . . . . . .. . . . . .. .. . . . . . .. . . . .. . .. . . . . . . . 6 - 7
B asic c onnec tion . . . . . .. . . . . . . . . . . . . . .. . . . . . . . . . . . . . .. . . . . . . . . . . . . . .. . . . . . .. . . . . . . . . . 8 - 9
R emote control prep aratio n . . . . . . . . . . . . . . . . . . . . . . . . . . . . . .. . . . . . . . . . . . . . . . . . . . . . . . . 1 0
DVD Operations:
B asic p lay. .. . . . . . ... . . .. . .. .. . . . ... . . .. . . ... . . . .. .. . .. . . ... . . . .. .. . . . . . . .. . . . .. . .. . . . . . .. . . . 11
S t op pin g pl a y. .... . .. .. .. . .. .. .... ... .. .. . .. .. .... ... .. .. . .. .. .... ... .... . . ... .. .. ... .... . . 12
S kippin g ah ead o r bac k .... ........ ......... ........ ......... ........ ......... ....... 12
F as t F o rwar d / Ba c kwa rd
. .... .... ......... ........ .. ...... ........ ......... ........ .12
P ause or p lay .. ......... ........ ......... ........ ........ ......... ........ ......... ....... 12
S low-m otion play( DVD/ VCD) ....... ........ . ........ ........ ........ ......... ....... 13
M p3 pla yback ...... ... ... .. . ... ... . .. .. ... . .. ...... ... ... .. . ... ... . .. ...... .. ...... ... .... 13
M P4 p layba ck ... ......... ........ ........ ......... ........ ........ ........ ......... ....... 14
C A R D P L AY B AC K . . . .. . . . . . .. . . . . . . .. . . . . . .. . . . . . . .. . . . . . .. . . . . . . .. . . . . . .. . . . . . . .. 1 5
U S B.. . .. . ... . . ... . .. . .. . . .. .. . . . .. .. . . . . .. . . .. ... . . .. .. . . . . .. . .. . ... . . .. ... 1 6
J PEG CD . ..... ... .. ..... .. ... ..... ........ .. ..... . .... .... .. ..... . .... .... . ....... ... ..17 -18
E njoyin g Vide o CD with pla yback contr ol. . . . . . . . . . . . . . . . . . . . . . . . . . . . . . . . . . . . 1 8
O n scre en dis play in forma tion . . . . . . . . . . . . . . . . . . . . .. . . . . . .. . . . . . . . . . . . . . . . . . . . . .. 1 9
P rogram play. . . . . .. . . . . . .. . . . . . . .. . . . . . .. . . . . . . .. . . . . . .. . . . . . . .. . . . . . . .. . . . . . . . . . . . . . . . . . 1 9
R epeat play . ......... ......... ......... ......... ......... ......... ......... ......... ......... ......... .20
T FT MO DE.... ......... ......... ......... ......... ......... ......... ......... ......... ......... ......... .20
G O TO. ......... ......... ......... ......... ......... ......... ......... ......... ......... ......... ......... .21
C hangi ng su btitle langua ge(DV D on ly)..... ......... ......... ......... ......... ......... .21
Z OOM. ......... ......... ......... ......... ......... ......... ......... ......... ......... ......... ......... .21
C hangi ng aud io sou ndtrac k lang uage [ DVD/VCD di sc]. .. . . . . . .. . . . . . . ... . . . . . .. . . 2 1
Viewing from differe nt ang le(DV D only ) ....... ......... ......... ......... ......... ......... 22
In itial S ettings ........ ......... ......... ......... ......... ......... ......... ......... ......... .... 22 -24
G enera l setup.... .... . ....... .. .... .. ... .... . .... .... ..... ... . ....... .. ...... ... .... . . ... .22 -23
A udio s etup. . . . . . ... . . . . . .. . . . .. . .. . . . . . . .. . .. . . .. . . . . . . ... . . . . . .. . . . . ... . . . . . . .. . . . .. . .. . . 2 4
TV Operations:
Turn on the u nit...... ......... ......... ......... ......... ......... ......... ......... ......... ......... .25
A ntenn a ope ration ........ ......... ......... ........ ......... ......... ........ ......... ......... .25
B asic o perati ons... ......... ......... ......... ......... ......... ......... ......... ......... ......25 -26
T V Me nu C ontrol . ........ ......... ......... ......... ......... ........ ......... ......... ......... .26
M a i n M e n u . . . . . .. . . . . . .. . . . . . . .. . . . . . .. . . . . . . . . . . . . . .. . . . . . . . . . . . . . .. . . . . . . .. . . . . . 27 - 3 0
For Reference:
D efiniti on of te rms. . . . . . .. . . . . . .. . . . . . . .. . . . . . . . . . . . . .. . . . . . . .. . . . . . . . . . . . . .. . . . . . . . . . . 3 1
S pecific ations........ ........ ......... ......... ........ ......... ........ ......... ........ ........ 32
Trouble shooti ng.... . .. .. ... . . ... .. .. . .. ... .. ... ..... .. ..... . .. .. ... . . ... .. .. . .. ... .. ... .32 - 33
R egion code sett ing .... ......... ........ ......... ........ ........ ......... ........ . ........ .33
4
-Pres s up o r down butto n to se lect th is item , and p ress right bu tton t o ente r INPU T PAS SWOR D
page , Input 0000( In this unit, t he orig inal p asswo rd is 0 000) to enter PROG RAM CONT ROL
page as abo ve. Th ese s etting allow c ertain peop le to vi ew cer tain ch annel s, which may be
espe cially u seful to forb id child ren fr om vie wing s ome u nbefit ting ch annel s.
5.1 V-CHIP SETT ING
-Pres s right butto n to en ter thi s sub-m enu.
5.1.1 Movie rating s
-Pres s right butto n ente r MOV IE RAT INGS sub-m enu.
-Pres s up/d own b utton t o sele ct item as de sired a nd pre ss EN TER b utton t o set i t.
-Opti on: G, PG,PG -13,R,NC-1 7,X an d Y.
5.1.2 USA T V Con tent ra tings
-Pres s right butto n ente r this s ub-me nu.
-Pres s up/d own b utton t o sele ct item as de sired a nd pre ss EN TER b utton t o set i t.
-Opti on:Y,Y7,G,P G,14 a nd MA .
5.1.3 Canad a Eng lish ra tings
-Pres s right butto n ente r this s ub-me nu.
-Pres s up/d own b utton t o sele ct item as de sired a nd pre ss EN TER b utton t o set i t.
-Opti on:C,C8+,G, PG,14 + and 18+.
5.1.4 Canad a Fre nch ra tings
-Pres s right butto n ente r this s ub-me nu.
-Pres s up/d own b utton t o sele ct item as de sired a nd pre ss EN TER b utton t o set i t.
-Opti on:G,8 ans+, 13ans +,16an s and 18ans .
5.2 RRT SE TTING
-Pres s up/d own b utton t o sele ct this item a nd pre ss righ t butto n to e nter.
5.3 BLOCK ENABLE
-Pres s up/d own b utton t o sele ct this item a nd pre ss left /right b utton to set it ON o r OFF.
5.4 UNRAT ED
-Pres s up/d own b utton t o sele ct this item a nd prs s left/r ight bu tton to set it ON or OFF.
5.5 CHANG E PAS SWO RD
- It is u sed to chan ge the passw ord, a nd the proce dure o f chan ging p asswo rd is d escrib ed as
followings:
E nter ne w pas sword in the NEW PASSW ORD row, a fter th at the system will r equire you to
confi rm the new p asswo rd. Th en ent er the new pa sswo rd aga in in th e CONFIRM PASS WORD
row.I f succe ss,ma ssage “Chan ge Pa ssword Succ ess!” will ap pear in the s creen.
NOTE : The origin al pas sword is 000 0, you can ch ange it, but y ou sh ould w rite it d own a nd
keep it safe . If you forge t the p asswo rd, ple ase co ntact with th e supp lier.
29
2.2 SKIP
-Pre ss up o r dow n button to s elect s kip ite m, the n pres s left or righ t butto n to se lect on or off .
ON: If SKIP is ON, chan nel nu mber what y ou sel ect wi ll be sk ipped when select ing ch annel
usin g the CH- or CH+ b utton.
OFF : If SK IP OFF, all th e cha nnel n umber s(the c hannels are stored in the unit) can be acce ssed
usin g CH- or CH+ butto n.
Skip/uns kip a channel:
1.Press up/down but ton to select CHANNEL i tem, then pre ss left/right button to select the channel backwar d/
forward you want to s kip.
2.Press up/down but ton to select the SKIP item in channe l setup menu and press le ft/right button to skip
current c hannel or no t.
2.3 FAVORITE L IST
-Pre ss up o r dow n button to s elect t his ite m, the n pres s right button to ge t in the favor ite list page.
-You can s et max imum five fa vorite chann els. P ress u p or do wn bu tton to selec t item then p ress
left/r ight b utton t o set t he cha nnel is your favorit e channel or not.
3.CC SETUP
7” TF T DISP LAY
This p layer has a b uilt- in 7" TF T display win dow, t o prov ide cle ar visi on, an d low radiation.
AUTO TV S CANNING F UNCT ION
COMB INAT ION O F TV/D VD P LAYER
Press SWIT CH bu tton to switc h the u nit in T V or D VD mo de as you want to.
WITH RECH ARGEABLE LITH IUM B ATTERY
MEMO RY F UNCT ION
SUPP ORT V IDEO /AUDI O OUT PUT
MULT I-SUB TITLE S FUN CTIO N(OSD)
Subti tles ma y be d isplay ed in o ne of a multi - langu age d epend ing on the so ftware .
CC S etup
CC Display
Off
608CC Type
708CC Type
CC Mode
CC Custome r
:Up/Down
FEATURES
C1
Service 1
Customer
:Se lect MENU:Go Back
3 .1 CC DISPLAY
- Press up or down b utton to sele ct it an d press left or righ t butto n to se t the c c disp lay ON or OF F.
3 .2 608 CC TY PE
- Press up or down b utton to sele ct this item, and press le ft or rig ht but ton to chang e the c c type .
- Option :C1/C 2/C3/ C4/T1 /T2/T3 /T4
3 .3 708 CC T YPE
- Press up or down b utton to sele ct this item, and press le ft or rig ht but ton to chang e the c c type .
- Option :Serv ice1/S ervice 2/Serv ice3/S ervic e4/Ser vice5/ Servic e6
3 .4 CC MODE
- Press up or down b utton to sele ct this item, and press le ft or rig ht but ton to chang e the c c mod e.
- Option : Broa dcast /Custo mer
- If you select CUSTOMER , Ther e will a ppea r CC CUSTOMER i tem, s elect th is item and
p ress r ight bu tton to enter, you c an set what you wa nt to, such a s font ,color, etc.
4.EAS SETUP
FULL REMO TE C ONTROL FUNCTIO N
GUID E DISPLAY L ETS O PERATION MOR E EAS ILY
BUILT-IN S TAND HOLDER
USB/ CARD READER F UNCT ION
This p layer can pla y USB /SD / MMC/ MS ca rd con taining files in VCD /SVCD/DVD/MP3 /WMA /
MP4/ JPEG /CD fo rmat.
(NOT E: The USB p ort of this un it can not co nnect w ith th e remo vable HDD. )
SLIDE SHO W IN 17 MO DES
MULT I TV S YSTEM SUPPORT
The p layer c an pla y disc s with signal system of PAL and NTSC .
GRAP HICA L USE R INT ERFA CE SC REEN
Simpl y by p ressin g the O SD bu tton o n the remote contro l, info rmatio n on th e play er and
disc c an be displa yed on the sc reen f or eas y iden tificati on, Th e playe r's op eratio ns and
settin gs can be pe rforme d by o perati ng the remot e cont rol wh ile mon itorin g scree n.
MULT I-AUDIO FU NCTIO N
The a udio s oundtr ack ca n be h eard in up to 8 lang uages . (The numb er of a udio s ound
langu ages d epend s on t he soft ware. )
EAS Set up
Always
Sk ip low priority
MULT I-SUB TITLE S FUN CTIO N
Subti tles ma y be d isplay ed in o ne of a maxi mum o f 32 la nguag es dep endin g on th e soft ware.
Sk ip low/medium priority
:Up/Down OK:Select MENU:G o Ba ck
-Th is syst em can displa y EAS (Emerg ency A lert Sy stem)m essag e broa dcast pursua nt to
47C FR11 .117 of the FC C Rule s.
-Press up or dow n butto n to se lect th is item , and p ress rig ht butt on to e nter.
-Op tion:a lways, skip lo w prior ity and skip lo w/med ium priority
-Press up or dow n butto n to se lect wh at you desire and p ress OK /ENTE R but ton to c onfirm ,
the n there will be a ic on in th e fram e. Pre ss OK/ ENTER button again , the ic on will disapp ear.
28
5
MAIN MENU
CONTROL REFERENCE GUIDE
Com mo n proced ure for initia l set tings
Main unit
1
2
1 .Press MEN U butto n.
3
3
4
24
CH -
CH +
>
SWITCH
MEN U /OK
>
V OL-
16
2 .Use t he UP or DO WN bu tton to selec t prefe rred p age, th en pre ss RI GHT b utton t o ente r.
E ach p age fo r settin g the v alue will dis play. T hen m ove th e up o r down butto n to se lect ite m
a nd use left o r right button to set .
17
3 .Press MEN U butto n aga in to re turn t o prev ious m enu se tting p age.
18
19
P ress M ENU button to ent er tv M AIN M ENU p age a s follo ws:
Main Menu
20
Auto S earch
CH Setup
CC Setup
EAS Setup
V OL+
Program Control
System Setup
5 6 7 8 91 01112 13 14 15
1 SD/MMC/ MS card slo t
2 USB slot
3 Built-in S peaker.
4 TFT Displ ay Window- Displays all
information about DVD /TV work sc ene.
5 SWITCH button- Press this button to switch
the unit b etween TV a nd DVD mode.
6 PLAY/PAU SE button- Press this b utton to start
or pause p laying a disc .
7 DOWN/CH - button- P ress this butt on to down,
and in DV D mode, if yo u keep press ing it for
more than 2 seconds, t he player wi ll skip to the
next chap ter or title(DV D) or track ( for CD).In
TV mode, p ress this bu tton to play t he previous
channel.
8 UP/CH+ b utton- Press this button t o up,
and in DV D mode, if yo u keep press ing it for
more than 2 seconds, t he player wi ll skip to
the previous chapter o r title(for DVD)or track
(for CD).In TV mode, p ress this but ton to play
the next c hannel.
9 LEFT/ FR button- Pre ss LEFT butt on to left,
and if you keep pressin g it for more than 2
seconds, the player wi ll play the dis c backward
at speed:x 2,x4,x8,x16 ,x32.
10 MENU/O K button- P ress this but t on to confirm
an operation. In DVD mode, press it for a long
time to re turn to the root menu(for DVD) or to
turn on/o ff the PBC (f or VCD).In T V mode, press
it for a lo ng time to enter TV settin gs menu pag e.
11 RIGHT/F F button- Press RIGHT button to righ t,
and if you keep press ing it for mor e than 2
seconds , the player w ill play the d isc forward
at speed :x2,x4,x8,x16,x32.
12 VOL - bu tton- Press this button to decrease
the volume.
13 VOL+ bu tton- Press this button to increase
the volume.
14 CHARGE INDICATO R, Power ON / Standby
Indicato r
6
:Up/Down
21
:Select MENU:Go Ba ck
1.AUTO SEARCH
Auto Search
Source Type
Start Search
SNR
Ante nna
0.00dB
22
:Select
ME NU :Go Ba ck
C LLOS
OSE
OSE
E
23
15 Remote con trol sensor
16 External An tenna Jack- When the sig nal is
too weak, co nnect a external antenna to this jack
for a better reception.
17 AV OUT Jack- Connect T V or other ex ternal
AV equipment to this jack to use the u nit as a
signal sourc e.
18 Phone- Connect headphone to this ja ck for
private listening.
19 Power Switch- Switch th is knob to tur n on the
unit or set it i n standby mode.
20 DC In Jack- Power input jack.
21 TELESCOPI NG ANTENN A
22 STAND HOL DER
23 BATTERY C OVER
24 OPEN- To op en the disc c over.
1. 1 SOU RCE TYPE
It is used to se t the source t ype.
-P ress u p or down bu tton to selec t it and then press l eft or right b utton t o set.
-Options: Ante nna/Cable.
1. 2 STA RT SEARCH
Before n ormal watch ing yo u must searc h effec tive c hanne l first.
-P ress u p or down bu tton to selec t it and press RIGHT butt on to g et in s canning setup pag e.
-P ress RIGHT navigation b utton t o cancel the auto s can.
1. 3 SNR
This opt ion is not use r adju stable .
2.CH SETUP
Chann el Setup
Channel
Skip
Favo rite List
:Up/Down
2-3
Off
:Se lect ME NU :Go Ba ck
2.1 CHANN EL
-Pres s up o r down butto n to se lect it and th en pre ss left or righ t butt on to c hange the ch annel
numb er.
27
CC
CONTROL REFERENCE GUIDE
It is used to set the caption mode.
-Keep pressing CC bu tto n to selec t different mode as d esired.
-Option: On/Off
Remote control
INFO(INFORMATION)
It i s used to dis play cu rrent progra m info rmatio n.
-P ress INFO bu tton, t he screen w ill disp lay as below :
Current channel
number&name
Signal
Compatibility
2 -3 Flo wer
480i
Current time
03:45 AM
Current audio
language
A UDIO [Unkn ow]
U nrate d
EP G (Electron ic program guide)
Page 1 of 5
When vi ewing a digit al chan nel, p ress th e EPG Butto n to a ccess
the program gu ide su pplied by the signa l prov ider (not ava ilable
in all are as).
Pr ess the LEFT /RIGHT but ton to access previ ous/ne xt pag e in
pr ogram sched uler.
/ :Page +/-
TV MENU CONTROL
Pr ess TF T/TV M ODE button to en ter this contr ol pag e. The n you c an se lect di fferent item b y
ke eping pressi ng this butto n and u sing n aviga tion bu ttons to chan ge pr esettin g.
-Pre ss TFT/TV M ODE button to ent er the PICTU RE CONTRO L pag e:
PI CTURE
BRIG HT
CONTRAST
COLOR
HUE
ENGLISH
50
50
50
50
NOTE:The level of BRIGHT, CONTRAST,
COLOR and HUE can be adjusted 0-100.
The menu language can be changed
among multi-languages.
IIIIIIIIII III II III IIIII II III II III III------ ------- ------- -------
1.M ove th e UP o r DOW N nav igation butto n to se lect B RIGHT, CONTRAS T, COL OR, H UE or
ENGL ISH item , th en pre ss the LEFT or RIG HT na vigati on but ton to adjust the lev el of t he
sele cted it em.
2.Pr ess TF T/TV MODE butto n agai n to en ter OP TION page. Press UP or DOWN navig ation
butt on to s elect NORM AL or Z OOM item. Then p ress the LEF T or RIGHT naviga tion b utton t o
adju st. Th e NORMAL it em ca n be a djuste d between N ORMA L and DOWN mode ( to sw itch th e
pict ure be tween norma l and v ertica l mode .). And the Z OOM can be set to 16:9 o r 4:3 mode.
OPTION
NO RMAL
16:9
16:9
ZOOM
ZOOM
DOWN
OPTION
3. Press TFT/T V MOD E but ton ag ain to exit th is page .
26
36
1 .MUTE - To mute the soun d.
16
1
2 .NUMER IC butto ns -To i nput the numeric
in formatio n, such as track number, channe l number
17
a nd so on .
18
3 .FF butt on -Pres s this bu tton to play the d isc
2
fo rward a t speeds : x2,x4,x 8,x16,x3 2(in DVD mode) .
4 .FR butt on -Pres s this bu tton to p lay the d isc
19
b ackward at speeds:x2,x4 ,x8,x16, x32(in DVD mode).
20
5 .SLOW button - Press this button to play t he disc a t
21
s peeds:1/2,1/4,1/ 8,1/16.
22
3
6 .ZOOM button - Press this button to enlar ge pictur e
23
4
24
s ize, max .to X 4 or to shrin k picture size, min. to X1/4.
5
6
25
7 .ANGLE button -Press th is button to disp lay
7
26
th e angle number and change to di fferent a ngles.
8
27
8 .PROGR AM butt on -Pre ss this button to s etup
28
th e memo ry order of chapt er or title (for DVD) or
9
29
tr acks (fo r VCD/CD).
10
30
9 .TFT/TV MODE b utton -P ress thi s button to enter
11
31
T FT/TV m ode page.
32
12
1 0 .TITLE button -Press th is button to retur n to
13
33
ti tle menu (for DV D).
14
34
11 .SUBTITLE but ton -Pre ss this b utton to display
15
35
a nd change subtit le language(for D VD only ).
1 2 .AUDIO button -To sele ct the au dio mod e(in DVD mode) .
1 3 .SWITC H butto n -To sw itch the mode be tween TV
a nd DVD mode.
1 4 .INFO -To displ ay current progra m inform ation, s uch as
c hannel n umber, s oundtra ck mode , subtitle language and s o on(onl y for TV m ode).
1 5 .EPG - Display t he progr am infor mation o f curren t day or l atter day s(only f or TV Mo de).
1 6 .STANDBY -To set the u nit in sta ndby mo de or sw itch the unit on.
1 7 .DISP button -P ress DI SP butto n continuously d uring pla yback, t he scree n will dis play the playing
in formatio n, such as elaps ed time, remaini ng time a nd so on (in DVD mode).
1 8 .N/P bu tton -Pr ess this button t o select NTSC or PAL sys tem (for DVD onl y).
1 9 .GO TO button -Press t his butto n to set the playe r to play disc sta rting at a certain point.
2 0 .STOP button - Press th is button to halt p laying.
2 1 .PLAY/ PAUSE button - Press th is button to start or pause playing the disc .
2 2 .PREV button - Press th is button to play the prev ious cha pter(for DVD) or track(for VCD/CD ).
2 3 .NEXT button - Press th is button to play the next chapter( for DVD) or track (for VCD /CD).
2 4 .A-B button -Press this button t o repeat playing sections between two spe cific poi nts (A-B).
2 5 .REPE AT butto n -Press this button to re peat pla ying one chapter or one title (forD VD) or r epeat
p laying the curren t track o r the who le track s (for VC D/CD).
2 6 .CH+/U P -To m ove up o r select p rogram forward.
2 7 .SETUP button -Press this butto n to ent er DVD i nitial set tings me nu( for D VD mod e).
2 8 .ENTE R button -Press this butt on to con firm what you ha ve selec ted.
2 9 .Navigation bu ttons -P ress this button to move up, down , left or right.
3 0 .CH-/DOWN -To move d own or s elect program ba ckward.
3 1 .MENU button -Press th is button to ente r main m enu pag e(in DVD mode) or to ent er TV se ttings
m enu.(in TV mode ).
3 2 .VOL - button - Press th is button to decre ase the volume.
3 3 .VOL + button -Press th is button to incre ase the volume.
3 4 .CC -To set the caption mode(on ly for TV mode).
3 5 .EXIT - To exit th e menu page(on ly for TV mode).
3 6 .USB/C ARD/DV D butto n -To sw itch the mode fro m USB/ CARD/D VD mod e.
7
BASI C CONNECTION .
TV OPERATIONS
Ensure all the cables are disc onnec ted fro m the main u nit before co nnect ing to AC power
source .
Read through the instru ctions befor e conn ecting other equipment.
Connecting to AC power source
TURN ON THE UNIT
1. Pus h POW ER sw itch a t the ri ght sid e of th e unit to turn on the unit.
2. Pres s SW ITCH b utton to set the un it in TV mode .
ANTENNA OPERATION
EXTERNAL ANTENNA
I nstall e xtern al ante nna in to ante nna ja ck for best r ecepti on.
INPUT
OFF-ON
9-12V - - - PO W ER
PHON E
AV OUT
RF IN
INPUT
OFF-ON
9-12V - - - PO W ER
P H ONE
AV OUT
RF IN
To po wer outlet
Main unit
E xterna l anten na jac k
AC adaptor
NOTE:
Before connect ing to AC power, push the
POWE R ON/OFF switch to OFF.
BASIC OPERATIONS
A UTO SEARCHING
Bef ore normal watching you must s earch effect ive channels first.
-Press ME NU button on rem ote control, the screen wi ll display:
Rechargeable Battery Use
Main Menu
The player built-i n a chargeable Lith ium ba ttery.
Auto Search
CH Setup
CC Setup
EAS Setup
Program Control
System Setup
1.Ch arge t he battery
-Con nect the ada ptor to the D C 12V IN jac k, then set th e unit in POWER ON mode (TH E
PLAYING MODE)for ful ly charge.
-Set in POWER O N mode and press the STANDBY butt on (THE STANDBY MOD E) or
set in POW ER OFF mode for f ully charge.
And the indicator is red during charging; it gets g reen when chargin g is co mpleted.
2.Time to r echarge the batte ry
Char ge the built-i n battery pack 8 hours before u sing the play er for the first time.
Recharge and pla yback time depends on battery pack c apaci ty and the te mpera ture conditio n.
Generally speaki ng, the batte ry nee ds to be charged about 4 hours.
3.Us ing and Mai ntaini ng Re charg eable Battery
-.The norm al working conditio n temperatu re is: 0 ~45 O C ;
-.Always unplug AC/DC power supply for the unit when ever n ot playing.
NOT E: A new bat tery pa ck wh ich ha s not b een us ed or one wh ich has not been u sed fo r more
than a mon th, ma y appe ar to n ot rec harged enou gh , th is is du e to the cha racteri stic of this
batte ry and is not a mal function. In t his cas e, rec harge it two or thre e time s before the first us e,
and i t need s more than 8 hours to re charge batte ry.
Nois es may be generated dur ing recharging. In t his cas e, use a more distant power so cket.
Do n ot recharge or disc harge batter y near a heat ing ele ment such as a he ater or direct sunlight.
:Up/Do wn
:Sel ec t ME NU: Go Ba ck
-Select AU TO SEARCH item, press right button to ent er this item.
-Set the SOURCE TYPE wha t you want. S elect START SEARCH it em the n pre ss right to start
to search channels automati cally. Wait for several min utes u ntil searching finished, then the
first searc hed c hanne l will play.
NOTE: You mus t do au to sea rch ag ain after diff erent system selection ac cording to y our are a.
SELECT WANTED PROGRAM
1. Pr ess CH + bu tton to enter next c hanne l.
2. Pr ess CH - but ton to enter p reviou s cha nnel.
3. Pr ess nu meric but to ns on t he rem ote co ntrol directl y to se lect pr ogram what you wa nt.
Exam ple: Track 9 , pres s "9" th ree se conds later, it will autom aticall y switc h to tr ack 9,
or press EN TER button to con firm d irectly.
Trac k 12,p ress "1 " and "2", th ree se conds later, it will a utoma tically switc h to tra ck12, or pres s
ENT ER bu tton to confir m dire ctly.
Note : If on e frequ ence dot ha s more than o ne ch annel, for ex ample , you want se lect
<CH 14 NO .2>, p ress 1 and 4 , then press right n avigat ion but ton an d inpu t 2.Pre ss EN TER
butto n to c onfirm . Once the in put is done, it will s tart br oadca sting t he sel ected c hanne l
imm ediate ly.
VO LUME CONTRO L
1. Pr ess th e VOL + or VO L- to adjust the le vel of c urren tly volu me.
2.Th e leve l of VO LUME can b e adju st from 0-40.
M UTE CO NTROL
P ress t he MU TE bu tton to mute the so und, p ress it again to swi tch ON the so und.
N OTE: When the un it is in Mute mode, press ing VO L+ bu tton w ill swit ch ON the so und an d turn
it up, pressi ng VO L- butt on will switch ON the sou nd and turn i t down .
8
25
Connecting to TV set
2. A UD IO S ETUP
TV set
- -AUDIO SETUP PAGE- SPEAKE R SE TUP
To video input connec tor (yellow)
To audi o input connectors (red, white)
EQUALIZER
Video/audio cable
GOTO AUDIO SE TUP PAGE
T O AV OUT JA CK
INPUT
OFF-ON
9-12V - - - PO WE R
PHONE
AV OU T
RF IN
2.1 Speak er se tup-It is to se t the s peake r outp ut leve ls
Optio ns:LT/ RT -Le ft/Rig ht mix mode.
ST EREO -Selec t this o ption if you do not have a 2.1 channe l ampli fier
V S URR - surrou nd -It is use d to se t dum my surroung ding a udio e ffectiv eness .
Connecting to ex ternal signal sources
T O AV OUT JA CK
OFF-ON
INPUT
9-12V - - - PO W ER
P HONE
AV OUT
RF IN
2.2 EQUA LIZER SETUP - It is used tocom pens ate for freque ncy d istortio n to im prove its
freq uency respo nse in audio syste ms(no t appli cable) .
O ption s: EQ TYPE. In this optio n you c an ch oose d ifferen t EQ T YPE.
BAS S BO OST. I n this o ption you ca n set i t to ON or OF F
SUP ER B ASS: I n this o ption , you c an set it to O n or O FF.
TREBLE BOOST: In th is opti on,you can s et it to On or OFF.
Recorder/DVD
To video input connector (ye llow)
To audio input connectors (red or white)
Video/audio
cable
Connecting to audio equipmen t
Au dio e quip men t
To audi o inp ut co nnec tors (red, whit e)
Vide o/au dio c able
T O AV OUT J ACK
RF IN
9
AV OUT
24
PH ON E
1. C onne ct the headp hone.
Adjust th e volu me to minimize the volum e.
Connec t the h eadph one to phone jack.
2. Adjust the vo lume to the level that yo u wan t.
INPUT
OFF-ON
9-12V - - - PO W ER
Connect headphone
REMOTE CONTROL PREPARATION
1.1 TV TYPE- It is f or sele cting the TV system acco rding to the colour syste m of th e TV.
O ption:PAL
N TSC
Battery installation
Insert the ba ttery while o bserving the correct
(+) and (-) polaritie s as i llustrated at right(Fig 1).
2 OPEN
Ser vice life of b atte ry
十
十
The battery normally last fo r abou t one
year although this depends on how ofte n
the remote control is used.
If the remote c ontrol fails to work even
when it is operated near the playe r, replace
the battery.
Use one type CR2025 battery.
1.2 TV DISP LAY - It is fo r selec ting TV outp ut mod e.
Op tions: Norm al /PS: Pan & scan mode
Norm al/ LB: Letter box m ode
Wide : 16:9 wide s creen mode
PUSH 1
1.3 AN GLE MARK - it is u sed to selec t whet her or not th e multi - angle icon is disp lay on
scree n when a Mu lti-ang le DVD disc i s play ing.
Op tions: On: Ic on will be dis playe d
Off: Ic on wil l be turned o ff
十
十
1.4 OS D LA NG - It is use d to ch oose the desired langua ge for differe nt use r. In th is player,
you ca n cho ose En glish o r othe r lang uages .
3
1.5 CA PTIO NS - It is use d to switch th e cap tion ON/OFF when playin g DVD disc.
N ote:
Do no t use rechar geable (Ni-C d) batt ery.
Do no t attem pt to r echar ge, sh ort-circ uit,
disas sembl e, hea t or thr ow the batter ies
into th e fire.
Do no t drop , step o n or o therwi se imp act
the re mote c ontro l. This may d amage the
parts or lead to ma lfunct ion.
If the remote contr ol is n ot goin g to be
used for a lo ng tim e, rem ove th e batte ry.
1.6 SCREEN SAVE R - w hen th e playe r is no t in us e for 5 minut es, a r unning DVD logo w ill
move across the s creen t o prot ect the TV CRT.
Op tions: On: S creen saver is enab led
Off: S creen saver is disa bled
十
十
1.7 DE FAULT - It is used to res et to fa ctory setting s.
4
Fig 1
REMOTE CONTROL SENSOR
6m
Remote co ntrol operation
30
1. Remov e the p rotec tive pl astic ta b befo re
o perat ing the remo te con trol.
2. Keep t he rem ote co ntrol f rom no more than
6 m from the D VD pl ayer a nd wit hin ab out
6 0 o of t he fron t of th e playe r (Fig 2).
NO TE: Th e ope rating distan ce ma y vary accord ing
t o the b rightn ess of the ro om.
Do not point b right lights a t remo te con trol
s ensor.
Do not place object s betw een th e rem ote
c ontrol and th e rem ote co ntrol s ensor.
Do not use th is rem ote co ntrol w hile
s imulta neous ly ope rating the re mote c ontrol
o f any other e quipm ent.
10
30
Fig 2
23
Viewing fromdifferent
angle (DVD only)
DVD OPERATIONS
Before enjoying DVD/Video CD/CD
The On-Screen menu language of the unit
has been factor y pre-set to E nglis h. If you wan t
to c hange the menu language to o ther
lan guage, plea se refe r to "DVD operations /
Init ial set tings/ General setup / OSD lang ”. In
the explanation below it is assume d that Englis h
has been selected as menu langua ge.
Som e DVD s ma y conta in sce nes w hich ha ve
bee n shot simul taneou sly fro m a nu mber of
diffe rent a ngles . For th ese d iscs, th e sam e
sce ne can be vie wed f rom ea ch of t hese
diffe rent a ngles using the AN GLE b utton.
Pre ss ANG LE du ring p lay, nu mber of ang le
bein g play ed wil l be di splaye d in th e scre en,
pre ss the button to cha nge to different an gles.
Basic Play
Initial Settings
Onc e the i nitial p rogram ming is ent ered it is
retaine d in m emory until c hange d, the playe r
can alw ays b e operated u nder t he sam e
condit ions.
The settin gs will be ret ained i n the m emor y
until th e sett ings are chan ged e ven af ter
setting the p layer t o the s tandby mode .
N UMERIC
BUTTONS
PLAY /PAUS E
Comm on pr ocedu re for initial settin gs
1.Pres s SET UP bu tton.
2.Use the na vigatio n butt ons to select
prefe rred item, an d pre ss ENT ER bu tton,
each scree n for s etting the va lue is d isplay ed.
Then move the na vigati on but ton to set the
item and press ENTER button to con firm th e
setti ngs.
ANGLE
S ETUP
E NTE R
NAVI GAT ION
BUTTONS
NUME RIC
BUTTO NS
1.Switch on the DVD p layer (power switc h is
lo cated on the right side o f the unit.)
NOTE: 1).Make sure that a ll the connections
in cluding connections to AC adaptor, other
AV equi pment etc. have be en completed
before s witching the POWER knob to the
"ON"position. .
2). After switc hing th e unit "OFF" wait serval
seconds before turning the unit back "O N"
The uni t may malfunction i f the unit is
switched back "ON" immediately after
switchin g "OFF".If a malfunction occurs,
switch the unit "OFF" and wait serval
seconds before turning it "ON"ag ain.
2.Press SWITCH button to set the unit in DVD
m ode.
3. Push th e ope n button to open the disc cover.
PLAY/
PAUSE
PREV
NEXT
ENT ER
NAVIGATION
BUT TONS
TI TLE
MENU
SWIT CH
OPEN
3.Pres s SET UP bu tton to close setup menu in
any m ode.
4.Use left/rig ht nav igation butto n to sw itch to
anot her ma in set up item s
1.G ENERAL SETUP
4 . Plac e a dis c onto the dis c com partm ent. H old the disc w ithou t touch ing eit her of its
surfa ces, p osition it with the p rinted title si de fac ing up , align it with the gu ides, a nd pla ce
it in i ts prop er pos ition.
5 . Clos e the d isc co ver, af ter clo sing th e disc cover, play b egins . The p layer starts to read
the d isc imm ediat ely.
LOAD ING
--GEN ERAL SETU P PAGE-TV TYPE
NTSC
TV DISPLAY
PS
ANGLE MARK
OSD LA NG
CAPTIONS
SCREEN SAVER
DEFAULT
D VD -V ID EO
6. When a menu screen appe ars on the TV, mov e the n avigat ion bu ttons o r pres s the n umeri c
butt ons to select prefer red ch apter numbe r, then press ENTE R but ton to play it.
ON
ENG
O FF
ON
1 C HA PT ER
2 C HA PT ER
3 C HA PT ER
4 C HA PT ER
1
2
3
4
3 CHAPTER 3
7.Pres s NEX T or PREV b utton t o play the ne x tor p reviou s chap ter.
8.To st op pla y and return to the menu screen , pres s TITL E butt on, or MENU button .
GOTO GENERAL S ETUP PAGE
22
11
Stopping play
GO TO
Pres s GO TO but ton con tinuo usly to selec t the ite myou want to set a nd en ter a ti me nu mber,
chap ter nu mber, track n umbe r etc. A ccord ingly, t he dis c wil l b e play ed fro mthe s electe d poin t.
Press the STOP button to st op pla ying a disc.
NOTE: W hen pl ayer is stopp ed, the playe r
reco rds th e poin t where STO P was pressed
(RE SUME functi on). P ress PLAY ag ain,
playback will res ume from thi s poin t . Whe n
the tray is opene d or STOP is press ed again,
the RESU ME fun ction will be cleared.
Changing subtitle language
(DVD only)
Skipping ahead or back
Skipping ahead
Press NEXT
butto n during play
A chapter (DVD) or a track (V ideo CD/CD) is
skip ped each tim e the button is pressed.
Skipping back
Press PREV
butto n during play
A chapter( DVD) or a track (Vi deo C D/CD) is
skip ped each tim e the button is pressed.
STOP
PLAY/PAUSE
FF
PREV
FR
NEXT
It is possible to change the subtitl e lang uage t o
a differe nt language from th e one selected at
th e initia l settings.( This op eratio n work s only
wi th discs on which multiple subti tle lan guage s
ar e reco rded)
1.Press SUBTITLE b utton during play, t he
screen will d isplay the cu rrent language.
2. Press SUBT ITLE b utton continuously to
chang e language o r turn off.
NOTE : When no subtitles are recorded,
press thi s butt on wil l not w ork.
C HANGING S UBTITLE LA NGUAGE
S ubti tle 0 2 /07 :En glis h
Su btit le 01 /07 :Chi nes e
Z OOM
ZOOM play
This func tion a llows you to enjoy a motion or
mo tionless picture.
Press ZOOM butto n when playi ng, the
sc reen s hows:
Fast forward (backward)
During playb ack, p ress F F
b utton o r FR
button to fas t forwa rd/rew ind.
Press PLAY button to res ume n ormal play.
2X
3X
4X
1/4X
1/3X
1/2X
SUBTITLE
AUDIO
Fast forw ard
2X
FF 4X
FF 8 X
FF1 6 X
32 X
Fast bac kward
2X
FR 4X
FR 8 X
FR 1 6 X
Press NAVIG ATIO N button to s croll a cross
th e enla rged p icture.
32 X
Changing audio soundtrack
language(DVD/VCD disc)
Pause or play
Dur ing pla yback , pres s PLAY /PAUSE
pla y, pres s PLAY butto n.
b utton , the pl ay will be pa used, To res ume no rmal
12
It is possible to change the audio soundtrack
la nguage to a different language from the one
se lected at the initial settings (This ope ration
works only with discs on which multiple audio
so undtrack lan guage s are recorded).
Press AUDIO button while playing DVD disc , the screen will display the nu mber of curre nt
soundtrack languages,pressing the button again will change the language.
Pressing AUDIO b utton while playing VCD disc will change audio output mo de: M ono Left,
Mono Right, Mix-mono a nd Stereo.
NOTE: When no so undtrack languages are recorded, pressi ng this button will not w ork.
When the power is turned on or the disc is removed, the language heard is the one
selec ted at the in itial settings.
21
Repeat play
Slow-motion play(DVD/VCD)
Press REPEAT bu tton during p lay, it will
repea t play one ch apter or one title (for DVD
disc), or repeat play track (for VCD/CD).
Pr ess th e SLO W butt on dur ing playback.
1) Plays the disc at a 1/2 of norma l spee d at
fir st. Each time the b utton i s pressed, th e
pl ay spe ed becomes 1/4,1/ 8,1/16 .
2) Press PLAY button, the unit wil l return to
normal play.
DVD DISC
Chapter
Repeat a c hapter
Title
Repe at one title
All
Repeat all
G O TO
VCD/CD DISC
Rep eat on e track
Track
A-B
REPEAT
Mp3 playback
1 .Insert the di sc con taining the fi les in Mp3
forma t to be playe d and a fter several
secon ds, the moni tor wil l displa y all t he
folder s on th e disc :
Repe at who le disc
All
A-B repeat play
00:00 00:00
001/12 4
ENTER
NUMERIC
BUT TONS
TFT/
TV MODE
Repeating sections between two specific
points(A-B repea t)
1. Press A-B button durin g play at the
point where repeat pla y is to be started(A).
2. Press A-B button at the point where
repeat pla y is to be ended(B). Rep eat play of
the select ion between points A and B sta rts.
3. Press A-B button once again to return to
normal play.
M USIC
SO NGS
PL AY/
PAUSE
PR EV
LOVE
NE XT
SLOW
RE PEAT
TFT MODE
Press TFT/TV MOD E but ton to enter t his con trol page. Then yo u can select differe nt item by
keepin g pres sing th is but ton and using navig ation button s to ch ange preset ting.
-P ress T FT/TV MOD E butto n to e nter th e PICT URE CONT ROL p age:
2.Sel ect the folde r you w ant to play u sing t he
nav igatio n butto ns an d pres s the E NTER
button to confir m.
3 .Th e files in this folder are displaye d and
sel ect the desir ed son g by n avigat ion bu ttons,
the n pres s the PLAY b utton to star t playb ack.
Volume level in dicator
PICTURE
Current son g/
Play tim e Total time
Total songs
BRIGHT
CONTRAST
COLOR
HUE
ENGLISH
N OTE:Th e level o f BRIGH T, CON TRAST,
C OLOR a nd HUE can be adjusted 0-100.
T he menu languag e can b e change d
a mong m ulti-lang uages.
50
50
50
50
Current fold er
MU SIC
Mp 3
Mp 3
1. Move the UP or DO WN na vigati on but ton to select BRIGH T, CO NTRA ST, C OLOR , HUE or
EN GLISH i tem, then p ress th e LEF T or R IGHT naviga tion b utton t o adju st the l evel o f the
se lected item.
2. Press TFT/T V MOD E but ton ag ain to e nter O PTIO N page . Pres s UP o r DOW N nav igatio n
bu tton to selec t NOR MAL o r ZOO M item . Then press the LE FT or RIGH T navi gation button to
ad just. T he NO RMAL item c an be adjus ted be tween NORM AL an d DOW N mo de( to switch the
pi cture b etwee n norm al and vertic al mo de.). A nd the ZOOM can b e set to 16:9 or 4:3 mode .
OPTION
NORMAL
16 :9
16 :9
ZOOM
ZOOM
Equ alizer indicat or
01:53 040: 36
001/124
Mp 3
IIII III II III IIIII II III II III IIIII IIII- --- ---- --- ---- ------- --- --
P layback indic ator
Mp 3
Mp 3
Mp 3
ALA N
BUZ Z
CAN DY
DIAN A
MAN DY
SIM PSON
4 . Pres s NEX T or PREV b utton t o turn the
c urrent menu page to the n ext or previo us
m enu p age.
5 . Pres s REP EAT b utton t o chan ge pla y mod e.
- SH UFFLE : all th e files will b e rand omly s orted and pl ayed b y the o rder.
- RA NDOM : rand omly select any fil e to pla y.
- SIN GLE: play o ne file only.
- RE PEAT ONE: repeat one fi le.
- RE PEAT FOLD ER: all the fil es in the fold er will be pla yed re peate dly.
- FO LDER : all the files in the f older will be played .
DOWN
OPT ION
3.Pres s TFT/TV MODE button a gain t o exit this pa ge.
20
13
EN TER
NAVIGATION
BU TTONS
Mp4 playback
On screen display information
Pres s DISP butto n to d isplay playin g
info rmatio n.
1.Insert the disc co ntaini ng the files in Mp4
format to be played and after severa l
seco nds, t he monitor will show all th e
folders on the dis c:
D VD disc
TITLE ELAPSE D
T: 02 /03 C: 07/28
00 :0 0 0 0:00
00 1/12 4
TI TLE REMAI N
T: 02/ 03 C: 0 7/28
0:1 9:20
1 :17 :00
CH AP TER ELAPSED
T: 02/ 03 C: 07/ 28
0 :01 :53
CHAPTER REMAIN
T: 02/03 C: 07/28
0:0 1:34
MU SIC
SONGS
DI SPLAY OFF
D ISP
Tt = TITL E NO.
Ch= CHAPTER Number
LOV E
NUMERIC
BUTT ONS
DISP
NUMER IC
BUTTO NS
VC D disc
TC:
T:02/ 0 3 0 :19: 2 0
DISPL AY OFF
TR:
T: 02 /0 3 1: 17 :0 0
GO TO
10+
2 .Selec t the folder y ou wa nt to p lay usi ng
the n avigat ion buttons a nd pre ss the
ENTE R but ton to confirm .
3 .The f iles in this fo lder ar e displayed a nd
selec t the d esired file by navig ation
butto ns, the n pres s the PLAY/ PAUSE
butto n to st art pla yback.
PLAY/
PAUSE
PREV
NEXT
CD disc
D C:
T:02/ 0 3 0:19:20
DR:
T:02/ 03 1:17:00
P ROGRAM
REPEAT
EN TER
TR:
T:0 2/ 03
NAVIGAT ION
BUTTONS
TC:
T:0 2/ 0 3 0:01:53
0: 01:34
ENTE R
NAVI GATION
BUTT ONS
Vol ume level ind ic at or
Pla yba ck indicato r
Cur re nt fi le /Tot al fi le s
Program play
00:0 0 0 0: 00
001/ 124
Current folder
The playe r plays the fil es in a n desi red ord er.
1. Press P ROGR AM bu tton a nd the scree n will
di splay the pro gram menu.
GIF T
Mp4
Mp4
Mp4
Mp4
Mp4
Mp4
AL AN
BUZZ
CANDY
DIANA
M ANDY
SI MPSON
PROGRAM: CHAPTER/TRACK(01 . 15)
1
2
3
4
5
------
6
7
8
9
10
------
EX IT
4.Press the NEXT or PREV bu tton p lay the
next or pr evious file.
5.Press the GO TO butt on to play the disc
fro m the certain point as yo u want to.
6.Press the DISP button to display the
playing i nformation, t he tim e rema in, the
time elap sed a nd so o n.
7.Press RE PEAT button to change p lay mo de.
-SHUFFL E: all the file s will be randomly sorted and p layed by the order.
-RANDO M : ran domly selec t any fi le to p lay.
-SI NGLE : play one file only.
-REPEAT ONE: repea t one f ile.
-REPEAT FOLDER: a ll the f iles in the fol der wi ll be pl ayed r epeate dly.
-FO LDER: all the files in the folder will be played.
14
2. Press n avigat ion but tons to choo se me mory
in dex an d then press ENTER but ton to s tart
in put. Enter de sired titles/c hapte rs num bers
by using the n umeric butto ns. Th e selec ted
tit les/ch apters are st ored in the m emory.
Select
on t he me nu to s ee the next p age. Up to 2 0 track s/cha pters c an be stored .
NOT E: Le ading zero is not ne cessa ry. If th e trac k num ber is more t han 10 , pres s the 1 0+ key
fir st and then t he uni t digit.
Exampl e: Trac k 12, p ress " 10+" a nd the n "2"
Track 21, pre ss "10 +" twi ce and then "1"
3. Select START on the menu and p ress E NTER button to sta rt prog ram p lay or select EXIT on
th e men u and press ENTE R butt on to e xit wit hout p rogram play.
4.To stop t he pro gram, press PROG RAM button select STOP on th e men u, then press ENTE R
bu tton.
19
CARD Playback
JPEG CD
1.Inse rt the C ARD( SD/MM C/MS ) cont aining
the file s in VC D/SVCD/DV D/MP 3/WM A/MP4 /
JPEG CD for mat to be pla yed.
2.Pres s USB/CARD/DVD butto n to switch th e
unit in CARD reade r mod e.
3.Afte r sever al sec onds, all the folder s in the
CARD will di splay o n mon itor sc reen:
Slide show effects
Press PROG RAM button to sel ect one of the
effect s when chan ging fr om on e pictu re to
anoth er:
1
2
3
4
5
6
7
8
9
10
11
12
13
14
15
16
17
WIPE TOP
WIPE BOT TOM
WIPE LEF T
WIPE RIG HT
DIAGONA L WIPE LEFT TOP
DIAGONA L WIPE RIGH T TOP
DIAGONA L WIPE LEFT BOTTOM
DIAGONA L WIPE RIGH T BOTTOM
EXTEND F ROM CENT RE H
EXTEND F ROM CENT RE V
COMPRES S TO CENT ER H
COMPRES S TO CENT ER V
WINDOW H
WINDOW V
WIPE FRO M EDGE TO CENTRE
MOVE IN F ROM TOP
NONE
ALAN
BUZZ
CANDY
DIANA
PL AY/
PAUSE
NEXT
Enjoying Video CD with
playback control
1. Wh en pla ying V CD 2.0 with P BC, t he play er
will sh ow th e VCD versio n and PBC s tatus o n
the sc reen.
PROGRAM
EN TER
NAVIGATION
BU TTONS
2. A fter a few se conds , a me nu wil l appe ar on
the scree n.
1
2
3
3. Press num eric b uttons to select cor resp onding track, if the track nu mber is unde r 10,
choos e one of the numer ic butt ons 0 ~ 9.If t he
track numbe rexceed 10, press 10+ b utton
firstly, then press numeric buttons 0 ~ 9.
4. Press NEXT or PREV button to play the next
or pre vious track.
NOTE: Whe n PBC is OFF, there will b e no m enu page on the screen, you can sele ct any track
to play by us ing numeric button s. When PBC is ON ,ther e will b e a m enu page on the sc reen,
and you can select any track on the menu to play.
18
NUM ERIC
BUTTONS
FF
CARD
FR
ZOOM
Current media file type
PLAY/
PAUSE
PREV
NE XT
REP EAT
PREV
VCD 2.0
PBC ON
1 Track
2 Track
3 Track
USB/CARD
/DVD
\B ELLE\
4.Select a folder you want to play by usin g the
nav igatio n butto ns and press the ENTER button
to confirm .
5.The files in thi s folde r disp lay and selec t the
des ired fi le by navigation bu ttons, then press
the ENTER button to start playback.
6. Press NEXT or PREV button to turn the
curr ent men u page to the n ext or previous
menu page.
7. Press REPEAT button to change repea t
playing mod e.
- SHUFFLE: all the files will be randomly
sorted and p layed by the order.
- RANDOM : random ly se lect any file t o play.
- SINGLE : play o ne file only.
- REPEAT ONE: repeat one file.
- REPEAT FOLDER: all the files in the folder
will be p layed repeatedly.
- FOLDER: all the files i n the fo lder will be
played.
8 . Press STOP b utton when playin g, then you
will enter preview mode.
9.Press MENU b utton to retu rn file s list m enu.
10.P ress rig ht/ left button to rotate the image
clockwise/ counter-clockwise duri ng phot o
playback.
11.Press up / down button t o flip the image
vert ically/ horizontally during photo playb ack.
ENTER
NAVIGATION
BUTTONS
MENU
12.Press ZOOM button to enter the zoom
mode:
-Pre ss FF button to enlarge picture to 100%,
125%, 150 % and 200%
-Pre ss FR button to shrink pictures to 50%,
75% , and 100%.
15
USB Playback
JPEG CD
ROTATING
1.In sert US B con tainin g the f iles in MP 3,
pict ure or movie forma t to be played .
2.Pr ess U SB/CA RD/DV D but ton to switch the
unit in USB read er mod e. The n the screen will
disp lay as follow ing:
For JPEG picture CD, s elect the fol der yo u
w ant to play u sing th e navi gation butto ns and
p ress E NTER button to co nfirm.
The files in this f older a re dis played and
s elect y our pic tures by usi ng the up/do wn
n avigat ion bu ttons a nd pre ss EN TER b utton t o
s tart pla yback . A thu mbna il of ea ch pic ture wi ll
b e disp layed while y ou scr olling across the fil e
n ame.
USB/CARD
/DVD
WAITING
NUMERIC
BUTTONS
3.Af ter sev eral s econd s, all th e fold ers in the
USB will d isplay on mo nitor s creen :
00:00 00:00
001/124
Flipping pictures
Pre ss UP navig ation b utton to flip t he
pictu re vert ically.
Pre ss DO WN na vigati on but ton to flip the
pictur e horiz ontall y.
Bel le
PLAY/
PAUS E
PRE V
NEXT
REP EAT
Once a folder and f ile is selected, the
pict ure is loaded onto the scr een.
MU SIC
PHOTO
ENTER
NAVIGAT ION
BU TTON S
LO VE
USB
Picture Shrink/Zoom
4 . Sele ct a folder yo u wan t to pla y usin g the
n avigation bu ttons and pr ess the ENTE R
b utton to confirm.
5 .The f iles in this fo lder ar e disp layed and
s elect t he des ired fi le by n avigation bu ttons,
t hen pr ess the ENTER button to start t o play.
I F YOU SELECT MUSIC FILE TO PLAY:
Cur rent song
/Tot al so ngs
USB bit rate
indic ator
Vol ume level
indicato r
Play time
Tota l tim e
Playback indi cato r
E qua lizer indi cato r
01:53 04 0:36 65k b
001/1 24
Curren t folder
M USIC
Mp3
Mp3
Mp3
Mp3
Mp3
Mp3
------ 1
------ -1
-----~2
------ -1
-----~2
-----~2
U SB
C ur r ent m e dia fi le ty pe
16
6.Pr ess N EXT o r PREV butto n to tu rn the
cur rent m enu pa ge to the ne xt or p reviou s
me nu pag e.
7.P ress REPEAT butto n to s et repe at pla ying
mod e.
- SHUFF LE: a ll the files will be ra ndoml y
s orted and pl ayed b y the order.
- RAND OM : ra ndom ly sele ct any file to play.
- SINGL E: pla y one f ile onl y.
- REPEAT ONE: repe at one file.
- REPEAT FOL DER: all the files i n the f older
w ill be p layed repeatedly.
- FOLDE R: all the files in th e fold er will be
played
For Sales Information Please Contact
RoadTrucker Inc (www.RoadTrucker.com
8312 Sidbury Rd. Wilmington, NC 28411
(800) 507-0482 / (910) 686-4281
N OTE: The ti me to load an d disp lay pi cture
Press ZOOM b utton t o ente r the z oom
depen ds on the file size o f the p icture s.
mode .
During playba ck, press MENU button
Press FF or FR button to enlarge o r shrink
to re turn to folder selection or STO P bu tton to picture to 50%, 75%, 100%, 12 5%, 150% and
ente r preview mode.
200% .
Press REPEAT bu tton to change play m ode:
- S HUFF LE: all the fil es will be ran domly
ZOO M 150%
ZOO M 50%
s orted a nd pla yed b y the o rder.
- RANDO M : ra ndoml y selec t any file to p lay.
- S INGLE : play one fi le only.
- REPEAT ONE : repe at one file.
- REPEAT ALL: repea t all fil es in th e
c urrent folder.
If the pictur e is en larged , you m ay pr ess
- F OLDE R: all t he file s in th e folde r will b e
the n avigat ion but tons to pan a cross other
pl ayed.
portio ns of the pic ture.
Skip to next/previous picture
Press N EXT button to skip to the next pi cture
or PREV button to skip to th e prev ious picture.
If no key is pressed for 5 seconds, it will skip
to next picture autom atically.
Rotating pictures
Press RIGHT navigation button to rotate
the pictu re clockwise .
Press LEFT naviga tion b utton to rotate
the pictu re cou nter-clockwise.
17