1
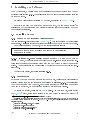
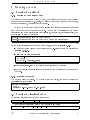
EtherCAT Dextrous Hand - User Manual Shadow Software team - [email protected] October 15, 2012 1 CONTENTS Contents 1 Overview 2 2 Installing our Software 2.1 2.2 Installing Routes 3 . . . . . . . . . . . . . . . . . . . . . . . . . . . . . . . . 2.1.1 From ROS apt repository (recommended) 2.1.2 From sources . . . . . . . . . . . . . . 3 . . . . . . . . . . . . . . . . . . . . . . . . . . . . . . 3 Import our custom Environment Variables . . . . . . . . . . . . . . . . . . 3 Navigating our code 3.1 3.2 5 6 Conguration and settings . . . . . . . . . . . . . . . . . . . . . . . . . . . 6 3.1.1 Specifying system parameters 6 3.1.2 Specifying default controllers settings, and other useful settings . . . . . . . . . . . . . . . . . . . . . . . 7 Important Packages . . . . . . . . . . . . . . . . . . . . . . . . . . . . . . . 7 4 Running our code 4.1 3 8 Starting the real hand . . . . . . . . . . . . . . . . . . . . . . . . . . . . . 8 4.1.1 Setting up the Ethernet port . . . . . . . . . . . . . . . . . . . . . . 8 4.1.2 Starting the driver . . . . . . . . . . . . . . . . . . . . . . . . . . . 8 4.2 Starting the simulated robot . . . . . . . . . . . . . . . . . . . . . . . . . . 8 4.3 Starting the GUI . . . . . . . . . . . . . . . . . . . . . . . . . . . . . . . . 9 4.4 Checking it works . . . . . . . . . . . . . . . . . . . . . . . . . . . . . . . . 9 4.4.1 Reading data out of the Hand . . . . . . . . . . . . . . . . . . . . . 9 4.4.2 Reading the tactile sensors . . . . . . . . . . . . . . . . . . . . . . . 10 4.4.3 Sending Commands to the Hand 10 4.4.4 Getting information on the current state of the controllers . . . . . 11 4.4.5 Checking the diagnostics . . . . . . . . . . . . . . . . . . . . . . . . 12 . . . . . . . . . . . . . . . . . . . 5 Where to go next 13 6 What to do if it doesn't work 14 6.1 Check your ROS setup . . . . . . . . . . . . . . . . . . . . . . . . . . . . . 6.2 Use the ROS community . . . . . . . . . . . . . . . . . . . . . . . . . . . . 14 6.3 Contact us . . . . . . . . . . . . . . . . . . . . . . . . . . . . . . . . . . . . 14 7 Changelog 14 15 7.1 shadow_robot . . . . . . . . . . . . . . . . . . . . . . . . . . . . . . . . . . 15 7.2 sr_cong 15 7.3 shadow_robot_ethercat . . . . . . . . . . . . . . . . . . . . . . . . . . . . 15 7.4 sr_teleop . . . . . . . . . . . . . . . . . . . . . . . . . . . . . . . . . . . . 15 7.5 sr_contrib . . . . . . . . . . . . . . . . . . . . . . . . . . . . . . . . . . . . 15 . . . . . . . . . . . . . . . . . . . . . . . . . . . . . . . . . . . . EtherCAT Dextrous Hand User Manual 1 1 1 OVERVIEW Overview This user manual will get you started with using our EtherCAT hand or simulated robots. We'll guide you through installing the code in in section 3 section 2, explain where to nd things section 4. This read (section 5), and show you some basic commands and code samples in guide ends with some pointers to essential documentation you should section 6). and some troubleshooting tips ( You can nd below a kinematics diagram of the Shadow Hand. The joint names are indicated on the diagram. As a convention, and because of the way the Hand is actuated, the joint 1 and 2 for the rst nger, middle nger, ring nger and little nger are grouped in the joint 0: FFJ0 = FFJ1 + FFJ2, MFJ0 = MFJ1 + MFJ2, If you have any questions, don't hesitate to contact us at: etc. [email protected]. EtherCAT Dextrous Hand User Manual 2 2 2 INSTALLING OUR SOFTWARE Installing our Software For a typical user, we really recommend installing our software directly from the apt repository (see section 2.1.1). This will ensure that you keep the latest released software on your computer. 1 We assume you've already installed ROS Fuerte, as detailed on the ROS Wiki . However if you plan to modify some parts of our code, you can use an overlay 2 to install some of the sources from our publicly available Launchpad repository on top of your existing installation. 2.1 Installing Routes 2.1.1 From ROS apt repository (recommended) 3 You can install pre-built packages for Ubuntu 12.04 . This is the easiest way of installing our software. You'll also receive updates automatically whenever you update your system. Once you've installed ROS Fuerte, you can easily install our stacks: > sudo apt −g et i n s t a l l ros − f u e r t e −shadow−robot \ ros − f u e r t e −shadow−robot − e t h e r c a t ros − f u e r t e −sr − v i s u a l i z a t i o n \ ros − f u e r t e −sr − t e l e o p 2.1.1.1 Install a sr_cong overlay for the EtherCAT Hand EtherCAT Hand, you should create an overlay for the sr_config If you have an stack: this stack con- tains all the dierent conguration les which can be modied to reect your specic system. You shouldn't use the one installed by default as they are dened for the simulated hand. To create this overlay, just follow 2.1.2 section 2.1.2. From sources If you need to modify one of the packages for your own use, you'll want to rst install the released version from the apt repository as explained in section 2.1.1. This will ensure that you have all the code you need. Once you've identied in which stack the package you want to modify is, you can create an overlay to use the source version. 4 To create an overlay, we'll use the rosws the sr_cong 5 utility. In this example, we'll overlay 6 stack, using trunk version of the code hosted on launchpad using bzr : 1 url: http://www.ros.org/wiki/fuerte/Installation/Ubuntu use another version of a stack than the default installed one. The path to the package in the overlay will be prepended to the ROS_PACKAGE_PATH, so it will be used instead of the default installed version. 3 url: http://releases.ubuntu.com/precise/ 4 url: http://ros.org/wiki/rosws 5 url: http://launchpad.net/sr-cong 6 url: http://bazaar.canonical.com 2 Overlay: EtherCAT Dextrous Hand User Manual 3 2 INSTALLING OUR SOFTWARE lp:sr-config. First we need to install the rosws/rosinstall utilities if you haven't done so already (you've probably already installed this when following the ROS wiki instructions): > sudo apt −g et i n s t a l l python − r o s i n s t a l l python −rosdep bzr We're now going to create a workspace (in the ∼/workspace directory), based on your currently installed ROS system (we're assuming you're using ROS Fuerte), and add the stacks we want to overlay to the workspace. We'll then update the workspace to download the code into it. > > > > rosws i n i t ∼ / workspace / opt / r o s / f u e r t e s o u r c e ∼ / workspace / setup . sh rosws s e t s r _ c o n f i g −−bzr l p : sr − c o n f i g rosws update To use the newly created environment, simply source the setup.sh created in the previous step (to have it sourced automatically when you open a new terminal, simply add it to your ∼/.bashrc as show on the second line). > s o u r c e ∼ / workspace / setup . sh > echo s o u r c e ∼ / workspace / setup . sh >> ∼ / . bashrc 7 To install the system dependencies, we'll use the rosdep utility. This utility needs to be initialised the rst time you use it: > sudo rosdep i n i t > rosdep update You now have the up-to-date database of system dependencies on your system. You can install the dependencies for the stack you want to build: > rosdep i n s t a l l s r _ c o n f i g Finally, you can build the whole stack in one go using the rosmake command: > rosmake s r _ c o n f i g 2.1.2.1 Available rosinstall les This step is only recommended for people who are going to be heavily modifying our stacks (or for those who are not using ubuntu, and thus can't use the pre-built packages). If you want to install all our stacks in one go, you can use the 8 rosinstall les avail- able here . Once you've downloaded the code using the rosinstall commands described previ- ously, you can build all our stacks: 7 url: http://ros.org/doc/api/rosdep2/html/overview.html http://bazaar.launchpad.net/∼shadowrobot/sr-build-tools/trunk/view/head:/data/shadow_robotfuerte.rosinstall 8 url: EtherCAT Dextrous Hand User Manual 4 2 INSTALLING OUR SOFTWARE > rosdep i n s t a l l shadow_robot shadow_robot_ethercat \ sr_contrib sr_visualization sr_teleop > rosmake shadow_robot shadow_robot_ethercat \ sr_contrib sr_visualization sr_teleop 2.2 Import our custom Environment Variables As described in section 3.1.1, we're using a le to dene some useful environment vari- ables. To make sure the variables are imported in your setup, you need to source it in your ∼/.bashrc, after sourcing the ros setup.sh. It should look like this: ∼ /.bashrc #s o u r c e the r o s setup . sh s o u r c e / opt / r o s / f u e r t e / setup . sh #or the one c r e a t e d i n your workspace # i f you used an o v e r l a y #s o u r c e ~/ workspace / setup . sh #now s o u r c e our a d d i t i o n a l environment v a r i a b l e s s o u r c e ` r o s s t a c k f i n d sr_config ` / bashrc / env_variables . bashrc EtherCAT Dextrous Hand User Manual 5 3 3 NAVIGATING OUR CODE Navigating our code Our code is split into dierent stacks, each containing a set of packages: shadow_robot: contains simulation software, utility packages, ... This is the core stack. shadow_robot_ethercat: sr_contrib: contains the code for running our etherCAT hand. contains experimental high level packages. If you write an interesting package, we'd be happy to add it to this stack. sr_visualization: sr_teleop: 9 contains the GUI and visualisation tools. contains drivers for dierent tools used to teleoperate our hand (cyber- glove , ...) sr_cong: contains the conguration les. If you have one of our Hands, you should have an overlay of this conguration to make sure you don't lose your conguration when updating your system (as described in section 2.1.2). 3.1 Conguration and settings We moved all the conguration to the sr_config stack. The idea is to isolate the data that is specic to the user in a given stack, this way you can easily create an overlay, as described in section 2, to make sure your specic conguration is not overwritten by an update. 3.1.1 Specifying system parameters 10 The system parameters are specied in the le env_variables.bashrc automatically in your environment, please go to section 2.2. . To load them This File is heavily com- the default options mented and should be easy to modify to suit your installation ( should be ok for most users).11 env_variables.bashrc #s e t to 1 to compile sr_hand and s r _ t a c t i l e s with the gazebo i n t e r f a c e export GAZEBO=1 # s e t to 1 f o r one f i n g e r hands export ONE_FINGER=0 # s e t to 1 f o r l e f t hands export LEFT_HAND=0 # s e t to 1 i f you have a CAN hand 9 url: http://www.cyberglovesystems.com http://bazaar.launchpad.net/∼shadowrobot/sr-cong/trunk/view/head:/bashrc/env_variables.bashrc 11 If you bought an etherCAT hand, the system you'll receive from Shadow will already be congured properly for you. There are no variables stating that you have an etherCAT hand in this le, because the launch le for starting the simulator and the one used to run the hand are dierent, as you can see in this manual. 10 url: EtherCAT Dextrous Hand User Manual 6 3 NAVIGATING OUR CODE export REAL_HAND=0 # s e t to 1 i f you have a CAN arm export REAL_ARM=0 #s e t to 1 i f you have a muscle arm or hand export MUSCLE=0 #s e t to 1 i f you want to b u i l d the c o m p a t i b i l i t y i n t e r f a c e # f o r the etherCAT hand ( makes i t p o s s i b l e to run your programs # developed f o r the CAN Hand on the etherCAT hand ) # d e f a u l t i s 1 as i t j u s t b u i l d s another node . export ETHERCAT=1 #port i n which the etherCAT hand i s plugged i n # ( more i n f o i n s e c t i o n 4 . 1 . 1 ) export ETHERCAT_PORT=eth1 #s e t to 1 i f you ' r e u s i n g PWM c o n t r o l on the etherCAT hand motors by d e f a u l t export PWM_CONTROL=0 #s e t to 1 i f you want to have a c c e s s to the i n t e r n a l firmware r e p o s i t o r y #NOTE: f o r Shadow employees only f o r the time being export INTERNAL_FIRMWARE=0 #s e t to 1 i f you have e l l i p s o i d f i n g e r t i p s (ATI nano s e n s o r s ) export ELLIPSOID=0 #s e t to 1 i f you want to p u b l i s h more debug i n f o r m a t i o n # on the etherCAT hand . export DEBUG=1 3.1.2 Specifying default controllers settings, and other useful settings The controller settings (as well as the dierent mappings and polling rates for the etherCAT hand) can be found in the sr_ethercat_hand_cong package. You can mod- ify the controller values which will be loaded by default by modifying the les in this package. For example if you want to modify the mixed position velocity controllers, you can open s/host). sr_edc_mixed_position_velocity_joint_controllers.yaml (in controlWe recommend using the controller tuner GUI plugin (see section 4.3) for tuning and saving those parameters. 3.2 Important Packages sr_hand: Contains the code and the dierent launch les for the simulated Hand and the CAN hand. sr_edc_launch: sr_example: Contains the main launch le for the EtherCAT Hand. Contains some simple code examples. EtherCAT Dextrous Hand User Manual 7 4 4 RUNNING OUR CODE Running our code 4.1 Starting the real hand 4.1.1 Setting up the Ethernet port The rst time you connect an EtherCAT Hand, you will need to check on which Ethernet port the hand is connected to. Usually, you will have 2 network ports in your computer, one for your network, the other one for the hand. An easy way to see which port the hand is using is to unplug the hand network cable from your computer and then plug it back in. You can now type dmesg and you should see a line saying which port has just been plugged in, for example, in the lines below, you see that eth1 is used by the hand: [ 1 6 6 6 1 . 9 0 1 9 2 0 ] e1000e : eth1 NIC Link i s Down [ 1 6 6 6 6 . 4 6 0 5 1 8 ] e1000e : eth1 NIC Link i s Up 1000 Mbps F u l l Duplex Now that we know which Ethernet port is used by the hand (eth1 in our example), we can edit the interface in the system parameters, as shown in Make sure you've created your overlay for the Let's open the conguration le: section 2.1.1.1. section 3.1.1: sr_config stack as described in > roscd sr_config > cd bashrc > g e d i t env_variables . bashrc ETHERCAT_PORT eth1 Set the Save and restart your terminal to make sure the new options have been taken into to the correct value (it is by default) account. 4.1.2 Starting the driver You can now start the driver. To be able to run the driver, you need to elevate the permissions to root access: #e l e v a t e p e r m i s s i o n s > sudo − s > r o s l a u n c h sr_edc_launch sr_edc . launch 4.2 Starting the simulated robot To start the simulated robot you can simply run: > r o s l a u n c h sr_hand gazebo_hand . launch Or if you want a simulated Shadow Arm as well as our hand: > r o s l a u n c h sr_hand gazebo_arm_and_hand . launch EtherCAT Dextrous Hand User Manual 8 4 RUNNING OUR CODE 4.3 Starting the GUI To start the GUI, run: > rosrun rqt_gui rqt_gui We're using the rqt_gui 12 for driving the hand. We implemented some plugins to help you control the hand. They are all in the Shadow Robot item in the plugins menu. 4.4 Checking it works 4.4.1 Reading data out of the Hand First look at the data coming out of the hand. > r o s t o p i c echo / j o i n t _ s t a t e s −−− header : seq : 7235 stamp : s e c s : 73 n s e c s : 785000000 frame_id : name : [ WRJ2 , WRJ1 , FFJ4 , FFJ3 , FFJ1 , FFJ2 , . . . ] p o s i t i o n : [ − 0.007345193851005405 , 0.0007282010249589632 , . . . ] v e l o c i t y : [ 0 . 0 0 0 2 1 6 4 6 4 9 7 1 0 7 9 4 7 9 3 , 0.0015999764385997265 , . . . ] effort : [0.0 , 0.0 , 0.0 , 0.0 , . . . ] The data is published on the the simulated hand). /joint_states topic (or /gazebo/joint_states You will see the incoming data streaming in your console. for You have access to the joint names as well as the current positions (in radians), velocity (in radians per second) and eort (an arbitrary value, proportional to the eort applied at the motor-end of the tendon.) for each joint as shown below (stop with ctrl+c): You should also be able to visualise the current state of the robot using rviz To start rviz run the command below. 13 . You'll need to select a base link and add a Robot Model from the add button in rviz. > rosrun r v i z r v i z 12 url: 13 url: http://www.ros.org/wiki/rqt_gui http://www.ros.org/wiki/rviz EtherCAT Dextrous Hand User Manual 9 4 4.4.2 RUNNING OUR CODE Reading the tactile sensors Depending on the conguration of your hand, you may have dierent types of tactile sensors. Your sensor type is automatically detected by the driver which then publishes the correct information on the /tactile topic. The following command will output the data coming from the sensors on the screen. > r o s t o p i c echo / t a c t i l e The elds from the Shadow PSTs are: int16[] pressure: an array of integers containing the current pressure value for the sensors. int16[] temperature: an array of integers containing the current temperature for the sensors. The elds from the Biotac sensors are: int16 pac0: rst pressure AC reading (this is used to detect pressure changes, behaves as a dierential) int16 pac1: second pressure AC reading int16 pdc: pressure DC reading (this is proportional to the pressure exerted on the nger) int16 tac: temperature AC reading (this is used to detect temperature changes, behaves as a dierential) int16 tdc: temperature DC reading (this is proportional to the temperature o the sensor) int16[19] electrodes: the values for the electrodes of this tactile sensor (gives you information on which zone is being touched on the nger) 4.4.3 Sending Commands to the Hand You can easily control the dierent joints of the Hand: each of the joint is controlled by a controller. Each of those controllers has a /command and a /state EtherCAT Dextrous Hand User Manual topic. The /state 10 4 RUNNING OUR CODE topic prints useful debug information regarding the controllers, while the /command topic is used to send new targets to the controllers. To identify the topic on which you want to send the target, you can use the list command. Let's say we want to send a target to FFJ3: rostopic > r o s t o p i c l i s t | grep f f j 3 / s h _ f f j 3 _ m i x e d _ p o s i t i o n _ v e l o c i t y _ c o n t r o l l e r /command / sh_ffj3_mixed_position_velocity_controller / state This means that we're going to publish our target on the topic: /sh_ffj3_mixed_position_velocity_controller/command. To do this, we can simply use the rostopic pub command. For example, to send a target of 1 rad to FFJ3 at 10Hz: > r o s t o p i c pub / s h _ f f j 3 _ m i x e d _ p o s i t i o n _ v e l o c i t y _ c o n t r o l l e r /command \ std_msgs/ Float64 − r 10 1 . 0 To see a code example you can have a look at the package 4.4.4 sr_ethercat_example. Getting information on the current state of the controllers As you can see above, each controller publishes its own /state topic. This topic contains lots of useful information regarding the current state of the controller. If you subscribe to it, you'll be able to have access to the current target, position, error, derivative, etc... Dierent informations are published depending on the type of controller that is loaded: The mixed position velocity controller (a position control loop running on top of a velocity control loop) information is the following: header: contains a timestamp set_point: the position target process_value: the current joint position process_value_dot: the current joint velocity commanded_velocity: the velocity demand generated by the position control loop error: the dierent between the position target and the current position time_step: the timestep between two control cycles command: the torque command sent to the motor measured_eort: the torque measurement from the motor friction_compensation: value applied from the friction compensation map (not used yet) position_p: the Kp for the position PID loop. position_i: the Ki for the position PID loop. position_d: the Kd for the position PID loop. EtherCAT Dextrous Hand User Manual 11 4 position_i_clamp: RUNNING OUR CODE the value used for clamping the I term for the position PID loop. velocity_p: the Kp for the velocity PID loop. velocity_i: the Ki for the velocity PID loop. velocity_d: the Kd for the velocity PID loop. velocity_i_clamp: the value used for clamping the I term for the velocity PID loop. For the position controller: 4.4.5 header: contains a timestamp set_point: the position target process_value: the current joint position process_value_dot: the current joint velocity error: the dierent between the position target and the current position time_step: the timestep between two control cycles command: the torque command sent to the motor p: the Kp for the position PID loop. i: the Ki for the position PID loop. d: the Kd for the position PID loop. i_clamp: the value used for clamping the I term for the position PID loop. Checking the diagnostics The etherCAT Hand regularly publishes diagnostics about the state of the hardware. You can view them using the robot_monitor 14 utility. This way you can monitor the dierent state of the motors, the sensors, etc... 14 url: http://ros.org/wiki/robot_monitor EtherCAT Dextrous Hand User Manual 12 5 5 WHERE TO GO NEXT Where to go next The ROS wiki 15 is probably the best place to start learning about ROS. We strongly rec- ommend going through the excellent ROS Start Guide 16 17 , especially the set of tutorials 18 You should also look at some of our tutorials for the EtherCAT Hand . . We'd be delighted to get your contributions (patches, nice demos, etc...). Don't forget our software is open-source, so if you want to contribute, you should probably check this wiki page 19 out. 15 url: http://ros.org/wiki http://ros.org/wiki/ROS/StartGuide 17 url: http://ros.org/wiki/ROS/Tutorials 18 url: http://ros.org/wiki/shadow_robot_etherCAT/Tutorials 19 url: http://ros.org/wiki/shadow_robot#Contributing 16 url: EtherCAT Dextrous Hand User Manual 13 6 6 WHAT TO DO IF IT DOESN'T WORK What to do if it doesn't work 6.1 Check your ROS setup You can use very simple examples to check dierent things: Check you can access our stacks (if this command doesn't get you to the shadow_robot folder, make sure you've installed the code properly and sourced the generated section 2): setup.sh as described in > r o s c d shadow_robot Check you can publish and subscribe to a simple topic. You'll need to start each of the following commands in a separate terminal. The rst command is used to start the rosmaster. The second one will publish some data on the test topic while the third command subscribes to the topic and print the output on the screen. If this test works, you should see the incoming data streaming in your third terminal. #i n t e r m i n a l 1 , s t a r t the rosmaster # we s t a r t i t i n a s e p a r a t e xterm window # as you need to keep i t running during # the whole e x p e r i e n c e > xterm −e r o s c o r e & #i n t e r m i n a l 2 p u b l i s h data at 5Hz on / t e s t > r o s t o p i c pub / t e s t std_msgs/ Float64 − r 5 1 . 0 #i n t e r m i n a l 3 , s u b s c r i b e to the / t e s t t o p i c # you should s e e the streaming data # stop i t with C t r l+c > r o s t o p i c echo / t e s t data : 1 . 0 −−− data : 1 . 0 −−− data : 1 . 0 20 If all hope is lost, run the roswtf utility. 6.2 Use the ROS community A good thing to remember is that you're probably not the rst one having run into this 21 problem. You should check the ROS community website: answers.ros.org and post your question if you can't nd a relevant answer. 6.3 Contact us Don't hesitate to contact us: 20 url: 21 url: [email protected]. http://ros.org/wiki/roswtf http://answers.ros.org EtherCAT Dextrous Hand User Manual 14 7 7 CHANGELOG Changelog 7.1 shadow_robot 19/06/2012 - rev. 364: Better mixed position velocity controllers. 19/04/2012 - rev. 361: Hand with Biotacs model added 19/03/2012 - rev. 334: Reorganised the code in dierent stacks. Removed some packages from the shadow_robot stack to put them in either sr_contrib, sr_cong, sr_teleop, sr_visualisation, sr_demo stacks. We're keeping only the core packages in this stack for easier release / maintenance. 7.2 sr_cong 19/03/2012 - rev. 1: Created the sr_cong stack to store the user specic cong. The values by default should work for most users (simulated right hand with all the ngers). Users should overlay sr_cong if they want to modify the cong les. Useful for easy release. 7.3 shadow_robot_ethercat 11/04/2012 - rev. 546: Using lowpass lter instead of alpha-beta lter for better control 29/03/2012 - rev. 543: added support for three nger hands 15/03/2012 - rev. 539: Control inputs from the host (backlash compensation on/o, sgl increase, jiggle, write eeprom, ...) 14/03/2012 - rev. 538: Switching from PWM demand to TORQUE demand on the y. 14/03/2012 - rev. 537: Added a service to nullify the demand sent to the motor easily. This way the user can easily stop the control of the hand. 16/12/2011 - rev. 532: Rewrote bootloader 7.4 sr_teleop 20/02/2012 - rev. 329: reorganising the code. Created sr_teleop stack to contain packages used to teleoperate our robots. 7.5 sr_contrib 17/02/2012 - rev. 328: reorganising the code. Created sr_contrib stack to contain some high level packages which may be a bit less stable than the core ones found in shadow_robot. EtherCAT Dextrous Hand User Manual 15


![Delibera n. 0639 del 08 giugno 2015, [file]](http://vs1.manualzilla.com/store/data/006103036_1-78de1975695bfba79ad3b3b760e3ce17-150x150.png)