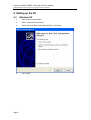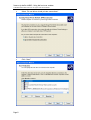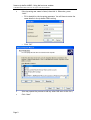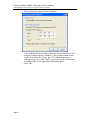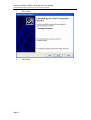
1
ip.buffer App Note
AN002 : Using dial-out over
modem
Date
Author
Release
2007-10-02
MP
Initial draft
© UK 2007 Scannex Electronics Limited. All rights reserved worldwide.
Scannex Electronics Ltd, UK
t: +44(0)8707 48 65 65
f: +44(0)8707 48 67 67
Scannex LLC, USA
t: 1-866-4BUFFER
(1-866-428-3337)
http://www.scannex.co.uk
[email protected]
http://www.scannex.com
[email protected]
Table of Contents
1.
Introduction.................................................................................1
2.
Setting up the ip.buffer Modem entries................................................2
2.1.
3.
4.
2.1.1.
Country ...........................................................................2
2.1.2.
Initialisation .....................................................................2
2.1.3.
Default IP.........................................................................2
2.2.
Modem: Dial-out settings............................................................2
2.3.
Dial-out exclusion ....................................................................3
2.4.
ISP #1 & #2 ............................................................................3
Where to dial ...............................................................................4
3.1.
Across the Internet ...................................................................4
3.2.
Private RAS Server....................................................................4
Setting up the PC ..........................................................................5
4.1.
5.
Windows XP............................................................................5
Setting up the ip.buffer delivery ...................................................... 13
5.1.
6.
Modem: Global ........................................................................2
Email push ........................................................................... 13
5.1.1.
Destination ..................................................................... 13
5.1.2.
SMTP Servers................................................................... 13
5.2.
FTP push ............................................................................. 13
5.3.
TCP Push ............................................................................. 13
Setting up the ip.buffer alerts ......................................................... 14
6.1.
Configuration........................................................................ 14
6.2.
Test alert ............................................................................ 14
Scannex ip.buffer AN002 : Using dial-out over modem
© UK 2007 Scannex Electronics Ltd. All rights reserved worldwide.
1. Introduction
All ip.buffer products with an “m” suffix (e.g. ip.4-128m) have an internal modem
that supports both dial-in and dial-out features.
Contrary to older buffer products, the ip.buffer uses the TCP/IP protocols
exclusively and therefore uses the PPP (Point-to-Point Protocol) over the modem.
This allows for greater long-term flexibility and the ability to leverage the global
Internet for delivering stored data.
This application note explains how to use the dial-out features of the ip.buffer to
connect across the Internet or to a central PC server.
All the destination “push” delivery methods can be sent over the modem link.
When the dial-out connection is active, the ip.buffer cannot be administered over
the modem link. This prevents hackers and “script kiddies” locating and hacking
the ip.buffer while it is delivering data. Remote administration can only be
performed via the dial-in method (see AN001).
Page 1
Scannex ip.buffer AN002 : Using dial-out over modem
© UK 2007 Scannex Electronics Ltd. All rights reserved worldwide.
2. Setting up the ip.buffer Modem entries
Initially you can connect the ip.buffer to your Ethernet LAN and use the Scannex
“SEDiscover” application to locate the ip.buffer and program its IP address. From
there you can use a web-browser to access the configuration pages. (See the main
ip.buffer manual for more details.)
The modem options are available from the web-page.
•
Click on “SETUP” at the top of the web page
•
In the “Global” section, choose the link for “Modem”
2.1.
Modem: Global
2.1.1. Country
The country code sets up the modem for use in a specific country.
B5 is the default, which is for the US, and will work in most other areas. The
ip.buffer manual has a full list of Multitech country codes.
2.1.2. Initialisation
The initialisation string is used for forcing other modes in the modem. Leave this
blank.
2.1.3. Default IP
When you dial into the ip.buffer it will require an IP address that corresponds to
the modem/PPP link. This field sets the address, and defaults to 192.168.234.235.
This address ideally should not exist on your LAN (or in the routing table for your
PC). Generally the address range 192.168.0.x are used for LAN connections and it is
very unlikely that the .234. range will be used.
2.2.
Modem: Dial-out settings
These settings control the timings for dialling out.
•
Dial Type chooses between Tone and Pulse dialling
•
Connect time is the maximum time (in seconds) to wait for a successful
PPP negotiation before giving up on the dial-out.
•
Online max time specifies how many minutes the ip.buffer should stay
online trying to deliver data. This is especially useful when trying to
deliver huge amounts of data – it breaks up the delivery into
manageable chunks.
•
Interval time is the time to wait after hanging up a dial-out attempt
(whether successful or not)
•
Retry limit sets the maximum number of dial out attempts before
holding off…
•
Hold off time is the pause after trying to dial out but failing.
Page 2
Scannex ip.buffer AN002 : Using dial-out over modem
© UK 2007 Scannex Electronics Ltd. All rights reserved worldwide.
2.3.
Dial-out exclusion
In many cases the modem is used for both dial-in administration and dial-out
delivery. In this case, you can program a daily time range when the ip.buffer will
not attempt to dial out.
You should always be able to dial-in for administration between these times, even
if the ip.buffer still has data and alerts to send.
The ip.buffer will not dial-out during the first 5 minutes of booting. This is
to allow dial-in access (you can ask someone to power cycle the ip.buffer
and be sure it won’t be using the modem).
2.4.
ISP #1 & #2
One or two ISP (Internet Service Provider) details can be entered in these fields.
If the “Number” field is blank then that ISP is ignored in the dial-out attempts.
The number don’t have to be ISPs – they could telephone numbers of private RAS
servers (see the next section).
Page 3
Scannex ip.buffer AN002 : Using dial-out over modem
© UK 2007 Scannex Electronics Ltd. All rights reserved worldwide.
3. Where to dial
The ip.buffer really has two methods of delivery over modem: either across the
Internet, or to a private RAS server.
3.1.
Across the Internet
Being able to dial out onto a cheap, or “free” Internet service means the ip.buffer
can deliver data and alerts to anywhere in the world for the price of a local phone
call.
It also means that the central system can be connected to an ADSL service that can
handle hundreds of concurrent connections – rather than having to maintain a bank
of modems in the central site.
For such a scenario we recommend the following guidelines:
•
Run the central system on a high priority ADSL service (you want the line
to be fixed quickly if anything goes wrong). You will need fixed IP
address assignments.
•
Setup a firewall on the ADSL line that provides a “service” port
mapping. For example, if running the SMTP/email delivery option, we
suggest using a non-standard port (say port 20025) that the firewall will
route to an internal IP address (the machine that has the SMTP server)
•
Run the SMTP server behind the firewall. Preferably, use a product like
Scannex’s SECollector which acts as an SMTP server and delivers the
data directly to a directory (without having to store the emails in an
“InBox”)
•
Ideally, if you have a DNS domain (like “scannex.com”), and you can
setup your own “A” entries, create an entry like “data.scannex.com”
and point the IP address to your ADSL service.
o
You can then program the ip.buffer to connect to
“data.scannex.com” and have the freedom to physically move the
data centre by just changing the DNS A-entry.
Of course, you can choose to deliver by FTP push, or email to a public InBox just as
easily.
3.2.
Private RAS Server
In some cases you may want the privacy of a private RAS server. In this situation
the ip.buffer’s ISP#1 telephone number should be the public number of the modem
that’s connected to the PC.
Obviously, the PC can handle only one concurrent connection per modem.
Consequently this approach is more suited to small scale setups where having a
public IP address for the central site is not possible, or where there are no
Internet-accessible servers available.
This guide will show you how to create an incoming RAS connection on your
Windows XP machine to service the incoming calls from the ip.buffer(s).
Page 4
Scannex ip.buffer AN002 : Using dial-out over modem
© UK 2007 Scannex Electronics Ltd. All rights reserved worldwide.
4. Setting up the PC
4.1.
Windows XP
•
Start up the Control Panel
•
Select “Network Connections”
•
Select the task “New Connection Wizard”, click Next
•
Click “Next”
Page 5
Scannex ip.buffer AN002 : Using dial-out over modem
© UK 2007 Scannex Electronics Ltd. All rights reserved worldwide.
•
Select “Set up an advanced connection”
•
Click “Next”
•
Select “Accept incoming connections”
Page 6
Scannex ip.buffer AN002 : Using dial-out over modem
© UK 2007 Scannex Electronics Ltd. All rights reserved worldwide.
•
Click “Next”
•
Select all the modems that you would like to act on this connection
(make sure the “Communications cable between two computers” and
“Direct Parallel” are unticked!)
•
Click “Next”
Page 7
Scannex ip.buffer AN002 : Using dial-out over modem
© UK 2007 Scannex Electronics Ltd. All rights reserved worldwide.
•
Select “Do not allow virtual private connections”
•
Click “Next”
Page 8
Scannex ip.buffer AN002 : Using dial-out over modem
© UK 2007 Scannex Electronics Ltd. All rights reserved worldwide.
•
If the incoming user name is listed, then tick it. Otherwise, press
“Add…”
o
Fill in details for the incoming username. You will have to enter the
same details in the ip.buffer ISP#1 setting
o
Click “OK”
•
(You may repeat the process to add any other RAS users to the list.)
•
Click “Next”
Page 9
Scannex ip.buffer AN002 : Using dial-out over modem
© UK 2007 Scannex Electronics Ltd. All rights reserved worldwide.
•
Page 10
Click the “Properties” button (or double click the “Internet Protocol
(TCP/IP)” entry
Scannex ip.buffer AN002 : Using dial-out over modem
© UK 2007 Scannex Electronics Ltd. All rights reserved worldwide.
Page 11
o
Enter appropriate values for the IP address
o
If the ip.buffer will be accessing resources only on that PC you can
leave the values as shown. However, if the ip.buffer needs to use
the PC as a router, the “From” and “To” addresses must be a
subrange of your PC’s LAN. The PC will act as a router and forward
incoming traffic to the appropriate destination point.
o
Click “OK”
Scannex ip.buffer AN002 : Using dial-out over modem
© UK 2007 Scannex Electronics Ltd. All rights reserved worldwide.
•
Click “Next”
•
Click Finish
Page 12
Scannex ip.buffer AN002 : Using dial-out over modem
© UK 2007 Scannex Electronics Ltd. All rights reserved worldwide.
5. Setting up the ip.buffer delivery
Although you have finished the setup for the PC and the modem settings for the
ip.buffer you still need to “glue” the delivery method to the modem.
Delivery methods can choose between:
•
LAN only
•
Modem only
•
LAN then Modem – will try the LAN first and then modem if the LAN
socket connection failed.
5.1.
Email push
5.1.1. Destination
There are two stages to setting up Email push. First, in the destination options,
enter an appropriate “email to” address. Then choose the “Server” (either SMTP #1
or SMTP #2).
Once that’s set you can program up the SMTP server settings.
5.1.2. SMTP Servers
Under the “Setup” web page, choose “Email (SMTP) Servers”.
Here you fill in the details for the available SMTP outbound server connections. To
always use the modem/PPP link, change the “Interface” to “Modem only”.
Make sure you enter the SMTP server IP address and the Domain. The username and
password are only required if the server you are using requires authentication to
send emails.
5.2.
FTP push
In the destination settings for the channel, choose the “Interface” type. When the
delivery is triggered (by a schedule, conditions, or a user event) the destination
delivery task will attempt to push the data across the selected interface.
With the “LAN then Modem” option, If the FTP cannot be contacted at all (i.e.
because of a socket error) the ip.buffer will then attempt to use the modem. If the
FTP server is contacted, but fails because of an authentication error the ip.buffer
will not try the modem (because it’s highly likely that the configuration error will
occur again over the modem!).
5.3.
TCP Push
In the destination settings for the channel, choose the “Interface” type. When the
delivery is triggered (by a schedule, conditions, or a user event) the destination
delivery task will attempt to push the data across the selected interface.
Page 13
Scannex ip.buffer AN002 : Using dial-out over modem
© UK 2007 Scannex Electronics Ltd. All rights reserved worldwide.
6. Setting up the ip.buffer alerts
6.1.
Configuration
Since the ip.buffer sends all alerts by SMTP (email), you need to setup the SMTP
server options as outlined in section 5.1.2.
Additionally, in the web page “Setup”, choose the option “Services: Email alerts”
and:
•
Choose the appropriate SMTP server from the drop down list
•
Enter a valid “email to” (which may include multiple recipients
separated by a semicolon “;”)
•
Choose what alert triggers should be emailed.
6.2.
Test alert
Once you have setup the alert options you can send a test alert by:
•
Go to the “STATUS” web page
•
Hover the mouse over the “Alerts” box on the bottom right.
•
You should see a “[Trigger User Alert!]” appear on the right hand side of
the screen – click this!
An email will be sent.
Page 14