1
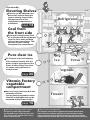
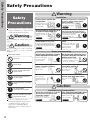
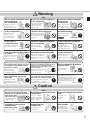
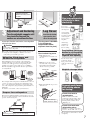
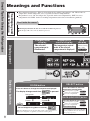
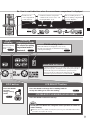
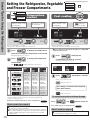
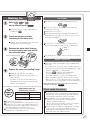
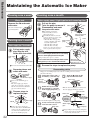
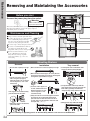
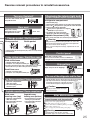
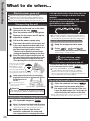
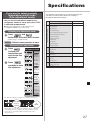
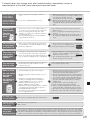
Refrigerator-Freezer
MR-G57N
OPERATING INSTRUCTIONS
Non-Freon Refrigerators
This refrigerator uses non-Freon refrigerant
(isobutane) and non-Freon foam insulation
(cyclopentane).
These materials are harmless to the
environment, and do not affect the ozone
layer and global warming.
User-friendly
Elevating Shelves
Shelves can be adjusted up or
down shelf without having to
remove already stored items.
Storage capacity of the
refrigerator compartment is
maximized.
Refrigerator
page 14
Cool from
the front side
Surround Cooling System Cold
air is directed into the refrigerator
from the front, back and both
sides of the compartment. This
ensures uniform cooling
throughout the compartment.
Chilled
Refrigerator
Soft
freezing
Freezing
Pure clear ice
UV Catalyst and Lead reducing
filter removes bacteria with the
power of light and enhances the
flavor of water. Enjoy Pure clear
ice cubes using tap water or
mineral water.
page 20
Ice
Versa
Vegetable
Vitamin Factory
vegetable
compartment
Not only keeps freshness but also
enhances nutrition.
Just by placing vegetables inside,
vitamins and polyphenols can be
enhanced by the power of light.
Freezer
page 16
Universal Design and Layout
Frequently used fridge sections
are located at eye level for easy use.
This feature-rich model offers many
other conveniences.
Non-Freon Refrigerator
This refrigerator uses non-freon refrigerant and non-freon foam insulation
material. Non-freon refrigerant (isobutane) and non-freon foam insulation
material (cyclopentane) do not deplete the ozone layer and their contribution
to global warming is extremely low, and are environmentally-friendly substances.
C
O
N
T
E
N
T
S
Safety Precautions
4
From Installation to Operation 6
Smart Tips for Using the Refrigerator
Meanings and Functions
Setting the Refrigerator, Vegetable
and Freezer Compartments
Setting the Ice Making Compartment
Setting the Versa Compartment
Other Settings
Soft-Freezing
Using Compartments
Food can be stored in small
pieces as they can be sliced in
frozen state, requiring no thawing,
reducing time needed for cooking.
Refrigerator Compartment
Vegetable and Freezer Compartments
Versa Compartment
Soft Freezing (Sliceable Frozen Food)
Ice Making Compartment (Automatic Ice Maker)
page 12,18
Maintenance
Maintaining the Automatic Ice Maker
Assembling Water Supply Pump and Pipe
Removing and Maintaining the Accessories
Troubleshooting
What to do
(during blackout, during long periods
of non-use and during transport)
Specifications
Troubleshooting
Silent Design
Our new original technology
has enabled low noise level
of 17dB(A).
This refrigerator is manufactured for refrigerating and
freezing foods in general households.
For industrial use, please use a commercial refrigeratorfreezer.
Key plastic parts of the refrigerator have the material
name on them to facilitate recycling.
22
22
24
Safety Precautions
Safety Precautions
Warning
Safety
Precautions
Installation
Leave space around the
refrigerator
Leaking refrigerant can
accumulate, then catch
fire and explode.
Leave space
Danger and the degree of danger caused by
improper handling are categorized and
described by the following indicators.
Warning
Improper handling can result in death, serious
injury, etc.
Caution
Avoid installing the refrigerator in an
easily wet or highly humid area
Insulation failure can
cause electric shock
or fire.
page 6
Using extension cords and plugging
too many leads into a single socket
can cause heat build-up or fire.
Do not wet
Never attempt to dismantle,
repair or alter
6
Service Call
Power and power plug
Remove power plug before changing
interior light bulb or maintenance
Non-removal of plug
can cause electric
shock or injury.
4
Placing heavy objects against or
on, folding or bundling cord can
cause electric shock or fire.
Prohibited
Do not pull on the power plug
or cord to unplug it.
Can cause electric
shock or fire.
Can cause damage to
the cord, electric
shock or fire.
Do not use
Dust can cause
insulation failure,
which may lead to
fire.
Prohibited
Do not remove or insert
power plug with wet hands.
Can cause electric
shock.
Wet hands prohibited
Remove dust
Caution
Be sure to follow
instructions for execution
In the case of malfunction or defect,
immediately unplug the refrigerator and
consult the retail store at which you
purchased it or a Mitsubishi Electric
Maintenance Service or Customer Service
representative.
Do not push the refrigerator on to
or against the power cord. Do not
damage power cord.
Do not use damaged cords,
plugs, or loose sockets
Never touch when your hand
is wet
Be sure to remove the power
plug from the socket
Only use an outlet that meets the specified rating.
Insert prongs to the root
of plug firmly otherwise
it can cause heat
build-up and fire.
Remove dust from power plug
Never bring into contact or
wet with water
6
If the power cord is damaged, purchase a new cord
from MITSUBISHI SERVICE CENTER. Make
sure that the power cord is designed for this model.
Remove plug
Never touch
page
Insert prongs to the root of
plug
page
Never do
Use a dedicated outlet for the power supply that meets the
rating specified on the rating label. (The rating label is
located on the door-liner of the refrigerator compartment.)
If the power cord is damaged, call our MITSUBISHI
SERVICE CENTER for the replacement.
Improper handling can result in personal
injury or damage to house, household
furnishings, etc.
Meaning of symbols
Anchor the refrigerator to a strong wall
or posts to provide against damage
during earthquakes
The refrigerator can tip
over and cause injury.
page 7
Tip-resistance
Installation and transportation
Anchor the refrigerator to a strong
and level floor by adjusting the
adjustable supports
Unstable anchoring can cause the
refrigerator to move and lead to injury.
page
7
Install level
Use transport hand-holds when
transporting the refrigerator
Holding other parts
can cause injury.
page
26
Grip hand-holds
Warning
Use
Do not place containers with
water on top of
the refrigerator
Wetting electrical
parts can cause
electric shock or fire.
Do not wet
Do not use electrical appliances
in the refrigerator
If the refrigerant leaks and
contacts the electrical
appliance, it can cause
explosion or fire.
Prohibited
Do not place volatile inflammable
objects inside
the refrigerator
Benzene, cosmetics and
hair dressing products
can catch fire or explode.
Do not store
Do not place objects on top
of the refrigerator
Do not store chemicals or scientific
specimens in the refrigerator
Use only interior bulbs with
designated rating.
Objects may fall
when doors are
opened and closed
and cause injury.
Items that require strict
management should not
be stored household
refrigerators.
Using non-designated
bulbs can cause fire.
Prohibited
Do not store
page
25
Designated products only
Do not hang on door or door handle;
do not stand on
compartment doors
Do not touch the machinery of the
automatic icemaker (located above
the ice storage bin)
Do not damage the refrigerant
circuit or the pipes nor mount
anything with screw
The refrigerator may tip
over and cause injury.
Can cause injury
when icemaker plate
revolves.
The refrigerant is
flammable, which can
cause explosion or fire.
Prohibited
If you notice gas leakage, do not
touch the refrigerator. Open windows
to ventilate.
Sparks from electrical
contacts can cause
explosion or fire.
Ventilate
Do not touch
Prohibited
Do not wash with water or spill
food liquids on the refrigerator
Do not place combustible sprays
near the refrigerator
Water and food liquids can
cause electric shock or fire.
Immediately wipe clean wet
surfaces.
Sparks from electrical
contacts can cause
inflam-mation or fire.
Do not wet
Do not use
Malfunction and long-term storage
If the refrigerant circuit is damaged, do not touch
the refrigerator and avoid using flames nearby.
Open windows to ventilate.
In the event of malfunction (when you detect
a burning odour or other abnormality),
remove the power plug from the socket turn
off the refrigerator
If the refrigerant
circuit is damaged,
consult the retail store.
Continued operation during
malfunction can cause
electric shock or fire.
Ventilate
Can cause injury,
electric shock or
fire.
Remove plug
When refrigerator is not in use
for a long period, remove the
door seal
When the refrigerator is not in use for a long
period, remove the power plug from the socket
and open the door to dry the refrigerator
Children can be put in
danger if they are trapped
inside the refrigerator.
If not dried sufficiently, refrigerant
(gas) can leak due to condenser
corrosion and cause explosion or fire.
Remove seal
Do not attempt to dismantle,
repair or alter
Dry
Do not dismantle
This refrigerator uses flammable
refrigerant and foaming gas for
insulation. Please deliver the unit to
specialized industrial waste dealer
when you wish to dispose of it.
Please follow the rules in your
country.
Dispose of properly
Caution
Use
Do not excessively pack with
food items, or remove shelves or
open doors with
excessive force
Can cause food items
Prohibited
to fall and injury.
Do not place bottles in the freezer
compartment
Do not eat smelly or discoloured
food
Can cause injury if
content of the bottle
freezes, causing the
bottle to shatter.
Can cause food
poisoning or
illness.
Do not touch food items or
containers in the freezer
compartment
with wet hands
Do not put your hands or feet
underneath the
refrigerator
Can cause frostbite.
Wet hands prohibited
Do not store
Steel plates, etc. can
cause injury.
Do not touch
Prohibited
Close the door using the
door handles
Be careful not to
catch fingers in the
door when you hold
it. Can cause injury.
Hold door handle
5
From Installation to Operation
From Installation to Operation
At least 10cm
Dedicated
outlet that meets
the specified rating.
At least 2cm
Install the
refrigerator.
Installation area
The installation area should not be
exposed to direct sunlight or hot
air, and should be well-ventilated
to avoid diminished cooling power and to
economise on the cost of electricity.
It should have little humidity
to prevent rusting
It should be strong and level
to prevent vibration and noise, half-shut doors, and
tilted doors.
Install a strong plate or board under the
refrigerator if the supports easily sink into the
floor. (For prevention of deformation or
discoloration due to heat or weight)
A place away from other devices
Prevention of television noise or image disturbance.
Leave space for heat
ventilation
Leave at least 2cm of space on the right and
left and 10cm of space between the ceiling
and the top of the refrigerator
to allow heat to escape from the ceiling and the
sides of the refrigerator
Heat builds up in exterior walls of the
refrigerator
When the refrigerator is first used and during the
summer heat build-up can exceed 50-60˚C
Warning
Do not close the ventilation hole of the
refrigerator or the crack around the refrigerator.
If the refrigerant leaks, ignition or explosion
may be caused.
Do not cause damage to
refrigerant circuit (piping) /
Do not attach screws.
Non-freon refrigerants are flammable gas.
However, it is hermetically sealed, therefore,
leaking is infrequent.
Warning
Just in case of having damaged
the refrigerant circuit.
1. Do not use electric items or fire equipments
near by.
2. Open the window and ventilate the room.
And then contact the retail store you have
purchased from for further instructions.
6
Connect the power supply.
*Connect power supply soon after
installing the refrigerator.
Use a dedicated outlet
Use a dedicated outlet for the power supply that meets the rating specified on the
rating label. (The rating label is located on the door-liner of the refrigerator
compartment.)
Warning
Using outlets that do not meet the specified rating or plugging in too many leads
into a single socket can cause heat build up or fire.
The refrigerator will not be damaged even if the power is
supplied soon after installation.
It takes a while for the refrigerator to cool, therefore
supply power as soon as possible.
Electrical Connections
Make sure this unit is properly grounded.
The unit should always be plugged into its own electrical outlet.
This will provide the best performance and prevent electrical circuits from being
overloaded and causing a fire.
Make sure that the electrical outlet provides the proper voltage.
Extension cords are not recommended.
If your unit is installed in the high humidity location, not only ground connection
but also installation of an earth leakage breaker is recommended.
If the power cord is damaged, purchase a new cord from MITSUBISHI
SERVICE CENTER. Make sure that the power cord is designed for this model.
If the power cord is damaged, call our MITSUBISHI SERVICE CENTER for
the replacement, in order to avoid a hazard.
Turn each adjustable
support in the arrow
direction until they touch
the floor.
Use your refrigerator
efficiently to save
electricity
adjustable
support
caster
Leg cover
Leave space
between items in
the refrigerator.
Adjustment and Anchoring
Leg Cover
Turn the adjustable supports until
they touch the floor and the
casters are raised from the floor
Insert into the bottom
space from the front
side of the refrigerator.
to prevent vibration and noise, transmigration
and half-shut doors
Caution
(The leg cover is bundled
in the refrigerator
compartment before
shipment from the plant.)
Insufficiently adjusted supports can cause injury due to
migration of the refrigerator.
Level the refrigerator left to right, with the front of the
refrigerator raised slightly, so that the doors close
easily and to prevent half-open doors.
Adjusting tilted doors and
an uneven refrigerator
If the installation area is not level or the refrigerator
supports sink after a few days due to the weight of the
food, the door will appear lower. (Depending on the
quantity of food, the food weight can exceed 100 kg.)
Turn the adjustable support in the direction given below
for readjustment.
How to attach leg cover
1Pull out the freezer
compartment door and take out
the case.
page 25
2With the freezer door open,
insert the nail of leg cover into
the handle hole in the length
direction as far as possible.
Handle hole
The right
door sags
down
Leg cover
The left
door sags
down
adjustable
support
right left
rear
support
For example, if the refrigerator is installed in the corner of
a room, one of the rear supports may sink into the floor.
Use a caster stand (sold separately) or strong plate at the
rear of the refrigerator. (In general, the plate should be 2-3
mm thick.)
To obtain a caster stand, contact your retail store.
Allow large
quantities of
food to cool
before storing.
Frost build-up can cause
decline in cooling ability
as a result of even the
slightest door opening
Be sure not to catch
food items, plastic
bags, power cords, etc.
in the door when you
close it.
Helpful storage hints
wipe
Leg
Handle
wrap
Nail
3Push down until the leg cover is
almost level.
Prepare for earthquakes
Securely pack foods
with strong odours
for storing.
Foods that tend to
spread odour
Thread strong belts through the 2 handy-grip recesses on
the top-rear of the refrigerator and secure them to the wall,
posts or another strong area
Strong
belts
Avoid opening
and closing the
door unnecessarily
and leaving the
door open for a
long time.
Make sure that leg
cover surface is level
Pickled scallions, dried fish,
fermented soybeans (natto), miso,
beef, pickled radish, sardine, hot
Korean pickles, Chinese meat
dumpling, etc.
Foods that tend to be
affected by odour
Pudding, ice cream, potato salad,
tofu, rice, bread, milk, cake, ice, etc.
Warning
Your refrigerator tipping over can cause injury.
The deodoriser cannot remove odour
completely.
7
Smart Tips for Using the Refrigerator
Meanings and Functions
The Display and
their Meanings
This control panel displays “What is selected for the ice making compartment” and “What is the set
temperature” for the refrigerator, versa, vegetable and freezer compartments.
The product is set at “M” for refrigerator, vegetable and freezer compartments, “REF” for versa
compartment and “REG” for the ice making compartment at the time of installation (purchase).
Short note for users:
The display will turn off after 30 seconds if no button is pressed.
The display will come on if any button is pressed.
Display panel
Compartment
display
The selected
compartment is
illuminated.
Temperature
control display
The temperature control
mode of the selected
compartment is displayed.
Selection buttons
Press this button to change the compartment displayed.
Refrigerator
is pressed.
Versa
page
10,12
Press this button to select the
temperature control mode.
For refrigerator, vegetable page
and freezer compartments
For versa compartment
page
10
12
QUICK (HOLD 3 SEC) button
Freezer
Press this button for fast cooling.
Vegetable
For refrigerator, vegetable page
and freezer compartments
For versa compartment
page
Note
Do not keep pressing (about 3 seconds)
.
Pressing this button for a long time will reset the control panel. Do not
press for a long time except when you want to reset the panel.
8
Illuminated during
quick cooling.
SELECT button
ROOM button
The display changes each time
QCK
display
10
12
Short note for users:
Fast cooling cannot be performed when the
versa compartment is set at soft freezing mode.
Pressing “QUICK” will cause the buzzer to
emit “peep, peep” tone.)
Ex.: How to read indications when the versa drawer compartment is displayed
It indicates the
versa compartment
is selected now.
Refrigerator
Ice making
It indicates that the temperature
control for the versa is set to “soft
freezing/medium” level.
The ice making mode for
the ice making compartment
is set at “Regular”.
Versa
Vegetable
Freezer
ECO
display
Illuminated during
energy-saving
mode. page 13
Ice making
compartment mode
The selected ice making
compartment mode is
illuminated. page 11
Child safety lock
When this indicator is displayed, it rejects any
mischievous tampering or unintentional pressing of
control panel settings.
page 13
Short note for users:
If all indicators blink 3 times every 30 to 60 seconds or if the compartment
display and temperature control display on the control panel repeatedly, it
means that the refrigerator is in demonstration operation mode. The
refrigerator suspends its cooling function during this mode. The
demonstration operation mode must be cancelled manually. page 26
ECO button
Press this button
to select
energy-saving
mode.
page
ICE SELECT button
Press this button to change the ice making mode or
to stop ice making or to start fast cooling.
page
11
ICE MAKER CLEANING (HOLD 5 SEC)
13
Press this button to clean the ice tray.
page
23
Note
Do not press the button for a long time unless you want to select ice
maker cleaning.
Otherwise, the ice tray will be cleaned (rinsed). Do not press and hold the button unless
you want to clean (rinse) the ice tray.
9
Smart Tips for Using the Refrigerator
Setting the Refrigerator, Vegetable
and Freezer Compartments
Setting at the time of installation (purchase)
Refrigerator
Vegetable
Freezer
Refrigerator
Temperature
control
Vegetable
Freezer
Display the compartment
which you want to control
the temperature.
Check here to control
the temperature.
* The above illustration is an example.
Settings may be different according to the selected mode.
Press
Fast cooling
Display the compartment
which you want to control
the temperature.
is displayed
during fast cooling.
* The above illustration is an example.
Settings may be different according to the selected mode.
to display the compartment
Fast cooling is used for home freezing or cooling bulk
purchased foods fast.
you want to change the temperature control mode.
The display will change at each press.
Press
to display the
Press
to change the temperature
compartment you want to cool fast.
The display will change at each press.
control mode.
The
display will change at each press.
Refrigerator
Vegetable
Freezer
Compartment display
Temperature control
Too cool
2 to 3°C
higher than
“M” level
2 to 3°C
higher than
“M” level
2 to 3°C
higher than
“M” level
Slightly cool
1 to 2°C
higher than
“M” level
1 to 2°C
higher than
“M” level
1 to 2°C
higher than
“M” level
Around
0 to 6°C
Around
3 to 9°C
Around
-16 to -22°C
Slightly cooler
1 to 2°C
lower than
“M” level
0 to 1°C
lower than
“M” level
1 to 2°C
lower than
“M” level
Much cooler
2 to 3°C
lower than
“M” level
1 to 2°C
lower than
“M” level
2 to 3°C
lower than
“M” level
Standard
* The above shows only rough standard. The temperature may vary according to
the usage conditions, such as how foods are stored and opening/closing
frequency of refrigerator door.
Temperature control mode for the versa compartment page 12
and hold for 3 seconds
Press
(Until a “beep” sound is heard)
indicator comes on.
The cooling is automatically completed
after about 2 hours.
indicator goes off.
To stop the operation halfway through
Press
and
indicator comes off.
Short notes for users:
The temperature inside the refrigerator may temporarily increase or
decrease before and after defrosting.
The temperatures given above represent the temperatures measured
after reaching stabilization at the lower center part of the refrigerator
when the ambient temperature is 30°C and the doors closed with
nothing inside.
10
Fast cooling of versa compartment page 12
Short note for users:
During Fast cooling, the noise from the refrigerator will
become higher due to high speed cooling.
Setting at the time of installation
(purchase)
Setting the
Ice Making
Ice Making Compartment
Ice making
Selecting ice
making modes
Display the ice making
compartment
Short notes for users:
The display will turn off after 30
seconds if no button is pressed.
The display will come on if any button
is pressed.
Quick ice
making mode
repeatedly
Press
to display
.
Ends automatically
It automatically completes after operating for about 9
hours, when the ice storage bin is full of ice (about 60 to
100 pieces) or when no water is left in the water tank.
indicator goes off and then
indicator goes on.
* The above illustration is an example.
Settings may be different according to the selected mode.
Press
repeatedly to make your
To improve clear ice
To increase crystal ice making time
required ice maker setting blink.
The display will change at each press.
Press
Ice making mode can be selected from 4 types.
(Regular ice making)
Select this mode when you want
to make a large quantity of ice.
(Quick ice making)
Select this mode when you want
to make ice quickly.
(Crystal ice making)
Select this mode when you want
to make crystal clear ice.
It will take more time compared to
“REG” mode (about 5 to 8 hours).
not use ice such in winter
time.
The compartment can be used for frozen
food storage. Before using this compartment
as a freezer, clean the water supply system.
page
23
and
simultaneously and hold for about 3 seconds.
(Until a “beep” sound is heard)
indicator turns on and
whichever
applicable, will blink.
Displays of other compartments will be extinguished
temporarily.
Blinking
Press
(Stop ice making) Select this mode when you do
,
repeatedly and select “H” if you want to
make clearer ice cubes or “L” if you want to increase
crystal ice making time. The selected mode will blink.
After a while, a “beep” sound is heard and the blinking
display is left and after 2 seconds, it will stay lit and the
mode is set to the lighting display.
Display of other compartments will be reset to the previous
display.
Selecting “L,” “M” or “H” will light only
Short notes for users:
During “QCK” mode, the noise from the refrigerator will
become higher due to high speed cooling.
The ice making time differs according to the ambient
temperature and conditions of usage.
.
Settings for crystal ice making time and clarity
Display
L
M
H
Ice making time Faster than “M” About 5 to 8 hours Slower than “M”
Clarity (percentage 70 to 80% of ice 80 to 90% of ice 90% or more of ice
of clear area)
It is set at “M” at the time of installation (purchase)
Immediately after installation, it may take more than 24 hours
to make ice even if “QCK” mode is selected.
11
Smart Tips for Using the Refrigerator
Setting the
Versa Compartment
Versa
Temperature
Control
Versa compartment is displayed.
Check here to
control temperature
mode.
* The above illustration is an example.
Settings may be different according to the selected mode.
Press
Press
and display
Setting at the time of installation (purchase)
Versa
Fast cooling
Versa compartment
is displayed.
is effective when
,
is selected.
or
is
illuminated during
fast cooling.
* The above illustration is an example.
Settings may be different according to the selected mode.
.
Fast cooling is used for home freezing or cooling
bulk purchased foods fast.
Fast cooling is OK with food inside.
After Fast cooling the temperature will
be reset to its previous set temperature.
repeatedly and change to make
your required temperature control mode.
Versa compartment can be selected
page 17
from 6 choices.
Press
and display
Press
and display
.
,
About 3°C
,
whichever is applicable.
* No Fast cooling for
About 0°C
and hold for 3 seconds
Press
(Until a “beep” sound is heard)
About -7°C (M)
is displayed.
The cooling is automatically completed after about 2 hours.
indicator goes off.
About -17°C
To stop the operation halfway through
Short notes for users:
The temperature inside may increase or decrease temporarily before
and after defrosting.
The temperatures given above represent the temperatures measured
after reaching stabilization at the lower center part of the refrigerator
when the ambient temperature is 30°C and the doors closed with
nothing inside.
If soft freezing is selected, freezing takes place at about -7°C and it
may take about 24 hours until the food is completely frozen.
12
Press
and
indicator goes off.
Short notes for users:
When the versa compartment is set at soft freezing
mode, fast cooling will not take place. Press QCK
until a “beep” sound is heard.
During fast cooling, the noise from the refrigerator will
become higher due to high speed cooling.
Short notes for users:
Other Settings
The display will turn off after 30
seconds if no button is pressed.
The display will come on if any button
is pressed.
Child Safety
Lock
Energy-saving Running
lights on
If rejects any mischievous
tampering or unintentional pressings
of control panel settings.
Press
at the same time and hold for 3 seconds.
(Until a “beep” sound is heard)
turns on.
To cancel
Follow the operation
explained above.
* Even if child safety lock is on, compartment can
be selected
When there’s no opening or closing of door during
night time or when you are not home.
The refrigerator automatically switches between
Energy-Saving Operation Mode and Normal Operation
Mode to minimize the energy consumption.
Press
If you want to reset
To reset “ROOM”, “SELECT”, “QUICK”
and “ECO” to the mode they were
set at the time of installation.
and hold for
Press
on the panel lights.
about 3 seconds.
(Until a “beep” sound is heard)
Press ECO button again.
Selected modes at the time of installation
To cancel
ROOM
Refrigerator
SELECT
Vegetable
Freezer
QUICK
•
ECO
Indicators go off
Temperature control of versa compartment will
not change.
If the ice making compartment was set at
,
it will be
.
It will be the same as when other settings were
made.
13
Using Compartments
Refrigerator Compartment
Short notes for users:
Interior light
The interior light will turn off temporarily if it is
lighted for 60 minutes continuously. Close the
door thereafter and the interior light will turn on
each time the door is opened.
Elevating Shelves
Two-way Flexishelf
Change pocket (large)
Change pocket (small)
Elevating Shelves
Bottle pocket (large)
Rotating partition
The rotating partition may get
damaged, when it is turned up
Lid of slide chilled case
Slide chilled case
Bottle pocket (small)
Door alarm
If one of the doors is left open for more than 1
minute, a “beep” sound is heard, notifying fridge
temperature and energy efficiency are affected.
(Refrigerator compartment, ice making
compartment and freezer compartment)
Prevents wasteful leakage of cool air and
reduces wasteful power consumption.
Free egg shelf
Small item case
Two-way Flexishelf
1 As a wide shelf
Elevating Shelves
Move the lever on the front of the shelf left or right to adjust the shelf to the desired position.
2 Make the shelf to the half
size for taller foodstuffs
Move the lever to the right to raise the shelf.
Move the lever to the left to lower the shelf.
The lever will be difficult to move when heavy items are placed on the shelf.
When the Elevating Shelves are lowered, one of the shelf supports may come off if
the shelf contacts any foods under the shelf. To prevent from any damage of foods.
If one of the supports comes off, push it back into position from above.
How to remove the shelf page
14
24
Change pocket
Each pocket at the right and left sides can be hung in
two different positions.
Note
Do not leave food items hanging over the edge of the shelves.
Do not place bottles that can not reach the bottom of the
compartment in the front row of the bottle pocket.
Doing so can cause half-shut doors and broken bottles.
How to remove the pockets page
25
Lid of slide chilled case
Open the lid by pulling the case toward you.
In the following cases, the items in the slide
chilled case may be frozen.
Please set the refrigerator compartment
temperature to “M”, “LM” or “L”.
When the temperature for the refrigerator is set to “H”
When the ambient temperature becomes 5°C or less
(in winter)
Do not close the door of the refrigerator with
the items in front of the slide chilled case
The case is automatically set to “CHIL”. The temperature
cannot be adjusted using the control panel.
To store meat, fish, processed foods (such as fish paste, ham,
etc.), yogurt, etc.
Small item case
The case can be used for storing various items including
eggs and small articles according to your idea.
The case is automatically set to “CHIL”.
Do not store food that freeze easily.
Be sure to properly replace and cover the
case with the lid
Do not set a commercial tube stand outside
the door pocket
Failure to do so may prevent the door from closing properly,
cause insufficient cooling, items to drop from shelves,
injury and damage to the case or lid.
Set the large tubes at the back
Not doing so can cause the tubes to fall out from its
original position.
15
Using Compartments
Vegetable and Freezer Compartments
Slide case
Vegetable case
Note
2L PET bottles can also be stored.
Do not place tall objects
under the slide case
Vegetable pocket
Asparagus and cucumbers can
be stored upright.
Tall objects may cause damage
to food or the slide case.
If the slide case was removed and
not used, it may cause the
vegetable compartment to get dry.
LEDs (Top of the compartment)
Lighting up vegetables to enhance
vitamin and polyphenol
Vegetables are still alive even after they are harvested.
Exposure to light can enhance nutritiousness
of vegetables.
*Orange LEDs 3 locations
Those LEDs are always on.
*Purple LED 1 location
*Blue LED 1 location
LEDs are controlled to illuminate for 160
minutes per day. They may be off when you
open the door.
Note
Do not disassemble or spray
water on the LEDs.
Water penetration may cause malfunction.
As long-life LEDs are used, normally,
no replacement is necessary.
Short notes for users:
There are no such foods that cannot be stored under the LED light. Simply
store them in the usual manner.
Even with poor light, vegetables increase nutrients. Then there is no need to
unwrap the covers, unless they shut out the light.
Cover vegetables and
fruit in plastic wrap to
preserve freshness.
Vegetable nutrients will not continue to increase forever. The storage
stability will depend on the freshness when bought. Please use the freshest
vegetables available.
The vegetable compartment has high humidity, therefore the bottom of each case may
become cloudy or condensation may form when a large amount of leafy vegetables is
placed in the vegetable compartment. If condensation collects in the bottom of a case,
it will cause the case to become dirty, therefore wipe the case with a dry cloth.
Door alarm
Freezing case (top)
Freezing case (bottom)
Note
For freezing only
Freezable 500 mL PET bottles
can be placed in upright.
Do not place anything other than
freezable PET bottle beverages.
Frozen liquid may cause
the bottle to break.
page
16
5
If one of the doors is left open for more
than 1 minute, a “beep” sound is heard,
notifying fridge temperature and energy
efficiency are affected.
(Refrigerator compartment, ice making
compartment and freezer compartment)
Prevents wasteful leakage of cool air and
reduces wasteful power consumption.
Food storage limit line
Do not place food items over
storage limit line in the
lower freezing case.
Door could not be totally closed and
could damage food items or the
freezing case.
Versa compartment
Versa case
Aluminum tray
Food is cooled quickly due
to pre-cooled aluminum.
Note
If the setting for this compartment has been changed from refrigeration or chilled to freezing or
soft freezing, do not place frozen food inside until an elapse of at least 30 minutes
Place the food items so that the cool airflow can flow above the items.
Chilled
Select the setting according to your dietary needs.
page
12
Refrigerator
Soft
freezing
Freezing
You can select from 6 types
app. 3°C
Refrigerator
For cooling beverages
If food cannot fit into the
refrigerator compartment
app. 0°C
app. -7°C
(medium)
app. -17°C
For storing processed food,
(such as fish paste, ham,
etc.), yogurt, cheese etc. for
about 1 week.
Chilled
Soft freezing
For storing meat or fish for
about 2 to 3 weeks
If food gets too hard to cut
through set at “L” and if
food does not get frozen
easily, set at “H”.
Freezing
For storing frozen food, ice
cream, etc.
For storing meat, fish or
other processed foods for
about 1 to 3 months.
Short note for users:
The temperatures given above represent the temperatures
measured after reaching stabilization at the lower center part
of the refrigerator when the ambient temperature is 30°C
and the doors closed with nothing inside. The temperature
may vary according to the usage such as storage condition
of foods and door opening/closing frequency.
(
Short term
frozen food
storage
)
17
Using Compartments
Soft Freezing (Sliceable frozen food)
Items that are not suitable
for soft freezing
Soft Freezing
Meat and Fish
Items that can not be frozen normally are not suitable for
soft freezing either. Form and quality of such items after
freezing are not guaranteed.
Example: konyaku (nutrition yam paste), bean curd, milk,
eggs, potatoes, etc.
Though your meat or fish may seem as frozen as if it were frozen
normally, with soft freezing you need not separate food or wait
for it to thaw because your meat or fish can be cut with a knife
immediately after you remove them from the versa compartment,
thereby shortening your cooking time!
Items that have been transferred from freezer to soft freezer or
soft freezer to freezer should be used within 1-2 weeks.
Blocks of meat
The soft freezer cannot preserve commercial ice
cream or frozen foods. Store these items in the
freezer compartment.
Meat that has been stored in the freezer or was bought frozen
can be transferred to the soft freezer, so you can divide up and
remove only the amount that you want to use.
Depending on its size, your meat
should be ready to cut within 2-5
hours after it is transferred to the
soft freezer.
Thinly sliced meat or bacon
Thinly sliced meat or bacon can be cut immediately. They
will thaw while cooking or dipped in basting, during
which time you can easily separate them.
They may not be able to
be separated
immediately after they
are removed from the
soft freezer.
Ground meat
You can cut and remove the
amount you want to use.
Furthermore, if you cut them into
small cubes, they will thaw enough
in 15-30 minutes for you to loosen
with your hands.
Cutlets and cod roe
Cutlets can be cooked on a
low flame without taking
the time to thaw them. Cod
roe and other highly salted
foods do not freeze and can
be used immediately.
18
Fruit
The soft freezer is recommended for very sweet fruit. Try soft
freezing with various fruit.
Eat fruit frozen without thawing.
(these fruit will not be fresh again after thawing)
The flavor of fruit kept in the soft freezer for more than 1
week may change. It is recommended to eat fruit within 2-3
days to best enjoy its new taste.
Freezing time may vary depending on sugar content of the
fruit, so allow 1 day for freezing.
Others
Meat sauce
Store left over sauces in an airtight container. You can remove the
sauce with a spoon and use it as a universal sauce with gratin or
omelets.
Sauces with high liquid content may not be removable with a
spoon.
Line the inside of a storage container with plastic wrap, pour
sauce into container, remove by holding the wrap and cut the
amount you need with a knife.
Smoothie
Blend soft-frozen fruit and yogurt and milk in a blender to make
an easy healthy drink.
Example: Cut half a peeled apple into bite-size pieces, and a
peeled kiwi into 1-cm circular slices. Freeze fruit in the soft
freezer. Then blend soft-frozen apple and kiwi, 250cc of milk
and honey (if you like) in a mixer until it becomes smooth.
(makes 2 servings)
Watermelon
Spinach
Boil spinach, place it in an airtight
container and soft-freeze for later
use in miso soup or butter saute.
Make watermelon ice by cutting
watermelon into bite-size pieces
and freezing in the soft freezer.
Fermented soybeans and fried bean curd
Canned fruit
Soft-freeze mikan oranges or
pineapple in its syrup to make easy
sherbet.
May not freeze depending on
the sugar content of the syrup.
Fermented soybeans can be
mixed immediately after removal
from the versa compartment.
Chilled fermented soybeans can
be quite tasty. You can cut the
amount of fried bean curd you
want to use.
Short notes for users:
Please pay attention to the
following when using soft freezing
Since food freezes takes place at approximately -7˚C with soft
freezing, it may take up to 24 hours for food to freeze
completely.
Open and close compartment doors with as low frequency as
possible when you add items to the soft freezer.
The degree of freezing may vary depending on the type of item,
cooking method, arrangement of item (folded and layered or
location of item), amount, and period of storage.
Items may not freeze or may freeze too much (for cutting with a
knife) depending on content of sugar, salt and fat.
Items that have frozen too much can be cut with a knife if they
are left in room temperature for 5-15 minutes.
Adjust the temperature in accordance with degree of
freezing.
page 10
When not frozen enough
Adjust soft freezing setting
to “H”1-2˚C below “M”
Foods that do not freeze easily
Food with high salt content,
such as cod roe
Food pre-seasoned with soy
sauce or bean paste
Food with high sugar content,
such as stewed beans
Food with high sugar content,
such as bananas
When frozen too much
Adjust soft freezing setting
to “L”1-2˚C above “M”
Foods that freeze easily
Food with high water
content, such as boiled
vegetables
Food with high water
content, such as rice
Large blocks of meat with
low fat content, such as thigh
meat
19
Using Compartments
Ice Making Compartment
(Automatic Ice Maker)
Your first batch of ice
Ice
making
Water supply port cap
Discard the first 2-3 batches of ice you make
or ice that is made after more than 1 week of
nonuse (about 20 cubes).
This ice often has bad odour or dust on it.
Water tank lid
Pipe, water supply pump,
light-type bacteria removing filter
with Lead-removal function
Water tank (app. 1.2L)
Pipe
V-LED lamp
Bring light to light-type bacteria
removing filter to prevent the
bacteria from being bred in the water
tank. (The automatic ice maker must
be cleaned regularly. page 22 )
Ice tray
Can not be removed.
Soundproof mat
Ice storage box
The soundproof mat reduces
the sound of ice dropping
into the storage bin. Do not
remove the mat.
Ice server
Door alarm
If one of the doors is left open for more
than 1 minute, a “beep” sound is heard,
notifying fridge temperature and energy
efficiency are affected.
(Refrigerator compartment, ice making
compartment and freezer compartment)
Prevents wasteful leakage of cool air and
reduces wasteful power consumption.
Note
Door
Please do not put
anything deep inside
the ice storage bin.
Ice server
Ice storage bin Make the ice flat.
Ice level
sensor lever
(Detects the
ice storage
level)
When storing food items in the ice storage bin, they must not be higher than the
top of the bin. (This can cause a malfunction or prevent the door from closing.)
The ice level sensor lever will detect the ice storage automatically,
and will stop ice making when it reaches a certain amount. (app. 60
to 100pcs.) In order to detect the ice level correctly, please make the
ice flat and put the ice server in the front of the ice storage bin. The
automatic ice maker could be damaged if it contacts an object.
20
Do not poor anything like sugar, juice, tea or
soft drinks, in the water tank. (Heat resisting
temperature, app. 60°C)
Placing liquid other than water may
cause damage to the automatic ice maker
or water supply pump.
Do not fill the water tank higher than the full-level mark.
Filling the water tank with a kettle while
it is still in the tank holder, or filling it
higher than the full-level mark may
cause “connected” ice to form.
Making Ice
Select
,
Ice shapes
The shape of ice is trapezoid but somewhat flat and uneven
or
on the control panel.
page
11
The size of ice made for one time may vary with the water
Initial setting of the ice making compartment at
installation is
.
amount in the water tank.
One batch of ice is 5-8 pieces.
If the water tank is filled above the full-level mark, the water
Check the amount of water
remaining in the water tank.
Open the door to the refrigerator compartment and
check the level from above the tank.
channels in the ice tray will freeze, causing 2-3 pieces of ice to
stick together and bumpy ice.
If some pieces of ice stored long time, they will be stuck or
become smaller. (This phenomenon is called “sublimation”.)
Remove the water tank. Remove
the water supply port cap and fill
the tank with water.
Up to the full-level mark
The quickly made ice may be cracked or split due to fast freezing.
About Crystal Ice
Replace the water tank holding it level.
Tipping the tank will cause water spillage.
If the water tank does not fit properly in place, ice
will not be made.
In addition, it can cause the water tank to freeze.
Check that there is no foreign material in the tank
When you want to change the clarity of the ice or the ice
making time operation page 11
holder or water supply pipe.
Ice
making
time
Approximate time for
making one set of ice
Quick ice making mode
60-90 minutes
Regular ice making mode 100-120 minutes
Crystal ice making mode
There may be white sediment (white crystal) or bubbles inside
the ice cube.
In cases below, may cause clear ice into such white sediment ice.
• When the mode has been changed from “REG(Regular), “QCK
(Quick)”, “STOP(Stop)” to “CRL(Crystal)”.
(It is set at
mode at the time of installation).
• Ice made of water containing much mineral.
(This white sediment is a crystal of mineral ingredients)
• When surrounding temperature, status of use have changed.
• When pieces of ice are stored long time in the ice storage bin.
(Frost will cover the ice. If it is put into water, the frost will dissolve.)
5-8 hours
One batch of ice: 5 to 8 pieces
Clear ice is made slowly to increase the clarity of the ice cube.
The time may vary according to the ambient temperature of
the refrigerator or its usage condition and the type of water
used. It may take longer time than given above.
It is recommended not to open or close the ice making
compartment door, when making clear ice.
Short notes for users:
Ice made of water containing much mineral such as mineral
water might cause white sediment (white crystal). When the ice
melts into water, it may appear fibrous. This white sediment is
a crystal of mineral ingredients, which is not harmful.
The V-LED lamp comes on in the following condition.
• When the door of the refrigerator compartment or ice
making compartment is kept open
(However, the lamp goes out when the door is kept open for 5 minutes.)
• Before and after feeding water into the ice tray.
The time required for making ice might be longer according
to the frequency of closing and opening the door, the
temperature around the refrigerator, and the amount and
temperature of the water added to the tank.
21
Maintenance
Maintaining the Automatic Ice Maker
Cleaning once a week
Water tank
Cleaning once a month
Water supply pump / Light-type bacteria removing filter
Remove the lid and wash
with water.
Pull out the pipe.
Twist the pump to remove it.
(the tank can withstand up to
approximately 60°C)
Disassemble and wash
the parts with water.
Water supply pipe / Tank holder
Water supply
pipe
Light-type bacteria
removing filter
Cap
Cover
Tab
Note
Do not use kitchen detergent, benzene, bleach or other cleaning
products to clean the light-type bacteria removing filter.
Be sure to read all instructions for detergents, bleach and other
cleaning products you use to clean the water tank and lid.
Separate pieces and
wash with water.
Aluminum pipe
Packing
Twist on the aluminum pipe to
replace it.
*The water supply pipe may be
white due to minerals or chlorine,
but this is not abnormal. Wash the
pipe and continue using it.
Reverse steps to
replace the pipe.
Reassembly points
Improper reassembling might cause failed ice making or increased noise.
Check the following.
Fit the filter cover’s tab (1)
Align the marks on the
and hook (2) into the cap.
pipe and the water tank.
Water tank
mark
1
Rotate the cap and catch
the cap hook (1) onto the
water supply pump tab (2).
Rotate
*Make sure that no foreign object is found between
the water supply pipe and the pipe junction.
Pipe junction
Water tank
1
*Make sure that the impeller is in the pump.
Securely rotate the water supply pump
into the water tank to install it.
Rotate
Pipe
Impeller
2
Replace the water supply pipe.
Be sure that sides A and B fit flush
against each other. Otherwise, the
ice maker may malfunction if the
pipe is not installed properly.
2
Light-type
bacteria
removing filter
Side A
Water supply
pipe
While pushing the
tab downward with your
finger, pull the cover off.
Reverse the steps to replace the pump.
Do not let water flow into the tank holder.
22
2
The products above give ice odours.
Tank holder
Side B
Pipe
The impeller is magnetic.
Wash carefully to remove
all foreign objects.
Normally the filter need not be
Pipe
replaced. However, replace it in
the following conditions:
• When the filter is clogged by Water supply
passing something other than pump
water through the filter
• When the filter is broken
• When the filter is moldy
Impeller
In such cases, contact the retail store at
which you purchased this refrigerator.
Cleaning once a month
Pull out water supply
pipe. Wipe the tank
holder with clean cloth.
1
Water tank
Water tank
Be careful not
to pinch any
foreign object.
Water supply
pipe
Pipe
Insert horizontally
Tank holder
(on the refrigerator
body)
Improper fitting or any foreign object will produce
a clearance between the pipe and the pipe junction
to cause freezing of the water tank.
Regular cleaning produces clean and delicious ice.
Regular cleaning prevents water stains, molding, etc.
To clean (rinse) the ice tray
Cleaning the ice tray using water from
the water tank
Remove ice from the ice storage bin and
close the ice making compartment door.
Remove ice
When the automatic ice maker will
not be used for a long period of time
When using the
setting
*Follow these instructions for transportation of the refrigerator as well.
Discard all the ice and water from the ice tray
in the ice storage bin to empty the ice tray.
Remove the water tank and close
the ice making compartment door.
Water tank
Ice making
compartment
Fill the water tank with water
and set it in place.
Press
on the control panel and
hold for about 5 seconds
(Until the buzzer emits “peep, peep” tone.).
The display (
,
,
, or
)
of the ice making compartment will blink
(for about 1 minute ).
(The water and ice will empty from the ice tray.)
After the blinking stops, the original display will return.
Press
on the control panel and
hold for about 5 seconds
(Until the buzzer emits “peep, peep” tone.).
The display (
,
,
, or
)
of the ice making compartment will blink
(for about 1 minute ).
(The ice tray will be cleaned by the water from
the water tank.)
Remove the ice storage bin and
discard the water and ice.
Do not discard the two-layer soundproof mat.
Ice storage bin
Set the ice making compartment
page 11
to
.
Repeat step
2 to 3 times.
Remove the ice storage bin and
discard the water and ice.
Do not discard the two-layer soundproof mat.
Wash the water tank (water pump, pipe, and
light-type bacteria removing filter), water supply
pipe, ice storage bin, and soundproof mat with
water. Dry carefully and reinstall parts.
To restart the ice maker, switch the ice making
setting. page 11
Put the water tank back
to its original position.
Ice storage bin
23
Maintenance
Removing and Maintaining the Accessories
Before you start
Remove the power plug from the socket.
Warning
Failure to remove the plug
may result in electric shock.
Wait at least 10 minutes before you replace the power plug.
The refrigerator will not operate if the plug is replaced
immediately after it is removed.
Maintenance and Cleaning
Wipe or remove and wash parts with water.
To remove oily deposits, wet a cloth with warm
water or dishwashing detergent and wipe.
(Be sure to wipe off all oily deposits. Oily
deposits can cause plastic parts to break.)
Be sure to wipe off any detergent you used.
Be sure to read all instructions and heed
precautions for chemically treated
disposable cloths you use to clean parts.
Do not use alcohol, benzene, steel
wool or alkaline-base detergents.
They will cause damage to plastic
parts (door handles, cap, cases, etc.)
and coating.
Elevating Shelves
Removal
Installation
1Move the lever completely to the right. 1Make sure that the lever is moved completely to the right.
2Push up each support, one at a time,
with a strong effort. (4 supports)
(When the internal hooks are released
from the refrigerator, a “click” sound
will be heard.)
1Push up the nails at the back side
of tray (3 places) using fingers.
2Make sure that the 4 metal stoppers are securely fitted into
the refrigerator, then lightly set the shelf into the refrigerator
and align the 4 supports with the 4 stoppers.
3Push each of the 4 supports, one
at a time, downward from above.
(When the internal hooks catch
onto the refrigerator, a “click”
If the supports are not released easily,
sound will be heard.)
push the internal hooks inward.
3After the 4 supports are released,
pull out the shelf.
Tray removal
4Finally, move the lever to the left and right and check that
the shelf moves up and down while remaining level.
(If the shelf does not remain level, the 4 hooks are not
securely caught onto the refrigerator. Remove the shelf
and repeat steps 1 to 4.)
2Lift up the back side of tray until the
nails at the front (3 places) and nails on
both sides (2 places) are removed.
*Lift up the tray slowly, otherwise it may fall.
3Remove the tray with both hands.
Disassembling or applying grease to the Elevating Shelves can cause it to malfunction.
24
Reverse removal procedures to reinstall accessories.
Replacing the interior light bulb
Two-way flexishelf
Refrigerator compartment / Vegetable compartment (Tricolor LED)
Push the shelf inward, then lift
and pull forward.
Refrigerator compartment
Door seal
Dirty seal is easily
damaged and can cause
refrigerated air to leak.
Door seal
1Remove the plug.
2Remove the AUTO-shelves (2) and two-way flexishelf.
3Press the tab upward as you pull the cover forward.
4Replace the interior light bulb
Please purchase a light bulb for the refrigerator
3
5
(MR-G57N) from your retail store.
5To replace the cover, insert the
upper tabs and then the lower tabs.
Vegetable Compartment (LED)
Change pocket / Bottle pocket
Change pocket
1
Bottle pocket
Warning
Using non-designated interior light bulbs can cause fire.
Non-removal of plug before changing interior light bulb
can cause electric shock or injury.
Just in case of refrigerant-leakage, explosion or fire can
be caused.
2
1
2
Please contact the retail store at which you purchased it
1Alternately lift up the left and right sides (the pockets are securely installed).
2Pull towards you.
Slide chilled case / Small item case
1
Slide chilled case
2
1Support the lid with a hand.
2Lift up the case and pull it towards you.
*The ceiling shelf at the upper side of slide chilled case cannot be
removed. Do not try to remove this part even for cleaning.
Control panel
Wipe with a soft dry cloth.
*Do not use alcohol, benzene, steel wool or alkaline-base
detergents. They can cause the control panel to malfunction.
Drip gutters
Wipe away all soil or drippings.
2
Small item case
1Pull the case till it stops.
2Lift up the case and pull it towards you.
Drip Gutters
1
The rear of the refrigerator and the floor
Ice Making compartment / Versa compartment
1Open the compartment
door till it stops.
2Lift out holding the area
closest to you.
2
1
1Turn the adjustable supports to lift them off the floor and move the refrigerator.
2Wipe away all soil from the rear of the refrigerator, the wall and the floor.
Air circulation can cause dust to collect at the rear of and on
the floor under the refrigerator, creating black soiled areas.
Soot and
dust
Caution
Vegetable compartment / Freezer compartment
Slide case,
freezing case (top)
Vegetable case,
freezing case (bottom)
1Open the compartment
door till it stops.
2Lift out holding the area
closest to you.
3Pull out the door by slightly
holding it up and let it tilt.
4Lift out holding the area
closest to you.
2
4
1
Do not put your hands underneath the refrigerator.
Doing so can cause injury.
After Maintenance
Inspect the power cord, plug and outlet
Is the power cord or plug damaged?
Has dust collected on the power plug?
Is there abnormal heat build-up in the power plug?
Is the outlet coming loose?
Have you properly reinserted the power plug?
Dust
Damaged
cord
Warning
3
Damaged power cords or plugs, and dust
collected on plugs can cause electric shock or fire.
25
Troubleshooting
What to do when...
Electric power goes out
Refrain from frequently opening and closing the
refrigerator doors, and avoid storing additional items.
Setting for modes other than temperature may change.
Please check. (Child Lock, Energy-Saving, Fast Cooling, etc.)
Transporting the unit
If all indicators blink 3 times every 30 to 60
seconds even though no button has been
pressed.
Or, if the compartment display and
temperature control display on the control
panel blink in turn repeatedly.
(Demonstration operation mode)
Discard the water and ice in the water
tank and the ice tray. page 23
Wear the protector such as work-gloves.
Remove the leg cover and lift up the
adjustable support.
Pull out the power supply plug.
Place towels beneath the exhaust port and
at the corner beneath the back side of the
refrigerator and then place a container or a
tray about 3cm high to collect water.
*Towels must be placed to prevent water
leakage and possible damage to the floor.
Slowly tilt by about 30 degrees towards the rear and
drain water collected in the evaporating dish from the
exhaust port located at the bottom of the rear side.
(The evaporating dish is not visible from outside.)
*As it is heavy, the work must
be performed by two people.
*Small children or people
not confident about their
physical strength should not
try to participate and should ask
a transportation company to do the work.
Keep the refrigerator door open.
Press
,
and
simultaneously and hold for about 5 seconds.
(Until a “beep” sound is heard)
If
mark is blinking rapidly
(about 5 times per second)
Or if the alarm cannot be turned off.
Pressing “ICE SELECT” and holding for about 5
seconds will stop the alarm if it keeps sounding.
However, as it is necessary to perform inspection,
please contact the retail store at which you purchased
it or a Customer Service representative.
The unit will not be used for a long period of time
Clean the automatic ice maker.
Front Lower interior Upper part of back side
Warning
It uses flammable refrigerant, do not damage the refrigerant
circuit. If the gas leaks, ignition or explosion may be caused.
To move the refrigerator or to change the direction
Lift adjustable supports
page
7
Move it in forward and backward directions
*Dragging it in directions other than the longitudinal forward
and backward directions may cause damage to the floor.
Make sure to place a cloth for floor
protection underneath the caster and
rear support before changing directions.
26
How to cancel demonstration operation
Contact the retail store at which you purchased it
or the consumer service office. page 31
Gently transport the unit with 2 or more people,
gripping the hand-holds on the lower-front interior
and the upper-rear of
the unit.
Do not lay the unit on its side
(doing so can cause malfunction
of the compressor).
The refrigerator suspends its cooling function during this mode.
Please contact the retail store at which you purchased it or reset
the demonstration operation by the following resetting method.
page
23
After removing the power plug from
the outlet, clean the interior of the unit.
Leave the doors open for 2 to 3 days to
sufficiently dry the interior of the unit.
*Failure to sufficiently dry the interior of the unit can cause molding, odours,
and refrigerant (gas) leakage due to corrosion of the condenser.
Specifications
If you want to select precisely
temperature control mode
(Fine adjustment mode)
This appliance is designed for use in New Zealand only and
can not be used in any other country. No servicing is
available outside of New Zealand.
You can set fine adjustment mode for the
refrigerator, freezer or versa (only when “FZR”
is selected) compartments.
During fine temperature control, the selected
compartment blinks every 10 seconds.
Press
and
simultaneously and hold for about 3 seconds.
(Until a “beep” sound is heard)
To reset
Follow the same procedure as above.
Refrigerator Compartment
Selecting fine adjustment mode
Performing fine adjustment
Fine Temperature Control
to display the
compartment you
want to make fine
adjustment.
Low mode
page
10
App. 0.3°C
lower than “L”
App. 0.6°C
lower than “L”
Press
repeatedly to make
fine adjustment.
Selecting
“L” and “M”
page
10
Ice Making
Versa
Vegetable
Freezer
Compartment Compartment Compartment Compartment
Press
Accessories
Units
Model
MR-G57N
Elevating Shelves
2
Two-way flexishelf
1
Slide chilled case
1
Lid of slide chilled case
1
Water tank (with light-type bacteria removing
1
filter with plumbum-removal function.)
Change pocket (large)
2
Change pocket (small)
2
Small item case
1
Free egg shelf
1
Bottle pocket (large)
1
Bottle pocket (small)
1
Ice storage bin
1
Soundproof mat
1
Ice server
1
Versa case
1
Aluminum tray
1
Vegetable case
1
Slide case
1
Vegetable pocket
1
Freezing case (top)
1
Freezing case (bottom)
1
Leg cover
1
App. 0.3°C
higher than “M”
Medium mode
page
10
App. 0.3°C
lower than “M”
Selecting
“M” and “H”
page
10
App. 0.6°C
higher than “H”
App. 0.3°C
higher than “H”
High mode
page
10
Ex.: When the refrigerator compartment is set 0.6ºC lower than “L”.
“REF” blinks
every 10
seconds.
“H”
blinks
*The displays above are meant for explanatory purposes only. The
temperature may vary according to the usage conditions, such as
how foods are stored and opening/closing frequency of the
refrigerator door.
27
Troubleshooting
Troubleshooting
When
Check the following
Unit does
not cool at all
1 Is the unit receiving power?
2 Compartments and temperature control modes on
the control panel blinks in turn.
1 Check the power plug and the main power supply.
2 Under demonstration operation. Please reset the
demonstration operation mode.
page 26
1 See if the selected temperature control mode for the
compartment that is not cooling enough is “L”.
2 Have you just begun using the unit?
1 Change setting to “M” or “H”.
Unit does not
cool sufficiently;
unit does not
produce
ice or ice
melts
Ice maker does
not produce ice
or produces very
little ice.
Water level in
tank does not
decrease.
Making ice
time is long
1 Have you just begun using the unit?
2 Are the water supply pump and pipe set properly in
the water tank?
3 Is the water supply pipe set properly in the tank
holder?
4 Have you left food or the ice server laying in the
ice storage bin?
5 Is the ice making compartment set to “ STOP”?
6 Is the ice making compartment set to “CRL ”?
7 Is there enough water in the water tank? Is the
refrigerator tilted?
2 It sometimes takes 4-5 hours for unit to cool and up
to 24 hours for ice to make in the summer.
3 Check that installation was properly executed.
page 6
4 Check that the unit is not excessively packed with food
items and that the doors are not ajar.
page 7
1 It sometimes takes 4-5 hours for unit to cool and up
to 24 hours for ice to make in the summer.
2 In particular, check that the outlet of the pipe in the
tank is securely installed to the tank.
page 22
3 Check the installation.
page 22
4 Assume that there is sufficient ice in the storage bin.
Remove foods, etc. from the storage bin. Level out
the ice evenly in the storage bin.
5 Select either “REG”, “QCK” or “CRL” mode.
6 “CRL” takes longer time to be made than usual ice.
(approx 5-8 hours)
7 Sometimes there are few pieces of ice in a batch.
page 21
1 See if “H” or “CHIL” is selected for the
temperature control mode.
2 Have you placed items with high water content in
the back of the unit?
3 Is surrounding air temperature less than 5ºC?
1 Change setting to “M”. Keep in mind that temperature
temporarily drops during “QUICK” mode.
2 Please place water-containing foods, such as tofu,
vegetables and fruits, and beverages at the front side.
3 Set refrigerator compartment and vegetable
compartment to “L” to prevent freezing.
1 Is “SOFT FZR” or “FZR” selected for the
temperature control mode?
1 If “SOFT FZR” or “FZR” is selected for the
temperature control mode, food will become frozen.
1 Is the temperature setting set to “REF” or “CHIL”?
3 Are the items on top packed too tightly?
1 Items will not freeze when the temperature setting is
set to “REF” or “CHIL”.
2 It takes some time for the unit to cool. Wait at least
30 minutes before placing frozen foods in the versa
compartment or use fast cooling.
3 Place the food items so that the cool airflow can flow above the items.
Temperature
cannot be
adjusted
1 Is
Cancel the child lock setting.
Control panel
is extinguished
The display illumination will turn off after 30 seconds if no button is pressed for energy-saving purpose.
Pushing any button, the display panel will go on.
Items in
compartments
other than
the freezer
compartment
begin to freeze
Items in the versa
compartment
begin to freeze
Items in the versa
compartment
begin to melt
28
3 Have you impeded heat ventilation due to no space
around the refrigerator, placed it in direct sunlight,
etc.?
4 Anything obstructing the cool air flow? Or is the
door being opened frequently or left ajar?
Solutions and reasons
2 Has the temperature just been adjusted or have you
just begun using the unit?
displayed?
page
13
If situation does not change even after troubleshooting, immediately contact a
representative of the retail store where purchase was made.
Dew drops get accumulated on the outside or
inside the refrigerator.
Frost gets accumulated
in the freezer compartment.
1 Do you open the door frequently or is the door
ajar?
2 Is it a rainy or highly humid time of year?
Water drips onto the floor.
1 When moisture in the air is cooled, frost or dew drops
are formed. Dewdrops or frost may accumulate even
on a small space formed at the door.
page 7
Such dewdrops may drip onto the floor.
2 Moisture may temporarily collect on the unit. Wipe
with a dry cloth. Frost can form easily in the freezer
compartment. Try to reduce the time that the door is
open.
The door is
easy to open
The door
will not
close
1 Does any food come in contact with the refrigerator
door? Are too many foods stored in the refrigerator?
2 Is any food dropped into the back side of the
sliding door, or is the power cable placed between
the unit and the door?
3 Is the unit installed properly? Are the adjustable
supports right on the floor?
1 Be careful not to stick any stored foods out of the
shelves or cases.
2 Remove dropped items and items trapped between
the doors.
3 Lower the adjustable supports to raise the front of
the refrigerator slightly and make closing the door
easier.
page 7
You are concerned
by strong odours
(from food or ice)
1 Have you placed items with strong odours inside
the unit without covering them with plastic wrap?
1 The deodoriser can not completely remove extremely strong
odours, so be sure to cover with plastic wrap. page 7
2 Perform maintenance and clean regularly. page 22
The water tank
or the water
supply pipe
freezes
Your television
picks up noise
Noise is loud
the unit makes
disturbing
sounds
the following
sounds are
normal
2 Is the water tank clean?
1 Is the pipe securely attached to the water tank? Is
there any foreign object in the pipe or pipe joint?
2 Is any food or plastic dropped into the back side of
the case in the ice making or freezer compartment?
1 Improper installation or any foreign object might
produce a clearance. Then the cold air can flow
backward to cause freezing.
page 22
2 The cold air flows backward to cause freezing.
Remove the dropped food or plastic.
1 Is your television or other appliances located near the refrigerator?
2 Is the refrigerator’s power outlet close to the
antennae drop area?
1 Relocate unit at a distance from televisions and other appliances.
2 Use a dedicated power source.
1 Sounds suddenly get louder or tone changes.
1 The unit has switched to high-speed operation for powerful cooling
during first operation, when temperature is hot, when doors are
opened and closed frequently, during “QUICK” mode, etc.
2 These are sounds made during automatic ice making. The unit’s
automatic ice maker and pump make a sound every 100 minutes
or so, regardless of whether or not the tank is filled with water.
3 These are sounds made during automatic ice making
operation check. This sound is made even during
“STOP” mode.
4 It is the sound of a fan motor starting to run.
5 It is the sound of refrigerant (gas) flowing.
6 This is a creaking sound made when warm air has
penetrated the unit, causing plastic parts to expand.
7 The sound is made when the air control damper operates.
8 This is the sound of the airflow from the cooling fan.
2 Rattling, squeaking sounds sometimes (every 1-2
hours).
3 After the power supply has been turned on, a
howling or creaking sound is heard during ice
making “STOP” mode (every 1 to 2 hours).
4 Whistle sounds after closing doors, etc.
5 Hissing, bubbling sounds sometimes
6 When the door is opened a whipping sound or a sound like
water dripping is heard from the inside of refrigerator.
7 Sounds like buzzing mosquitoes.
8 Low whirring sound sometimes after opening the
freezer compartment door.
Ice is dented, comes
out cloudy small melts
Refer to page 21 regarding shape and clarity of the ice.
The water tank and
water supply pipe
become warm
The anti-freeze heater is turned on.
This is normal.
The outer walls
heat up; wind
blows from the floor
It is because the refrigerator is attached with heat release / anti-condensation pipe on the sides and ceiling,
anti-condensation heater in the partition between left and right refrigerator doors and also a heat release accelerating fan
at the bottom. Immediately after installation or during summer time, the outside temperature may become high (app. 50
to 60ºC) or hot air may blow out from the bottom. These are necessary for cooling and are not considered as abnormal.
page
21
29
MEMO
30
MEMO
31
■ The appliance is not intended for use by young children or infirm persons without supervision.
■ Young children should be supervised to ensure that they do not play with the appliance.
■ WARNING - Do not use mechanical devices or other means to accelerate the defrosting process, other
than those recommended by the manufacturer.
■ WARNING - Do not use electrical appliances inside the food storage compartments of the
appliance, unless they are of the type recommended by the manufacturer.
■ WARNING - Should the refrigerant circuit be damaged, do not use electric items or fire equipments near
by, and open the window to ventilate the room. And contact the retail store at which you purchased it or
the following MITSUBISHI SERVICE CENTER.
H E A D O F F I C E : T O K Y O B L D G . , 2 - 7 - 3 , M A R U N O U C H I , C H I Y O D A - K U , T O K Y O 1 0 0 - 8 3 1 0 , J A PA N
BLACK DIAMOND TECHNOLOGIES LTD.
Wellington
1 Parliament Street
Lower Hutt
Wellington
Phone: (04) 560 9100
Auckland
Unit 1, 4 Walls Road,
Penrose
Auckland
Phone: (09) 526 9340
Christchurch:
Suite 2, Level 1
37 Mandeville street
Christchurch
Phone: (03) 341 7052
AE79Y158H01
Printed in Japan