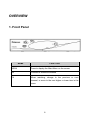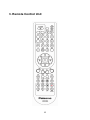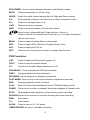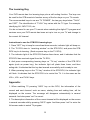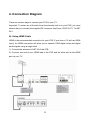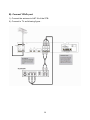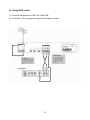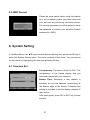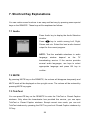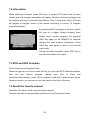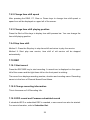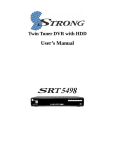
1
IMPORTANT SAFETY INSTRUCTIONS 1. Be sure to read this user manual 6. Install before starting your operation. Unbalanced the unit installation horizontally. may cause damaged to unit. 2. Never open the cover. It is very 7. When the unit is suddenly moved to a dangerous to touch the inside of the unit hot area from a cold area, it may cause due to possible electric shock. problems. In that case, turn off the power, and turn on after 1-2 hours. 3. When you don’t use this unit for a 8.Install the unit in a place with: long time, please pull the power cord good ventilation from the outlet. suitable temperature Also do not use a no direct sunrays damaged power cord. low humidity low vibration influence 9. Do not put heavy objects on the unit. 4. Do not touch the power with wet hand. If there is liquid flowing into the unit, pull out the power cord immediately because it may cause fire or electric shock. 5. Place the unit in a well ventilated and no heat environment. 1 Instruction Markings: This symbol indicates there is a dangerous voltage within the PVR, which may have sufficient magnitude to constitute a risk of electric shock if not handled correctly. To avoid the risk of electric shock, do not open the housing at any time. The lightning flash with arrowhead symbol, within an equilateral triangle, is intended to alert the user to the presence of un-insulated “dangerous voltage” within the product’s enclosure that may be of sufficient magnitude to constitute a risk to persons. The exclamation point, within an equilateral triangle, is intended to alert the user to the presence of important operating and maintenance (Servicing) instructions in the literature accompanying the appliance. 2 Table of Contents IMPORTANT SAFETY INSTRUCTIONS.................................................................. 1 Instruction Markings: ............................................................................................. 2 GENERAL INFORMATION ...................................................................................... 5 1. Preface.............................................................................................................. 5 2. Main Features ................................................................................................... 5 3. Accessories ....................................................................................................... 7 4. General Operation of STB................................................................................. 7 OVERVIEW .............................................................................................................. 8 1. Front Panel........................................................................................................ 8 2. Rear Panel ........................................................................................................ 9 3. Remote Control Unit........................................................................................ 10 4. Connection Diagram........................................................................................ 13 OPERATION .......................................................................................................... 16 1. Installation ....................................................................................................... 16 1.1 Auto Search ............................................................................................... 17 1.2 Manual Search........................................................................................... 17 1.3 Channel Edit .............................................................................................. 18 1.4 Factory Default .......................................................................................... 19 2. Program Guide ................................................................................................ 19 3. Program Manage ............................................................................................ 20 3.1 Program Edit.............................................................................................. 20 3.2 Favorite Edit .............................................................................................. 21 4. Program Select ............................................................................................... 23 5. PVR................................................................................................................. 24 5.1 Record File Edit ......................................................................................... 24 5.2 Schedule.................................................................................................... 25 5.3 PVR Setting ............................................................................................... 26 5.4 Recording Info ........................................................................................... 26 5.5 HDD Format .............................................................................................. 27 3 6. System Setting ................................................................................................ 27 6.1 Common Set.............................................................................................. 27 6.2 Video Set ................................................................................................... 28 6.3 Audio Set ................................................................................................... 28 6.4 Time Zone Adjust....................................................................................... 28 6.5 System Information.................................................................................... 28 7. Shortcut Key Explanations .............................................................................. 29 7.1 Audio ......................................................................................................... 29 7.2 MUTE ........................................................................................................ 29 7.3 TeleText..................................................................................................... 29 7.4 Information................................................................................................. 30 7.5 EPG and EPG Schedule............................................................................ 30 7.6 Recall the favorite channel ........................................................................ 30 7.7 (HDD) File List ........................................................................................... 31 7.8 PVR ASSIST ............................................................................................. 31 7.9 Time shift ................................................................................................... 31 7.10 REC ......................................................................................................... 32 7.11 File playback............................................................................................ 33 7.12 Bookmark ................................................................................................ 35 SPECIFICATIONS.................................................................................................. 36 TROUBLE SHOOTING .......................................................................................... 38 4 GENERAL INFORMATION 1. Preface Thank you for your purchasing our products. This HDPVR is equipped with the latest technology and design; it can decode high and standard definition digital TV programs, and can also record and playback terrestrial digital broadcasts. You can view a variety of programs provided through terrestrial. Simply pressing the power button of the remote control unit, the crystal clear picture and DVD quality sound of digital broadcasting that your TV portrays through this product, allows you to watch whatever channel you wish off the digital broadcasting network. Throughout this manual you will notice that the operation is easy to use. In case you experience any difficulties using this product, please consult the relevant section of the manual for assistance. 2. Main Features MPEG-2 HD/SD decoding (MP@HL/ML) Fully DVB-T & MPEG-2 compliant Down-mixes 5.1 AC3 to two channels encoded with Dolby Prologic Surround, also Support PCM digital audio output (Bitstream) 5000 Editable Channels Auto or Manual installation Electronic Program Guide and Information Plate (EPG) RF modulator for TV standard (PAL B/G, NTSC) Digital Audio Output S/P DIF 5 Signal level & quality indicator Composite video output Auto PAL/ NTSC conversion Standby with low power consumption Clock adjustment Excellent Performance Fast Channel Change Conversion between SD programs and HD programs YPbPr Output: supporting 1080i HDMI output: supporting 1080i Digital Reception covers through VHF & UHF band Wide screen 16:9 and normal 4:3 Aspect Ratio Bandwidth of 6MHz & 7MHz & 8MHz Supported TeleText / Bitmap subtitle, compliant with ETSI/EN300 472 S/P DIF (Digital Audio or Dolby AC3 Stream out) RTC (Real Time Clock) Timer 65536 Color Graphic 8 Favorite Channel List Channel Editing Capability (Move, Delete, complied Lock and etc.) PVR Functions and Twin Tuner Function Time shift (buffering): 1 Hours Recording Time: up to 100 Hours (Depend on HDD) Variable Forward Play Speed: 2, 4, 8, 16, 32,1/2, 1/4, 1/8 Variable Reverse Play Speed: 2, 4, 8, 16, 32, 1/2, 1/4, 1/8 Fast Schedule: Support Once/Daily/Weekly mode Region Selection for Replay Variable Combination of Watching and Recording Simultaneously Live Watching or Recording + Live Watching or Recording or HDD Playback Grouping for Cascade Playing Particular tips to help you 6 3. Accessories Please check the following accessories are enclosed 1 x User Manual 1 x Remote Control Unit 2 x AAA Batteries 1x AV Cable Note: If any of the accessories listed above are missing, please contact the dealer where this product was initially purchased. 4. General Operation of STB Throughout this manual you will notice that the everyday operation of your STB is based on a series of user friendly on screen display and menus. These menus will help you get the most from your STB, guiding you through installation, channel organizing, viewing and many other functions. All functions can be carried out using the buttons on the RCU, and some of the functions can also be carried out using the buttons on the front panel. Should you experience any difficulties with the operation of your unit, please consult the relevant section of this manual, including the Problem Shooting, or alternatively call your dealer or a customer service adviser. NOTE: Please be aware that new software may change the functionality of the STB. The photo and the function explanation involved in this specification are for reference only. If there is any mistake, please refer to the entity. 7 OVERVIEW 1. Front Panel NAME FUNCTION MENU Press to display the Main Menu on the screen OK Connect to terrestrial antenna CH When watching, change to the previous or next channel, or move to the next higher or lower item in the menu. 8 2. Rear Panel NAME FUNCTION 2 LOOP OUT IF Loop through output to 2nd receiver 1 LOOP OUT IF Loop through output to 2nd receiver 2 ANT IN Connect to terrestrial antenna 1 ANT IN Connect to terrestrial antenna R-AUDIO Right audio output L-AUDIO Left audio output CVBS Composite video output S/P DIF Connect to amplifier for digital audio output RS232 Serial port used for software upgrade HDMI HDMI video output, supporting high definition output YPbPr Component video output. Supports high definition output 100-240V Power supply ON/OFF Main power switch 9 3. Remote Control Unit 10 STB POWER: Press to switch between Operation and Standby modes MUTE: Press to temporarily cut off the sound AUDIO: Switch the audio channel among the Left, Right and Stereo modes 0-9 : Enter required numbers in the input box or select a channel to watch P+/-: Press to scroll page down or up LAST: Returns to previous program. INFO: Press to show information of the current channel : Move cursor up/down/left/right, Page up/down, Volume +/- OK: Press to execute the selected item in the menu, or to confirm the desired value in input mode MENU: Press to display the Main Menu on the screen EPG: Press to display EPG (Electronic Program Guide) menu FAV: Press to display the FAV list EXIT: Press to return to the previous menu or escape from the item PVR Functions: LIST: Press to display the Recorded Program List. TEXT: Press to enter the teletext window CC: Used to turn Closed Caption subtitles on or off PVR/ASSIST:Press to display the PVR Assist window. FIRST: Change playback position (backward). SET MARK: Set the bookmark in playback process bar. PLAY MARK: Press to jump to the next bookmark in playback process bar. END: Change playback position (Forward). PLAY: Return to Normal Speed Playback from FF/FB/Slow/Paused mode. PAUSE: Pause from live video or playback, step when playback in Paused mode. STOP: Stop playback when playback or stop recording when recording. RECORD:Record current service or set stop recording time when recording. REW: Fast rewind F.F: Fast forward SLOW: Press to slow at 1/2, 1/4, speed TIMER RECORD: Shortcut to schedule recording. 11 The Learning Key Your PVR remote has four learning keys plus a self-coding function. The keys can be used for the STB remote to function as any of the four keys on your TV remote. The recommended keys to use are “TV POWER”, the two grey keys below ”TV/AV”, and “SET”. The identification of ”TV/AV” key varies with the TV type. For example, identifying AV, INPUT 123, etc. You do not need to use your TV remote when watching the digital TV program and services once your PVR remote has been set up to turn on your TV and change to the correct AV channel. Instructions to use the STB RCU learning keys: 1. Press “SET” key to keep for more than three seconds, indicator light will keep on; 2. The TV RCU aims to “receiving window” on the STB RCU, and press the STB RCU key to do learning. (Such as power key on the TV RCU); 3. The indicator light of the STB RCU flashes three times, and it indicates that the STB RCU has received signal from the TV RCU; 4. And press corresponding learning keys on “TV key” window of the STB RCU again (such as power key), the indicator light will plash three times, and then extinguish. It indicates that the key has learned successfully and is ready to use. 5. When pressing keys on the “TV key” window of the STB RCU, the indicator light will flash. It indicates that the STB RCU is to control the TV. It is the same as the VOL+, VOL- and TV/AV keys. Appendix : 1. When watching TV pressing “INFO’ key on the RCU, the information of the current and next channel, such as name, starting time and ending time, will be displayed on the screen. The message will disappear automatically in several seconds. And also press “exit” to cancel. 2. The description information of the current channel will be displayed on the screen in several seconds with by pressing “INFO” again. And then press “exit” to enter the full-screen mode to watch TV program. 12 4. Connection Diagram There are various ways to connect your PVR to your TV. Important: To make use of the twin tuner functionality built-in to your PVR, you must ensure that you connect the supplied RF crossover lead from LOOP OUT 1 To ANT IN 2. A). Using HDMI Cable HDMI is the recommended connection for your PVR (if you have a TV with an HDMI input). An HDMI connection will allow you to transmit 1080i digital video and digital audio signals using a single lead. 1). Connect the antenna to ANT IN of the STB. 2). Connect one end of your HDMI lead to the PVR and the other end to the HDMI port on your TV. 13 B). Connect YPbPr port 1). Connect the antenna to ANT IN of the STB. 2). Connect to TV as following figure.. 14 C). Using RCA cable 1). Connect the antenna to ANT IN of the STB. 2). Connect to TV by using the supplied AV lead as shown: 15 OPERATION In normal view mode, pressing the MENU key will display the main menu. And keep pressing the Exit key will exit each sub-menu until going back to the normal view. This menu consists of five menu items as shown below. Installation Program Guide Program Manage Program Select PVR System Setting Use the ▲▼ keys to move up or down from one item to another. Press the OK key on your remote to enter the selected sub-menu. To escape the menu system at anytime, press EXIT on the remote Note: When in sub-menus, pressing the EXIT key will take you back one-step through the sub-menus. To completely exit from the menu, keep pressing the EXIT key on your remote. 1. Installation The Installation menu allows two ways to search for programs: Auto Search and Manual Search. 16 1.1 Auto Search For beginners, the Auto Search feature is the best choice. First use ▲▼ Keys to select Auto Search from the Installation menu. Then press OK to enter into Auto Search sub-menu. The system will automatically search programs under Channel Edit. Once the search is complete, the newly found programs will be added to the TV program list and your PVR will automatically display the first found channel. During the search process you may press the EXIT key to stop or press the OK key to skip. Press EXIT key again to exit from this window. 1.2 Manual Search You can set parameters in Manual Search window if you are familiar with relevant parameters. In this mode, only one channel, whose necessary parameters are set in Manual Search window by hand, can be searched. Channel No. : Press key to select proper option among the Channel List that you can edit in Channel Edit window. Frequency: The value varies with what you have selected in Channel No. Bandwidth: Press keys to choice 6M, 7M or 8M. At the bottom of this window, there are two dynamic color bars reflecting the signal’s quality and strength. You can check whether you have set the antenna well by these two bars. After modifying, press OK key to start searching. Searching well, system will turn to view first searched program automatically. 17 1.3 Channel Edit Select Channel Edit item in the Installation menu and press OK key. Then Channel Edit window will be displayed on the screen. From here, new channel can be added and the existing ones can be edited or deleted. You can use the color keys on the REMOTE to execute the corresponding command shown at the bottom of this window. Add (Red key) Delete (Green key) Modify (Yellow key) Add After pressing red key on the REMOTE, the Add Channel window, where you can set necessary parameters of the new channel, will be displayed on the screen. Frequency: You can input values referring to above by using the number keys on the REMOTE. Bandwidth: Press keys to choice 6M, 7M or 8M. Have all above parameters set well, press OK key to confirm and exit from the Add Channel window. In Channel Edit window, you can find that the new channel has been added to end of the list. Delete This command allows you to delete one or more unwanted channels. Select the channel you want to delete and press green key on the REMOTE, you will find the channel have been deleted from the channel list. 18 Note: After you choose to delete the channel (press the green key), the system won’t ask you to confirm your deletion. So please make sure before you delete the channel. Modify Select the channel you want to edit first and then press yellow key to display Modify Channel window. The operations are the same as “Add”. 1.4 Factory Default In Installation menu, move cursor to Factory Default item and press OK key, a warning message box will be displayed on the screen, press OK key to ensure the default. NOTE: After restoring default, all programs you have searched will be erased and all parameters will return to the factory default. Please use this operation with care. 2. Program Guide NOTE: Press EPG key on the REMOTE, will also enter into Program Guide window directly. In Program Guide window, the up-right small Picture in Graphics (PIG) and down-right program guide list vary with what you have selected in left TV program list. Use keys to move cursor between TV program List and downright list, and ▲▼ keys to move up or down in each list. The selected TV program’s EPG is displayed in the down-right list. Recall key is used to switch among EPG of several future days. 19 Press FAV key to change the group. Press Green color key to enter into the program schedule window. Press EXIT key to return to main menu. 3. Program Manage 3.1 Program Edit Through this window, you can edit programs according to your requirements. The three color keys on the REMOTE have their corresponding functions. Delete (Red key) Move (Green key) Rename (Blue key) Delete This deletion command allows you to delete one or more unwanted programs permanently. First select the program you want to delete and press red key on the REMOTE. You can continue to select other unnecessary programs and mark them with the crossings. And finally press OK key to delete all of them from the list. Move Only one program item can be moved up or down each time. Press keys to select program you want to move and press green key on the REMOTE. An Up-Down-Pointed arrow will be displayed right to the selected program. You can press keys to move this program to where you want to locate. Press green key again to confirm new location. 20 Rename Use ▲▼ key to select the program you want to rename, press blue key on the REMOTE, and will pop up a keypad window where you can rename the program name. In this keypad window, select your required character by using direction keys on the REMOTE and press OK key. Then the selected character will be shown in the title bar at the top of this keypad window. To switch between capitalization and lowcase, please select Caps On command and press OK key on the REMOTE. Back command allows you to erase the unwanted character in the title bar. Move cursor to OK command and press OK key. The keypad will disappear and the new name will be shown in the program name column. You can define several program names in the same way. 3.2 Favorite Edit This window includes the three columns of FAV, Selected and Programs. While there are no prepared favorite groups in FAV column, you can define and modify favorite groups’ name by using corresponding color keys on the REMOTE. And more, you can add programs to any favorite group. keys are used to switch among three columns, and Up/Right keys are used to select item in each column. Notice that what will be shown in the Selected and Programs column varies with the favorite group that you have selected in the FAV column. How to define a favorite group Press Red key on the REMOTE, and will pop up a keypad window where you can define a favorite group name. In this keypad window, select your required character by using direction keys on the 21 REMOTE and press OK key. Then the selected character will be shown in the title bar at the top of this keypad window. To switch between capitalization and lowcase, please select Caps On command and press OK key on the REMOTE. Back command allows you to erase the unwanted character in the title bar. Move cursor to OK command and press OK key. The keypad will disappear and the new name will be shown in the FAV column. You can define several favorite groups in the same way. How to modify a favorite group In the FAV column, use ▲▼ keys to select one that you want to modify and press yellow key. Then a keypad window will pop up for further operation, please refer to the above specification. How to delete a favorite group In the FAV column, the selected favorite group will be deleted from the list after green color key on the REMOTE is pressed. Note: After you choose to delete the group (press the green key), the system won’t ask you to confirm your deletion. So please make sure before you delete the group. How to add programs into a favorite group Select one favorite group (for example Sports favorite group that you have just defined) in FAV column, and then move cursor to Programs column. In Programs column, select programs that have a relation with Sports and press OK key, and then those programs will be added into Sports favorite group and shown in the selected column. 22 If you want to deselect one program in Sport favorite group, move cursor to program that you want to delete from selected column and press OK key, and then this designated program will disappear in selected column. 4. Program Select In the Main Menu, use ▲▼ keys to select Program List item, and press OK key to enter into Program List window. From here, the default mode is “TV” mode. In program list, keys are used to select desired program and press OK key to view in full screen. To watch only selected favorite channels (see section Favorite Edit), say you had setup 2 favorite Groups. 1. All HD channels. 2. All SD channels. You can use the left and right arrow buttons to select how the program list is displayed. You can choose between show ALL, or only HD or SD groups (which you created earlier). Say you choose HD favorite group, you will see the Channels you added into this favorite group. If you highlight one of these channels and pressed OK, the Receiver will go back to normal viewing mode, but each time you change channel, you will only cycle through channels within your HD favorite group. To get back to all channels, simply press OK button and get the program list back up, and use the Left and Right arrow keys to change the Program list choice back to ALL. 23 5. PVR 5.1 Record File Edit You can edit recorded channels in the menu. Delete: Select a recorded file you want to delete, and press Red key. Rename: Press Yellow key to display the keypad dialog. Using the arrow keys on the REMOTE, you can edit the file name. Lock: Press Blue key on the selected file name. GroupMgr: Press Green key, there will show the list of Recorded Group except “All”. Then you can press OK key to add a recorded file to the group, Red key to cancel exist group, Green Key to create a new one, or Yellow Key to modify its name. 24 5.2 Schedule To add a new Scheduled task, press the Green key on your remote. To delete existing scheduled tasks: press the Red key to delete an individual task, or press the Blue key to delete all the existing tasks. You will have to confirm your decision once you press OK. Press the EXIT or MENU keys to exit. In Add Schedule, there are parameters below to be set. Schedule Type: Rec or Play Schedule Start Time: Input wanted time by numeric keys, or press OK to enter the sub-menu to set the date and time (FAV key is used to switch between date and time) Schedule End Time(hh:mm): Input wanted time by numeric keys. Schedule mode: Once / Daily / Weekly. When you choose the mode of weekly, press the Ok key you can see the weekday Group, select the days you want and press OK key to back. Channel Name:Select the desired channel. Note: If record mode is weekly, you can choose days from Sunday to Saturday. The Schedule will start to record or play when time is up these days every week. 25 5.3 PVR Setting Schedule start time offset: Schedule record or play to start earlier or later. Schedule stop time offset: Schedule record or play to stop earlier or later. Remind before schedule start: Remind you before schedule is going to start Divide Record By EPG Event: Select on or off. PVR Icon Time Out: Select the time that the PVR icon is displayed on the screen by using keys. Default Recording Duration: the default duration of manual record. Time shift Start Mode: The available options are: Never, Always and Pause key. New setting can work after playing a new service. 5.4 Recording Info When you are recording, you can see the light down left on the front panel winking. And you can enter the Recording info, otherwise there will be a message of “there is no record going!” Recording Info will tell you the recording information as follows: Index: R1 or R2 Mode: Quick or Schedule Channel Name File Name: you can change the name by pressing OK key. Valid Record Time: the real recording time Past Time: Display the past time. Duration: the recording will stop until the duration is reached. 26 5.5 HDD Format Please be extra careful when using this feature as it will completely erase your hard drive and your will lose any previously recorded content. For security purposes you will be asked to enter the password to confirm your decision.(Default password is :0000). 6. System Setting In the Main Menu, use ▲▼ keys to select System Setting item, and press OK key to enter into System Setting menu. This menu consists of five items. You can access its sub-menu by highlighting this item and pressing OK key. 6.1 Common Set Transparency: The value is from 0 to 30%. The transparency of the closed caption that you have seen varies with your selection. Banner Time: Whenever a new channel is selected, an Info bar appears momentarily at the bottom edge of the screen. Therefore this setting is provided to set the display duration of the Info bar. After setting well, press OK or EXIT key to save and exit. 27 6.2 Video Set Screen Type: 4:3 or 16:9 Aspect Ratio: Full Screen / Letterbox / Pan_Scan Resolve: AUTO / 1080I / 576P / 720P 6.3 Audio Set Audio Channel Mode: Stereo / left / right Decoder: MPEG or AC3 6.4 Time Zone Adjust In this menu, user can change time zones for different countries. Press the ▲▼ keys to change. Use keys to select between “Daylight Saving On” and “Daylight Saving Off” for daylight saving. Press OK or EXIT key to save and exit. 6.5 System Information From here, you can get not only the information about the hardware and software, but also product type and release date, etc. 28 7. Shortcut Key Explanations You can realize some functions in an easy and fast way by pressing some special keys on the REMOTE. These keys will be explained as follows: 7.1 Audio Press Audio key to display the Audio Selection window. Press key to switch among Left, Right, Stereo and mix. Select the best audio channel output for the current program. NOTE: That the available selections in audio language window depend on the TV broadcasting service. If the service provides several audio languages, use keys to select appropriate language and press OK key to confirm. 7.2 MUTE By pressing MUTE key on the REMOTE, the volume will disappear temporarily and MUTE mark will be displayed on the up-right corner. The volume will be restored by pressing MUTE key again. 7.3 TeleText You can press CC key on the REMOTE to enter the TeleText or Closed Caption windows. Only when the broadcaster has provided this service, you can open TeleText or Closed Caption windows. Except normal view mode, you can exit TeleText windows by pressing the EXIT key and exit Closed Caption windows by CC key. 29 7.4 Information When watching a channel, press INFO key, a simple EPG banner that includes current and next program information will appear. Duration of banner’s display can be modified referring to Common Setup Banner Time. Further more, SD or HD mark will display at top-right corner of this banner according to current TV Program transmitted header. By pressing INFO key again at this bar, system will pop up a bigger textbox showing more details about current program. By pressing INFO key again on the REMOTE to continue reading the next program information. Press INFO key once again to return to the normal view mode. During the whole operation, press EXIT key to exit from this banner at anytime. 7.5 EPG and EPG Schedule This is the same as Program Guide. When the right list is on focus, press OK key you can enter EPG Schedule window, then you can reserve program, change type (Rec or Play) and mode(once/daily/weekly), press OK to complete it and Exit to back without saved. When is success, you can see an icon like clock on the right of the item. 7.6 Recall the favorite channel Press the FAV key to recall a stored favorite channel. Favorite channels are programmed and stored in the Program list menu. 30 7.7 (HDD) File List You can see the record file list as shown in the screen by pressing the HDD key. You can see the used percent of hard disk on the left-down corner. Pressing key to change view between the group and file lists. When File list is on focus, its program name, start time and duration will display, and you can operate as follows: Press INFO key to see the information of this file, when there is no information, it will display “this file has no description”. Press INFO Key again, the info will disappear. Press OK key to playback this file. 7.8 PVR ASSIST PVR Assist is a quite convenient function, it will display all the PVR operation according to the current situation, and press OK key to start it. 7.9 Time shift 7.9.1 Start Time shift When Time shift Start Mode is Always, you can press the Red, Blue Key or Pause Key to start it. When the mode is Pause, you can only start it by pressing Pause Key. You can’t start time shift when the mode is never. Of course you can change this mode in PVR Setting view. 31 7.9.2 Change time shift speed After pressing the REW, FF, Slow or Pause keys to change time shift speed, a speed icon will be displayed on upper left of the screen. 7.9.3 Change time shift playing position Press the Red or Blue keys to display time shift process bar. You can change the time shift playing position. 7.9.4 Stop time shift Method 1: Press the Stop key to stop time shift and return to play live service. Method 2: Start play new service, time shift of old service will be stopped automatically. 7.10 REC 7.10.1 Start record Press the RECORD key to start recording. A record icon is displayed on the upper left of the screen and the light down left on the front panel is winking.. The record icon displays recording number, duration and recoding name. Recording name is in the form of Channel Name-Event Name. 7.10.2 Change recording information This is the same as 5.4 Recording Info. 7.10.3 EPG record and Common scheduled record If scheduled EPG or scheduled REC is reached, a new record can also be started. For more information, refer to Scheduled list. 32 7.10.4 Recording file information If current recording service has EPG information, recorded file is partitioned automatically according EPG items. Recorded file name is program name, file duration is program duration and file description is program description. If current recording service has no EPG information, recorded file name is channel name and it will not be partitioned. 7.10.5 Stop record Press the STOP key to stop recording. You will be asked to confirm. 7.11 File playback 7.11.1 Change file playback speed Press the REW, FF, SLOW keys to change file playback speed, a speed icon is displayed in the upper left of screen. 7.11.2 Change file playback position Press the Play, Red or Blue keys to display playback process bar. You can press the Red or Blue keys to change file playing position. 7.11.3 Display playing file information Press the INFO key to pop up a bar to show current playing file information. 7.11.4 Jump file playback time In the playback process bar, you can press number keys to input a time, then press the OK key or wait for a while, file will play from the time selected if the time is valid. 33 7.11.5 Cut out and Save Selected Region 1. Start playback a recorded service. 2. Press Play, Red or Blue button to display Playback progress bar, Press OK key twice then there will be a notice named “Please add a start or an end mark position, then confirm to cut!”. 3. To specify one start point with green key and end point of region with yellow key, press ok key. 4. You can press ok key to cut and cancel to cancel the operation.. 34 7.12 Bookmark You can jump to a position directly by bookmark function in file playback. To search positions very quickly and easily, use bookmarks. 7.12.1 Add a bookmark To add a bookmark, press the GREEN key at the position you want to add it into playback process bar. You can make the bookmark at maximum 20 positions for one file. 7.12.2 Go to a bookmark Press the YELLOW key to jump to the next bookmark in the playback process bar. Then the file plays from the bookmarked position. 7.12.3 Delete a bookmark To remove a bookmark, you should jump to the bookmarked position by pressing the YELLOW key and then press the GREEN key to delete the book mark. 35 SPECIFICATIONS Tuner Input Frequency 474~858MHz Loop Out Frequency 474~858 MHz Input Level -90 ~ -20 dBm Bandwidth 6M, 7M, 8M Input Impedance 75 Ohms Channel Decoding Standard DVB-T EN300 744 FEC Code Rate 1/2,2/3,3/4,5/6,7/8 Demodulation (QPSK,16 and 64 QAM) Video decoding Standard MPEG2/4 H.264 MP@HL,MP@ML Aspect Ratio 4:3, 16:9 Video Resolution 1920*1080i MAX Audio Decoding Standard ISO/IEC 13818-3 and TR101154 Decoding MPEG-1 layer I and II ,AC3 Audio Mode Left/Right/Stereo Audio sampling frequency 32, 44.1, 48KHz High Definition Output Output Format 1080i, 720p, 576p Output Connector HDMI / YPbPr / VGA Memory Flash Memory 8MB DDR 128MB 36 Front Panel IR Receiver: 38KHz 7 Keys Standby, Menu, Select, Channel , VOL Rear Panel Connector ANT IN, LOOP OUT HDMI YPbPr /CVBS, Audio L/R Video S/P DIF RS232 Remote Control Type Infra-red (Carrier Freq: 38 KHZ) Battery 2×1.5V AAA Type Power/Ambient Input Voltage AC 100~240V, 50/60Hz Power Consumption 40Wmax Operation Temperature 0~40℃ 37 TROUBLE SHOOTING The table below covers some of the more common reasons for abnormal PVR function. Problem Likely Causes Front LED’s do not light Remedy AC power cord disconnected Connection of Video or Audio to input terminals is incorrect. Antenna cables incorrectly connected No picture is right. Check each AV lead at each end. Check the RF path from antenna through both tuners to adjust the antenna No signal or weak signal Wrong Channel Information in menu Black and white Your TV or PVR picture mode screen or V-Hold does not match broadcast Battery exhausted Call an antenna specialist from local paper or similar. Type values again carefully Check that screen shape best matches your screen and PAL B/G is selected. Fit fresh batteries Remote Fluorescent light interfering Control Unit is not with remote control signals working Check your choice of AV or RF Antenna not delivering clear Check cable connections, or signal The the power socket modulator and RF OUT or sound Connect power cord properly to Switch light Off Remote control is incorrectly Point front of RCU carefully aimed towards PVR. 38 Distorted Menu Brightness or Contrast level of Adjust Brightness and Contrast Screen TV set too high Not working Processor stopped to lower levels Remove the power cord or switch AC OFF and ON 39