1
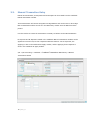
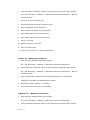
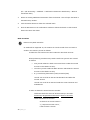
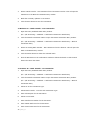
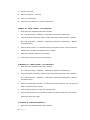
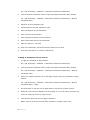
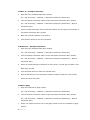
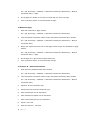
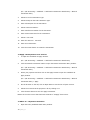
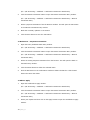
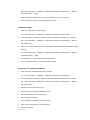
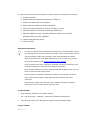
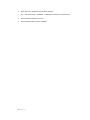
PARITY SOFTWARE’S SAGE ERP X3 CASHBOOK USER MANUAL Introduction Parity‟s Cashbook allows for the efficient reconciliation of Bank Statements to Bank Entry transactions within Sage ERP X3. Parity‟s Cashbook allows you to enter General Ledger transactions, Purchase Management transactions, Sales Management transactions into batches and the posting of these Batches. Parity‟s Cashbook integrates with Sage ERP X3 Bank Entry Transactions created in a Sage ERP X3 module will filter into the Parity Cashbook module and Manual Transactions created via Parity‟s Cashbook module will be visible in the Sage ERP X3 system once the relevant batches have been posted. Transactions reconciled from within Parity‟s Cashbook will also filter through to the Sage ERP X3 Bank Reconciliation module as reconciled and vice versa. Future versions of Parity‟s Cashbook will include multi-currency management, full audit trails, various reporting options as well as the reversal of General Ledger, Purchase Management and Sales Management transactions and advanced user securities. Please contact your Value Added Reseller for more information. Symbols and Conventions This manual was written using U.S. English. Please consult the glossary in this manual for definitions of unfamiliar terms. The following symbols are used in the manual to make certain types of information stand out: This symbol indicates helpful hints, suggestions or shortcuts This is a warning symbol. Extra care should be taken when performing processes where this symbol is displayed. 2|Page The following convention is used in this manual to refer to navigation and other information: • File > Save This symbol (>) indicates the path or sequence of steps to follow, in order to complete a particular process. This example directs you to go to the File menu and choose Save. Copyright Copyright Manual copyright © 2010 Parity Software. All rights reserved. The right to copy this documentation is limited by copyright law and the terms of the software license agreement. The software licensee may make a reasonable number of copies or printouts for personal use. Making unauthorized copies, adaptations, compilations, or derivative works for commercial distribution is prohibited and constitutes a punishable violation of the law. Warranty: Parity Software disclaims any warranty regarding the sample code contained in this documentation, including the warranties of merchantability and fitness for a particular purpose. Limitation of liability: The content of this manual is furnished for informational use only, is subject to change without notice, and should not be construed as a commitment by Parity Software. Parity Software assumes no responsibility of liability for any errors or inaccuracies that may appear in this manual. Neither Parity Software nor anyone else who is involved in the creation, production or delivery of this documentation shall be liable for any indirect, incidental, special, exemplary or consequential damages, including but not limited to any loss of anticipated profit or benefits, resulting from the use of this documentation or sample code. 3|Page License Agreement Parity Software (PTY) LTD Software License Agreement Carefully read all the terms and conditions of this Agreement prior to installing software. Do not register and activate this software until this entire Agreement has been read. Installing this software indicates acceptance of these terms and conditions. If you do not agree to these terms and conditions, then return the software and other components of the software package of this product to the place of purchase for a refund. If this software was downloaded in its demonstration form and the terms of the license are not agreed to, the software may be retained only in its demonstration form solely for the purpose of passing on the demonstration software to another prospective buyer. No refunds will be given for products downloaded off of the Internet that have been registered and activated. Use of this product is covered by a license agreement provided by Parity Software, with the software product. For any further queries, please call Parity Software on +27 11 728 2999. Publication Date: 2010 1. LICENSE: This license is granted as a personal, non-transferable, and nonexclusive license to use the enclosed software, under the terms stated in this Agreement. Title, copyright and ownership of the software and any and all related documentation remains with Parity Software (Pty) Ltd (Parity Software). This software and related programs may be used only on a single site licensed for use of Sage ERP X3, for the number of concurrent users as provided for in the original Sage ERP X3 registration and purchase. Registration keys can be obtained directly from Parity Software. Distribution of copies of the registered and activated software or any of the associated documentation to others is strictly prohibited. The demonstration version of the software may be distributed freely. Modification, reverse engineering, de-compiling, disassembly or translation of the software or related documentation is strictly prohibited without the prior written consent of Parity Software (Pty) Ltd. 2. BACKUP: Backup copies of this software may be made solely for personal use. Copyright notice must be reproduced and included on all backup copies. If all or any portion of this software is included in other software packages, then the copyright notice must appear on these other materials. 3. TRANSFER: 4|Page This software may not be transferred to any other party. There are no provisions whatsoever for any other transfer, operation, or use of the software by any other party whatsoever except for the original buyer of the product that has been registered with the Parity Software at the time of original purchase and software activation. 4. LIMITED WARRANTY: Parity Software warrants for a period of thirty days (30 days) from the date of receipt that the software covered by this agreement will perform substantially in accordance with the accompanying written documentation. The licensee assumes the entire risk as to the results and performance of the software. This warranty gives the licensee specific legal rights and may also include other rights that vary from country to county. Parity Software makes no claim in regard to the merchantability or suitability for any specific purpose of this or any other software product. 5. ACKNOWLEDGMENT: By registering, activating, and using this product the licensee acknowledges that they have read this agreement, understood it, and agree to be bound by its terms and conditions. The licensee also agrees that this agreement is the complete and exclusive statement of agreement between the parties and supersedes all proposals or prior agreements, verbal or written, and any other communications between the parties relating to the subject matter of this agreement 6. REMEDIES: Parity Software's entire liability and the licensee‟s exclusive remedy shall be at the option of Parity Software, either (a) return of price paid or (b) repair or replacement of the software that does not meet the limited warranty and is returned to Parity Software. If the licensee has need of service or help regarding this software, they should contact the dealer through which the software was originally purchased. There is no obligation to render assistance to the user if they are not the owner under which the software is registered, or if the registered user has not purchased a recognized support plan from the vendor of this product. This Agreement will be governed by the laws of the Republic of South Africa. Document Version V6.4 v.2 5|Page Contents Introduction ................................................................................................................. 2 Copyright ..................................................................................................................... 3 License Agreement ........................................................................................................ 4 1. Parity Cashbook Setup ............................................................................................. 7 1.1. EFT BP Banking Details ............................................................................................ 7 2. Parity Cashbook Process .......................................................................................... 10 2.1. Batch Entry .......................................................................................................... 10 2.2. Manual Transaction Entry ........................................................................................ 15 2.3. Reconciliation ....................................................................................................... 36 2.4. EFT File Creation ................................................................................................... 39 6|Page 1. Parity Cashbook Setup Not all aspects of setup are included in this User Manual; refer to the Administrator Manual for further setup instructions. 1.1. EFT BP Banking Details Use the EFT BP Banking Details window to enter Bank details for Business Partners that will be paid by the EFT. Multiple banking details can be entered and stored per Business Partner. It is important to ensure that this window is properly secured against unauthorized modification. A/P - A/R Accounting > Cashbook > Cashbook Setup> EFT BP Banking Details 7|Page The window consists of four Sections: BP Details EFT Bank Detail ID EFT Banking Details Additional Info BP Details BP: Select the Business Partner from the left list, lookup the Business Partner or type in the Business Partner Code to select the Business Partner for whom the EFT Banking Details are to be setup. EFT Bank Detail ID Bank Detail ID: An ID is created for each Business Partner bank account that is to be paid into by EFT. EFT Banking Details Bank Detail ID: The Bank Detail ID is the name of the banking details you are going to enter. If the Default box is marked, Cashbook will always use those banking details when making EFT payments. Default: When the Default box is marked, these banking details will be set as the default banking details for this Business Partner. Cashbook will always use those banking details when making EFT payments. However, the Default banking details can be changed. Inactive: When the Inactive box is marked, the Business Partner‟s banking details will become inactive and they will not be able to be paid via EFT. Account Type: The Account Type menu lists various account types. These include: 8|Page Current Account Savings Account Transmission Account Bond Account Subscription Share Account Credit Card IBT Code: Line Number The IBT Code is the branch code of the Bank where the account is held, into which the payments are to be made. Account Number: The Account Number is the account number belonging to the Business Partner, into which EFT payments are to be made. Credit Card Details: If Credit Card was selected as your Account Type, the following information is required: Credit Card Name - the name displayed on the Credit Card. Credit Card Number - the number displayed on the Credit Card. Expiry Date - the expiry date displayed on the credit card. Additional Info Set Payee Reference: Allows a choice between 3 possible options for the reference to be displayed on the Business Partner’s Bank Statement: Payee Reference – to upload the details entered into the Payee Reference field for display on the Business Partner‟s bank statement Payment Number – to upload the payment number for display on the Business Partner‟s bank statement. BP – to upload the Business Partner Code for display on the Business Partner‟s bank statement. Payee Reference: The Payee reference is the reference of the payment that will be displayed on the Business Partner‟s Bank Statement if Set Payee Reference is set to Payee Reference. EFT User Defined 1 & Enter any additional information related to the EFT BP Banking 2: details. 9|Page 2. Parity Cashbook Process The Parity Cashbook Transactions process consists of creating batches, creating transactions, reconciliation and the posting the batches. Typically a batch per Bank Statement would be created in order to balance to that particular Bank statement. The user will only be able to post a batch once the closing amount balances to the marked transactions in the reconciliation window and the Difference field is equal to zero. 2.1. Batch Entry Batches are created and bank entries are reconciled from the Batch Entry window. The user can also navigate the Manual Transactions Entry window from the Batch Entry window. A/P - A/R Accounting > Cashbook> Cashbook Transactions > Batch Entry 10 | P a g e The Batch Entry window consists of 5 main sections: Batch Details Statement Details Balances Transactions Tab Window Buttons Batch Details Batch Num: This is an alphanumeric value used to identify the Batch. When Automatic Batch Numbering has been activated in the Cashbook setup this field may be left blank as it will be populated once the batch is created. Description: This is the description for the batch. Date: The Date of the reconciliation. Bank: This field is used to select an existing Bank Code representing the bank which is being reconciled. Currency: This field will display the currency of the Bank that is being reconciled. This field is not editable. Provisional Batch: A batch may be marked as a Provisional Batch; this will allow the entry of an opening balance to use to balance. A Provisional batch may not be posted. This is to allow multiple recons for the same Bank. I.e. the Previous statement does not have to balance in order for you to start balancing a new batch. Statement Details Start Date: This field should correspond to the „From date‟ on the Bank Statement. Closing Date: This field should correspond to the „To date‟ on the Bank Statement. Opening Balance: The opening balance will be the sum of all previously reconciled transactions for the specified Bank Code. Provisional Balance: This field allows the entry of an Opening balance that can be used to balance to until the previous recon is finalized. Closing Balance: The closing Balance should be the total amount reflected on your Bank Statement. 11 | P a g e This is the amount that needed to reconcile back to, by marking and/or creating transactions. Update Trn Cut-off This date can be blank and is used to filter the bank entries that Date: are included in the reconciliation. Balances Total Debit: This amount represents the number of Debit transactions that have been marked in the Reconciliation window Total Credit: This amount represents the number of Credit transactions that have been marked in the Reconciliation window Difference: This field calculates the difference between the Closing Balance and the Marked transactions in the Transactions section of the window. Transactions Tab The grid in the transactions section of the window is populated from existing transactions within the Cashbook. For a more detailed explanation refer to the Reconciling Bank Entries section of this manual. Window Buttons The Batch Entry window allows you to Create, Save and Delete, Batches. The Mark All and Un-Mark All buttons allow you to select or deselect all transactions within the scrolling window. The Manual Transaction button allows you to enter Cashbook transactions while performing the reconciliation. The Update Button allows you to update the reconciliation window with transactions that have not yet been reconciled up to the entered Cut-off date. The Cancel button cancels all actions since the last Save. The Post button is used to post the Manual Transactions created for the current reconciliation. The posting process also finalizes the current recon. It is important to note that the Recon cannot be posted until the Difference is Zero. The Search button is used to search within the transactions in order to find a specific transaction. Remove Filter is used to clear the filters created by the Search function. 12 | P a g e The Statement button is used to access the window where the Statement is imported, electronically reconciled and automatic transactions created. To Create a Batch: 1. Open the Parity Cashbook Batch Entry window. A/P - A/R Accounting > Cashbook> Cashbook Transactions > Batch Entry 2. Enter a Batch Number if Automatic Batch Numbering has not been activated in the Cashbook setup. If this option has been activated you may leave this field blank. 3. Enter a description into the Description field. 4. Enter the Date for this reconciliation. This is a mandatory field. 5. Enter the Bank Code. This is a mandatory field. 6. If the previous reconciliation has not been completed, and you intend to proceed with the new batch, mark this batch as a Provisional Batch in order to proceed with the recon. 7. Enter a Start Date (The beginning date for this reconciliation). This is a mandatory field. 8. Enter a Closing Date (The ending date for this reconciliation). This is a mandatory field. 9. If the batch is marked as a Provisional Batch, enter the Provisional Balance (the provisional opening balance) 10. Enter the Update Trn cut-off date if you would like to have a cut-off date for the transactions that are updated into the window for reconciliation. 11. Click the Create button to create the batch. To Edit a Batch: 1. Open the Parity Cashbook Batch Entry window. A/P - A/R Accounting > Cashbook > Cashbook Transactions> Batch Entry 2. Select an existing Batch Number from the left list. This will open the batch in the Batch Entry window. 3. Make the necessary updates or corrections. 13 | P a g e 4. Click the Save button to save the updates. To Print a Batch: 1. Open the Parity Cashbook Batch Entry window. A/P - A/R Accounting > Cashbook > Cashbook Transactions> Batch Entry 2. Select an existing Batch Number from the browser. This will open the batch in the Batch Entry window. 3. Select the Print icon in the Sage ERP X3 Toolbar. To Delete a Batch: 1. Open the Parity Cashbook Batch Entry window. A/P - A/R Accounting > Cashbook > Cashbook Transactions> Batch Entry 2. Select an existing Batch Number from the browser. This will open the batch in the Batch Entry window. 3. Click the Delete button to delete the selected batch. 4. Click the OK button on the confirmation window to delete the batch or click the End button the cancel the delete. 14 | P a g e 2.2. Manual Transaction Entry Manual GL transactions, PL Payments and SL Receipts can be created from the Cashbook Manual Transaction window. These transactions will become integrate into Sage ERP X3 and can be seen in other Sage ERP X3 standard modules as well as in the Bank Entry window once the Batch has been posted. Use this window to create the transactions necessary to balance to the Bank Statement. PL Payment and SL Deposits created in the Cashbook Manual Transactions window can be applied to invoices from/ to their respective Business Partners. For PL Payments, the applying is done in the Cashbook PL Apply window, and the applying for SL Deposits is done in the Cashbook SL Apply window. A/P - A/R Accounting > Cashbook > Cashbook Transactions> Batch Entry Manual Transactions Button 15 | P a g e The Manual Transaction Entry window consists of 7 sections: Details Documents Amount Transaction Lines Distributions Balances Window Buttons Details This section is used to setup Transaction header information. Transaction Type Select the Transaction Type from: GL SL PL Sub Type This field will display the options available for the Transactions Type that has been selected. For the GL Transaction Type, select to create: Increase Adjustment Decrease Adjustment Withdrawal Bank Transfer – Out Bank Transfer – In For the SL Transaction Type, select to create: Receipt Payment For the PL Transaction Type, select to create: Payment Refund Description: Enter a description for the transaction in here. From Bank: This field will be enabled when the GL Transaction Type and the Bank Transfer-In Sub Type has been selected. 16 | P a g e It will allow the selection of the Bank Code from which to transfer the amount. When the Bank Transfer-Out Sub Type has been selected, this will default to the Bank Code of the current Batch. To Bank: This field will be enabled when the GL Transaction Type and the Bank Transfer-Out Sub Type have been selected. It will allow the selection of the Bank Code into which to transfer the amount. When the Bank Transfer-In Sub Type has been selected, this will default to the Bank Code of the current Batch. BP: This field will only be available when the PL Transaction Type has been selected. Use this field to select the Business Partner for this transaction. Documents: This section is used to setup Document and reference information as well as the Document Date. Batch Number: This will default to the Batch Number of the current Batch. Document Number: Enter the Document Number of the transaction into this field. Reference Number: This field is used to enter the Reference Number that will update onto the transaction in Sage ERP X3. Bank Reference: This field will only become available when the GL Transaction Type has been selected. This field is can be used to add an additional reference to the transaction that is being created. Document Date: Enter the date of the document in this field Amount: This section is used to setup the tax information for the transaction. Tax Code: This field allows the user the select an existing tax code to determine how tax will be calculated. Once this field is selected the Tax Rule and Accounting Code will be automatically populated. 17 | P a g e Tax Account: This field allows the entry of the Tax Account to which the Tax should be distributed to in the General Ledger Amount + Tax, Tax Amount, In this field the Inclusive Amount of the document can be entered. The system will automatically calculate the Tax Amount and the Amount – Tax fields and populate them accordingly. These values may also be manually entered. Tax Amount: In this field the Tax amount can be entered; although it will be automatically be populated once the Tax + Amount have been entered. Amount – Tax: In this field the Exclusive Amount of the document can be entered. The system will automatically calculate the Tax Amount and the Amount – Tax fields and populate them accordingly. These values may also be manually entered. Transaction Tab This tab is used to enter the transaction line information. Account: Select the GL account to be affected The Account Description, Description, Tax Code, Tax Account and Description fields will automatically fill based on previous selections Amount Incl, Amount The Inclusive and Exclusive Amounts and Tax Amounts must be Excl, Tax Amount: entered into these fields Distributions Tab: Use this tab to view distribution information of the transaction being created/edited. Balances: This section displays the Totals from the Header and the Totals from the Transaction line window and the Differences between the two. These values have to balance in order to Create or Save the transaction from this window. Total Debits: This is the total from the Transaction Line section, in the field Amount Incl. for all lines in the window. Total Credits: This is the total from the Window header Amount section, in the field Amount + Tax. 18 | P a g e Difference: This field calculates the difference between the Total Debits and Total Credits fields. This amount has to be zero in order to Create or Save the transaction. Tax Difference: This field calculates the difference between the Tax Amount field in the header and Tax Amount field in the Transaction Line window. This amount has to be zero in order to Create or Save the transaction. Window Buttons The Manual Transaction entry window will allow the creation (Create), saving (Save) and deletion (Delete) of Transactions. A/P - A/R Accounting > Cashbook> Cashbook Transactions > Batch Entry Manual Transactions Button Apply 19 | P a g e The Cashbook SP Apply/ Cashbook PL Apply window has a Header and a Lines (Open Items) section. The Header section has the summary apply information, and the Lines section contains more detailed information regarding the documents being applied to a deposit or payment. BP: This is the Business Partner that the transactions to apply are for. No. of Items: This is the number of items that have been applied. Bank Amount: This is the amount or the value of the deposit or payment. Payment allocated to This field tracks the amount that has been applied. As more BP: invoices are applied to the deposit or payment, this field gets updated. Total Discount: This field tracks the discounts that are issued. As more discounts are issued in the Open Items line section, this field gets updated. Remaining: This field displays the amount or value of the payment that has not been applied to invoices. As more invoices are applied, this amount is reduced. Document Type: This field displays the document type for the invoice or document that will be applied to the deposit or payment. Document: This is the document number for the document that is applied. Due Date: This is the due date for the document/ invoice. Currency: This is the currency for the document/ invoice. Amount: This is the document/ invoice amount. Amount Apply: This is the amount or value that is going to be applied. This value can be different to the Amount value but it cannot be greater. Discount Available: This is the discount that can be issued on the document. Discount: This is the actual discount that is issued on the document. Remaining: This is the documents remaining amount. You will have a value in the field if the Amount to Apply field is less than the Amount field. 20 | P a g e Update Flag: This field gets updated when the transactions is selected to be applied. Window Buttons The Cashbook PL Apply/ Cashbook SL Apply window will allow the user to Save and Cancel Transactions. To Create a GL – Increase Adjustment Transaction: 1. Open the Parity Cashbook Batch Entry window. A/P - A/R Accounting > Cashbook > Cashbook Transactions> Batch Entry 2. Click the Manual Transaction button to open the Manual Transaction Entry window. A/P - A/R Accounting > Cashbook > Cashbook Transactions> Batch Entry > Manual Transaction Entry 3. Select GL as the Transaction Type. 4. Select Increase Adjustment as the Sub Transaction Type. 5. Enter a description for the transaction. 6. Enter a Reference Number for the document. 7. Enter a Bank Reference for the document. 8. Enter a Document Date for the Transaction. 9. Select a Tax Code. 10. Enter the Amount + Tax Field. 11. Enter Line information. 12. Click the Create button to create the Transaction. To Edit a GL – Increase Adjustment Transaction: 1. Open the Parity Cashbook Batch Entry window. A/P - A/R Accounting > Cashbook > Cashbook Transactions> Batch Entry 2. Click the Manual Transaction button to open the Manual Transaction Entry window. A/P - A/R Accounting > Cashbook > Cashbook Transactions> Batch Entry > Manual Transaction Entry 21 | P a g e 3. Select an Increase Adjustment transaction from the Browser window. This will open the transaction in the Manual Transaction Entry window. 4. Make the necessary updates or corrections. 5. Click the Save button to save the Transaction. To Delete a GL – Increase Adjustment Transaction: 1. Open the Parity Cashbook Batch Entry window. A/P - A/R Accounting > Cashbook > Cashbook Transactions> Batch Entry 2. Click the Manual Transaction button to open the Manual Transaction Entry window. A/P - A/R Accounting > Cashbook > Cashbook Transactions> Batch Entry > Manual Transaction Entry 3. Select an existing Increase Adjustment transaction from the browser. This will open the batch in the Batch Entry window. 4. Click the Delete button to delete the selected batch. 5. Click the OK button on the confirmation window to delete the batch or click the End button the cancel the delete. To Create a GL – Decrease Adjustment Transaction: 1. Open the Parity Cashbook Batch Entry window. A/P - A/R Accounting > Cashbook > Cashbook Transactions> Batch Entry 2. Click the Manual Transaction button to open the Manual Transaction Entry window. A/P - A/R Accounting > Cashbook > Cashbook Transactions> Batch Entry > Manual Transaction Entry 3. Select GL as the Transaction Type. 4. Select Decrease Adjustment as the Sub Transaction Type. 5. Enter a description for the transaction. 6. Enter a Reference Number for the document. 7. Enter a Bank Reference for the document. 8. Enter a Document Date for the Transaction. 9. Select a Tax Code. 22 | P a g e 10. Enter the Amount + Tax Field. 11. Enter Line information. 12. Click the Create button to create the Transaction. To Edit a GL – Decrease Adjustment Transaction: 1. Open the Parity Cashbook Batch Entry window. A/P - A/R Accounting > Cashbook > Cashbook Transactions> Batch Entry 2. Click the Manual Transaction button to open the Manual Transaction Entry window. A/P - A/R Accounting > Cashbook > Cashbook Transactions> Batch Entry > Manual Transaction Entry 3. Select a Decrease Adjustment transaction from the Browser window. This will open the transaction in the Manual Transaction Entry window. 4. Make the necessary updates or corrections. 5. Click the Save button to save the Transaction. To Delete a GL – Decrease Adjustment Transaction: 1. Open the Parity Cashbook Batch Entry window. A/P - A/R Accounting > Cashbook > Cashbook Transactions> Batch Entry 2. Click the Manual Transaction button to open the Manual Transaction Entry window. A/P - A/R Accounting > Cashbook > Cashbook Transactions> Batch Entry > Manual Transaction Entry 3. Select an existing Decrease Adjustment transaction from the browser. This will open the batch in the Batch Entry window. 4. Click the Delete button to delete the selected batch. 5. Click the OK button on the confirmation window to delete the batch or click the End button the cancel the delete. To Create a GL – Withdrawal Transaction: 1. Open the Parity Cashbook Batch Entry window. A/P - A/R Accounting > Cashbook > Batch Entry 23 | P a g e 2. Click the Manual Transaction button to open the Manual Transaction Entry window. A/P - A/R Accounting > Cashbook > Cashbook Transactions> Batch Entry > Manual Transaction Entry 3. Select GL as the Transaction Type. 4. Select Withdrawal as the Sub Transaction Type. 5. Enter a description for the transaction. 6. Enter a Reference Number for the document. 7. Enter a Bank Reference for the document. 8. Enter a Document Date for the transaction. 9. Select a Tax Code. 10. Enter the Amount + Tax Field. 11. Enter Line information. 12. Click the Create button to create the transaction. To Edit a GL – Withdrawal Transaction: 1. Open the Parity Cashbook Batch Entry window. A/P - A/R Accounting > Cashbook > Cashbook Transactions> Batch Entry 2. Click the Manual Transaction button to open the Manual Transaction Entry window. A/P - A/R Accounting > Cashbook > Cashbook Transactions> Batch Entry > Manual Transaction Entry 3. Select a Withdrawal transaction from the Browser window. This will open the transaction in the Manual Transaction Entry window. 4. Make the necessary updates or corrections. 5. Click the Save button to save the transaction. To Delete a GL – Withdrawal Transaction: 1. Open the Parity Cashbook Batch Entry window. A/P - A/R Accounting > Cashbook > Cashbook Transactions> Batch Entry 2. Click the Manual Transaction button to open the Manual Transaction Entry window. 24 | P a g e A/P - A/R Accounting > Cashbook > Cashbook Transactions> Batch Entry > Manual Transaction Entry 3. Select an existing Withdrawal transaction from the browser. This will open the batch in the Batch Entry window. 4. Click the Delete button to delete the selected batch. 5. Click the OK button on the confirmation window to delete the batch or click the End button the cancel the delete. Bank Transfers Multicurrency Bank Transfers: In Cashbook for Sage ERP X3, the creation of a bank transfer from one bank to another one creates a journal as follows: It debits the one bank account and credits the other bank account. When performing a Multicurrency Bank transfer two journals are created as follows: One journal Debits the bank account and then Credits the Control Account in that banks currency. The other journal Credits the Bank Account and Debits the Control Account in that banks currency E.g. Transferring from Bank1 (USD) to Bank2 (EUR) Journal one would be in USD and Credit Bank1 and Debit the Control Account Journal two would be in EUR and Credit the Control Account and Debit Bank2 In order to obtain the Control Account number: Cashbook checks the Chart of Accounts setup in X3 under Parameters>Organizational Structure>Charts of accounts Under Miscellaneous Accounts It checks if an account exists in: „1.) Suspense account conso‟, if that is blank it checks 25 | P a g e „16.) Rounding gain matching‟ and lastly if that one is blank it checks „2.) Default account‟ To Create a GL – Bank Transfer - Out Transaction: 1. Open the Parity Cashbook Batch Entry window. A/P - A/R Accounting > Cashbook > Cashbook Transactions> Batch Entry 2. Click the Manual Transaction button to open the Manual Transaction Entry window. A/P - A/R Accounting > Cashbook > Cashbook Transactions> Batch Entry > Manual Transaction Entry 3. Select GL as the Transaction Type. 4. Select Bank Transfer - Out as the Sub Transaction Type. 5. Enter a description for the transaction. 6. Select a To Bank. 7. Enter a Reference Number for the document. 8. Enter a Bank Reference for the document. 9. Enter a Document Date for the transaction. 10. Select a Tax Code. 11. Enter the Amount + Tax Field. 12. Enter Line information. 13. Click the Create button to create the transaction. To Edit a GL – Bank Transfer - Out Transaction: 1. Open the Parity Cashbook Batch Entry window. A/P - A/R Accounting > Cashbook > Cashbook Transactions> Batch Entry 2. Click the Manual Transaction button to open the Manual Transaction Entry window. A/P - A/R Accounting > Cashbook > Cashbook Transactions> Batch Entry > Manual Transaction Entry 26 | P a g e 3. Select a Bank Transfer - Out transaction from the Browser window. This will open the transaction in the Manual Transaction Entry window. 4. Make the necessary updates or corrections. 5. Click the Save button to save the transaction. To Delete a GL – Bank Transfer - Out Transaction: 1. Open the Parity Cashbook Batch Entry window. A/P - A/R Accounting > Cashbook > Cashbook Transactions> Batch Entry 2. Click the Manual Transaction button to open the Manual Transaction Entry window. A/P - A/R Accounting > Cashbook > Cashbook Transactions> Batch Entry > Manual Transaction Entry 3. Select an existing Bank Transfer - Out transaction from the browser. This will open the batch in the Batch Entry window. 4. Click the Delete button to delete the selected batch. 5. Click the OK button on the confirmation window to delete the batch or click the End button the cancel the delete. To Create a GL – Bank Transfer - In Transaction: 1. Open the Parity Cashbook Batch Entry window. A/P - A/R Accounting > Cashbook > Cashbook Transactions> Batch Entry 2. Click the Manual Transaction button to open the Manual Transaction Entry window. A/P - A/R Accounting > Cashbook > Cashbook Transactions> Batch Entry > Manual Transaction Entry 3. Select GL as the Transaction Type. 4. Select Bank Transfer - In as the Sub Transaction Type. 5. Enter a description for the transaction. 6. Select a From Bank. 7. Enter a Reference Number for the document. 8. Enter a Bank Reference for the document. 9. Enter a Document Date for the transaction. 27 | P a g e 10. Select a Tax Code. 11. Enter the Amount + Tax Field. 12. Enter Line information. 13. Click the Create button to create the transaction. To Edit a GL – Bank Transfer - In Transaction: 1. Open the Parity Cashbook Batch Entry window. A/P - A/R Accounting > Cashbook > Cashbook Transactions> Batch Entry 2. Click the Manual Transaction button to open the Manual Transaction Entry window. A/P - A/R Accounting > Cashbook > Cashbook Transactions> Batch Entry > Manual Transaction Entry 3. Select a Bank Transfer - In transaction from the Browser window. This will open the transaction in the Manual Transaction Entry window. 4. Make the necessary updates or corrections. 5. Click the Save button to save the transaction. To Delete a GL – Bank Transfer - In Transaction: 1. Open the Parity Cashbook Batch Entry window. A/P - A/R Accounting > Cashbook > Cashbook Transactions> Batch Entry 2. Click the Manual Transaction button to open the Manual Transaction Entry window. A/P - A/R Accounting > Cashbook > Cashbook Transactions> Batch Entry > Manual Transaction Entry 3. Select an existing Bank Transfer - In transaction from the browser. This will open the batch in the Batch Entry window. 4. Click the Delete button to delete the selected batch. 5. Click the OK button on the confirmation window to delete the batch or click the End button the cancel the delete. To Create a SL –Deposit Transaction: 1. Open the Parity Cashbook Batch Entry window. 28 | P a g e A/P - A/R Accounting > Cashbook > Cashbook Transactions> Batch Entry 2. Click the Manual Transaction button to open the Manual Transaction Entry window. A/P - A/R Accounting > Cashbook > Cashbook Transactions> Batch Entry > Manual Transaction Entry 3. Select SL as the Transaction Type. 4. Select Deposit as the Sub Transaction Type. 5. Enter a description for the transaction. 6. Enter a site for the transaction. 7. Enter a Reference Number for the document. 8. Enter a Document Date for the transaction. 9. Enter the Amount + Tax Field. 10. Enter Line information; include the Business Partner at line level. 11. Click the Create button to create the transaction. To Apply an SL Deposit to an SL Invoice: 1. To Open the Cashbook SL Apply window. A/P - A/R Accounting > Cashbook > Cashbook Transactions> Batch Entry 2. Click the Manual Transaction button to open the Manual Transaction Entry window. A/P - A/R Accounting > Cashbook > Cashbook Transactions> Batch Entry > Manual Transaction Entry 3. Select your deposit and then click on the Apply button to open the Cashbook SL Apply window. A/P - A/R Accounting > Cashbook > Cashbook Transactions> Batch Entry > Manual Transaction Entry > Apply 4. On the browser on the left, click on Open Items to see the list of Open invoices. 5. Select the invoice that the deposit is for by clicking on it. You can select more than one invoice as a deposit can be for many invoices. 6. Click the Save button to save the apply transaction. NOTE: Click on the invoice that has been selected to “unapply” that invoice. 29 | P a g e To Edit a SL – Receipt Transaction: 1. Open the Parity Cashbook Batch Entry window. A/P - A/R Accounting > Cashbook > Cashbook Transactions> Batch Entry 2. Click the Manual Transaction button to open the Manual Transaction Entry window. A/P - A/R Accounting > Cashbook > Cashbook Transactions> Batch Entry > Manual Transaction Entry 3. Select a Receipt transaction from the Browser window. This will open the transaction in the Manual Transaction Entry window. 4. Make the necessary updates or corrections. 5. Click the Save button to save the transaction. To Delete a SL – Receipt Transaction: 1. Open the Parity Cashbook Batch Entry window. A/P - A/R Accounting > Cashbook > Cashbook Transactions> Batch Entry 2. Click the Manual Transaction button to open the Manual Transaction Entry window. A/P - A/R Accounting > Cashbook > Cashbook Transactions> Batch Entry > Manual Transaction Entry 3. Select an existing Receipt transaction from the browser. This will open the batch in the Batch Entry window. 4. Click the Delete button to delete the selected batch. 5. Click the OK button on the confirmation window to delete the batch or click the End button the cancel the delete. To Edit an Apply 1. Open the Cashbook SL Apply window. A/P - A/R Accounting > Cashbook > Cashbook Transactions> Batch Entry 2. Click the Manual Transaction button to open the Manual Transaction Entry window. A/P - A/R Accounting > Cashbook > Cashbook Transactions> Batch Entry > Manual Transaction Entry 3. Select your deposit and then click on the Apply button to open the Cashbook SL Apply window. 30 | P a g e A/P - A/R Accounting > Cashbook > Cashbook Transactions> Batch Entry > Manual Transaction Entry > Apply 4. On the apply line double click on the line fields that you want to change. 5. Click on the Save button to save transaction change. To Delete an Apply 1. Open the Cashbook SL Apply window. A/P - A/R Accounting > Cashbook > Cashbook Transactions> Batch Entry 2. Click the Manual Transaction button to open the Manual Transaction Entry window. A/P - A/R Accounting > Cashbook > Cashbook Transactions> Batch Entry > Manual Transaction Entry 3. Select your deposit and then click on the Apply button to open the Cashbook SL Apply window. A/P - A/R Accounting > Cashbook > Cashbook Transactions> Batch Entry > Manual Transaction Entry > Apply 4. On the apply line, right click and select Delete Line. 5. Click on the Save button to save transaction change. To Create a SL – Refund Transaction: 1. Open the Parity Cashbook Batch Entry window. A/P - A/R Accounting > Cashbook > Cashbook Transactions> Batch Entry 2. Click the Manual Transaction button to open the Manual Transaction Entry window. A/P - A/R Accounting > Cashbook > Cashbook Transactions> Batch Entry > Manual Transaction Entry 3. Select SL as the Transaction Type. 4. Select Refund as the Sub Transaction Type. 5. Enter a description for the transaction. 6. Enter a Reference Number for the document. 7. Enter a Document Date for the Transaction. 8. Select a Tax Code. 9. Enter the Amount + Tax Field. 31 | P a g e 10. Click the Create button to create the Transaction. To Edit a SL – Refund Transaction: 1. Open the Parity Cashbook Batch Entry window. A/P - A/R Accounting > Cashbook > Cashbook Transactions> Batch Entry 2. Click the Manual Transaction button to open the Manual Transaction Entry window. A/P - A/R Accounting > Cashbook > Cashbook Transactions> Batch Entry > Manual Transaction Entry 3. Select a Refund transaction from the Browser window. This will open the transaction in the Manual Transaction Entry window. 4. Make the necessary updates or corrections. 5. Click the Save button to save the Transaction. To Delete a SL – Refund Transaction: 1. Open the Parity Cashbook Batch Entry window. A/P - A/R Accounting > Cashbook > Cashbook Transactions> Batch Entry 2. Click the Manual Transaction button to open the Manual Transaction Entry window. A/P - A/R Accounting > Cashbook > Cashbook Transactions> Batch Entry > Manual Transaction Entry 3. Select an existing Refund transaction from the browser. This will open the batch in the Batch Entry window. 4. Click the Delete button to delete the selected batch. 5. Click the OK button on the confirmation window to delete the batch or click the End button the cancel the delete. To Create a PL – Payment Transaction: 1. Open the Parity Cashbook Batch Entry window. A/P - A/R Accounting > Cashbook > Cashbook Transactions> Batch Entry 2. Click the Manual Transaction button to open the Manual Transaction Entry window. 32 | P a g e A/P - A/R Accounting > Cashbook > Cashbook Transactions> Batch Entry > Manual Transaction Entry 3. Select PL as the Transaction Type. 4. Select Receipt as the Sub Transaction Type. 5. Enter a description for the transaction. 6. Select a Business Partner. 7. Enter a Reference Number for the document. 8. Enter a Document Date for the Transaction. 9. Select a Tax Code. 10. Enter the Amount + Tax Field. 11. Enter Line information. 12. Click the Create button to create the Transaction. To Apply a PL Payment to a PL Invoice: 1. To Open the Cashbook PL Apply window. A/P - A/R Accounting > Cashbook > Cashbook Transactions> Batch Entry 2. Click the Manual Transaction button to open the Manual Transaction Entry window. A/P - A/R Accounting > Cashbook > Cashbook Transactions> Batch Entry > Manual Transaction Entry 3. Select your payment and then click on the Apply button to open the Cashbook SL Apply window. A/P - A/R Accounting > Cashbook > Cashbook Transactions> Batch Entry > Manual Transaction Entry > Apply 4. On the browser on the left, click on Open Items to see the list of Open invoices. 5. Select the invoice that the payment is for by clicking on it. 6. Click the Save button to save the apply transaction. NOTE: Click on the invoice that has been selected to “unapply” that invoice. To Edit a PL – Payment Transaction: 1. Open the Parity Cashbook Batch Entry window. 33 | P a g e A/P - A/R Accounting > Cashbook > Cashbook Transactions> Batch Entry 2. Click the Manual Transaction button to open the Manual Transaction Entry window. A/P - A/R Accounting > Cashbook > Cashbook Transactions> Batch Entry > Manual Transaction Entry 3. Select a payment transaction from the Browser window. This will open the transaction in the Manual Transaction Entry window. 4. Make the necessary updates or corrections. 5. Click the Save button to save the Transaction. To Delete a PL – Payment Transaction: 1. Open the Parity Cashbook Batch Entry window. A/P - A/R Accounting > Cashbook > Cashbook Transactions> Batch Entry 2. Click the Manual Transaction button to open the Manual Transaction Entry window. A/P - A/R Accounting > Cashbook > Cashbook Transactions> Batch Entry > Manual Transaction Entry 3. Select an existing Payment transaction from the browser. This will open the batch in the Batch Entry window. 4. Click the Delete button to delete the selected batch. 5. Click the OK button on the confirmation window to delete the batch or click the End button the cancel the delete. To Edit an Apply 1. Open the Cashbook PL Apply window. A/P - A/R Accounting > Cashbook > Cashbook Transactions> Batch Entry 2. Click the Manual Transaction button to open the Manual Transaction Entry window. A/P - A/R Accounting > Cashbook > Cashbook Transactions> Batch Entry > Manual Transaction Entry 3. Select your deposit and then click on the Apply button to open the Cashbook PL Apply window. 34 | P a g e A/P - A/R Accounting > Cashbook > Cashbook Transactions> Batch Entry > Manual Transaction Entry > Apply On the apply line double click on the line fields that you want to change. 4. Click on the Save button to save transaction change. To Delete an Apply 1. Open the Cashbook PL Apply window. A/P - A/R Accounting > Cashbook > Cashbook Transactions> Batch Entry 2. Click the Manual Transaction button to open the Manual Transaction Entry window. A/P - A/R Accounting > Cashbook > Cashbook Transactions> Batch Entry > Manual Transaction Entry 3. Select your deposit and then click on the Apply button to open the Cashbook PL Apply window. A/P - A/R Accounting > Cashbook > Cashbook Transactions> Batch Entry > Manual Transaction Entry > Apply 4. On the apply line, right click and select Delete Line. 5. Click on the Save button to save transaction change To Create a PL – Refund Transaction: 1. Open the Parity Cashbook Batch Entry window. A/P - A/R Accounting > Cashbook > Cashbook Transactions> Batch Entry 2. Click the Manual Transaction button to open the Manual Transaction Entry window. A/P - A/R Accounting > Cashbook > Cashbook Transactions> Batch Entry > Manual Transaction Entry 3. Select PL as the Transaction Type. 4. Select Refund as the Sub Transaction Type. 5. Enter a description for the transaction. 6. Select a Business Partner. 7. Enter a Reference Number for the document. 8. Enter a Document Date for the Transaction. 9. Select a Tax Code. 35 | P a g e 10. Enter the Amount + Tax Field. 11. Click the Create button to create the Transaction. To Edit a PL – Payment Transaction: 1. Open the Parity Cashbook Batch Entry window. A/P - A/R Accounting > Cashbook > Cashbook Transactions> Batch Entry 2. Click the Manual Transaction button to open the Manual Transaction Entry window. A/P - A/R Accounting > Cashbook > Batch Entry > Cashbook Transactions> Manual Transaction Entry 3. Select a Refund transaction from the Browser window. This will open the transaction in the Manual Transaction Entry window. 4. Make the necessary updates or corrections. 5. Click the Save button to save the Transaction. To Delete a PL – Payment Transaction: 1. Open the Parity Cashbook Batch Entry window. A/P - A/R Accounting > Cashbook > Cashbook Transactions> Batch Entry 2. Click the Manual Transaction button to open the Manual Transaction Entry window. A/P - A/R Accounting > Cashbook > Batch Entry > Cashbook Transactions> Manual Transaction Entry 3. Select an existing Refund transaction from the browser. This will open the batch in the Batch Entry window. 4. Click the Delete button to delete the selected batch. 5. Click the OK button on the confirmation window to delete the batch or click the End button the cancel the delete. 2.3. Reconciliation The reconciliation of Bank Entry Transactions happens from within the Batch Entry window. The reconciliation window will list all Bank Entry transactions in the system up until the Cut-off date. 36 | P a g e The generic process for the Reconciliation of a bank account in the cashbook is as follows: 1. Create the batch. 2. Update with the transactions that exist in Sage X3. 3. Import the statement from the bank. 4. Auto-match the statement to the cashbook. 5. Click on possible matches to confirm if match is correct. 6. Manually match the relevant remaining transactions. 7. Manually capture or Auto create transactions that are on the bank statement but not in the cashbook. 8. Finalize and check the recon. 9. Post the batch. Some Important Notes: In order to manually mark a transaction as matched it is possible double-click on the matched field in the reconciliation line window. Marking a transaction like this will automatically update the Total Debit, Total Credit and Difference Fields. When documents exist on the Bank Statement that do not exist in the system, they can be created via the Manual Transaction Entry window. Once documents have been created in the Manual Transaction window they will automatically appear in the Batch Entry window as matched. Once the Bank Statement has been fully matched and the Difference is zero, the batch can be printed and then posted. Once the batch is posted the transactions created via the Manual transaction Entry window will be visible in Sage ERP X3 and the transactions will be reconciled. When deleting a Batch from the Batch Entry window all manual transaction created from with the batch will be deleted as well. To print a batch: 1. Open the Parity Cashbook Create Batch window. A/P - A/R Accounting > Cashbook > Cashbook Transactions> Batch Entry 2. Click the Print button in the Sage ERP X3 Toolbar to print the Batch Report. To post a batch: 37 | P a g e 1. Open the Parity Cashbook Create Batch window. A/P - A/R Accounting > Cashbook > Cashbook Transactions> Batch Entry 2. Ensure that the Difference is zero. 3. Click the Post Button to post the Batch. 38 | P a g e 2.4. EFT File Creation EFT Batch Entry window is used to generate EFT batches and EFT files. A/P - A/R Accounting > Cashbook > EFT File Generation This window consists of 2 sections: Batch Header info Payments Tab Batch Header Info Batch Number: This is the Batch Number that will automatically be assigned to the batch when a new EFT batch is created. Bank: This field lets you select for which bank to create the EFT file for. Company / Site: Select the company/site File Path: This field automatically fills based on the setups on the Parity EFT Setup window If the Locked tick box on the Parity EFT Setup window is un39 | P a g e ticked the user will be able to change the file path on this window. It is important to ensure that the user that is creating the file has write access to this file location. File Name: This name is automatically filled and is generated according to the setups on the Parity EFT Setup window. Status: This field displays the status of the batch Possible statuses are: Entered File Generated In the Bank First/ Last Action The First Action Date and the Last Action Date are automatically Date: populated, depending on the EFT File Type selected. Num. Documents: This field displays the number of payments currently in the batch. Total: This field displays the total payment amount in the batch. Payments Tab This tab allows you to add payments to the Batch. On the left browser click on Payments, all available payments will be listed. Click on the payment you want to add to the batch and that payment will appear in the Payments tab. The more payments you select the Num. Documents field will get updated with the number of payments selected and the Total field will get updated with the sum of the payments. Payment: Enter the payment number of the payment being added to the batch. BP: Displays the Business Partner linked to the payment. Name: Displays the name of the Business Partner linked to the payment. Description: Displays a description for the payment. Currency: Displays the currency of the payment. Amount: Displays the Amount of the transaction. Window Buttons The Manual Transaction entry window will allow the user to Save, Create and Delete Transactions as well as creating the Bank File and Posting the batch. 40 | P a g e Create File Selecting this button will create the EFT output file in the location specified and set the batch status to „File Generated‟. Post Selecting this button will Post the batch and set the Batch Status to „In the bank‟. The user will not be able to create a file for this batch again. To create an EFT Batch: 1. Open the EFT File Generation window. A/P - A/R Accounting > Cashbook > Cashbook Transactions> EFT File Generation 2. Select the bank 3. Update the file path if need be 4. Insert payments into the payments tab 5. Click the Create Button To create an EFT Batch file: 1. Open the Parity Create EFT Batch window. A/P - A/R Accounting > Cashbook > Cashbook Transactions> EFT File Generation 2. Select an existing batch 3. Click the Batch File button To post an EFT Batch file: 1. Open the Parity Create EFT Batch window. A/P - A/R Accounting > Cashbook > Cashbook Transactions> EFT File Generation 2. Select an existing batch 3. Click the Post button 41 | P a g e