1
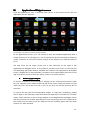
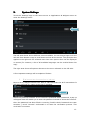
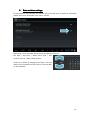
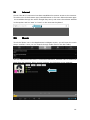
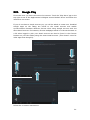
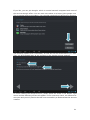
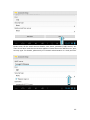
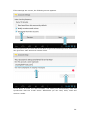
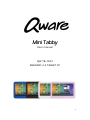
Mini Tabby
User manual
QW TB-1543
ANDROID 4.2 TABLET PC
1
2
Table of contents
Inhoud
I.
_________________________________________________________
4
_________________________________________________________4
IMPORTANT WARNINGS
WARNINGS_________________________________________________________
II.
_____________________________________________ 5
INTRODUCING YOUR NEW MINI TABBY
TABBY_____________________________________________
III.
_________________________________________________________________ 6
KEY FEATURES
FEATURES_________________________________________________________________
IV.
__________________________________________________________
7
__________________________________________________________7
PACKAGING CONTENTS
CONTENTS__________________________________________________________
V.
_____________________________________________________________ 8
PRODUCT LAYOUT
LAYOUT_____________________________________________________________
VI.
____________________________________________________
9
____________________________________________________9
HARDWARE SPECIFICATION
SPECIFICATION____________________________________________________
VII.
___________________________________________________ 10
STARTUP AND SHUTDOWN
SHUTDOWN___________________________________________________
A.
WHEN THE MINI TABBY IS POWERED OFF AND YOU WOULD LIKE TO TURN IT ON____________________ 10
B.
WHEN THE MINI TABBY IS POWERED ON AND YOU WOULD LIKE TO TURN IT OFF____________________ 10
VIII.
_____________________________________________________________ 11
HOME SCREEN
SCREEN_____________________________________________________________
IX.
________________________________________________ 13
APPLICATIONS/WIDGETS SCREEN
SCREEN________________________________________________
A.
X.
REMOVING APPS/WIDGETS_______________________________________________________ 13
_____________________________________________________________ 14
SYSTEM SETTINGS
SETTINGS_____________________________________________________________
A.
WIRELESS NETWORK CONNECTION TO INTERNET__________________________________________14
B.
DISPLAY____________________________________________________________________ 15
C.
DATE AND TIME SETTINGS________________________________________________________ 16
XI.
___________________________________________________________________ 17
INTERNET
INTERNET___________________________________________________________________
XII.
____________________________________________________________________
17
____________________________________________________________________17
MUSIC
MUSIC____________________________________________________________________
XIII.
___________________________________________ 18
GALLERY WITH VIDEOS AND PHOTOS
PHOTOS___________________________________________
XIV.
___________________________________ 18
WALLPAPER ON HOME SCREEN BACKGROUND
BACKGROUND___________________________________
XV.
_________________________________________________________ 19
SOUND RECORDING
RECORDING_________________________________________________________
XVI.
__________________________________________________________________ 20
CAMERA
CAMERA__________________________________________________________________
XVII.
______________________________________________________________
21
______________________________________________________________21
GOOGLE PLAY
PLAY______________________________________________________________
XVIII.
_________________________________________________________________ 25
E-MAIL
E-MAIL_________________________________________________________________
XIX.
_________________________________________________________ 28
USB PORT OPTIONS
OPTIONS_________________________________________________________
A.
CONNECT TO A PC_____________________________________________________________ 28
B.
USB KEYBOARD AND MOUSE______________________________________________________ 29
XX.
_______________________________________________________ 30
FIRMWARE UPGRADE
UPGRADE_______________________________________________________
3
I.
•
Important warnings
NB: Please take extra care when allowing young kids access to a tablet
or phone with a registered credit card to it without proper guidance.
Make sure they cannot buy digital content in the Google Play store or in
certain apps or games without your consent to avoid unwanted billing!
•
This is a high precision electronic product. Do not open or disassemble it, this
will violate the warranty regulation and it is dangerous.
•
Avoid high impact collisions of the product with a hard surface; do not drop or
throw it.
•
Avoid exposing the product to the following conditions: high and low
temperatures, moisture, fluids, dust, sand, strong magnetic fields, radiation and
long-term exposure to sunlight.
•
Please use a damp cotton cloth and gently wipe the product shell. Do not use
chemical cleaning solutions. This product should not be exposed to dripping or
splashing water. Do not (partially) submerge the product in any type of fluid.
•
Prolonged exposure to a headphone with high volume sound may cause
permanent damage to the hearing organs. Please use caution and limit the
volume and exposure to remain aware of your surroundings.
•
Do not use the product when participating in any traffic, by land, sea or air, with
or without the use of any sort of transportation vehicle.
•
Please only use designated chargers and accessories approved by Qware. If you
use any other type, it violates the warranty regulations and may cause
dangerous situations.
•
Please follow the relevant local environmental regulations when disposing
obsolete electronic equipment, batteries and accessories.
•
When you have any questions, please contact your local dealer or contact the
Qware help desk 0900-1113222 (€0,50 p/m, Monday to Friday between 10-18h)
•
The company assumes no responsibility when the product is damaged, repaired
or other causes for loss of data. Please refer to the user manual for standard
operating procedures.
4
II.
Introducing your new Mini Tabby
Congratulations on your purchase of the Qware Mini Tabby (TB-1543) 4.3” tablet PC.
The Mini Tabby uses the Android 4.2 operating system and is based on a powerful
Cortex A8 1.2GHz processor.
The Mini Tabby has 4GB of internal memory of which approximately 2GB is allocated
for direct application downloads. The other memory part is free to use for storage of
pictures, music, movies and other data files. A micro SD card slot enables you to
even enhance the memory capacity further. Fast 512MB DDR III RAM memory
improves the performance of the Mini Tabby.
The Mini Tabby has a 4.3"multi touch capacitive touch screen, which makes it
possible to very easily control the device by using only your fingertips.
The fast 802.11b/g/n build-in wireless network adapter enables fast web surfing
and downloading. The Mini Tabby further has a mini-USB port which enables the
connection of accessories.
5
III.
Key features
Feature
Advantage
Incredible data rate up to 150MBPS*
Fast web surfing and downloading
Sensitive capacitive touch screen
Accurate touch control of the tablet
PC
4GB build in memory
Sufficient storage space for the
Android
OS,:
Sufficient
storage
space for the Android OS, apps,
pictures, music and other files
Powerful Cortex A8 processor
Fast execution of commands
and programs
Mali 400 graphics processor unit
fast 3D graphics, decoding,
ideal for playing games
* Theoretical standard based on IEEE standard of 802.11 b,g,n chipset used. Actual Throughput may
vary. Network conditions and environmental factors lower actual throughput rate. All specifications
are subject to change without notice.
6
IV.
Packaging Contents
Open the package carefully and please make sure that all items listed below are
present. Do not discard the packing materials within the warranty period; if you
have to return the product it must be in its original package including all extra
content:
1x Tabby tablet pc, article nr. QW TB-1543
1x MiniUSB adapter cable with female USB socket to male MiniUSB plug ( to connect
USB accessories)
1x MiniUSB connection cable with male USB plug to male MiniUSB plug ( to connect
the Tabby to a PC or USB-AC adapter)
1x Stereo earphones (standard 3.5mm jack, personal audio solution)
1x User manual document (instructions in English, Dutch, French and German)
7
V.
Product Layout
The Android system uses the following keys:
1) Volume keys
volume + and volume - buttons on top to adjust the volume.
2) Power key
to turn on and off of the unit or by short pressing it to enter or leave the
standby mode.
3) Earphone jack
to connect earphones if necessary
4) Mini USB port
to connect accessories or PC
5) Micro SD card slot
increase the data storage capacity by inserting a Micro SD card (sold
separately
6) Camera
to capture pictures
7) Speaker
sound output
8) Reset
use a paperclip
9) Microphone
voice recording
8
VI.
Hardware specification
Product specification
A13 Cortex A8 Multi-Core ARM v7 processor Frequency 1.2GHz
Processor
Memory
512MB DDR3 RAM
Memory built-in 4GB
Storage
(partly used for OS+backup, system apps and app installations)
Supports Micro SD card to expand memory up to 32GB
Wireless
IEEE802.11b/g/n wireless network
USB
USB2.0 OTG high speed interface and USB1.1
3.5mm headphone jack
High-quality loud speaker
Audio
Built-in microphone
Headset maximum output power of 40mW
Frequency response: 20Hz-20KHz
SNR: greater than 90db
Screen
Other
Size
4.3 inch
Resolution
HVGA 480*272
Color
16 million colors
Operating
Capacitive multi-touch panel
Size
113.5*77*12 mm
DC input
DC 5.0V / 2.0A
Weight
119g
Battery
Built-in lithium polymer battery 1200mAh
9
VII.
Startup and shutdown
A. When the Mini Tabby is powered off and you would like to turn
it on
�
Press and hold the power button for a few seconds and the Mini Tabby
will begin loading the Android software.
The following startup screens appear
After loading has completed, you’ll be greeted by the lock screen (which also
appears when you exit standby).
�
Touch the lock icon and drag it outside the circle that appears to unlock
the screen. If performed correctly, the ‘desktop’ (also called ‘home
screen’) will appear.
This lock screen blocks unintended button presses and touch screen interactions
when the tablet is not in use. It can be customized in the settings menu.
B. When the Mini Tabby is powered on and you would like to turn
it off
�
Press and hold the power button for a few seconds until the Mini Tabby
asks you if you want to shut down the tablet completely. Touch ‘OK’ to
shut down the device
10
Press the power button for a short moment short to have the Mini Tabby enter
stand-by mode.
To end stand-by mode, press the power button again for a short moment.
VIII.
Home screen
After startup has completed, the Android 4.2 homescreen appears:
The default home screen has several shortcuts in the middle of the screen which you
can freely activate, remove, add to or adjust. The title underneath the icon explains
its purpose. The four ‘manual’ icons are manuals in the languages English (ENG),
French (FRA), Dutch (HOL) and German (GER).
Top left corner
Google Search is a quick shortcut to search the web by typing key words. The
microphone icon next to it allows you to search by speaking the key words using the
built-in microphone. Google will try to recognize the spoken words and insert them
as text in the search bar.
Top right corner
This icon with six squares is a shortcut to all installed apps and widgets. When
touched it will show the Applications & Widgets screen (see Chapter VII).
Bottom left corner
6 main function buttons in the black status bar (from left to right):
Undo/Back/Return | Go to home screen | Show apps running in background |
Settings for wallpaper/apps/system | Decrease sound volume | Increase sound
volume
Bottom right corner
The status bar shows the current status of the Wi-Fi network connection (if Wi-Fi is
turned on), battery status and time. Some settings, connections, notifications or
apps can add specific icons here to display relevant information (for instance an
active USB connection with a PC, newly installed apps, newly received e-mail, etc.).
11
IX.
Applications/Widgets screen
Click the applications icon in the top right corner of the home screen and the
application screen appears:
(shown apps may differ from those actually installed)
In the applications screen, you can choose to start any installed application with a
simple short touch on the app icon. You can also press and hold an app or widget to
create a shortcut on the home screen; drag it to the position you wish the shortcut
to be.
The app icons on the home screen are in fact shortcuts to the apps in the
Applications & Widgets menu. If any shortcut on the home screen is removed the
corresponding app itself remains installed and visible in the Applications & Widgets
screen. Widgets are in fact elaborate, interactive and customizable shortcuts to the
app and can be removed from the home screen in a similar fashion.
A.
Removing apps/widgets
To remove a shortcut, touch the app or widget icon for a few seconds until a ‘trash
bin icon’ appears in the middle of the top left of the screen. Drag the shortcut to the
‘trash bin icon’ and it will turn red; if you let go once it’s red the shortcut will be
removed.
To remove an app (and its corresponding widget, if it has any) completely, please
select ‘Apps’ in the ‘Settings’ menu and select the app there to choose the ‘uninstall’
option. Once removed, it will no longer appear on the Applications & Widgets screen
and the home screen as well. Apps bought in the Google Play store are registered to
the Gmail account used to buy the app and can be installed again with the same
account if it was removed.
12
X.
System Settings
Touch the ‘Settings’ app on the home screen or Applications & Widgets screen to
enter the Settings menu:
The left area shows all the different menus available. You can drag a finger over the
left side from bottom to top to scroll down and see all the menus. This principle also
applies to the right side if a selected menu has more options than can be displayed
on screen (for instance, a list of all available languages can be scrolled down this
way).
The right area shows all options relevant to the menu selected on the left side.
A few important settings will be explained further:
A.
Wireless network connection to internet
Next to Wi-Fi, drag the switch from ‘OFF’ to ‘ON’ to activate the Wi-Fi transmitter. It
will start scanning for nearby active Wi-Fi hotspots.
Select the preferred network. If the network is protected with a password, a pop up
will appear that will enable you to enter the password needed to access the network.
Once the password has been filled in correctly (Double check! Passwords are case
sensitive.), touch ‘Connect’ underneath it to start the verification process. This
could take a moment.
13
If the password is entered correctly, the message ‘connected’ will appear
underneath the network name. If this doesn’t appear, touch the name of the
network and choose ‘forget’ to erase the password and try again.
B.
Display
The Tabby does not support a cabled connection to an external screen. All video
output is shown on the LCD screen of the tablet itself.
Here you can set the brightness level by
sliding the circle to the left or right, change
the wallpaper, adjust the timer for standby
and change the font size of the menus.
14
C.
Date and time settings
If connected to the internet, the easiest way to set the time is with the ‘Automatic
date & time’ and ‘Automatic time zone’ options.
Otherwise, set it manually by touching the different options:
Set date | Set time | Select time zone | Use
24-hour format | Select date format
Scroll up or down by dragging the finger over the
date or time numbers on the screen or set the date
on the calendar.
15
XI.
Internet
Check if the Wi-Fi connection has been established to ensure access to the internet.
Touch the icon of the browser app (named Browser or Chrome. Others browser apps
are available through the online Google Play store) and enter the website address
in the top bar and hit ‘start’ or ‘enter’ on the onscreen keyboard.
XII.
Music
Touch the ‘Music’ icon in the Applications & Widgets screen, you will enter the music
player interface. Here you can search through audio files on the Mini Tabby.
You can copy music files from a connected USB drive, MicroSD card or download
them from the internet. When a song is played, the following screen appears:
16
XIII.
Gallery with videos and photos
Touch the ‘Gallery’ app to view video and photo files saved on the ‘Mini Tabby’s
memory. Touch the folder where the file can be found and then touch the file to
display it on screen.
When viewing pictures, you can zoom in or out by touching the screen with two
fingers and moving them towards or away from each other. The top right menu
offers options like rotate, set as wallpaper, crop, etc.
XIV.
Wallpaper on home screen background
On the home screen, choose an unoccupied area and touch it with one finger for a
few seconds until a pop up menu appears.
�
‘Gallery’ allows you to select a
custom picture or photo from
your own library and set it as the
background of the home screen.
�
‘Live Wallpaper’ is a special wallpaper with 3D animation or interactive
parts. Search the Google Play store for numerous beautiful variations
and customize your Tabby. (Please note that live wallpapers drain the
battery faster than normal wallpapers or pictures)
�
‘Wallpaper’ is a selection of beautiful images already made available on
your Tabby.
17
XV.
Sound recording
Touch the app “Sound recorder” and the following screen will appear.
Press ‘Record’ button to start recording and press ‘Stop’ button to stop recording.
For playback, touch the “Music” app, then ‘Playlists’, then ‘My recordings’.
The recording playlist will appear as shown in the next screen. Select the recorded
file and touch “Play” to playback.
18
XVI.
Camera
Touch the ‘Camera’ app go activate the camera and view what the camera sees on
screen. The camera captures a picture once you touch the blue circle on the right.
The bottom shows the photo and video options which allows you to switch between
the two.
When switched to video, the circle changes to red. Once you touch the red circle, the
camera starts recording video and sound. Press it again to stop the recording.
19
XVII.
Google Play
First make sure you have connection the internet. Touch the ‘Play Store’ app or the
top right corner of the Applications & Widgets screen labeled ‘Store’ and follow the
instruction on screen.
If you do not have a Gmail account yet, you will be asked to create one. Installed
Google apps on the Tabby are linked to the Gmail account and enable
synchronization between different devices when using Google services with the
same Gmail account. For instance, favorite webpages saved in a Chrome browser on
a PC when logged in with your Gmail account can also be found in the Chrome
browser on your Mini Tabby using the same Gmail account. (This doesn’t count for
other apps than Google’s).
Follow the on screen instructions.
20
If you like, you can join Google+ which is a social network integrated with most of
the services Google offers. You can read more about it at https://plus.google.com
This is optional and not mandatory. You can skip it and still join later at any moment.
The following options aren’t mandatory as well and can be deactivated if you wish.
They can be activated later at any moment in the Google account settings.
To finish creating the Google account, please press the arrow in the bottom right
corner and the following screen will appear. This is a security check, it’s different for
everyone and you only need to do this once successfully to authenticate the account
creation.
21
Fill in the security code shown on the screen and press the bottom right arrow. The
device will contact the Google server and the following screen appears.
And after a few minutes, the following screen appears.
Registering your credit card information is optional. Some apps or other content
available in the Google Play store are sold for a certain fee which require you to pay.
You can choose to fill in the credit card information at any other moment.
NB! Friendly reminder: Please take extra care when allowing young kids
22
access to a tablet or phone with a registered credit card to it without
proper guidance. Make sure they cannot buy digital content in the Google
Play store or in certain apps or games without your consent to avoid
unwanted billing!
The last step allows you to automatically backup data linked to your Gmail account.
After this screen, you enter the Google Play store online which gives you access to
an enormous library of apps. Other services are expected to be added to the Google
Play store by Google in the future, like e-books, movies, music, devices, etc. Some
countries already have access to these services.
(Google Play store content differs
per country. Google Play e-books have been added to the Dutch store per July 2013)
You can also visit the Google Play store on a pc using the Chrome browser , via
https://play.google.com and if you link the same Gmail account you can buy, install
and remove apps remotely on the Mini Tabby from your browser on the pc.
To search for a specific app, touch the magnifying glass in the upper right corner; to
check your apps, touch the downwards facing arrow; for options, touch the three
dots. Drag your finger over the screen from bottom to top to scroll down and view
the different segments. For category selection, drag your finger over the screen
from the left border to the right. For top lists of apps (paid, free, popular, etc.), drag
your finger over the screen from right to left.
23
XVIII.
E-mail
Make sure you are connected to the internet. In the application screen, touch the
‘E-mail’ app to enter the e-mail client. The first time you use this app, you need to
configure the account information.
Enter your email and password, touch ‘Next’ and the next screen appears.
Please select the account type. For instance, we select a POP3 account type and the
next screen appear.
24
Please enter all the email account details; user name, password, POP3 server, etc.
Then touch ‘Next’ and the next screen appears. Please also enter SMTP server, port,
security type. For details, please ask your network administrator or e-mail provider.
25
If the settings are correct, the following screen appears.
Set the options as you wish and touch ‘Next’ to go to the following screen where you
can give the e-mail account a custom name.
Touch ‘Next’ to enter the mail interface. The Tabby will automatically load and
synchronize with the e-mail server. Afterwards you can read, write, send and
receive e-mails.
26
XIX.
USB port options
A.
Connect to a PC
Use the MicroUSB-USB cable to connect the Tabby with a pc. If the message ‘New
hardware detected’ pops up in Windows, please ignore it and close the installation
wizard.
Touch the notification ‘USB connection’ in the bottom right of the screen when it
appears.
27
Touch ‘Turn on USB storage’ to access the memory in the Mini Tabby via the pc,
much like you would with a USB memory stick. Look for the newly added drive in the
pc explorer.
� Please do not disconnect the Mini Tabby, the cable and the pc from each
other in this mode.
To disconnect, return to this ‘USB connected’ screen and ‘Turn off USB storage’
before removing the Mini Tabby or cable.
B.
USB keyboard and mouse
Use the MicroUSB adapter cable to plug in a USB mouse, USB keyboard or USB
memory stick.
28
XX.
Firmware upgrade
The Android upgrade process will format the internal flash memory.
�
Please back up your data before upgrading the firmware.
�
Make sure the battery of the Mini Tabby is fully charged when
starting the upgrade process. If the battery is depleted during the
upgrade process, it could disable the Mini Tabby completely and
permanently. Upgrading is at your own risk.
�
Make sure to use only the designated image file and updating
program software as instructed by Qware. Using other software is
at your own risk. Qware is not responsible for damages caused by other
software than the ones recommended by Qware.
When and if a new firmware version is available, it can be downloaded from the
website http://www.qware.nl
Requirements:
1x Mini Tabby (with fully charged battery),
powered off completely
1x MicroSD card with 1GB memory minimum,
FAT32 formatted and completely empty.
Step 1 - Download the firmware image file
‘update.img’ and copy it to the MicroSD card
Step 2 – Insert the MicroSD card into the
Tabby, then press and hold Volume+ and
then Power until the screen shows the Qware
logo and let go.
Step 3 – When the Android mascot appears
with the exclamation mark, press and hold
Power, and then ‘Volume +’ together for
approximately 1 second and then release
them both.
Step 4 – Use the ‘Volume –‘ to navigate
down to the fourth option ‘apply update from
external storage’ and use the Power button
to confirm the selection.
� This
will
process.
start
Do
not
the
upgrade
touch
any
29
buttons during this process.
During the process, this screen appears.
Step 5 – Finish the upgrade process once the
‘Update rkimage complete.’ message appears
by removing the MicroSD card from the Tabby
and pressing power button.
ATTENTION:
�
Please DO NOT power off the Mini Tabby until the upgrading process has
finished.
�
Please make sure the Tabby is FULLY CHARGED before starting
upgrading, in order to avoid not enough internal battery power for whole
upgrading process.
�
Please use the “RESET” button on the back (use a paperclip) if the
upgrade did not
start and repeat the procedure described above.
30
™ Entertainment Electronics
Qware
Qware™
Distributed by:
Pirox International BV
P.O. Box 12040
3004 GA Rotterdam
The Netherlands
31